
Статья обновлена: 29 июня 2022
ID: 12401
В некоторых случаях для анализа и устранения неполадок в работе программы «Лаборатории Касперского» специалист технической поддержки может запросить дамп определенного процесса.
Чтобы получить дамп процесса:
- Нажмите Ctrl+Alt+Delete на клавиатуре.
- Выберите Диспетчер задач.
- Если у вас:
- Windows 7, перейдите на вкладку Процессы.
- Windows 11, вкладка Процессы будет открыта автоматически, перейдите к следующему шагу.
-
Windows 8, 8.1, 10 или серверная система нажмите Подробнее.
- Нажмите правой кнопкой на процесс, дамп которого необходимо получить, и в контекстном меню выберите Создать файл дампа.

- Дождитесь сообщения об успешном создании файла.
- Скопируйте путь к файлу дампа.
- Нажмите OK.
- Нажмите +E на клавиатуре.
- Вставьте скопированный адрес папки в адресную строку.
- Нажмите Enter на клавиатуре.
Папка с созданным файлом дампа будет открыта.
Спасибо за ваш отзыв, вы помогаете нам становиться лучше!
Спасибо за ваш отзыв, вы помогаете нам становиться лучше!
Latest update: July 11, 2022
ID: 12401
In some cases, Kaspersky support engineers may request a dump file of a certain process to fix the issue.
To get the process dump file:
- Press Ctrl+Alt+Delete on the keyboard.
- Select Task Manager.
- If you are using:
- Windows 7, go to the Processes tab.
- Windows 11, the Processes tab will be opened by default. Proceed to the next step.
-
Windows 8, 8.1, 10 or Windows Server 2008, click More details.
- Right-click the process for which you need to create a dump file. Select Create Dump File.

- Wait until you get the notification on successful creation of the file.
- Copy the path to the dump file.
- Click OK.
- Press +E combination on your keyboard.
- Paste the copied path to the folder to the address line.
- Press Enter on the keyboard.
The folder with the dump file will open.
Did you find this article helpful?
Thank you for your feedback! You’re helping us improve.
Thank you for your feedback! You’re helping us improve.
Introduction
In this article, we are going to understand and learn, How we can take a process dump of a Specific Windows Process which we can later use either for Debugging or send to Microsoft for a Review.
ProcDump is a command-line and UI utility from Microsoft, part of the Sysinternals suite, designed to monitor applications for CPU spikes and generate crash dumps during these spikes. This tool is invaluable for diagnosing and troubleshooting application issues, particularly those related to performance and crashes.
Process Dump is generally taken at times when you are troubleshooting a specific application that is in a hung state and not responding. To understand the reason for the Application not responding, developers can take a dump of the process and understand where a thread is possibly stuck.
Types of Dump:
Two types of Process Dumps can be generated for a specific Process.
Mini Process Dump
- This is the dump which generally is a small size capture of the Process.
- They only contain basic process and stack details which can generally be useful in finding some of the already known issues.
- Windows Error Reporting (WER) sometimes also captures these dumps in terms of any failure.
Full Process Dump:
Collecting a “Full” process dump of the crash will provide a dump containing all process code and memory, rather than only small critical sections of process structures and memory immediately adjacent to the site of the crash.
Ways to Capture Process Dump:
ProcDump:
Link to Download: https://docs.microsoft.com/en-us/sysinternals/downloads/procdump
- Procdump is a command-line utility that can be used in many useful scenarios while working with Application issues.
- ProcDump is a command-line utility whose primary purpose is monitoring an application for CPU spikes and generating crash dumps during a spike
- ProcDump also includes hung window monitoring, and unhandled exception monitoring and can generate dumps based on the values of system performance counters.
Write a mini dump of a process named ‘notepad’ (only one match can exist):
C:\>procdump notepad
Write a full dump of a process with PID ‘4572’:
C:\>procdump -ma 4572
Write up to 3 minidumps of a process named ‘consume’ when it exceeds 20% CPU usage for five seconds:
C:\>procdump -c 20 -s 5 -n 3 consume
Write a mini dump for a process named ‘hang.exe’ when one of its Windows is unresponsive for more than 5 seconds:
C:\>procdump -h hang.exe hungwindow.dmp
Write a full dump of a process named ‘Outlook’ when Outlook’s handle count exceeds 10,000:
C:\>procdump -ma outlook -p "\Process(Outlook)\Handle Count" 10000
Write a MiniPlus dump of the Microsoft Exchange Information Store when it has an unhandled exception:
Process Explorer
Link to Download: https://docs.microsoft.com/en-us/sysinternals/downloads/process-explorer
Let’s now talk about the GUI way of doing things. Process Explorer is a useful tool that can be used to review the various processes running over a windows operating System.
Process Explorer shows you information about which handles and DLLs processes have opened or loaded.

The Steps to Take Process Dump:
Right, Click on the Process which you want to take a dump of -> Select Create Dump -> Select Mini or Full Dump Based on your requirement.

Using Good Old Task Manager:
Once we are aware of all the other ways of taking a Process Dump we will now learn about taking a Process dump using our Task Manager.
The Steps to Take Process Dump:
Open Task Manager: Right-click on a Process -> Create Dump File.

Once Clicking the Option you will see the message box asking you to wait.
Post that you can see the location under the local Temp where the Dump is being Saved.
Automatic Dump Capture:
- In case if a Process crashes the Windows Error Reporting should automatically generate a Mini Dump of the Process which has terminated under C:\ProgramData\Microsoft\Windows\WER\” subdirectories
- Collecting and submitting these existing mini-dumps for analysis can sometimes provide useful clues or confirmation of a previously resolved issue.
- To have WER write a full process dump during future crashes, the following registry key and value must be created:
[HKEY_LOCAL_MACHINE\Software\Microsoft\Windows\Windows Error Reporting\LocalDumps]
"DumpType"=dword:00000002
Note the “LocalDumps” subkey typically does not exist by default and must be created in addition to the actual “DumpType” DWORD value within that subkey.
This will cause future crashes captured by WER to have full process dumps written instead of just mini-dumps.
(Image credit: Windows Central)
On Windows 10, ProcDump is a command-line tool specifically designed to create crash dump files manually. A «dump» is a special file that contains (all or parts) of the data loaded in memory at the time dump was triggered. Usually, you would use this file for analysis to determine the root of a problem with an app or the OS.
Although Windows 10 can create crash dumps files automatically when it encounters an error that it cannot handle, sometimes you may still need to generate these files manually. For example, if you are a developer and you are testing a new application. Or when an app is not responding or constantly crashing, and you need to send the details to the software vendor support to investigate the issue.
Whatever the reason might be, the Microsoft ProcDump tool is a nifty tool you can use in Command Prompt to create a crash dump file in many different ways, including generating a minidump file using the app or process name or process ID. You can also use the tool to create multiple dumps at different intervals automatically. Or you can specify other criteria, such as when the process reaches a specific processor usage, the app is unresponsive, and more.
In this Windows 10 guide, we will walk you through the steps to use the Microsoft ProcDump tool to generate dump files manually on your device.
- How to install ProcDump on Windows 10
- How to use ProcDump on Windows 10
How to install ProcDump on Windows 10
To install the ProcDump command-line tool on Windows 10, use these steps:
- Open ProcDump official page.
- Click the Download ProcDump link.
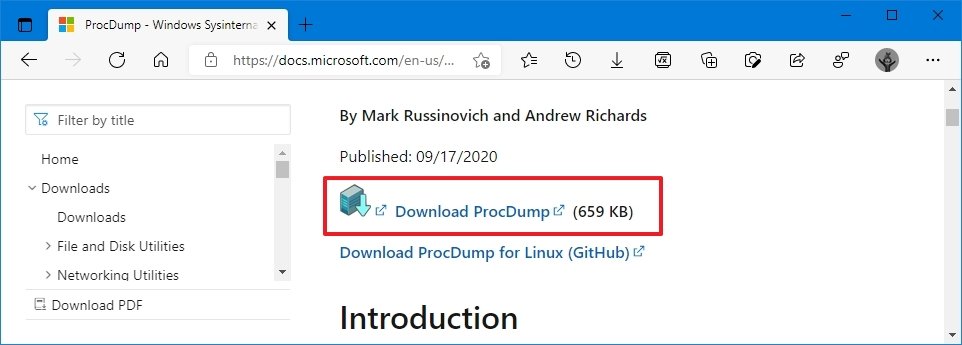
- Save the file on the device.
- Open the zip folder.
- Click the Extract all option from the «Compressed Folder Tools» tab.
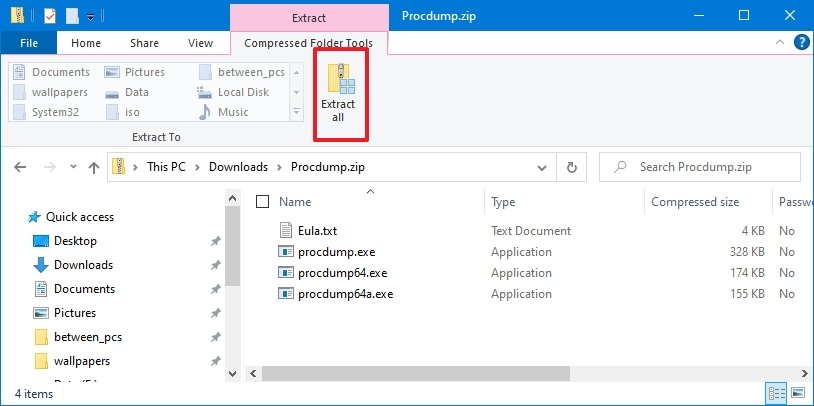
- Confirm a path to extract the files.
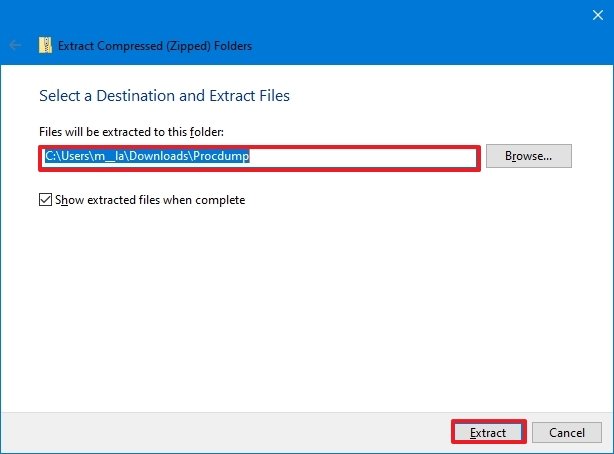
- Check the Show extracted files when complete option.
- Click the Extract button.
Once you complete the steps, you can use ProcDump with Command Prompt to create dumps files on Windows 10.
How to use ProcDump on Windows 10
The ProcDump tool includes many options to record and create dump files. In the steps below, we will show you a bunch of examples to create a dump file for a specific application and different scenarios, including when a process is unresponsive, crashes, uses a significant amount of processor resources, and more.
All the latest news, reviews, and guides for Windows and Xbox diehards.
To get started with the ProcDump tool, use these steps:
- Open Start.
- Search for Command Prompt, right-click the top result, and select the Run as administrator option.
- Type the following command to navigate to the folder containing the ProcDump tool and press Enter:
cd C:\PATH\TO\PROCDUMPIn the command, make sure to update the path with the folder’s location with the ProcDump tool.For example, this command opens the tool location inside the «Downloads» folder:cd C:\Users\username\Documents\Procdump - Type the following command to create a minidump file of a running app and press Enter:
procdump APP-NAMEIn the command, replace APP-NAME for the executable name of the app.This example creates a dump file for the File Explorer app:procdump explorer

- Type the following command to create a dump file using the process ID of the app and press Enter:
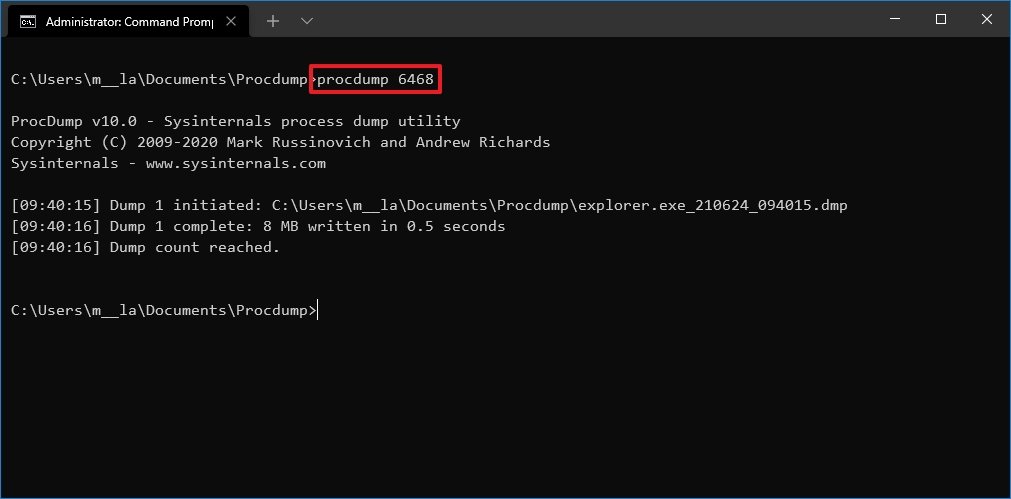
procdump PROCESS-IDIn the command, replace PROCESS-ID with the actual ID of the process or application.This example creates a dump file for File Explorer with the process ID of 6468:procdump 6468Quick tip: You can always confirm the process ID (PID) of an app in the Details tab of Task Manager or using thetasklistcommand.
- Type the following command to create a full dump file for an application and press Enter:
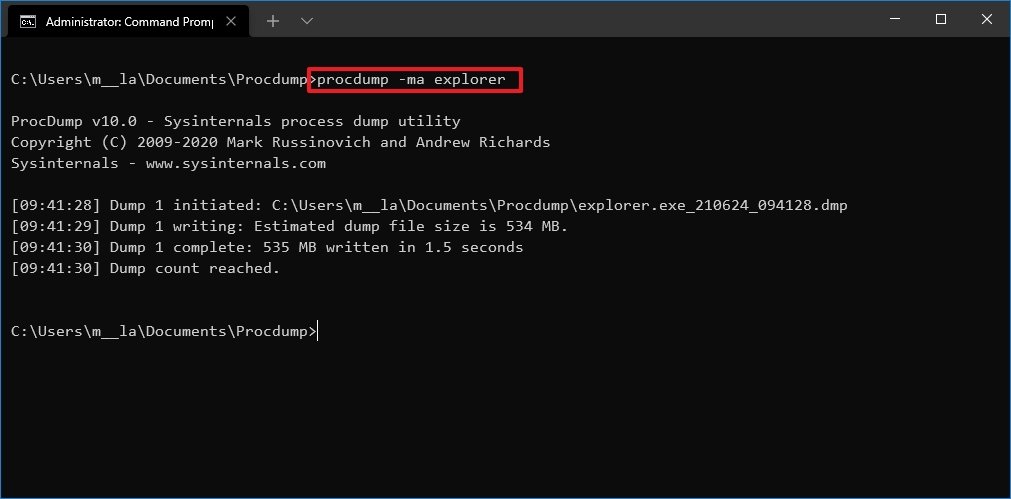
procdump -ma APP-OR-PIDIn the command, replace APP-OR-PID for the name or process ID of the app.This example creates a full dump file for File Explorer:procdump -ma explorerQuick note: A full dump file contains everything available in memory related to the application. In contrast, a minidump file is only several megabytes in size, and it includes basic information about the application.
- Confirm the location of the .dmp file.
After you complete the steps, the dump file will be generated in the ProcDump folder.
Create multiple minidumps manually
To use ProcDump to create multiple minidump files on Windows 10, use these steps:
- Open Start.
- Search for Command Prompt, right-click the top result, and select the Run as administrator option.
- Type the following command to navigate to the folder containing the ProcDump tool and press Enter:
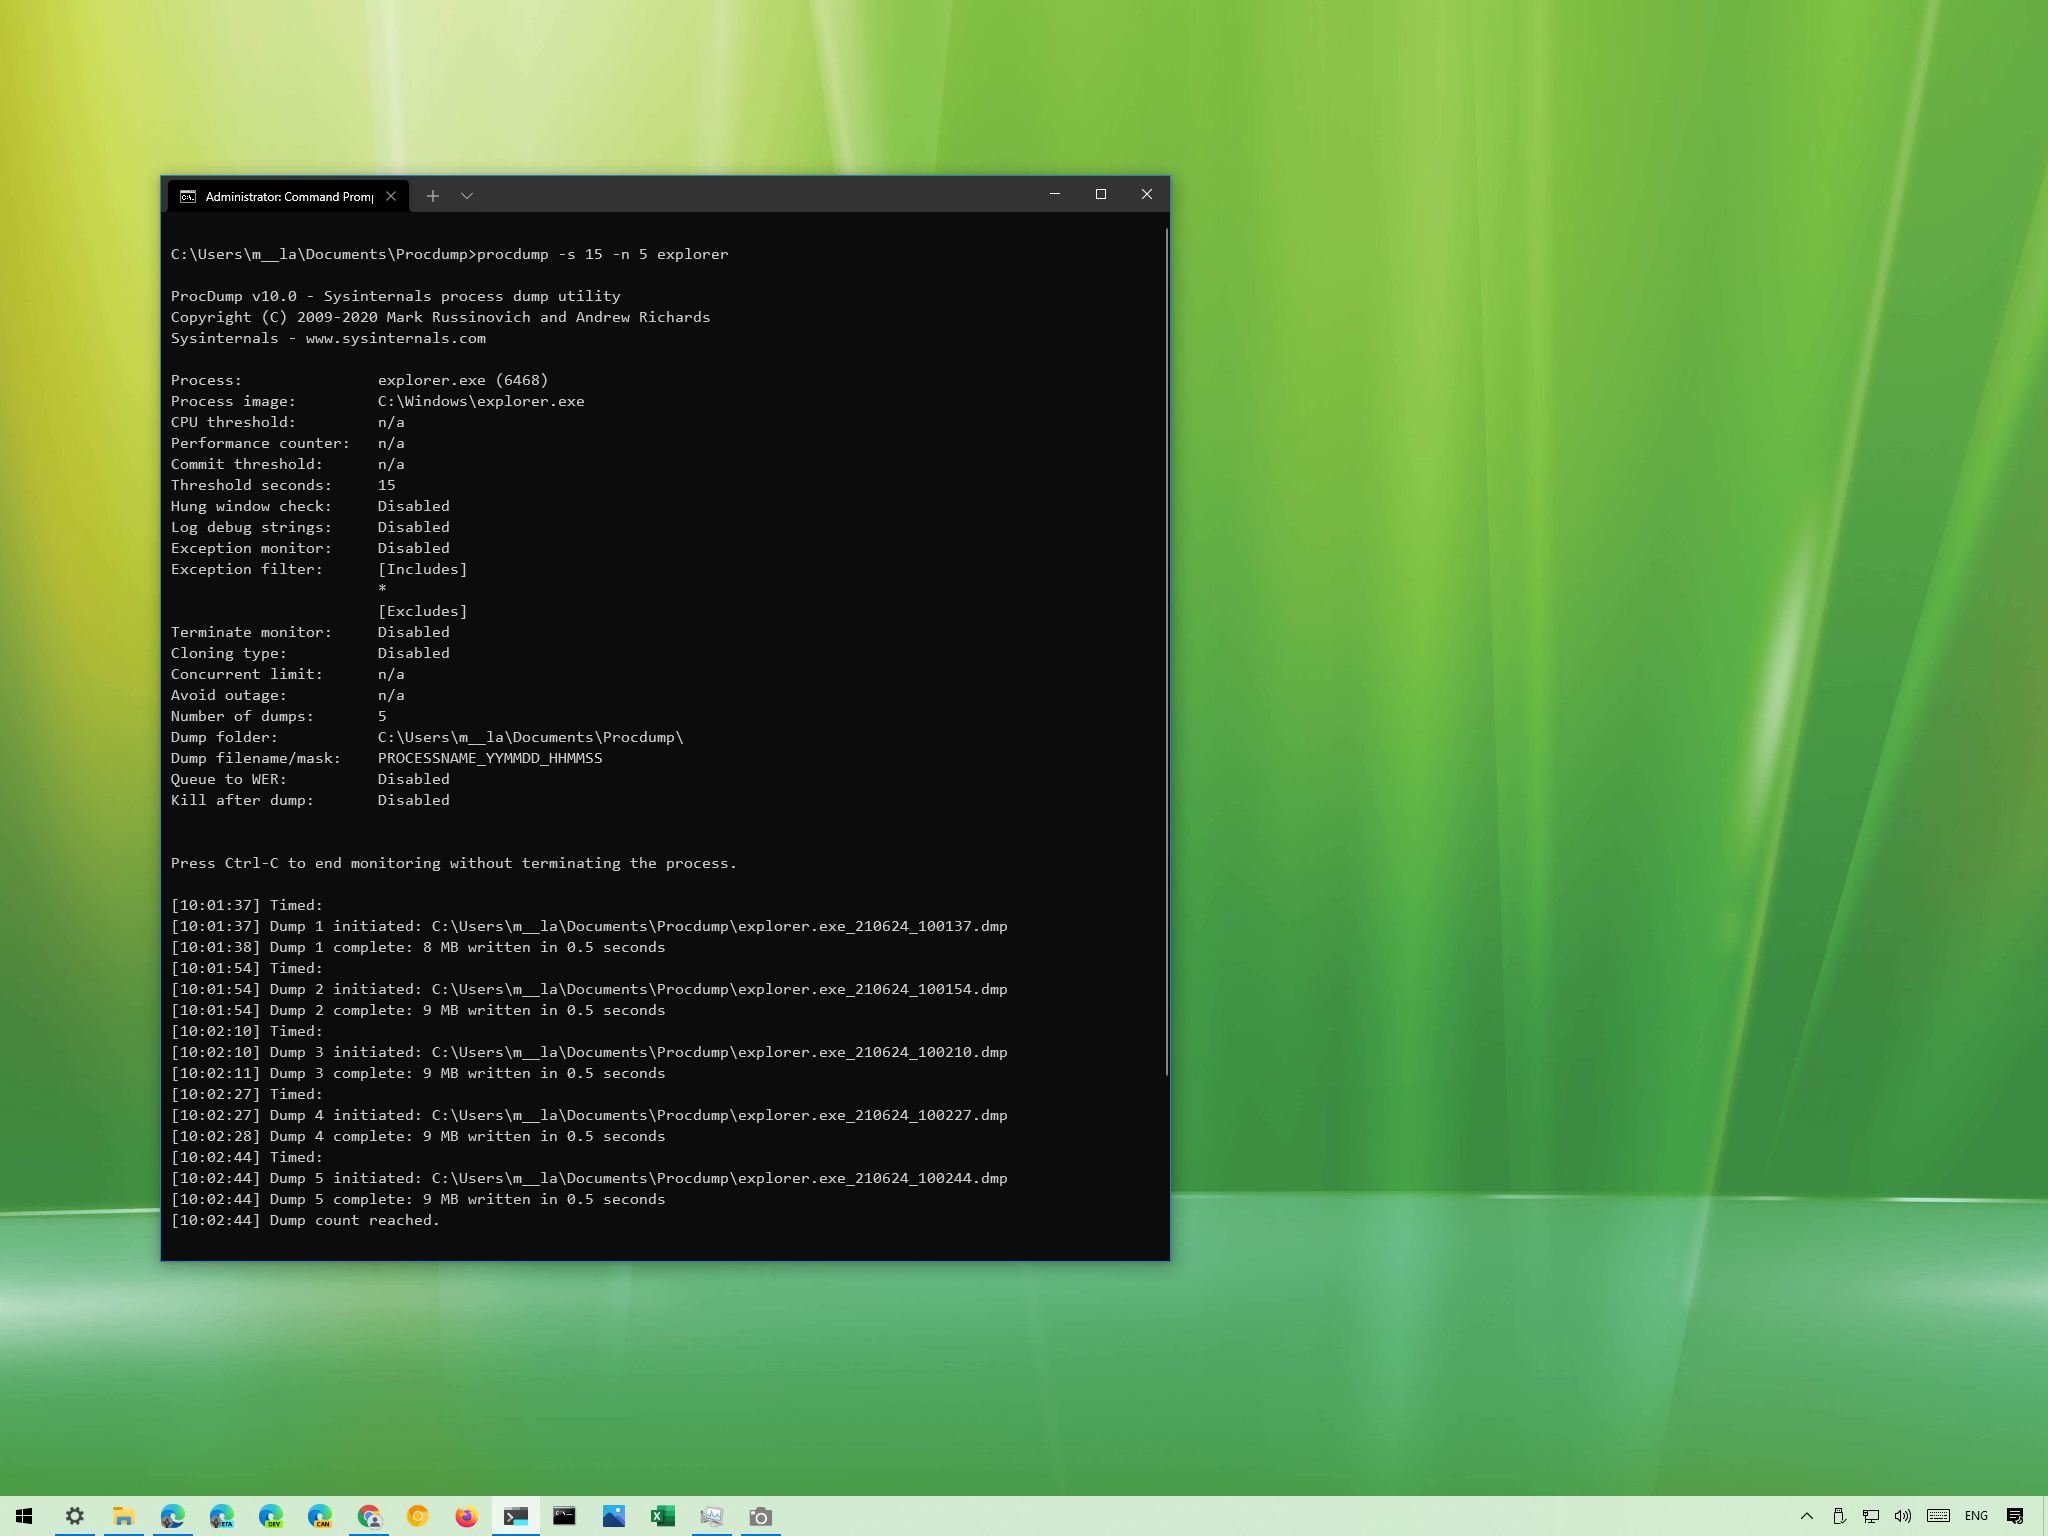
cd C:\Users\username\Documents\Procdump - Type the following command to write five minidumps 15 seconds apart from one another and press Enter:
procdump -s 15 -n 5 PROCESS-NAMEIn the command, replace the PROCESS-NAME for the name of the process you want to write a dump. Also, remember to update the 15 for the number of seconds to wait before generating a new file and 5 for the number of dump files you want to create.This example writes five dump files for the Windows Explorer process:procdump -s 15 -n 5 explorer
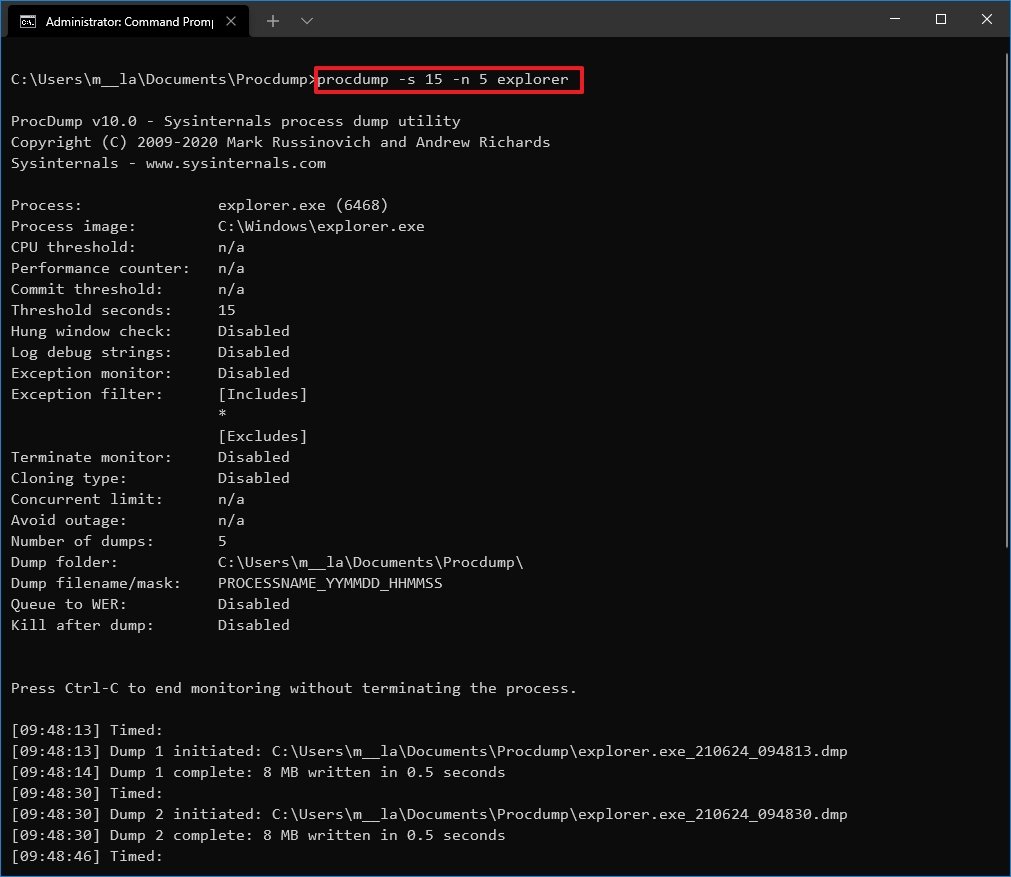
Once you complete the steps, the tool will create (in this case) five dump files 15 seconds apart from one another.
Create minidumps based on processor usage
To write a dump file after the app system usage reaches a specific threshold, use these steps:
- Open Start.
- Search for Command Prompt, right-click the top result, and select the Run as administrator option.
- Type the following command to navigate to the folder containing the ProcDump tool and press Enter:
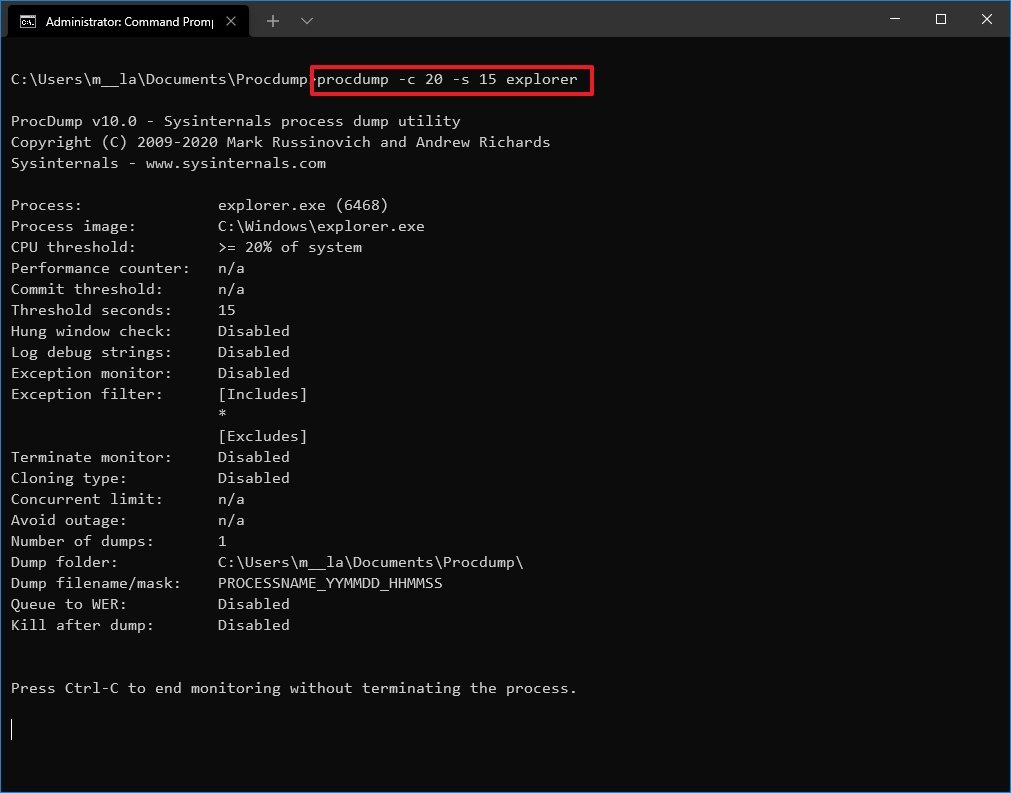
cd C:\Users\username\Documents\Procdump - Type the following command to write a minidump file when the process exceeds the 20% processor usage for 15 seconds and press Enter:
procdump -c 20 -s 15 PROCESS-NAMEIn the command, replace the PROCESS-NAME for the name of the process you want to write a dump. Also, remember to replace 20 and 15 for processor usage and a wait time in seconds.This example writes a dump file of the explorer.exe process that uses over 20% of processor resources for 15 seconds:procdump -c 20 -s 15 explorer
- (Optional) Type the following command to write an error dump file when a specific app pushes processor usage above 20% for 10 seconds and press Enter:
procdump PROCESS-NAME -p "\Processor(_Total)\% Processor Time" 20This example writes a dump file of the explorer.exe process that uses over 20% of processor resources for 10 seconds:procdump explorer -p "\Processor(_Total)\% Processor Time" 20
After you complete the steps, the command will monitor the application, and when it exceeds the processor usage for the time you specified, then a dump file will be generated.
Create minidumps for unresponsive process
To create a minidump as soon as a process is unresponsive, use these steps:
- Open Start.
- Search for Command Prompt, right-click the top result, and select the Run as administrator option.
- Type the following command to navigate to the folder containing the ProcDump tool and press Enter:
cd C:\Users\username\Documents\Procdump - Type the following command to write a minidump file when a process becomes unresponsive for more than five seconds and press Enter:
procdump -h PROCESS-NAME DUMP-NAME.dmpIn the command, replace the PROCESS-NAME for the name of the process you want to monitor and DUMP-NAME for the file’s name.This example writes a dump when the Windows Explorer process becomes unresponsive for five seconds:procdump -h explorer explorer-unresponsive-data.dmp

Once you complete the steps, a dump file will be written to the ProcDump folder when the application becomes unresponsive.
Create minidump during launch of a process
To launch an app, keep monitoring it, and write a dump file when an exception occurs, use these steps:
- Open Start.
- Search for Command Prompt, right-click the top result, and select the Run as administrator option.
- Type the following command to navigate to the folder containing the ProcDump tool and press Enter:
cd C:\Users\username\Documents\Procdump - Type the following command to start an app and create a dump file when it crashes, and press Enter:
procdump -e 1 -f "" -x C:\PATH\TO\STORE\DUMP "C:\PATH\TO\APP.EXE"In the command, replace C:\PATH\TO\STORE\DUMP for the folder location to store the dump. Also, change C:\PATH\TO\APP.EXE for the path of the app you want to monitor and create a dump.This example creates a dump file of Google Chrome when it crashes and stores the «dump» file inside the dumps folder:procdump -e 1 -f "" -x C:\dumps "C:\Program Files\Google\Chrome\Application\chrome.exe
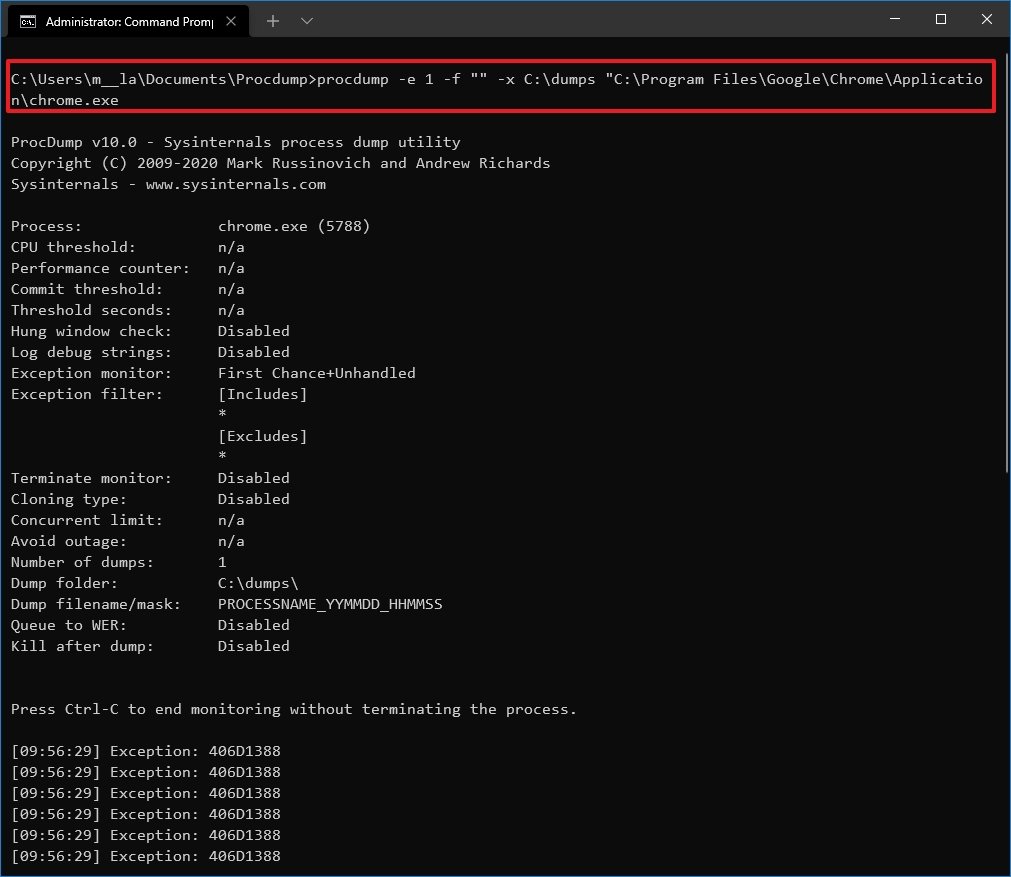
After you complete the steps, the tool will launch and monitor the app, and when it crashes, it will create a dump file in the folder location you specified.
Activate Postmortem Debugger to create full dump automatically
You can also register the tool as a Postmortem Debugger to allow ProcDump to monitor and automatically write a full dump when one or more processes crash. Here’s how:
- Open Start.
- Search for Command Prompt, right-click the top result, and select the Run as administrator option.
- Type the following command to navigate to the folder containing the ProcDump tool and press Enter:
cd C:\Users\username\Documents\Procdump - Type the following command to monitor and create a full dump file when one or more processes crash and press Enter:
procdump -ma -i C:\PATH\TO\STORE\DUMPIn the command, replace C:\PATH\TO\STORE\DUMP for the location to store the dump file.This examples stores the full dump file in the «dumps» folder:procdump -ma -i C:\dumps
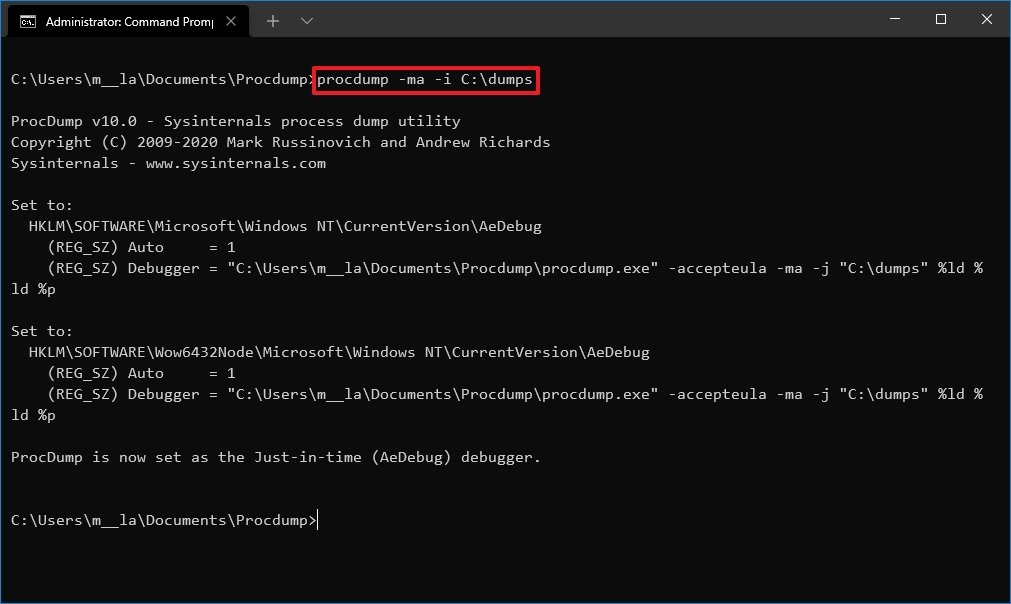
Once you complete the steps, the ProcDump tool will monitor the system, and it will create dump files whenever an application crashes.
We are focusing only on some basic examples. You can always run the
procdump -ecommand to review all the available options.
More Windows 10 resources
For more helpful articles, coverage, and answers to common questions about Windows 10, visit the following resources:
- Windows 10 on Windows Central — All you need to know
- Windows 10 help, tips, and tricks
- Windows 10 forums on Windows Central
Mauro Huculak has been a Windows How-To Expert contributor for WindowsCentral.com for nearly a decade and has over 15 years of experience writing comprehensive guides. He also has an IT background and has achieved different professional certifications from Microsoft, Cisco, VMware, and CompTIA. He has been recognized as a Microsoft MVP for many years.
PostedNovember 20, 2020
UpdatedJune 29, 2022
0 out of 5 stars
| 5 Stars | 0% | |
| 4 Stars | 0% | |
| 3 Stars | 0% | |
| 2 Stars | 0% | |
| 1 Stars | 0% |
Microsoft Windows
- Download the ProcDump tool for Windows and save it to the root of the C: drive on the system in question.
- Run the commands from the command prompt.
The following syntax can be used while running the tool depending on what data is required in the process dump file:
procdump [-64] [-c CPU usage [-u] [-s seconds] [-n exceeds]] [-h] [-e] [-ma] [-r] [-o] [ [dump file]] | [-x][arguments]
Common Switches:
- -ma — Creates a dump of all process memory. This switch should always be used for support cases in order to ensure as much information as possible is collected.
- -e — Creates a dump when the target process encounters an unhandled exception. This is useful for most crashes.
- -t — Generates a dump when the process ends, even if no errors were encountered.
- -w — Instructs ProcDump to wait for a process with the specified name to launch. This is used when you want to start ProcDump before the process.
- -i — Install ProcDump as the post mortem debugger for Windows Processes. This will allow ProcDump to automatically be invoked on application errors.
- -u — When run with no other arguments, will uninstall ProcDump as the post mortem debugger.
- -c — Specify a CPU threshold at which to generated a dump. This is typically used when troubleshooting high CPU usage issues.
- -m — Specify a memory usage threshold (in MB) at which to generate a dump. This is typically used when troubleshooting high memory usage issues or memory leaks.
- -s — Write a dump after specified number of seconds. This is useful in conjunction with -c and -m.
- -n — Write n number of dumps.
- -x [arguments] — Have ProcDump execute the executable and writing the dump file to the specified arguments.
- -64 — Forces the creation of 64-bit dump. This switch should generally not be used on 32-bit processes.
Linux
- Download and install the ProcDump tool for Linux, per the instructions on GitHub, to the system in question.
- Run the commands from the command prompt with
sudo.
The following syntax can be used while running the tool depending on what data is required in the process dump file:
sudo procdump [OPTIONS...] TARGET
Common Switches:
- -C –CPU threshold at which to create a dump of the process from 0 to 100 * nCPU.
- -c — CPU threshold below which to create a dump of the process from 0 to 100 * nCPU.
- -M — Memory commit threshold in MB at which to create a dump.
- -m — Trigger when memory commit drops below specified MB value.
- -n — Number of dumps to write before exiting.
- -s — Consecutive seconds before dump is written (default is 10)
TARGET must be specified as -p pid, where pid is of the process in question.
Command Line Examples:
- Immediately generate a full memory process dump for CcSvcHst.exe: procdump -ma CcSvcHst.exe
- Generate a full memory process dump for the process with PID 4512 when it exists: procdump -ma -t 4512
- Attach to a process with the name httpd.exe when it launches. Then generate a full dump, if it encounters an unhandled exception: procdump -ma -e -w httpd.exe
- Have ProcDump run BadApp.exe and write a full dump to C:Dumps if it encounters an unhandled exception: procdump -ma -e -x C:Dumps C:Program FilesBadAppBadApp.exe
- Install ProcDump as the postmortem debugger, and instruct it to write full dumps to C:Dumps: procdump -ma -i C:Dumps
- Create up to 3 full dumps of the process with PID 3213, if that process consumes 75% or more total CPU for 10 seconds: procdump -ma -c 75 -s 10 -n 3 3213
References:
http://technet.microsoft.com/en-us/sysinternals/dd996900.aspx
https://github.com/Microsoft/ProcDump-for-Linux
Was this article helpful?
0 out of 5 stars
| 5 Stars | 0% | |
| 4 Stars | 0% | |
| 3 Stars | 0% | |
| 2 Stars | 0% | |
| 1 Stars | 0% |