
SNMP stands for Simple Network Management Protocol, It is use to collect the behaviors of network devices through IP and send the network devices behaviors information’s to the NMS (Network Management system) for example: Open Manager, Zenoss and etc. The Ports of SNMP (Simple Network Management Protocol) are 161 udp and 162 udp.
In Windows Server 2012 R2 Simple Network Management Protocol (SNMP) service include agents that monitor the activity of Server and report to the Network Management System (NMS).
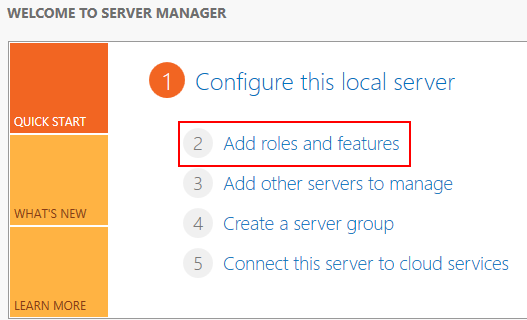
To install a Simple Network Management Protocol (SNMP) Service on Windows Server 2012 R2 click on “Add roles and Features”.
After click on Add roles and features click «Next» to continue. if you want to remove roles and features this page also help you therefore not check mark the «Skip the page by default».
To select the installation type choose the option of «Role-based or feature-based installation».
Select a server from Server Pool then click «Next» to continue.
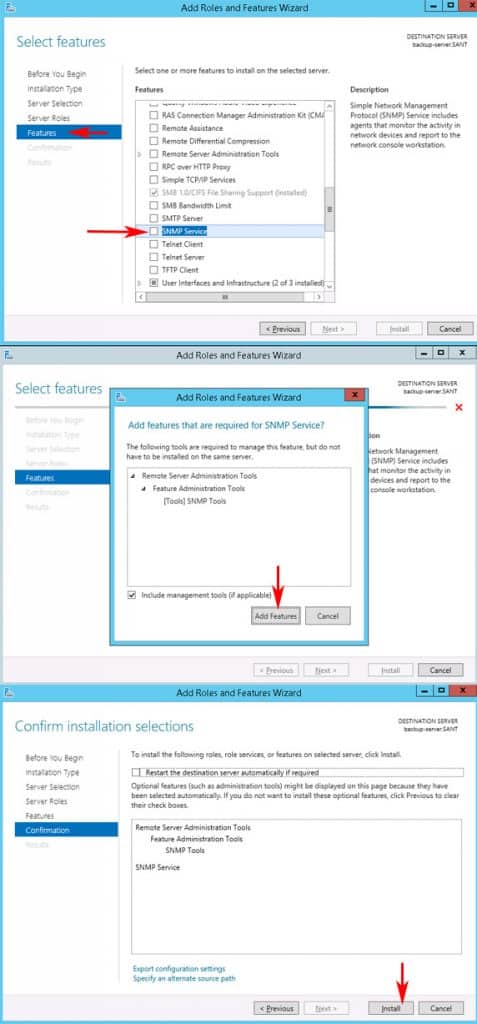
Select the Server Feature «SNMP Service» from the Features window.
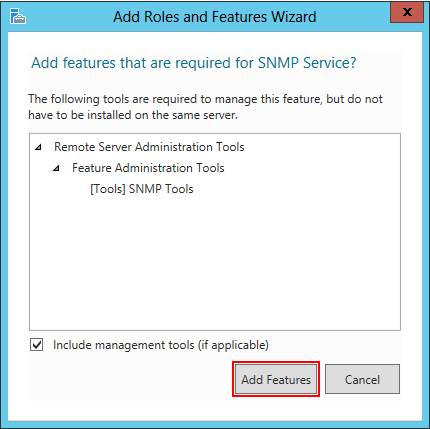
Click on «Add Features» to include the Management tools that are required for Simple Network Management Protocol (SNMP) Service.
To complete the installation of Simple Network Management Protocol (SNMP) click on «install». You can also tick mark on «Restart the destination server automatically if required».
Simple Network Management Protocol (SNMP) has successfully installed.
After the successful installation of Simple Network Management Protocol (SNMP) service on Windows Server 2012 R2, open the Services to configure Simple Network Management Protocol (SNMP) service. Right click on SNMP Service then click on properties.
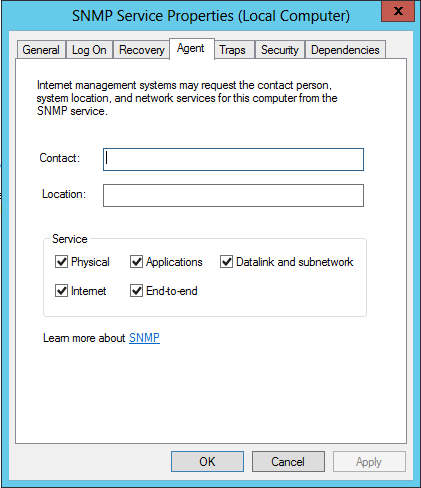
Click on tab «Agent» then provide the contact person and system location of Network Management System (NMS). Select all the Services (Physical, Applications, Datalink and subnetwork, internet, End-to-end) as per the requirement.
Click on tab «Traps» then provide the «Community Name» and «Trap Destinations» of Network Management System (NMS).
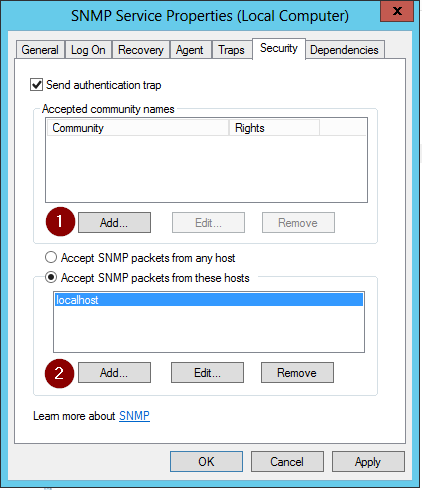
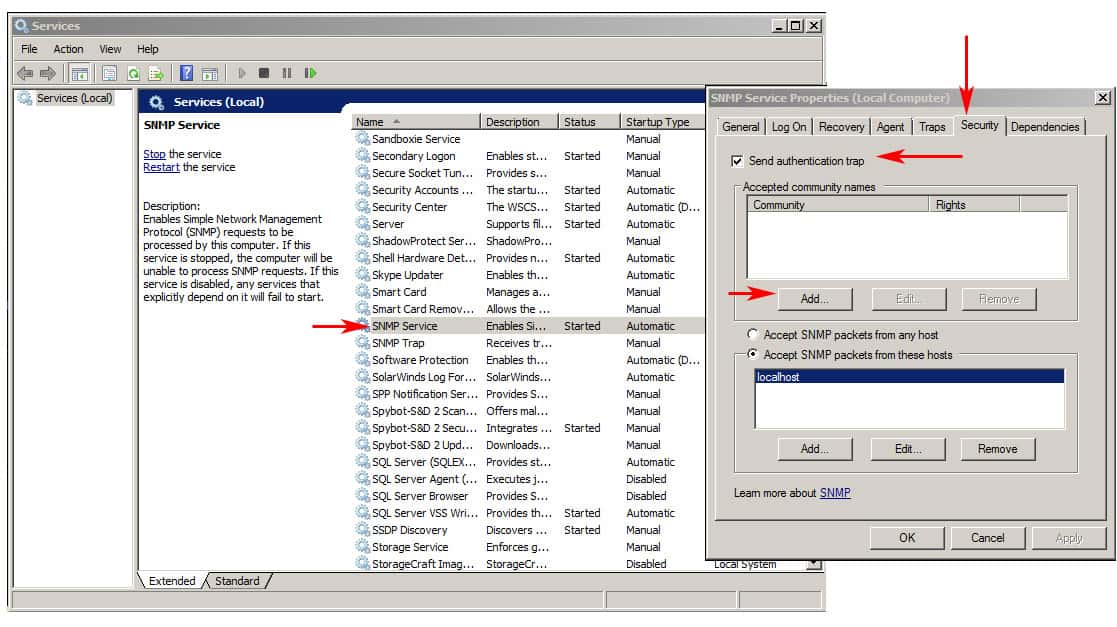
Finally click on tab «Security» then add the community name with «READ ONLY» rights and select «Accept SNMP packets from these hosts» for add the IP addresses of Network Management System (NMS).
Thanks for Read this Article
- Home
- nullServices
- Offshoring
- Software Outsourcing Services
- Technical Expertise
- Mobile Application
- Mobile Application Development
- Mobile Testing
- Augmented Reality
- iBeacon
- Web Solutions
- Web Development
- E-learning
- Learning Management Systems
- NetSupport Solutions
- NetSupport Education Solutions
- E-Learning Projects
Offshoring
Mobile Application
Web Solutions
E-learning
- Offshoring
- nullProducts
- NetSupport
- About NetSupport
- NetSupport Manager
- NetSupport School
- NetSupport DNA (corp)
- NetSupport ServiceDesk
- NetSupport DNA (edu)
- NetSupport Notify
- WhatsUp Gold
- About WhatsUp Gold
- Modules and Capabilities
- WhatsUp Gold Editions
- WhatsUp Gold 2021 version
- Reports
- Orchtech HR
- Purple Bureau
- Purple Bureau SMEs
- Purple Bureau
Netsupport Corperate
WhatsUp Gold
Purple Bureau
- NetSupport
- Projects
- About Us
- About Orchtech
- Memberships
- Distributors/Partners
- Funding Bodies
- Our Clients
- Awards
- Contact Us
- Contact Us
- Request a Meeting
Edit
About Us
Orchtech is a software development company working in multiple countries worldwide and our experience spans over multiple services/products such as Offshoring/Outsourcing software development, Mobile applications development services, Web development and HR mobile applications for internal employees management.
Contact Info
-
Orman Tower, Floor 12, Apt. 123, 48 Giza Street, Dokki, Giza, Postal code: 12612. -
+20 2 37622752 -
Week Days: 09.00 to 18.00 Saturday & Friday: Closed
Open server manager by clicking on the icon on your taskbar
Click on Add roles and features then click Next à Select Role-based or feature-based installation and click Next.
Now select a server from the server pool like your local server’s name and click on Next à click on Next on the Server roles screen à Now under features check the box under SNMP Service.
Once this is selected another window will open if the other features aren’t already installed on your local server. Click on Add Features à click Next à click Install. Once installed, click Close.
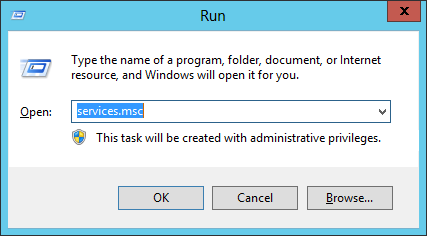
Now that you installed the SNMP service open up Windows services by holding the windows key and press the letter R to get to the run prompt. Type in “services.msc” and click OK.
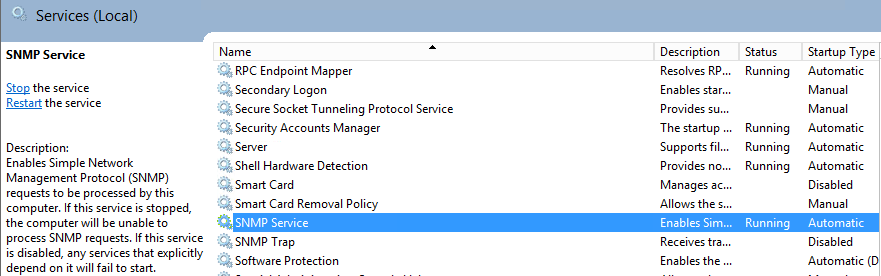
Next verify that the service is started as well as set to automatic startup and double click on SNMP Service.
Under the Agent tab select what services you want to monitor and click on the Security tab next.
Next you first want to click on Add under the accepted community name and define if it’s read only or not and give it a name. This is the name that you would be using to communicate with the server gathering SNMP data from the machine. Second you want to define the SNMP server’s IP address so click on Add in the lower section of the window and provide the static IP address of the monitoring server to allow it to accept packets from that host. Finally click OK then restart the SNMP service and you are finished from the host side of Configuring SNMP agentless monitoring on Windows Server 2012 / R2 .
Nov 19, 2014
Recently ran into an issue on Windows Server 2012 R2 systems and came across some systems that had SNMP installed but the Security, Agent, and Traps tabs were missing. This is due to the facet that Microsoft has deprecated SNMP in Server 2012. (http://technet.microsoft.com/en-us/library/hh831568.aspx)
NOTE: This is in addition to the SNMP Services feature. If you haven’t already installed the SNMP Services you will also need to install these.
To correct the issue just add roles and features under Server Manager -> Manager -> Add Roles and Features:
Installation Type = Role Based or Feature Basked Installation and click Next.
Server Select = The local server you are on. (Note: if you try to do multiples it will fail. See Unattended Install note below.)
Server Roles = Click Next
Feature =Remote Server Administration Tools -> Feature Administration Tools -> SNMP Tools
Click Next and Install.
Go to Services MMC and Restart the SNMP Service.
Close out Services MMC and re-open it. Go to Properties of SNMP and now you will have all the configuration Tabs for SNMP.
We may earn a commission if you make a purchase through the links on our website.
Settings up Microsoft SNMP Service on Windows 7 locally and remotely is something that many admins need to do in their network environments in order to monitor all desktops in their network properly using SNMP.
In order to do this, Windows 7 SNMP Service needs to be installed and configured in order to allow Network monitoring and management software to poll them in order to get information about them.
Automatic Installing and Enabling SNMP Service (Local and on Remote PC/Servers)
Below we’ve highlighted the manual way of installing and enabling SNMP service on your Windows 7, 2008 Server and 2012 R2 Server installations – its a little hands-on as you can see from the tutorial, so we’ve added this cool tool/utility we found from SolarWinds to enable snmp on your local machine and on your Whole network from one place.
- Download and Install the SNMP Enabler for Windows utility from SolarWinds
SolarWinds NPM SNMP Enabler for Windows
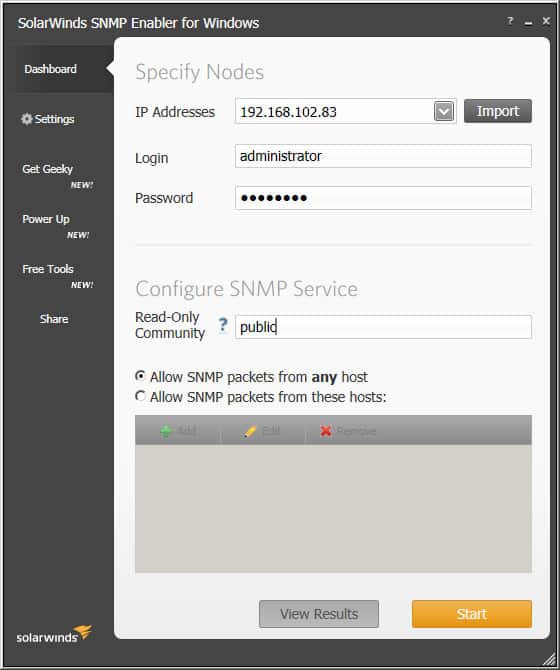
Start a 30-day FREE Trial! - Run the Utility and specify which IP Address you like to remotely Install and Enable SNMP service on.The Utility also allows you to Bulk Enable the Service on multiple Windows 7, Windows 8.1, Windows 10, Windows Server 2008 and Windows Server 2012 R2 by Importing a File with all the IP Addresses listed in there via the “Import” button.(You can export a list of all IP Addresses used from within DHCP server and import into this utility)

- Click the Start button and the utility will go to each IP Address specified and check whether the SNMP Service has been installed already (if it has not, It will Install SNMP Service on that remote server/desktop) and then configure the Community String for you.When it has completed, you will see a screen like the once below:
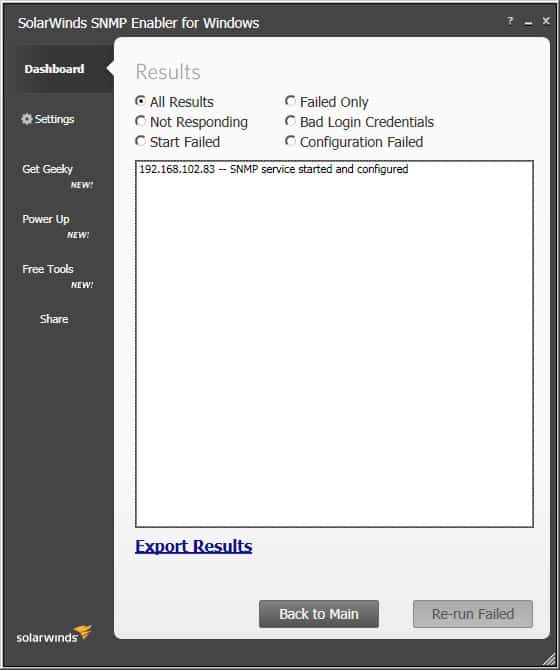
At this point, SNMP Service will be installed along with the Community String enabled and ready to send data out.
Manual Install on Windows 7/2008 Server and 2012 R2 Server
Note: Make sure your using an account that is a member of the “Local Administrators” group or else you’ll have issues with the process below.
-
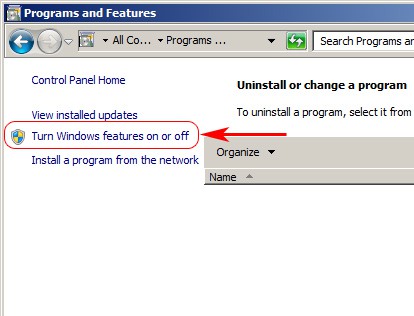
Start > Control Panel > Programs and Features
-
On the Left Sidebar Menu, click on Turn Windows features on or off in the left-hand side of the page.

-
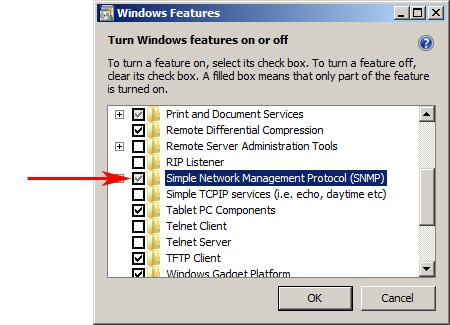
When the “Windows Features” dialog box opens, scroll down and check the “Simple Network Management Protocol” box (see image below), and then click OK.

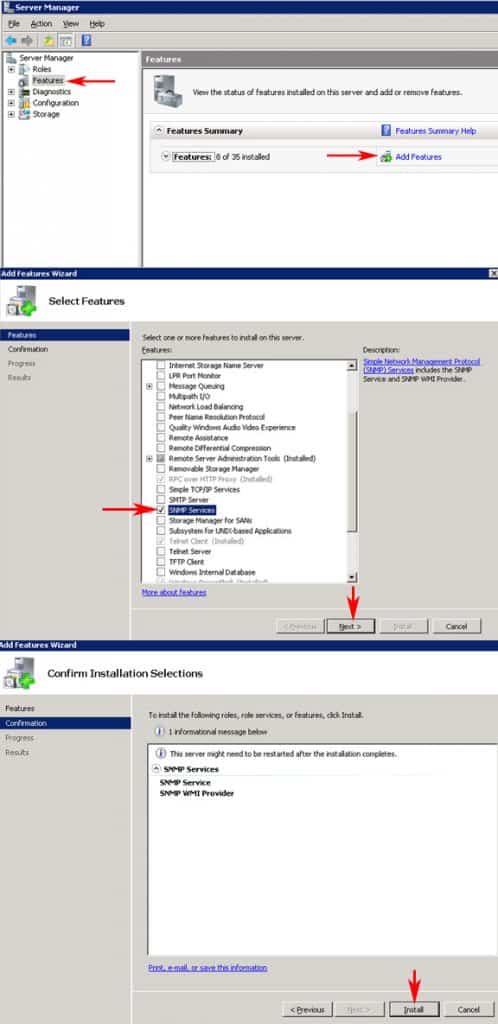
- For Microsoft Windows 2008 Server, the Server Manager dialog box will open. Click on Features on the left menu, and in the Features dialog box on the right side, click on Add Features and then scroll down and check the “SNMP Services” dialog box and click Next and then click Install. See screenshot below:

- For Microsoft Windows 2012 R2 Server, the Add Roles and Features wizard will open, click Next for “Role-based or feature-based installation” and then click on Features >
scroll down to SNMP Service and check box > Click Add Features when pop-up box asks you to confirm SNMP Tools installation > Click Next > Click Install. See the screenshots below for step-by-step tutorial:
- For Microsoft Windows 2008 Server, the Server Manager dialog box will open. Click on Features on the left menu, and in the Features dialog box on the right side, click on Add Features and then scroll down and check the “SNMP Services” dialog box and click Next and then click Install. See screenshot below:
-
At this point, you may be Prompted to Insert a Windows 7 Installation disc or may not, depending how you installed your Operating System.
-
The SNMP Service is now set to automatically start with your PC.
You will also need to manually specify a community string within the SNMP service window, as they automatically specify on when you install the service itself. To do so, follow the instructions below:
- Start > type in services.msc and press Enter Key to open up the Services Dialog box
- Scroll down to SNMP Service and double-click on it to open up the dialog box for that service
- Click on the Security tab
- Make sure the “Send authentication trap” check box is Checked

- Click “Add” under the “Accepted community names” and add your Community name into the given text field and make sure “READ ONLY” is selected in the Community rights field, then click the ADD button.
- In the field right below the Community string names, you’ll have the option to specify which hosts can poll the device for SNMP information by adding either an IP Address or Host Name – we suggest you add your Host name of your monitoring server to ensure that is the only machine allowed to poll for data.
You should now be able to monitor the given machine using SNMP services, whether its a Windows 7, Window 8, Windows 10 or Windows 2008 Server or Windows 2012 R2 server.
If you want a quick and easy way to Enable this service without going through the hassle of manually doing it, definitely consider grabbing the FREE Trial from SolarWinds to do it from the Link below.