
Все способы:
- Компоненты SNMP
- Устанавливаем SNMP
- Способ 1: Штатные «Параметры»
- Способ 2: «Windows PowerShell»
- Способ 3: «Панель управления»
- Настройки протокола
- Вопросы и ответы: 0
Компоненты SNMP
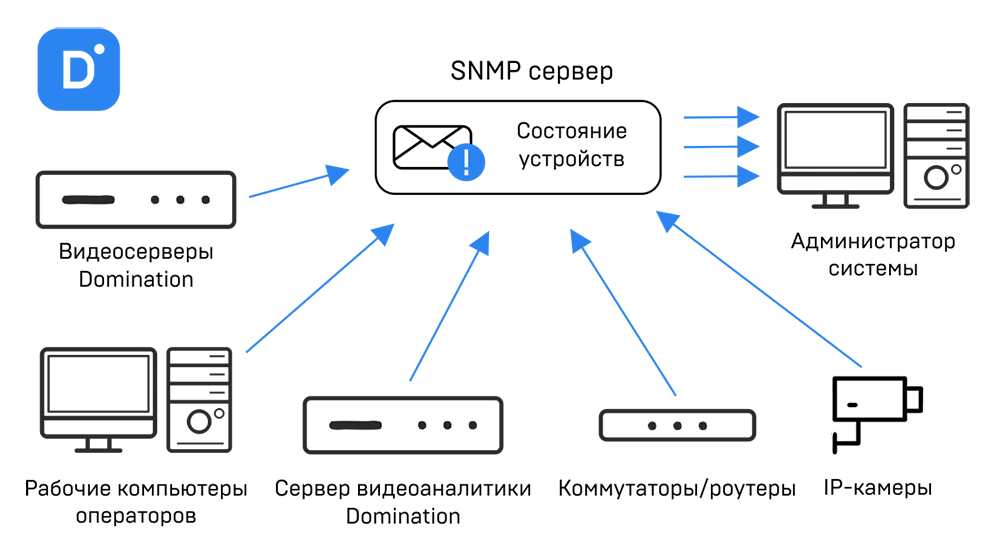
Прежде чем включить и настройки протокол SNMP, следует разобраться, что он собой представляет и из чего состоит. Это упростит понимание редактирования параметров. Вообще SNMP (Simple Network Management Protocol), как правило, используется для мониторинга и оповещения о событиях, которые происходят в сети и связаны с различными устройствами (сервера, принтеры, сетевое оборудование и другое). Протокол считается довольно быстрым и легким, при этом он использует UDP-порты 161 и 162 для передачи данных. Когда он включен, статистика производительности устройств сохраняется.
Существует несколько ключевых компонентов среды, которая управляется посредством протокола SNMP:
- SNMP Manager – представляет собой центральную систему, управляющуюся сетью и контролирующую ее, она в основном получает запросы.
- SNMP Agent – это процесс, предназначенный для отображения состояния и статистики сетевого узла в тот момент, когда он получает SNMP-запрос. Также он собирает, хранит и передает данные мониторинга.
- Управляемые устройства – это все сетевое оборудование, поддерживающее SNMP, которое будет отслеживаться.
- MIB SNMP – протокол использует структуру с иерархиями, использующую идентификаторы объектов для управления (на каждом сетевом сервере есть файлы MIB – к ним и запрашиваются данные мониторинга).
- OID SNMP – это идентификаторы объектов, которые организованы в MIB в виде древовидной структуры, где находится функция управления всех продуктов и устройств.
Также стоит отметить, что есть три версии протокола SNMP (v1, v2c и v3), причем последняя является самой безопасной и совместимой. Инструмент мониторинга используется для различных целей, в том числе для обнаружения сетевых устройств, управления ими, а также для обеспечения видимости производительности сетевого оборудования, анализа статистики о подключенных устройствах, запуска оповещений в случае проблем или несоответствий.
Устанавливаем SNMP
Протокол SNMP был предустановленной функций в ранних версиях операционной системы Windows, но теперь он считается устаревшим и необязательным, в особенности в Windows 10 версии 1809 и выше. Именно поэтому теперь, чтобы включить его, потребуется сначала инсталлировать его в систему, но делается это с помощью встроенных средств.
Способ 1: Штатные «Параметры»
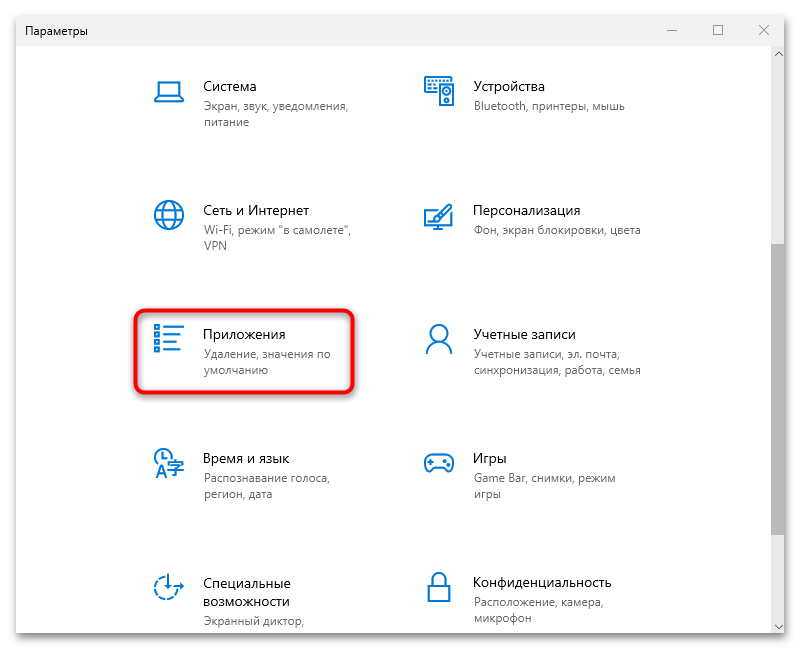
Самый простой способ установить SNMP – инсталлировать его через обновленный интерфейс системных «Параметров» Windows 10:
- Откройте приложение «Параметры» через меню «Пуск».
- Перейдите в раздел «Приложения».
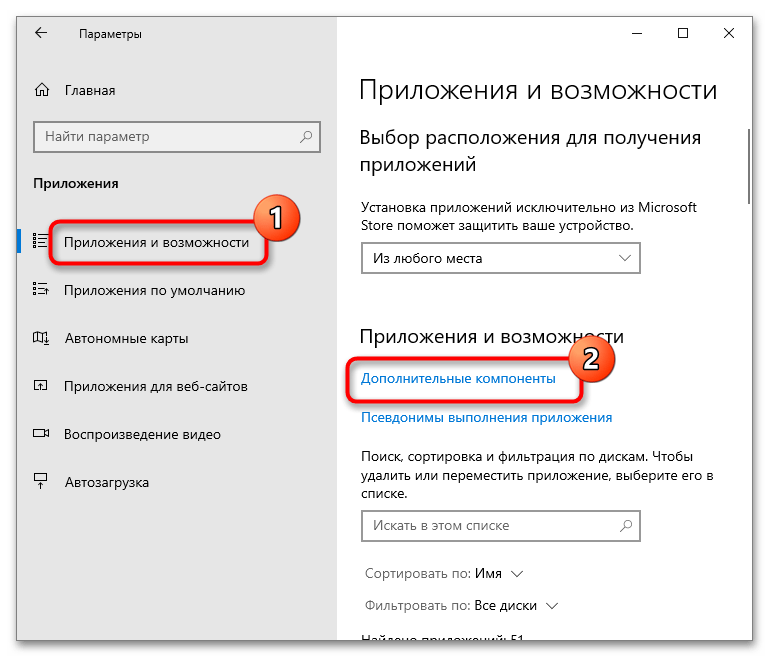
- На вкладке «Приложения и возможности» кликните по строке «Дополнительные компоненты».
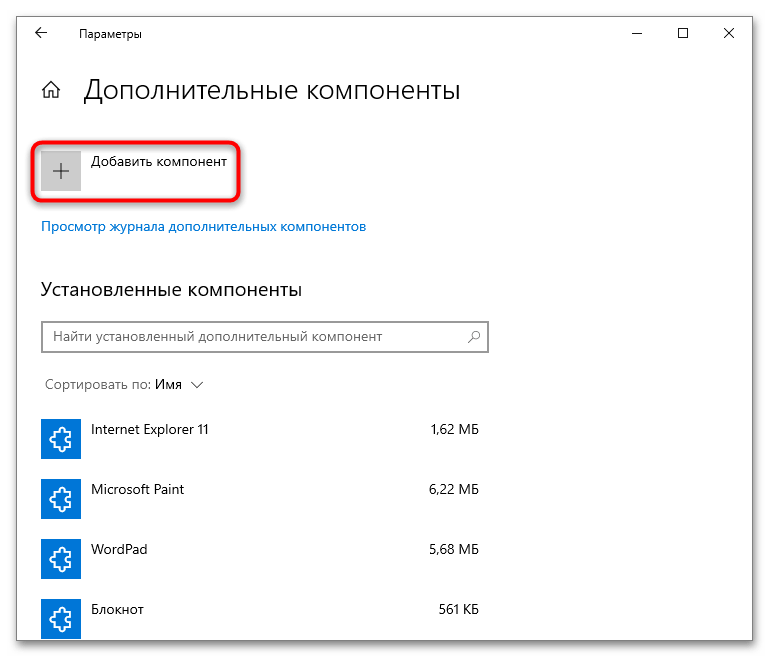
- Нажмите на строку «Добавить компонент». Отобразится список, где нужно отыскать SNMP-протокол, – в нем нажмите сперва на соответствующую строку, затем на кнопку «Установить».
После скачивания всех необходимых компонентов произойдет автоматическая установка, и настройки должны вступить в силу сразу. Теперь можно будет переходить к непосредственной настройке, но не исключено, что потребуется перезагрузка системы.
Способ 2: «Windows PowerShell»
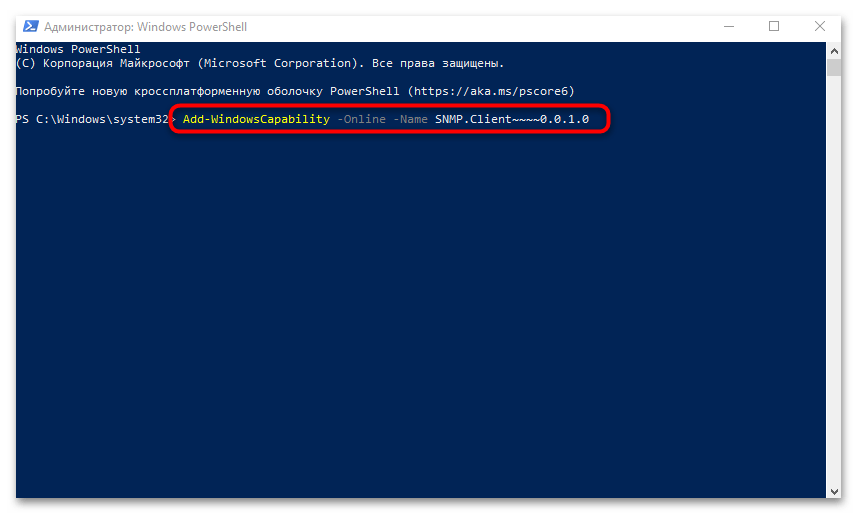
Есть еще один способ установки службы SNMP – это использование специальной команды в консоли (потребуется доступ в интернет):
- Запустите «Windows PowerShell» от имени администратора. Для этого можно воспользоваться строкой системного поиска или кликом правой кнопкой мыши по «Пуску» (выбор пункта «Windows PowerShell (Администратор)»).
- В окне консоли вставьте команду
Add-WindowsCapability -Online -Name SNMP.Client~~~~0.0.1.0и нажмите на клавишу «Enter», чтобы выполнить ее.
Способ 3: «Панель управления»
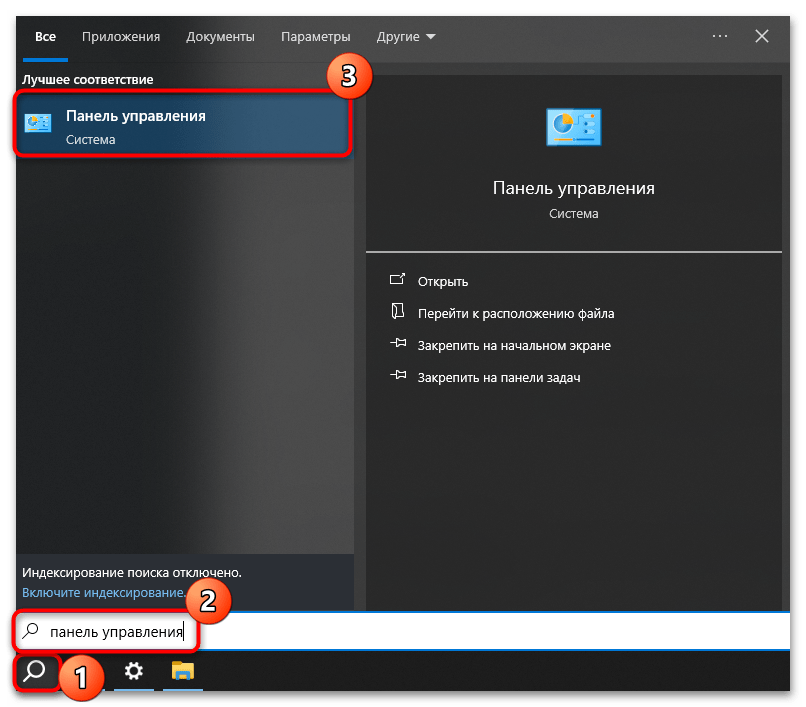
Данный вариант подойдет, если вы используете раннюю версию Windows 10 или даже 8. В этом случае установка компонентов протокола осуществляется через классическую «Панель управления»:
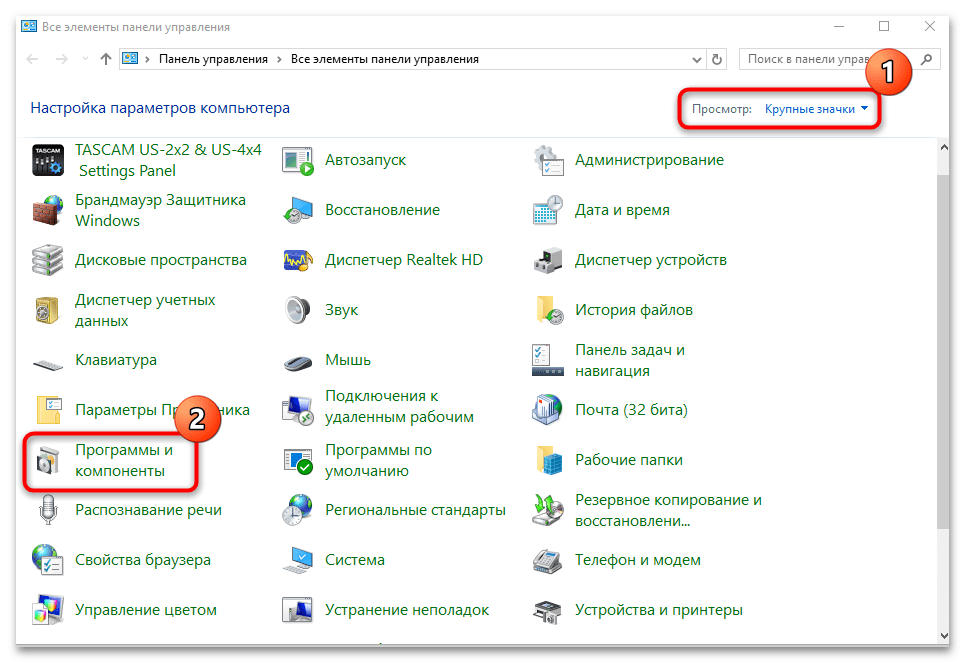
- Откройте «Панель управления», отыскав средство с помощью системного поиска.
- Для удобства выберите отображение разделов в виде крупных или мелких значков, затем нажмите на «Программы и компоненты».
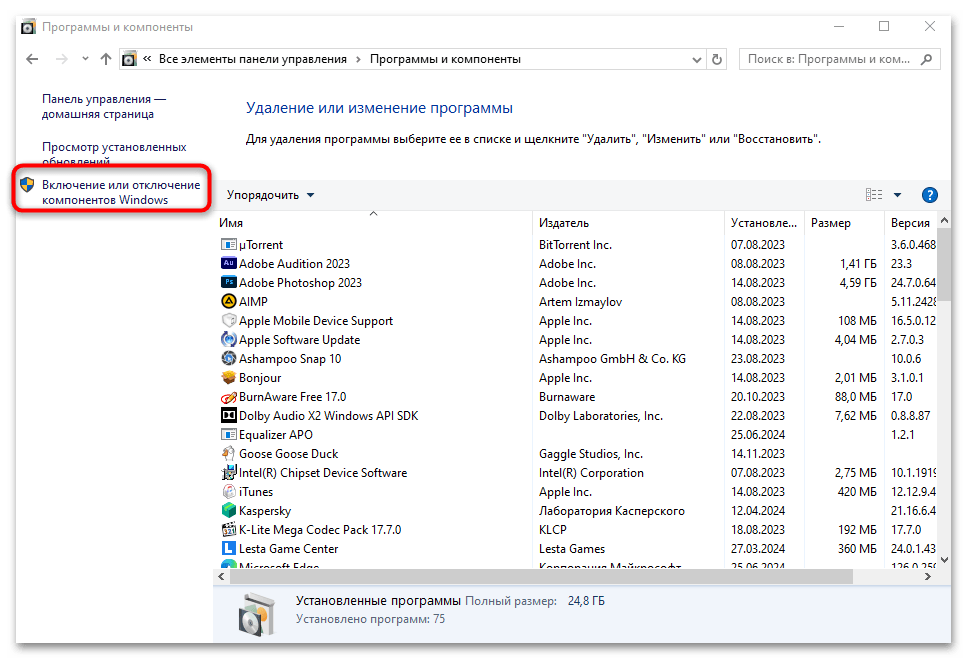
- В открывшемся окне на панели слева кликните по строке «Включение и отключение компонентов Windows».
- Далее отыщите пункт «SNMP-протокол» и отметьте его (также должна отметиться дополнительная опция – «Поставщик WMI для SNMP»). Сохраните внесенные изменения.
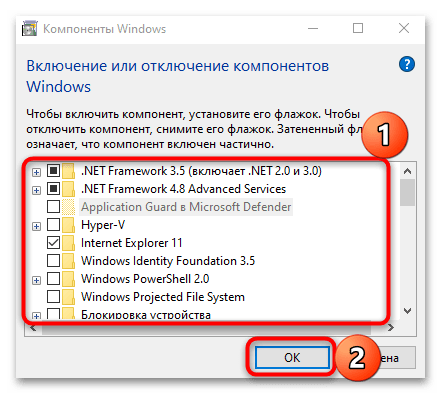
Если потребовалось активировать протокол таким образом, лучше перезагрузите компьютер, чтобы новые параметры вступили в силу.
Настройки протокола
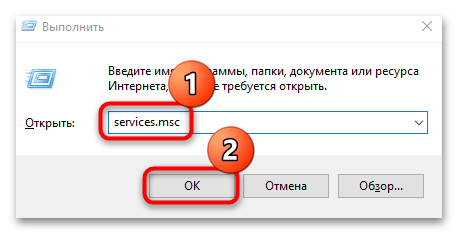
Эта инструкция не является полноценным методом, который позволяет установить компоненты протокола, но если SNMP не работает (а вы, используя предыдущие варианты, убедились, что он уже есть в системе), проверьте, запущена ли соответствующая служба. Делается это через системную оснастку «Службы»:
- Одновременно нажмите на клавиши «Win + R», в появившемся окне введите
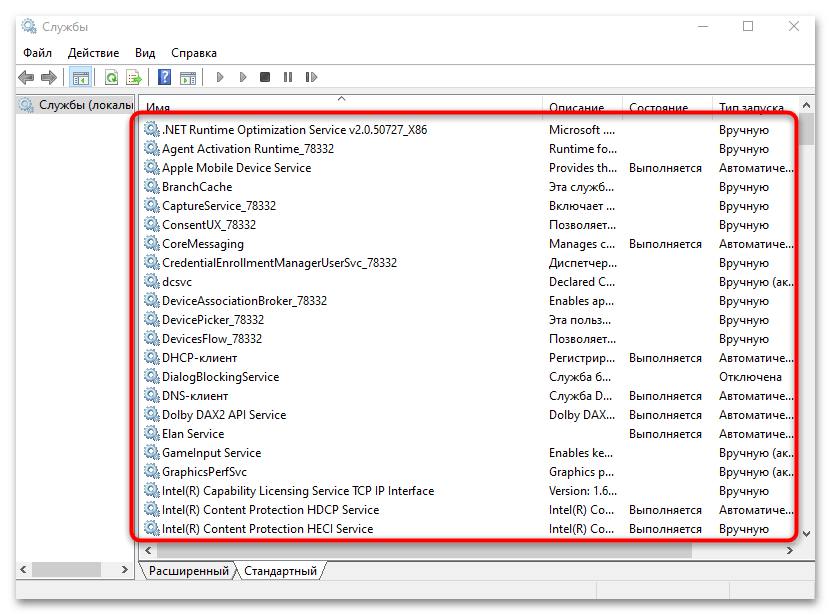
services.mscи нажмите на кнопку «ОК». - В списке найдите пункт «Служба SNMP» и посмотрите значение в столбце «Тип запуска». Убедитесь, что установлено «Автоматически». Если нет, дважды кликните левой кнопкой мыши по строке.
- В новом окне «Свойства» из меню «Тип запуска» выставьте значение «Автоматически» и щелкните по «Применить».
- Если требуется, запустите службу вручную и нажмите «ОК».
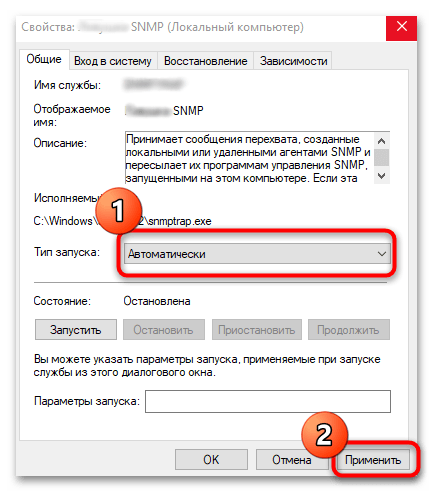
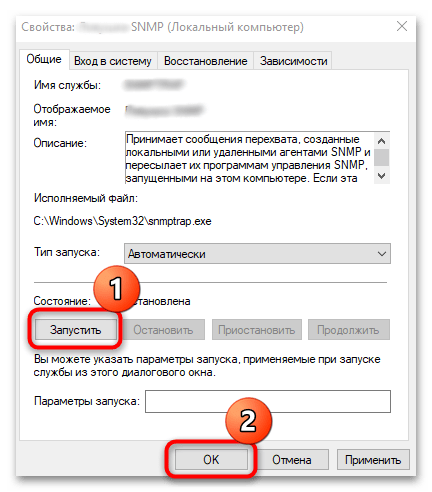
По сути, это является одной из основных настроек протокола – вы выставляете автоматический тип его запуска. После перезагрузки компьютера служба, отвечающая за его работу, будет включаться самостоятельно без ручного запуска. Также следует выполнить ряд дополнительных действий с ней:
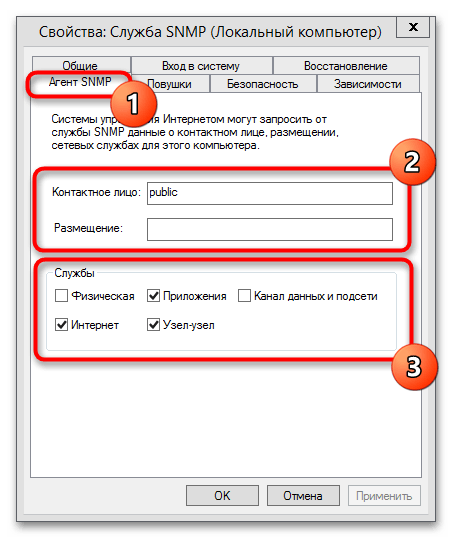
- Дважды кликните по названию службы, после чего вы снова попадете в окно с ее «Свойствами». Обратите внимание, что для нее предусматривается несколько дополнительных вкладок – сперва перейдите на «Агент SNMP». Здесь в специально выделенных текстовых полях нужно прописать свои контактные данные и местоположение компьютера, а ниже можно указать один из вариантов сервисов, данные которых будут собираться и отправляться.
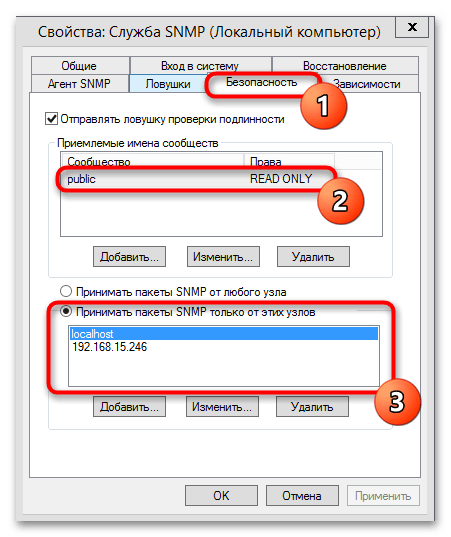
- На вкладке «Безопасность» настраиваются параметры безопасности для различных серверов SNMP. Здесь нужно добавить имена хостов, которые следует аутентифицировать. Также для сообщества нужно выставить уровень доступа. Всех существует несколько уровней: «None», «Notify», «READ ONLY», «READ WRITE», «READ CREATE». Последний – это максимальное значение, при котором сервер SNMP может вносить любые изменения в систему. Как правило, выбирается уровень «READ ONLY» — сервер мониторинга будет работать с системой, но изменения вносить ему будет запрещено. Отметьте пункт «Принимать пакеты SNMP только от этих узлов», затем в поле ниже пропишите нужные данные, нажимая на «Add». Сохраните все настройки при помощи «ОК». Чтобы новые параметры вступили в силу, перезагрузите компьютер.
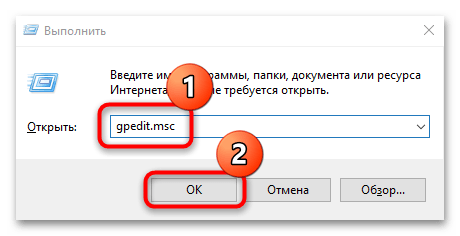
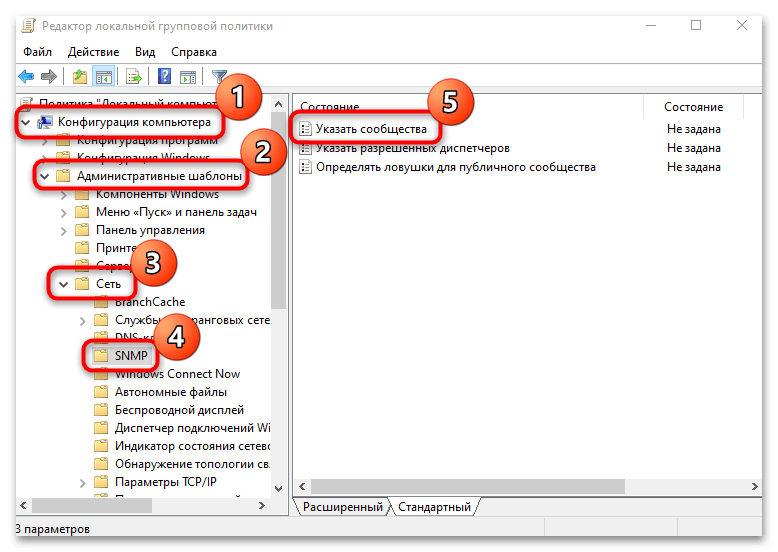
Также можно внести некоторые настройки через оснастку «Редактор локальной групповой политики»:
- Запустите оснастку, введя
gpedit.mscв окне «Выполнить» («Win + R»). - На панели слева перейдите по следующему пути: «Конфигурация компьютера» — «Административные шаблоны» — «Сеть» — «SNMP». В центральной части окна вы увидите несколько основных параметров. Откройте «Указать сообщества» двойным кликом левой кнопкой мыши.
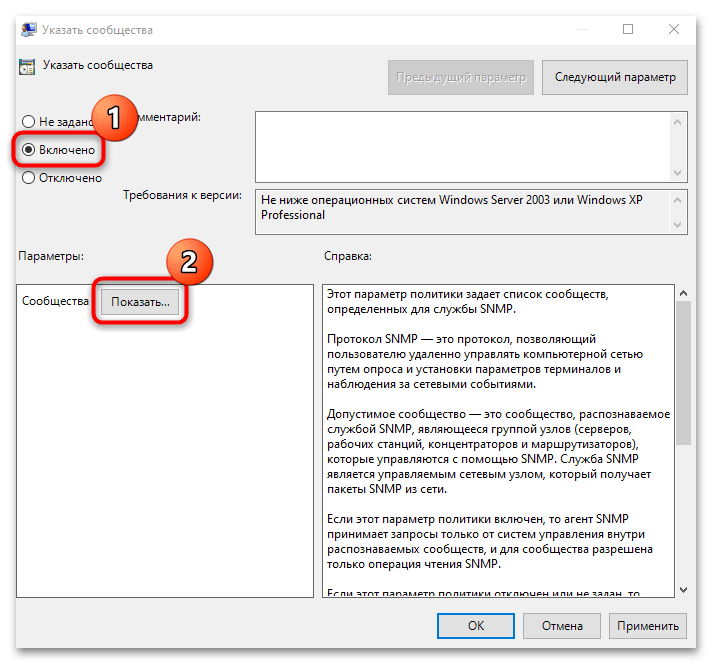
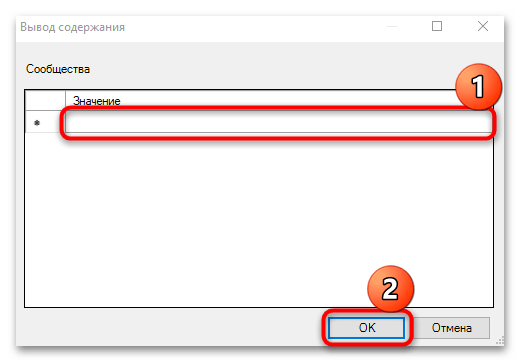
- В следующем окне отметьте пункт «Включено», затем нажмите на кнопку «Показать», которая стала активной.
- Далее укажите сообщества сервера и сохраните настройки.
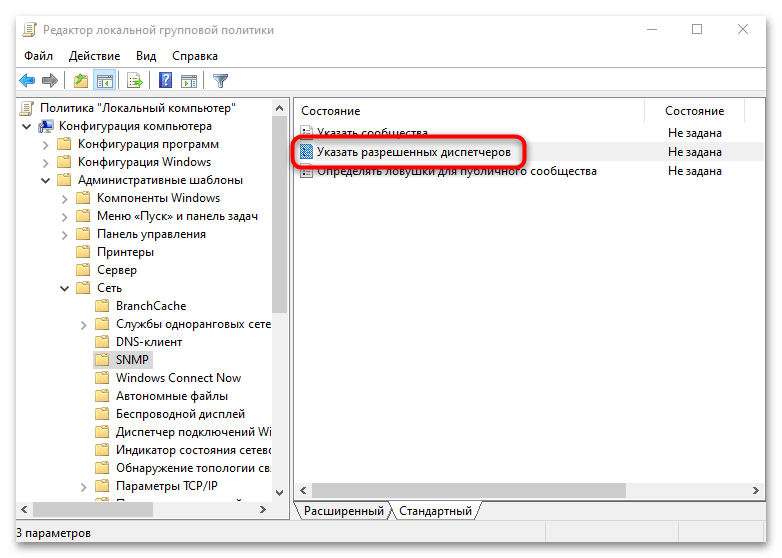
- Аналогичным образом укажите разрешенные диспетчеры, открыв соответствующий параметр.
- Для политики «Определить ловушки для публичного сообщества» настройте имена хостов, которым будут приходить сообщения ловушек от службы SNMP.
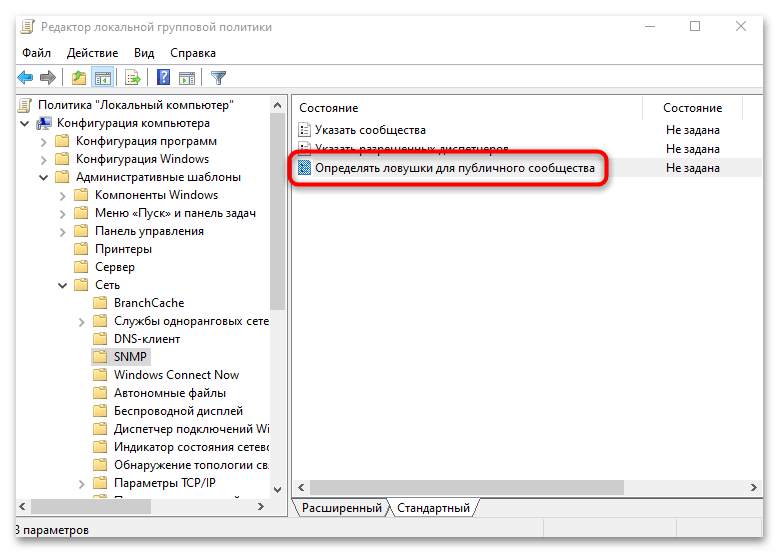
Как только все параметры активированы и настроены, можете закрывать оснастку «Редактор локальной групповой политики», после чего протокол SMNP должен заработать на компьютере.
Наша группа в TelegramПолезные советы и помощь
In this tutorial, I will show you how to download, install, and use SnmpB MIB Browser on Windows 10/8/7. SnmpB is an open-source (GPLv2) and a 100% free SNMP MIB browser. I’m a big fan of the open-source movement, and this is something that I have been looking for a long time – a fully functional and free MIB browser/walker that has these features:
- MIB management – browse, add, load, and edit your MIB files;
- Support for all SNMP versions – SNMPv1, SNMPv2c, and SNMPv3;
- SNMP Walk/Get/Set option – send SNMP queries to devices (agents);
- Agent discovery – detect and identify SNMP-enabled devices on the network;
- SNMP trap receiver – receive SNMP trap events from devices on the network;
- Install on any operating system – Windows, Linux, Mac, BSD.
You need a little knowledge about SNMP protocol before you can use MIB browser. If you don’t know what MIB, OID, and agent are and how they work, please take a few minutes to read my post: What is SNMP? How does it work? Learn with examples.
However, if you have a basic understanding of SNMP, then let’s install and learn how to use MIB browser!
Check out Best Monitoring Tools Online MIB browser that has more than 13 0000 MIB files. You can browse MIB files or download them in various formats (MIB, CSV, JSON, YAML).
Table of Contents
- Step 1: Install SnmpB MIB browser on Windows
- Step 2: Send SNMP queries to devices (agents)
- a) Add SNMP-enabled device (agent profile) to SnmpB MIB browser
- b) Send SNMP queries (SNMP Walk / SNMP Get / SNMP Set)
- Step 3: Manage MIB’s on SnmpB MIB Browser
- a) Loading MIB modules
- b) Adding new MIB files
- Step 4: Discover SNMP agents with MIB browser
- Step 5: Receive SNMP traps with MIB browser
Step 1: Install SnmpB MIB browser on Windows
Download SnmpB MIB Browser from sourceforge.net (click here) and install it using the setup wizard. Just click “Next” on each page and don’t change the default setting.
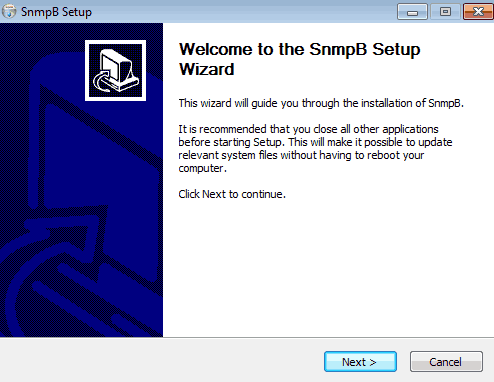
After the installation, Windows should ask you to allow access for SnmpB to communicate over the network, you must click “Allow access” if you are planning to send SNMP queries (UDP 161) to network devices.
This guide will focus on how to install SnmpB on a Windows operating system, but keep in mind that you can also install SnmpB MIB browser on Linux, BSD, and Mac operating systems.
Step 2: Send SNMP queries to devices (agents)
Before we can send SNMP queries to devices (agents), we first need to configure SNMP settings for those devices using SnmpB “agent profile” option.
a) Add SNMP-enabled device (agent profile) to SnmpB MIB browser
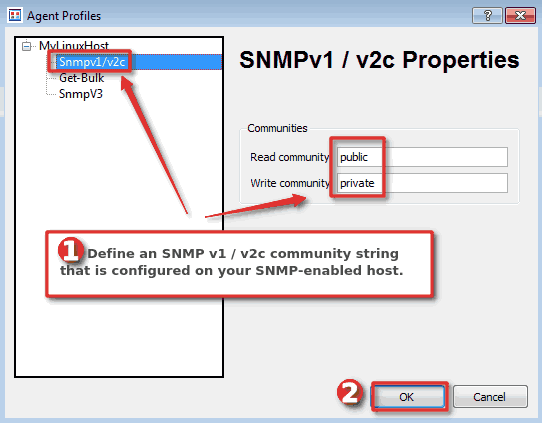
Let’s create our first “agent profile” that will define SNMP settings for some SNMP enabled devices. In my example, I will add my Linux server that uses SNMP v1 protocol
Click on the “wrench” icon on the main screen:
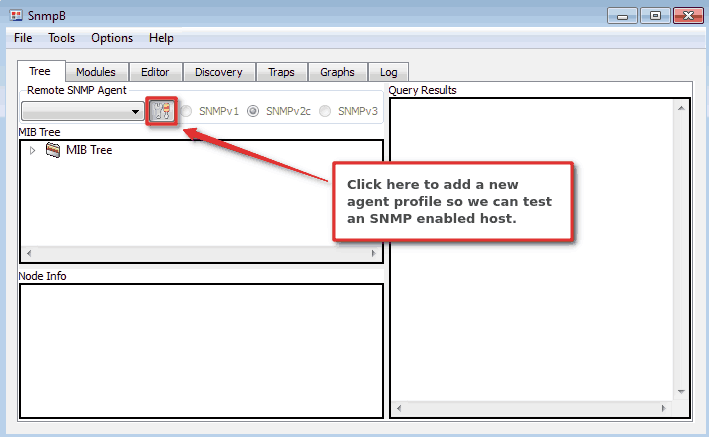
And then right-click on the white part of the screen to add a new agent profile. Define the SNMP settings on the “General Properties” screen just as shown in the image below, but use the SNMP settings for your device (agent).

Here’s an explanation for each parameter:
- Name – hostname of your device (agent), can be anything
- Agent Address/Name – set IP address or DNS name of your device (agent)
- Agent Port – default is UDP port 161, this is rarely changed
- Retries – how many times MIB browser should retry SNMP query before it fails, default is 1
- Timeout (sec) – how long should MIB browser wait for a query to finish, default is 3, but I like to give it a more time
- Supported SNMP version – click on all versions and later you can choose which one you want
Don’t click OK yet! Now, we need to configure security settings, I will use SNMP v1 / v2c so I will configure “Read commuity” as “public” and “Write community” as “private” (community strings are like passwords).
SNMPv3 configuration needs a little bit of more configuring. Before configuring SNMPv3 on the agent profile, on the main screen go to: “Options” → “Manage SNMPv3 USM Profiles” → right-click on the white part of the screen to create “New USM profile” → Configure “User” and “Security” → Click “OK“. After that, you can return to the “Agent profiles” section and under the SNMPv3 tab configure “SNMPv3 user (USM)” and “SNMPv3 context“.
b) Send SNMP queries (SNMP Walk / SNMP Get / SNMP Set)
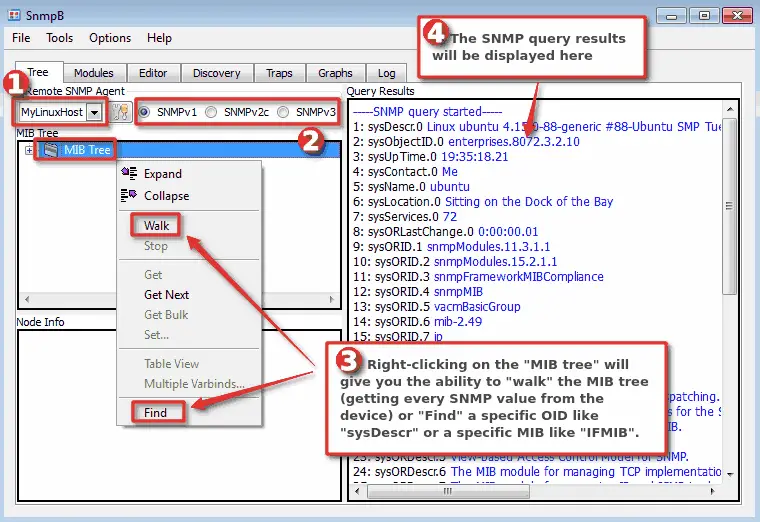
In addition to browsing MIBs, SnmpB is also a MIB walker, so you can walk the MIB tree and get every SNMP value from the device (agent). Let’s do just that on our recently added SNMP device/agent!
Choose your device from the dropdown “Remote SNMP agent“, select SNMP version, right-click on the “MIB tree” and select the “Walk” option. Wait for a few seconds and on the right, you should see your query results.
What if you want to find a specific SNMP OID like “sysName”? That’s easy! Just right-click on the “MIB Tree“, then select the “Find” option and enter an OID name just as shown in the image below.
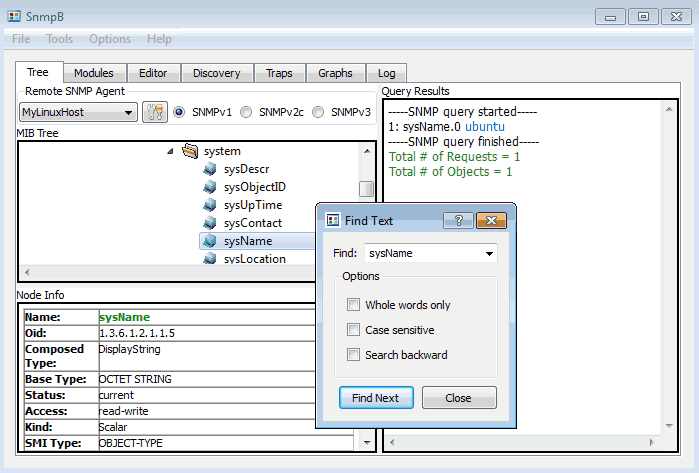
Now you can click on “sysName” and send the SNMP query (Walk or Get) only for that OID. The result of the query will be displayed on the right side. In my case, the “sysName” of my Linux server is “ubuntu“.
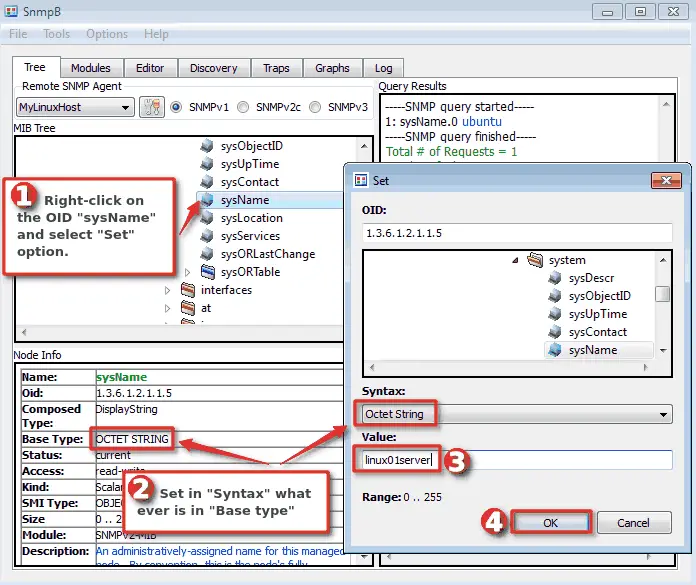
Let’s play a little bit more! What if you wanna set a hostname on the remote SNMP-enabled device to “linux01server” using only SNMP protocol? That is also possible with the “SNMP Set” option, but only if you have configured write permissions on the agent.
To do that, you need to right-click on the OID “sysName”, then select the “Set” option, select “Syntax” and set a new value. Click “OK” when you are done and voilà – hostname is changed.
CONGRATULATIONS!
You have successfully installed SnmpB MIB browser and learned how to send SNMP queries!
CONTINUE TO LEARN MORE:
Manage MIB’s , discover SNMP agents, and receive SNMP traps with SnmpB MIB browser
Step 3: Manage MIB’s on SnmpB MIB Browser
Remember when we were doing a query on the MIB tree to get all the values from the device (agent)? Well, we didn’t get all the values because we didn’t have all the MIB files!
MIB browser will only send SNMP queries from the MIB’s that are available in the local folder and loaded in the application itself. Therefore, we must learn how to add and load a completely new MIB if needed MIB is not available.
a) Loading MIB modules
SnmpB MIB browser has a tab called “Modules” where you can manage the available MIBs. On the left you have “Available MIB Modules“, these are MIBs that exist in the local MIB directory but are not loaded and will not be used. To load a MIB, you need to select the MIB and transfer it from “Available MIB Modules” to “Uploaded MIB Modules”.
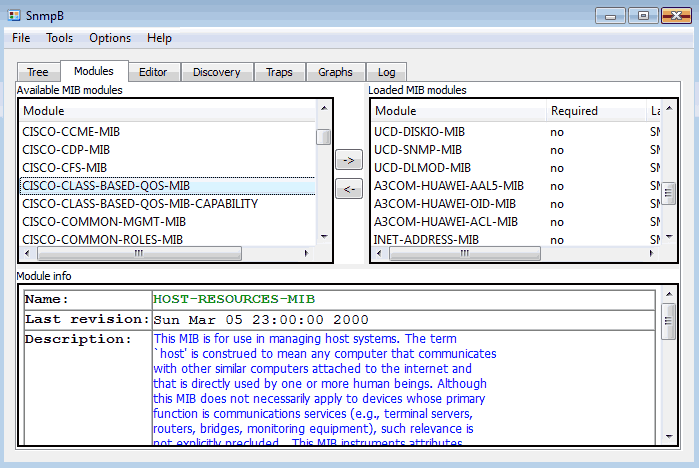
After the transfer, you can use that MIB in the “MIB tree“.
Notice in the image above Cisco MIB called “CISCO-CLASS-BASED-QOS-MIB“. Don’t try to find it because it does not exist in your MIB browser! This is because the MIB browser has a limited number of MIBs. You will need to download from somewhere and copy a MIB file that you need to the default MIB folder. Move on to the next section to learn how to do it.
b) Adding new MIB files
“Available MIB Modules” section will only show MIB files that exist in the folder “C:\Program Files (x86)\SnmpB\mibs” (default path). Therefore, you need to copy your MIB file to that folder and he will appear in “Available MIB modules” section.
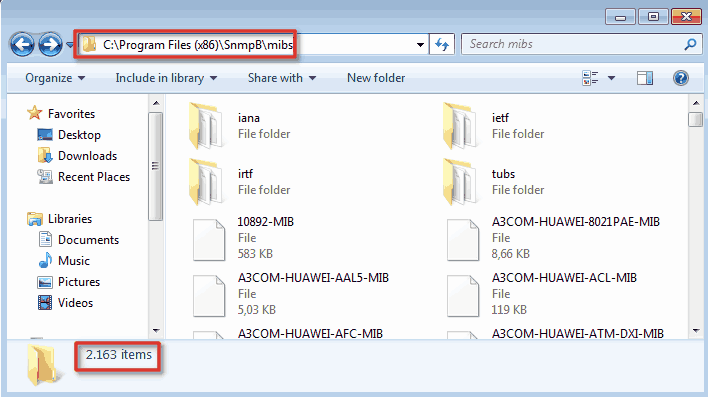
Restart SnmpB after adding a new MIB file. If for some reason your MIB does not appear, try removing the file extension from the MIB file because “.txt” and “.my” are not supported, only “.mib” or no extension at all will work.
I recommend that you download my basic MIB collection – select one by one MIB or download the entire collection in a zip file.
Step 4: Discover SNMP agents with MIB browser
SnmpB has another nice functionality, it can detect SNMP agents on the network. The configuration is quite easy, on the “Discovery” section you need to define the IP network range, select agent profile, SNMP version and click on the discovery button.

Step 5: Receive SNMP traps with MIB browser
I saved the best for last, let’s learn how to receive SNMP traps with SnmpB. You will not believe how many times this functionality has helped me with configuring trap support on a monitoring system.
And it’s pretty easy to use. Just send traps from an agent and check the “Traps” section for arrival.
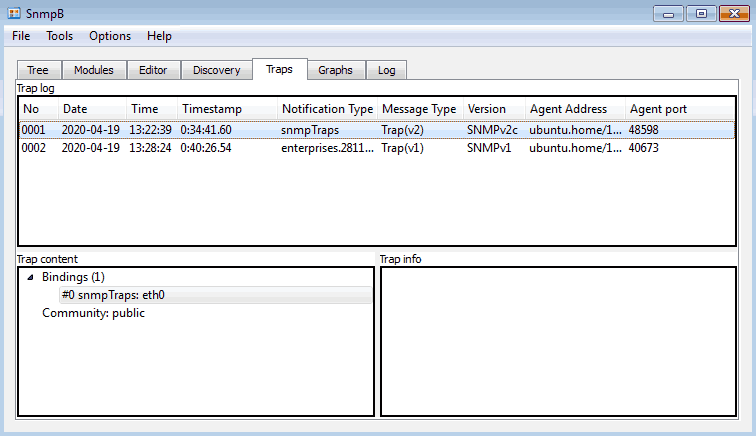
You can use the Net-SNMP tool to send traps from a Linux computer. Here are my Net-SNMP testing commands that I used to create the traps you see in the image above:
# SNMP v1 trap example
snmptrap -v 1 -c public 192.168.5.110 .1.3.6.1.4.1.28116.20 192.168.5.110 6 "" "" 1.3.6.1.4.1.28116.20.1 s "Trap 123 test"

# SNMP v2c trap example
snmptrap -v2c -c public 192.168.5.110 "" "SNMPv2-MIB::snmpTraps" "SNMPv2-MIB::snmpTraps" s "eth0"
Check out my post “Snmpwalk Examples + snmpget, snmpset, snmptrap” if you need more examples on how to send SNMP v1, v2c, and v3 traps.
Как установить стандартную службу SNMP в Windows и настроить мы разобрали тут Установка и настройка службы SNMP в Windows
Стандартный Шаблон ОС Windows SNMPv2
Теперь перейдем к пункту как получать с нее данные.
Неполный список MIB, которые поставляются с системой.
Они устанавливаются вместе со службой SNMP в каталоге %systemroot%\system32
Полный список баз MIB см. в наборе ресурсов Windows.
В моем случае были следующие MIB: Для Windows 10 x64 и один в один Server 2008 R2
accserv.mib 14кб
authserv.mib 15кб
dhcp.mib 4кб
ftp.mib 6кб
hostmib.mib 48кб
http.mib 21кб
inetsrv.mib 1кб
ipforwd.mib 15кб
lmmib2.mib 26кб
mcastmib.mib 30кб
mib_ii.mib 107кб
msft.mib 1кб
msipbtp.mib 13кб
msiprip2.mib 34кб
rfc2571.mib 22кб
smi.mib 4кб
wins.mib 26кб
Скачать
Зависимости
FROM SNMPv2-SMI
FROM SNMPv2-TC
FROM SNMPv2-CONF
FROM RFC-1212
FROM SNMP-FRAMEWORK-MIB +
FROM RFC1155-SMI +
FROM RFC1213-MIB +
FROM MSFT-MIB +
FROM INTERNETSERVER-MIB +
FROM WINS-MIB +
Переименовал для удобства если выходит какая ошибка.
Стало — было
RADIUS-ACC-SERVER-MIB.mib — accserv.mib 14кб
RADIUS-AUTH-SERVER-MIB.mib — authserv.mib 15кб
DHCP-MIB.mib — dhcp.mib 4кб
FTPSERVER-MIB.mib — ftp.mib 6кб
HOST-RESOURCES-MIB-WIN бы такая но внутри разные HOST-RESOURCES-MIB.mib — hostmib.mib 48кб
HTTPSERVER-MIB.mib — http.mib 21кб
INTERNETSERVER-MIB.mib — inetsrv.mib 1кб
RFC1354-MIB.mib — ipforwd.mib 15кб
LanMgr-Mib-II-MIB.mib — lmmib2.mib 26кб
IPMROUTE-MIB.mib — mcastmib.mib 30кб
RFC1213-MIB.mib — mib_ii.mib 107кб
MSFT-MIB.mib — msft.mib 1кб
MSIPBOOTP-MIB.mib — msipbtp.mib 13кб
MSIPRIP2-MIB.mib — msiprip2.mib 34кб
SNMP-FRAMEWORK-MIB.mib — rfc2571.mib 22кб
RFC1155-SMI.mib — smi.mib 4кб
WINS-MIB.mib — wins.mib 26кб
Скачать:
Описание для некоторых Mib
lmmib2.mib — это частный MIB для серверов Windows.
dhcp.mib — Определенная Microsoft MIB, содержащая типы объектов для мониторинга сетевого трафика между удаленными узлами и DHCP-серверами.
hostmib.mib — Содержит типы объектов для мониторинга и управления ресурсами хоста.
lmmib2.mib — Охватывает службы рабочих станций и серверов
mib_ii.mib — Содержит информационную базу управления (MIB-II), которая обеспечивает простую работоспособную архитектуру и систему для управления Интернетом на основе TCP/IP.
wins.mib — Определенная Microsoft MIB для службы имен Интернета Windows (WINS)
База сведений об управлении SNMP (MIB)
Дополнительная информация:
Windows NT: обычно можно скопировать MIB из агента расширения SNMP, который поддерживает конкретный MIB. Некоторые дополнительные базы MIB доступны в комплекте ресурсов Windows NT 4.0.
Библиотеки DLL агента расширения для MIB-II, LAN Manager MIB-II и MIB ресурсов хоста устанавливаются вместе со службой SNMP. Библиотеки DLL агента расширения для других MIB устанавливаются при установке соответствующих служб. Во время запуска службы служба SNMP загружает все библиотеки DLL агента расширения, перечисленные в реестре.
Пользователи могут добавлять другие библиотеки DLL агента расширения, которые реализуют дополнительные MIB. Для этого они должны добавить запись реестра для новой библиотеки DLL в службе SNMP. Они также должны зарегистрировать новую MIB в приложении консоли управления SNMP. Дополнительные сведения см. в документации, прилагаемой к вашему приложению консоли управления.
Microsoft назначено пространство имен 1.3.6.1.4.1.311, определенное в MSFT.MIB. Microsoft имеет право назначать имена объектам в любом месте ниже этого пространства имен.
Идентификатор объекта в иерархии записывается как последовательность субидентификаторов, начинающаяся с корня и заканчивающаяся на объекте. Подидентификаторы разделяются точкой.
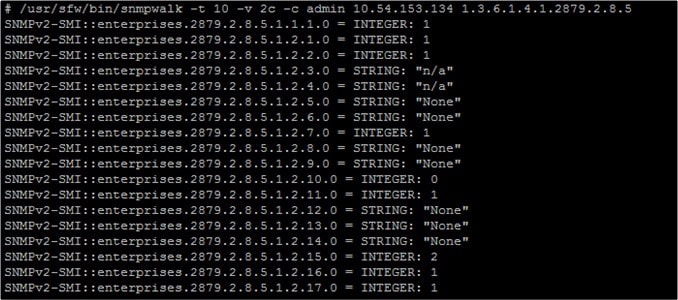
Возьмем пример: Мониторить состояние запущенных в Windows служб через SNMP
используя MIB, кажется, что вы можете получить статус каждой службы, обратившись к LanMgr-Mib-II-MIB::svSvcOperatingState, Я боролся с доступом к OID, который включал «строку имени службы».
Сразу напишу такое
Сама функция агента SNMP является услугой, официально предоставляемой MS. (—> Когда я обратился на форум MS, мне ответили, что «работа по SNMP не рекомендуется»…)
Изначально я нашел очень много инфы на такой вид запроса
Код: Выделить всё
snmpwalk -v 2c -c public IP:Port LanMgr-Mib-II-MIB::svSvcOperatingState["index","LanMgr-Mib-II-MIB::svSvcName","Имя Службы"]Пример:
Код: Выделить всё
snmpwalk -v 2c -c public 192.168.150.3:161 LanMgr-Mib-II-MIB::svSvcOperatingState["index","LanMgr-Mib-II-MIB::svSvcName","Zabbix Agent"]Или по OID
Код: Выделить всё
snmpwalk -v 2c -c public 192.168.150.3:161 1.3.6.1.4.1.77.1.2.3.1.3[index,1.3.6.1.4.1.77.1.2.3.1.1,"Zabbix Agent"]И в ответ я должен был получить статус запрошенной службы
Рабочий статус сетевой службы:
активный(1)
ожидающий продолжения(2)
ожидающий паузы(3)
приостановленный(4)
Но приходил все к ошибке, разберем более детально:
Используем файл mib для запроса: LanMgr-Mib-II-MIB
Параметр: SvSvcOperatingState — Вы можете получить статус службы
LanMgr-Mib-II-MIB::svSvcOperatingState — объект, возвращающий рабочее состояние службы.
LanMgr-Mib-II-MIB::svSvcName — который возвращает имя службы.
По раздельности запросы выполнялись
Код: Выделить всё
snmpwalk -v 2c -c public 192.168.150.3:161 LanMgr-Mib-II-MIB::svSvcOperatingStateКод: Выделить всё
snmpwalk -v 2c -c public 192.168.150.3:161 LanMgr-Mib-II-MIB::svSvcNameполучаем ответ
LanMgr-Mib-II-MIB::svSvcName.»Zabbix Agent» = STRING: «Zabbix Agent»
LanMgr-Mib-II-MIB::svSvcName.»…………» = Hex-STRING: D0 A1 D0 B5 D1 80 D0 B2 D0 B5 D1 80
Русские символы в Hex формате.
Так же можно запросить данные по всем mib и выгрузить их в файл:
Код: Выделить всё
snmpwalk -v 2c -c public 192.168.150.3:161 >> Host3.logНаткнулся на японскую статью по запросам служб windows snmp Японский Вариант статьи
Оказалось что имя службы не воспринимается для Английского языка имя службы нужно преобразовать в Десятичную систему ASCII
И синтаксис команды запроса будет другим.
Однако кажется, что часть символьной строки необходимо преобразовать в код ASCII. ( Я использовал этот сайт Преобразователь кода ASCII)
Видео подробно о кодировках
В десятичное число переводим имя
Skype for Business Server XMPP Translating Gateway
Получаем в 10тичной
83 107 121 112 101 32 102 111 114 32 66 117 115 105 110 101 115 115 32 83 101 114 118 101 114 32 88 77 80 80 32 84 114 97 110 115 108 97 116 105 110 103 32 71 97 116 101 119 97 121
Когда строка символов преобразуется
svSvcOperatingState.○.83.107.121.112.101.32.102.111.114.32.66.117.115.105.110.101.115.115.32.83.101.114.118.101.114.32.88.77.80.80.32.84.114.97.110.115.108.97.116.105.110.103.32.71.97.116.101.119.97.121
становится
Вам нужно ввести длину этой строки символов в начале получаем 50
Итак, в итоге будет следующее.
svSvcOperatingState.50.83.107.121.112.101.32.102.111.114.32.66.117.115.105.110.101.115.115.32.83.101.114.118.101.114.32.88.77.80.80.32.84.114.97.110.115.108.97.116.105.110.103.32.71.97.116.101.119.97.121
Для имени Службы: APC PBE Agent
APC PBE Agent — 65 80 67 32 80 66 69 32 65 103 101 110 116
Когда строка символов преобразуется
65.80.67.32.80.66.69.32.65.103.101.110.116
Кол-во чисел 13
Получаем OID
13.65.80.67.32.80.66.69.32.65.103.101.110.116
Пробуем запросить
Код: Выделить всё
snmpwalk -v 2c -c public 192.168.150.3:161 LanMgr-Mib-II-MIB::svSvcOperatingState.13.65.80.67.32.80.66.69.32.65.103.101.110.116Ответ:
LanMgr-Mib-II-MIB::svSvcOperatingState.»APC PBE Agent» = INTEGER: active(1)
Запрос
Код: Выделить всё
snmpwalk -v 2c -c public 192.168.150.3:161 LanMgr-Mib-II-MIB::svSvcName."Zabbix Agent"В ответ ошибка
LanMgr-Mib-II-MIB::svSvcName.Zabbix Agent: Unknown Object Identifier (Index out of range: Zabbix Agent (svSvcName))
Если имя переведем в десятичную систему сформируем OID
Zabbix Agent — 12.90.97.98.98.105.120.32.65.103.101.110.116
Запрос
Код: Выделить всё
snmpwalk -v 2c -c public 192.168.150.3:161 LanMgr-Mib-II-MIB::svSvcName."12.90.97.98.98.105.120.32.65.103.101.110.116"Ответ
LanMgr-Mib-II-MIB::svSvcName.»Zabbix Agent» = STRING: «Zabbix Agent»
И ответ пришел.
Запрос
Код: Выделить всё
snmpwalk -v 2c -c public 192.168.150.3:161 LanMgr-Mib-II-MIB::svSvcOperatingState."12.90.97.98.98.105.120.32.65.103.101.110.116"или
Код: Выделить всё
snmpwalk -v 2c -c public 192.168.150.3:161 1.3.6.1.4.1.77.1.2.3.1.3.12.90.97.98.98.105.120.32.65.103.101.110.116Ответ
LanMgr-Mib-II-MIB::svSvcOperatingState.»Zabbix Agent» = INTEGER: active(1)
Ради эксперимента попробуем первый запрос с OID
Код: Выделить всё
snmpwalk -v 2c -c public 192.168.150.3:161 LanMgr-Mib-II-MIB::svSvcOperatingState["index","LanMgr-Mib-II-MIB::svSvcName","12.90.97.98.98.105.120.32.65.103.101.110.116"]Ответ
LanMgr-Mib-II-MIB::svSvcOperatingState[index,LanMgr-Mib-II-MIB::svSvcName,12.90.97.98.98.105.120.32.65.103.101.110.116]: Unknown Object Identifier
Запрос полностью в OID
Код: Выделить всё
snmpwalk -v 2c -c public 192.168.150.3:161 1.3.6.1.4.1.77.1.2.3.1.3["index","1.3.6.1.4.1.77.1.2.3.1.1","12.90.97.98.98.105.120.32.65.103.101.110.116"]Ответ
.1.3.6.1.4.1.77.1.2.3.1.3[index,1.3.6.1.4.1.77.1.2.3.1.1,12.90.97.98.98.105.120.32.65.103.101.110.116]: Unknown Object Identifier (Sub-id not found: svSvcEntry -> 3[index,1)
Еще попробуем так:
Код: Выделить всё
snmpwalk -v 2c -c public 192.168.150.3:161 LanMgr-Mib-II-MIB::svSvcOperatingState."Zabbix Agent"Ответ
LanMgr-Mib-II-MIB::svSvcOperatingState.Zabbix Agent: Unknown Object Identifier (Index out of range: Zabbix Agent (svSvcName)
И везде получаем ОШИБКИ
Для других языков
Однако если имя службы содержит японский язык, на него нельзя будет сослаться, даже если оно будет преобразовано в код ASCII.
Ниже описана процедура подтверждения SNMP OID японской службы.
Поскольку значение, возвращаемое Snmpwalk, представляет собой шестнадцатеричное число,
Веб-конференции Skype для бизнеса Server (Hex)
Hex-STRING: 53 6B 79 70 65 20 66 6F 72 20 42 75 73 69 6E 65 73 73 20 53 65 72 76 65 72 20 57 65 62 20 E4 BC 9A E8 AD B0
↑ Возвращаемое значение для запроса имени службы.
Исследуйте только «встречную» часть строки.
↓
Часть «Встреча» → Раскрыт код символа → UTF-8 (шестнадцатеричный)
E4 BC 9A E8 AD B0
Преобразовать в двоичный
Стандарт преобразования сайта 32 символа (1 символ полной ширины считается за 1 символ) 32.83.101.114.118.101.114.32.87.101.98.32.228.188.154.232.173.176
→ НГ
Стандарт преобразования сайта 34 символа (1 символ полной ширины считается за 2 символа) 32.83.101.114.118.101.114.32.87.101.98.32.228.188.154.232.173.176
→ НГ
Стандарт конверсии сайта 36 символов (считается по количеству элементов, а не по количеству символов) 115.115.32.83.101.114 .118.101.114.32.87.101.98.32.228.188.154.232.173.176
→ Успех
Возвращаемое значение: LanMgr-Mib-II-MIB :: svSvcOperatingState.»Skype for Business Server Web ……» = ЦЕЛОЕ ЧИСЛО : активно (1 )
Теперь вы можете получить рабочее состояние служб Windows по SNMP, но когда служба выходит из строя, она не возвращает код, например стоп, в качестве возвращаемого значения.
По-видимому, когда служба не запущена, доступ к самому OID недоступен, и сторона диспетчера SNMP выдает ошибку «Такого OID нет». (Нет такого экземпляра в настоящее время не существует с этим OID)
Кроме того, похоже, что с момента остановки (запуска) службы проходит около 2 минут, пока статус не может быть обнаружен SNMP.
Вывод:
Мониторить состояние работы службы Windows можно прямо из SNMP-менеджера, но, похоже, потребуется некоторая изобретательность.
Немного из другой оперы но так же про кодировки в snmp
Аналогично например с антеннами microtik при обнаружении элементов вместо одного значения дает целую строку в шестнадцатеричных числах. Их необходимо преобразовать и получить 1 значение.
Что то вроде предобработки на JAVA
Код: Выделить всё
//разбиваем на части по разделителю "точка"
var a = value.split('.');
//последний элемент разбиваем на части по разделителю "двоеточие"
var b = a[a.length-1].split(':');
//и в цикле каждый его компонент преобразуем из HEX в DEC
for (var i=0; i<b.length; i++) {
b[i] = parseInt(b[i], 16)
}
//после чего собираем всё обратно
a[a.length-1] = b.join('.');
return a.join('.');
«Code:
.1.3.6.1.4.1.14988.1.1.1.2.1.3.c4:ad:34:50:3a:4c
При использовании в правилах LLD на входе будет не одна строка такого вида, а сгенерированный Zabbix-ом JSON, где строка такого вида — лишь одно из полей.
Поэтому логично, что скрипт ломается.»
Если в вашей среде есть старые SNMP-устройства, и их время безотказной работы отображается как дата и время в шестнадцатеричных числах. Это требует многого, чтобы фактически преобразовать эти данные во что-то более понятное.
«используйте строго»; var str = значение; alert(«str: » + str); var y256 = str.slice(0,2); var y = str.slice(3,5); var m = str.slice(6,8); var d = str.slice(9,11); var h = str.slice(12,14); var min = str.slice(15,17); var y256Base10 = +(«0x» + y256); var yBase10 = +(«0x» + y); var Год = 256*y256Base10 + yBase10; var mBase10 = +(«0x» + m); var dBase10 = +(«0x» + d); var hBase10 = +(«0x» + h); var minBase10 = +(«0x» + min); var YR = String(Year); var MM = String(mBase10); var DD = String(dBase10); var HH = String(hBase10); var MIN = String(minBase10); если (mBase10 < 10) MM = «0» + MM; если (dBase10 < 10) DD = «0» + DD; если (hBase10 < 10) HH = «0» + HH; если (minBase10 < 10) MIN = «0» + MIN; var Date = YR + «-» + MM + «-» + DD + » » + HH + «:» + MIN; Дата возврата;
С помощью предварительной обработки JavaScript вы можете получить более читаемые значения.
Преобразование SNMP «DateandTime» в метку времени
- HEX в DEC
Problem to convert a data Hex-string in Zabbix Item Value
In the late 1980’s, SNMP or the Simple Network Management Protocol first emerged as a solution for managing nodes within a network. Since then SNMP data has been used to measure the system performance of devices across countless vendors to help ensure that networks stay up and running.
Today SNMP is one of the most popular networking protocols in the world and snmpwalk has become a go-to method for scanning multiple nodes at once.
Networking and Cyber Security Specialist
Updated: November 11, 2024
Networking and Cyber Security Specialist
Updated: November 11, 2024
How Does SNMP Work?
The snmpwalk command is a shorthand way to use multiple GETNEXT requests without having to type lots of different commands, fire off lots of different GETNEXT and view your infrastructure health. We look at some snmpwalk examples on Windows and Linux.
However, before we look at the snmpwalk command, we first need to look at how SNMP works. On SNMP-enabled devices, an SNMP agent collects information from the device and stores it within a Management Information Base (MIB) where this data is stored so that it can be accessed whenever the SNMP manager polls the SNMP agent.
When the SNMP Manager queries the SNMP agent, data is taken from the MIB and sent to the SNMP Manager where it can be viewed with a network monitoring tool. There are many different commands that you can use to query an SNMP agent. The most common ways are through the use of the GET or the GET-Next command.
The GET command is used to take an Object Identifier (OID) from the MIB. The GET-Next command is a little more advanced and goes through a MIB tree from OID to OID pulling information. This is where snmpwalk comes in.
What is snmpwalk?
The name, snmpwalk, is given to an SNMP application that runs multiple GETNEXT requests automatically. The SNMP GETNEXT request is used to query an enabled device and take SNMP data from a device. The snmpwalk command is used because it allows the user to chain GETNEXT requests together without having to enter unique commands for each and every OID or node within a sub-tree.
The snmpwalk is issued to the root node of the sub-tree so that system information is gathered from every connected node. This provides you with an efficient way to collect information from a range of devices like routers and switches. The information you collect arrives in the form of OIDs. An OID is an object which is part of the MIB within an SNMP-enabled device.
Installing snmpwalk in Windows
Windows users can get a version of snmpwalk from EZ5 Systems.
- Download a zip file from https://ezfive.com/snmpsoft-tools/snmp-walk/
- Unzip the README and executable file into an easy-to-reach location, such as your Desktop
- Locate the README file and open it with Notepad. This file shows the parameters for the command.
- Type cmd in the Start search bar and select Command Prompt – Run as Administrator
While the Linux command is snmpwalk, this version for Windows is capitalized as SnmpWalk. However, don’t worry about capitalization when running the program in Windows because the system is not case sensitive. You will see examples of usage that specifies the command SnmpWalk.exe. However, you don’t need to type the .exe part.
Parameters and Options for snmpwalk in Windows
The SnmpWalk command runs in a Command Prompt window and it has its own parameter invoking format. The takes the form of a dash, an identifier, a colon, and then a value. For example, -r:192.168.2.1 gives the IP address of a device to query. Some variables are switches and don’t need a value.
Here is a list of the variables for SnmpWalk:
| Parameter | Description | Default |
|---|---|---|
| -q | Quiet mode (suppress header; print variable values only) | |
| -r:host | Name or network address (IPv4/IPv6) of remote host | |
| -p:port | SNMP port number on remote host | 161 |
| -t:timeout | SNMP timeout in seconds (1-600) | 5 |
| -v:version | SNMP version. Supported version: 1, 2c or 3 | 1 |
| -c:community | SNMP community string for SNMP v1/v2c | public |
| -ei:engine_id | Engine ID. Format: hexadecimal string. (SNMPv3) | |
| -sn:sec_name | SNMP security name for SNMPv3 | |
| -ap:auth_proto | Authentication protocol. Supported: MD5, SHA (SNMPv3) | |
| -aw:auth_passwd | Authentication password (SNMPv3) | |
| -pp:priv_proto | Privacy protocol. Supported: DES, IDEA, AES128, AES192, AES256, 3DES (SNMPv3) | |
| -pw:priv_passwd | Privacy password (SNMPv3) | |
| -cn:cont_name | Context name. (SNMPv3) | |
| -ce:cont_engine | Context engine. Format: hexadecimal string (SNMPv3) | |
| -os:start_oid | Object ID (OID) of first SNMP variable to walk | 0.1 |
| -op:stop_oid | Object ID (OID) of last SNMP variable to walk | Walk to the very last variable |
| -csv | Output in CSV (Comma Separated Values) format |
Some of the parameters can only be used with SNMP version 3. This requirement is noted in the entries for the relevant parameters in the above table.
Installing snmpwalk in Linux
On Linux devices, snmpwalk is available as a package for you to install. The process of doing this depends on your Linux distribution. However, you can install Linux by entering the following commands:
- Redhat/Fedora/CentOs:
yum install net-snmp-utils - Ubuntu:
apt-get install snmp
Parameters and Options for snmpwalk in Linux
The snmpwalk command has has a range of different parameters that you can use. These include the following:
| hostname |
The SNMP agent name
|
| community |
The type of read community
|
| object_id |
Specify an object ID to return all SNMP objects below it. If NULL then the root of the SNMP object is taken as the object_id
|
| timeout |
Number of microseconds before the first timeout
|
| retries |
How many times to retry the connection in the event of a timeout
|
| -Os |
Shows the last symbolic element of an OID
|
| -c |
Sets a community string
|
| -v |
Specifies the SNMP version you want to use
|
How to Minimize the Information You See With snmpwalk
One of the first things you’ll notice when running snmpwalk is that there are too many results for you to read. You can easily end up with thousands of different results. To get around this vendors help you by providing you with a MIB file. The MIB file is used to specify which OIDs are available on a device. Many vendors provide you with a MIB file for each device you have. Having a MIB file allows you to run a query that is specific to that file, rather than walking through everything.
See also: SMNP tools
A note about the SNMP MIB structure
The MIB has a tree structure and there is no set width of branching at each node. The OID is a dot-notation system that shows the trail from the root node to the current node. Each node is represented by a number that has a meaning but you need a reference document to work out what each value means. The OID for a node includes the numbers of all the parent nodes above it. So, the OID shows a path down to a specific point on the MIB tree.
Not every node will be present because in some cases, a node has a series of possible child nodes, each of which represents a value option, for example, 1=Yes and 2=No, so that level of the tree wouldn’t have both the 1 and 2 nodes present because they are mutually exclusive.
How snmpwalk operates
The snmpwalk function is like a crawler that steps down each branch of the tree as far as values are available. When it reaches the end of the line, it looks up one level to see whether there are other nodes available apart from the one that was just visited. Each of the nodes can have a variable extent – it is possible that one leads down several levels, another has only one node below it, and another is the end node of a line.
The root node has no number and all of the useful SNMP values are found below just one of the three nodes beneath root. This is the iso node, which is numbered 1. There is only one node beneath iso, which is the org node and it is numbered 3. Beneath the org node is only one node, which is dod (6). There is only one node beneath dod, which is called internet and it is numbered 1. The next level has four nodes, but if you are working with a LAN, all of your meaningful data will appear under private, which is number 4. Below this, you will find only one node: enterprise (number 1).
The top part of the MIB tree means that all useful MIB OIDs start with .1.3.6.1.4.1. If you are a regular investigator of SNMP data, you will remember .1.3.6.1.4.1 like your bank card PIN.
There is one more factor that you need to know about the numbers in the OID. This relates to the manufacturer of the device that hosts the SNMP agent. The SNMP agent is pre-installed on all network devices. This courtesy has become an industry standard. So, before shipping each device, the producer installs firmware and a number of utilities, including the SNMP agent. This provides the manufacturer with an opportunity to mark its territory because the enterprise node can be followed by an identifier that denotes the supplier.
So, the industry has got together and assigned a number to each manufacturer. These are called Private Enterprise Numbers PENs) and the list is maintained by the Internet Assigned Numbers Authority (IANA). You can search the List of Private Enterprise Numbers at the IANA website.
So, if you are looking for data in a MIB from a switch created by Cisco Systems, the OIDs you will be looking at will all start with .1.3.6.1.4.1.9. For a device from APC, the OIDs with interesting information will all start with .1.3.6.1.4.1.318.
Using snmpwalk
The exact syntax for the snmpwalk command depends on the implementation that you are using. So, with the examples that you were advised to download above, the format of the command would be:
For Linux –
$ snmpwalk -v1 -c public 192.168.8.1
This uses SNMP v1 with the community string “public” and looks at the device with the IP address 192.168.8.1.
For Windows, that same query would be written as –
C:\Users\Laptop> snmpwalk -v:1 -r:192.168.8.1 -c:”public”
In that Windows version, you wouldn’t need to put in the -v:1 or -c:”public” parameters because these give the default values. So, if you missed those out, the command would use those values anyway.
Knowing that you are only going to get interesting information from a specific branch of the MIB tree, you can cut the scan short to skip directly to that part of the MIB.
On Linux, try:
$ snmpwalk -v1 -c public 192.168.8.1 .1.3.6.1.4.1.318
On Windows, you would type:
C:\Users\Laptop> snmpwalk -r:192.168.8.1 -os:.1.3.6.1.4.1.318
These two examples are for querying an APC device that has the IP address 192.168.8.1, so alter those numbers for your network.
Save Time with snmpwalk
The concept of snmpwalk seems complicated, but it isn’t in reality. The snmpwalk command is simply a shorthand way to use multiple GETNEXT requests without having to type lots of different commands. With one snmpwalk command, you can fire off lots of different GETNEXT and view your infrastructure health.
If you’re using the snmpwalk command then it’s important to remember to cut down the amount of information you receive as much as possible. Specifying a MIB will allow you to see specific information rather than data collected from an entire database of object IDs!
By drawing SNMP data from devices throughout your network this way, you can make sure that you don’t miss anything important happening on your network. After all the snmpwalk command is there to help you pull SNMP data from devices in your network as efficiently as possible.
An easier way to read an SNMP MIB
Command line steps through the MIB tree can be difficult to implement and if you are like most system administrators, you will soon start to build up your own scripts to automate the process. You will probably find that there is a limited number of fields that really interest you on a regular basis and you will get to know these OIDs pretty well. However, this is a lot of work that you could skip by just getting a pre-written tool. Such a utility is called a MIB browser.
An SNMP MIB browser is a tool that allows network administrators, security professionals, or systems integrators to interact with SNMP-enabled devices and explore their Management Information Bases (MIBs). It serves as a graphical or command-line interface to query, retrieve, and manipulate data from SNMP agents running on network devices (routers, switches, servers, etc.) by accessing MIB objects, which represent the device’s various parameters and statistics.
Our methodology for selecting MIB analyzers like snmpwalk
We reviewed the market for MIB analyzers like snmpwalk and assessed the options based on the following criteria:
- An interpreter for the OID structure of SNMP
- A tool that includes a visual layout of the OID tree
- A view that shows the OID value plus a description for each active node
- A display of whether an OID node has a value or not
- A graphical user interface that is easy to use
- A free trial for a no-risk assessment
- Value for money represented by useful functionality at a good price
You can get an SNMP MIB browser for free and we have two recommendations that are provided by two of the top system monitoring producers: ManageEngine and Paessler.
ManageEngine SNMP MIB Browser

The SNMP MIB Browser from ManageEngine is a visual snmpwalk tool that will run in Windows and Linux.
Key Features:
- MIB File Support and Loading: Supports loading custom MIB files to map OIDs to human-readable names.
- SNMP Get, Set, and Walk: Allows SNMP GET requests to retrieve device data, SNMP SET requests to modify device configurations, and SNMP.
WALK to retrieve entire branches of MIB data for comprehensive monitoring. - Bulk SNMP Operations: Facilitates bulk SNMP GET/SET operations, enabling users to retrieve or modify large sets of data quickly.
- Real-Time Monitoring: Enables real-time querying of SNMP agents to monitor device statistics.
- Trap Monitoring and Capture: Captures and displays SNMP traps, which are unsolicited alerts from devices that notify of critical events.
This is a great free alternative to the big network monitoring systems like PRTG if you just want to see the details in the MIB returned by a specific device. The MIB Browser can also query a series of devices and summarize their MIBs.
Pros:
- Support for SNMP Versions (v1, v2c, v3): Allows interaction with devices using all three major SNMP versions.
- Customizable Interface and OID Search: A customizable GUI with an OID search feature that helps users quickly locate and interact with specific SNMP objects.
- Multiple Platforms: Available for Windows, Linux, and macOS.
- Automated Reports: Supports automated report generation in various formats (HTML, PDF, CSV, XML).
- Email Alerts: Can be set up to notify a technician by email if specific events are detected.
Cons:
- Not a full network monitor: Upgrade to ManageEngine OpManager to get a complete monitoring system.
Download the free SNMP MIB Browser from ManageEngine.
PRTG MIB Agent

PRTG MIB Agent excels in its SNMP monitoring capabilities, allowing for comprehensive oversight of network devices through efficient SNMP polling. It supports SNMP walk, enabling users to retrieve large amounts of data from network devices, which is crucial for in-depth network analysis and troubleshooting.
Key Features:
- SNMP Monitoring: Monitors network devices using SNMP to ensure efficient performance.
- MIB Import: Allows easy import of MIB files to extend monitoring capabilities.
- Custom Alerts: Offers customizable alert settings for proactive issue resolution.
- Scalable Architecture: Supports a range of network sizes, from small businesses to large enterprises.
- Intuitive Interface: Features a user-friendly interface for easy setup and navigation.
With the ability to import custom MIB files, PRTG enhances its SNMP functionalities, ensuring it can monitor a wide range of devices and parameters. This makes it a versatile tool for network administrators aiming for detailed and proactive network management.
Pros:
- Comprehensive SNMP Support: Provides extensive SNMP monitoring for detailed network insights.
- Ease of Use: The intuitive interface makes configuration and operation straightforward.
- Customizable Alerts: Enables personalized alert settings to fit specific network requirements.
- Scalability: Suitable for various network sizes, accommodating growth and changes.
- MIB File Import: Easily extend monitoring by importing MIB files.
Cons:
- Complex Initial Setup: Initial configuration may be challenging for users without prior experience.
- Resource Intensive: Can be demanding on system resources, especially in larger networks.
- Learning Curve: Users might face a steep learning curve to fully utilize advanced features.
Download the free PRTG MIB browser from Paessler.
FAQs for snmpwalk
What is a MIB walk?
A MIB is the SNMP Management Information Base. This is created through a reference code structure with each item having sub-nodes that are identified by the parent ID plus an extension. So, the MIB has a tree structure. A MIB walk is the process of working through a received MIB report and checking every code defined in the SNMP standard to see if it has an associated value.
Are there any alternatives to SNMP?
SNMP is the only reporting standard that is universally implemented by network device manufacturers. There are some other reporting standards that some of the major device producers install as well. These include Netconf, which is available on Cisco devices – some other manufacturers install this as well. WMI is another option, but this is only available on devices that run Windows.
What is snmpwalk OID?
OID stands for “object identifier.” This is the code that identifies each node on the MIB tree. Therefore, a snmpwalk on OIDs is the same as a MIB walk.
How do you use SNMP GET command in Linux?
The snmpget command in Linux has a number of switches that modify the behavior of the utility. You can see these options by entering snmpget -h Here are the results that you will see:
-H display configuration file directives understood
-v 1|2c|3 specifies SNMP version to use
-V, –version display package version number
For example, you would type in snmpget -V to see the version number of your SNMP implementation
How can I tell if SNMP is running in Linux?
Issue any standard SNMP command at the command line to see if the SNMP service is running. For example, use the snmpget -v command.
How can I tell if SNMP is working in Windows?
To see if SNMP is running on a Windows computer:
- Go to the Start Menu, expand Windows Administrative Tools, and click on Services.
- Scroll down the displayed list of services to find the SNMP entry. Its Status should be Running if it is working.
See also: Best SNMP Monitoring Tools
In this article, we are going to discuss what is SNMP and how to install or enable and configure SNMP service in Windows 10. SNMP which stands for Simple Network Management Protocol is a standard internet protocol that is used to govern and manage communication amongst multiple networking devices connected over an IP. It enables organizations to monitor different networking devices including routers, workstations, modems, switches, servers, printers, etc. SNMP is already configured on most of the networking devices. And, once the protocol is enabled, device performance statistics are stored.

Let us now discuss the main component of SNMP.
Main Components of SNMP
Here are the key components of an SNMP-managed environment:
SNMP manager: It is the central system that manages and monitors the SNMP network. It is also known as Network Management Station (NMS) and runs on a host on the network. The SNMP manager basically queries the SNMP agent, obtains requests,
SNMP agent: It is a software process that gives the status and statistics of a network node when it receives an SNMP query. It is an important component in SNMP management that collects, stores, and transmits monitoring data to SNMP managers.
Managed Devices: These devices include all SNMP-enabled networking devices that you want to monitor, such as printers, routers, wireless devices, etc.
SNMP MIB: SNMP uses an extensible design with hierarchies defined as Management Information Base (MIB) that uses object identifiers (OIDs) network entity management. It is mainly defined as the format of information exchange in an SNMP management model. Each of the network servers has MIB files that are queried to collect monitoring data.
SNMP OID: OID aka Object Identifiers are organized in the MIB database in a tree structure where manageable features of all products are present.
SNMP Versions
There are basically three versions of SNMP that are:
- SNMPv1: The first version of SNMP protocol that is defined in RFC 1155 and 1157.
- SNMPv2c: This is the enhanced version and is defined in RFC 1901, RFC 1905, and RFC 1906.
- SNMPv3: The last version of SNMP as of now that also promotes remote configuration of SNMP entities. It is the most secure version as of yet and is defined in RFC 1905, RFC 1906, RFC 2571, RFC 2572, RFC 2574, and RFC 2575.
Basic SNMP Commands
Here are the main SNMP commands used in the network management model”
- GET: The SNMP manager sends GET requests to the managed devices to receive one or more values.
- GET NEXT: This command is used to retrieve the next OID value in the MIB tree
- GET BULK: This command is used to query and retrieve bulk data from a large MIB table.
- SET: To edit or add values of managed devices, this command is used by SNMP managers.
- TRAPS: Such command is started by an SNMP agent to send a signal to the SNMP manager when events occur.
- INFORM: Another command initiated by SNMP agent including a confirmation when SNMP manager receives the message.
- RESPONSE: This command carries back the values or signal of actions directed by the SNMP manager.
IT organizations can use dedicated SNMP monitoring software like PRTG Network Monitor or Spiceworks Network Monitor to manage and monitor networking devices and performance statistics. Here are some common uses of an SNMP monitoring tool:
- It is used to discover, manage, organize, and monitor network devices in an organization.
- It enables complete visibility of the performance of network devices.
- Analyze various statistics and information of connected network devices like connectivity, availability, performance, bandwidth, traffic, network usage graphs, and more.
- It allows to set up threshold limits for network usage.
- It lets you trigger alerts in case of exceptions or inconsistencies.
Now, let us check out how you can install and enable SNMP service and then configure it on Windows 10.
SNMP used to be a preinstalled feature in earlier versions of Windows. However, SNMP is now considered deprecated and is made an Optional Feature/ Feature on Demand (FOD) in Windows 10 version 1809 and later. Windows now recommend using Common Information Model (CIM) that is supported by Windows Remote Management.
In the latest Windows 10 builds, SNMP can be installed and enabled via the Settings app using the optional features option.
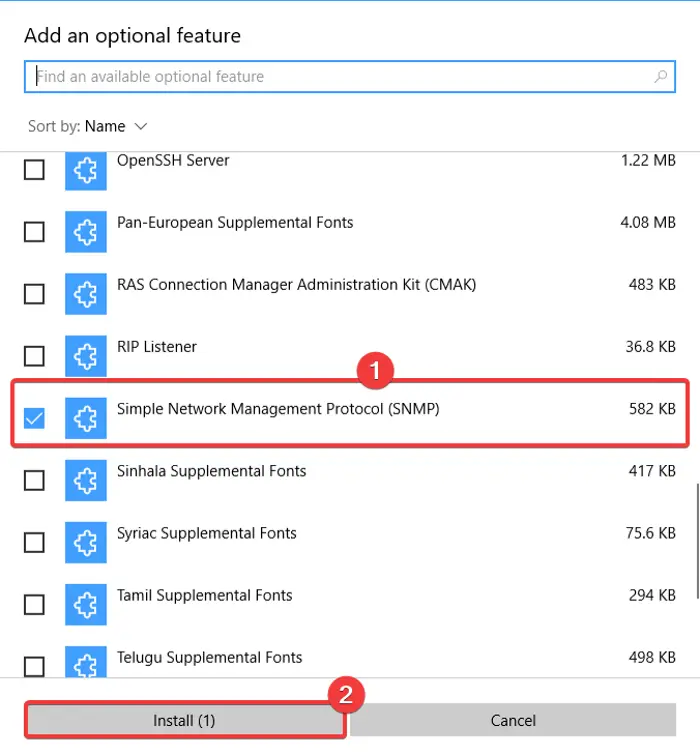
Here are the steps to enable and configure SNMP in Windows 10 using Settings:
- Click Windows + I hotkey to open the Settings App.
- Go to the Apps category and move to Apps & features tab.
- Tap on the Optional features button.
- On the new page, click on the Add a feature button.
- Scroll down to Simple Network Management Protocol (SNMP) and select it.
- Press the Install button to enable SNMP on your PC.
You can also use Control Panel to enable SNMP on your computer if you use an older Windows 10 build or even Windows 8.
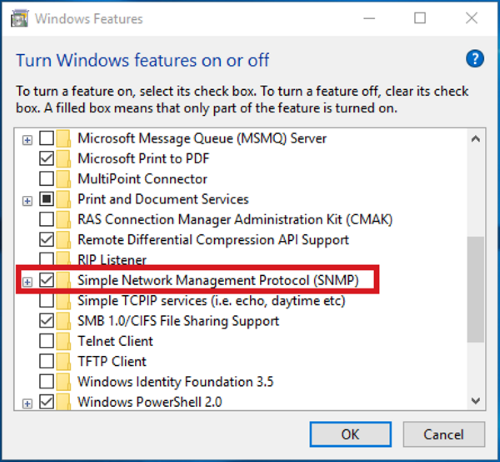
Simply use the following steps for that:
- Open Run using Windows + R and enter “control panel” in it and press Enter.
- Go to the Programs and Features and then click on the Turn Windows features on or off option.
- In the Windows Features list, select Simple Network Management Protocol (SNMP) and press OK to install it.
How to configure SNMP service in Windows 10
After installing, you need to configure the SNMP service in Windows 10. There are two main SNMP services that include:
- SNMP Service – main service to monitor and send information
- SNMP Trap – to receive trap messages from SNMP agents and forward them to SNMP management software.
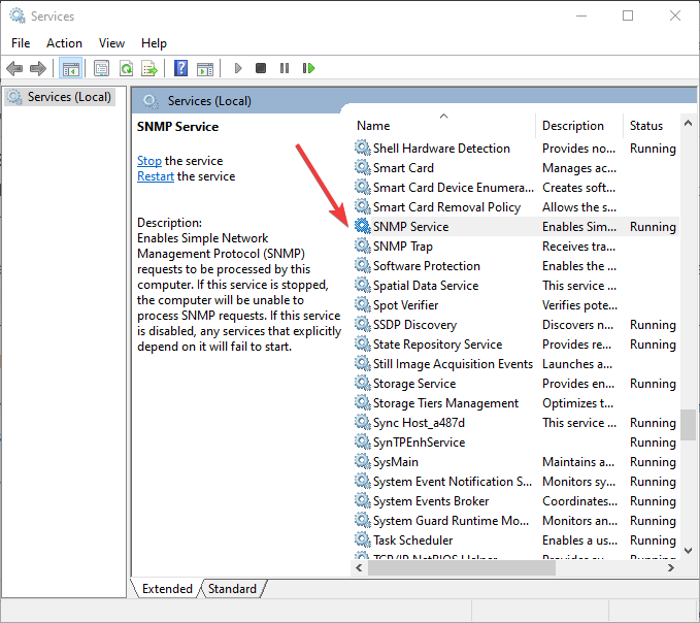
These services must be started automatically after SNMP installation. You can check and configure these from the Services Manager. Simply open the Services app by pressing Windows + R hotkey to evoke Run dialog and entering “services.msc” in it. In the Servies window, scroll down to the SNMP service in the list and see if it is running or not. If it is not running, simply click the Start button to start the SNMP service. Also, set its startup type to Automatic.
You can further set up various SNMP service properties including Agent, Security, etc. Just right-click on the SNMP service and select the Properties option.
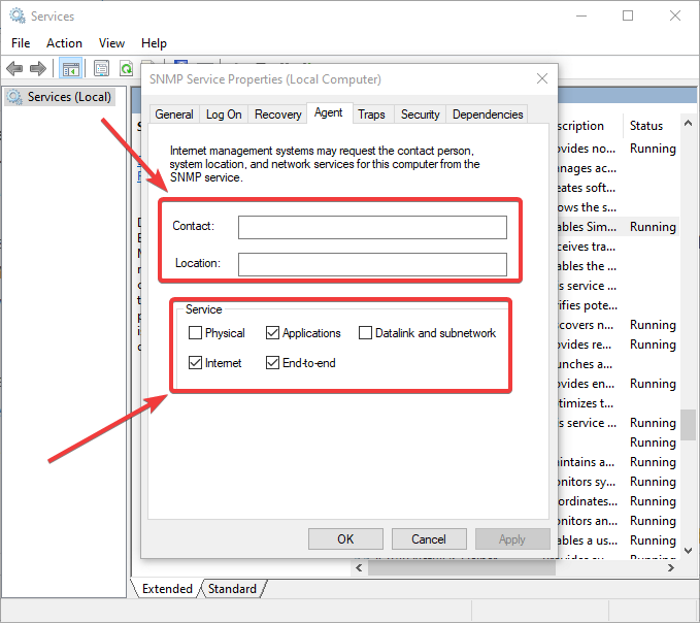
In the Properties window, go to the Agent tab where you can configure the SNMP agent information. You can add contact and location details to specify the user or administrator’s contact name and physical location of the computer. Furthermore, you can enable or disable five services from the list from which you receive monitoring data and send it to the monitoring device. These services include Physical, Applications, Datalink and subnetwork, Internet, and End-to-end.
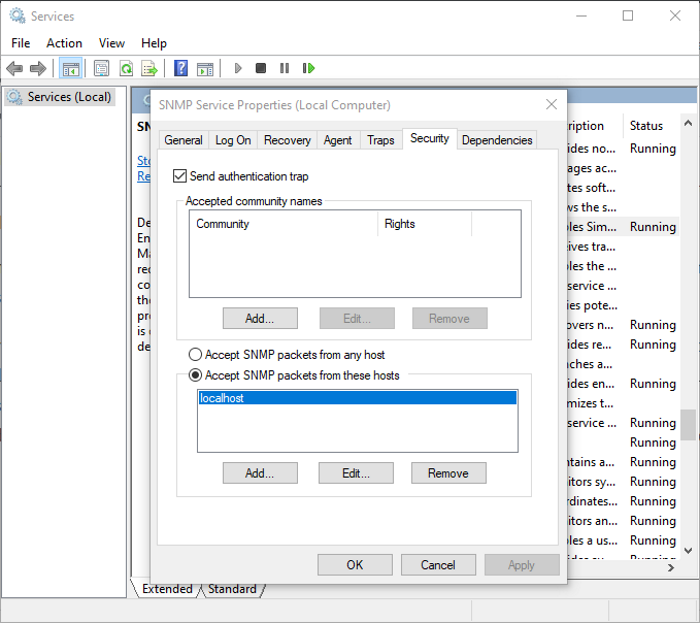
To configure some security-related settings for different SNMP servers, you can go to the Security tab in the Properties window. In the Accepted community names list, you can view and add SNMP hosts that are authenticated for sending SNMP requests. To add a community, click on the Add button and type the community name. You can provide None, Notify, READ ONLY, READ WRITE, or READ CREATE access to a particular community.
You can add a list of SNMP monitoring servers with IP addresses in the list of Accept SNMP packets from these hosts. This is to specify the servers from which SNMP packets are accepted. In case you enable Accept SNMP packets from any host option, no IP restrictions will be enforced on the SNMP agent to receive SNMP packets. This option is not safe and hence is not recommended on public computers.
IT admins can further configure some other settings related to SNMP and monitor all connected networking devices using SNMP management software and tools.
Hopefully, this article helped you learn about SNMP protocol and how you can enable and configure SNMP service in Windows 10.
Now read: Free Network and Internet Traffic Monitor Tools for Windows 11/10.