
Experiencing high CPU usage can significantly slow down your computer, making even simple tasks frustrating. Whether you’re running demanding software, multitasking with numerous applications, or playing high-performance games, consistently high CPU usage can lead to overheating, lag, and system instability. Fortunately, there are several ways to bring down CPU usage and optimize your PC for better performance.
From managing startup programs to tweaking system settings, we’ll help you troubleshoot high CPU usage issues and show you how to optimize your system for smooth, lag-free performance. Whether you’re using your Windows PC for gaming, video editing, or just using it for day-to-day tasks, these steps can help you reduce CPU utilization under control and ensure your computer runs efficiently.
If you’ve been wondering, “Why is my CPU usage so high?” or “How do I reduce CPU usage on my computer?” or Why it’s showing CPU 100% Usage? you’re not alone. 100 CPU Utilization is a common issue faced by many users, especially when their systems are running multiple applications or processes in the background. In this guide, we’ll provide a complete list of fixes and strategies that you can use to resolve high CPU usage on both Windows and Mac devices.
Table of Content
- How to Lower CPU Usage on Windows
- Method 1: Close Unnecessary Programs in Windows
- Method 2: Disable Startup Programs
- Method 3: Update Your Drivers in Windows
- Method 4: Scan for Malware in Windows
- Method 5: Adjust Power Settings in Windows
- Method 6: Clean Out Your Computer
- Troubleshooting Tips

Main Reasons for High CPU Usage
High CPU usage can be caused by a variety of factors, including:
- Resource-intensive applications: Some software programs, such as games, video editing software, or resource-heavy websites, can use a significant amount of CPU power.
- Too many open programs: Running multiple programs simultaneously can lead to high CPU usage, especially if they are demanding programs.
- Outdated software: Outdated software can be inefficient and may cause high CPU usage.
- Malware or viruses: Malware can infect your computer and use up CPU resources.
- Hardware issues: A failing hard drive or overheating CPU can also cause high CPU usage.
How to Lower CPU Usage on Windows
High CPU usage on Windows can significantly degrade your system’s performance, leading to slowdowns, freezes, and overall sluggishness. This issue can stem from various factors, including resource-intensive applications, background processes, system processes, or even hardware limitations.
Method 1: Close Unnecessary Programs in Windows
One of the most direct ways to reduce CPU usage is to close applications that are not actively in use. Many programs, especially those running in the background, can consume significant CPU resources. By closing these programs, you can free up processing power and improve your system’s overall performance..
Step 1: Open Task Manager
- Shortcut: Press Ctrl + Shift + Esc or Ctrl + Alt + Del to open the Task Manager.
- Manual: Right-click on the Taskbar and select «Task Manager» or search for it in the Start menu.
Note: When you open the Task Manager, its pre-default showing Processes of Windows
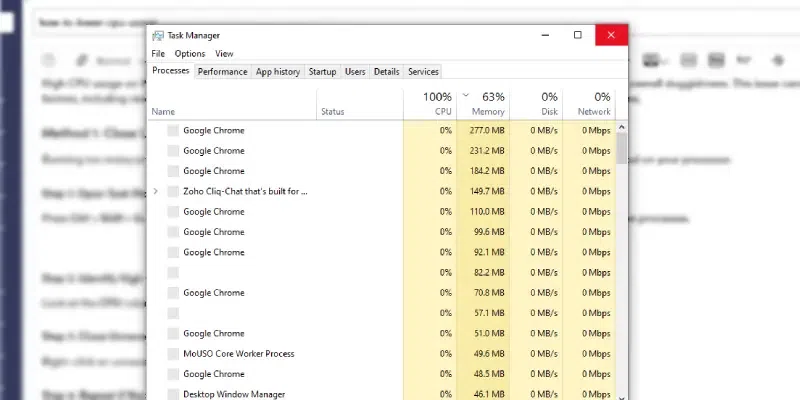
Step 2: Identify Resource-Intensive Programs
- In the Task Manager, switch to the «Processes» tab.
- Sort the processes by CPU usage to identify the top resource consumers.
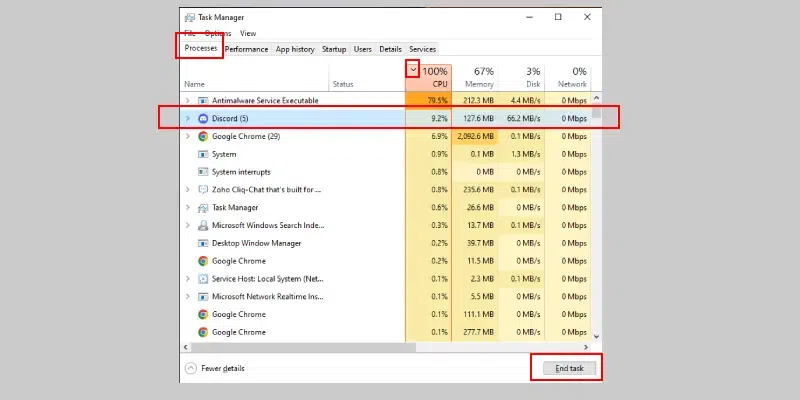
Step 3: Close Unnecessary Programs
- Right-click on the process you want to close and select «End task.»
- Be cautious when closing system processes, as this can lead to system instability.
Note: You can also directly End Task by Clicking the «End Task» button given in bottom right corner of the task manager.
Method 2: Disable Startup Programs
Many programs are configured to start automatically when your computer boots up. While some of these programs may be essential, others can significantly impact your system’s startup time and overall performance. By disabling unnecessary startup programs, you can reduce the initial load on your CPU and improve system responsiveness.
Step 1: Open Task Manager
- Shortcut: Press Ctrl + Shift + Esc or Ctrl + Alt + Del
- Manual: Right-click on the Taskbar and select «Task Manager» or search for it in the Start menu.
Step 2: Switch to the Startup Tab and Disable Unwanted Program
- Click on the «Startup» tab.
- Right-click on the program you want to disable and select «Disable.»
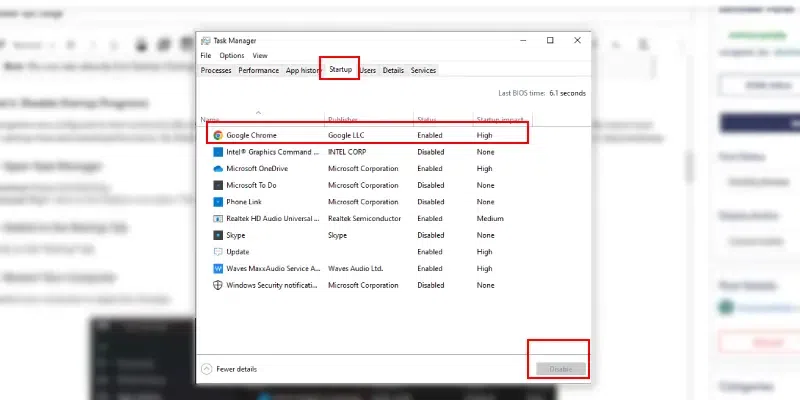
Note: By taking the help of Step 1 you can easily go to startup programms, then by RIght-clicking you can Disable it.
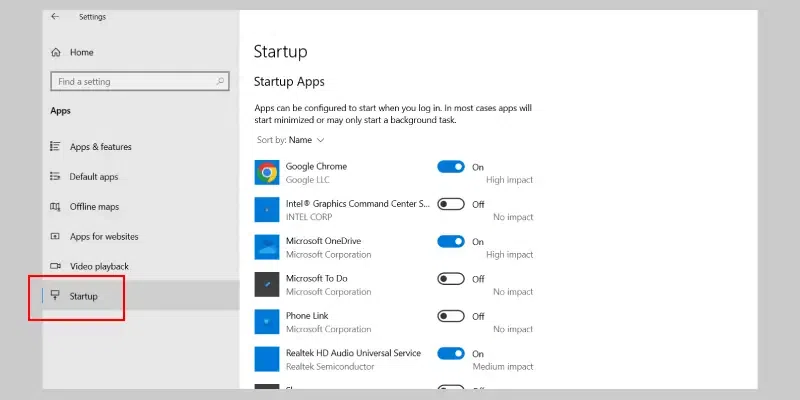
Alternate Method: Using Settings App (Windows 10/11)
Step 1: Open Settings and Click on Apps
- Press the Windows key + I or simply click on windows button and select settings.
- Click on «Apps.»
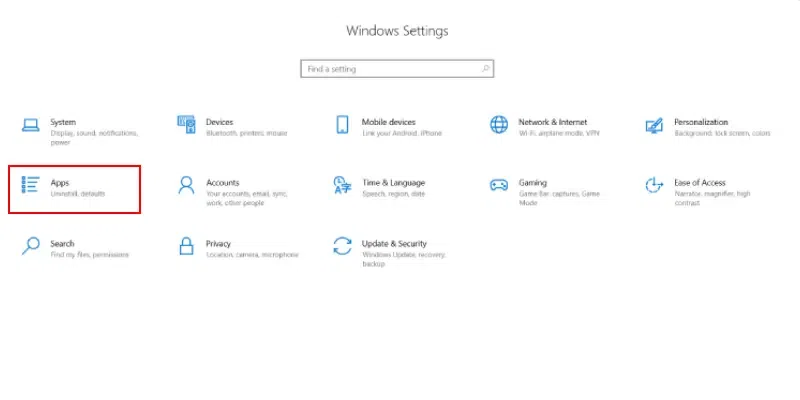
Step 2: Select Startup and Disable Unnecessary Programs
- Click on «Startup.»
- Toggle the switch to «Off» for the programs you want to disable.
Additional Tips:
- Be Cautious: Avoid disabling critical system programs, as this can lead to system instability.
- Review Startup Impact: Task Manager often shows the startup impact of each program. This can help you prioritize which programs to disable.
Method 3: Update Your Drivers in Windows
Outdated or corrupted device drivers can lead to various performance issues, including high CPU usage. Device drivers are software programs that allow your computer’s operating system to communicate with hardware devices like graphics cards, sound cards, and network adapters. Keeping your drivers up-to-date ensures optimal performance and compatibility.
In the below steps we will learn how to update windows «Using Windows Update» feature.
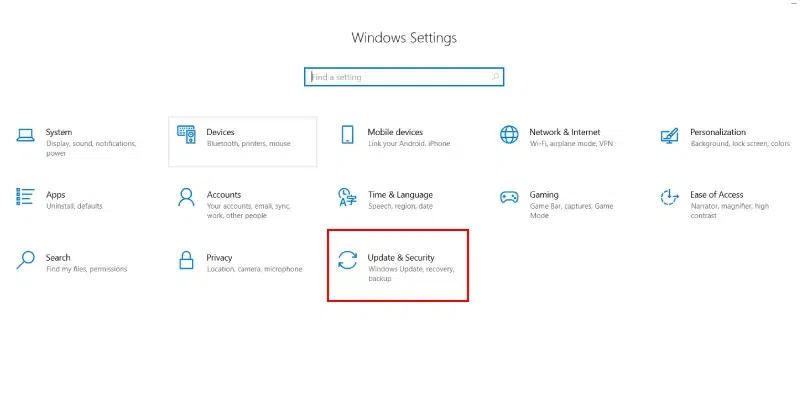
Step 1: Open Settings > Update & Security
- Press the Windows key + I.
- Click on «Update & Security.»
Step 2: Check for Updates
- Click on «Check for updates.»

Step 3: Install Updates
Windows Update will automatically download and install any available driver updates.
Note: Make sure to Restart the Computer to Successfully Install the Windows update.
Alternate Method: Another way is to Update Windows Drivers is by Using Device Manager
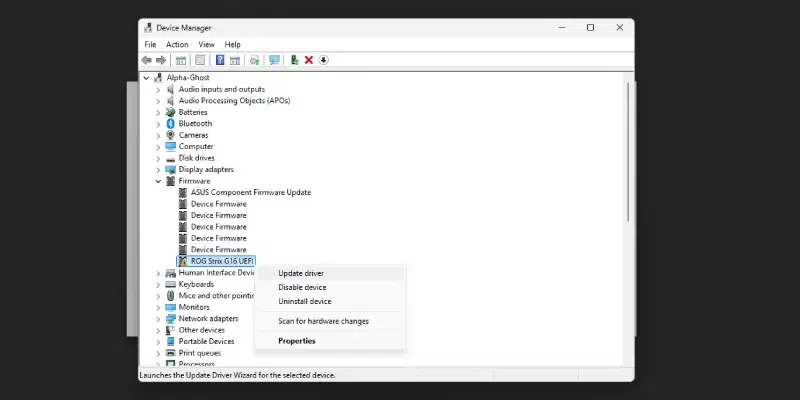
Step 1: Open Device Manager
- Press the Windows key + X and select «Device Manager.»

Step 2: Select Driver and Update
- Expand categories like «Display adapters,» «Sound, video, and game controllers,» and «Network adapters.»
- Right-click on a device and select «Update driver.»
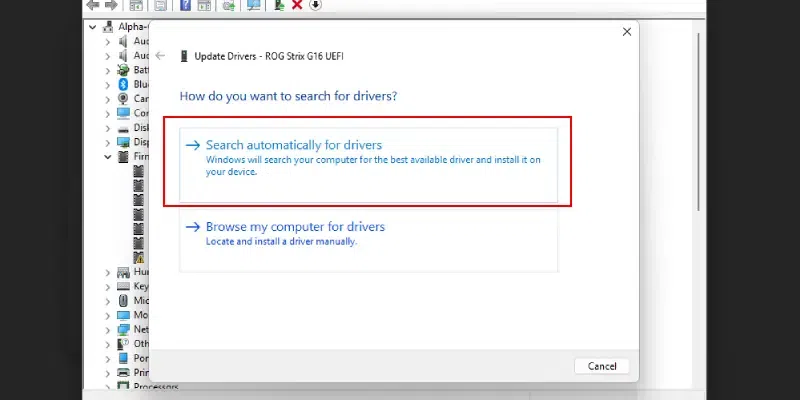
- Choose «Search automatically for drivers» to let Windows search for the latest drivers.
Step 3: Choose Update Option
Now you will be asked to choose the update type, here we have choosen Search Automatically for Drivers, this is the easiest way to update your driver or you can also browse from your computer if you have the driver file saved.
Additional Tips:
- Check Manufacturer’s Website: Sometimes, the latest drivers may not be available through Windows Update. You can check the manufacturer’s website for the latest drivers for your specific hardware.
- Use Driver Update Software: Third-party driver update software can automate the process of finding and installing driver updates. However, use reputable software to avoid potential security risks.
- Be Cautious with Third-Party Drivers: While third-party drivers can sometimes offer additional features or performance improvements, they can also cause stability issues. Only install third-party drivers from trusted sources.
Method 4: Scan for Malware in Windows
Malware, such as viruses, worms, and spyware, can consume significant CPU resources as they run in the background, performing malicious activities. These malicious programs can slow down your system, cause crashes, and even compromise your personal information.
Step 1: Open Windows Security
- Windows 10: Search for «Windows Security» in the Start menu and open it.
- Windows 11: Search for «Windows Security» in the Start menu and open it.
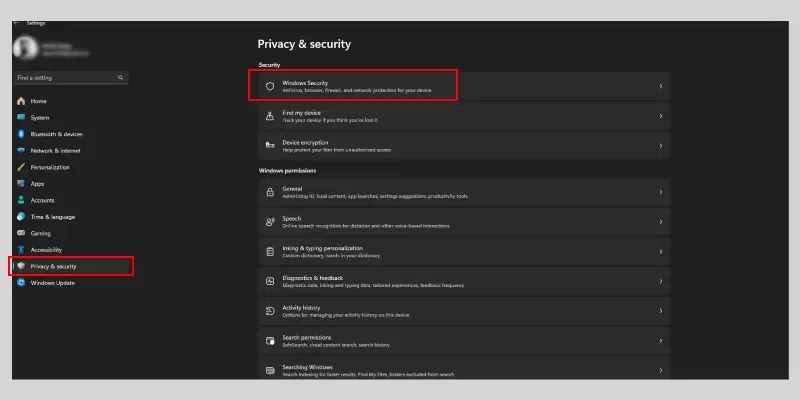
Another Way: You can also go to settings and then search for Privacy & Security and then select Windows Security in both Windows 10 and Windows 11.
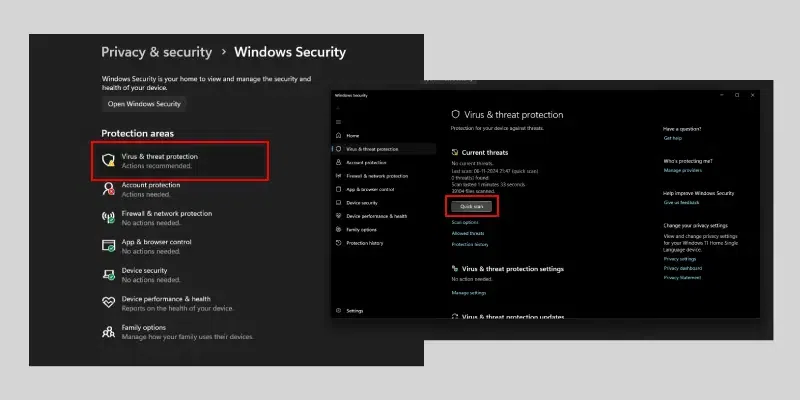
Step 2: Select Virus & Threat Protection and Run a Quick Scan
- Click on «Virus & threat protection.»
- Under «Current threats,» click on «Quick scan.»
- Wait for the scan to complete.
Optional: Run a Full Scan (for a more thorough check)
- In the same «Virus & threat protection» window, click on «Scan options.»
- Select «Full scan» and click «Scan now.»
- This might take longer, but it will scan your entire system.
Additional Tips:
- Keep Your Antivirus Updated: Ensure your antivirus software and its definitions are up-to-date.
- Be Cautious with Downloads: Avoid downloading files from untrusted sources.
- Use a Firewall: A firewall can help protect your system from unauthorized network access.
- Be Wary of Phishing Emails: Don’t click on suspicious links or open attachments from unknown senders.
Method 5: Adjust Power Settings in Windows
Your computer’s power settings can significantly impact CPU usage. Here’s how to adjust them on Windows 10 and 11
For Windows 10:
Step 1: Open Control Panel
Search for «Control Panel» in the Start menu and open it.
Step 2: Go to Power Options
Click on «Hardware and Sound,» then «Power Options.»
Step 3: Choose a Power Plan
Select a power plan that suits your needs:
- Balanced: A good balance between performance and power saving.
- Power saver: Prioritizes battery life over performance.
- High performance: Prioritizes performance over battery life.
Customize Power Plan Settings (Optional):
- Click on «Change plan settings» next to your selected plan.
- Adjust settings like screen brightness, sleep timeout, and power button action.
For Windows 11:
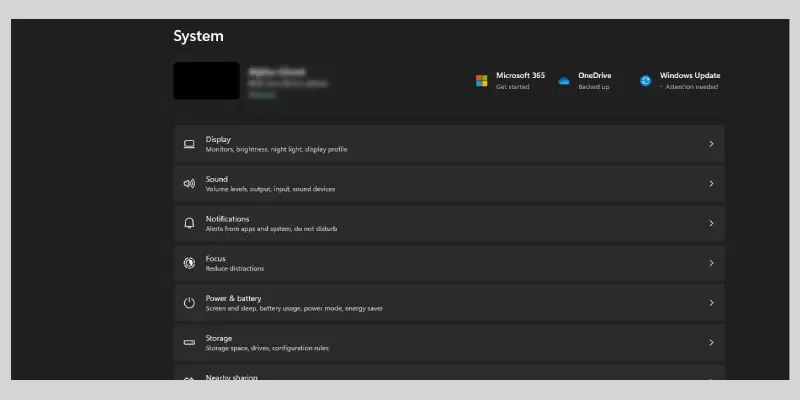
Step 1: Open Settings and Go to Systems
- Press the Windows key + I.
- Click on «System.»
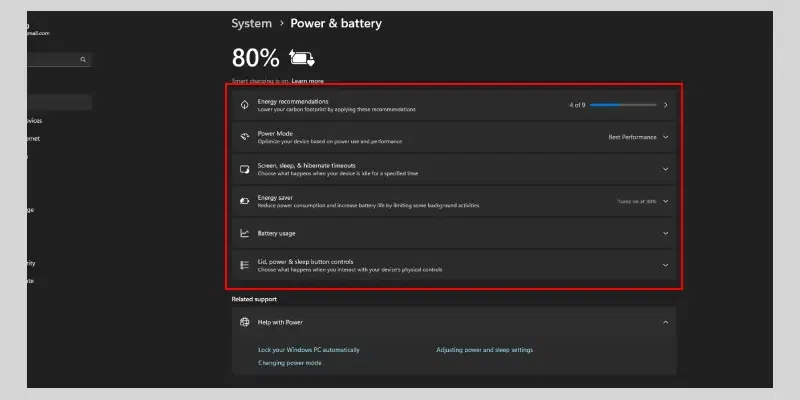
Step 2: Select Power & battery
Click on «Power & battery.»
Step 3: Choose a Power Plan
Select a power plan that suits your needs:
- Balanced: A good balance between performance and power saving.
- Power saver: Prioritizes battery life over performance.
- High performance: Prioritizes performance over battery life.
Customize Power Plan Settings (Optional):
- Click on «Additional power settings» to access advanced power settings.
- Adjust settings like screen brightness, sleep timeout, and power button action.
Method 6: Clean Out Your Computer
Dust and debris inside your computer can cause it to overheat, leading to higher CPU usage as the system tries to cool down. A clean computer can run more efficiently, including lower CPU usage. Here’s how to clean your hardware:
Step 1: Clean the Interior
- Turn off and unplug your device: Ensure it’s completely powered off.
- Open the case carefully: Follow your device’s specific instructions to open it.
- Remove dust: Use compressed air to gently blow dust out of fans, heat sinks, and other components.
- Clean fans: If necessary, use a soft brush to clean fan blades.
- Check for obstructions: Ensure there are no obstructions blocking airflow.

Step 2: Clean the Exterior
- Power off and unplug your device.
- Wipe the exterior: Use a soft, lint-free cloth dampened with a gentle cleaning solution to wipe the screen, keyboard, and mouse.
- Clean the keyboard: Use compressed air to remove debris from the keyboard keys. For stubborn dirt, use a soft-bristled brush or a cleaning gel.
- Clean the mouse: Wipe the mouse with a damp cloth. For optical mice, clean the sensor lens with a soft cloth.
Additional Tips:
- Regular Cleaning: Clean your computer regularly to prevent dust buildup.
- Avoid Extreme Temperatures: Keep your computer away from heat sources and ensure proper ventilation.
- Use a Cooling Pad: A cooling pad can help reduce CPU temperature, especially for laptops.
Troubleshooting Tips
If you’ve tried the above steps and your CPU usage is still high, consider these additional tips:
- Check for system updates: Make sure your operating system is up-to-date.
- Check for system overload: Ensure that no heavy applications like video editors or games are running unless necessary.
- Reset your PC: As a last resort, you can reset your PC to its factory settings to resolve persistent issues.
Conclusion
Lowering CPU usage is very important for maintaining a smooth and fast computing experience. By following these simple methods, such as closing unnecessary programs, updating drivers, and scanning for malware, you can reduce the load on your processor. If these steps don’t work, you may need to check for hardware issues or consult with a professional. Keep your system clean, updated, and free from unnecessary processes to ensure optimal performance.
There are times when one or more processes start taking 100% CPU usage in Windows 10. This may lead to a slow system. One solution to this issue is to limit CPU usage for specific applications in Windows 10. We will discuss these in this article.
Table of Contents
Adjust program affinity
We can also customize each process within Windows 10 to utilize only specific CPU cores while leaving the others for the other processes to execute simultaneously. This can be used to optimize CPU utilization, but only if handled carefully.
Note that customizing process affinity is not always useful. Before messing around with them, you need to consider whether you have CPU cores that are mostly idle, or are you running an application which executes independent threads?
In a situation where one thread needs to be executed before the other, process affinity can be set for both to utilize the same core. However, software having independent threads can be split across multiple cores to increase its performance.
Another consideration to make is whether the threads are cache-intensive. Meaning, do they all rely on extensive cached data? If they do, then the execution of each thread is very much dependent on the availability of the cached data. Hence, it would be better to run each thread on a separate core to maximize cached data resources.
- Launch the Task Manager and go to the Details tab.
- Look for the process you wish to modify the affinity, and right-click it. Click on Set affinity in the Context Menu.
- From the Process affinity window, you can select the cores you wish the process to limit to, and uncheck the boxes next to the rest. By default, all processes utilize all cores.
As my computer only had 4 cores, it is displaying them as CPU 0, 1, 2, and 3.
But how will you know what cores are available? This can be checked through the Task Manager’s graphical representation of CPU resources.
Open the Task Manager and go to the Performance tab.
Click on CPU in the left pane, and then right-click the real-time graph on the right side. Expand Change graph to and select Logical processors.

The Task Manager will now display graphs for utilization of each core individually, which can be used to identify the less-used cores and assign them to specific threads.

Limit overall CPU utilization
Too many threads and processes often take up the processing cores within the CPU. Over-performance of the CPU can also be a cause for it to overheat, especially in an old and dusty environment.
To check how much CPU is being consumed at any given time, head over to the Task Manager.
Launch the Task Manager by right-clicking the Taskbar, and click Task Manager.
Switch to the Performance tab.
This tab gives a graphical as well as percentage representation of how much each compartment is being used up, including the CPU, memory, network, and disk. From here, you can determine whether the CPU is being overused.

Anything over 90% can be considered dangerous for the CPU and the hardware.
If you think that it is too much for the computer to take, you can set a cap on CPU utilization through the Settings, which essentially means that it will not allow CPU utilization above that threshold. This will not resolve system slowness but will address CPU overheating and indirectly affect its performance.
- Navigate to the following location:
Control Panel -> Hardware & Sound -> Power options -> Change plan settings -> Change advanced power settings - In the Power Options window, expand Processor power management, and then expand Maximum processor state.
- Now click on On battery and set the maximum threshold value for CPU utilization. Do the same for Plugged in to allow different maximum CPU utilization percentages for when the computer is running on battery (in case of laptops) and when it is running on direct power.

- Click on Apply and Ok when done.

You will now notice that the CPU utilization percentage will not go over the set value in Task Manager.
Useful tasks for further CPU optimization
End/Kill all non-essential applications, processes, and files
Any applications or services running in the background which are not required also take up space in the CPU while the user is performing time-critical tasks. This often causes delays in the tasks on high priority.
Let’s see how we can eliminate the unimportant tasks and processes.
End process utilizing maximum CPU
Processes such as system scans and antiviruses often take up a significant portion of the CPU when searching through the entire computer. They make performing other tasks simultaneously almost impossible.
The perfect solution to this would be to schedule such applications to run scans at times other than the active hours. However, if the process has already been executed, it can be eliminated through the Task Manager.
- Open Task Manager (Ctrl + Shift + Esc)
- Under the Processes tab, click on the CPU bar to arrange the tasks in descending order. This means the processes taking maximum CPU percentage would come on top.
- From there, right-click on any task you do not need at the moment and click on End task.


This will free up space in the CPU for other important tasks.
Automatically adjust your Windows for maximum performance
Windows 10 comes with a built-in feature to disable all non-essential visual features instantaneously. This can be used to switch off all animations, window shadows, etc. Although small, these features take up some space in the CPU.
- Navigate to the following:
Start Menu -> Settings -> System -> About -> Advanced system settings - In the System Properties window, under the Advanced tab, click on Settings under Performance.

- In the Performance Options window, under the Visual Effects tab, select Adjust for best performance. Then click on Apply and Ok.

You may now notice that windows change instantaneously when switching between them, and no animations take place.
Disable auto-starting applications
Often there are some applications that start and popup as soon as you turn your computer on. Such applications significantly slow down the system boot-up process as they try to run during the start-up process and hold back other critical threads.
You can disable these applications from automatically starting, and can run them later if required.
Run the Task Manager and switch to the Startup tab.
You can see the applications that support automatic startup, and their current status in this tab. Click the applications that you want to disable and then click Disable at the bottom of the window.

Any non-essential application will now make room for other more-important processes to execute and utilize the processor.
Delete Pagefile
This step is not so much for the CPU, but rather for optimizing the system in general.
PageFiles are instantly-accessible cache files stored on the hard drive. Processes that execute on the RAM can now execute in the hard drive, saving time as well as RAM resources. These are dynamic files that can expand up to the size of the RAM itself. You can configure these to delete themselves from the hard drive each time you restart or shut down your computer.
Configuring these to auto-delete will make room for new files on the hard drive, and the old processes won’t execute anymore.
Since the process involves making changes to the System Registries, it is recommended to create a system restore point.
- Open the Registry Editor by typing in regedit in Run.
- Navigate to the following in the left pane:
HKEY_Local_Machine -> System -> CurrentControlSet -> Control -> Session Manager -> Memory Management - In the right pane, double-click ClearPageFileAtShutdown and set the Value Data to 1.

- Click Ok and then restart the computer for the changes to take effect.

Perform a general service of the hardware
Starting small, ensure that your computer’s hardware is clean. A buildup of dust and debris can cause improper air circulation through the hardware, which is important for it to function properly. It is true that the load on the CPU and other hardware causes the system to respond slowly, but so does the dust on the fans and heat sinks.
Dust is also sometimes the primary reason why systems often shut down completely without warning.
How have you used these tips to customize your operating system?
Многие пользователи Windows сталкиваются с тем, что процессор ПК или ноутбука постоянно нагружается до 100% — это может происходить в простое, при определённых действиях, в играх и других ситуациях.
В этом материале подробно о том, как выяснить, чем вызвано то, что процессор загружен на 100% в Windows 11 и 10 и вариантах действий. На близкую тему: Что делать, если диск нагружен на 100% в Windows.
Определение процесса, который нагружает процессор
Независимо от конкретной ситуации, нагрузка процессора вызывает выполнение какого-либо процесса Windows и первая задача, чтобы выяснить причины и пути к их устранению — определить этот процесс. Подойти к этому можно по-разному:
- Использовать стандартный диспетчер задач Windows 11/10, запустить который можно с помощью комбинации клавиш Ctrl+Shift+Esc или в контекстном меню кнопки пуск. В нём вы можете отсортировать процессы по столбцу «ЦП», нажав по его заголовку.

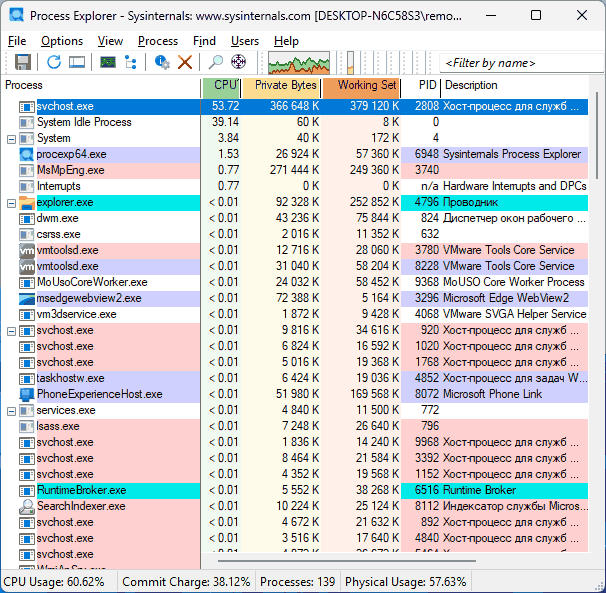
- Используя альтернативные диспетчеры задач, в частности — Process Explorer, скачать который можно с официального сайта, а запускать следует от имени администратора. Это предпочтительный вариант, поскольку для ряда процессов, часто вызывающих высокую нагрузку, он позволяет получить дополнительную информация, которая не представлена в стандартном диспетчере задач: например, дважды нажав по процессу svchost мы можем увидеть информацию о параметрах командной строки, с которыми он был запущен и определить конкретную службу, вызывающую нагрузку.


Выяснив имя процесса, который грузит процессор на 100% можно приступать к тем или иным действиям, в зависимости от конкретной ситуации и закономерностей появления нагрузки: постоянная, в периоды простоя, в определённых играх и программах.
Возможные итоги этого этапа:
- Нагрузка на процессор пропадает сразу при открытии диспетчера задач и возобновляется, стоит его закрыть — с большой вероятностью, на компьютере есть что-то вредоносное. Рекомендую выполнить проверку с помощью KVRT, Kaspersky Rescue Disk, Miner Search
- Нагрузка вызвана системным процессом Windows.
- Нагрузка исходит от процесса какой-либо сторонней программы.
Решение проблемы с высокой нагрузкой на процессор
В случае, если нагрузка вызвана каким-либо системным процессом Windows 11/10, следует разобраться, за что он отвечает и найти решения конкретно для этого процесса. Наиболее частые системные процессы, вызывающие высокую нагрузку и решения для них:
- svchost.exe
- WmiPrvSE.exe (WMI Provider Host)
- Служба узла SysMain
- MsMpEng.exe
- System
- TiWorker.exe (Windows Module Installer Worker)
- Системные прерывания
- Wsappx
- Csrss.exe
- Sihost.exe (Shell Infrastructure Host)
Если процесс, с которым возникла проблема, не представлен в списке, попробуйте выполнить поиск по этому сайту или в Интернете — с большой вероятностью описание задач процесса и решений высокой нагрузки с его стороны найдётся.
Несколько примечаний, касающихся системных процессов:
- Нагрузка на процессор в Windows 11/10 со стороны системных процессов может возрастать после некоторого периода простоя и исчезать через короткое время после начала использования компьютера. Связано это с функциями автоматического обслуживания системы, которое запускается в периоды простоя.
- Одна из самых частых причин повышенной нагрузки при штатном функционировании системы — фоновая установка обновлений Windows, что также можно увидеть, если зайти в «Центр обновлений» в «Параметрах». Такого рода нагрузка пропадёт по завершении их установки.
В ситуации, когда речь идёт о каком-то стороннем процессе (либо вы не знаете, что это за процесс), достаточно выполнить поиск в Интернете по его имени и, в зависимости от ситуации и конкретного процесса принять соответствующие решения, например:
- Удалить ПО, если необходимости в его использовании нет.
- Убрать соответствующую программу или стороннюю службу из автозагрузки, если она не нужна.
- Попробовать выполнить переустановку, обновление программы, вызывающей проблемы.
Как итог, универсальное решение 100-процентной нагрузки на процессор нет — всё зависит от конкретных обстоятельств и процесса, приводящего к нагрузке. Если вы не можете разобраться самостоятельно, опишите эти обстоятельства в комментариях, и я постараюсь подсказать решение.
Некоторые дополнительные нюансы и подходы к решению рассмотренной проблемы:
- Кратковременный всплеск нагрузки на процессор до 100% при открытии диспетчера задач — нормальное явление, затем она автоматически падает до приемлемых значений (при этом для «Бездействие системы» будет отображаться высокая «нагрузка», которая по факту является свободными ресурсами, а не нагрузкой). При отсутствии иных проблем и признаков повышенной нагрузки что-либо делать не следует.
- Высокая нагрузка на процессор в современных играх, в «тяжёлых» программах может быть нормальным явлением, повлиять на которое не всегда возможно, либо только изменением настроек самой игры или ПО.
- Если вы наблюдаете 100% нагруженный процессор при включении ПК или ноутбука (после «Завершения работы»), но она пропадает если использовать опцию «Перезагрузка» в меню завершения работы, попробуйте отключить быстрый запуск Windows.
- Если на компьютере установлены сторонний антивирус, проверьте, решает ли проблему его удаление с последующей перезагрузкой (при необходимости его можно установить повторно в дальнейшем). Некоторые пользователи устанавливают несколько антивирусов одновременно — это почти всегда приводит к проблемам, схожим с тем, которые изучаются в статье.
- В случае, если вы меняли настройки схемы электропитания, включали режим энергосбережения на вашем компьютере или выполняли другие аналогичные действия, проверьте, изменится ли ситуация, если вернуть соответствующие параметры в исходное состояние: включить схему электропитания с максимальной производительностью (или «Сбалансированная»), отключить энергосбережение, проверить выбранный режим питания в Параметры — Система — Питание и батарея.
- Проверьте, решает ли проблему чистая загрузка Windows — при её использовании в системе отключаются все сторонние службы и элементы автозагрузки. Если это решило проблему, останется выяснить, какой из этих элементов приводит к повышенной нагрузке.
- Аппаратные проблемы, связанные с питанием, могут приводить к тем же симптомам. Речь идёт о выходящем из строя блоке питания, не выдающего необходимые напряжения и мощность, использовании неоригинального зарядного устройства ноутбука.
- В некоторых случаях неисправность периферии и каких-либо внутренних компонентов компьютера (например, дисков) или проблемы с их подключением также вызывают «зависания» с высокой нагрузкой на процессор.
Надеюсь, что-то из предложенного поможет устранить 100-процентную нагрузку на процессор, либо определить, что в вашем случае она является результатом обычной работы системы и программного обеспечения.
Отличные новости для пользователей со слабыми компьютерами — энтузиаст выпустил в релиз утилиту ShiftDown, которая меняет приоритет для определённых процессов в случае, если нагрузка на процессор слишком высокая, тем самым разгружая его. Стоит отметить, что речь идёт о программе с открытым исходным кодом, которая работает как на Windows 10, так и на Windows 11. Изначально разработчик создал данную утилиту для компьютера с процессором Intel Core i5 третьего поколения после того, как у него возникли проблемы с производительностью системы — они возникли в связи с патчами, направляющими уязвимости Meltdown и Spectre.
Разработчик заявил, что его компьютер заметно тормозил, когда процессор находился под повышенной нагрузкой, и снижение приоритета определённых процессов позволяет решить эту проблему. Собственно, софт ShiftDown оценивает текущие состояние системы, а когда нагрузка на процессор превышает 25%, утилита меняет приоритет для процессов с самой высокой нагрузкой на IDLE, тем самым снижая общую загрузку системы. Автор софта при этом заявляет, что утилита с механизмом распределения приоритетов не должна снижать общую производительность компьютера, но улучшит состояние системы в ситуациях с высокой нагрузкой на процессор.
В ситуации, когда работа программы прерывается, система автоматически восстанавливает исходный приоритет для всех процессов. Единственная проблема данного решения в том, что установка утилиты ShiftDown не так проста, как хотелось бы, ведь софт устанавливается как служба в Windows, и это необходимо делать в ручном режиме (для установки требуется Microsoft .NET Framework 4.7).
Процесс установки:
- загрузите последнюю версию ShiftDown с GitHub и поместите в корень диска C;
- запустите командную строку от имени администратора;
- выполните команду sc.exe create ShiftDown binpath=»С:\shiftdown.exe» start=auto;
- выполните команду sc.exe start ShiftDown для запуска новой службы.
После выполнения вышеуказанных действий ShiftDown будет настроена для активации с запуском системы в автоматическом режиме — она будет обрабатывать процессы и менять приоритеты для снижения нагрузки на процессор.