Легко получайте доступ ко всем необходимым приложениям и пользуйтесь возможностями многозадачности с помощью таких инструментов, как макеты закрепления с новым, более интуитивным интерфейсом.
Snap Layout — одна из интереснейших функций Windows 11. Когда вы открываете несколько окон с приложениями, Windows 11 позволяет вам организовать их все на экране используя макеты прикрепления, которые изменят размер окон и расположат их в определенном порядке. Таким образом вы получаете больше свободного места на экране, чтобы максимально использовать возможности многозадачности.
Для тех, кто хочет ближе познакомится с функцией автоматического изменения размера и расположения окон на экране Windows 11, здесь мы рассмотрим различные способы достижения этой цели.
Автоматическое изменение размера и расположение окон на экране Windows 11 с помощью макетов
Режим многозадачности Snap layouts Windows 11 — это набор предопределенных шаблонов (макеты прикрепления), которые упорядочивают окна открытых приложений на экране на основе шаблона. Вы увидите функцию сразу же, как только наведете указатель мыши на кнопку «Развернуть» (Увеличение окна).
Кроме того, выбранный вами макет расположение окон можно свернуть на панель задач или развернуть как группу.
Макеты Snap Assist в Windows11
В настоящее время существует шесть типов макетов, с помощью которых вы можете группировать окна на экране:
- Макет 50:50 два окна одинакового размера
- Макет 80:20 включает в себя главное и второстепенное окно экрана
- Равномерный макет с тремя столбцами, требуется экран ноутбука / компьютера, совместимый с HD с разрешением 1080p (1920 × 1080).
- Макет для трех окон 50:25:25
- Макет 25:25:25:25 удобен для многозадачности с четырьмя открытыми окнами.
- Трех колоночный неравномерный макет 20:60:20.
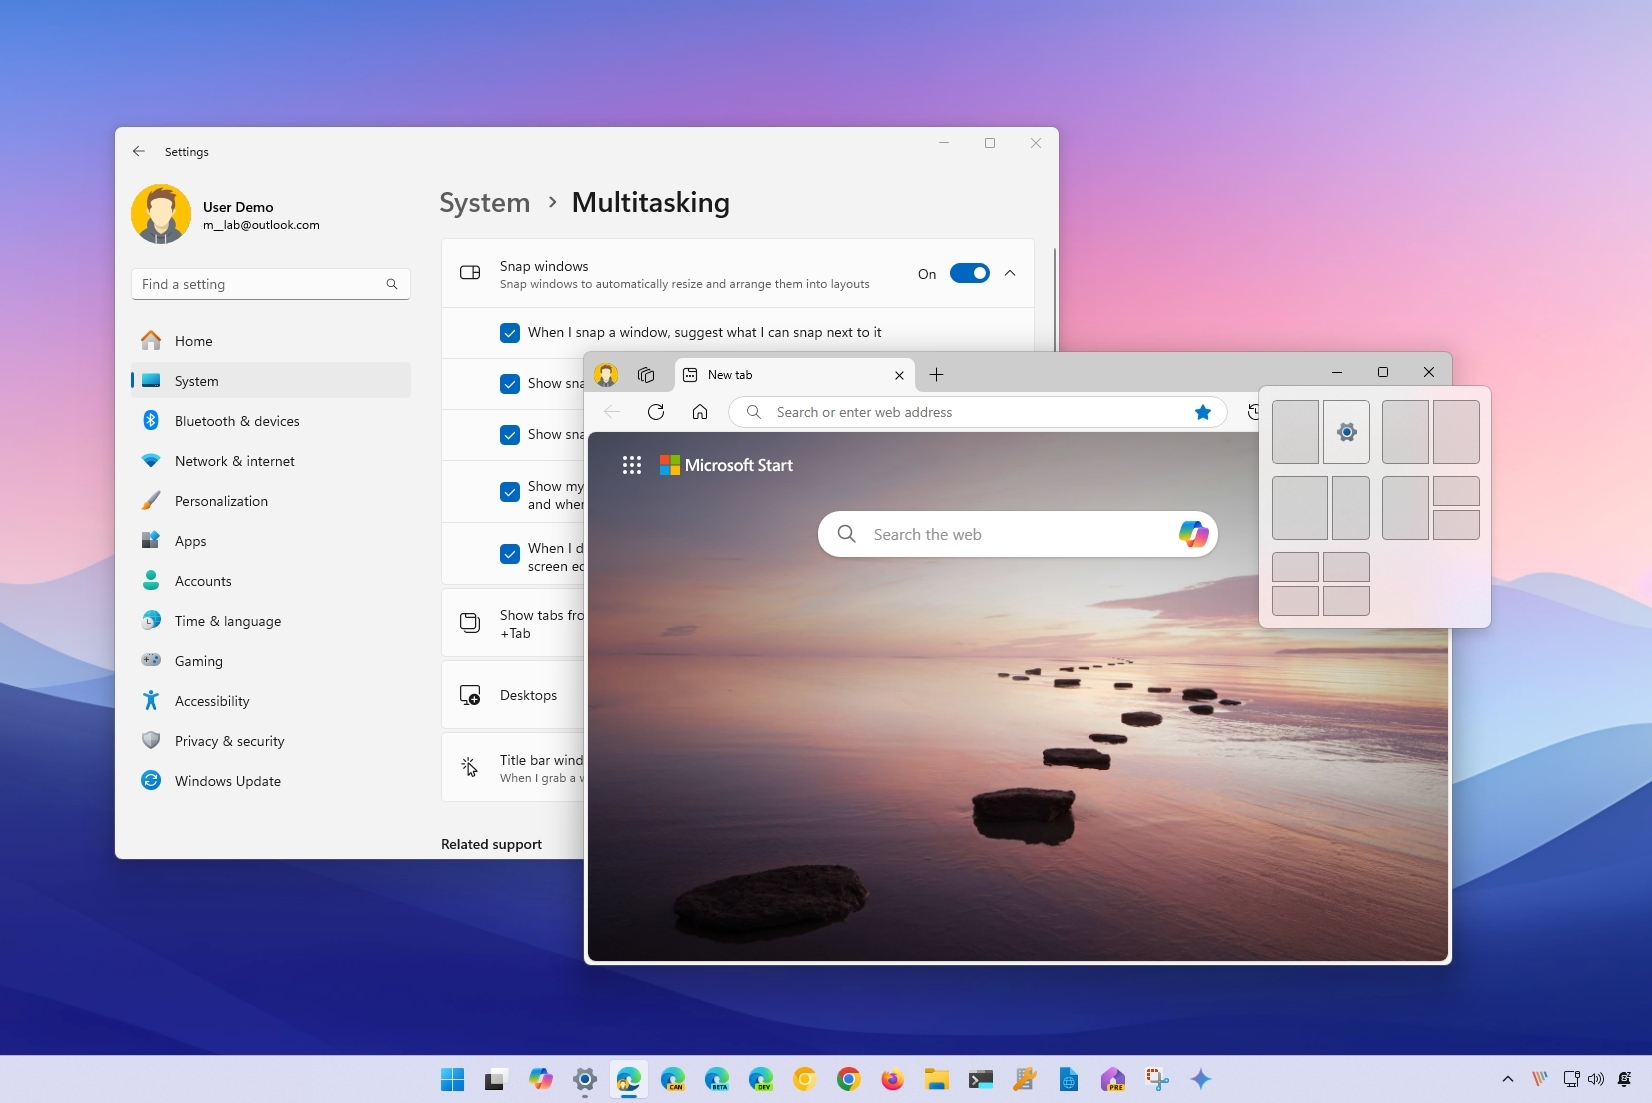
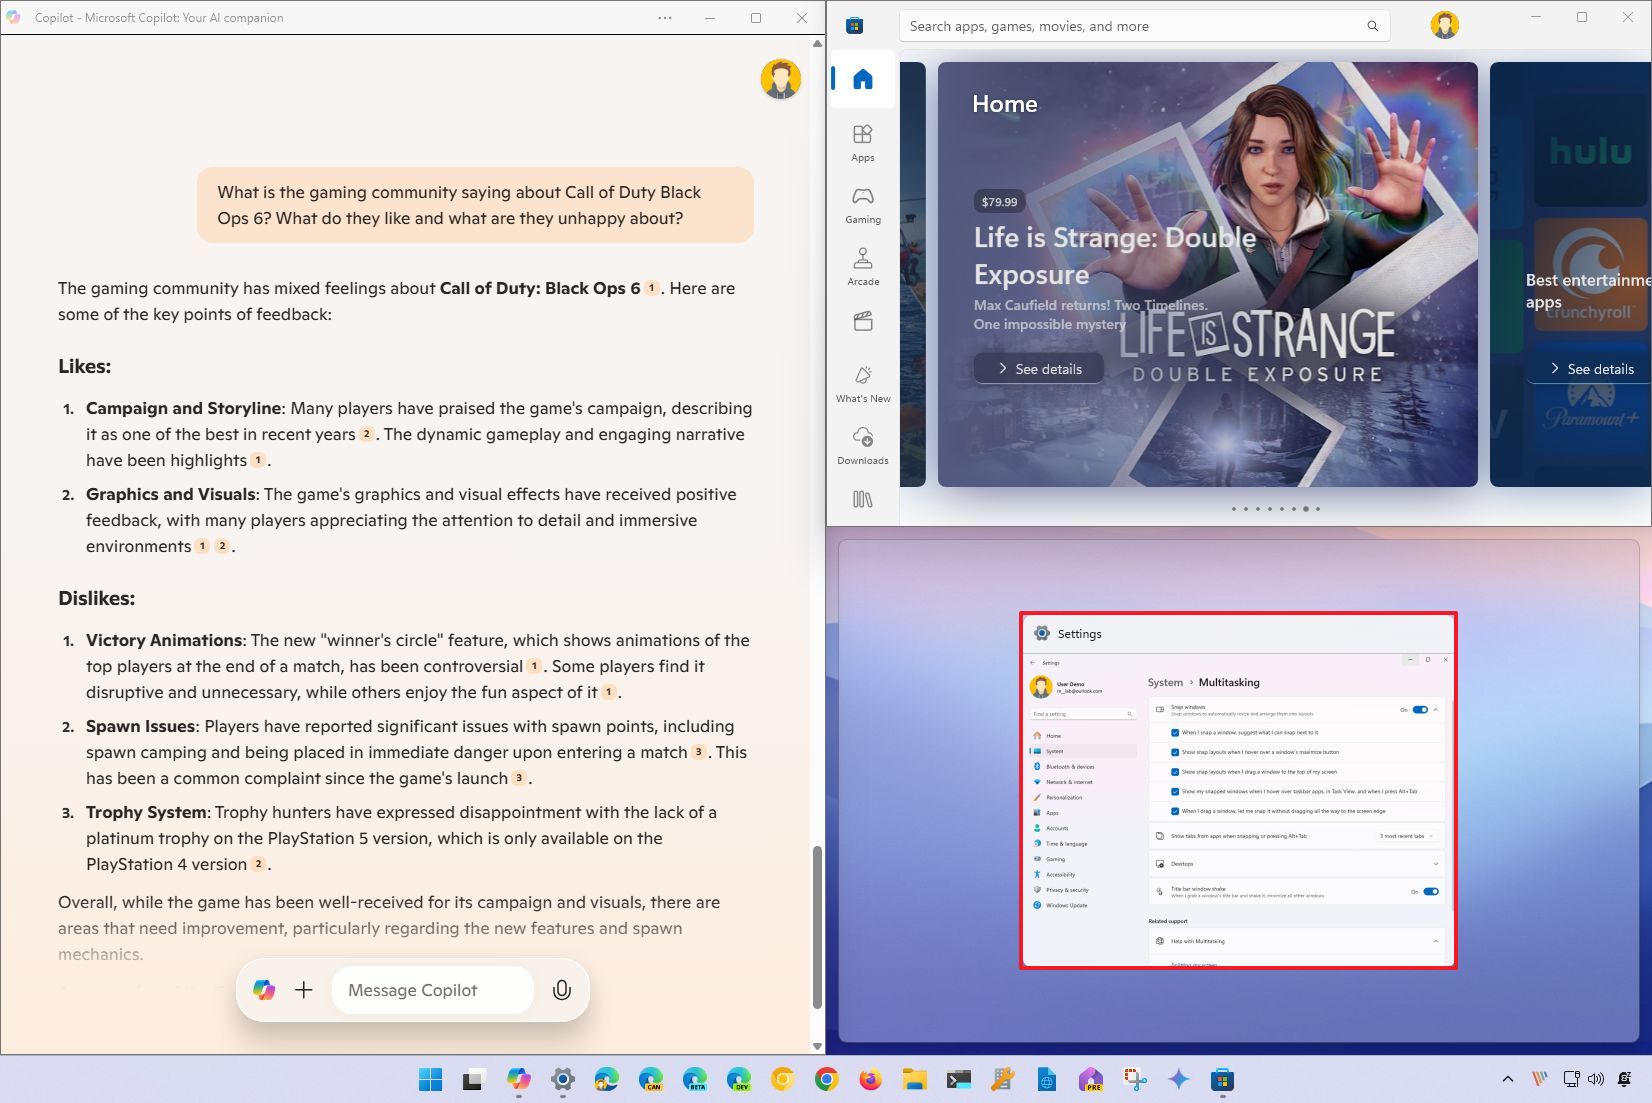
В приложении «Параметры» Windows 11 есть страница настроек «Многозадачность», на которой вы можете настроить, что поведение ОС при привязке двух или более окон.
Как использовать Snap Layout в Windows 11
Функция Windows 11 Snap Layout, проста и интуитивно понятна. Есть три способа добиться привязки окон в Windows 11: с помощью мыши, сочетаний клавиш и Snap Assist.
-
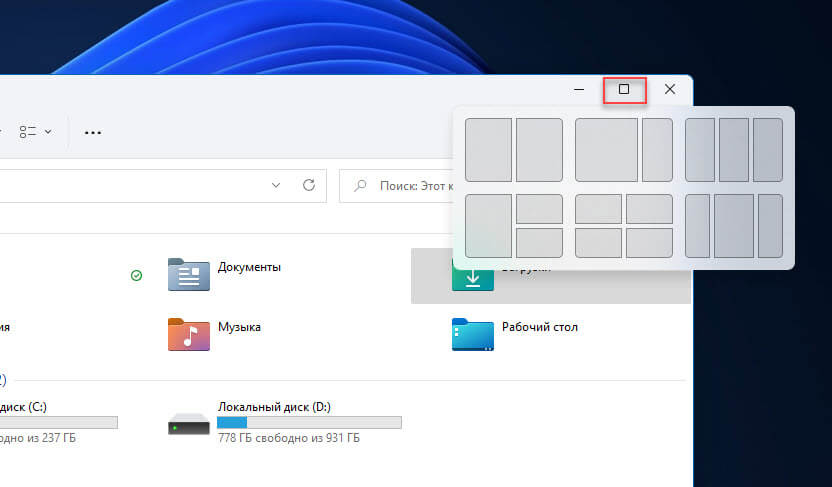
С помощью макетов при наведении указателя мыши на кнопку увеличения окна
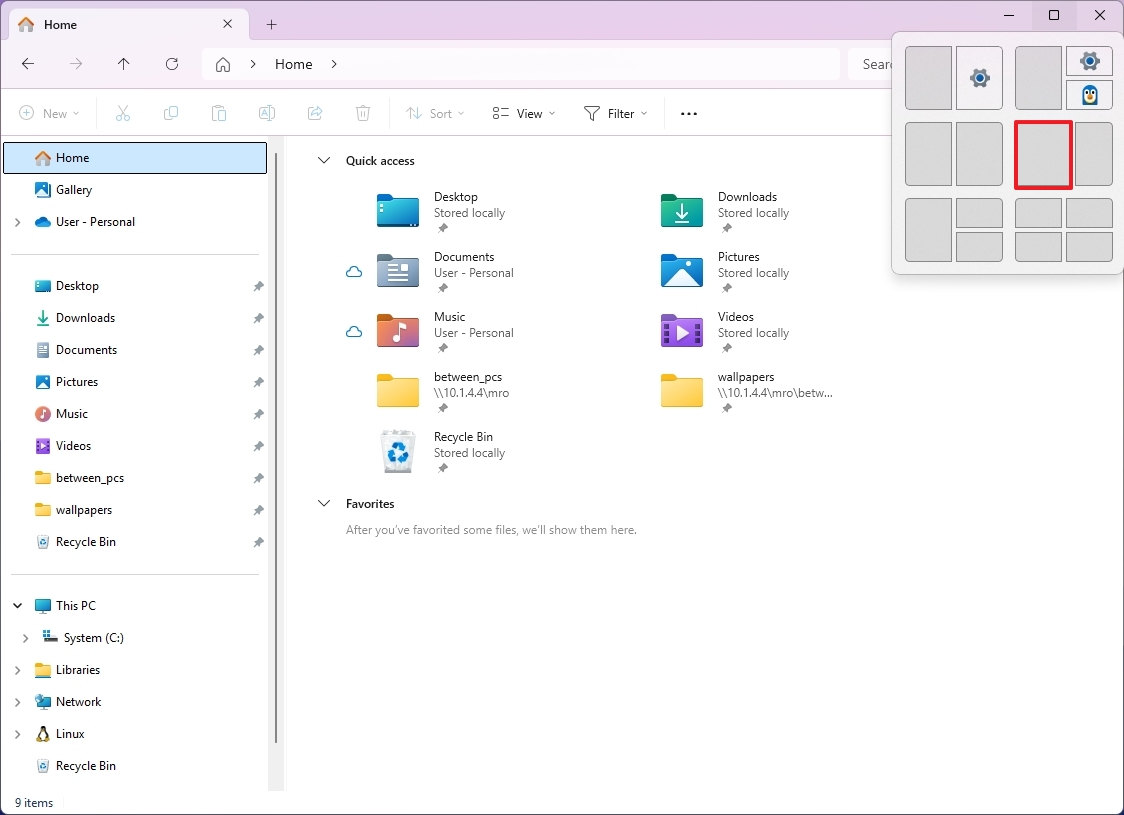
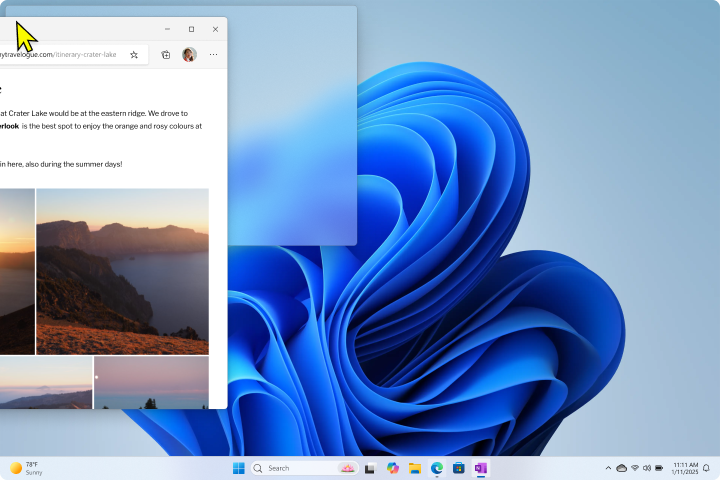
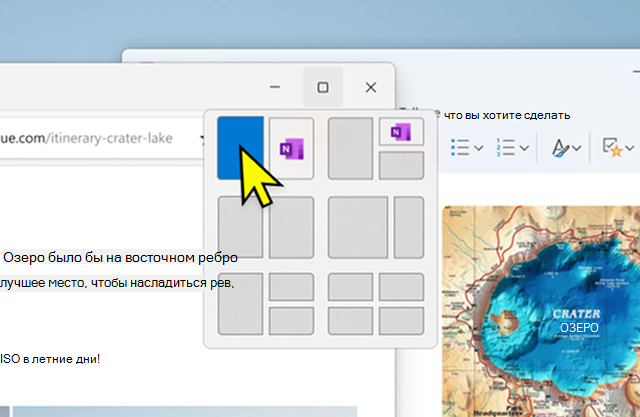
Просто наведите указатель мыши на кнопку развертывания окна, чтобы увидеть доступные макеты привязки, затем выберите нужный макет, чтобы привязать окно в нужной части экрана. Вы также можете вызвать всплывающее окно макетов привязки с помощью сочетания клавиш WIN Z.
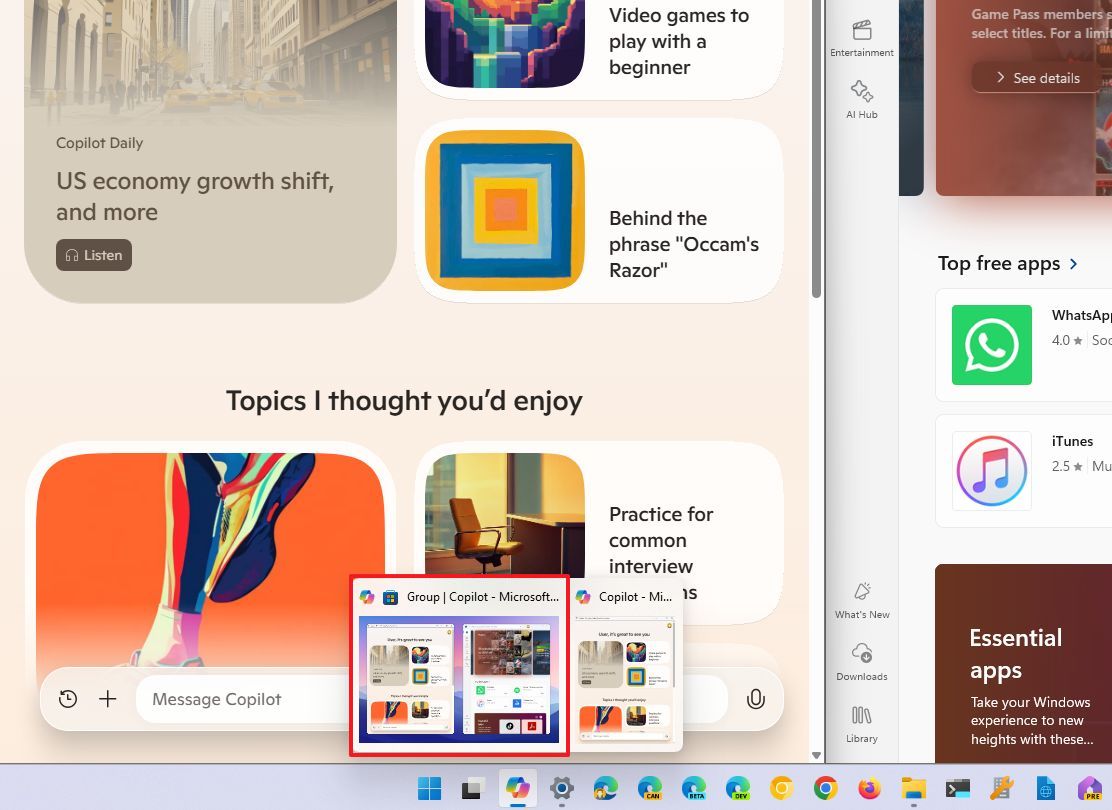
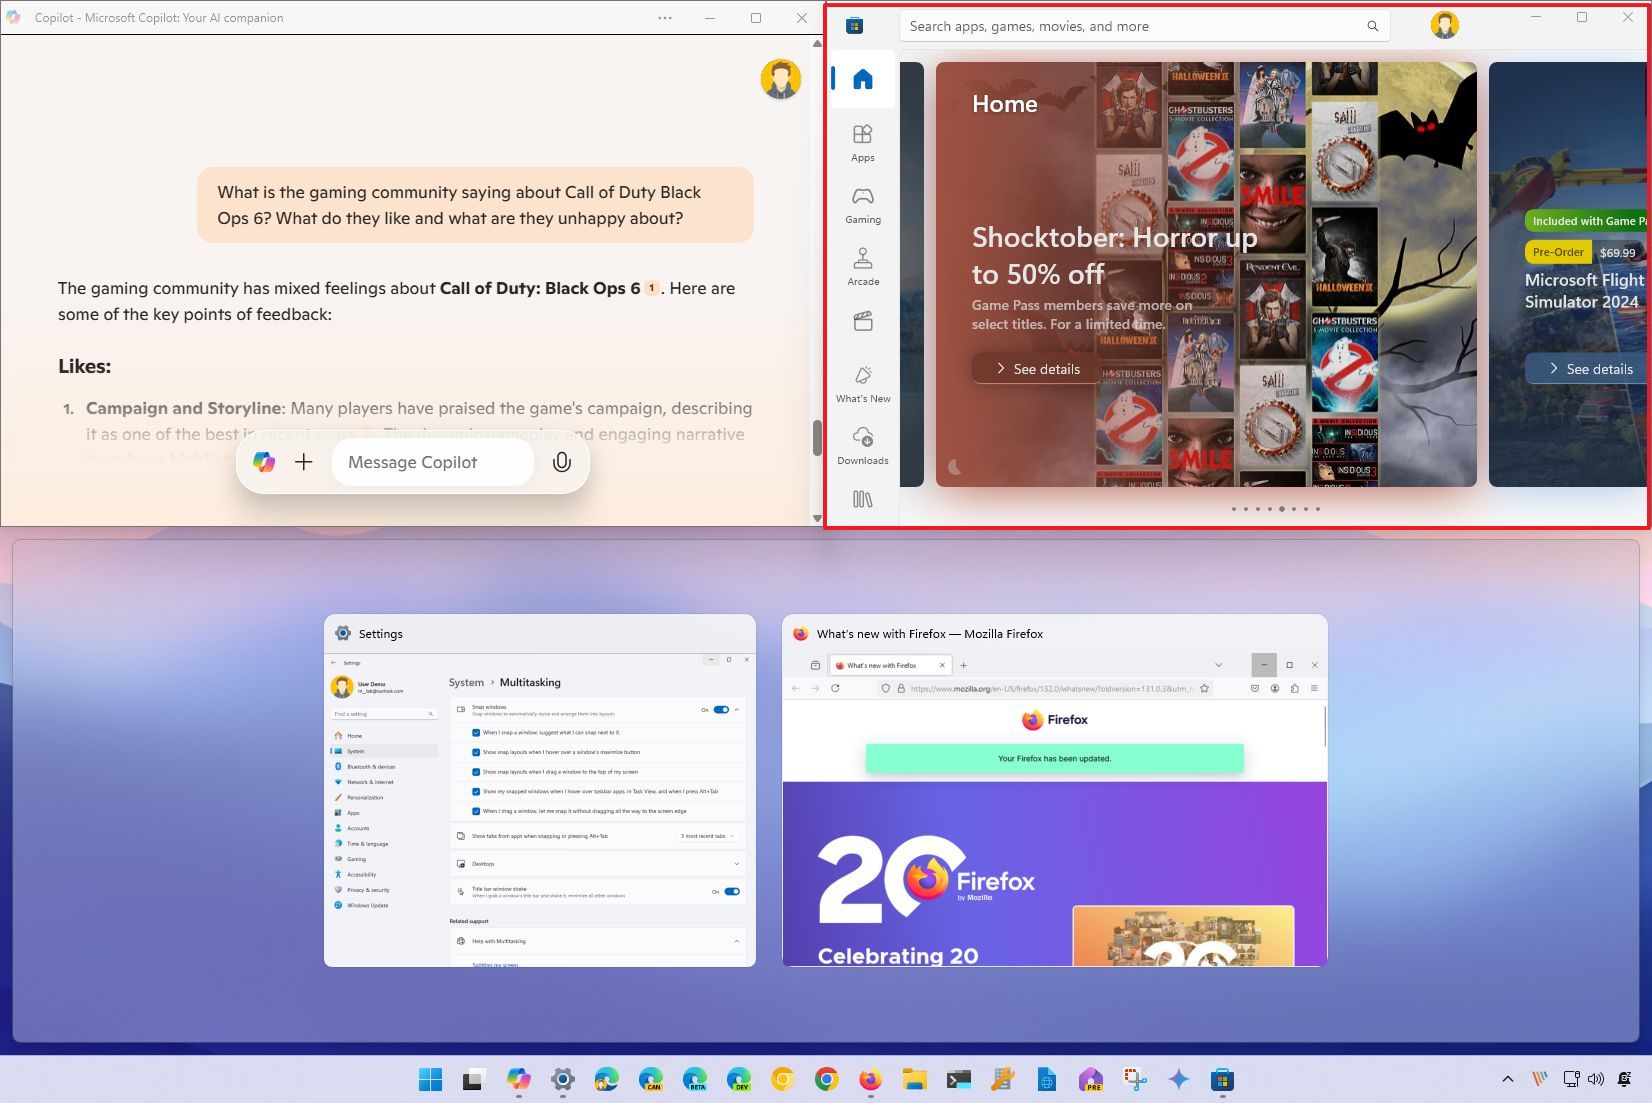
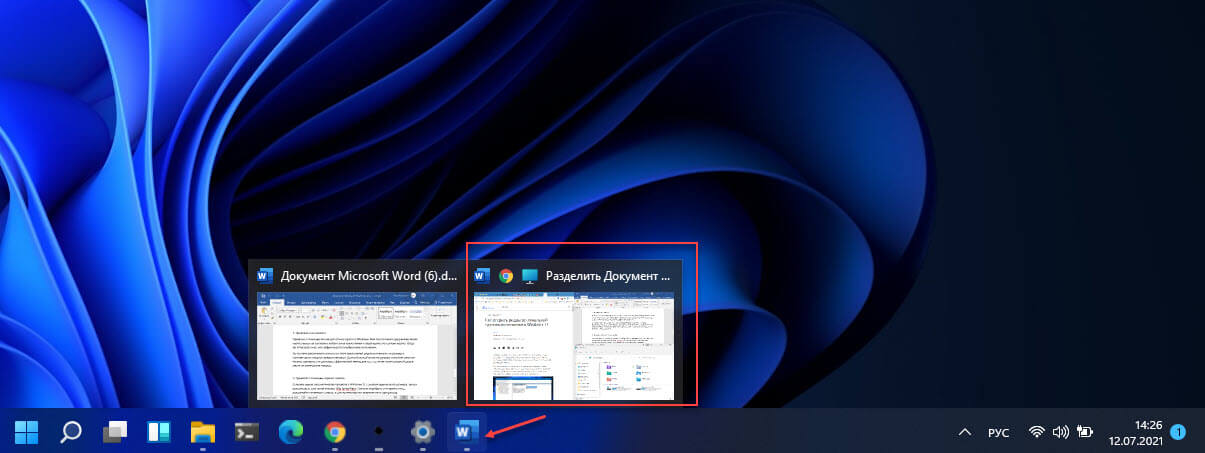
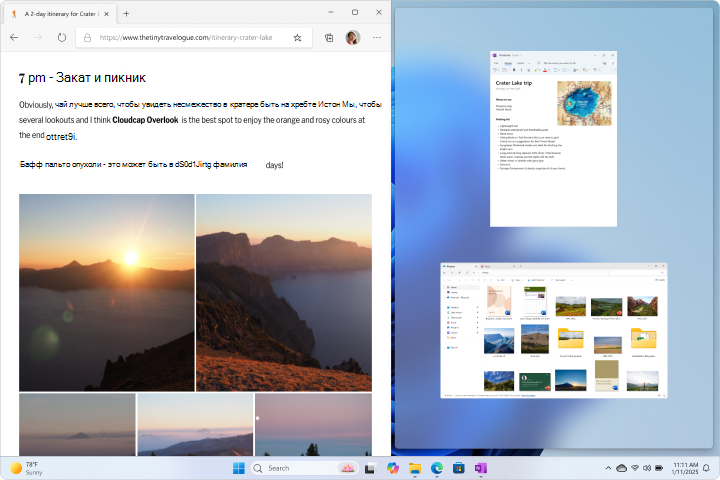
Группы привязки: Прикрепите как минимум 2 окна приложений на экране. Наведите указатель мыши на одно из этих открытых приложений на панели задач, чтобы найти группу привязок, кликните на ней, чтобы быстро переключиться на выбранную группу.
-
Привязка окон с помощью перетаскивания
Привязка с помощью мыши достаточно проста в Windows. Вам просто нужно удерживая левую кнопку мыши на заголовке любого окна приложения и перетащить его к углам экрана. Когда вы отпустите окно, оно зафиксируется в выбранном положении.
Вы можете расположить несколько окон приложений рядом и изменить их размер в соответствии с вашими предпочтениями. Данный способ является ручным и требует немного больше времени, это довольно эффективный метод для тех, кто хочет использовать больше места на имеющихся экранах.
-
Привязка с помощью сочетания клавиш
Если вам нужна автоматическая привязка в Windows 11 с окнами одинакового размера, лучше использовать сочетания клавиш: Win Вверх, Вниз, Влево, Вправо. Сначала переместите фокус в открытое окно, используйте сочетание клавиш, и оно автоматически будет прикреплено к выбранной стороне экрана.
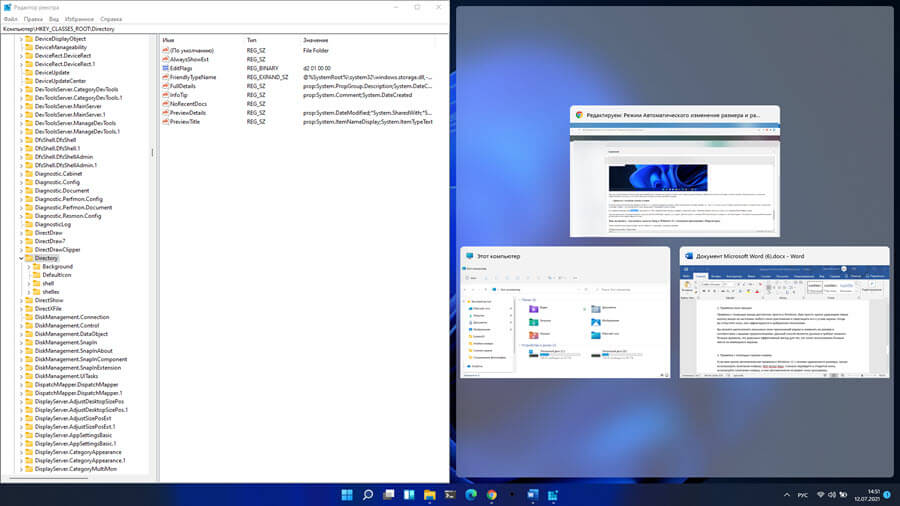
В следующем примере окно редактора реестра после сочетания клавиш Win ← со стрелкой «влево». Окно приложения оказалось в левом углу, занимая половину экрана.
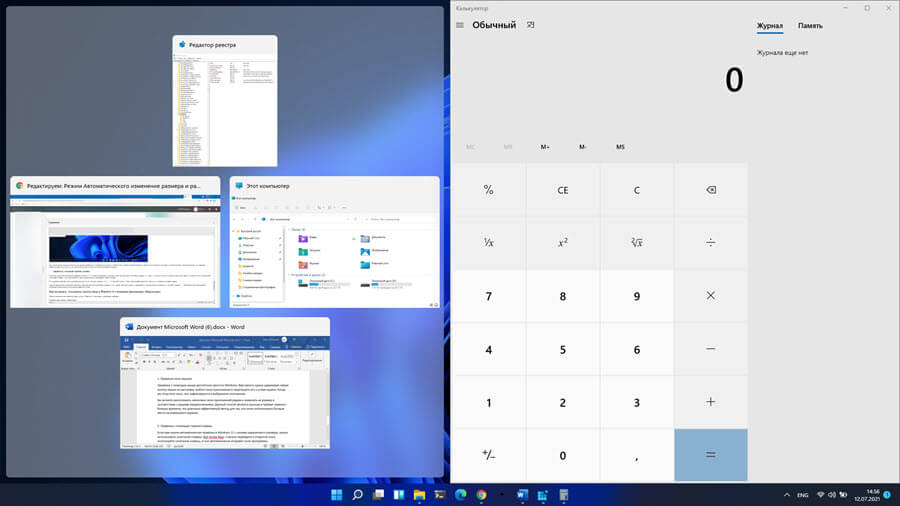
Другой пример ниже показывает привязку приложения «Калькулятор» к правому углу экрана. Для этого вместе с клавишей Win использовалась клавиша со стрелкой «вправо» → . Остальные окна приложений аккуратно расположены в виде прокручиваемой сетки.
Как включить / отключить макеты Snap в Windows 11 с помощью приложения «Параметры»
Чтобы отключить или включить Snap Layout в Windows 11, выполните следующие действия:
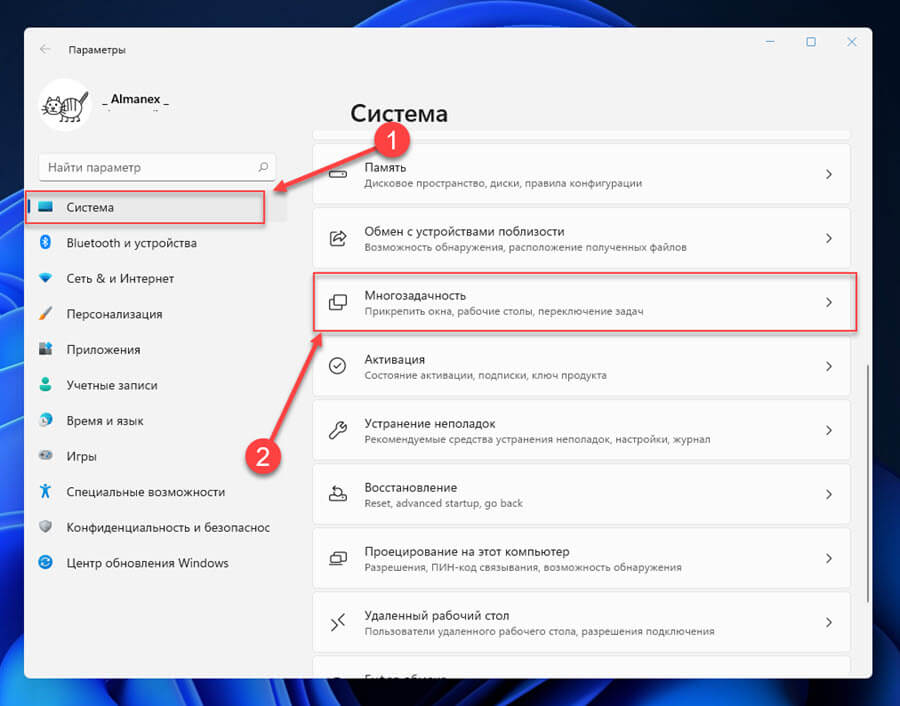
- Откройте приложение «Параметры».
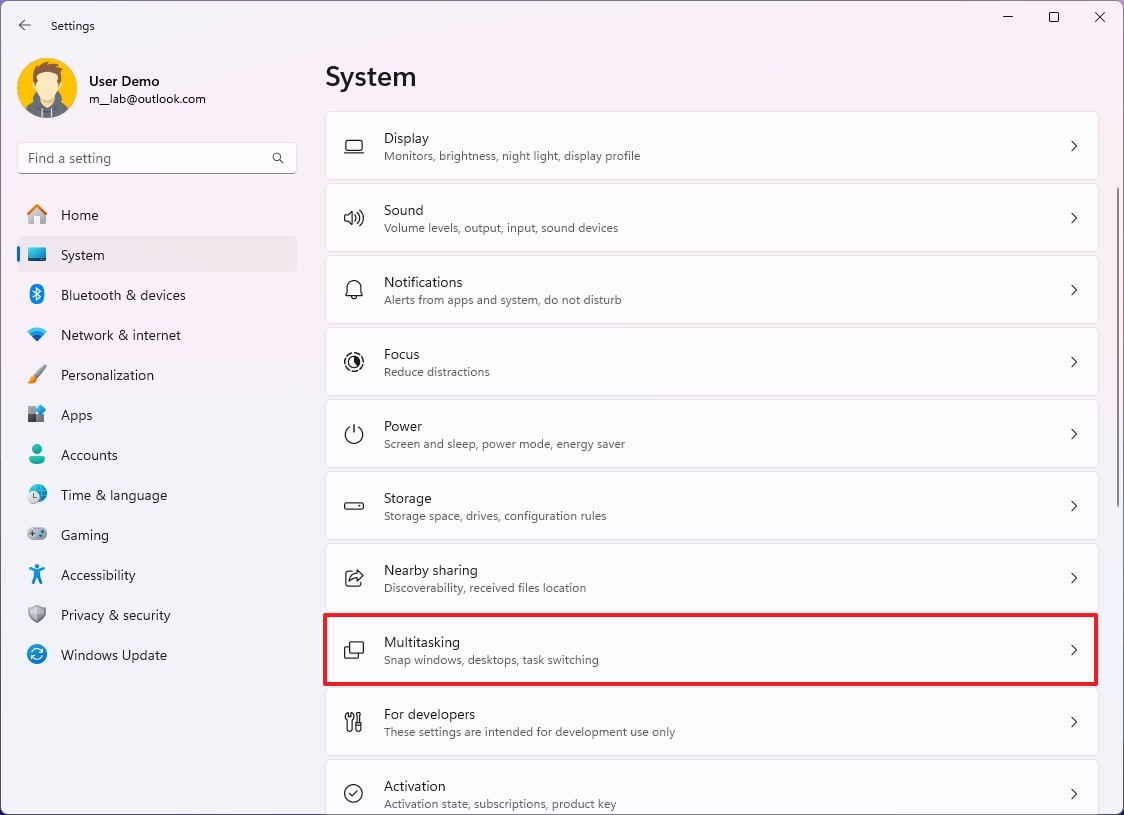
- Перейдите в раздел «Система»
- Выберите вкладку «Многозадачность»
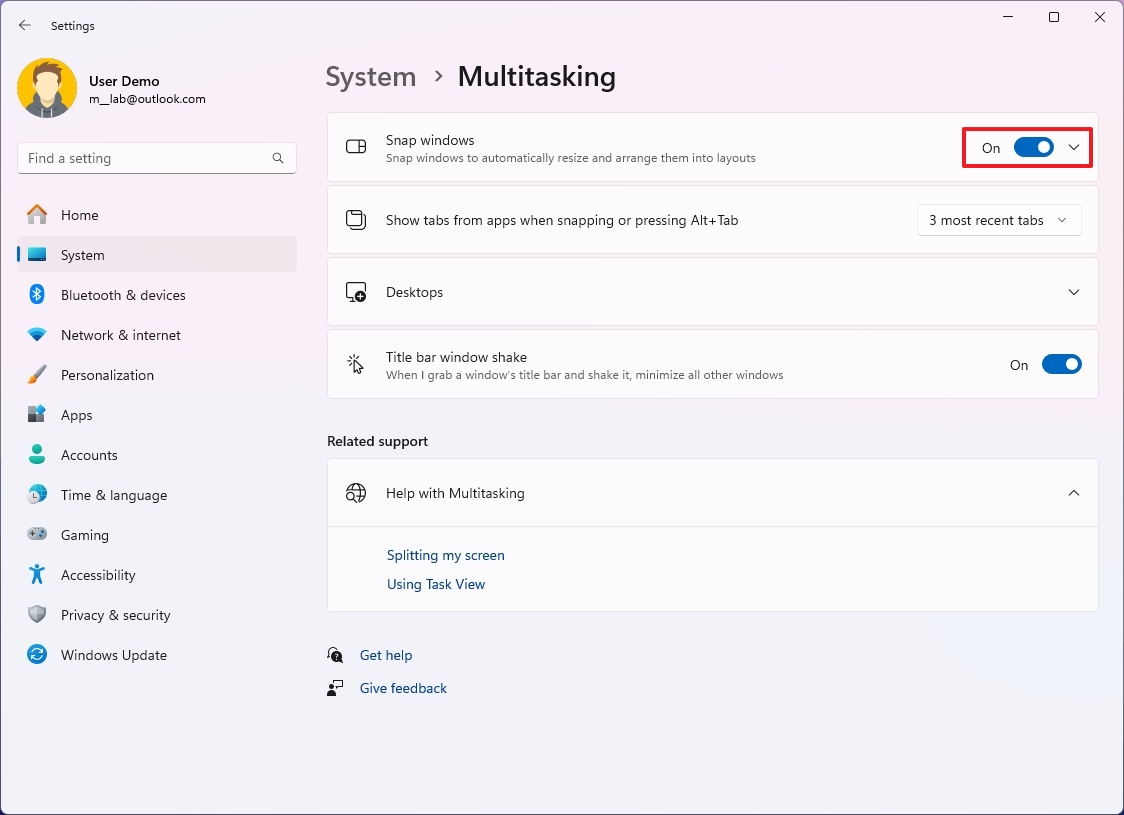
- В разделе «Прикрепить окна» передвиньте ползунок переключателя в положение «Откл.» чтобы выключить функцию привязки окна или в положение «Вкл.» чтобы включить.
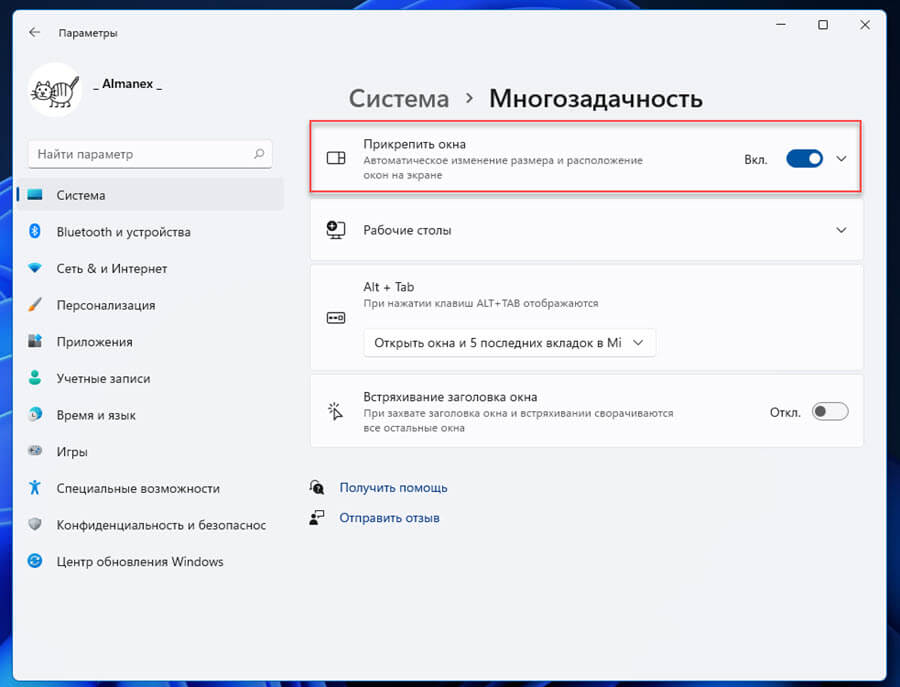
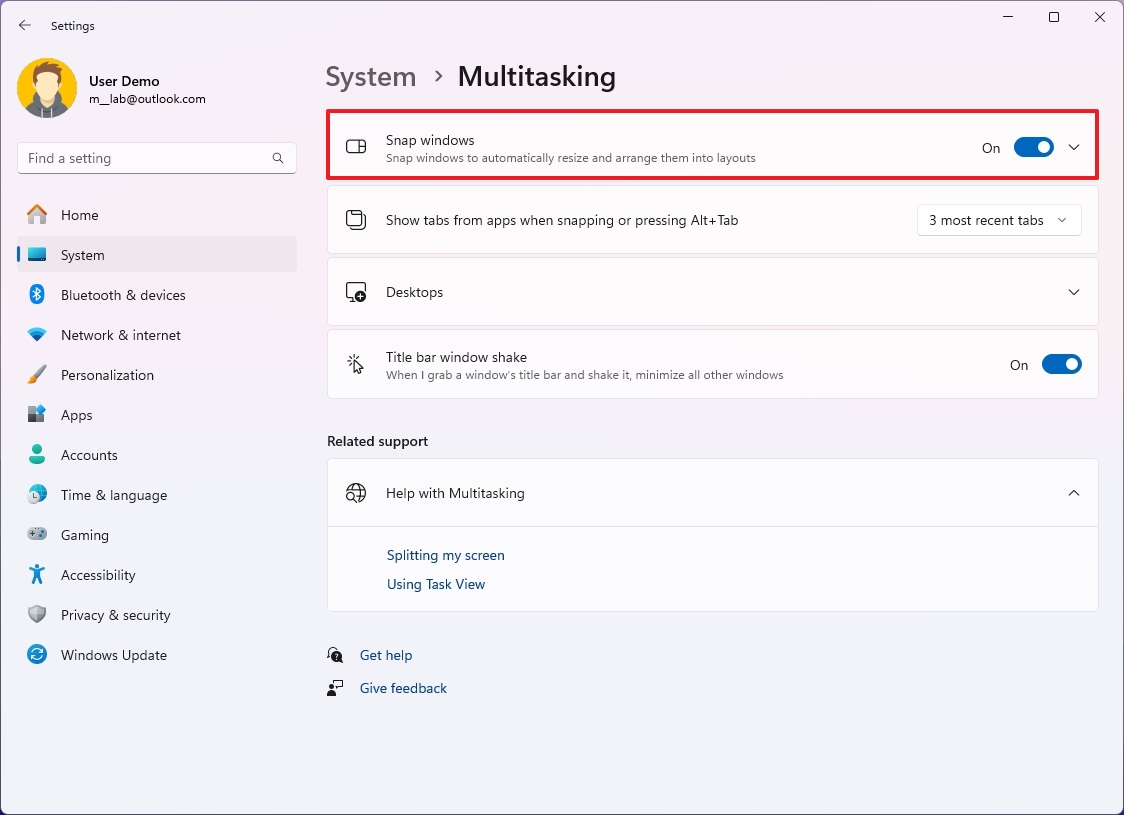
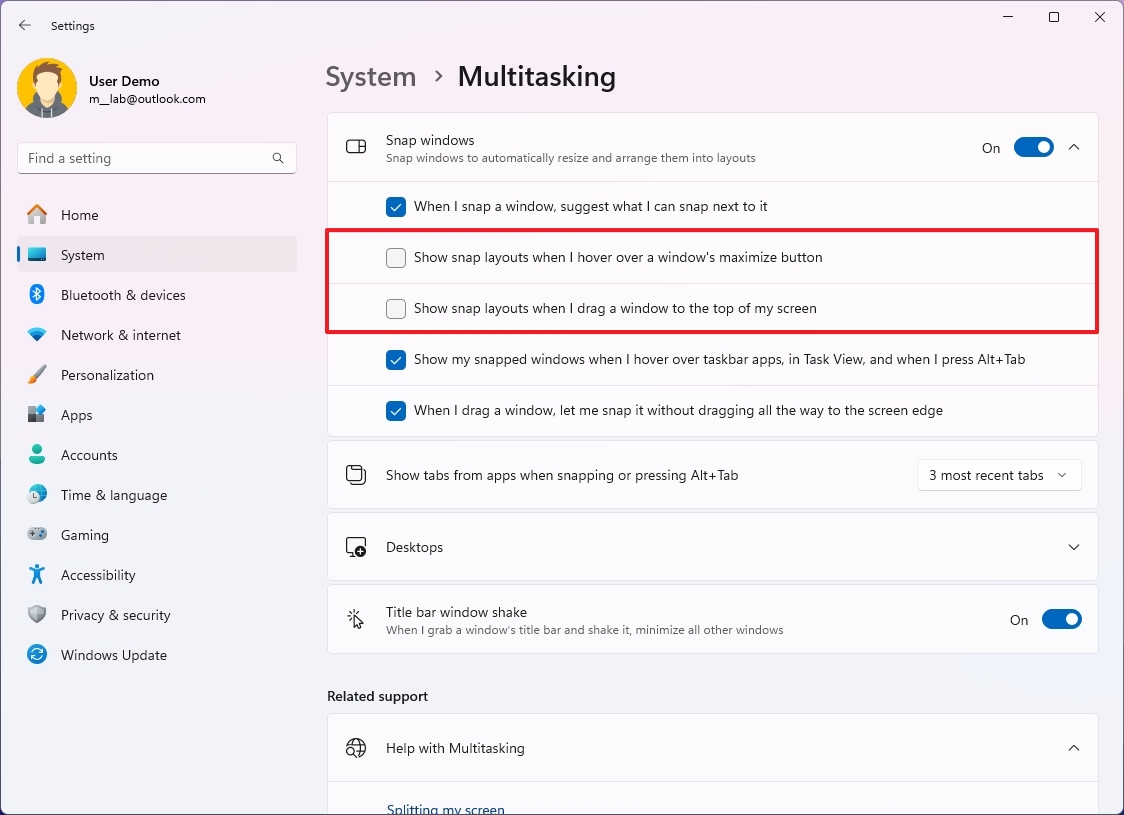
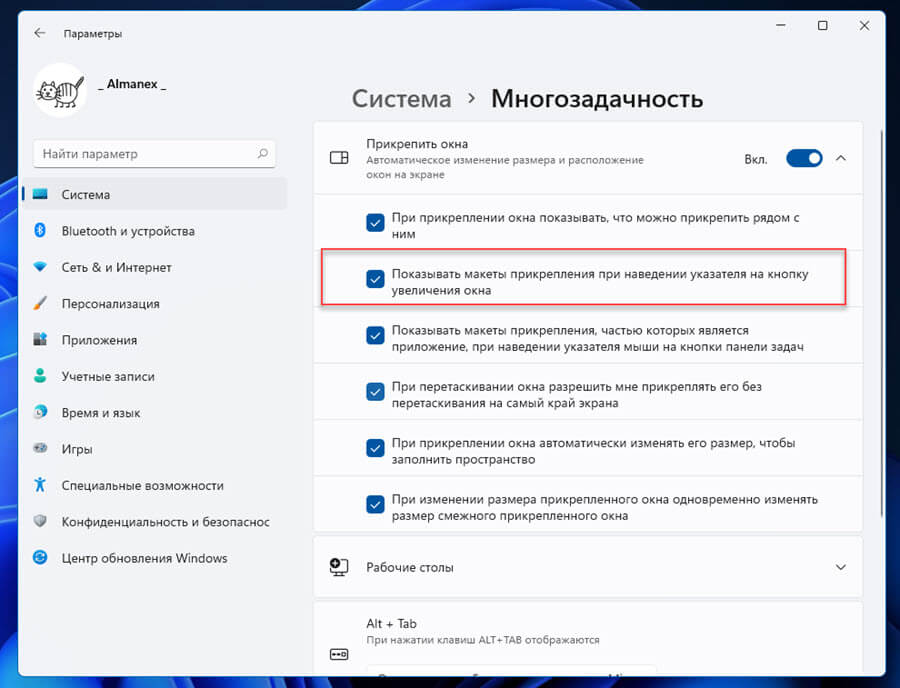
Если вы хотите отключить только отображение макетов, разверните вкладку «Прикрепить окна» и снимите флажок для опции «Показывать макеты прикрепления при наведении указателя на кнопку увеличения окна»
Отключить или включить функцию макетов Snap Assist с помощью реестра
Вы также можете использовать реестр Windows для отключения макетов.
- Откройте редактор реестра и перейдите к следующему разделу:
HKEY_CURRENT_USER\Software\Microsoft\Windows\CurrentVersion\Explorer\Advanced
- Найдите параметр с именем EnableSnapAssistFlyout. Если он существует, переходите к следующему шагу. Если вам не удалось его найти, кликните правой кнопкой мыши папку «Advanced», выберите в контекстном меню «Создать» «Параметр DWORD (32-бита)» и назовите его «EnableSnapAssistFlyout».
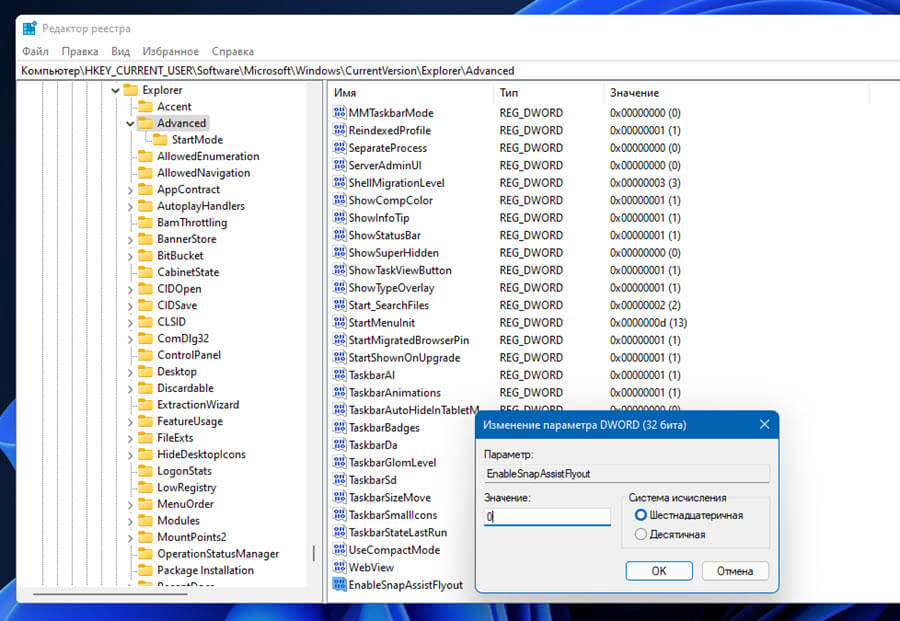
- Измените значение для созданного параметра «EnableSnapAssistFlyout»:
- Включить всплывающее меню Snap Assist — 1
- Отключить всплывающее меню Snap Assist — 0
- Теперь закройте «Редактор реестра» и перезагрузите компьютер или проводник, чтобы изменения вступили в силу.
Таким образом, вы можете включать и отключать макеты ассистента Snap Layouts в Windows 11.
Все!
Функция привязки позволяет быстро изменять размер и размещать окна на экране, перетаскивая их в края или углы. Это помогает эффективнее работать, упорядочив несколько окон, чтобы максимально увеличить пространство на экране. Помимо перетаскивания, вы также можете использовать предопределенные макеты для удобного упорядочения окон. Такая гибкость позволяет легко управлять рабочей областью независимо от того, работаете ли вы с двумя окнами рядом или упорядочиваете несколько окон в сетке.

С помощью Оснастки вы можете расположить все открытые окна на экране с помощью мыши, сенсорного ввода или клавиатуры. Чтобы узнать больше, разверните следующие разделы:
-
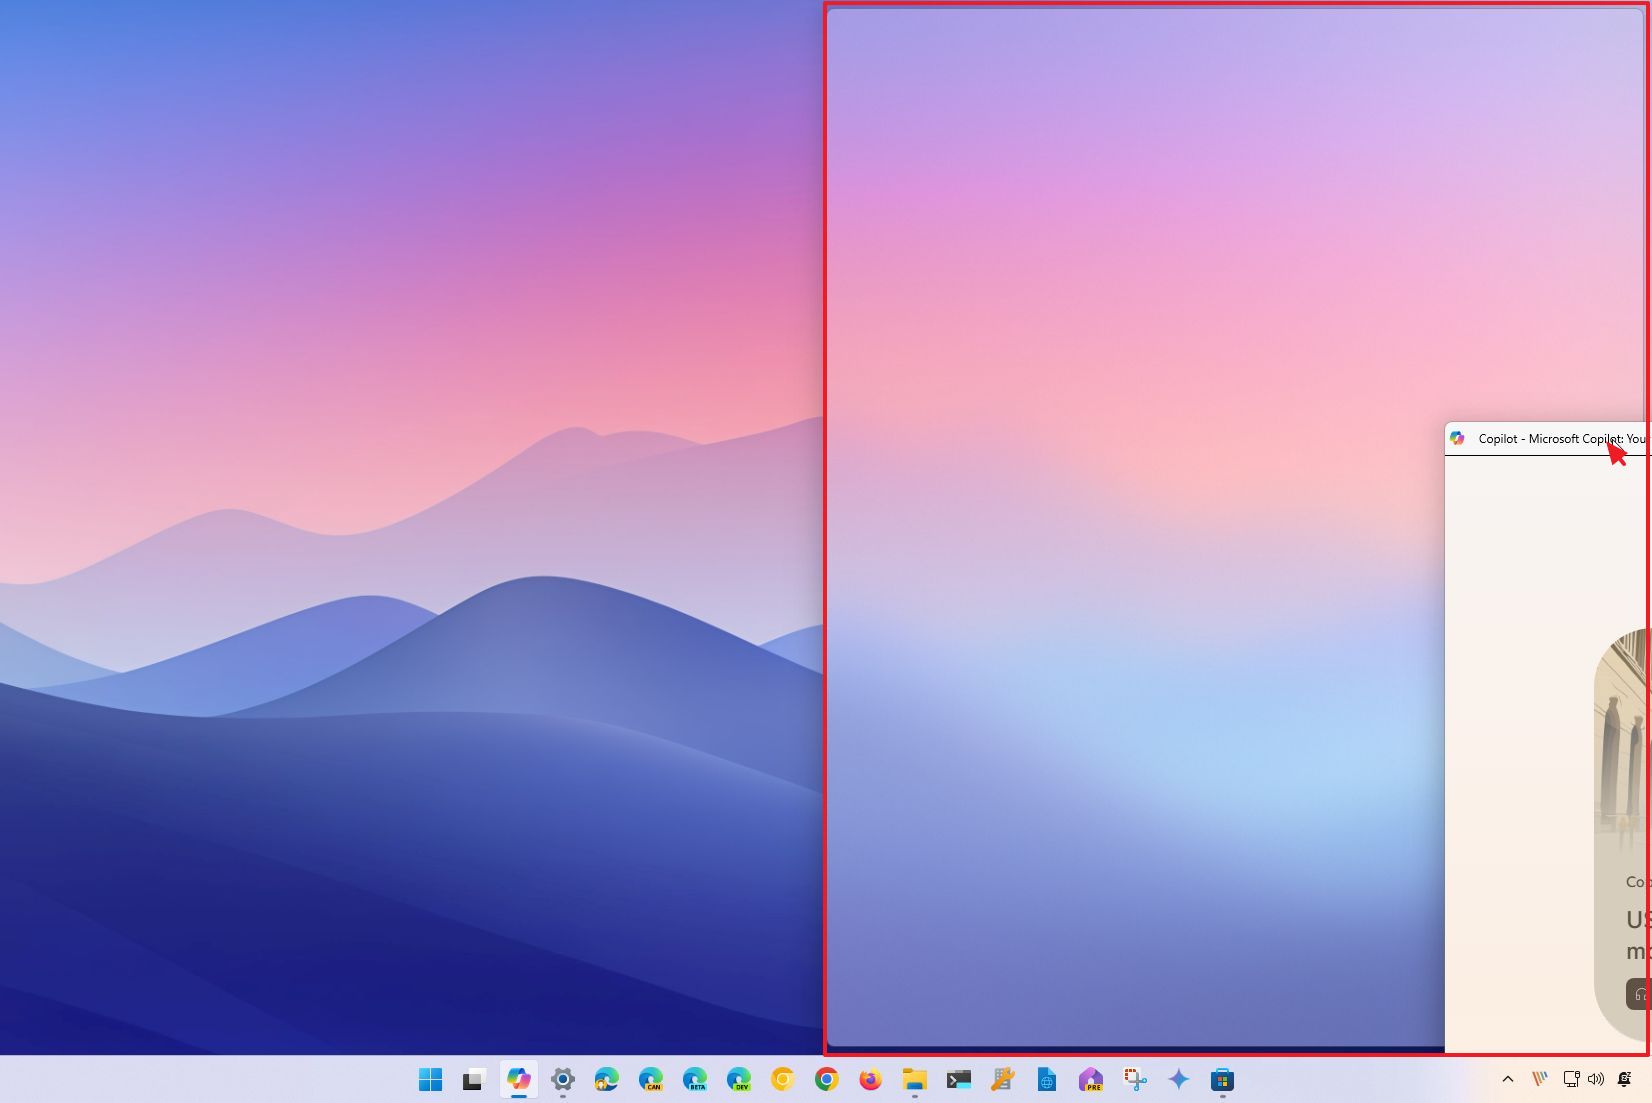
Прикрепление в сторону: перетащите окно влево или в правый край экрана, чтобы привязать его к этой стороне.
-
Привязка к углу: перетащите окно в угол, чтобы привязать его к этой четверти экрана
-
Вертикальное увеличение: перетащите окно в верхнюю часть экрана, чтобы развернуть его по вертикали, заполнив всю высоту при сохранении текущей ширины
Используйте мышь для прикрепления в Windows:
-
Выберите и перетащите окно или приложение, которое вы хотите привязать к боковой части или краю экрана. Поле макета привязки будет отображаться автоматически
-
Перетащите приложение в макет, который вы хотите использовать
-
Использование Snap Assist для заполнения макета другими окнами или приложениями, которые вы хотите привязать к друг другу
-
Нажмите и удерживайте клавишу с логотипом Windows + СТРЕЛКА, чтобы привязать приложение, в которое вы находитесь. Вы можете продолжать изменять позиции прикрепления с помощью стрелок клавиатуры
-
Используйте стрелку влево, чтобы разместить приложение в левой части экрана
-
Используйте стрелку вправо , чтобы разместить приложение в правой части экрана
-
Используйте стрелку вверх , чтобы разместить приложение в верхней части экрана
-
Используйте стрелку вниз, чтобы разместить приложение в нижней части экрана
-
-
Когда вы найдете нужное расположение, отпустите клавишу с логотипом Windows, чтобы расположить окно.
-
Использование snap Assist для заполнения макета другими окнами или приложениями, которые вы хотите привязать к одному экрану
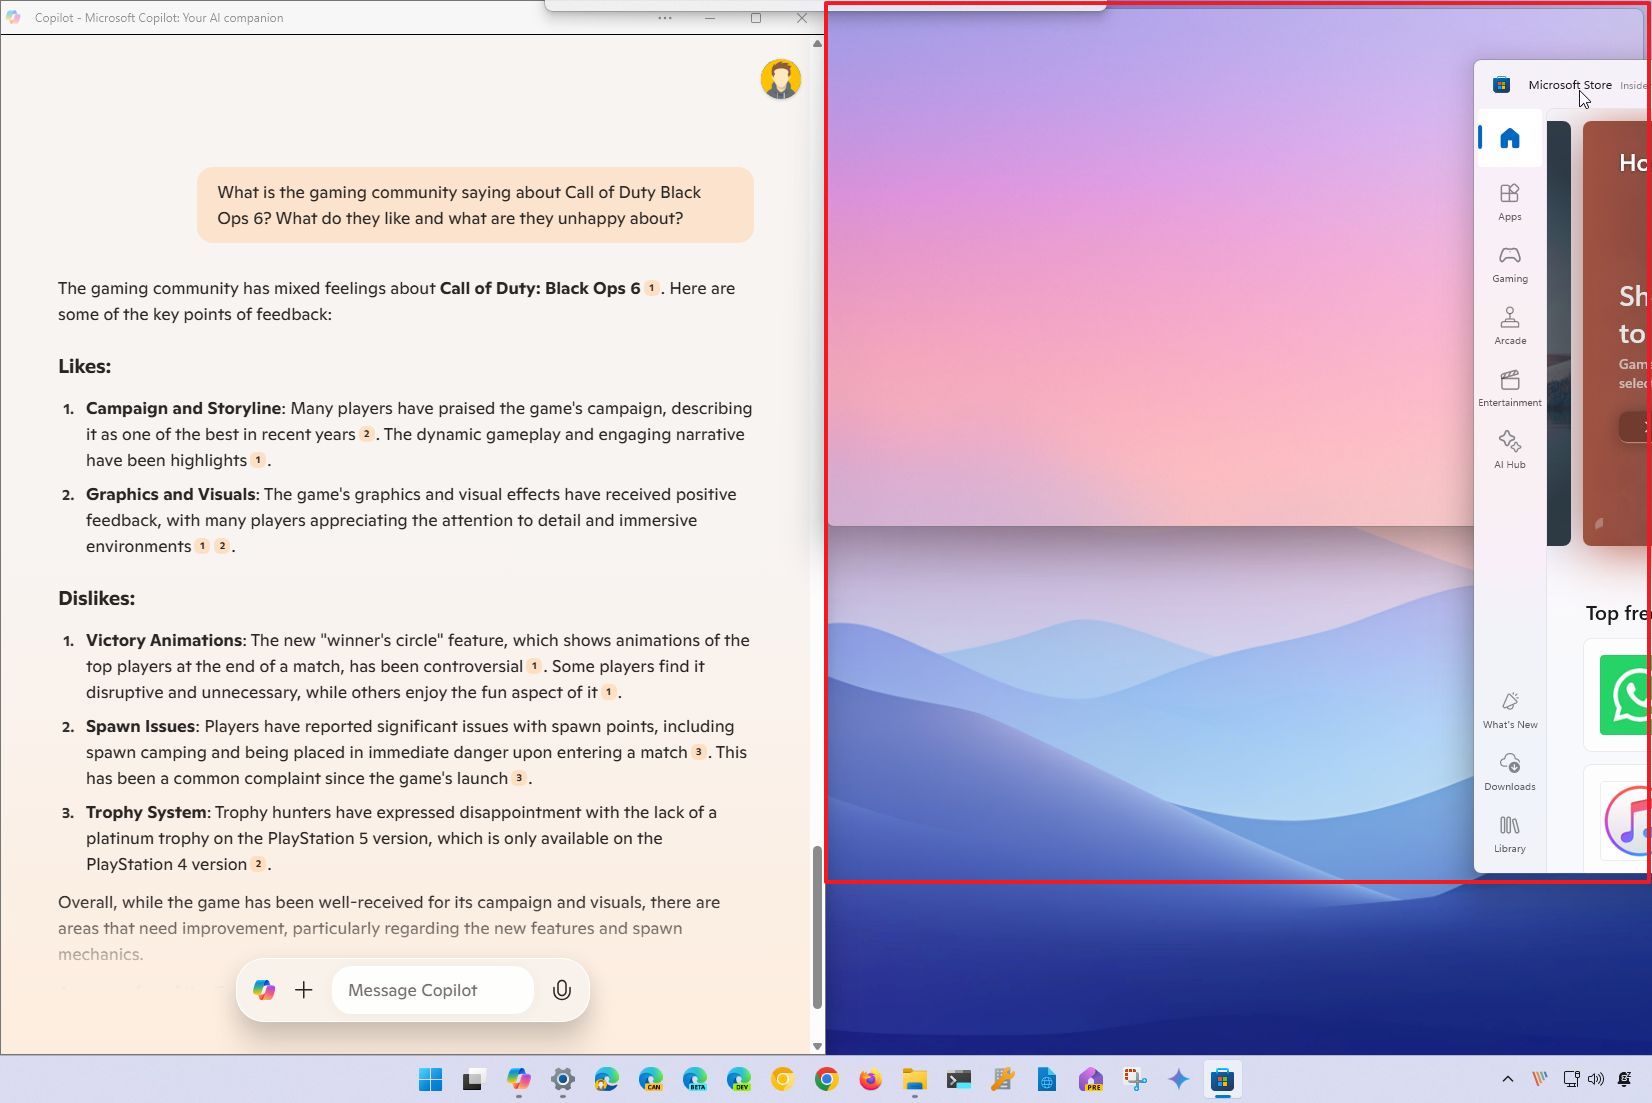
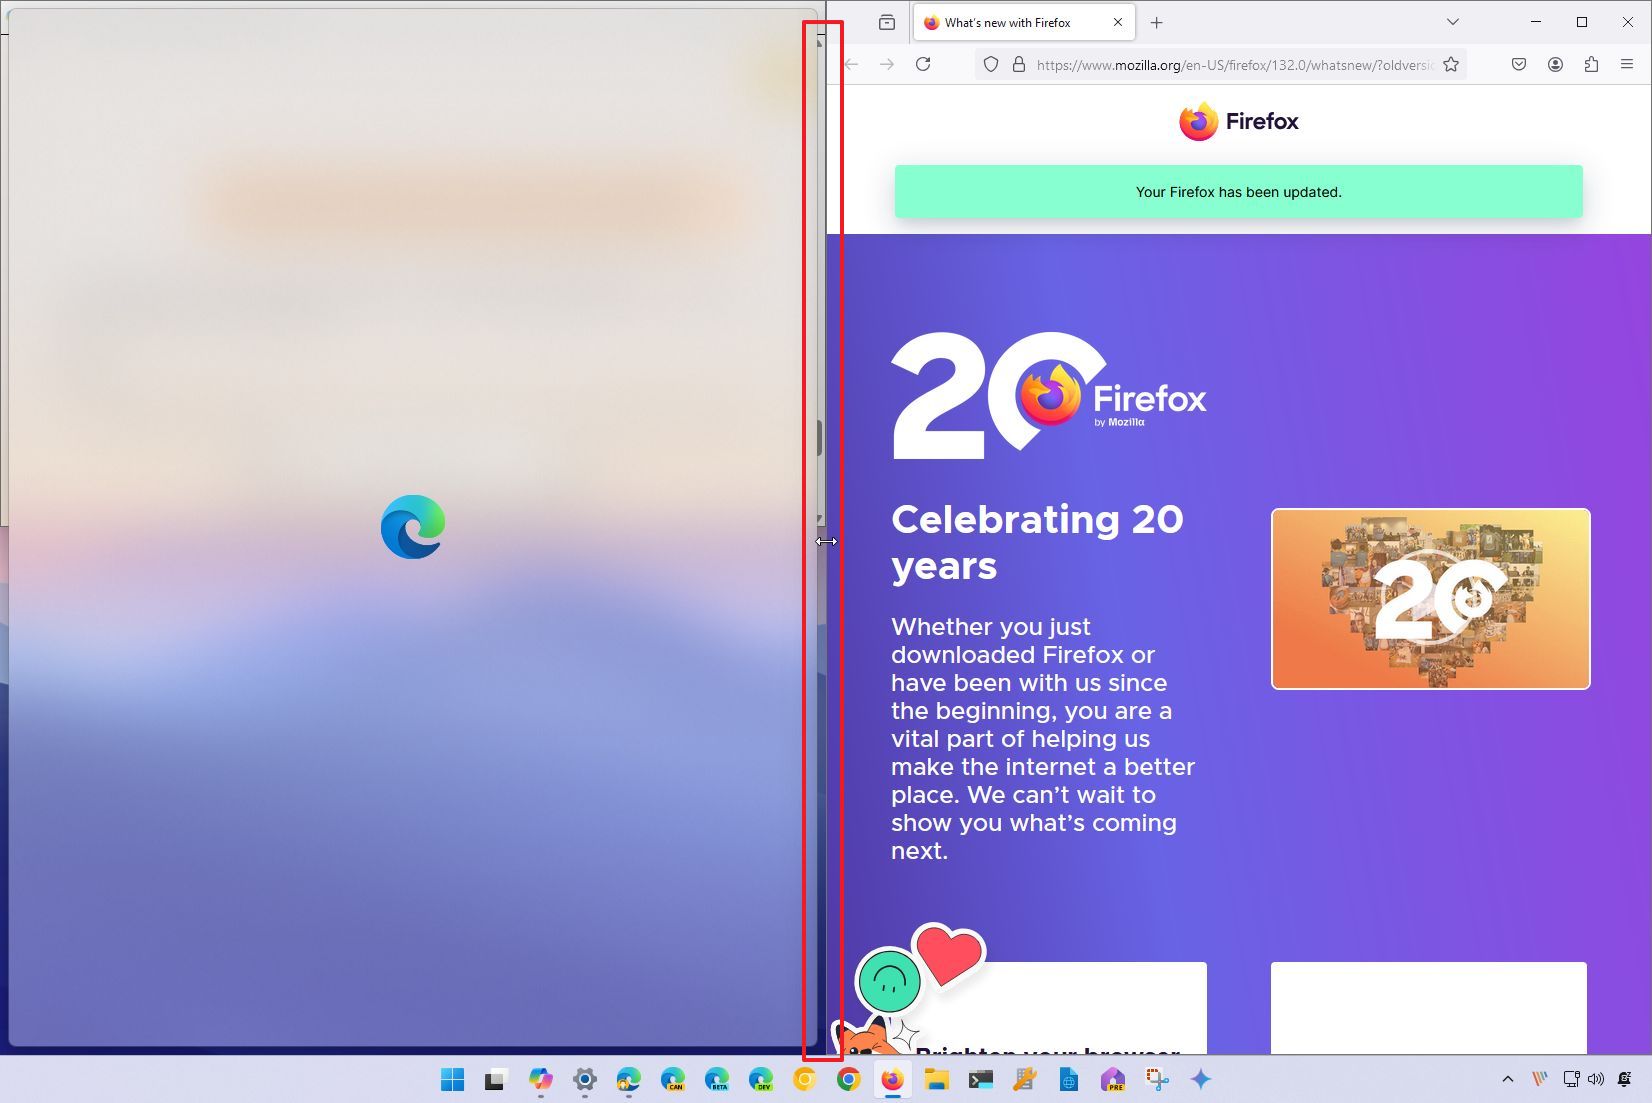
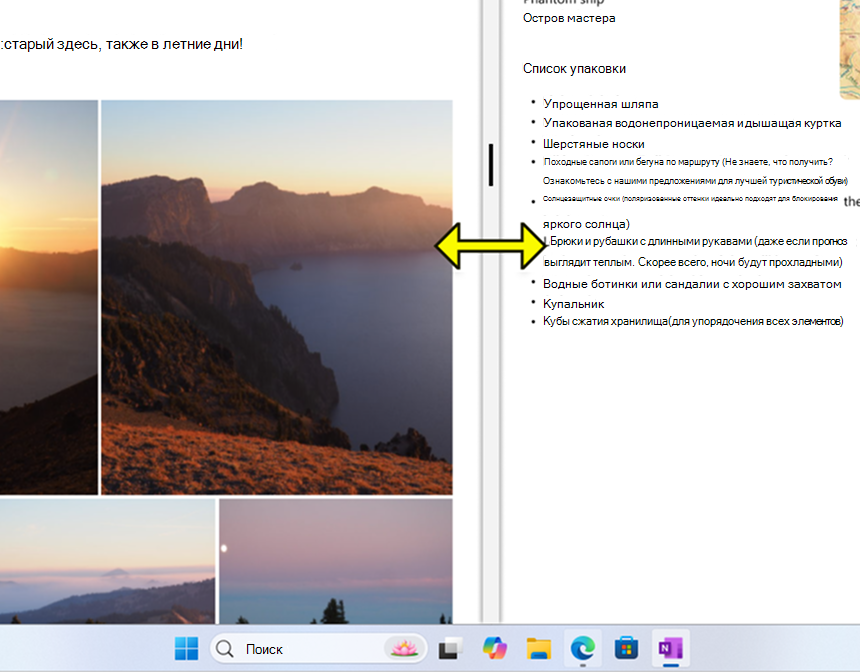
Вы можете легко изменить размер прикрепленных окон, выбрав и перетащив разделительные линии. Измените размер окна с одной стороны, и прилегающие окна будут изменяться так, чтобы у вас не было пустого места на экране.
-
Наведите указатель мыши на разделитель или коснитесь его. При выборе края, разделяющего два прикрепленных окна, появляется линейчатая панель. Если вы используете мышь, курсор мыши изменяется на двойную стрелку
-
Перетащите, чтобы изменить размер: выделите и удерживайте полосу разделителя, а затем перетащите ее, чтобы изменить размер прикрепленных окон.
Поддержка привязки
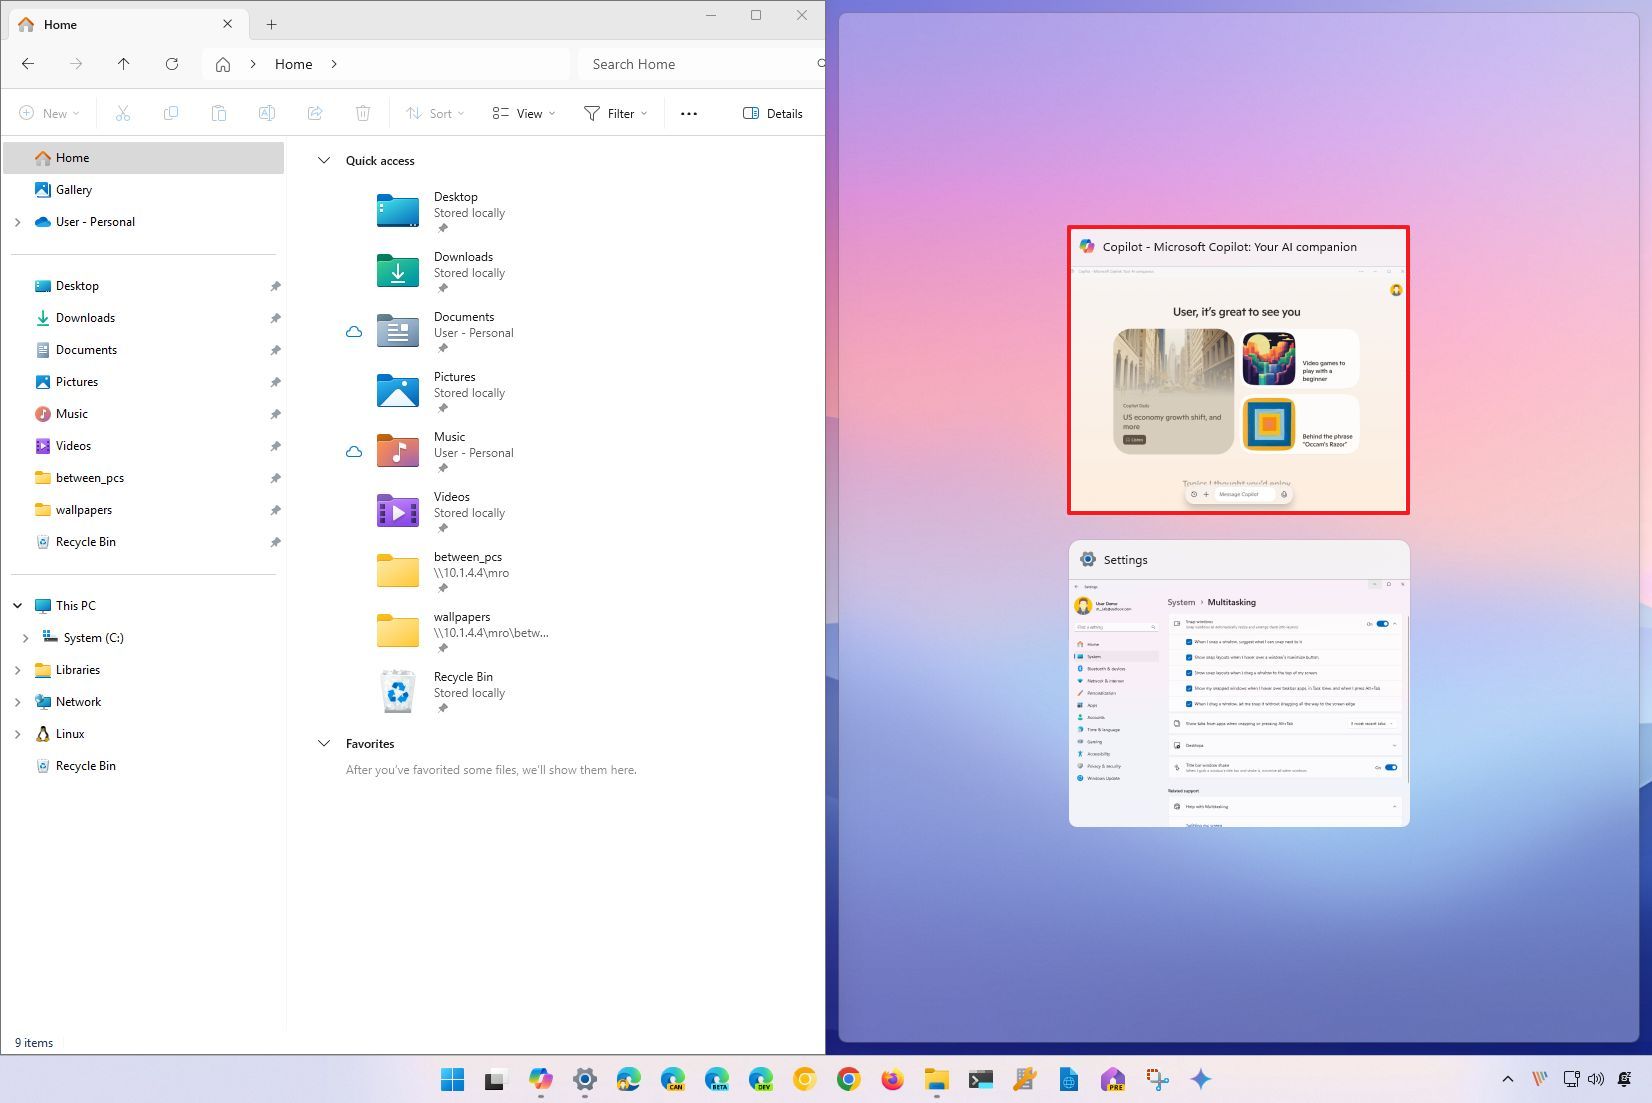
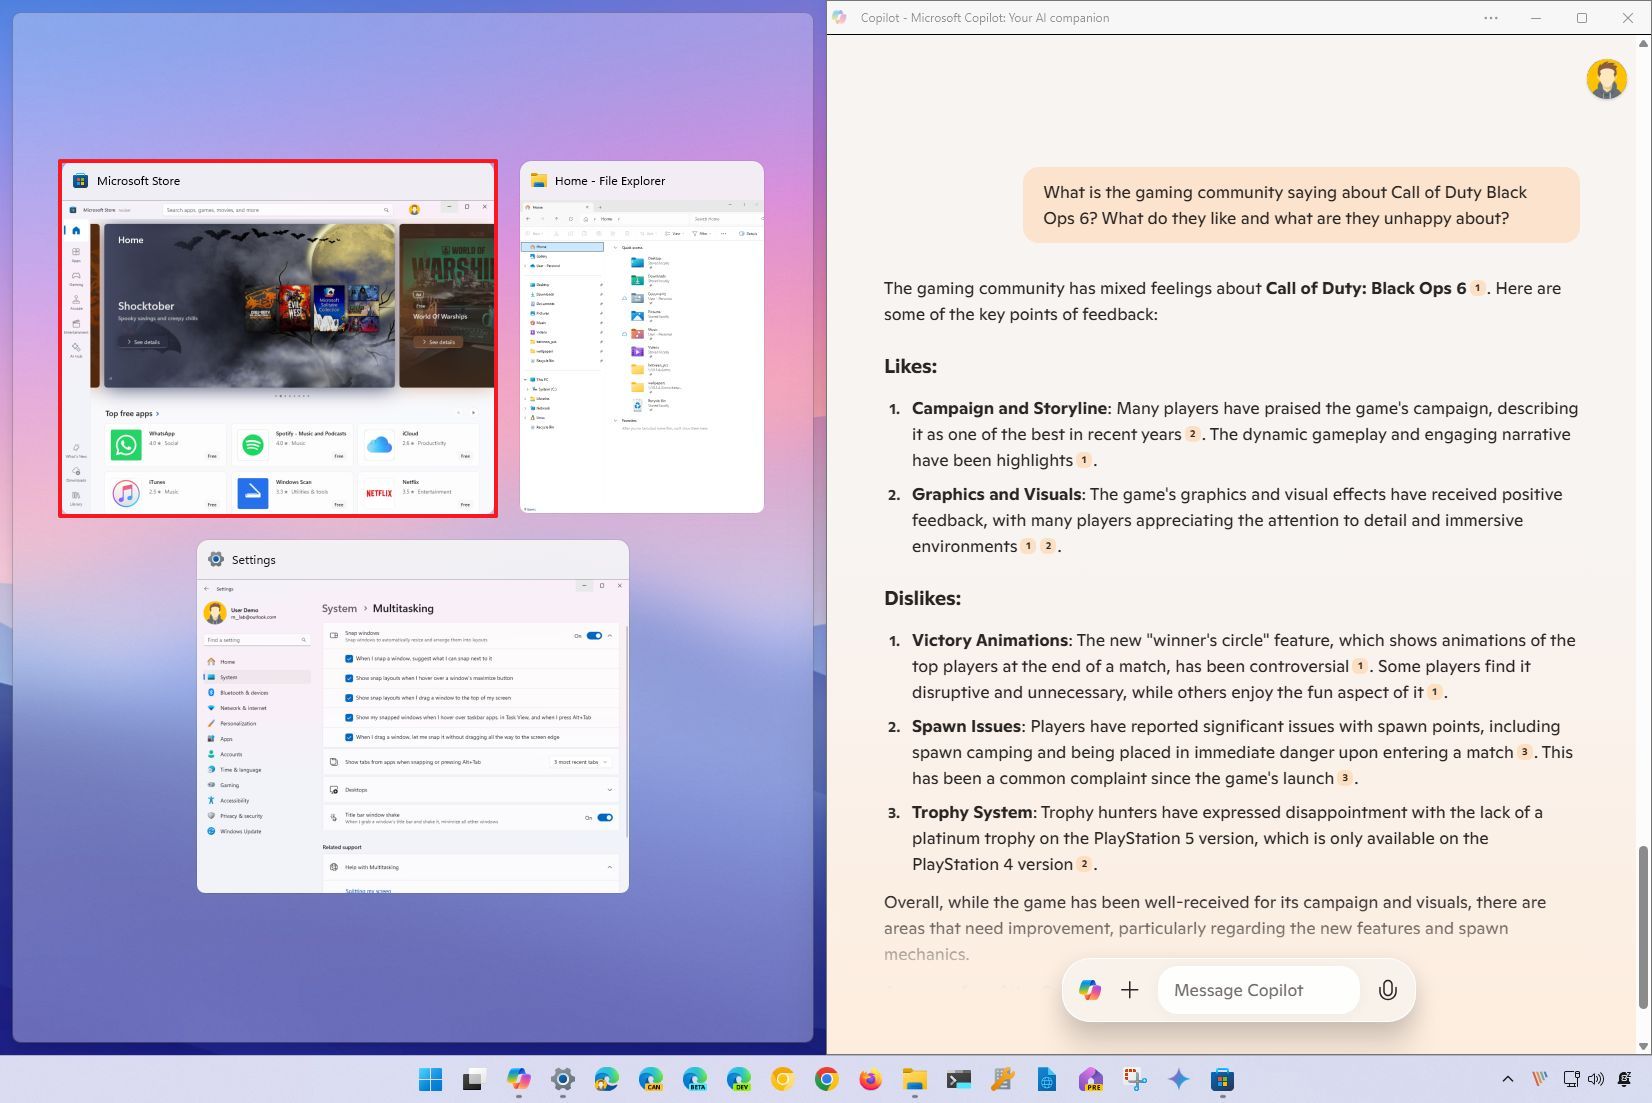
Snap Assist — это усовершенствование функции привязки, которое упрощает организацию окон. При прикреплении окна к одной стороне экрана в приложении Snap Assist отображаются эскизы других открытых окон, что позволяет быстро выбрать, какое окно следует привязать к другой стороне. Эта функция помогает создать более организованную и эффективную рабочую область, предоставляя визуальные подсказки и параметры для упорядочения окон.
Как использовать Snap Assist:
-
Прикрепите первое окно: выделите и перетащите окно к краю экрана, пока не появится полупрозрачное наложение. Отпустите окно, чтобы привязать его к месту
-
Прикрепите второе окно: выберите другое открытое окно из эскизов, отображаемых с помощью оснастки, чтобы привязать его к другой половине экрана.
Макеты привязки
Функция привязки в Windows предлагает предопределенные макеты, которые можно выбрать для организации всех открытых окон. После выбора макета вызывается snap Assist, чтобы помочь заполнить остальную часть макета другими окнами.
Примечание: В зависимости от размера дисплея могут отображаться различные предопределенные макеты.
Всплывающий элемент snap
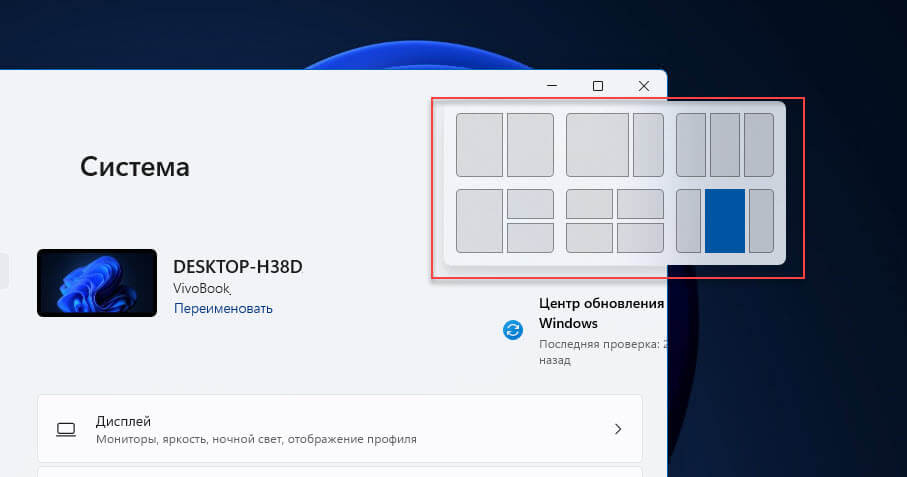
Всплывающее окно Привязка отображается при наведении указателя мыши на кнопку развернуть в окне. Вот как это использовать:
-
Наведите указатель мыши на кнопку восстановления или развернуть окно или нажмите Клавиша Windows +Z.
-
Выберите нужный макет. Затем активируется snap Assist, что позволяет заполнить остальную часть макета окнами по вашему выбору.
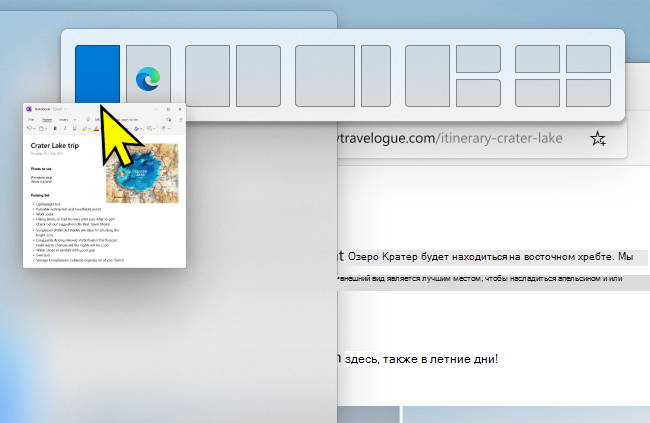
Панель прикрепления
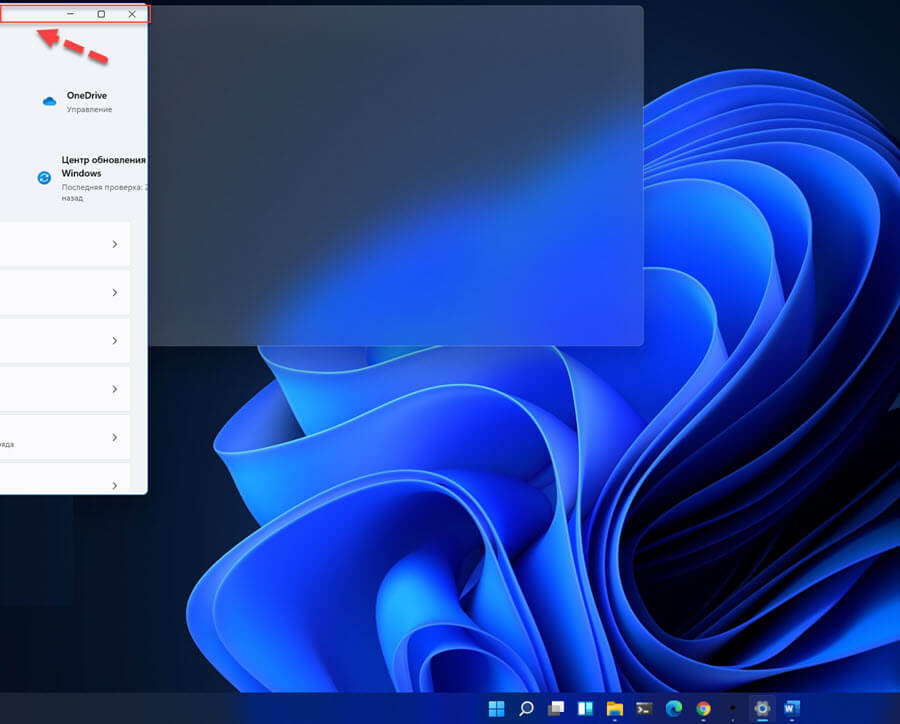
При перетаскивании окна в верхнюю часть экрана появляется панель прикрепления. Вот как его использовать
-
Перетащите окно в верхнюю часть экрана.
-
Выберите нужный макет. Затем активируется snap Assist, что позволяет заполнить остальную часть макета окнами по вашему выбору.
Группы привязки
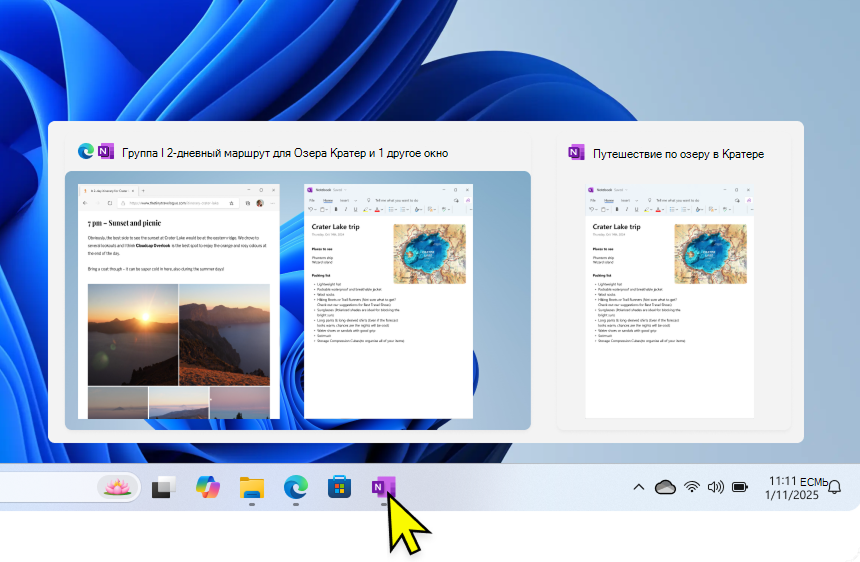
Группы прикрепления — это коллекции окон, которые вы привязали друг к другу, что позволяет сэкономить время, позволяя быстро вернуться к определенному расположению окон. Они создаются автоматически при привязке нескольких окон, гарантируя, что ваша рабочая область организована без каких-либо дополнительных усилий с вашей стороны.
Если вы прерваны и откроете новое приложение, вы можете легко вернуться в группу прикрепления. Просто наведите указатель мыши на любой значок приложения на панели задач, которая входит в группу прикрепления, и вы сможете восстановить всю группу или только это приложение.
Кроме того, группы привязки отображаются в представлении задач и в представлении ALT +TAB, что упрощает многозадачности.
Настройка параметров привязки

Ниже приведен список параметров, доступных для функции Привязки, и способы их настройки:
-
В приложении «Настройки» на устройстве с Windows, выберите Системный > Многозадачность или используйте следующую ссылку:
Многозадачность
-
Используйте переключатель Оснастки окна, чтобы включить иливыключить привязку.
-
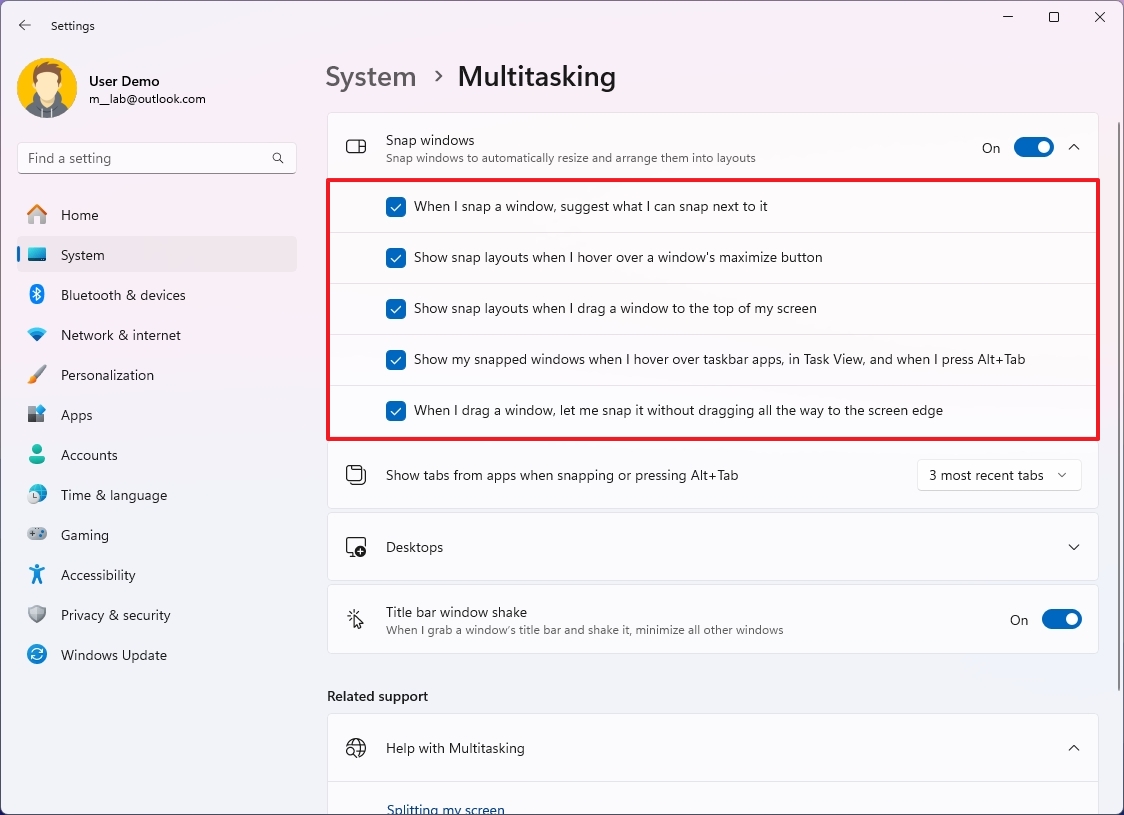
Чтобы настроить привязку, разверните раздел Оснастки windows и выберите нужные параметры с помощью флажков:
-
При прикреплении окна покажите, что можно привязать рядом с ним: включает или отключает snap Assist
-
Отображение макетов привязки при наведении указателя мыши на кнопку «Развернуть» окна: включает или отключает всплывающий элемент привязки
-
Отображение макетов прикрепления при перетаскивании окна в верхнюю часть экрана: включает или отключает панель прикрепления
-
Отображение прикрепленных окон при наведении указателя мыши на приложения на панели задач в представлении задач и при нажатии клавиш ALT+TAB: включает или отключает группы прикрепления
-
Когда я перетаскиваю окно, позвольте мне привязать его, не перетаскивая весь путь к краю экрана: позволяет привязать окна без необходимости перетаскивать их до края экрана