Setting up an SMTP server on a Windows 10 machine can transform how businesses handle email communication. Whether you’re running a small business, managing marketing campaigns, or working in enterprise IT, having a local SMTP server offers better control, enhanced security, and improved email deliverability.
This guide simplifies the process of installing and configuring an SMTP server on Windows 10. We’ll cover:
- Essential prerequisites.
- Step-by-step instructions to enable and configure the SMTP virtual server using Internet Information Services (IIS).
- Troubleshooting common issues.
By the end, you’ll be equipped to send emails securely, handle outbound email delivery, and manage your email infrastructure with confidence.
What Is an SMTP Server and Why Do You Need One?
An SMTP server is a type of email server used to send and relay emails over the internet. SMTP, short for Simple Mail Transfer Protocol, is the standard for transferring email messages between servers and to recipients.
Why Businesses Rely on SMTP Servers
For small businesses, marketers, and enterprise teams, an SMTP server ensures reliable email delivery, which is essential for communication and marketing campaigns. Here’s why:
- Email Deliverability: A dedicated SMTP server reduces the chances of your messages being flagged as spam.
- Control: Unlike third-party email services, you can customize and manage your own server configuration.
- Cost Efficiency: It’s a cost-effective solution for handling large volumes of email without third-party fees.
How It Works
When you send an email, the SMTP server processes the message by identifying the recipient’s domain, establishing a connection, and transferring the email to the destination server automatically. It also manages authentication, ensuring only authorized users can send emails.
Benefits of Running an SMTP Server on Windows 10
Setting up a local SMTP server on a Windows 10 machine offers several advantages:
- It enables outbound email delivery within your local network or across the internet.
- Supports tools like IIS 6.0 Manager, which simplifies SMTP server configuration.
- Provides options for TLS encryption, which secures communication.
Prerequisites for Setting Up an SMTP Server on Windows 10

Before starting the process of installing and configuring an SMTP server on Windows 10, make sure you have the necessary tools and resources. Proper preparation ensures a smoother setup and avoids unnecessary troubleshooting later.
System and Hardware Requirements
- Windows 10 machine with administrative access.
- Stable internet connection for sending emails beyond the local network.
- Adequate system resources to run an SMTP service, such as sufficient RAM and disk space.
Software Requirements
- Internet Information Services (IIS): A built-in feature in Windows 10 that supports SMTP server configuration.
- Firewall Access: Ensure your firewall settings allow traffic on port 25 (default SMTP port) or another designated port.
- Email Client: Optional but recommended for testing email delivery. Examples include Outlook or Thunderbird.
Key Preparations
- Install IIS Components: The SMTP virtual server functionality is part of IIS 6.0 Manager, which may need to be added via the Server Manager.
- Obtain a Domain Name: If you plan to send emails over the internet, a registered domain name adds professionalism and improves deliverability.
- SSL Certificate (Optional): Secure communication with TLS encryption by installing a valid SSL certificate on the server.
Optional Tools
- Telnet: Useful for troubleshooting connection issues with the SMTP server.
- Testing Tools: Services like Mailtrap or Postman can verify if your SMTP server setup is working correctly.
How to Enable and Configure SMTP Server on Windows 10 (Step-by-Step)
Follow these steps to enable and configure the SMTP server on your Windows 10 machine. This process involves enabling necessary features, configuring settings, and testing the server to ensure it’s ready to send emails.
Step 1: Enable IIS and SMTP Components
To set up the SMTP virtual server, you need to enable the necessary components in Internet Information Services (IIS).
- Open Control Panel:
- Go to Control Panel > Programs > Programs and Features.
- Turn Windows Features On or Off:
- Click on Turn Windows features on or off from the left panel.
- Enable IIS and SMTP:
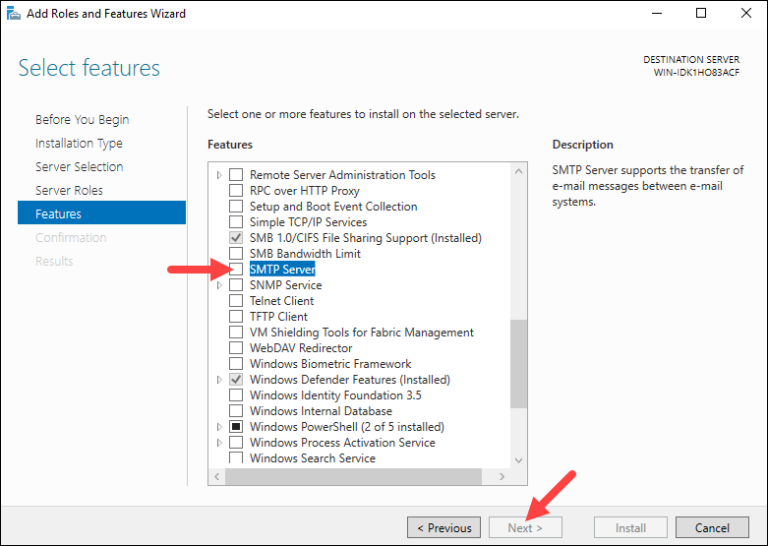
- Expand Internet Information Services and check the box for SMTP Server.
- Ensure related services like IIS Management Console and IIS 6.0 Manager are also selected.
- Install Features:
- Click OK and let Windows install the necessary components.
Step 2: Configure the SMTP Virtual Server
Once IIS and SMTP components are installed, you can configure the SMTP server.
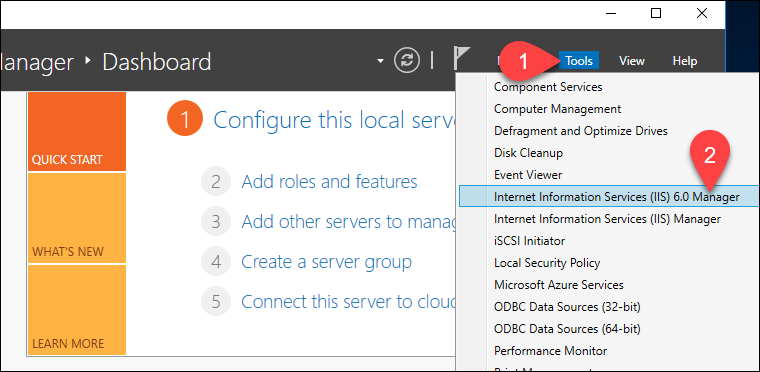
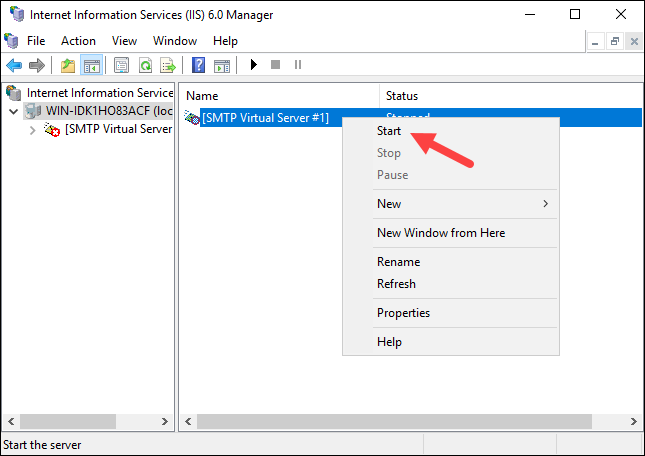
- Open IIS Manager (6.0):
- Search for IIS 6.0 Manager in the Start menu and open it.
- Expand the Computer Name:
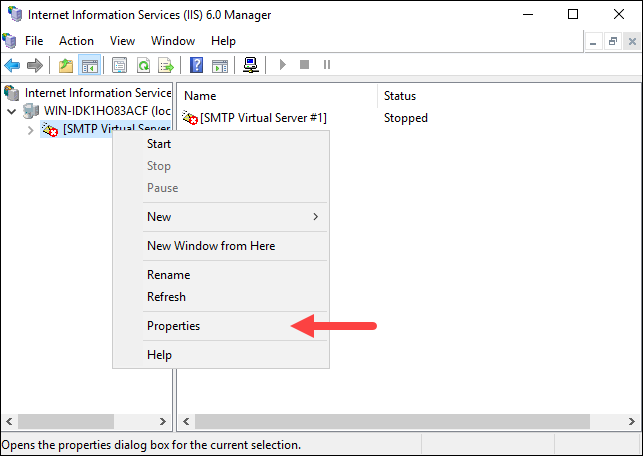
- In the left panel, expand your local server name to reveal the SMTP virtual server.
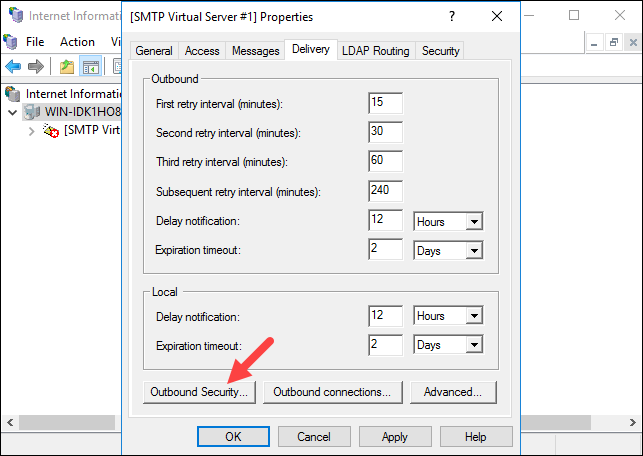
- Set Basic Authentication:
- Right-click on the SMTP virtual server and select Properties.
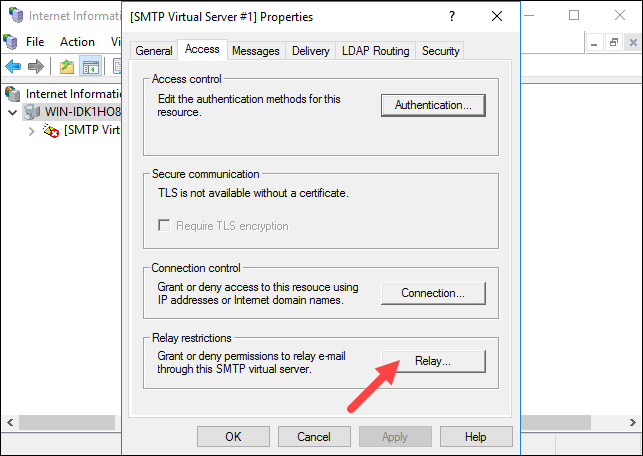
- Under the Access tab, configure authentication settings. Enable Integrated Windows Authentication if you’re using domain accounts.
- Specify IP Address and Port:
- Under the General tab, specify the IP address your SMTP server will bind to. Keep port 25 unless your ISP blocks it.
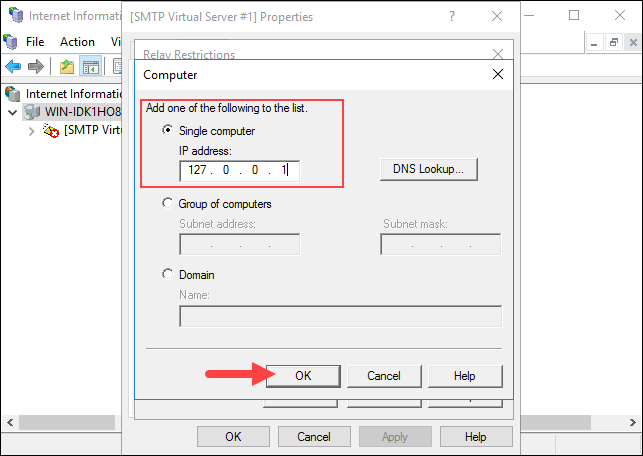
- Configure SMTP Relay Restrictions:
- Go to the Relay tab. Choose whether to allow specific IP addresses or a group of computers to relay emails.
Step 3: Configure Firewall for SMTP Traffic
Your SMTP server must communicate through the firewall for outbound email delivery.
- Open Windows Firewall Settings:
- Go to Control Panel > System and Security > Windows Defender Firewall.
- Create a New Rule:
- Click on Advanced Settings and add a new inbound rule for port 25 (or the port you configured).
- Allow the SMTP Service:
- Make sure the rule is applied to the SMTP service to allow incoming and outgoing traffic.
Step 4: Test Your SMTP Server
After configuring the SMTP server, test it to confirm it’s working properly.
- Send Test Emails:
- Use an email client to send a message through your server. Configure the client with your SMTP server’s IP address, port, and authentication credentials.
- Use Telnet for Troubleshooting:
- Open the Command Prompt and type
telnet [SMTP server IP] 25to check connectivity.
- Open the Command Prompt and type
Next Steps
You’ve now installed and configured the SMTP server on your Windows 10 machine. Make sure to restart the server and test different scenarios to ensure reliable email delivery. In the next section, we’ll discuss best practices for maintaining and optimizing your SMTP setup.
Best Practices for Using an SMTP Server
Proper maintenance and optimization are essential for ensuring your SMTP server performs reliably and securely. Here are some key practices to keep your server running smoothly and avoid issues like poor deliverability or security breaches.
1. Regular Monitoring and Maintenance
- Monitor Email Logs: Regularly review logs to detect failed deliveries, authentication errors, or spam activity.
- Update Server Software: Keep your Windows 10 and SMTP service components updated to fix bugs and improve performance.
- Restart the SMTP Server: Periodically restart the server to clear potential issues and ensure all updates are applied.
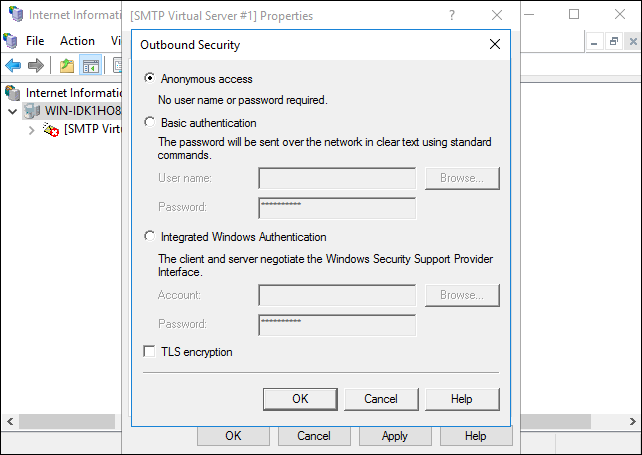
2. Secure Your SMTP Server
- Enable TLS Encryption: Always use TLS to secure the connection and protect emails during transmission.
- Install a Valid SSL Certificate: Enhance trust and secure the SMTP server with an SSL certificate.
- Authentication Settings: Require an account name and password for authentication to prevent unauthorized access.
- Restrict Anonymous Access: Configure your server to allow email relay only from trusted users or systems.
3. Improve Email Deliverability
- Avoid Blacklisting: Adhere to anti-spam regulations like CAN-SPAM. Use your domain name in email headers to boost credibility.
- SPF, DKIM, and DMARC: Set up these DNS records for your domain to verify emails sent through your SMTP server.
- Test Emails Using Tools: Use services like Mailtrap or Postman to simulate and test email delivery.
4. Manage Access and Traffic
- IP Restrictions: Limit email relays to a specified group of computers or IP ranges.
- Set Limits for Outbound Emails: Define quotas for the number of emails to be sent within a given time to prevent misuse.
- Throttling Settings: Configure throttling to ensure the server handles a large number of requests without crashing.
5. Troubleshoot Common Issues Proactively
- Connection Errors: Check firewall rules and ensure the SMTP service is running.
- Delivery Failures: Verify recipient addresses and inspect email headers for issues.
- Authentication Failures: Ensure users are using the correct account name or password.
Why Follow These Best Practices?
Adhering to these practices not only ensures smooth email operations but also protects your business’s reputation. By optimizing the SMTP server setup, you can reliably send outbound emails and build trust with your recipients.
Common Challenges and Troubleshooting Tips
Even with proper setup, you might face challenges when running an SMTP server on Windows 10. Here’s a list of common problems and their solutions to keep your server functioning smoothly.
1. Connection Errors
Problem: Unable to connect to the SMTP server or port.
Solution:
- Check if port 25 (or the designated SMTP port) is open in your firewall settings.
- Use Telnet to test the connection: cssCopy code
telnet [SMTP server IP] 25If this fails, confirm the server’s IP address and port configuration.
2. Email Delivery Failures
Problem: Emails are not being sent or are stuck in the queue.
Solution:
- Verify that the recipient’s email address and domain name are correct.
- Check server logs for errors related to authentication or email routing.
- Ensure the server isn’t blacklisted by verifying its IP address on public spam lists.
3. Authentication Issues
Problem: Clients fail to authenticate with the server.
Solution:
- Confirm the account name and password are entered correctly.
- Ensure Integrated Windows Authentication is enabled in the SMTP virtual server settings.
- Update user credentials if passwords were recently changed.
4. Spam and Security Concerns
Problem: Emails sent through your server are flagged as spam.
Solution:
- Configure SPF, DKIM, and DMARC records for your domain to enhance email authentication.
- Avoid open relay setups that allow unauthorized users to send emails.
5. Firewall or Network Conflicts
Problem: Emails are blocked by the firewall or other network policies.
Solution:
- Verify that your firewall allows SMTP traffic. Add rules for the specific port used (default is 25).
- Test with a different network or temporarily disable antivirus software to rule out conflicts.
6. TLS Encryption Issues
Problem: Email clients cannot establish a secure connection.
Solution:
- Ensure you have a valid SSL certificate installed on the server.
- Configure the client to use TLS to secure communications.
7. High Email Queue Volume
Problem: Large numbers of emails are stuck in the queue due to server overload.
Solution:
- Implement throttling to manage the number of emails processed per second.
- Use a dedicated local SMTP server for bulk emails to reduce load on your main server.
Tools to Enhance Your SMTP Server Performance
Optimizing your SMTP server setup goes beyond basic configuration. Using the right tools can improve performance, ensure deliverability, and streamline troubleshooting. Here are some helpful tools and services to consider.
1. Email Testing Tools
Testing your SMTP server setup is crucial for verifying that emails are being sent correctly.
- Mailtrap: Simulates an SMTP server to test email delivery without sending emails to real recipients.
- Postman: Allows you to test and debug your email requests, ensuring proper configuration.
- Telnet: A command-line tool for verifying server connectivity and diagnosing port or IP address issues.
2. Monitoring Tools
Track your server’s performance and email delivery metrics to ensure everything runs smoothly.
- MxToolBox: Monitors the health of your SMTP server, including blacklist status and DNS settings.
- Nagios: Provides real-time monitoring of server resources and alerts for potential issues.
- GFI MailEssentials: Offers email security and performance monitoring for business servers.
3. Security Tools
Secure your SMTP server to protect against unauthorized access and ensure compliance with best practices.
- SSL Certificate Managers: Simplify the process of installing and managing SSL certificates for TLS encryption.
- SpamAssassin: Filters spam and prevents malicious emails from being relayed through your server.
4. Performance Optimization Tools
- Email Delivery Services: Use tools like Amazon SES or SendGrid alongside your server to improve bulk email performance.
- SMTP Load Testing Tools: Simulate high traffic to test how your server handles outbound emails under pressure.
5. Automation and Integration Tools
- PowerShell Scripts: Automate routine tasks like restarting the server, updating settings, or managing logs.
- Email Client Plugins: Ensure seamless integration with applications like Outlook or Thunderbird.
FAQs
1. What is the difference between an SMTP server and a regular email server?
An SMTP server focuses solely on sending emails using the Simple Mail Transfer Protocol, while a regular email server handles both sending and receiving emails. For receiving emails, servers use protocols like POP3 or IMAP.
2. Can I use this setup for bulk email campaigns?
Yes, but it’s recommended to configure your server properly with anti-spam measures like SPF, DKIM, and DMARC. Additionally, use throttling settings to manage email volumes and avoid server overload.
3. How do I secure my SMTP server?
To secure your server:
Enable TLS encryption and install an SSL certificate.
Require authentication with a valid account name and password.
Restrict anonymous access and relay permissions to trusted IPs.
4. What’s the difference between port 25 and port 587?
Port 25 is the standard port for email relay between servers but is often blocked by ISPs to reduce spam.
Port 587 is commonly used for sending emails from clients with authentication and encryption enabled.
5. What are some tools to troubleshoot SMTP server issues?
Telnet: Test server connectivity and port availability.
Mailtrap: Verify email delivery without sending real emails.
MxToolBox: Check server health, blacklist status, and DNS configurations.
6. How do I enable TLS encryption on my SMTP server?
To enable TLS:
Install a valid SSL certificate on your server.
Configure your SMTP settings to support encrypted connections.
Ensure your email clients are set to use TLS to secure the connection.
7. Why are my emails being flagged as spam?
This could happen if:
Your server’s IP is blacklisted.
Your emails lack proper SPF, DKIM, or DMARC authentication.
The content or email headers trigger spam filters.
Conclusion
Setting up an SMTP server on Windows 10 empowers businesses to take control of their email communication. With a properly configured SMTP virtual server using Internet Information Services (IIS), you can ensure reliable email delivery, enhance security with TLS encryption, and avoid the limitations of third-party services.
This guide walked you through:
- Understanding the importance of an SMTP server.
- Preparing your system with the right tools and software.
- A detailed step-by-step process for setup and configuration.
- Troubleshooting common issues and optimizing performance.
Whether you’re managing email campaigns, sending automated notifications, or improving your organization’s email infrastructure, having your own SMTP server can be a game-changer. Follow the best practices outlined here, and make the most of your setup.
To find your SMTP server on Windows 10, you can use the command line tool Telnet. To do this, open the Command Prompt and type “telnet [server name] 25”. This will connect you to the SMTP server on port 25.
How do I know what my SMTP server is?
The best way to determine your SMTP server is to ask your email provider. They will be able to give you the specific settings you need in order to connect your account to their servers.
How do I find my SMTP server on Windows?
Assuming you’re using a Windows 10 computer, follow these steps:
1. Right-click the Start button and select Run.
2. In the Run window, type “cmd” and click OK to open the command prompt.
3. At the command prompt, type “nslookup -type=mx yourdomainname.com” (without quotes) and press Enter. This will return your SMTP server information.
How do you check SMTP server is working or not in Windows 10?
1) Open the Command Prompt.
2) Type “telnet [SMTP server address] 25” and press enter.
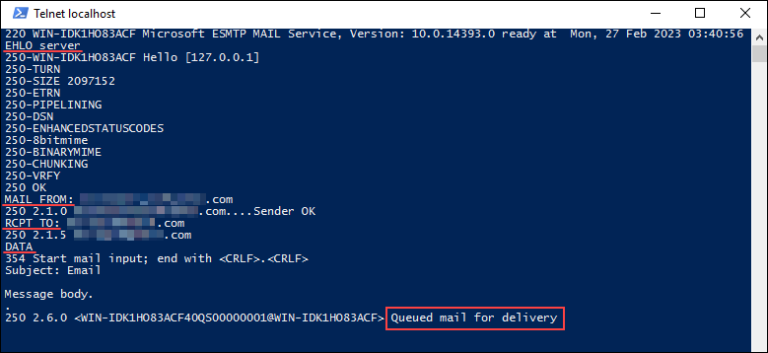
3) If the connection is successful, you should see something like this:
220 mail.server.com Microsoft ESMTP MAIL Service ready at Mon, 18 Feb 2019 16:25:31 +1100
4) Type “quit” and press enter to exit the telnet session.
How do I find my SMTP server using Command Prompt?
If you want to find your SMTP server using Command Prompt, you can use the “nslookup” command. To do this, open Command Prompt and type “nslookup -type=mx domainname.com”, where “domainname.com” is the name of your domain. This will return a list of MX records for the domain, which will include the address of the SMTP server.
What is SMTP host name?
The SMTP host name is the address of the server that handles outgoing email for a domain. For example, if you have an email account with Google Gmail, the SMTP host name would be smtp.gmail.com.
How do I find my SMTP server using command prompt?
To find your SMTP server using command prompt, you will need to use the ‘nslookup’ command. Type ‘nslookup’ followed by your domain name. Your SMTP server should be listed in the results.
What do I put for outgoing mail server?
The outgoing mail server is the server that allows you to send emails. To find out what your outgoing mail server is, you will need to contact your email provider.
Where is SMTP server setup?
The SMTP server is most likely set up on your web hosting account. If you are unsure, you can contact your web host and they will be able to tell you where the SMTP server is set up.
How do I know if SMTP port 587 is open WINDOWS 10?
There are a few ways to check if an SMTP port is open. One way is to use a port scanner such as nmap to scan for open ports on a system. Another way is to try connecting to the port using telnet or netcat. If the connection is successful, you should see a banner returned from the server indicating that it is an SMTP server.
How do I connect to SMTP server?
The process of connecting to an SMTP server varies depending on the email client you are using. However, the general process is as follows:
1. Open your email client and navigate to the settings menu.
2. Find the section labeled “Outgoing Mail Server” and enter the address of the SMTP server you want to use.
3. Enter your username and password for that server.
4. Save your changes and try sending a test email.
What is SMTP host name for Outlook?
The SMTP host name for Outlook is smtp-mail.outlook.com.
What is SMTP server port number?
The SMTP server port number is 25.
How do I configure SMTP?
The first step is to ensure that the SMTP server is configured and running. Next, you need to configure your email client to use the SMTP server. Finally, you can test the configuration by sending a test email.
{“@context”:”https://schema.org”,”@type”:”FAQPage”,”mainEntity”:[{“@type”:”Question”,”name”:”How do I know what my SMTP server is?”,”acceptedAnswer”:{“@type”:”Answer”,”text”:”nnThe best way to determine your SMTP server is to ask your email provider. They will be able to give you the specific settings you need in order to connect your account to their servers.”}},{“@type”:”Question”,”name”:”How do I find my SMTP server on Windows?”,”acceptedAnswer”:{“@type”:”Answer”,”text”:”nnAssuming you’re using a Windows 10 computer, follow these steps: n1. Right-click the Start button and select Run. n2. In the Run window, type “cmd” and click OK to open the command prompt. n3. At the command prompt, type “nslookup -type=mx yourdomainname.com” (without quotes) and press Enter. This will return your SMTP server information.”}},{“@type”:”Question”,”name”:”How do you check SMTP server is working or not in Windows 10?”,”acceptedAnswer”:{“@type”:”Answer”,”text”:”nn1) Open the Command Prompt.n2) Type “telnet [SMTP server address] 25” and press enter.n3) If the connection is successful, you should see something like this: n220 mail.server.com Microsoft ESMTP MAIL Service ready at Mon, 18 Feb 2019 16:25:31 +1100n4) Type “quit” and press enter to exit the telnet session.”}},{“@type”:”Question”,”name”:”How do I find my SMTP server using Command Prompt?”,”acceptedAnswer”:{“@type”:”Answer”,”text”:”nnIf you want to find your SMTP server using Command Prompt, you can use the “nslookup” command. To do this, open Command Prompt and type “nslookup -type=mx domainname.com”, where “domainname.com” is the name of your domain. This will return a list of MX records for the domain, which will include the address of the SMTP server.”}},{“@type”:”Question”,”name”:”What is SMTP host name?”,”acceptedAnswer”:{“@type”:”Answer”,”text”:”nnThe SMTP host name is the address of the server that handles outgoing email for a domain. For example, if you have an email account with Google Gmail, the SMTP host name would be smtp.gmail.com.”}},{“@type”:”Question”,”name”:”How do I find my SMTP server using command prompt?”,”acceptedAnswer”:{“@type”:”Answer”,”text”:”nnTo find your SMTP server using command prompt, you will need to use the ‘nslookup’ command. Type ‘nslookup’ followed by your domain name. Your SMTP server should be listed in the results.”}},{“@type”:”Question”,”name”:”What do I put for outgoing mail server?”,”acceptedAnswer”:{“@type”:”Answer”,”text”:”nnThe outgoing mail server is the server that allows you to send emails. To find out what your outgoing mail server is, you will need to contact your email provider.”}},{“@type”:”Question”,”name”:”Where is SMTP server setup?”,”acceptedAnswer”:{“@type”:”Answer”,”text”:”nnThe SMTP server is most likely set up on your web hosting account. If you are unsure, you can contact your web host and they will be able to tell you where the SMTP server is set up.”}},{“@type”:”Question”,”name”:”How do I know if SMTP port 587 is open WINDOWS 10?”,”acceptedAnswer”:{“@type”:”Answer”,”text”:”nnThere are a few ways to check if an SMTP port is open. One way is to use a port scanner such as nmap to scan for open ports on a system. Another way is to try connecting to the port using telnet or netcat. If the connection is successful, you should see a banner returned from the server indicating that it is an SMTP server.”}},{“@type”:”Question”,”name”:”How do I connect to SMTP server?”,”acceptedAnswer”:{“@type”:”Answer”,”text”:”nnThe process of connecting to an SMTP server varies depending on the email client you are using. However, the general process is as follows: nn1. Open your email client and navigate to the settings menu.n2. Find the section labeled “Outgoing Mail Server” and enter the address of the SMTP server you want to use. n3. Enter your username and password for that server. n4. Save your changes and try sending a test email.”}},{“@type”:”Question”,”name”:”What is SMTP host name for Outlook?”,”acceptedAnswer”:{“@type”:”Answer”,”text”:”nnThe SMTP host name for Outlook is smtp-mail.outlook.com.”}},{“@type”:”Question”,”name”:”What is SMTP server port number?”,”acceptedAnswer”:{“@type”:”Answer”,”text”:”nnThe SMTP server port number is 25.”}},{“@type”:”Question”,”name”:”How do I configure SMTP?”,”acceptedAnswer”:{“@type”:”Answer”,”text”:”nnThe first step is to ensure that the SMTP server is configured and running. Next, you need to configure your email client to use the SMTP server. Finally, you can test the configuration by sending a test email.”}}]}
How to setup SMTP server and what is SMTP server?
SMTP stands for “Simple Mail Transfer Protocol”. A SMTP server is responsible for sending/receiving e-mail messages to/from other smtp servers in Internet community. The mail transferring logic is based on RFC 821 and RFC 5321. Even as of today, communication via email still plays a vital role between companies in day-to-day running business.
Setup SMTP server for Windows 7 or 10?
For macOS users, you can configure SMTP server through macOS Server. For Linux and Unix users, you need extensive server knowledge to sertup SMTP server. For Windows 7 or 10 users? This Windows version is meant for end-users most of the time. However, you can still setup SMTP server through third-party server applications, such as EVO Mail Server or hMailServer. In the meantime, Windows Server require some Windows-server-specialized server ware such as EVO Mail Server, Axigen and Kerio.
How to configure DNS records for SMTP server, such as A, MX, SPF?
For SMTP server to communicate with Internet communicty out there, DNS record assignments are required. Basic DNS records are A and MX records and it would achieve better mail delivery result if SPF is also configured. Steps are simple:
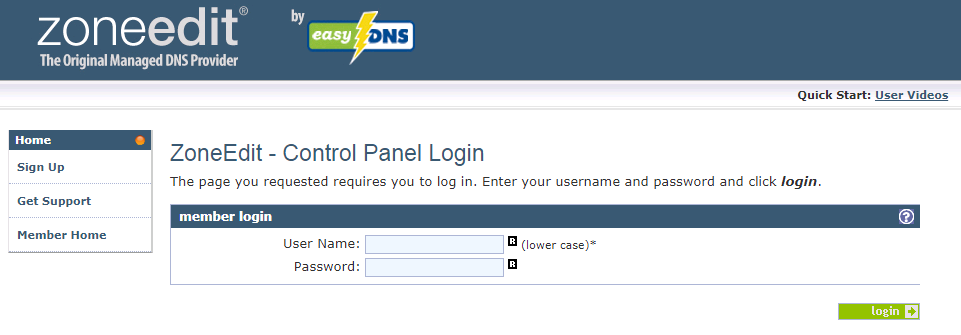
- Log in your DNS service. Here, we use Zoneedit DNS service in the demo below:

DNS setting for SMTP server - Add A record:

- Enter hostname of your SMTP server, such as smtp.yourdomain.com in HOST field.
- Enter its static IP address in IP Address field.
- Keep TTL default unless you need to modify it for other purposes.
- Add MX record:

- Enter zone or domain that your SMTP server is responsible for, such as yourdomain.com in MAIL FOR ZONE field.
- Enter SMTP server hostname, such as smtp.yourdomain.com in MAIL SERVER field.
- Enter an integer under PREF, such as 10, that defines priority of this SMTP server if you have multiple servers.
- Add SPF record:

- Enter hostname of your SMTP server, such as smtp.yourdomain.com in HOST field.
- Enter parameter string, such as: “v=spf1 ip4:<server_ip> a mx ~all” in TEXT field. The <> brackets should be ignore and simply enter server_ip.
- Keep TTL default unless you need to modify it for other purposes.


How to make SMTP server’s IP stay healthy?
Under normal circumstances, destination SMTP servers on Internet judge whether email messages from your SMTP server are spam or not based on your server IP credential given by anti-spam organizations on Internet. Before we get to know what to check, we need to make sure your SMTP server is using a static IP rather than dynamic one because spammers usually use dynamic IP to distribute spam mails. Consult your Internet service provider on how to obtain a static IP.
Next, there are two anti-spam organization we need to check whether your IP is listed on their list or what reputation your IP has:
- Spamhaus – To check, click on Blocklist Removal Center, enter your IP, and click on Lookup button to check. If you IP is listed, click into each entry and find out what can be done to delist your IP off the list.
- Senderbase – Enter your IP and click on magnifier symbol to find out reputation of your server IP. If your reputation is bad, then it will take time of days, weeks or even months for senderbase is assess whether spam mails are being sent out from your IP. Our suggestion for you is to change a static IP rather than wasting time to wait.
ISP limitation on self-running SMTP server
Before your smtp server setup, consult your ISP on whether it allows you to establish a smtp server. Then, also check whether it allows IP reverse resolution. What is it? The relationship between IP forward resolution and IP reverse resolution is like your name and your phone number on yellow page. We can look up your name and get your phone number on a phone directory. Likewise, when we look up your smtp server host name (for example: smtp.yourdomain.com), we can get your server IP address. Conversely, when we look up your IP address, we should be able to get your smtp server host name. However, for some Internet access subscription, your given static IP address is not allowed to have customized IP reverse resolution value.
How to check if your DNS records are well spreaded out across Internet?
Once your server DNS records kick in, we still cannot be sure whether other smtp server on Internet can find us. We can go to MX TOOLBOX and find out. Basically, we can check 4 DNS records and 1 listing to confirm your SMTP server is ready or not?
- A record
- MX record
- PTR record
- SPF record
- Blacklist
Simply enter value as demonstrated in the screenshots above, there will return results for us to check.
Limitation on EDM (Email Direct Marketing) for SMTP server
If you have a free Gmail, Outlook.com or Yahoo! mail account, then you would probably receive many EDM messages everyday. Some of them are directy dumped to mailbox’s SPAM folder while some of them are in INBOX folder. If you plan to distribute such EDM messages via your SMTP server, then you need to be aware of spam policies on these mail service providers. Please refer to the following list:
- Gmail – Bulk Sender Guidelines
- Outlook.com – Policies, Practices, and Guidelines
- Yahoo! – Yahoo Mail deliverability FAQs
- aol. – Bulk Sender Best Practices & Guidelines
For any additional policy and guideline of other mail service providers, you can google it using keywords such “mail server provider’s name + bulk mail policies” to find out.
How to configure built-in SMTP service on Windows Server?
Previously, we mentioned about how to setup SMTP server on Windows 7 or 10. Now, it is about Windows Server 2008, 2012 or 2016. In fact, Microsoft has implemented a SMTP service in Windows Server. All you need to do is enabling it according to a handy YouTube video tutorial here. However, this SMTP server barely plays a SMTP relay role rather than a comprehensive SMTP solution, such as Exchange Server, Kerio Connect or Axigen Mail Server, in which additional POP3, IMAP and even Groupware features are offered.
How to easily setup SMTP server other than Exchange Server?
For companies that run on Windows Server 2008, 2012, or 2016, Exchange Server is usually deployed along with Active Directory. This integration solution provides an environment where users can connect to synchronization services of messaging, calendar, address book, task on almost every client platforms, such as web browser, mobile devices, various types of laptop and desktop. However, the cost is higher than what medium and small business can afford.
However, EVO Mail Server, to some degree, provides similar services but at a much lower cost for especially those small business companies that cannot afford Exchange budget overhead. To setup, simply follow steps as below:
- Assume you have all DNS parameters for your company’s domain properly configured.
- Download and install EVO Mail Server software as administrator on Windows Server.
- Open EVO Mail Server GUI.
- Enter your company’s domain name next to Prmary Domain under Setting tab.
- Check Status tab and see if there is any issue under Mail, Network & Server sections.
- Create user accounts under Account tab.
- Create email account in mail client software and test sending e-mails.
For a complete tutorial on installing and configuring EVO Mail Server software as well as purchasing and deploying SSL certificate for the server, I have writeen another article detailing all of the above:
Cloud SMTP services
Cloud mailing serivces are becoming more and more popular, it’s convenient and more unlikely to be blocked when using cloud SMTP services. here are a list of cloud mailing services that you can choose:
- Amazon SES: Amazon SES is an email service that provides a way for sending transactional emails and marketing emails.
- MailGun: MailGun is an email service and SMTP provider, which is owned by Rackspace. It allows you to send, receive, track and store emails.
Introduction
Before we begin talking about how to install and configure SMTP Server on Windows, let’s briefly understand – What is an SMTP ?
SMTP (Simple Mail Transfer Protocol) is a protocol that allows email to be sent and received over the Internet and within a local network. SMTP works with the Mail Transfer Agent (MTA) to do that and makes sure the messages get to their intended recipients.
In order to transmit and receive email messages, mail servers and other message transfer agents typically use SMTP.
In this tutorial, you will install and configure SMTP Server on Windows. We will also address a few FAQs on how to install and configure SMTP Server on Windows.
Advantages of SMTP
- Reliable Delivery: SMTP ensures reliable delivery of email messages by following a set of rules and protocols.
- Compatibility: It is compatible with various email clients and servers, allowing seamless communication across different platforms.
- Efficient Communication: SMTP facilitates fast and efficient transfer of emails between servers, reducing delivery delays.
- Error Reporting: It provides detailed error reporting, allowing senders to identify and rectify issues with email delivery.
- Scalability: SMTP is highly scalable, making it suitable for both individual users and organizations with large email volumes.
Prerequisites
- A Windows Server OS.
- A user account with administrator privileges.
💡
Note: SMTP Server functionality is not available in client operating systems like Windows 11, Windows 10, and Windows 8. As a component of the Internet Information Services, Windows Server operating systems offer an SMTP server (IIS). As the client operating systems do not function as SMTP servers, they merely offer the SMTP email client.
Install SMTP on Windows
The installation of SMTP on Windows Server operating systems is simple. Install SMTP by using the Server Manager management console and the instructions listed below.
Step 1: Add Roles and Features in Server Manager Dashboard
Choose Dashboard in the left pane of the Server Manager management console after it is open.
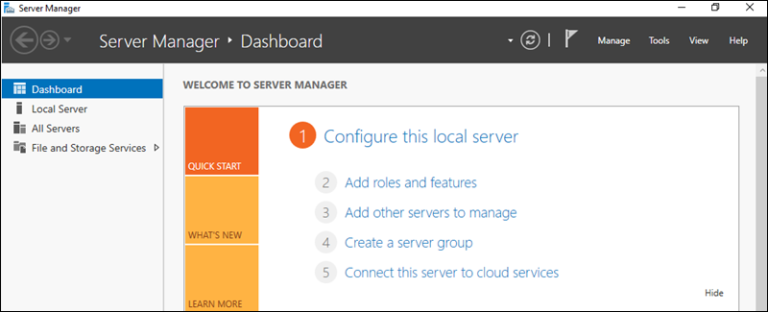
To launch the wizard and install the SMTP server, select the Add roles and features option from the Dashboard.
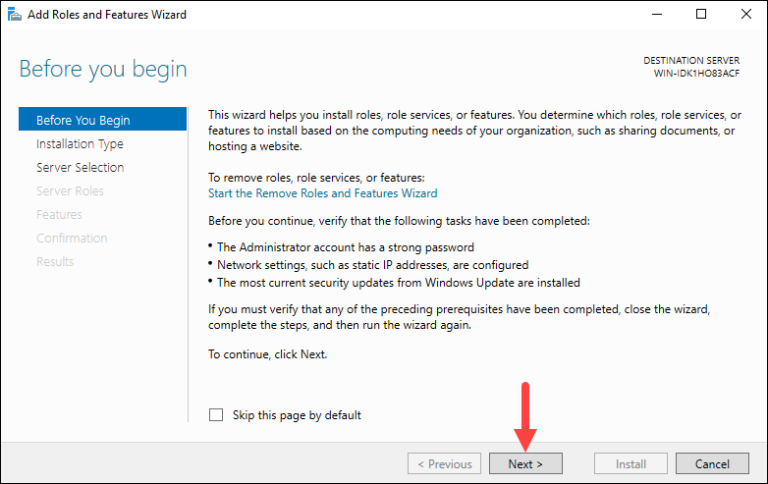
The Before You Begin page shows up and lists the requirements for adding a position as follows:
- Using a secure password for the Administrator account.
- The server’s network settings have been configured.
- You have the most recent security updates installed.
Click Next to continue the installation if every requirement has been met.
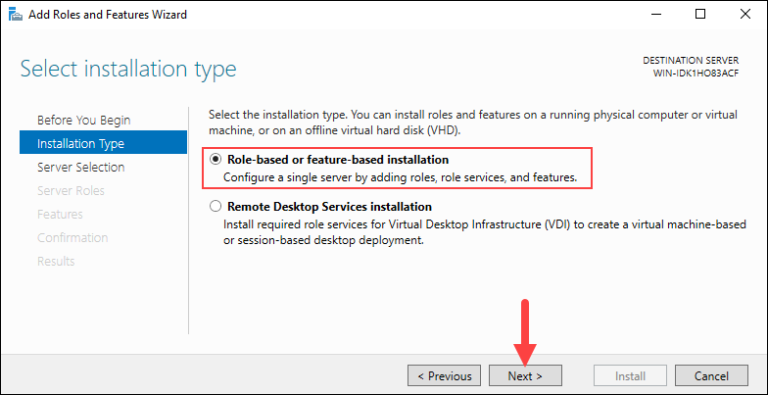
Step 2: Select Installation Type
Choose Role-based or feature-based installation from the Installation type window. To proceed, click Next.
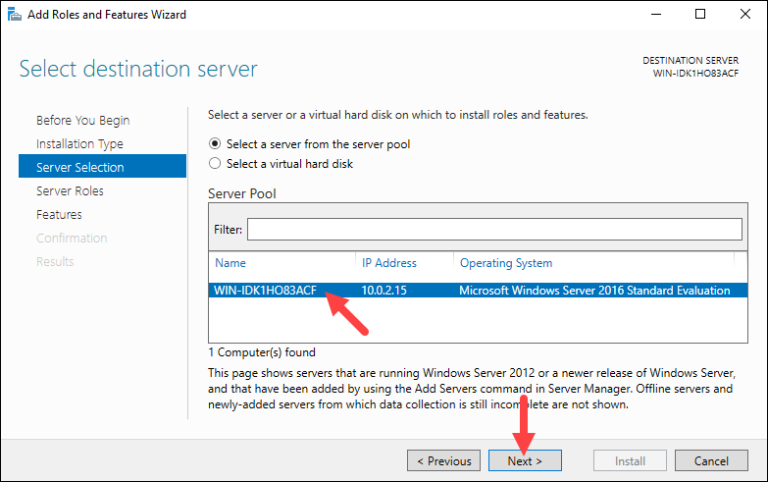
Step 3: Select Destination Server
To set the destination server, choose the Select a server from the server pool option and select the appropriate server from the Server Pool. The servers that you have added using Server Manager’s Add Server option are listed in the Server Pool. The local server is selected by default.
To proceed to the following step, click Next.
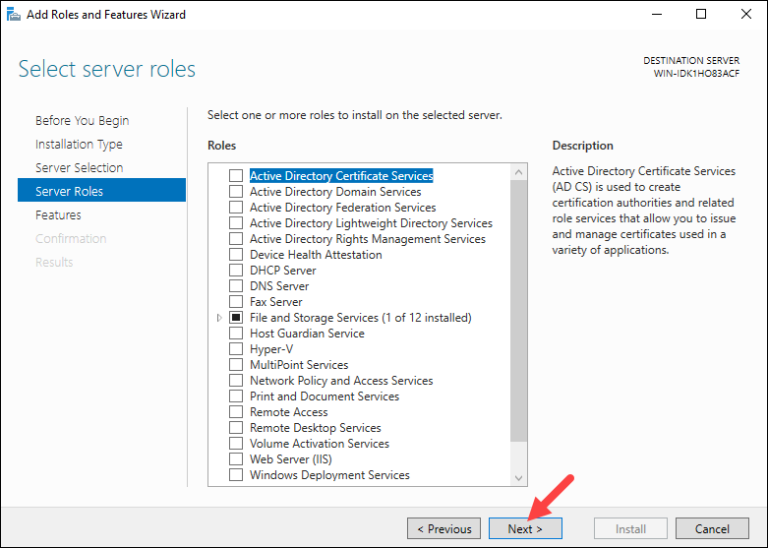
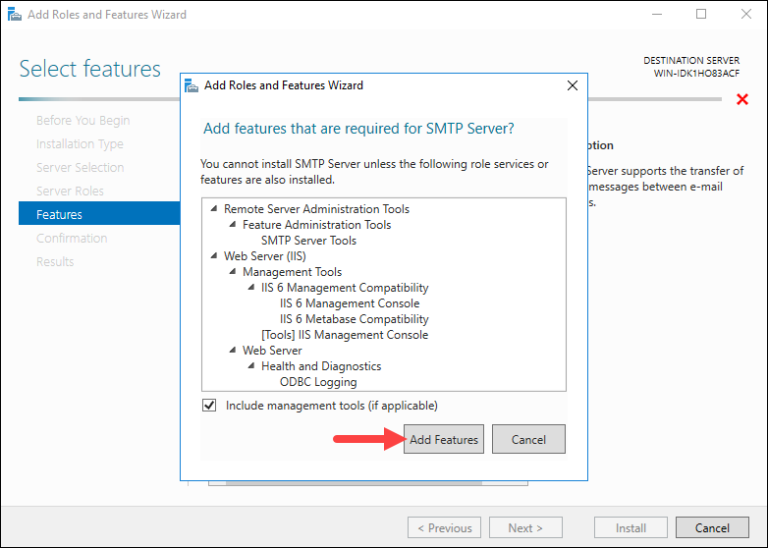
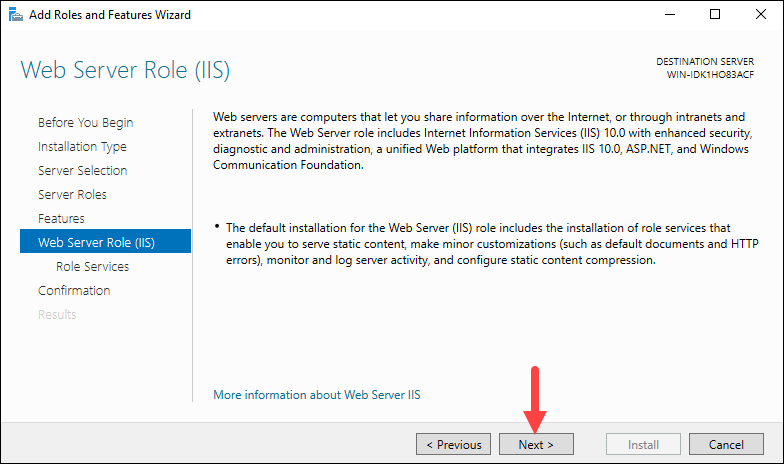
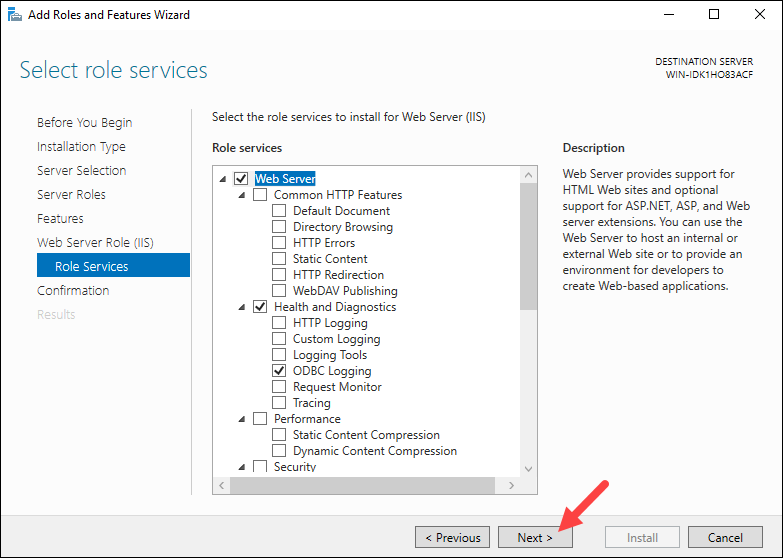
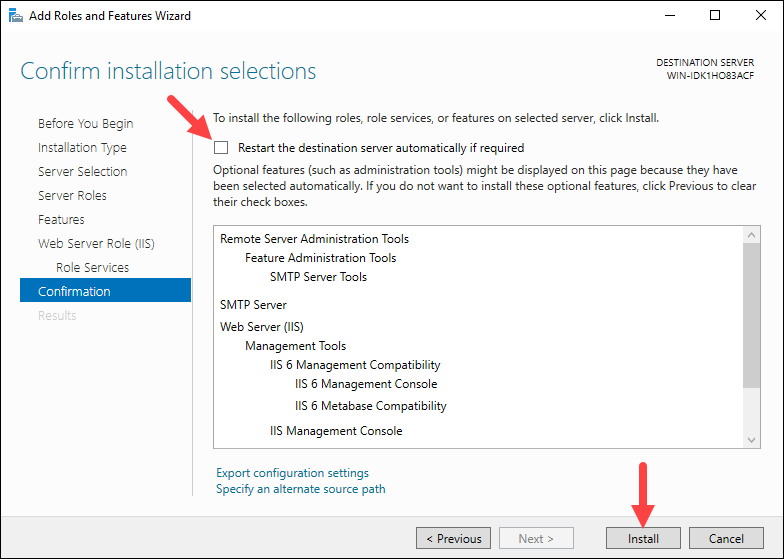
Step 4: Select Server Role
Choose which features and roles to install using the Select server roles screen. Click Next and leave the default option selected.

 Type this as the email subject: