
Если на вашем компьютере установлена не русскоязычная версия Windows 10, при этом не в варианте «Для одного языка» (Single Language), вы легко можете скачать и установить русский язык интерфейса системы, а также включить русский язык для приложений Windows 10, что и будет показано в инструкции далее.
Нижеприведенные действия продемонстрированы для Windows 10 на английском языке, однако будут теми же самыми и для версий с другими языками интерфейса по умолчанию (разве что пункты будут настроек будут названы по-другому, но, думаю, разобраться не составит труда). Примечание: если после установки русского языка интерфейса некоторые документы или программы показывают непонятные символы, используйте инструкцию Как исправить отображение кириллицы в Windows 10.
- Русский язык Windows 10 в Microsoft Store
- Как установить русский язык интерфейса в Параметрах
- Видео инструкция
- Установка с помощью Панели управления (старые версии Windows 10)
- Как включить русский язык в Приложениях Windows 10
Как установить русский язык интерфейса Windows 10 через магазин Microsoft Store
Самый простой метод установки русского языка Windows 10 в последних версиях системы — использовать загрузку языковых пакетов в магазине Microsoft Store. Путь будет одним и тем же, независимо от того, английская у вас версия системы, китайская или какая-то еще:
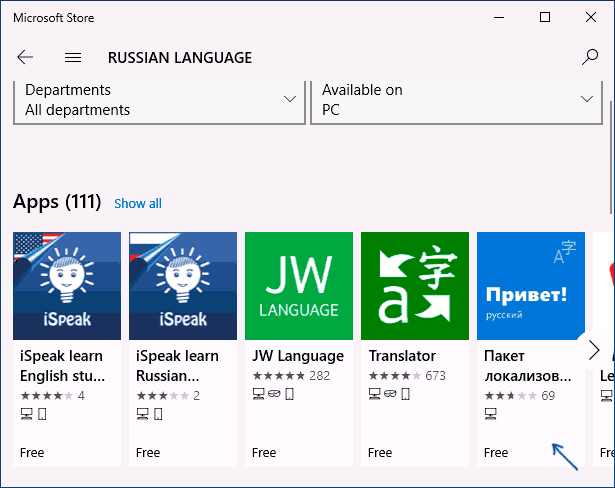
- Откройте магазин Microsoft Store (его значок стандартно расположен на панели задач) и в поиске введите «Russian language».
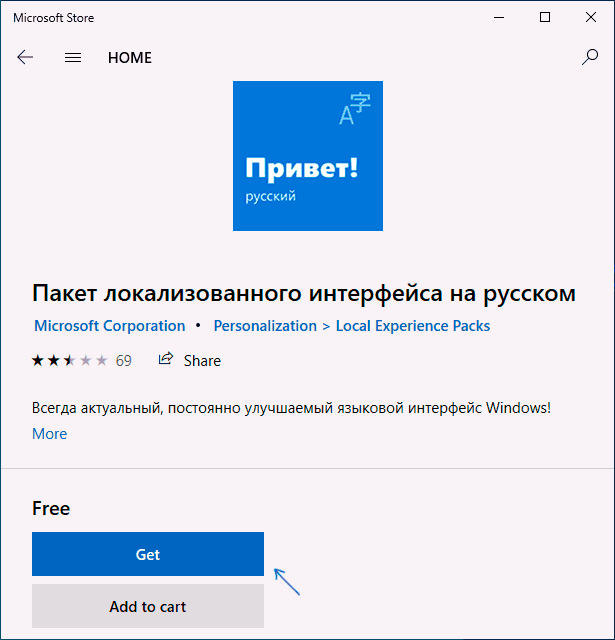
- Будет найдено несколько результатов, нам требуется тот, который называется «Пакет локализованного интерфейса на русском языке».

- Нажмите кнопку «Get» в английской версии или аналогичную синюю кнопку в любой другой версии Windows 10.

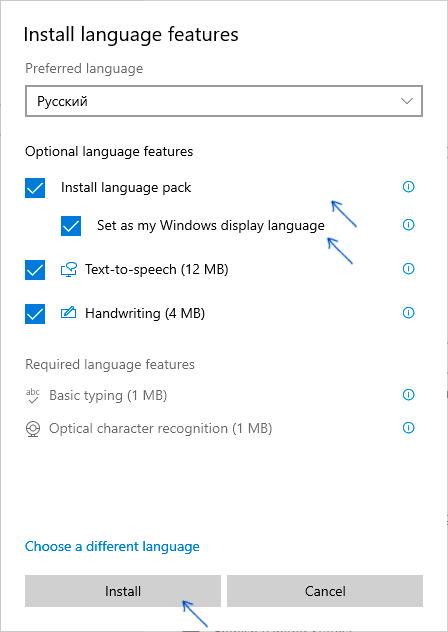
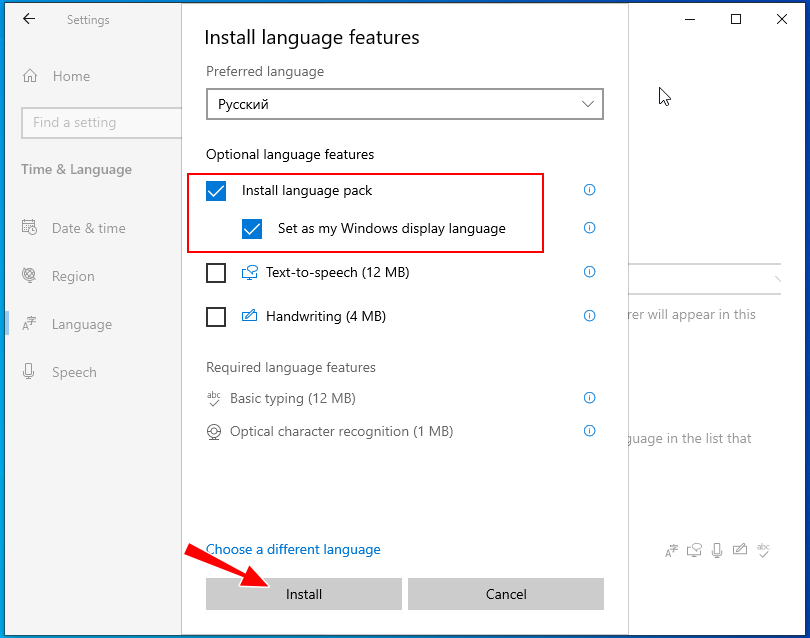
- Откроется окно параметров, которое в английской версии выглядит как на скриншоте ниже. По умолчанию включены Языковой пакет интерфейса на русском (верхние два пункта — первый загружает его, второй сразу устанавливает в качестве языка интерфейса Windows 10), а также компоненты для перевода текста в речь и распознавания рукописного ввода (нижние две отметки), если они вам не требуются — можно снять отметки.

- Нажмите кнопку Install (или аналогичную на других языках) для установки русского языка интерфейса.
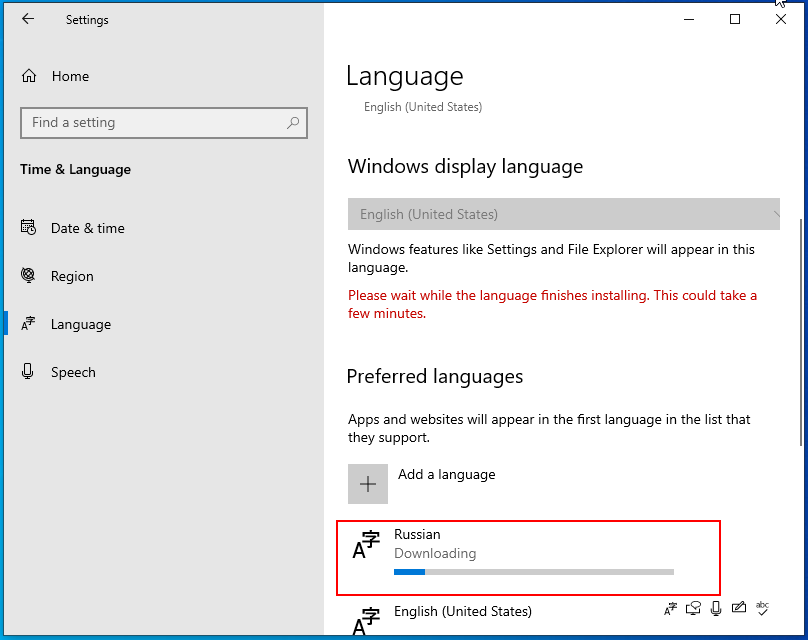
- Дождитесь, когда язык интерфейса будет загружен из Интернета и установлен. О том, что русский язык скачивается вам будет сообщать красная надпись в параметрах под «Windows display language».
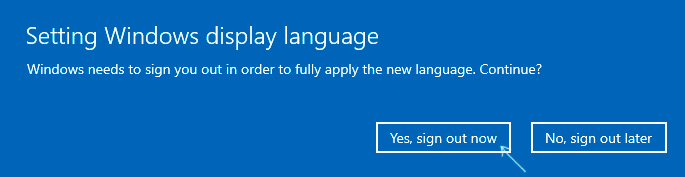
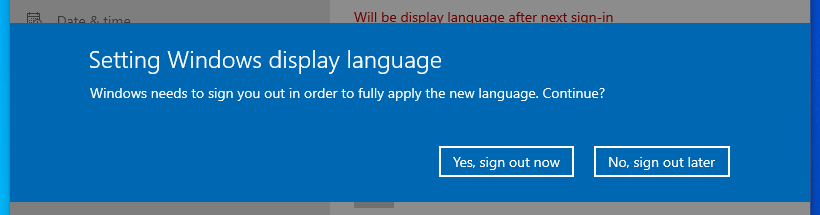
- После завершения загрузки русского языка, для окончания установки вам нужно будет выйти из системы и снова зайти, появится соответствующее окно. Нажмите «Yes, sign out now» для выхода.

- После перезагрузки и входа в систему язык Windows 10 станет русским, также, если ранее отсутствовала русская клавиатура, она будет автоматически добавлена в систему.


Обратите внимание, что несмотря на то, что для элементов интерфейса и для ввода будет по умолчанию установлен русский язык, встроенные приложения Windows 10 продолжат называться по-английски. Как это исправить — в соответствующем разделе инструкции.
Также учитывайте, что какие-либо блокировки функциональности, телеметрии, обновлений Windows 10 могут приводить к тому, что загрузка языкового пакета будет невозможной из-за блокировки доступа к серверам Майкрософт.
Установка русского языка в параметрах Windows 10
Этот способ по своей сути дублирует предыдущий, отличаться будет лишь то, где именно будет запущена загрузка языкового пакета для русского языка. Начиная с Windows 10 версии 2004 (май 2020, для предыдущих версий описание представлено далее) путь добавления языка выглядит следующим образом:
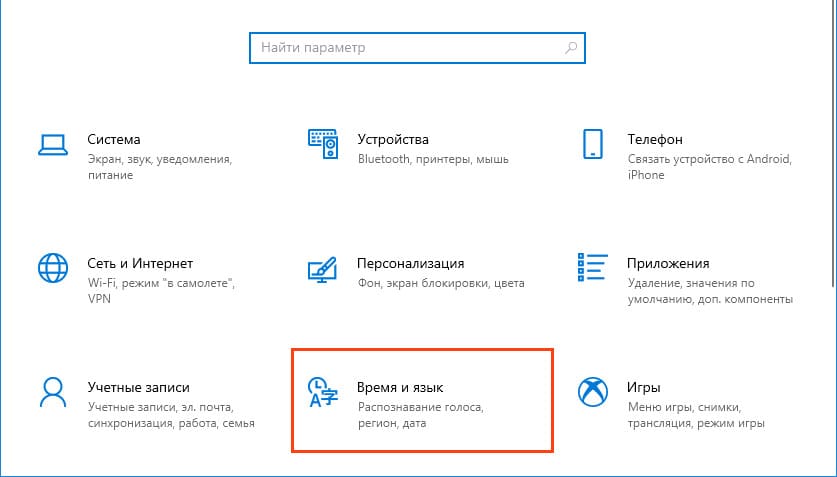
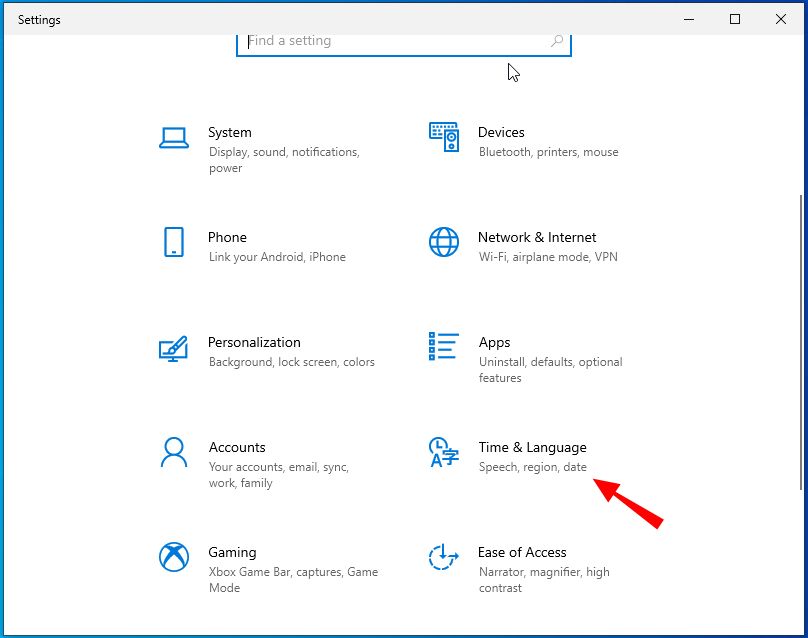
- Зайдите в Параметры (Settings), для этого можно нажать клавиши Win+I на клавиатуре.
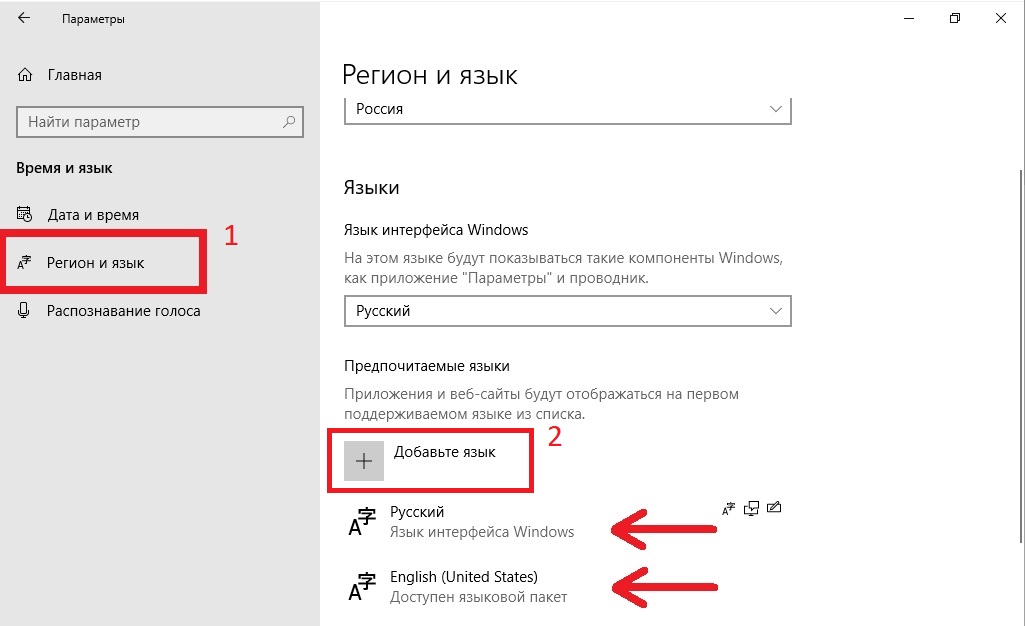
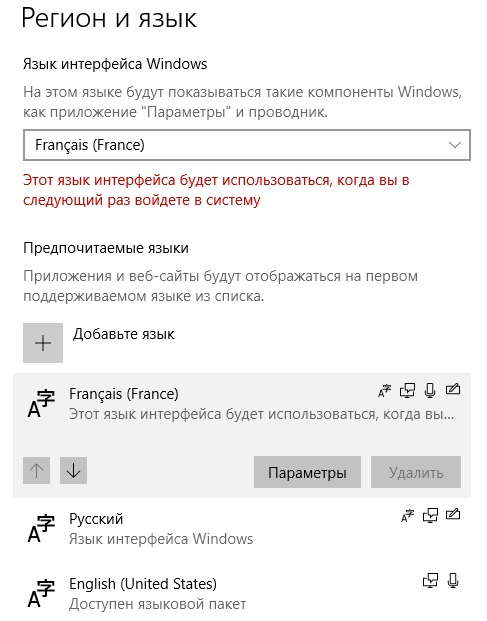
- Перейдите в раздел Время и язык — Язык или Регион и язык (Time & Language — Language или Region and language).
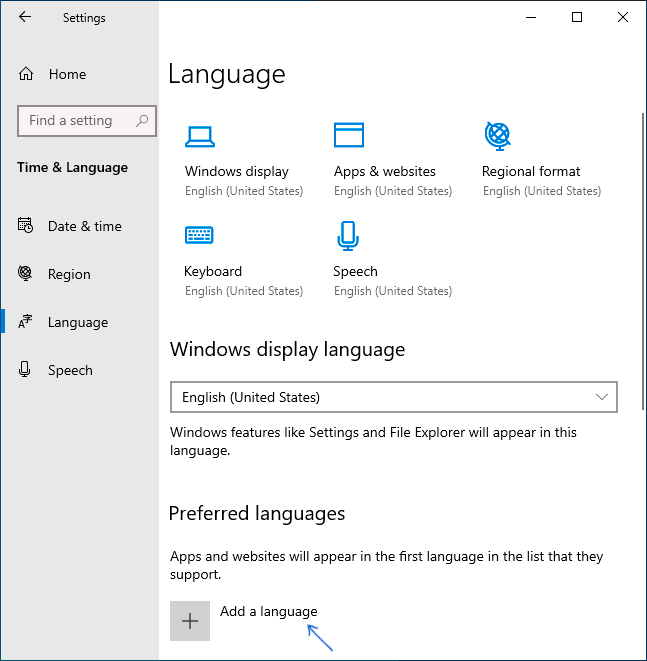
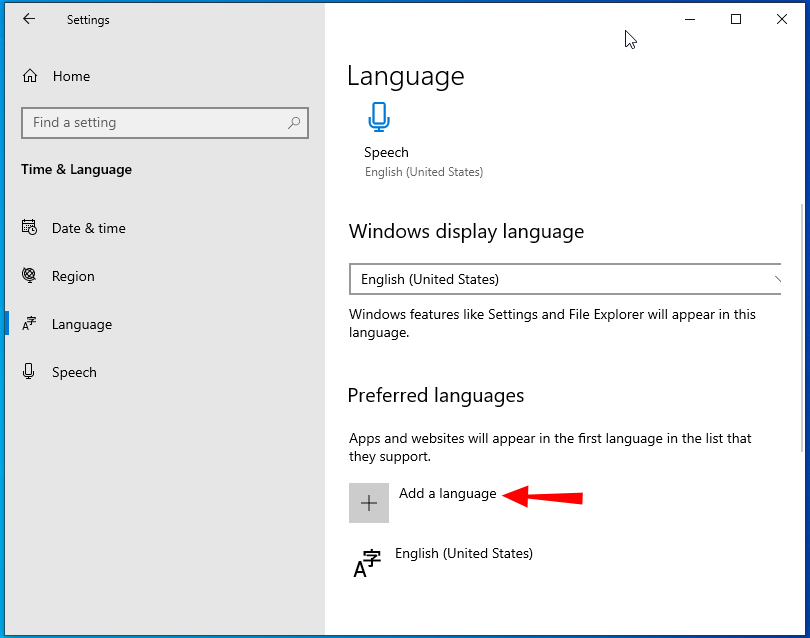
- В разделе Windows display language вы можете выбрать язык отображения Windows 10, но как правило, там есть лишь один язык. Чтобы добавить русский язык, нажмите «Add a language» в разделе Preferred languages (предпочитаемые языки).

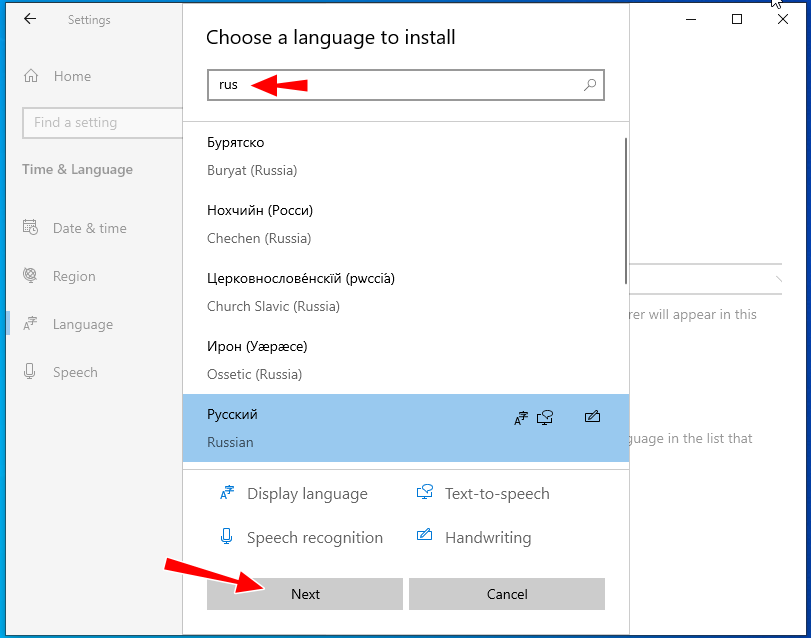
- В списке выберите русский язык, можно пользоваться поиском (если нет русского языка ввода, введите Russian в окно поиска), нажмите кнопку «Next».

- В следующем окне присутствуют 4 отметки, рекомендую оставить верхние 2, они скачают русский язык для Windows 10 и установят его в качестве языка по умолчанию. Следующие две отвечают за перевод текста в речь и рукописный ввод. Нажмите кнопку «Install».
- Дождитесь завершения скачивания и установки русского языка Windows 10, а на запрос о выходе из системы нажмите «Yes, sign out now» (Да, выйти сейчас). При повторном входе в систему язык будет русским.

В результате указанных шагов в системе появится русская клавиатура, а почти весь интерфейс Windows 10 будет на нужном вам языке. Однако, часть встроенных приложений продолжат отображаться на изначальном языке. О том, как это исправить — в соответствующем разделе инструкции далее.
В предыдущих версиях Windows 10 путь будет следующим: Параметры (клавиши Win+I) — Время и язык — Язык или Регион и язык (Settings — Time & Language — Region and language). Там требуется выбрать нужный язык (а при отсутствии — добавить его, нажав Add a language) в списке «Предпочитаемые языки» и нажать «Параметры» (Settings). И уже на следующем экране загрузить языковой пакет для этого языка (на скриншоте — загрузка английского языкового пакета, но для русского то же самое).
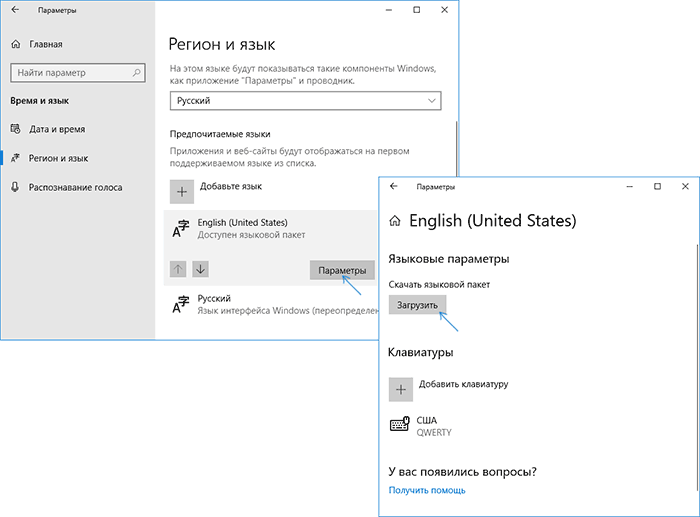
После загрузки языкового пакета, вернитесь на предыдущий экран «Регион и язык» и выберите нужный язык в списке «Язык интерфейса Windows».
Установка русского языка Windows 10 — видео инструкция
Как скачать русский язык интерфейса с помощью панели управления
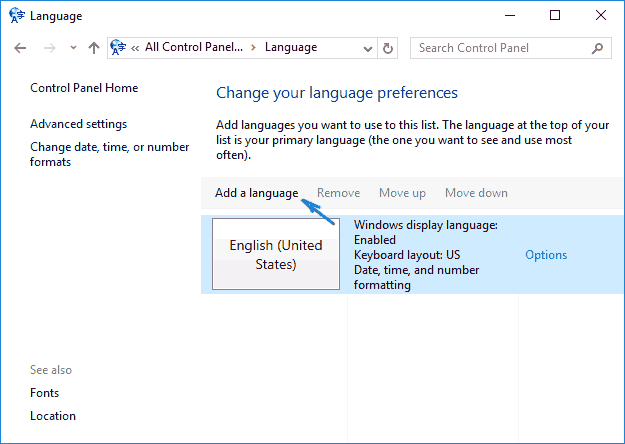
В предыдущих версиях Windows 10 то же самое можно проделать с помощью панели управления. Первый шаг — загрузка русского языка, включая язык интерфейса для системы. Сделать это можно с помощью соответствующего пункта панели управления Windows 10.
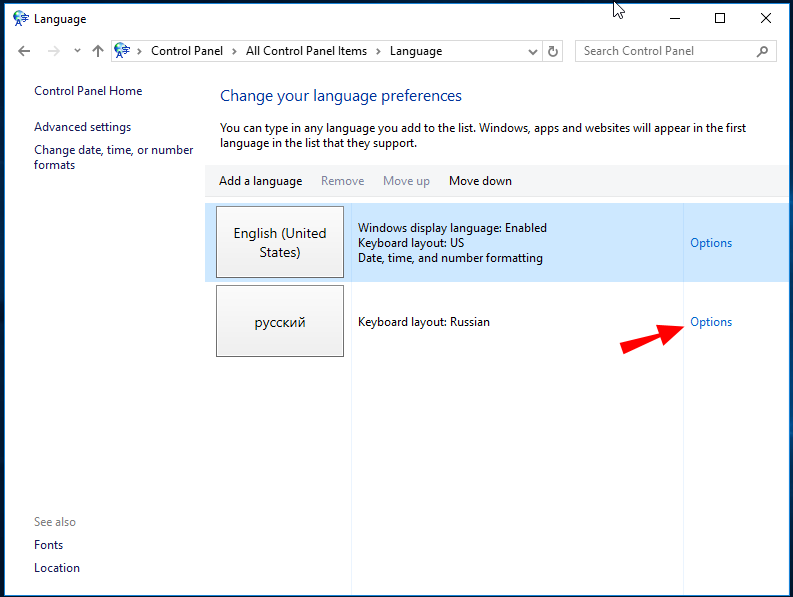
Зайдите в панель управления (например, через правый клик по кнопке «Пуск» — «Control Panel»), переключите сверху справа пункт «Просмотр» (View by) в значки (Icons) и откройте пункт «Язык» (Language). После этого выполните следующие действия по установке языкового пакета.
Примечание: если в вашей системе уже установлен русский язык, но только для ввода с клавиатуры, а не интерфейса то начните с третьего пункта.
- Нажмите «Добавить язык» (Add a language).

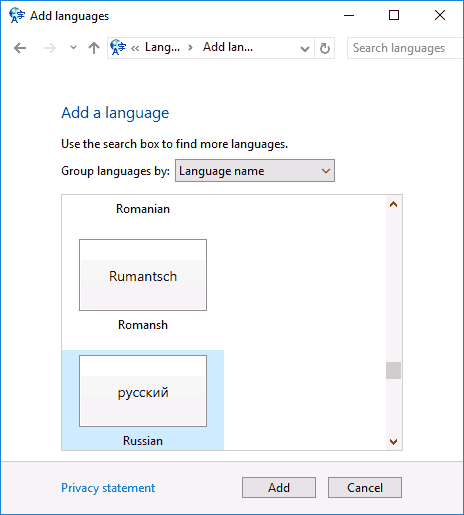
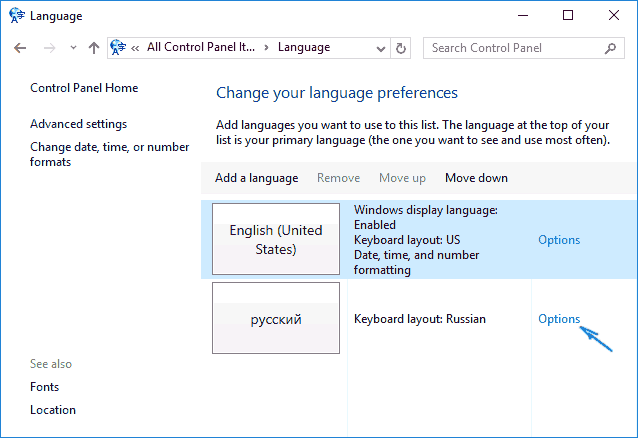
- Найдите в списке «Русский» и нажмите кнопку «Добавить» (Add). После этого русский язык появится в списке языков ввода, но не интерфейса.

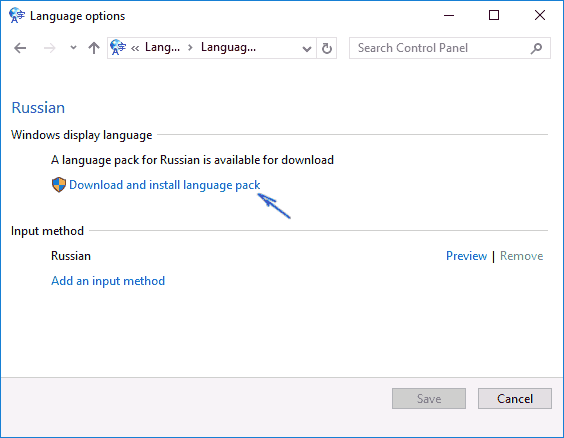
- Нажмите «Параметры» (Options) напротив русского языка, в следующем окне будет выполнена проверка наличия русского языка интерфейса Windows 10 (компьютер должен быть подключен к Интернету)
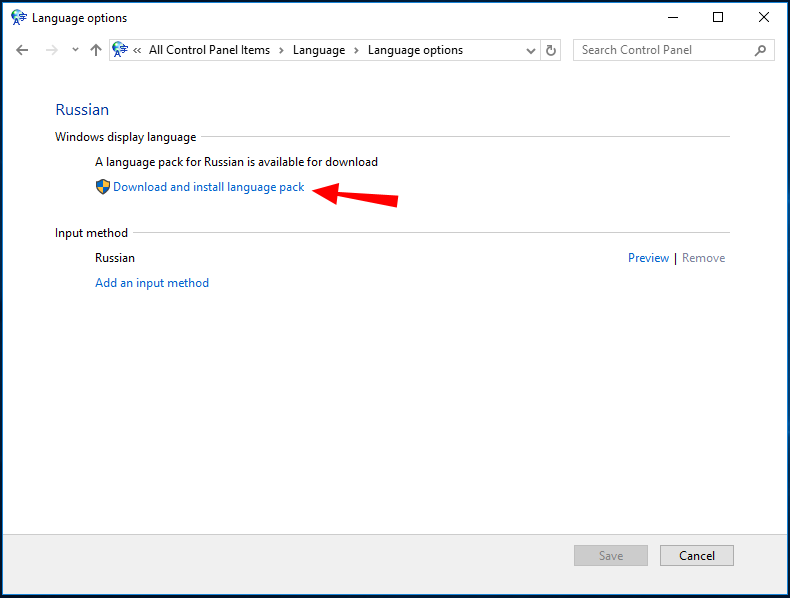
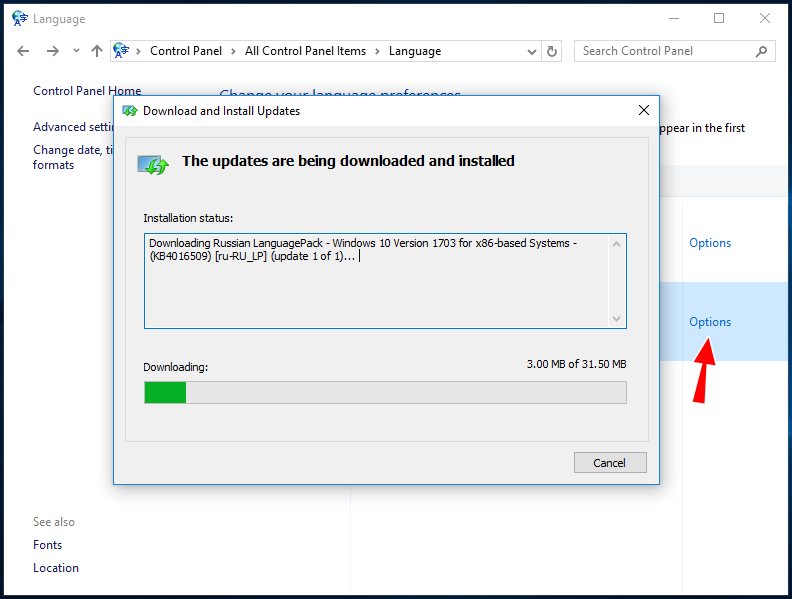
- Если русский язык интерфейса доступен, появится ссылка «Загрузить и установить языковой пакет» (Download and install language pack). Нажмите по этому пункту (требуется быть администратором компьютера) и подтвердите загрузку языкового пакета (чуть больше 40 Мб).

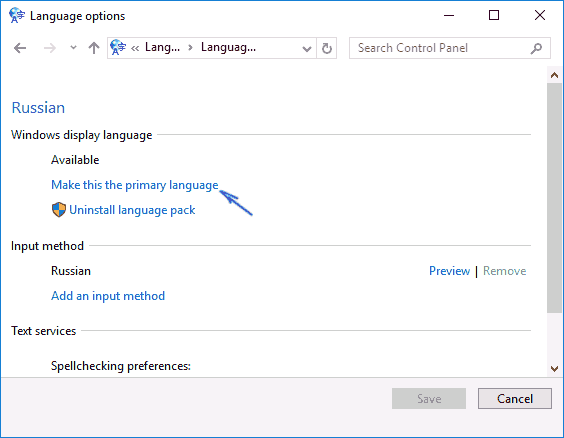
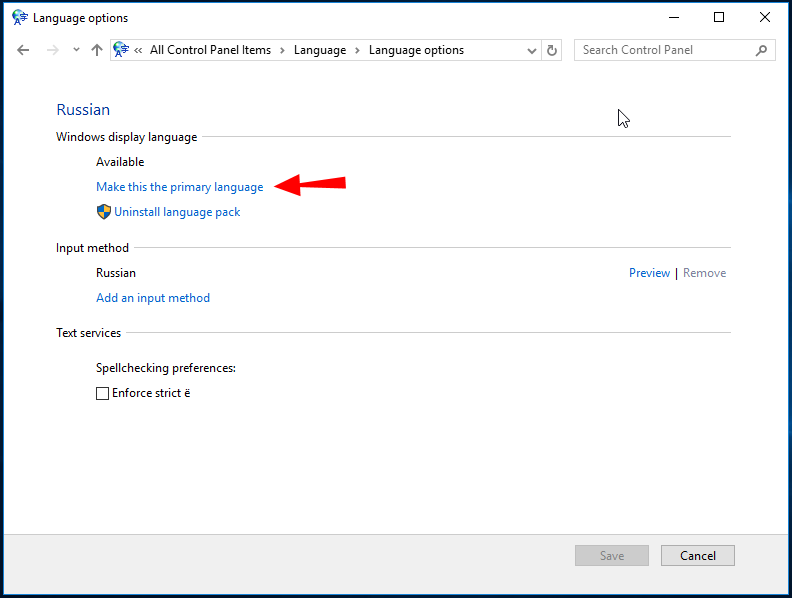
- После того, как русский языковой пакет будет установлен и окно установки закрыто, вы вернетесь в список языков ввода. Снова нажмите «Параметры» (Options) рядом с «Русский».

- В разделе «Язык интерфейса Windows» будет указано, что русский язык доступен. Нажмите «Сделать основным языком» (Make this the primary language).
- Вам будет предложено выйти из системы и снова зайти, чтобы язык интерфейса Windows 10 изменился на русский. Нажмите «Выйти сейчас» (Log off now) или же позже, если нужно сохранить что-то перед выходом.
При следующем входе в систему язык интерфейса Windows 10 будет русским. Также, в процессе шагов выше был добавлен и русский язык ввода, если он не был установлен ранее.
Как включить русский язык интерфейса в приложениях Windows 10
Несмотря на то, что описанные ранее действия, меняют язык интерфейса самой системы, почти все приложения из магазина Windows 10, вероятнее всего, останутся на другом языке, в моем случае — английском.
Чтобы включить русский язык и в них тоже, выполните такие действия:
- Зайдите в панель управления — «Язык» и убедитесь, что русский язык стоит на первом месте в списке. Иначе — выделите его и нажмите пункт меню «Вверх» над списком языков.
- В панели управления зайдите в «Региональные стандарты» и на вкладке «Местоположение» в пункте «Основное расположение» выберите «Россия».
- В Windows 10 последней версии язык отображения приложений можно отдельно задать в Параметры — Время и язык — Язык, но может потребоваться и ниже описанное действие.
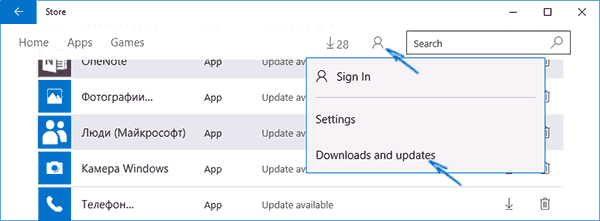
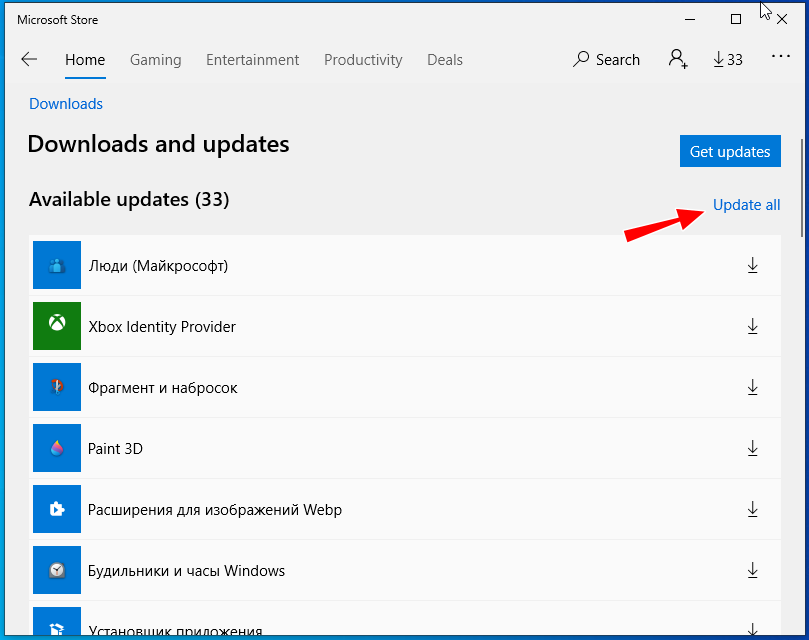
Готово, после этого, даже без перезагрузки, некоторые приложения Windows 10 также приобретут русский язык интерфейса. Для остальных запустите принудительное обновление через магазин приложений (Запустить магазин, нажать по значку профиля, выбрать пункт «Downloads and updates» или «Загрузки и обновления» и выполнить поиск обновлений).
Также в некоторых сторонних приложениях язык интерфейса может настраиваться в параметрах самого приложения и не зависеть от настроек Windows 10.
Ну вот и все, перевод системы на русский язык завершен. Как правило, все работает без каких-либо проблем, однако изначальный язык может сохраниться в предустановленных программах (например, имеющих отношение к вашему оборудованию). Также может быть полезным: Как изменить сочетание клавиш для смены языка Windows 10.
В данной статье пошагово рассмотри как сменить язык интерфейса в Windows 10.
Заходим в меню «Пуск» => Параметры
Время и язык
Переходим на среднюю вкладку «Регион и язык». Здесь Вы сразу можете выбрать один из доступных языков, которые не нужно дополнительно скачивать. На примере ниже это русский и английский. Можете нажать на него, применить, далее перезагрузить систему и язык изменится, к примеру на английский, если Вы его выберите. Но если нужного Вам языка нет в списке, нажимаем кнопку «Добавить язык».
Далее, у Вас откроется окно со списком языков, которые доступны для Windows 10. Можете в строке поиска сразу обозначить нужный Вам язык и выбрать его из списка, после нажимаете «Далее».
После подтверждаете, что именно Вам нужно скачать из языкового дополнения. Интерфейс, речь, или только раскладку. Мы на примере оставим все пункты отмеченными, после нажимаем «Установить».
Теперь дожидаетесь пока языковое дополнение скачается и установится. После просто перезагружаете систему и у Вас язык будет изменен.

А так же, мы настоятельно рекомендуем использовать только оригинальные дистрибутивы Windows 10, дабы получать все актуальные обновления и работать без каких-либо трудностей. Скачать их можете в нашем каталоге.
Помимо всего рекомендуем так же активировать систему только оригинальными ключами, приобрести их можете в нашем интернет-магазине по самым низким ценам от 1490 ₽. Моментальная доставка на Вашу электронную почту в автоматическом режиме сразу после оплаты. Гарантия и круглосуточная техподдержка. Подробнее о ключах Windows 10 на следующей странице.
Лицензионный ключ активации Windows 10 от
Applies ToWindows 11 Windows 10
Various language and keyboard/input layout settings in Windows can be managed in the Settings app including:
-
Installing and removing languages.
-
Changing the Windows display language.
-
Changing the language used by Microsoft Store apps and websites.
-
Adding speech features to a language.
-
Adding and removing keyboard/input layouts.
-
Changing keyboard/input layouts.
This article covers these tasks.
Note: For the sake of simplicity, the rest of this article refers to keyboard/input layout as just keyboard layout.
Select the desired task from the following list:
To check what languages are currently installed in Windows:
-
In the Time & language > Language & region window, the currently installed languages are displayed in the Language section.
The first step in setting language settings in Windows is making sure that the desired language is installed. To install a language in Windows:
-
Since language packs are downloaded via the Internet, make sure that the Windows device is connected to the Internet.
-
Save all work and close out of any open apps.
-
In the Time & language > Language & region window, under the Language section, select the Add a language button next to Preferred languages.
-
In the Choose a language to install window, enter in the name of the desired language in the Type a language name… text box or scroll through the list of available languages. Once the desired language is displayed, select it and then select the Next button.
-
In the Install language features window:
-
Under Optional language features, make sure Language pack is selected.
-
Under Optional language features, select any additional desired features, such as speech recognition.
-
Under Language preferences, if the language being installed should be set as the Windows display language, select Set as my Windows display language. For more information, see the Change the Windows display language section in this article.
-
-
Once all the options are selected as desired in the Install language features window, select the Install button.
-
In the Time & language > Language & region window, the following message is displayed under the Language section:
Please wait while the language finishes installing. This could take a few minutes.
In the list of languages, the download and install progress of the selected language is also displayed.
-
Once the selected language is finished installing, the language is added as a language under the Language section in the Time & language > Language & region window.
-
If the option Set as my Windows display language was selected:
-
The following message is displayed under the Language section in the Time & language > Language & region window prompting to sign out of Windows:
Windows needs to sign you out in order to apply your new display language.
To sign out of Windows, select the Sign out button next to the message.
Note: If there’s no Sign out button next to the message, then manually sign out by right-clicking on the Start menu and then selecting Shutdown or sign out > Sign out.
-
At the Windows sign-on screen, sign back into Windows. The Windows display language is applied and changes the selected display language.
Warning: When the Windows display language is changed, it might also change the keyboard layout to match the language. The input language icon at the sign-on screen shows the currently selected keyboard layout. Be aware of the possible different keyboard layout when entering the username and password at the Windows sign-on screen.
If necessary, use the password reveal icon in the password box to verify that the password is being entered correctly with the current keyboard layout. The keyboard layout can be changed from the sign-on screen using the input language icon.
Changing the keyboard layout only changes the layout and doesn’t change the Windows display language.
-
Note: A single language edition of Windows might be installed if one of the following messages is displayed when trying to add a language pack:
Only one language pack allowed.
Your Windows license supports only one display language.
For more information, see Check whether a version of Windows supports multiple languages.
The Windows display language determines the language used by the Windows user interface. It also determines the language used by Windows features such as the Settings app and File Explorer.
Changing the Windows display language also causes the selected language to move to the top of Preferred languages list. The first supported language in the Preferred languages list determines the language used by Microsoft Store apps and websites.
Important: Some languages aren’t fully localized. For languages that aren’t fully localized, some elements in Windows might still appear in the first language that is fully localized in the Preferred languages list.
To change the Windows display language:
-
Ensure that Windows already has the desired language installed before switching to it. To check what languages are currently installed in Windows, follow the section Check what languages are installed in Windows in this article. If the desired language isn’t currently installed, follow the section Install a language pack in this article.
-
Save all work and close out of any open apps.
-
In the Time & language > Language & region window, under the Language section, select the desired Windows display language in the drop-down menu next to Windows display language.
Tip: If the desired display language isn’t displayed in the Windows display language drop-down menu, see the section Install a language pack in this article to install the language.
-
The following message is displayed under Windows display language:
Windows needs to sign you out in order to apply your new display language.
To sign out of Windows, select the Sign out button.
Note: If there’s no Sign out button next to the message, then manually sign out by right-clicking on the Start menu and then selecting Shutdown or sign out > Sign out.
-
At the Windows sign-on screen, sign back into Windows. The Windows display language is applied and changes to the selected display language.
Warning: When the Windows display language is changed, it might also change the keyboard layout to match the language. The input language icon at the sign-on screen shows the currently selected keyboard layout. Be aware of the possible different keyboard layout when entering the username and password at the Windows sign-on screen.
If necessary, use the password reveal icon in the password box to verify that the password is being entered correctly with the current keyboard layout. The keyboard layout can be changed from the sign-on screen using the input language icon.
Changing the keyboard layout only changes the layout and doesn’t change the Windows display language.
Changing the Windows display language changes the language used by the Windows user interface and Windows features such as the Settings app and File Explorer. By default, it also changes the language used by Microsoft Store apps and websites by moving the selected Windows display language to the top of the Preferred languages list. For more information, see the section Change the Windows display language in this article.
However, the language used by Microsoft Store apps or websites can be controlled independently of the Windows display language. For example, the Windows display language can be in one language, while the language used by Microsoft Store apps or websites can be in another. The first supported language in the Preferred languages list determines the language used by Microsoft Store apps and websites.
To change the language used by Microsoft Store apps and websites:
-
In the Time & language > Language & region window, the current preferred order of the installed languages is shown under Preferred languages in the Language section.
-
To move the desired language for Microsoft Store apps and websites to the top of the Preferred languages list, select the language and then drag it to the top of the list. Observe how moving the language to the top of the Preferred languages list doesn’t affect the language selected as the Windows display language.
-
If desired, reorder the preference of other installed languages by selecting the language and then dragging it to the desired location in the Preferred languages list.
To install speech features for a language:
-
Since speech features are downloaded via the Internet, make sure that the Windows device is connected to the Internet.
-
Make sure that the language where speech is going to be used is set as the display language.
-
In the Time & language > Language & region window, under the Language section, select the ellipses next to the current Windows display language and then select Language options.
-
In the Time & language > Language & region > Options window, under the Language Features section, select the Download button next to each desired speech features that should be installed. For example:
-
Text-to-speech.
-
Basic Speech recognition.
-
Enhanced speech recognition.
Note: Not all languages have speech features. If some or all of the above features aren’t available as an option, that language doesn’t have those speech features.
-
Adding a keyboard layout allows selection of an alternate keyboard layout for the current Windows display language. Alternate keyboard layouts allow directly entering of characters using the keyboard or input device that aren’t available in the current Windows display language’s keyboard layout. For example, characters only found in other languages.
Note: A full language pack that matches the language of the desired keyboard layout doesn’t always need to be installed to gain access to that keyboard layout. All languages, including the current Windows display language, have keyboard layouts in various different languages. The current Windows display language might have the keyboard layout of the desired keyboard layout in a different language.
To add a keyboard layout:
-
In the Time & language > Language & region window, under the Language section, select the ellipses next to the current Windows display language and then select Language options.
-
In the Time & language > Language & region > Options window, under the Keyboards section, verify that the desired keyboard layout isn’t already installed. If it’s not, then select the Add a keyboard button next to Installed keyboards.
-
In the pop-up menu that appears, scroll through the list of keyboard layouts and then select the desired keyboard layout. The list is sorted first with the keyboard layouts from the selected language, and then alphabetically.
Important: If the desired keyboard layout isn’t listed, start this section over, but instead of the current Windows display language, select the language that matches the desired keyboard layout.
If the language that matches the desired keyboard layout isn’t installed, then follow the section Install a language pack in this article to install the language of the desired keyboard layout.
-
Once the desired keyboard layout is selected, it should display in the Time & language > Language & region > Options window under the Keyboards section. To switch to the keyboard layout that was installed, see Change the keyboard layout section in this article.
A keyboard layout can be selected from the input language icon in the system tray area of the taskbar. The input language icon displays the currently selected keyboard layout. To select a different keyboard layout:
-
In the system tray area of the taskbar, select the input language icon.
-
A pop-up menu is displayed with the available keyboard layouts. Select the desired keyboard layout.
-
The input language icon changes to the selected keyboard layout.
Tips: A keyboard layout can also be selected by holding down the Windows logo key on the keyboard and then selecting the Spacebar. Each selection of the Spacebar while holding down the Windows logo key cycles through the installed keyboard layouts. If selecting the Spacebar doesn’t do anything, only one keyboard layout is installed. To see what languages and keyboard layouts are currently installed in Windows, see the following sections in this article:
-
Check what languages are installed in Windows.
-
Add a keyboard layout.
If the desired keyboard layout isn’t available, follow the section Add a keyboard layout in this article.
To remove a currently installed language pack:
-
In the Time & language > Language & region window, under the Language section, select the ellipses next to the language that needs to be removed and then select Remove.
Note: If the Remove button is greyed out, the selected language to be removed is the current Windows display language. Switch to another Windows display language before attempting to remove the language. For more information, see Change the Windows display language section in this article.
-
In the dialog box that appears, confirm removing the language by selecting the Yes button.
To remove a currently installed keyboard layout:
-
In the Time & language > Language & region window, under the Language section, select the ellipses next to the language that contains the keyboard that needs to be removed and then select Language options.
Note: Installed keyboard layouts aren’t always part of a matching language. The keyboard layout might be installed as part of the current Windows display language. Languages can contain keyboard layouts that aren’t the same language as the language pack.
For this reason, the keyboard layout can be located either under the current Windows display language or the language that matches the keyboard layout. If the keyboard layout to be removed isn’t under the current Windows display language, then check the language that matches the keyboard layout.
-
In the Time & language > Language & region > Options window, under the Keyboards section, select the ellipses next to the keyboard that needs to be removed and then select Remove.
Note: If the Remove button is greyed out, the selected keyboard layout is the only installed keyboard layout for the current Windows display language. Add another keyboard layout before attempting to remove the keyboard layout. For more information, see Add a keyboard layout section in this article.
The input language icon in the system tray area of the taskbar allows selection of keyboard layouts. By default, the input language icon is enabled and displays in the taskbar. For more information, see the Change the keyboard layout section of this article.
An alternative to the input language icon is the legacy language bar found in previous versions of Windows. If the legacy language bar is enabled, then the input language icon in the taskbar is disabled and no longer displays. To reenable the input language icon and display it in the taskbar, follow these steps:
-
Select Start and then select Settings > Time & language > Typing .
Or
Select the following Time & language > Typing shortcut:
Open Time & language > Typing
-
In the Time & language > Typing window, select Advanced keyboard settings.
-
In the Time & language > Typing > Advanced keyboard settings window, under Switching input methods, uncheck the option Use the desktop language bar when it’s available.
Warning: Unchecking the option Use the desktop language bar when it’s available causes the input language icon to display again in the taskbar. However, it causes the legacy language bar to no longer display. If the legacy language bar is preferred over the input language icon, then leave the option Use the desktop language bar when it’s available enabled.
Additional options for the legacy language bar can be found under the Language bar options link in the Time & language > Typing > Advanced keyboard settings window.
Need more help?
Want more options?
Explore subscription benefits, browse training courses, learn how to secure your device, and more.
То, что на приобретаемом в магазине компьютерной техники ПК или ноутбуке предустановленная Windows 10 окажется на английском или ином языке представляется маловероятным, но такой сценарий тоже возможен. Но если и так, стоит ли делать из этого проблему? Конечно, нет, потому что ничто не мешает вам изменить язык интерфейса системы, тем более, что сделать это можно разными способами. Давайте же перейдём к их рассмотрению, предположив, что изначально в операционной системе доступен только один язык интерфейса — английский.
Чтобы сменить язык интерфейса с английского на русский, вам сначала нужно загрузить соответствующий языковой пакет. Откройте приложение Параметры (Settings) из меню Пуск или нажатием комбинации Win + I и перейдите в раздел Time & Language → Language или Region and language.
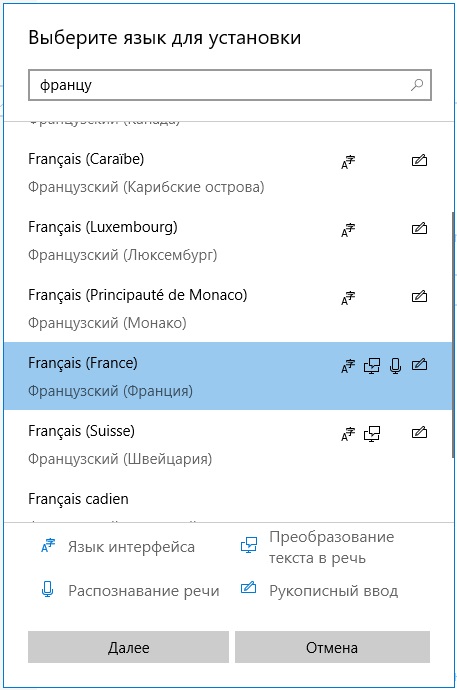
Нажмите в блоке «Preferred languages» кнопку «Add a language» и выберите в появившемся списке язык, который вам нужен, в данном примере русский.
Найти его быстрее поможет поиск, введите в его поле «russia». Далее жмём «Next».
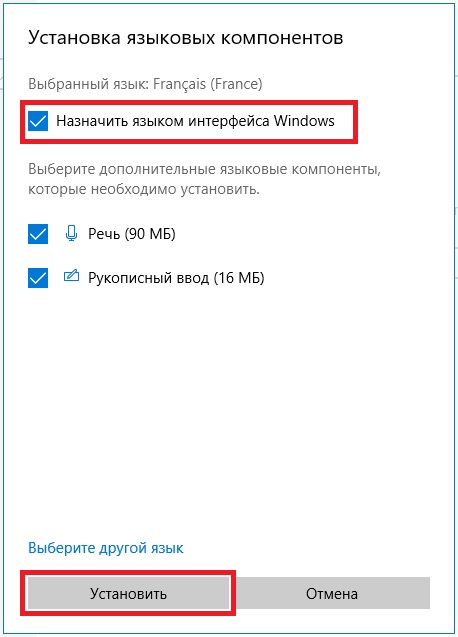
Отмечаем как минимум первый и второй чекбоксы (3 и 4 отвечают за конвертацию речи в текст и рукописный ввод) и нажимаем кнопку «Install».
По завершении процедуры загрузки и установки языкового пакета, которая займёт некоторое время, вам будет предложено выйти из системы. Войдя в систему, вы найдёте интерфейс русифицированным.
Если меню Пуск и приложение Параметры останутся нерусифицированными, перезагрузите компьютер.
Примечание: в более ранних версиях Windows 10 процедура смены языка интерфейса немного отличается. В частности, в разделе «Preferred languages» вам сначала нужно будет добавить язык в список и нажать кнопку «Settings», после чего станет доступна кнопка загрузки языкового пакета. После того как язык будет скачан и инсталлирован, останется назначить его языком по умолчанию в том же разделе «Preferred languages».
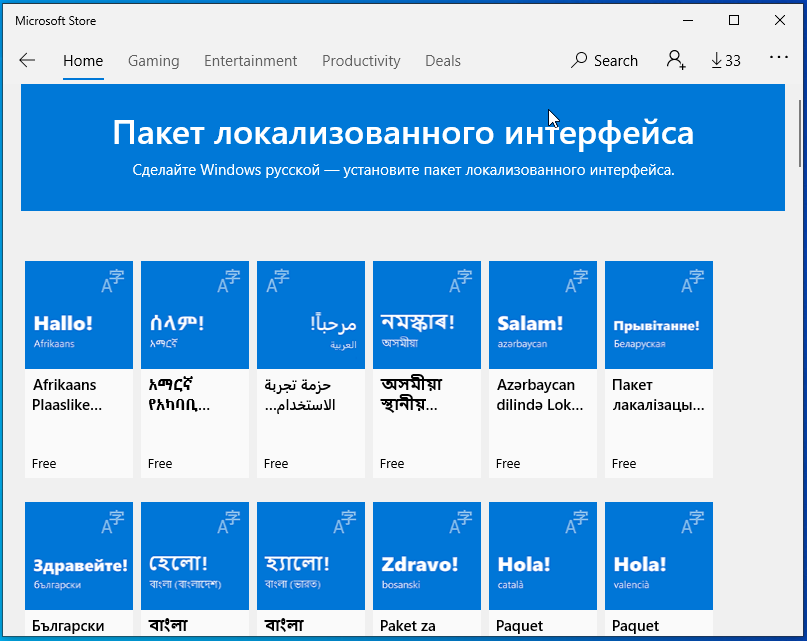
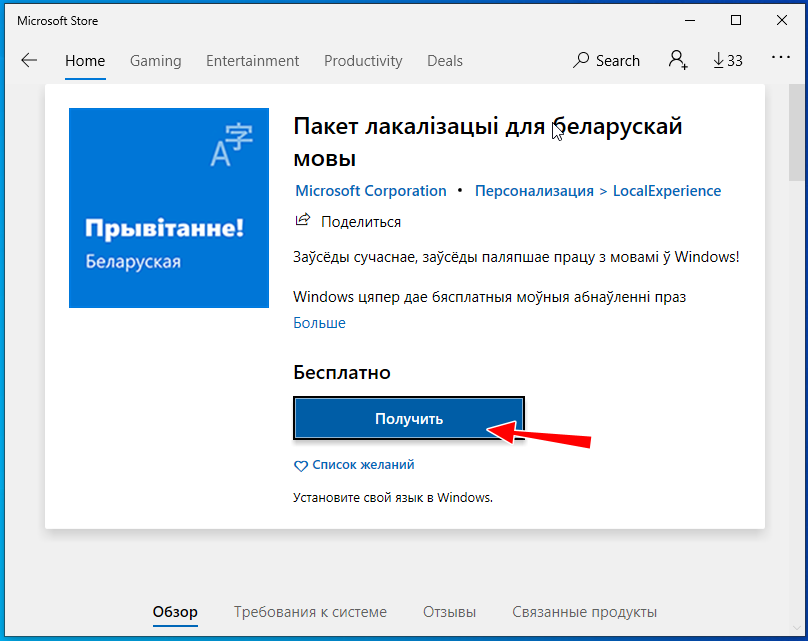
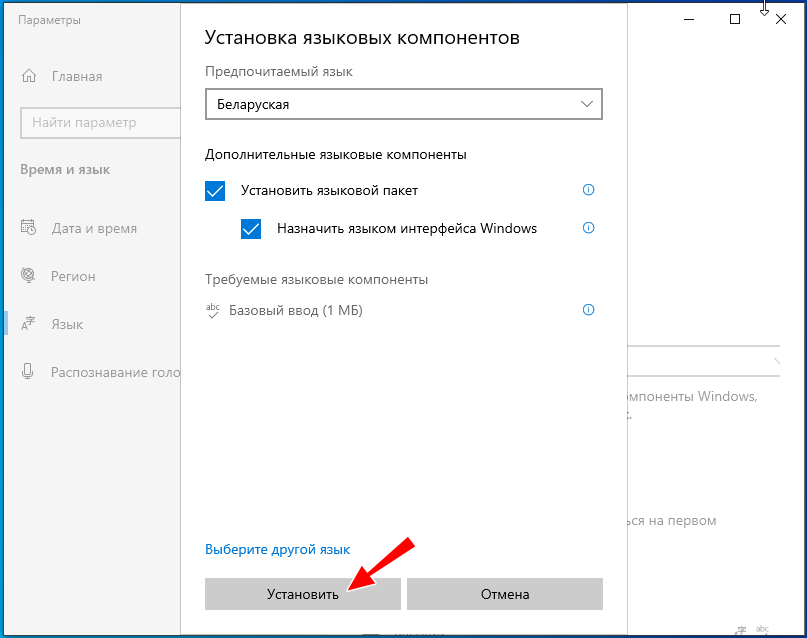
Есть и более простой способ изменить язык — установить его как приложение из Магазина Windows 10. Откройте Windows Store и вбейте в поисковое поле запрос «Local Experience Packs».

В результате вы получите список локализаций, выберите в нём нужный вам язык.
Нажмите «Получить» (Get). При этом будет открыто приложение «Параметры» и запущен мастер установки выбранного языка, и вам останется только нажать кнопку инсталляции пакета. Дальнейшие действия ничем не отличаются от описанных выше.
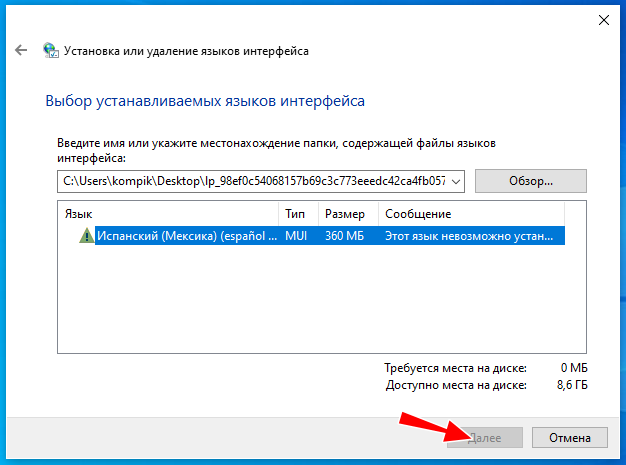
Если у вас имеется языковой пакет в виде CAB- или MUI-файла, вы можете установить его в автономном режиме. Для этого выполните в окошке быстрого запуска (Win + R) команду lpksetup,
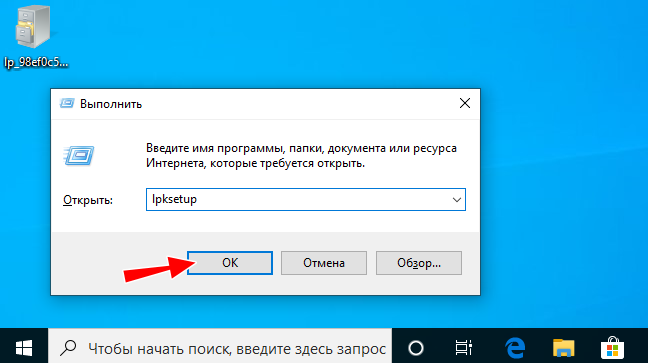
нажмите в окне запустившегося мастера «Установить языки интерфейса»
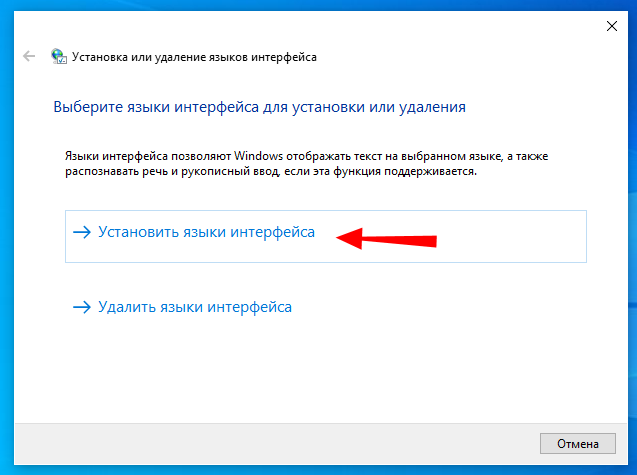
и укажите путь к языковому пакету CAB или MUI. Последний должен соответствовать версии Windows, в противном случае установить его не получится. После того как пакет будет установлен, откройте приложение Параметры, перейдите в раздел Время и язык → Язык и выберите его в списке «Язык интерфейса Windows».
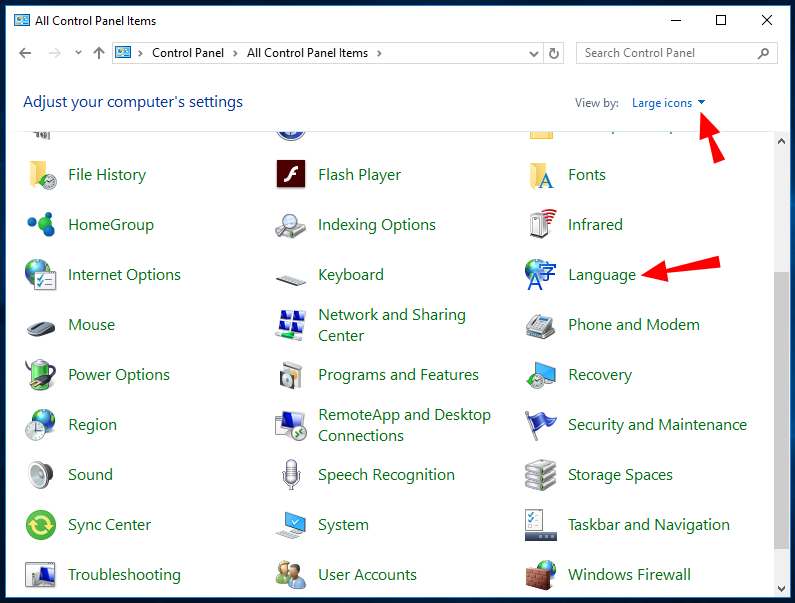
В более ранних версиях Windows 10 (до билда 2004) изменить язык можно также из классической панели управления. Откройте последнюю командой control, переключитесь, если нужно, в режим просмотра «Icons» (Большие или малые значки), найдите и запустите апплет «Language» (Язык). Далее выполните следующие действия:
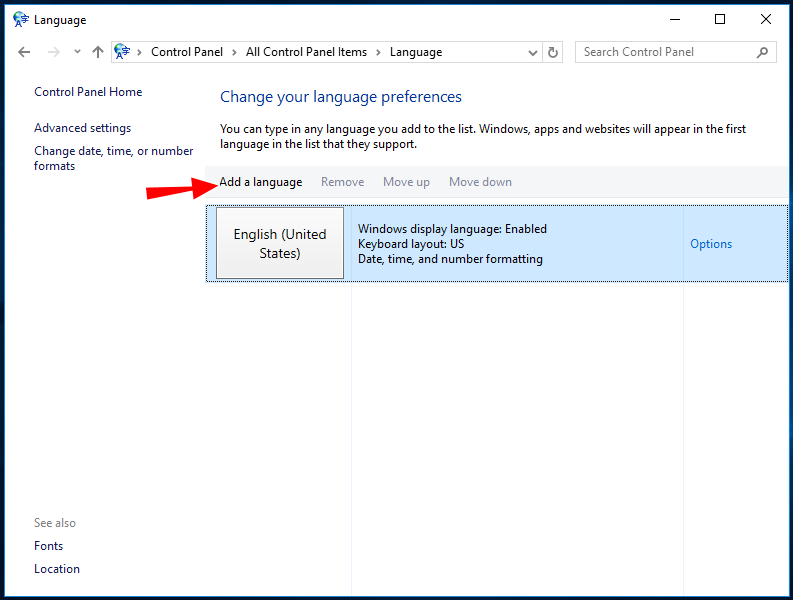
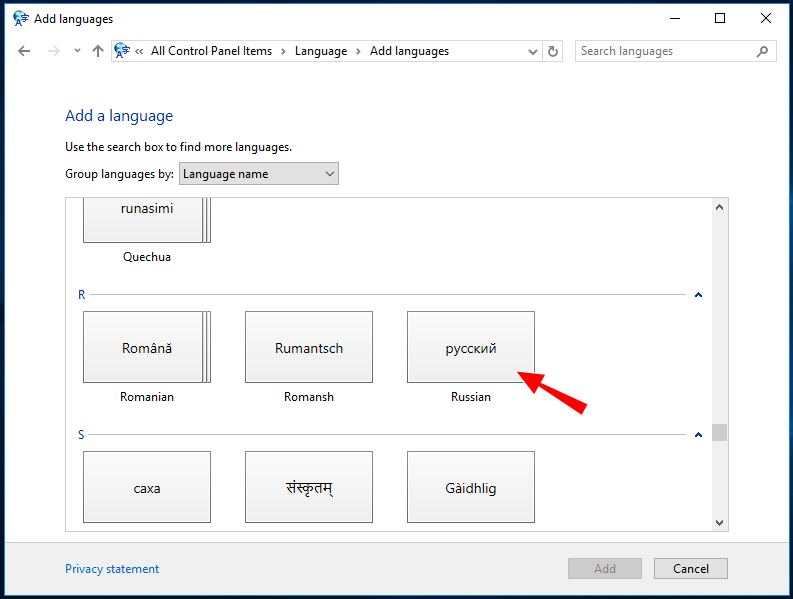
1. Нажмите «Add Language» и выберите в открывшемся списке нужный вам язык.
2. Нажмите кнопку «Add» для его добавления, а затем кликните по ссылке «Options» напротив добавленного языка.
3. В следующем окне нажмите «Download and install language pack» и дождитесь завершения процедуры установки пакета.
4. Вернитесь главное окно апплета «Language», нажмите напротив установленного языка «Options», а затем кликните по ссылке «Make this the primary language», то есть сделать основным языком.
5. Перезайдите в систему, а лучше перезагрузите компьютер.
После установки нового языка некоторые элементы интерфейса, а также поставляемые вместе с Windows 10 универсальные приложения могут остаться на изначальном языке. Чтобы русифицировать приложения, в разделе Параметров «Время и язык» нужно переключиться в категорию «Регион» и выбрать страну, соответствующую установленному языку.
После этого откройте Магазин Виндовс, выберите в меню «Загрузки и обновления» и установите пакеты обновлений для ваших приложений. В принципе, этого можно и не делать, если у вас не отключено автоматическое обновление приложений, через некоторое время Windows 10 сама скачает и установит нужные пакеты локализации.
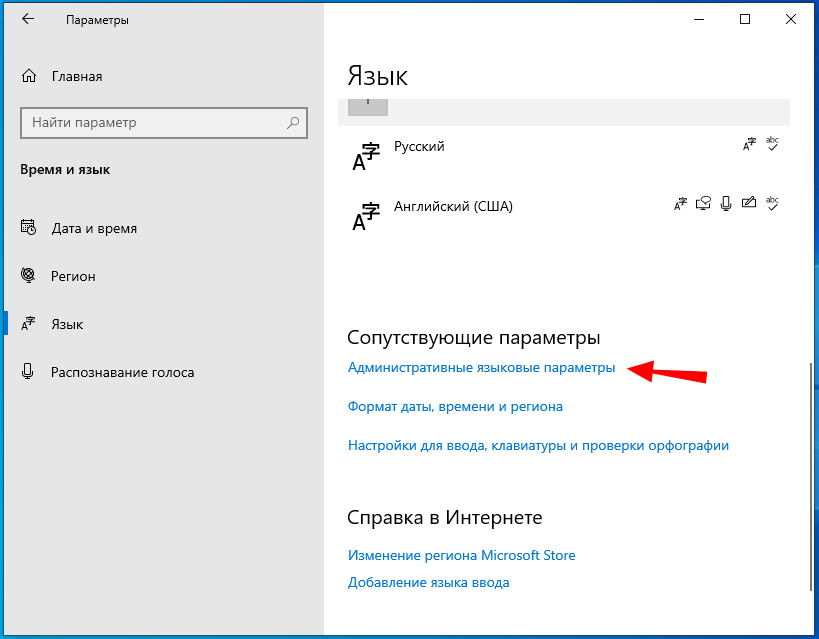
Почти всё готово, осталось только назначить язык для экрана приветствия и смены юзеров. Для сего в разделе «Язык» нажмите ссылку «Административные языковые параметры». В открывшемся окне «Регион» нажмите «Копировать параметры» и установите галки для показанных на скриншоте опций в новом окне параметров экрана и учётных записей.

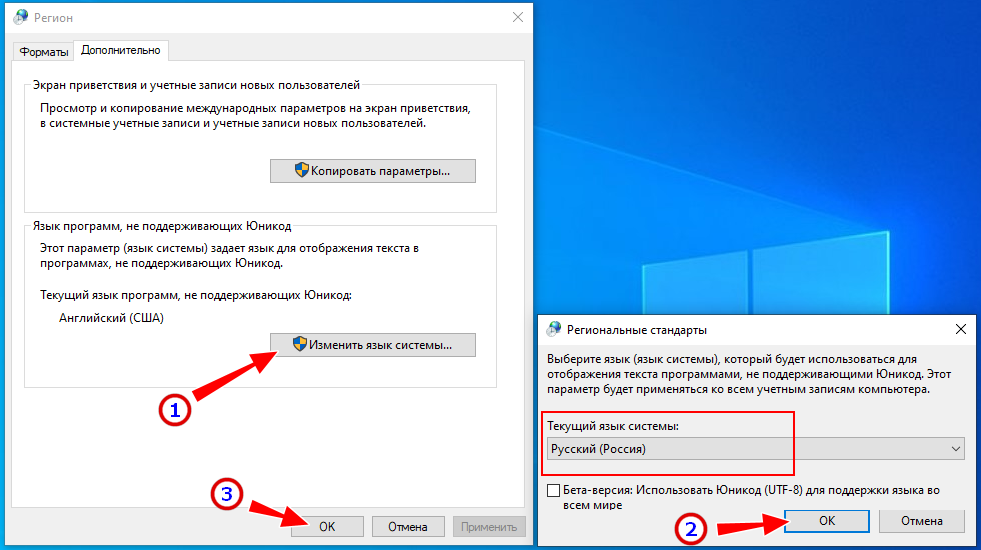
Сохраните настройки и перезагрузите компьютер. Также рекомендуем в окне «Регион» изменить текущий язык программ, не поддерживающих юникод. Нажмите кнопку «Изменить язык системы», выберите свой новый язык, сохраните настройки и перезагрузитесь. На этом процедуру смены языка в Windows 10 можно считать завершённой.
Reading time4 min
Views13K
Read this article to find out how to change the language of Windows 10 interface without having to reinstall it, what system languages can be installed and what settings should be modified for that purpose.

Introduction
In Windows 10, people usually choose the preferred language for the entire operating system when they install it. However, if the language settings were wrong, or people have to use computing devices with certain language preferences, there are some settings to be modified in order to bring them in line with your personal likings.
So if you ever need to change language preferences in Windows 10, this can be done in a quick and easy way with the help of the Settings app and without having to reinstall the operating system.
In today’s article, we will show you how to change the default display language into any other, including doing it for new and existing user accounts.
How to change the default display language in Windows 10?
If you have to move to a different region or you need to use a display language different from the default choice, or the initial language settings for the computing device have been wrong, there is absolutely no point in reinstalling Windows 10. All you need is to modify a couple of system settings to enjoy the experience of using your operating system in the right language.
Disable language synchronization
If you are using a Microsoft account, the language settings will apply to all devices linked to such account. If you plan to change regional and language settings for one computer only, you need to disable synchronization of such settings before you proceed.
This is how you disable language sync in Windows 10.
Open the main system application, Settings. You can do it in any way you prefer. For example, click on the Start button in the lower left corner of your desktop, on the Taskbar, and open the main Windows menu. Use the scroll bar or the mouse wheel to search the list of all programs and applications installed on this computer and find the line Settings, or click on the Settings button in the left side of the user menu, and the application will open.

In the main Settings window, scroll down if necessary and choose the tab Accounts.

In the left panel, go to Sync your settings.
In the right panel, find the section Individual sync settings and the line Language preferences, then set the slider to the Off position (disabled).

When these steps are taken, you can start changing language settings for the copy of Windows 10 installed on this computer, without worrying that this can affect similar settings in other linked devices.
The steps to take if you want to change the display language
To change the display language of your Windows 10, you should close all running applications and do what is described below.
Use any method you prefer to open the Settings application. For example, right-click on the Start button that you can find on the Taskbar, in the left lower corner of the desktop, or press the key sequence Windows + X instead to open the context menu, and select the line Settings. The application will start immediately.

Use the scroll bar or the mouse wheel to navigate the Settings window, and find the tab Time and language.

In the left panel, go to Language.
Now look to the right and find the section Preferred languages, where you can prioritize language settings, and click on the button Add a preferred language, with a + (plus) symbol on it.

In the new window Choose a language to install use the scroll bar or the mouse wheel to find the language you need, or start typing its name in the search field above.
Choose the language pack you are planning to use in Windows 10 from the list.

When the language is chosen, hit Next.
In the next page Install language features check the box for Install language pack to confirm your choice (the box with the tick will become blue, i.e. active).

Click Install below.
Changes will take effect after the language package is installed, which usually takes several minutes only. In some cases, restarting your Windows 10 may be required, and then the corresponding language settings will apply to all system elements. The changes will affect the sign-in screen, the Settings app, Windows Explorer, desktop, all applications, preferred browsers and websites you visit. From now on, they will use the new language by default. Besides, Windows 10 may suggest reviewing your current privacy settings.
Changing region settings
If you change the display language for Windows 10 because you move to a different region, then regional settings should be modified too.
Changing them in Windows 10 is easy enough: just follow the steps below.
Open the main system application, Settings, using any way you prefer. For example, press the keyboard shortcut Windows + I to access the app directly.
In the main window of the Settings app, find and select the tab Time and language.
In the left panel, select Region.
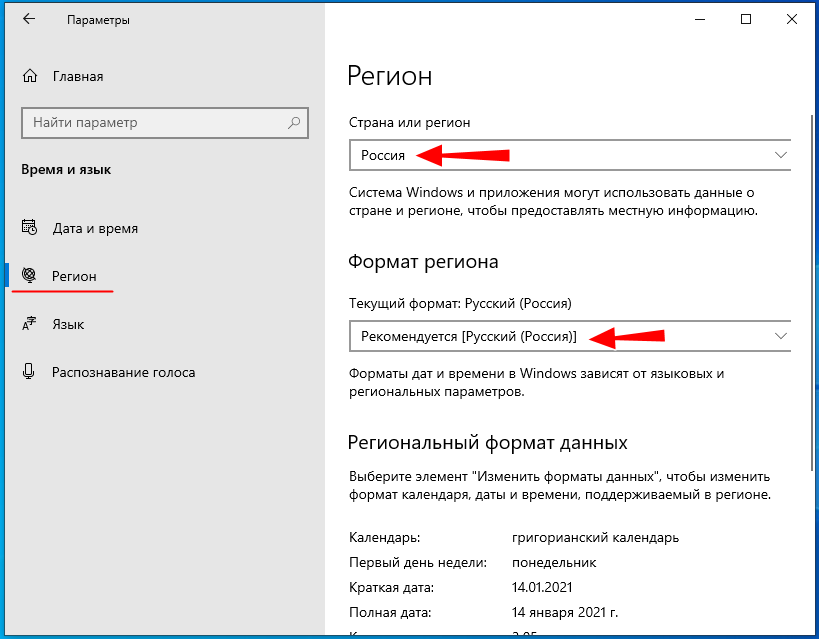
In the right panel, find the section Region and use the nested menu Country or region to specify your new location if it differs from the current settings.
In the section Regional format use another nested menu to select proper formats to display date and time in Windows, if these differ for your time and region.

Now look at the left panel and jump to the tab Language again.
Use the scroll bar or the mouse wheel to find the section Related settings and click on the link Administrative language settings.

In the new pop-up Region window, jump to the tab Administrative and in the section Welcome screen and new user accounts hit the button Copy settings.

The new window will show you corresponding screen and account settings. In the section Copy your current settings to check the boxes for each option: Welcome screen and system accounts and New user accounts.

Click ОК.
Click ОК one more time, and then restart the computer.
After all these steps, your computer will display proper regional settings specified according to your physical location.
Most of the time, people don’t change or install additional languages regularly for their personal needs. This opportunity to change language packs quickly is more often required in small or large companies that need to deal with customers having various language preferences.
Besides, this option would be useful for people who have to move to a different region and would like their regional settings to comply. Another scenario is buying a computer from another country when the required configuration is not available locally.
Also, you should remember that modifying language settings may disable some functions like Cortana because this service is not supported in certain regions.
Conclusion
Preferred display language is one of the easily customizable things in the operating system. If you ever need to change the language settings, use one of the methods described here to replace the language pack currently used by Windows 10 without having to reinstall it.
See the full article with all additional video tutorials. If you still have any questions, please ask in a comments. Also visit our Youtube channel, there are over 400 video tutorials.