
Почему рекомендуется заменить порт в Windows Server
Очень часто бывает, что злоумышленники сканируют порты и подбирают пароли для входа на ваш сервер. По умолачнию RDP использует порт 3389. Если вы поставили очень простой пароль, злоумышленник получит доступ к вашему серверу и будет его использовать для своих целей, либо зашифрует все данные и попросит от вас деньги. Проблема из-за сканирования портов может быть также в том, что из-за множества чужих попыток у Вас не будет возможности войти на сервер. Это может перегрузать процессорные ресурсы сервера. Если у Вас возникли такие подозрение, то настоятельно рекомендуется защитить порт RDP от роботов его сменой на любой удобный и свободных из диапазона от 1000 до 65535.
Как заменить порт в Windows Server?
Для начала мы должны подключиться к нашему серверу и открыть “PowerShell”.
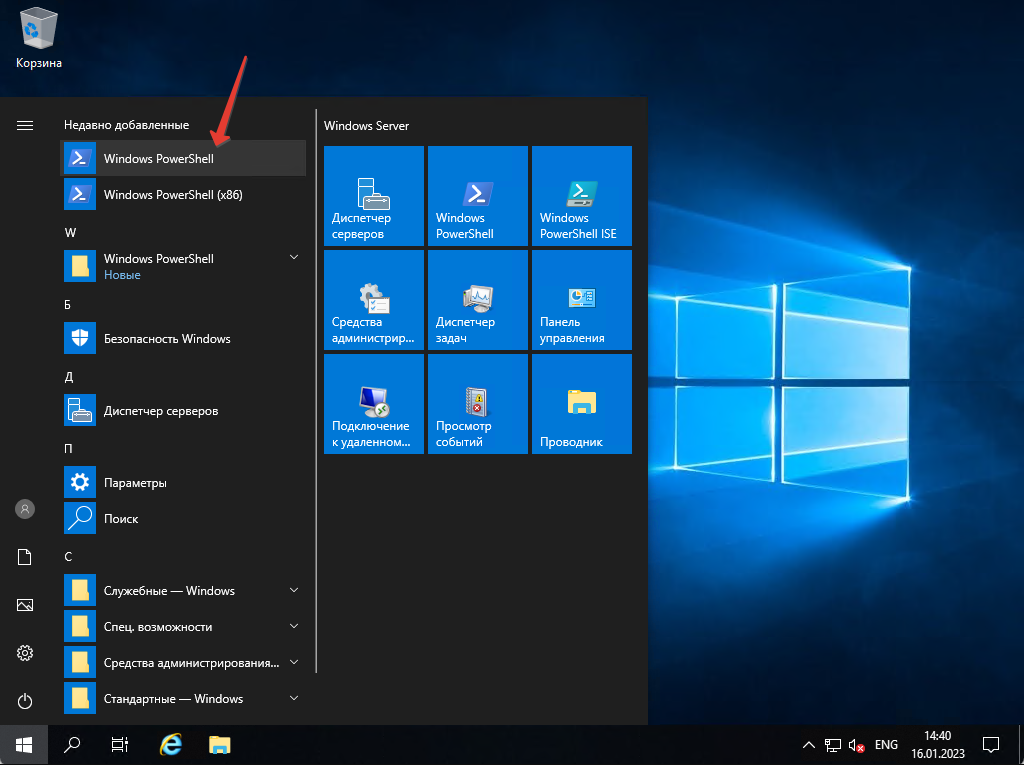
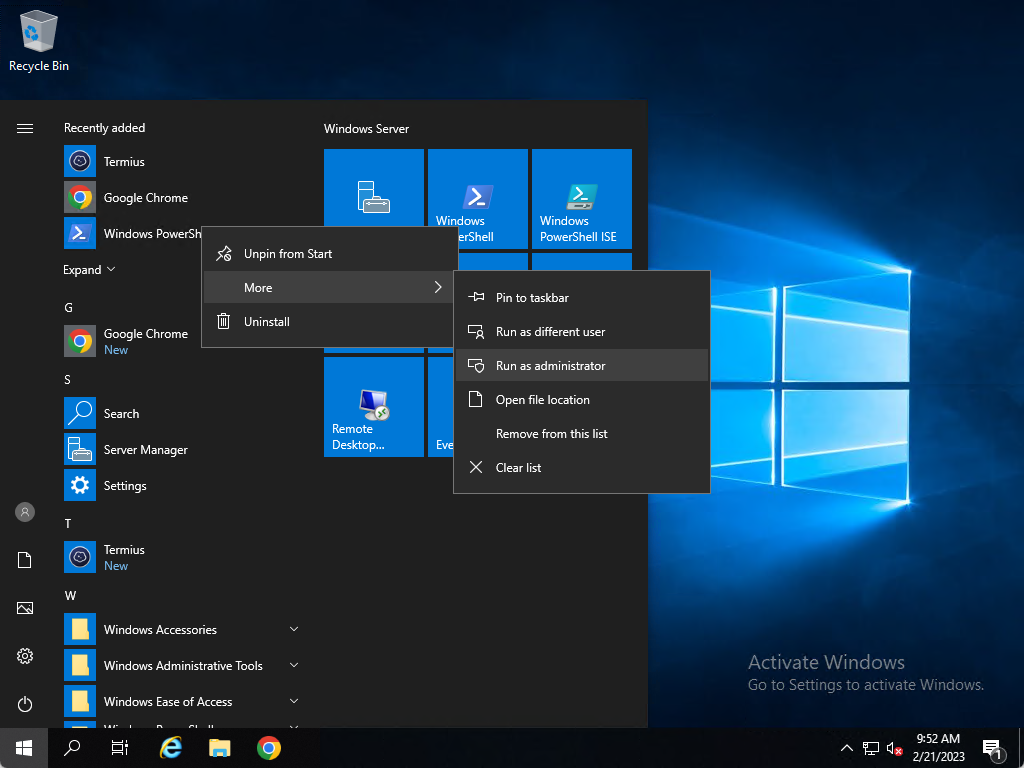
Нажимаем на “Пуск”, затем на “PowerShell”. Необходимо выбрать параметр запуска команды “От имени Администратора”. Предположим мы хотим сменить порт на 1312. После того как “PowerShell” открылся, выполняем данную команду.
Вы можете указать любой нужный вам другой порт, например 7777, 8888, 20000 и т.д.

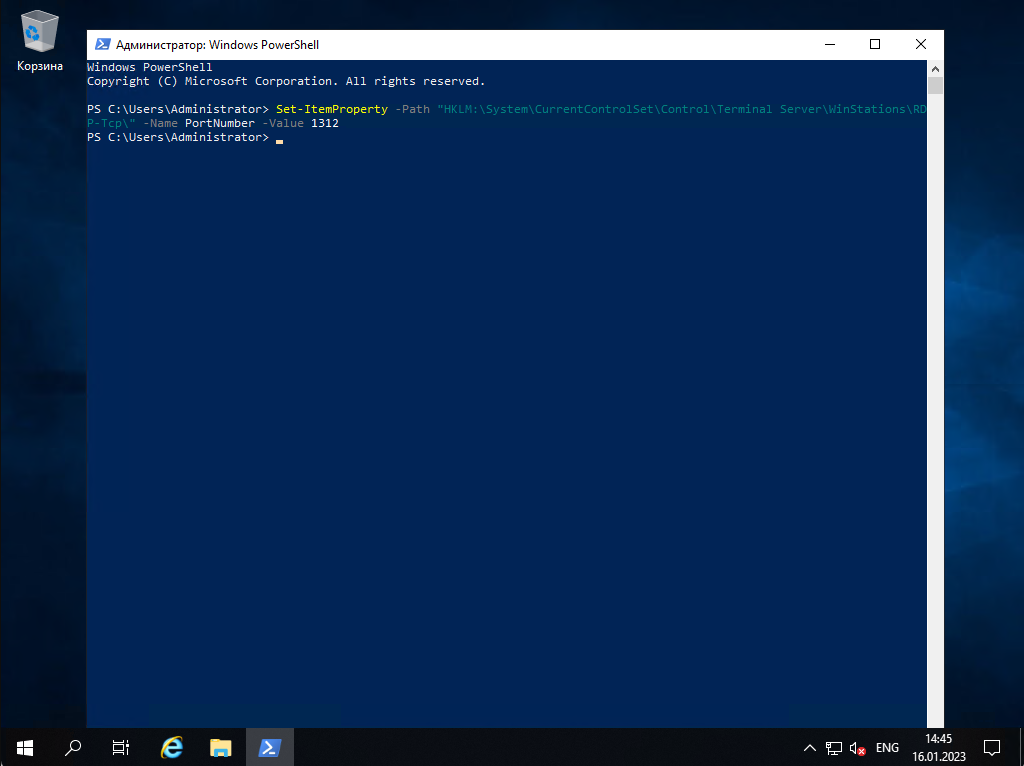
После открытия PowerShell вставьте эту команду и нажмите Enter, чтобы выполнить ее.
Set-ItemProperty -Path "HKLM:\System\CurrentControlSet\Control\Terminal Server\WinStations\RDP-Tcp\" -Name PortNumber -Value 1312

После выполнения команды мы видим, что ответа нет и это означает, что изменения мы сделали правильно.
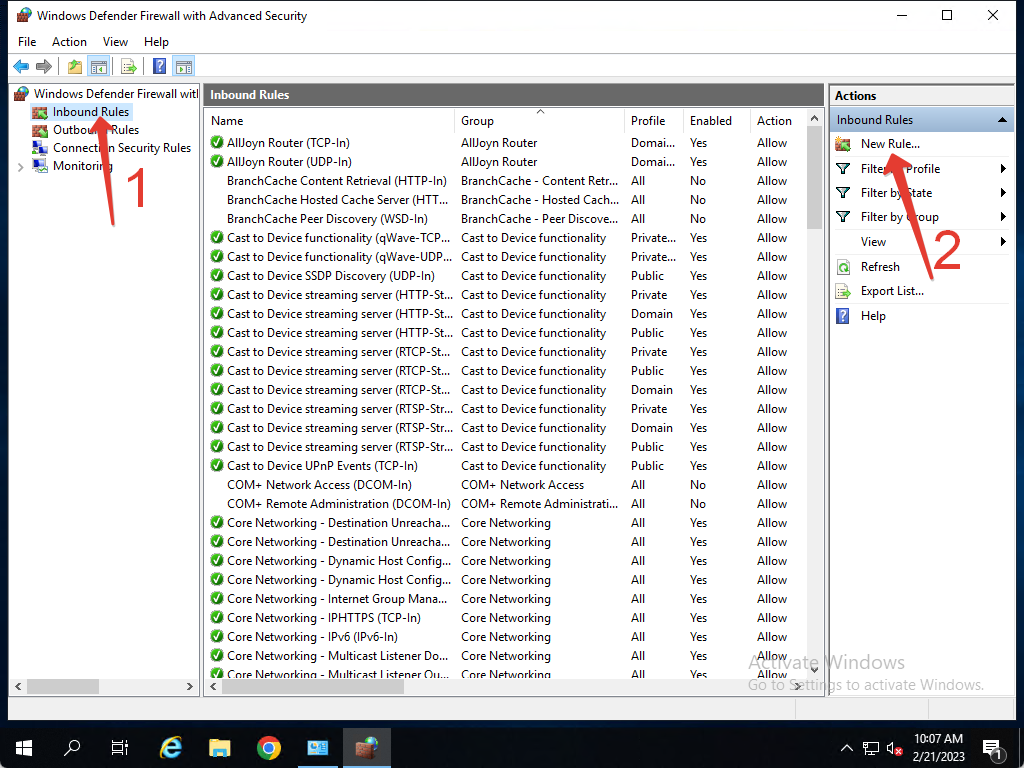
Как открыть RDP порт
Теперь мы не можем просто так подключиться на наш сервер, так как у нас “включен Брандмауэр” и порт не работает сразу после изменения на другой.
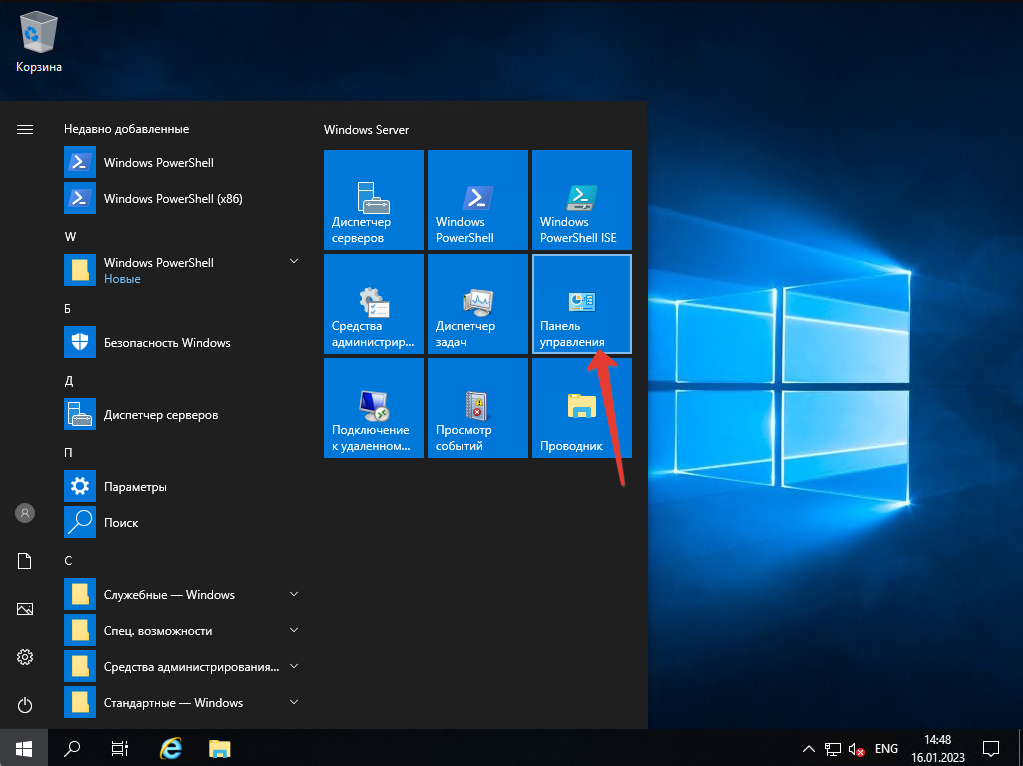
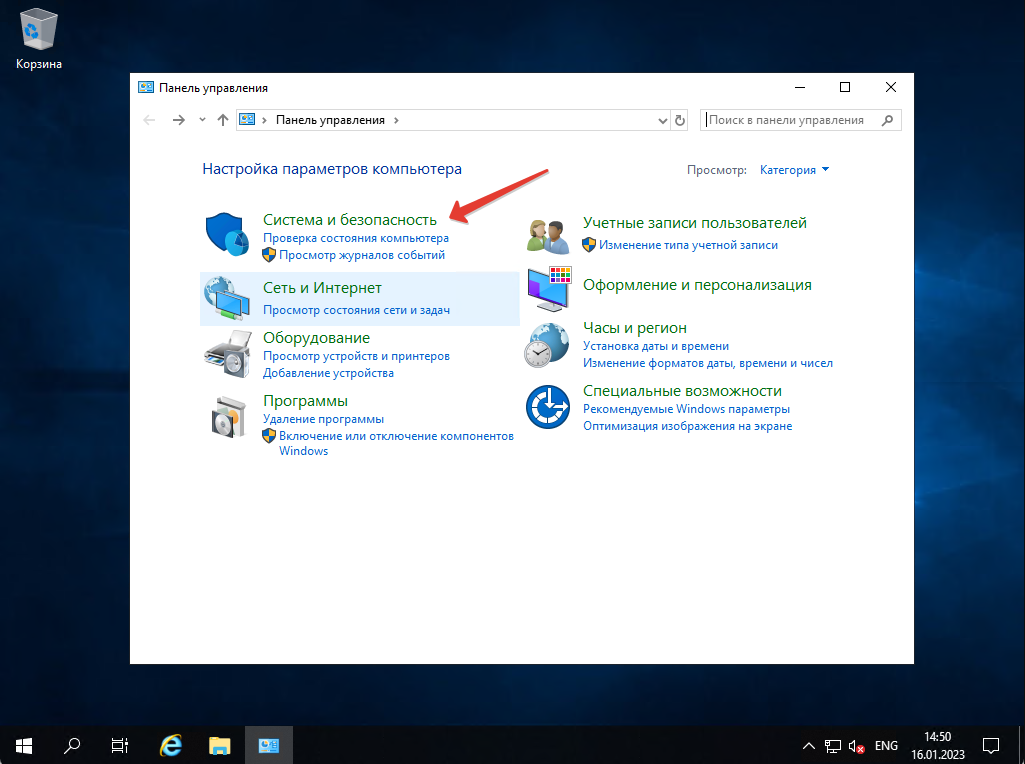
Мы должны добавить новый порт. Нажимаем на “Пуск” заново, затем на “Панель управления”.

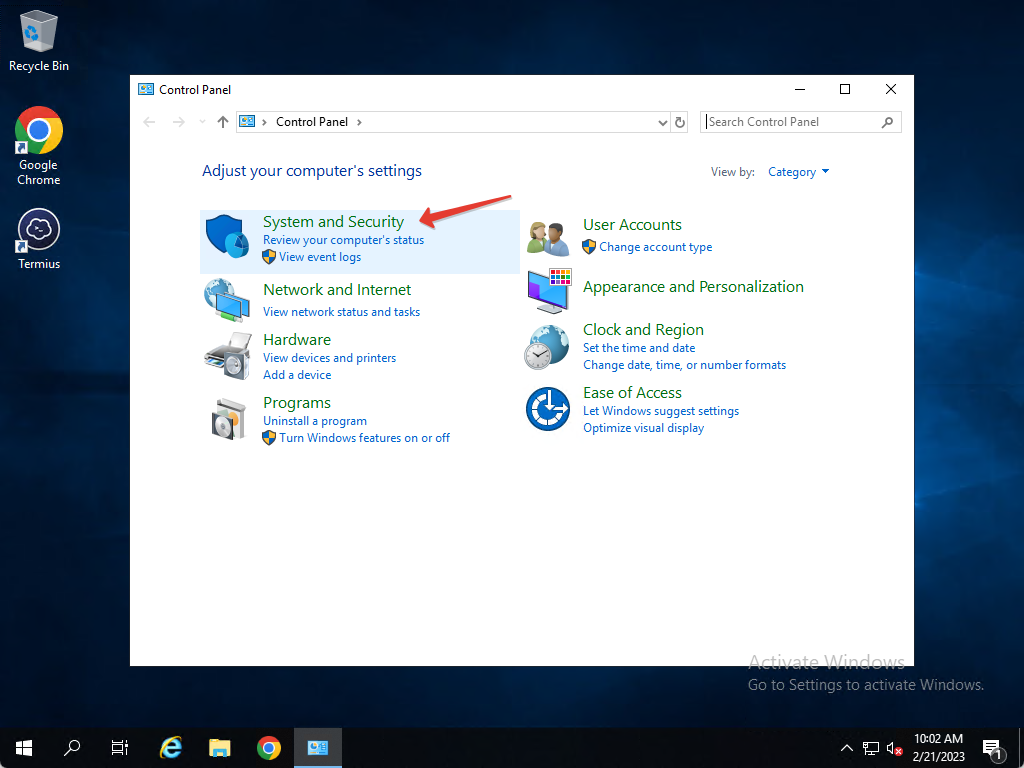
Когда панель управления открылась, мы нажимаем на “Система и безопасность”

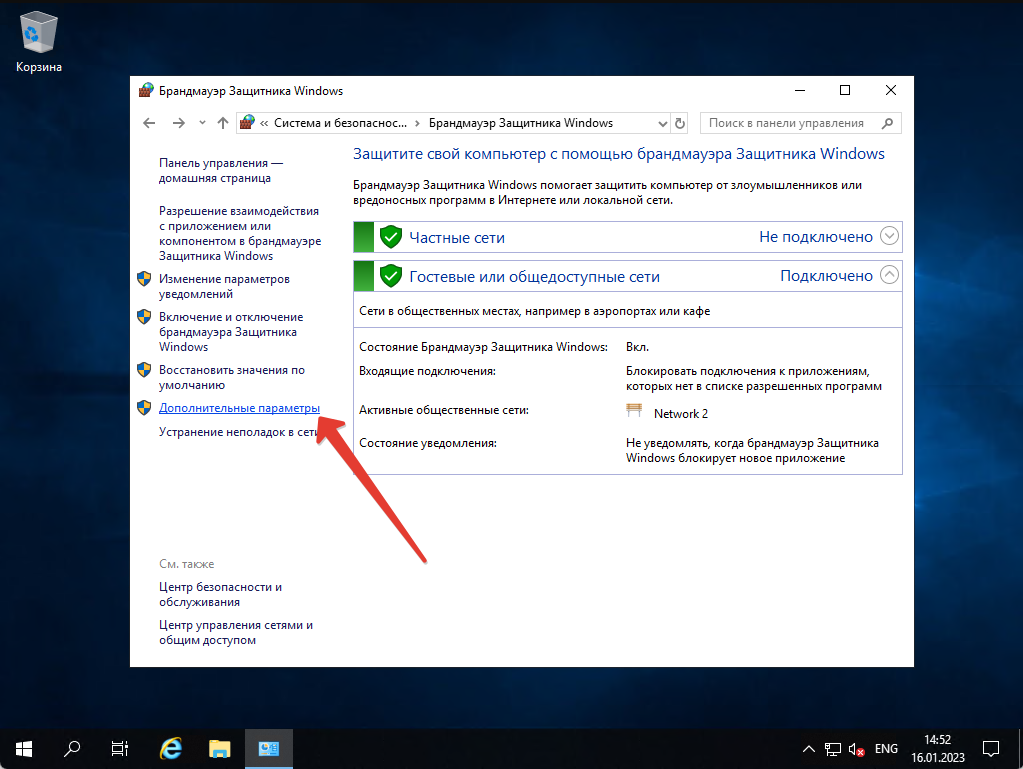
Затем нажимаем на “Брандмауэр Защитника Windows” и на “Дополнительные параметры“

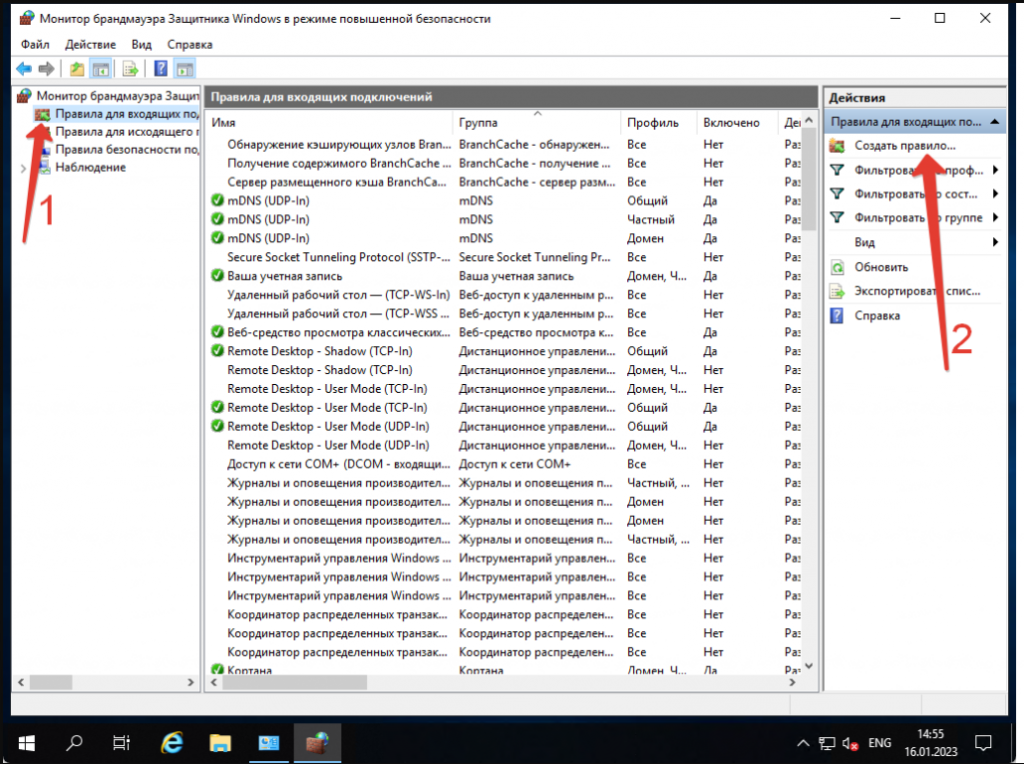
Здесь мы должны открыть порт. Нажимаем на “Правила для входящих подключений“, затем на “Создать правило“.

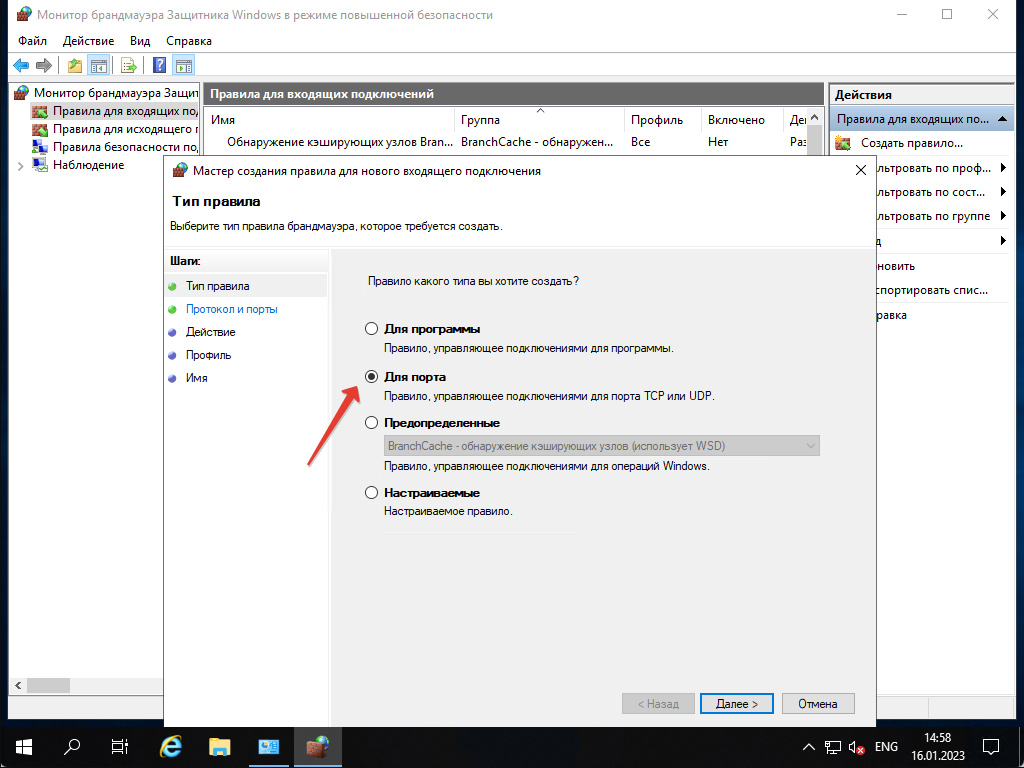
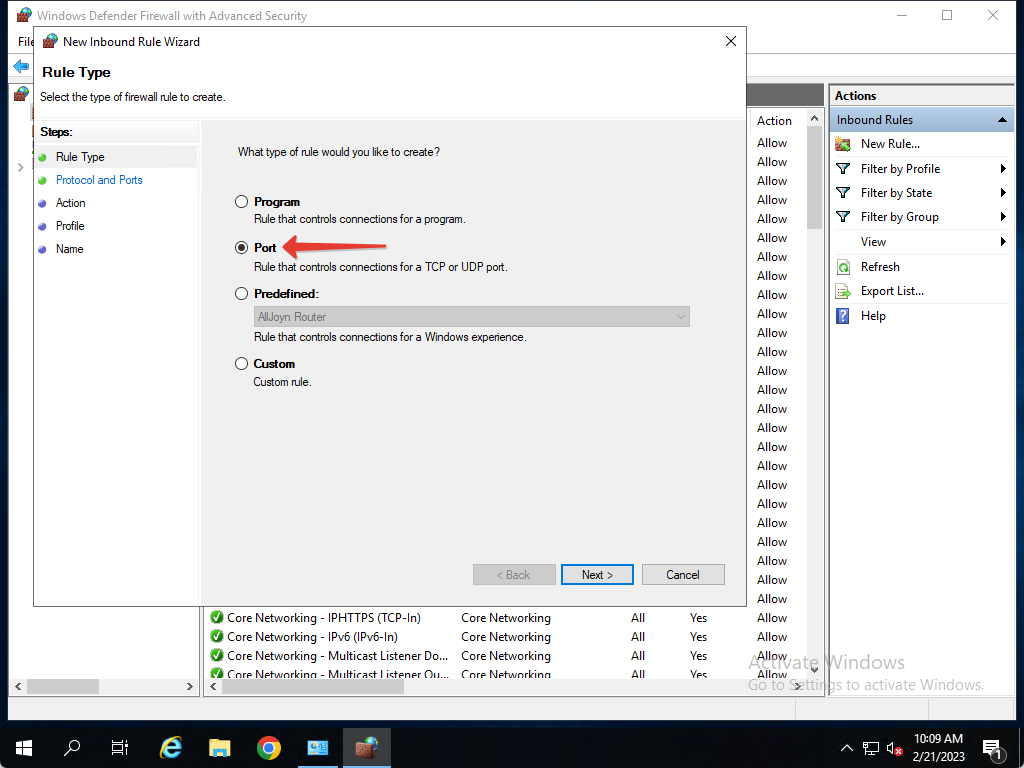
Выбираем “Для порта“, нажимаем “Далее“.

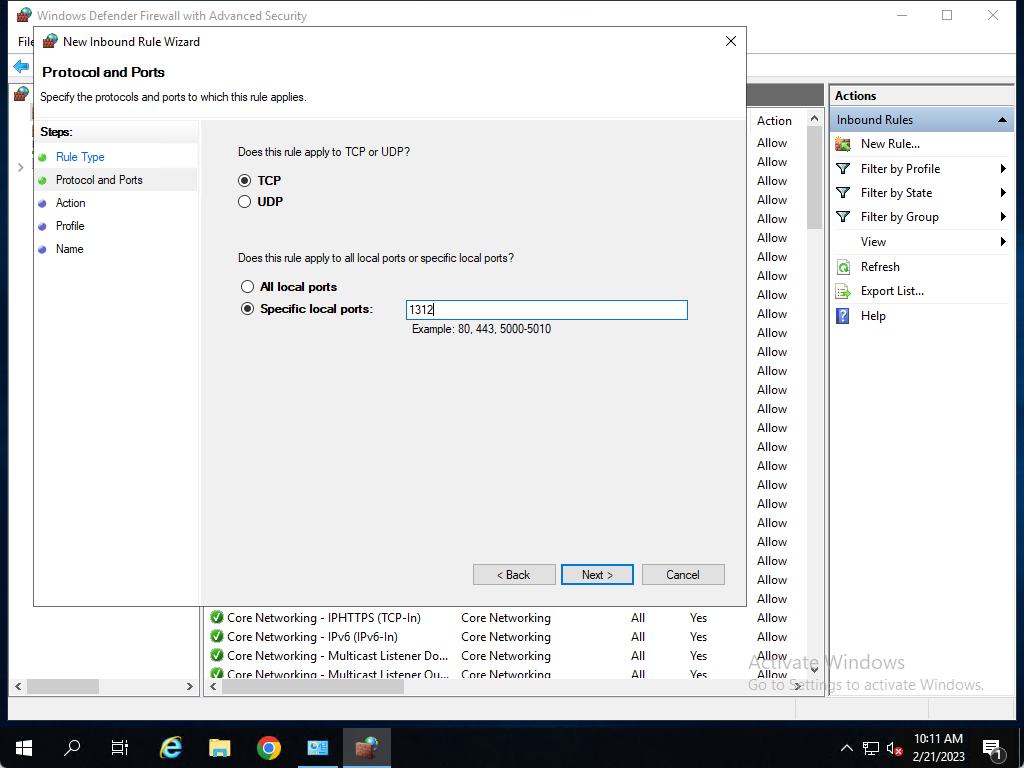
Указываем наш порт, который мы указали в команде в “PowerShell” и нажимаем на “Далее“

Оставляем все как есть в разделах “Действие” и “Профиль” и нажимаем Далее.
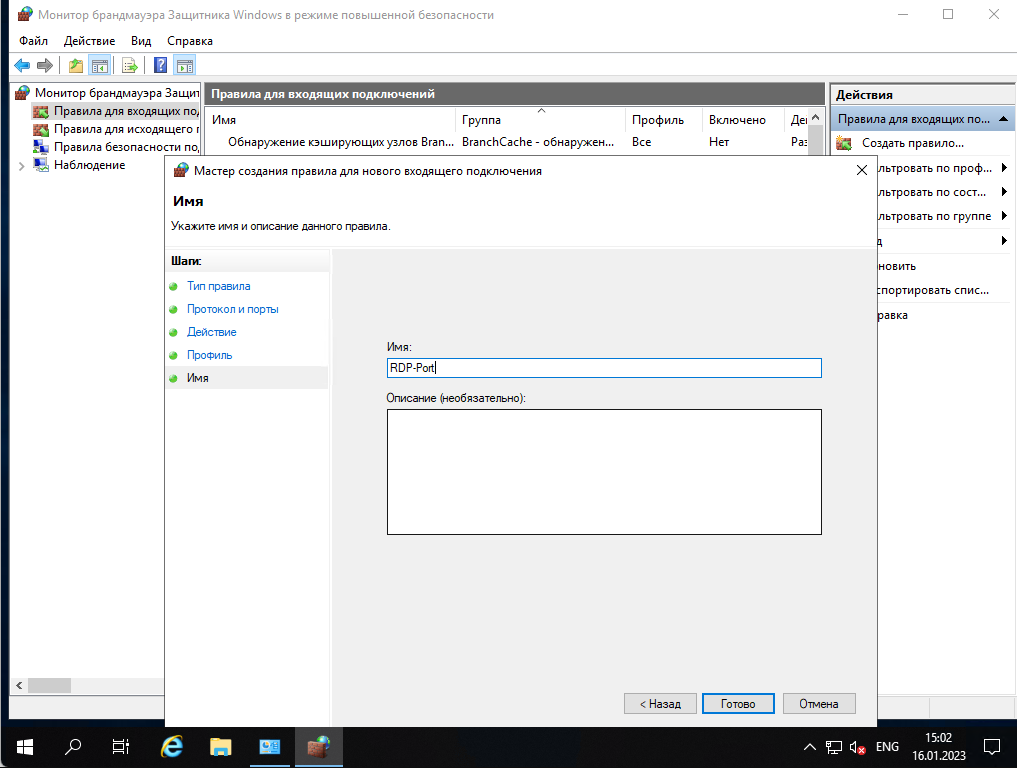
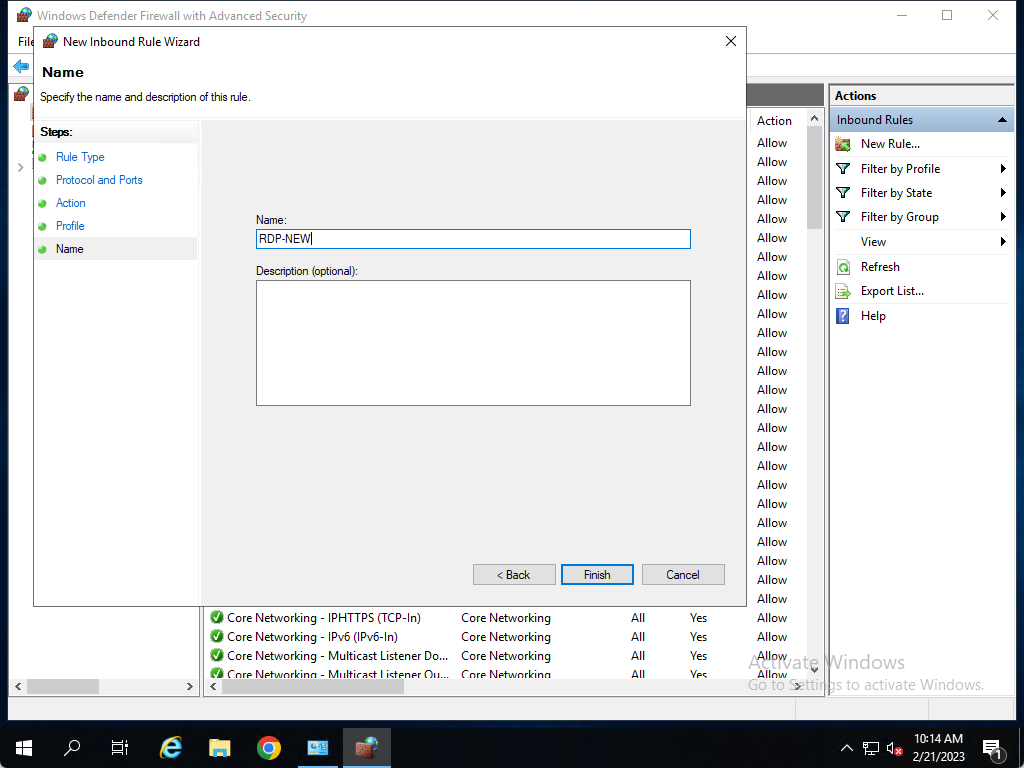
В “Имя” указываем название порта, по которому мы будем подключаться, и нажимаем на “Готово”.

Как перезапустить службу RDP
Мы еще не закончили. Чтобы сервер работал по новому порту мы должны перезагрузить службу удаленного доступа. Мы конечно можем также перезагрузить сервер, но есть вариант перезагрузить данную службу, чтобы все наше ПО продолжало работать, без даунтайма.
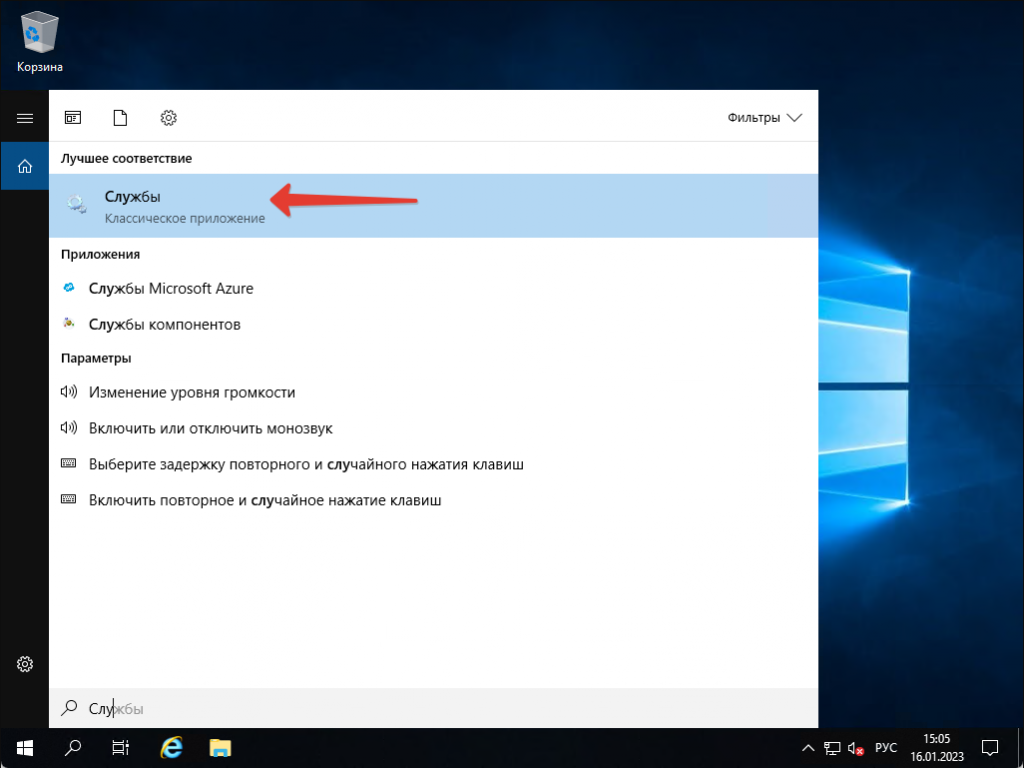
Нажимаем на “Пуск” и ищем “Службы”. Нажимаем и открываем.
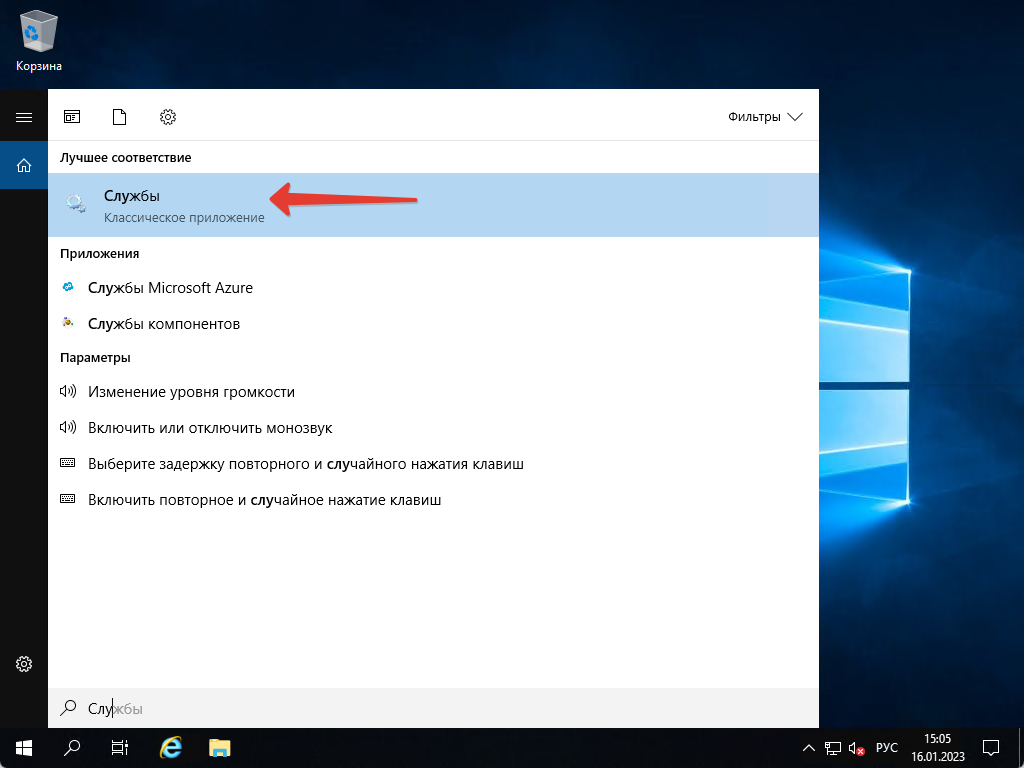
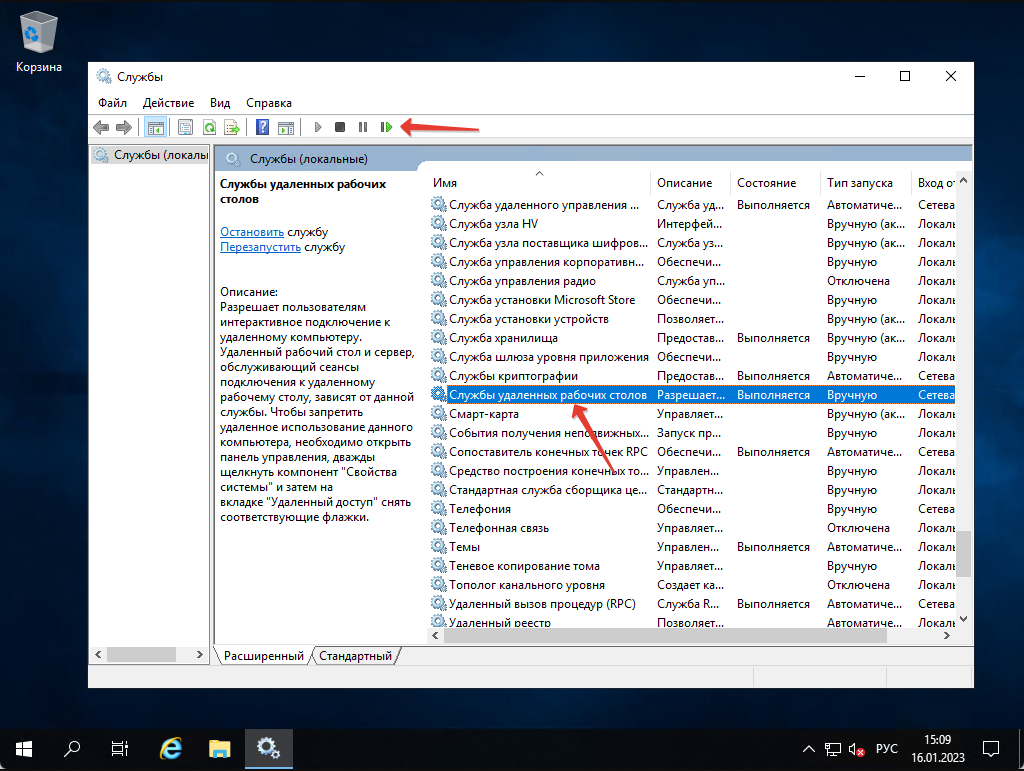
Ищем “Службы удаленных рабочих столов” и перезагружаем её.

Служба увидит новый порт и закроет нам сразу подключение по старому порту.
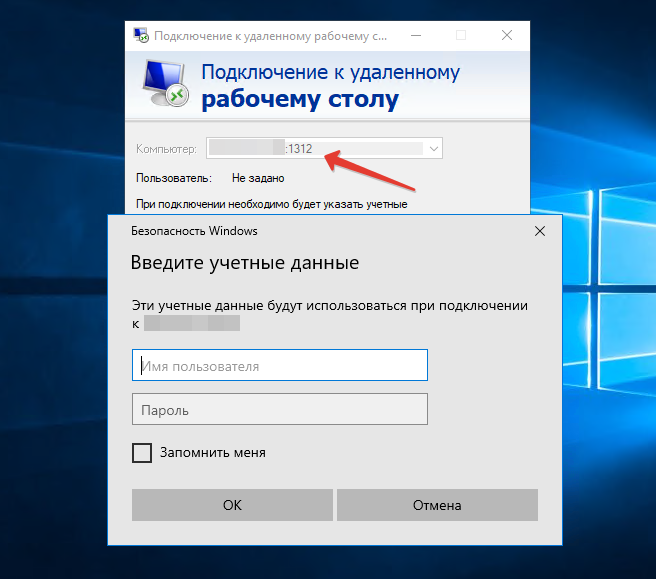
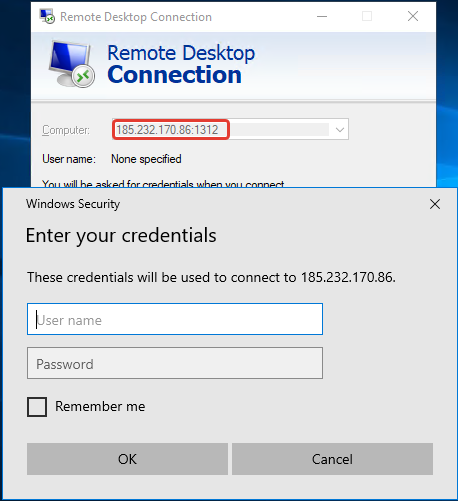
Открываем заново “Подключение к удаленному рабочему столу” на нашем устройстве и уже вводим IP и порт, который мы открыли и вводим данные от пользователя Administrator.

Теперь сервер можно использовать без страха, что злоумышленники будут подбирать пароли пользователей на вашем сервере, так как они обычно сканируют стандартный порт, а вы его изменили.
Услуги
Почему рекомендуется заменить порт в Windows Server
Часто бывает так, что хакеры сканируют порты и пытаются взломать ваш сервер, угадывая пароли. По умолчанию, для удаленного доступа к серверу Windows используется порт 3389. Если у вас установлен слишком простой пароль, злоумышленник может получить доступ к вашему серверу и использовать его для своих целей, например, для шифрования данных и вымогательства денег. Проблема в том, что постоянное сканирование портов может привести к перегрузке сервера из-за большого количества входных запросов. Если вы заметили подозрительную активность, настоятельно рекомендуется изменить порт RDP на другой, чтобы защитить сервер от автоматических атак. Вы можете выбрать любой свободный порт в диапазоне от 1000 до 65535.
Как заменить порт в Windows Server?
Сначала нам нужно зайти на наш сервер и открыть программу «PowerShell». Для этого нажмите кнопку «Пуск», затем найдите и выберите «PowerShell». Важно запустить его с правами администратора. Предположим, мы хотим изменить порт на 1312. Как только «PowerShell» откроется, введите и выполните соответствующую команду.
Вы можете выбрать любой другой порт, который вам нужен, например, 7777, 8888, 20000 и так далее.
После открытия программы PowerShell, скопируйте эту команду и нажмите клавишу Enter, чтобы выполнить её.
Set-ItemProperty -Path «HKLM:\System\CurrentControlSet\Control\Terminal Server\WinStations\RDP-Tcp\» -Name PortNumber -Value 1312
После того, как вы выполните команду, если не получите никакого ответа, это означает, что изменения были внесены правильно.
Как открыть RDP порт
Теперь, после изменения порта, мы не можем просто подключиться к серверу, потому что у нас включен брандмауэр, который блокирует новый порт. Нам нужно добавить новое исключение для порта. Для этого снова нажмите «Пуск», затем выберите «Панель управления».
После открытия Панели управления, нажмите на раздел «Система и безопасность».
После этого кликаем по «Брандмауэр Защитника Windows», а затем выбираем «Дополнительные параметры».
Здесь нам нужно разрешить доступ через порт. Кликаем по «Правила для входящих подключений» и затем выбираем «Создать правило».
Выбираем опцию «Для порта» и затем нажимаем кнопку «Далее».

Указываем номер порта, который мы ввели в команде в «PowerShell», и затем нажимаем «Далее».
Оставляем все без изменений в разделах «Действие» и «Профиль», а затем нажимаем «Далее». В поле «Имя» вводим название порта, по которому мы будем подключаться, и нажимаем «Готово».
Как перезапустить службу RDP
Мы еще не завершили. Чтобы сервер начал использовать новый порт, нам нужно перезапустить службу удаленного доступа. Мы можем перезагрузить весь сервер, но также есть возможность лишь перезапустить эту службу, чтобы все наше программное обеспечение продолжило работу, избежав простоя.
Кликаем по кнопке «Пуск» и ищем раздел «Службы». Затем открываем его.
Ищем «Службы удаленных рабочих столов» и выбираем опцию для её перезагрузки.
Как только служба заметит новый порт, она автоматически закроет доступ через старый порт. После этого мы снова открываем «Подключение к удаленному рабочему столу» на нашем устройстве и вводим IP адрес и новый порт, который мы открыли, а также учетные данные пользователя Администратор.
Теперь вы можете использовать сервер без беспокойства о том, что злоумышленники будут пытаться взломать пароли пользователей, потому что они обычно сканируют стандартный порт, который вы изменили.
Наши услуги
Юридическим лицам
Договор и полный комплект бухгалтерских документов по почте.
It’s highly recommended to change windows remote desktop default port for added security.
You can change the default port with a few easy steps, first, you’ll change the port and define this port in a firewall rule.
Method #1
Change RDP TCP port on Windows Server 2016/2019/2022
- Open registry editor app by searching for
regeditin windows search or useRUN. - Locate the following from
regeditapp:HKEY_LOCAL_MACHINE\System\CurrentControlSet\Control\Terminal Server\WinStations\RDP-Tcp
- look for
PortNumberand right-click on it andModify - Make sure to select
DecimalunderBaseoption - Change the port number to any number you prefer, let’s say
1234and clickOK - Quit the registry editor
- Open Firewall (Windows Defender Firewall with Advanced Security)
- From the left sidebar click on
Inbound Rules - From the right sidebar click on
New Rule - Select
Portand clickNext - Select
TCPand type the port number inSpecific local portand clickNextuntil you reach the step where you asked to enter a rule name, give the rule a name and ClickFinish. (Repeat from #7 to #11 for UDP) - Restart the server (recommended) or execute this PowerShell command
Restart-Service -Force -DisplayName "Remote Desktop Services" - Try to connect to RDP as usual but when you type the IP, don’t forget to append the custom port number after the IP in this format
IP:Port(e.g. 192.168.1.5:1234)
Video Tutorial:
Method #2
PowerShell
You can also change the RDP port by running the following PowerShell commands. In this command, we’ll specify the new RDP port as 1234.
To change the RDP Port:
Set-ItemProperty -Path 'HKLM:\SYSTEM\CurrentControlSet\Control\Terminal Server\WinStations\RDP-Tcp' -name "PortNumber" -Value 1234
Then Add Firewall Rule to open port 1234 on the Public profile using PowerShell
New-NetFirewallRule -DisplayName 'RDPPORT_TCP' -Profile 'Public' -Direction Inbound -Action Allow -Protocol TCP -LocalPort 1234
Repeat to open UDP port 1234 (recommended)
New-NetFirewallRule -DisplayName 'RDPPORT_UDP' -Profile 'Public' -Direction Inbound -Action Allow -Protocol UDP -LocalPort 1234
Restart your server
shutdown /r
Connect to RDP as usual but when you type the IP, don’t forget to append the custom port number after the IP in this format IP:Port (e.g. 192.168.1.5:1234)
Find this tutorial on Microsoft.com:
https://support.microsoft.com/en-gb/help/306759/how-to-change-the-listening-port-for-remote-desktop
Watch Video Tutorial: https://www.youtube.com/watch?v=k8mswkiok70
Why is it recommended to change the port in Windows Server
It often happens that hackers scan ports and guess passwords to access your server. By default, RDP uses port 3389. If you set a very simple password, an hacker will gain access to your server and use it for their own purposes, or encrypt all data and ask you for money. The problem due to port scanning can also be that due to many bots attempts, you will not be able to enter the server. This can overload the resources of the server. If you have such a suspicion, it is strongly recommended to protect the RDP port from bots by changing it to any port to the range from 1000 to 65535.
How to change RDP port in Windows Server?
To begin with the process, we must connect to our server and open “PowerShell”.
Click on “Start”, then on “PowerShell”. You must select the option to run “As Administrator”. Suppose we want to change the port to 1312. After PowerShell has opened, we execute this command.
You can specify any other port you want, such as 7777, 8888, 20000, etc.
After the PowerShell is opened, paste this command and hit the Enter to execute it.
Set-ItemProperty -Path "HKLM:\System\CurrentControlSet\Control\Terminal Server\WinStations\RDP-Tcp\" -Name PortNumber -Value 1312
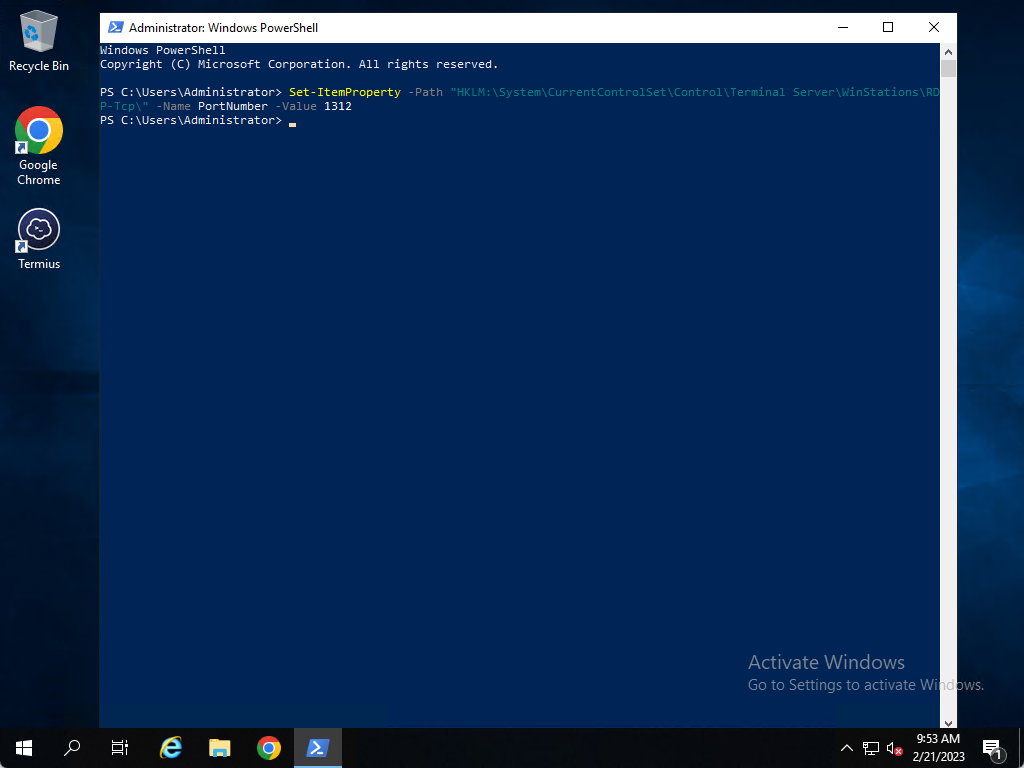
After executing the command, we see that there is no answer from the server, which means that we made the changes correctly.
How to open RDP port
Now we can’t just connect to our server, because we have “Firewall turned on” and the port does not work immediately after changing to another one.
We have to open a new port. Click on “Start” again, then on “Control Panel”.
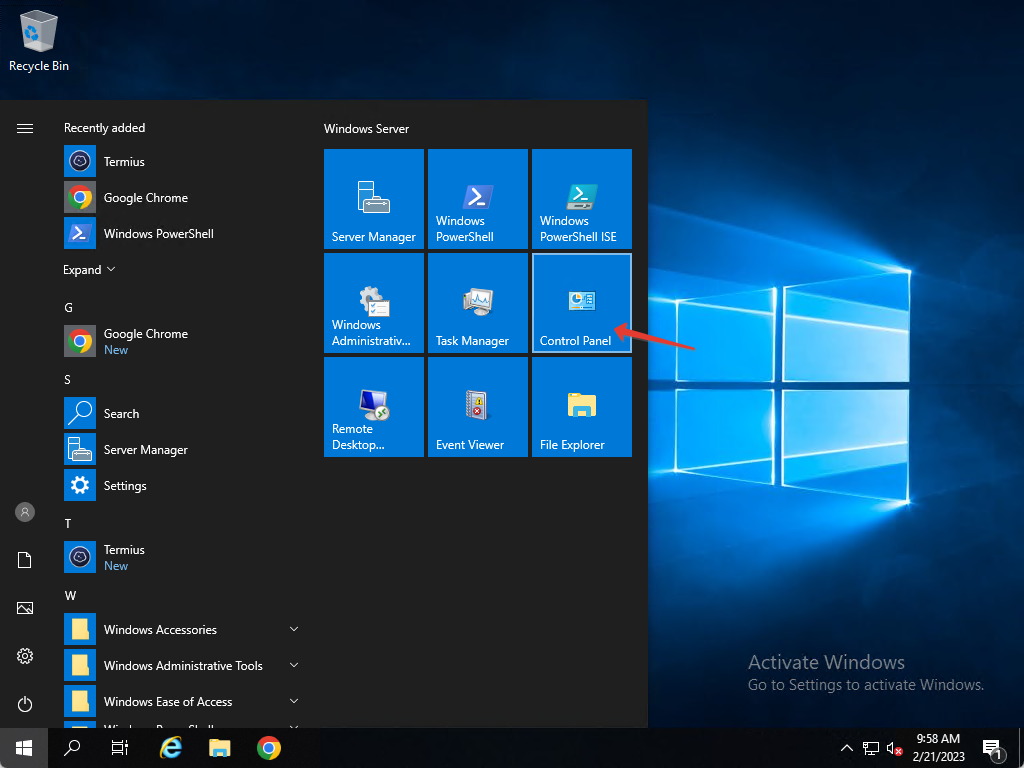
When the Control Panel has opened, we click on “System and Security”
Then click on “Windows Defender Firewall” and after that on “Advanced Settings”

Here we have to open the port. Click on “Inbound Rules”, then on “New Rule…”.
Select “Port”, then click “Next”.
We write down our port, which we specified in the command in “PowerShell” and click on “Next”
Leave everything as it is in the “Action” and “Profile” sections and click “Next”.
In the “Name” we indicate the name of the port on which we will open, and click on “Finish”.
How to restart the RDP service
We haven’t finished yet. In order server to work on the new port, we must restart the remote access service. Of course, we can also restart the server, but there is an option to restart this service, so all our software continues to work, without downtime.
Click on “Start” and look for “Services”. Click and open.
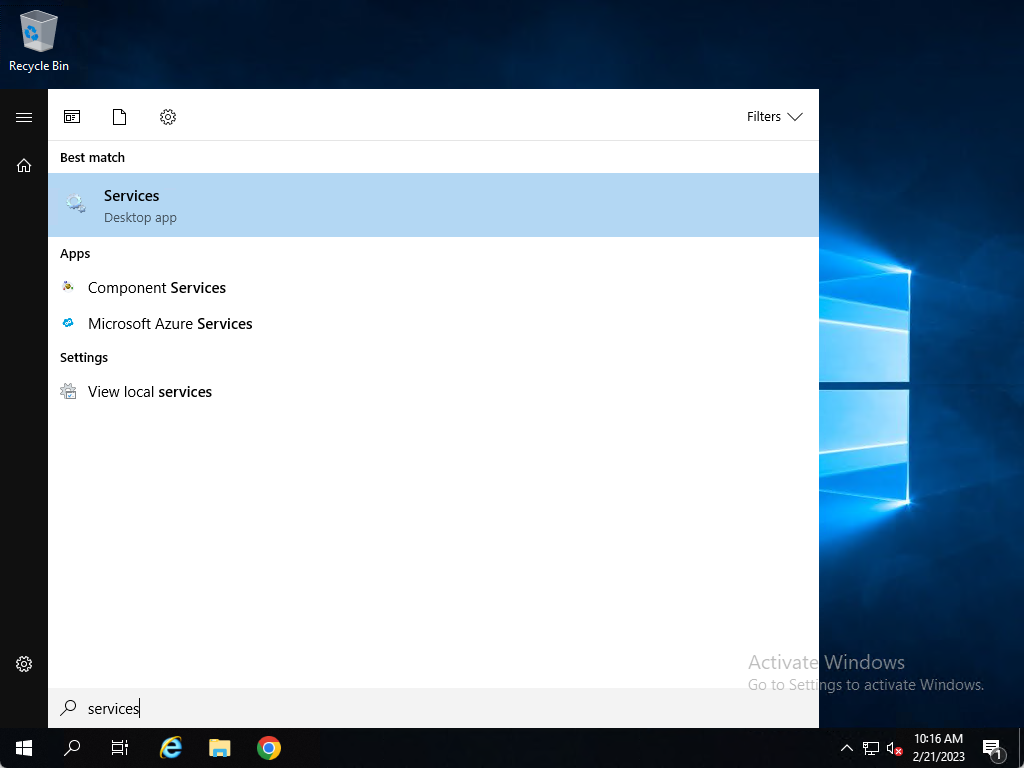
We are looking for “Remote Desktop Services” and we will restart it.
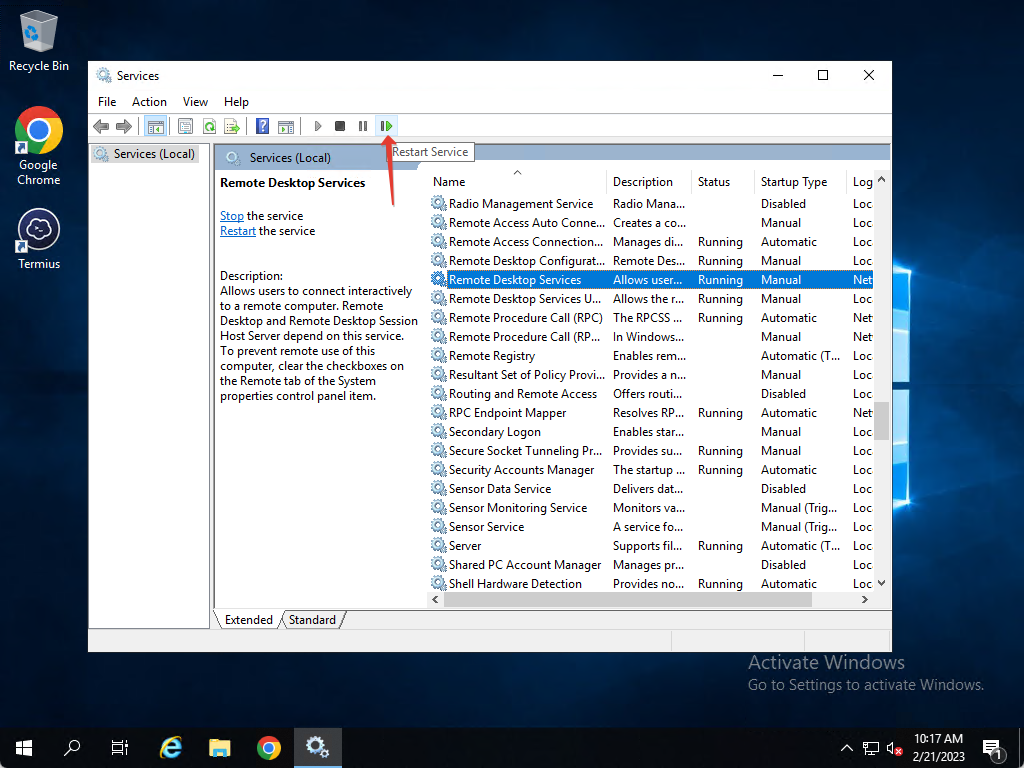
The service will see the new port and it will immediately close the connection to the old port for us.
We reopen “Remote Desktop Connection” on our PC or other device and enter the IP and port that we opened and enter password for the Administrator user.
Now the server can be used without the fear that hacker will guess the passwords of users on your server, since they usually scan the standard port, and you changed it.
Hello! One of the many tasks that system administrators have is to manage computers remotely. This way they can solve users’ problems. They can also update computers or resolve concerns about the use of computers. Although there are third-party applications, Windows Server has its own remote connection manager. Indeed, Remote Desktop allows you to connect to Windows Server with any device with a Remote Desktop client. However, this technology uses the Remote Desktop Protocol (RDP). Which is connected through port 3389. Additionally, today we will see how to change the remote desktop port in Windows Server 2019, 2016.
How to modify the port for the remote desktop connection in Windows Server
The main reason to modify this port is very simple. Because security is a crucial element in any server. Indeed, hackers know that port 3389 is the one used for remote connection. They can then try to access the computer to steal information or make unauthorized changes. Consequently, it is highly recommended to change this port. To do this we will modify the Windows Server Registry. With this intention, press the Win+R combination and execute the following command:
regedit

Now please follow the next path:
HKEY_LOCAL_MACHINE / SYSTEM / CurrentControlSet / Control / Terminal Server / WinStations / RDP-Tcp
Then select the value corresponding to PortNumber

Then double-click on the value. Immediately the values are displayed. Also, you can see that the value is displayed as d3d. This is because it is in a hexadecimal format. When you pass it to a decimal value, it is displayed as 3389.
Well, please edit it and add the value 6000. This will set this port. Finally, it is necessary to check a couple of steps. First, please check that the port is not blocked by the Windows Firewall. Finally, restart the server to set the changes.
Check access to the remote desktop.
Once the port is modified, it is time to check if the access to the remote desktop is correct. With this intention, please open the Remote Desktop client and enter the server name or IP address.

However, the connection will not be successful and you will see the following error message.

To access correctly, it is necessary to add the port number at the end of the IP address. For example:
192.168.30.128:6000

In this way, you will be asked for credentials to connect:

Lately, we have seen How to change the remote desktop port in Windows Server 2019, 2016. This way you can increase the security of the server. We hope that you like this. If so, please share on your social networks and don’t miss our post about How to use Active Directory Administrative Center in Windows Server 2019/2016.
— Advertisement —
Everything Linux, A.I, IT News, DataOps, Open Source and more delivered right to you.
Subscribe
«The best Linux newsletter on the web»