Introduction
In a Windows Server 2012 environment, assigning a meaningful and descriptive computer name is crucial for identification and management purposes. Whether you’re setting up a new server or need to modify an existing one, changing the computer name is a straightforward process. In this tutorial, we’ll walk through the step-by-step procedure to change the computer name in Windows Server 2012. In this article, I will show you how to change computer name using Windows Server 2012 Server Manager or Charm Bar.
To change the computer name using Server Manager
1. From the Start Screen, click on Server Manager

2. Server Manager will open, click on Local Server
3. Click on the the current computer name
4. System Properties will open. Click on Change
5. Type the new computer name and click on OK
6. A dialog box will pop up informing you to restart your machine so that changes take effect. Click OK and then Click on Close.
7. Click Restart Now
8. After the machine reboot, logon again and check the computer name inside Local Server
Another method to change the computer name is using the charm bar to open Server info.
1. Using your keyboard, click on both keys together : Window+i , then Click on Server info
2. The System window will open. Under the Computer name, domain, and workgroup settings section, click on the Change settings option
3. System Properties will open. Click on Change
4. Type the new computer name and click on OK
5. A dialog box will pop up informing you to restart your machine so that changes take effect. Click OK and then Click on Close
6. Click Restart Now
After the server restarts, log in and go back to the Local Server tab in Server Manager. Confirm that the new computer name is displayed under the Computer name section.
Conclusion:
Changing the computer name in Windows Server 2012 is a straightforward process that can be completed through the Server Manager interface. Ensuring your server has a meaningful and easily identifiable name is essential for efficient management and organization within your network.
Tarek Majdalani is an accomplished Windows Expert-IT Pro MVP, honored by Microsoft for eight consecutive years from 2007-2015. Holding a B.E. in Computer Engineering from the Lebanese American University, he pursued further education while working, earning various certificates showcased in his MVP profile. Tarek is currently serving as the Director of Engineering & Technology at Alrai Media Group in Kuwait. Since 2006, he has been actively contributing to the community by writing tutorials featuring tips and tricks, amassing over 300 tutorials on diverse systems.
Changing the hostname on a Windows Server 2012 is a straightforward process that allows you to customize the identity of your server. Whether you want to match it with your company’s naming convention or simply give it a more meaningful name, changing the hostname can be done in just a few steps. In this tutorial, we will guide you through the process of changing the hostname on a Windows Server 2012.
Step 1: Press the Windows key + X on your keyboard to open the Power User Menu.
Step 2: From the context menu, select «System.«
Step 3: In the System window, click on «Change settings» next to the computer name.
Step 4: In the System Properties window, click on the «Change» button.
Step 5: In the Computer Name/Domain Changes dialog box, enter the new hostname in the «Computer name» field.
Step 6: Click on the «OK» button and click «OK» again on the warning prompt.
Step 7: Finally, restart your computer for the changes to take effect.
| Pros | Cons |
|---|---|
| 1. Gives the server a more meaningful and customized identity. | 1. May require a restart to apply the changes. |
| 2. Helps to follow company’s naming convention or organization standards. | 2. Changing the hostname may temporarily disrupt network connections. |
| 3. Makes it easier to identify and manage multiple servers in a network. | 3. Some applications or services may need to be reconfigured after the hostname change. |
Changing the hostname on a Windows Server 2012 can be beneficial in terms of customization and organization. However, it’s important to consider the potential disruptions and configuration adjustments that may be necessary after the change. By following the steps outlined above, you can easily change the hostname on your Windows Server and tailor it to your specific needs.
Video Tutorial:How do I change my administrator name?
Where is host file in Windows Server 2012?
The Hosts file in Windows Server 2012 can be found in the following location:
1. Open File Explorer by clicking on the folder icon in the taskbar or by pressing the Windows key and the letter «E» together.
2. Navigate to the root directory of the system drive, typically «C:\«.
3. From the root directory, go to «Windows» folder.
4. Inside the «Windows» folder, locate and open the «System32» folder.
5. Within the «System32» folder, you will find a folder called «drivers«. Open this folder.
6. Now, open the «etc» folder, which contains various system configuration files.
7. In the «etc» folder, you should see a file named «hosts«. This is the Hosts file you are looking for.
The complete path to the Hosts file in Windows Server 2012 is typically as follows:
C:\Windows\System32\drivers\etc\hosts
Please note that modifying the Hosts file may require administrative privileges, so ensure you have the necessary permissions before making any changes.
To change the hostname of your device, you can follow these steps:
1. Access the settings: Open the settings menu on your device. This can usually be found by tapping on the gear icon.
2. Find the «About» section: In the settings menu, look for the «About» option. It is typically located towards the bottom of the list.
3. Locate the device name: Within the «About» section, you should find the current device name or hostname. It may be labeled as «Device Name» or «Hostname.«
4. Edit the name: Tap on the current device name or hostname to edit it. You may be prompted to enter your device password or use biometric authentication to proceed.
5. Enter the new hostname: Type in the new hostname that you desire for your device. Make sure to choose a unique and easily identifiable name.
6. Save the changes: Once you have entered the new hostname, save the changes by tapping on the «Save» or «Confirm» button. Your device will then use the new hostname.
It is worth noting that changing the hostname does not affect the functionality or performance of your device. However, it can have implications for network identification and communication in certain situations. If you are part of a network or need to access your device remotely, it is advisable to consult with the network administrator or refer to specific documentation for further guidance.
How do I find my hostname on Windows server?
To find your hostname on a Windows server, follow these steps:
1. Open the Command Prompt: Press the Windows key, type «cmd,» and press Enter. This will open the Command Prompt window.
2. In the Command Prompt, type «hostname» and press Enter. The hostname of your Windows server will be displayed on the next line.
That’s it! Following these steps will quickly provide you with the hostname of your Windows server.
How to find server hostname using CMD?
To find the server hostname using CMD (Command Prompt), follow these steps:
1. Open the Command Prompt by pressing the Windows key + R and typing «cmd» in the Run dialog box.
2. In the Command Prompt window, type the following command and press Enter:
`hostname`
This command will display the hostname of the computer/server you are currently using.
3. If you want to find the hostname of a specific server on your network, you can use the following command:
`ping [server IP]`
Replace [server IP] with the actual IP address of the server. The Command Prompt will display the server hostname in the results.
4. Another way to find the hostname is by using the `nslookup` command followed by the IP address of the server. For instance:
`nslookup [server IP]`
After executing this command, the Command Prompt will display the server’s hostname along with other DNS information.
Remember, these steps are for finding the server hostname using the Command Prompt on a Windows operating system. On different platforms, such as macOS or Linux, the process may vary slightly.
How do I edit hosts file in Windows 2012?
Editing the hosts file in Windows 2012 is a straightforward process that involves a few simple steps. By following these steps, you can easily edit the hosts file to manage local domain name resolution. Here’s a simplified guide to editing the hosts file on Windows Server 2012:
1. Launch a text editor with administrative privileges: To edit the hosts file, you need to open the text editor with administrative rights. Right-click on the text editor icon and select «Run as administrator» to ensure you have the necessary permissions.
2. Access the hosts file location: The hosts file is located in the «C:\Windows\System32\drivers\etc» directory. Use the file explorer or run the text editor as an administrator and navigate to this location.
3. Open the hosts file: In the «etc» directory, locate the file named «hosts» and open it with the text editor you launched in step 1.
4. Edit the hosts file: Within the hosts file, you’ll find a list of IP addresses and corresponding domain names. Each entry is on a new line, with the IP address followed by one or more space-separated domain names. To edit the file, simply add or remove entries as required by your needs. Ensure that you follow the formatting guidelines provided within the file itself.
5. Save the changes: Once you are done editing the hosts file, save the changes and close the text editor.
6. Test the changes: It’s essential to test whether the changes made to the hosts file are taking effect as intended. Open a web browser and try accessing the domain names you added or modified. If the DNS resolution is successful, you should be able to reach the specified IP address assigned to the domain name within the hosts file.
Remember, when editing the hosts file, exercise caution, and double-check all changes you make. Incorrect modifications or misconfigurations might lead to issues with local domain name resolution.
How to change Windows user name?
Changing a Windows user name can be done through a few simple steps. Here’s how you can do it:
1. Open the Control Panel: You can access the Control Panel by searching for it in the Windows search bar or by right-clicking the Start button and selecting «Control Panel.«
2. User Accounts: In the Control Panel, click on «User Accounts» or «User Accounts and Family Safety» depending on your Windows version.
3. Manage User Accounts: In the User Accounts section, you will find an option to «Manage User Accounts» or «Change your account name.» Click on this option.
4. User Account Properties: A new window will open, displaying a list of all user accounts on your computer. Select the account for which you want to change the name and click on the «Properties» or «Change account name» button.
5. Change User Name: In the User Account Properties window, you will find a field to change the user name. Replace the existing name with the new desired name and click on the «Apply» or «OK» button.
6. Restart your computer: To finalize the changes, you will need to restart your computer. Save any ongoing work and choose the «Restart» option.
Upon rebooting, your Windows user name should be changed to the new one you entered. It’s important to note that these steps may vary slightly depending on your version of Windows, but the general process remains the same.
Remember to back up your data and create a system restore point before making any changes to your user account or system settings.
После установки Windows Server или дестопной Windows 10/11, вам нужно изменить имя компьютера, заданное по-умолчанию. Чаще всего в имени компьютер рекомендуется указывать его местоположение или роль, например:
msk-dc01
,
wks-mskIT12
,
MRKTG021
и т.д. Можно использовать серийный или инвентарный номер устройства в качестве имени компьютера.
Содержание:
- Переименовать компьютер из графического интерфейса Windows
- Изменить имя компьютера с помощью PowerShell
При установке Windows сама генерирует имя компьютера формата, например,
DESKTOP-P2FHTKQ
. Имя содержит 15 символов, первые семь берутся из имени организации, остальные символы генерируются случайным образом. Для домашнего компьютера имя обычно не имеет особого значение, но если ваш компьютер находится в организации и работает в составе рабочей группы или домена AD, желательно задать осмысленное имя компьютера. В этой статье мы покажем, как переименовать компьютер Windows.
Имя компьютера должно соответствовать следующим требованиям:
- Длина не более 15 символов
- Не должно содержать специальных символов (< > ; : » * + = \ | ? ,)
- Можно использовать тире и нижнее подчеркивание
- Не должно состоять только из цифр
- Имя компьютера регистр независимо
- Если компьютер будет добавлен в домен Active Directory, имя компьютера должно быть уникальным в пределах домена.
Переименовать компьютер из графического интерфейса Windows
В современных версиях Windows 10 и 11 вы можете переименовать компьютер с помощью панели Settings.
- Нажмите
Win+I
и перейдите в раздел System -> About (можно использовать URI команду
ms-settings:about
для быстрого доступа к разделу Settings);
- Нажмите на кнопку Rename this PC;
- Укажите новое имя компьютера и нажмите Next;
- Перезагрузите компьютер, чтобы применить изменения.
Также вы можете изменить имя компьютера из классического интерфейса System Properties в Windows:
- Нажмите
Win+R
на клавиатуре и выполните команду
sysdm.cpl
или
systempropertiescomputername
; - Здесь отображается текущее имя компьютер и имя вашего домена или рабочей группы;
- Нажмите на кнопку Change, укажите новое имя компьютера и сохраните изменения.
- Перезагруите Windows
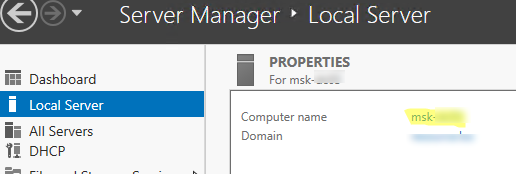
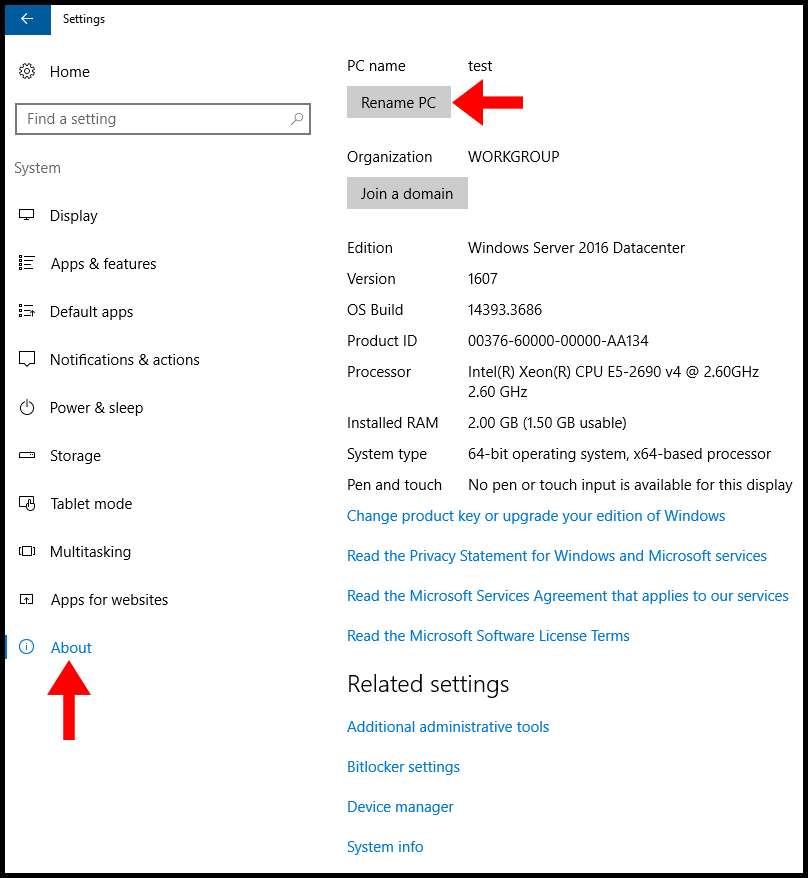
В Windows Server вы можете изменить имя компьютера через Server Manager. Выберите раздел Local Server и нажмите по имени в поле Computer Name.
Изменить имя компьютера с помощью PowerShell
Вы можете переименовать компьютер из командной строки с помощью PowerShell командлета Rename-Computer.
Откройте консоль PowerShell с правами администратора. Чтобы узнать текущее имя компьютера, выполните команду:
$env:computername
Или:
Hostname
Если вам нужно получить FQDN компьютера:
$env:computername.$env:userdnsdomain

Чтобы изменить имя компьютера, выполните:
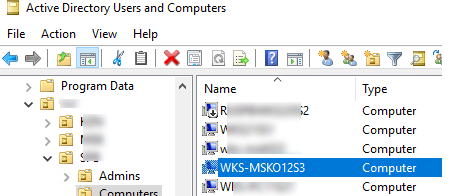
Rename-Computer -NewName "WKS-MSKO12S3"
Теперь можно перезагрузить компьютер с помощью команды Restart-Computer (или можно добавить опцию перезагрузки прямо в команду смены имени хоста):
Rename-Computer -NewName "WKS-MSKO12S3" –Restart -Force

После перезагрузки проверьте, что имя компьютера сменилось успешно.
Если этот компьютер был добавлен в домен AD перед сменой имени и находился в определенной OU (Organization Unit), его учетная запись но уже с новым именем по прежнему будет находится в том же самом контейнере. Можете проверить это с помощью консоли ADUC. Для переименования компьютера в AD вашей учетной записи должны быть делегированы разрешения на создание и удаление объектов Computers в этой OU.
Командлет Rename-Computer позволяет сменить имя удаленного компьютера. Используйте команды:
Rename-Computer -ComputerName "msk-test" -NewName "msk-preprod02" -DomainCredential Contoso\Admin01 –Force
Для подключения к удаленному компьютеру используется WMI, поэтому если он отключен на удаленном хосте или сетевые порты заблокированы, появится ошибка:
Rename-Computer : Cannot establish the WMI connection to the computer ‘priorauthdes’ with the following error message: Access is denied. (Exception from HRESULT: 0x80070005 (E_ACCESSDENIED)).
Можно использовать командлеты PowerShell Remoting для подключения к удаленному компьютеру. Если вы включили на удаленном компьютере WinRM вручную или настроили его с помощью GPO, можно использовать командлет Invoke-Command для запуска команды на удаленном компьютере. Чтобы переименовать удаленный компьютер, выполните:
Invoke-Command -ComputerName msk-test -ScriptBlock { Rename-Computer -NewName msk-preprod02 –Restart -Force}
Также для переименования компьютера ранее использовалась утилита netdom:
- Переименовать локальный компьютер:
netdom renamecomputer localhost /newname msk-preprod02 /reboot - Сменить имя удаленного компьютера:
netdom renamecomputer msk-test /newname:msk-preprod02 /userd:CONTOSO\Admin01 /password:*
В Windows Serve Core можно использовать встроенную псевдографическую команду sconfig для переименования компьютера.
Если вы устанавливаете ваш эталонный образ Windows на компьютеры с помощью автоматизированных средств установки (WDS, SCCM или по сети с помощью PXE), вы можете добавить в них небольшой скрипт для автоматического переименования компьютера в соответствии с политиками именования вашей организации.
Changing the hostname on Windows Server versions 2012 R2, 2016, and 2019 is a straightforward process. Below is a tutorial on how to change the hostname for each of these versions.
Step 1: Log in as an Administrator
Log in to your Windows Server 2012 R2 with an administrator account. You need administrative privileges to change the hostname.
Step 2: Open System Properties
Press Win + X and select “System.” Alternatively, you can right-click on “Computer” in the Start menu and choose “Properties.”
Step 3: Change Settings
In the System Properties window, click on the “Change settings” link in the “Computer name, domain, and workgroup settings” section.
Step 4: Change the Computer Name
In the “Computer Name/Domain Changes” window, click the “Change” button.
Step 5: Enter a New Name
Enter the new hostname in the “Computer Name” field and click “OK.”
Step 6: Restart
You will be prompted to restart your computer to apply the changes. Click “OK” to restart your server.
Windows Server 2016 and 2019
The process for changing the hostname in Windows Server 2016 and 2019 is very similar to that of 2012 R2.
Step 1: Log in as an Administrator
Log in to your Windows Server 2016 or 2019 with an administrator account.
Step 2: Open System Properties
Press Win + X and select “System.” Alternatively, you can right-click on “Computer” in the Start menu and choose “Properties.”
Step 3: Change Settings
In the System Properties window, click on the “Change settings” link in the “Computer name, domain, and workgroup settings” section.
Step 4: Change the Computer Name
In the “Computer Name/Domain Changes” window, click the “Change” button.
Step 5: Enter a New Name
Enter the new hostname in the “Computer Name” field and click “OK.”
Step 6: Restart
You will be prompted to restart your computer to apply the changes. Click “OK” to restart your server.
In all three versions (2012 R2, 2016, and 2019), changing the hostname requires administrative access, and you will need to restart your server for the changes to take effect. Always ensure you have proper backups and inform relevant parties before making changes to the hostname on a production server.
Auto-deployed Windows servers most likely come with random hostnames configured by the deployment system. If you’d like to change it, then you’ll need to change it manually. Learn how to change Windows Hostname for Windows Server 2019, 2016, and 2012 with our comprehensive guide in this article.
Windows Server 2019
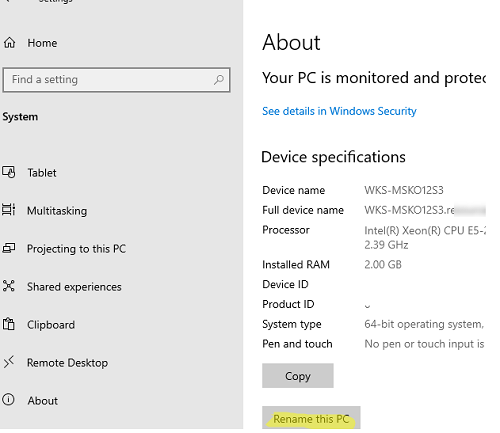
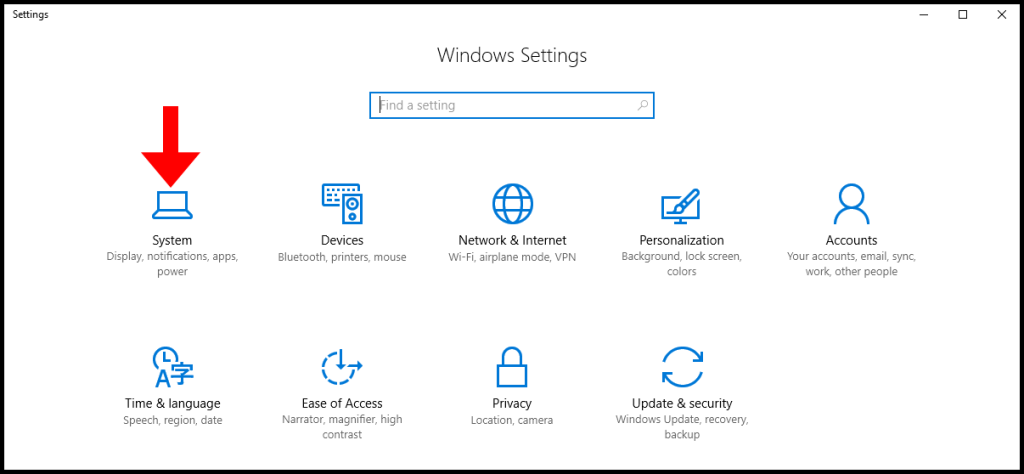
1. To start, log in to your Windows server 2019 and open Windows Settings.
2. Then on the Windows Settings page, click on System.
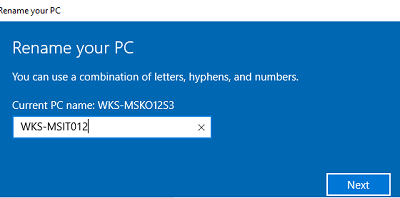
3. Then on the System page, navigate to the About tab on the left menu and click Rename this PC.
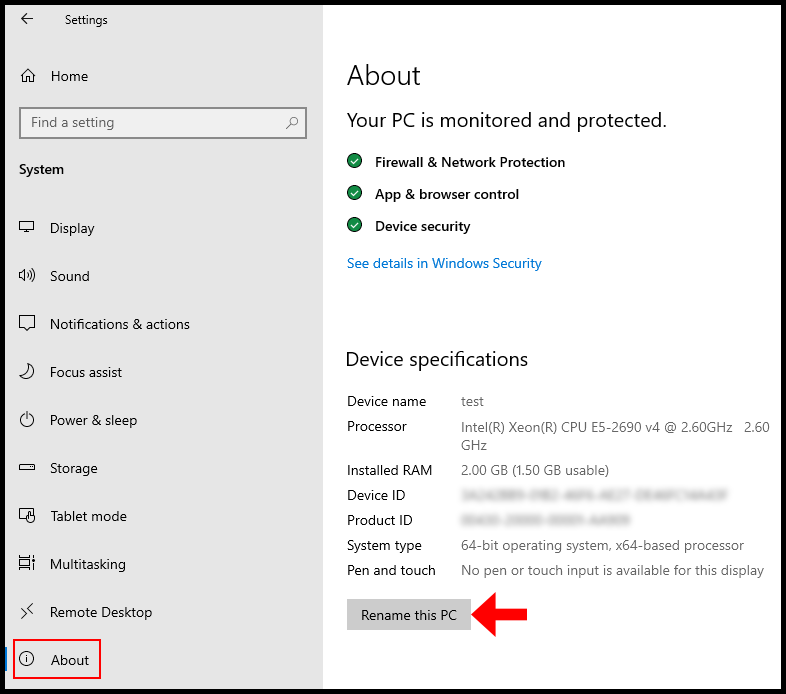
4. Then in the pop-up, enter the new PC name in the text field and then click Next.
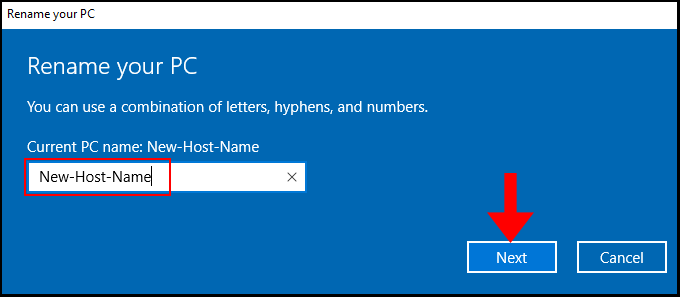
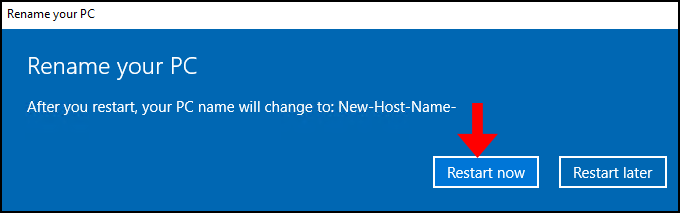
5. To save the changes, click Restart now on the next screen. We have successfully changed the Hostname on Windows Server 2019.
Windows Server 2016
1. To start, log in to your Windows server 2016 and open Windows Settings.
2. Then on the Windows Settings page, click System.
3. Next, navigate to the About tab from the left menu and click Rename PC.
4. Then in the pop-up, enter the new PC name in the text field and then click Next.
5. To save the changes, click Restart now on the next screen. We have successfully changed the Hostname on Windows Server 2016.
Windows Server 2012 R2
1. To start, log in to your Windows server 2012 and open Windows Settings.
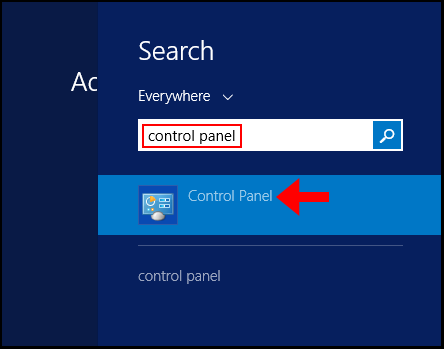
2. Then change the View by option to Small icons and then click System as seen below.
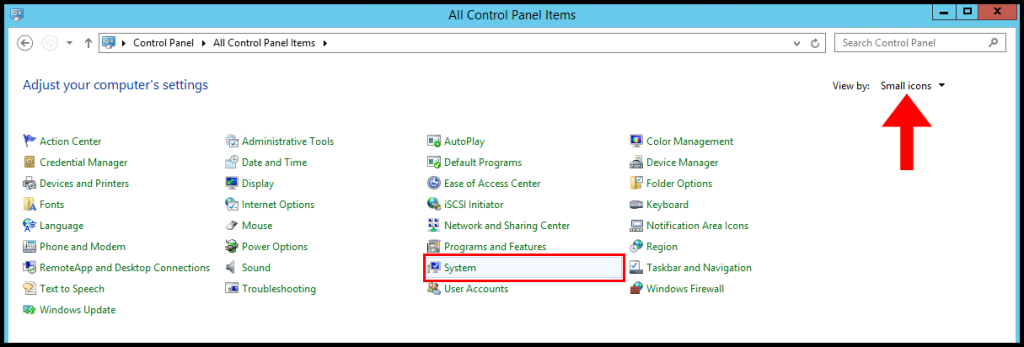
3. Next on the System page, click Change settings as seen in the image below.
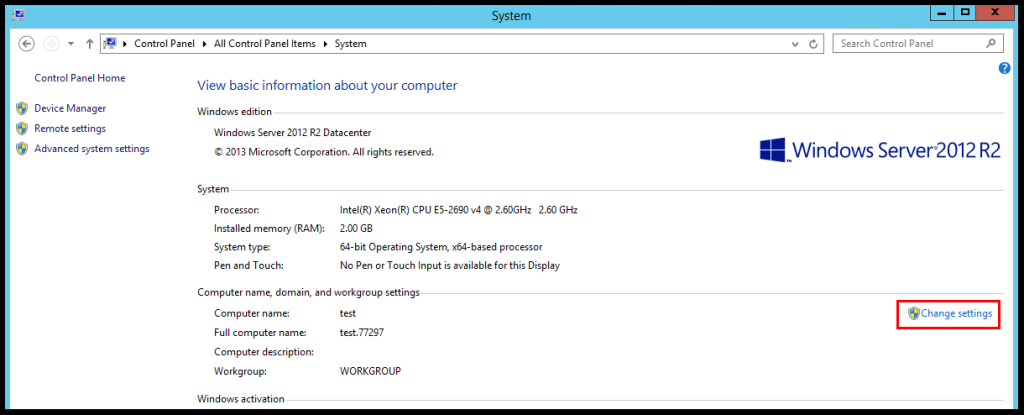
4. Then on the System Properties window, click Change to configure the Hostname.
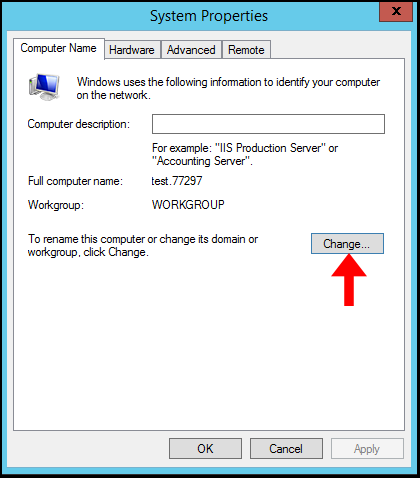
5. Enter the new hostname in the text field under Computer Name and click OK.
6. A pop-up will appear asking you to restart and then click OK.
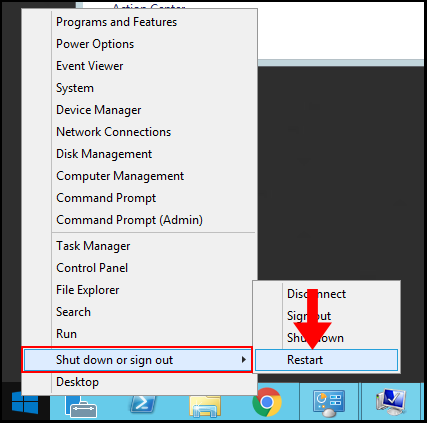
7. Lastly, right-click the Windows button at the bottom left and hover over Shut down or sign out and click Restart to complete the changes. We have successfully changed the Hostname on Windows Server 2012.