
Guide to Configure Magic Trackpad on Windows 10/11
Published
5 min read
How to Setup and Use Magic Trackpad on Windows 11/10
The Apple Magic Trackpad has gained immense popularity among tech enthusiasts for its sleek design, multi-touch functionality, and seamless compatibility with macOS devices. However, many users may not be aware that it can also be utilized on Windows 10 and Windows 11 machines. This article will guide you through the process of setting up and using the Magic Trackpad on Windows, including installation, configuration, and optimization for an enhanced user experience.
Understanding the Magic Trackpad
Before diving into setup, it’s important to understand what makes the Magic Trackpad unique. This input device allows for multi-touch gestures, which means users can perform a variety of commands using finger movements. Some popular gestures include scrolling, pinch to zoom, swipe between apps, and much more. While these features are natively supported on macOS, using them on Windows requires some additional configuration.
Compatibility and Requirements
To use the Magic Trackpad on a Windows device, you need the following:
-
Magic Trackpad – Either the original or the Magic Trackpad 2, which comes with improved features and a rechargeable battery.
-
Windows 10 or Windows 11 – Ensure your operating system is updated to enhance compatibility and access the latest features.
-
Bluetooth Adapter – A functional Bluetooth adapter is essential for wireless connectivity. Most modern laptops come with built-in Bluetooth, but if you’re using a desktop, you may need to purchase an external adapter.
Step-by-Step Setup Process
Step 1: Power On the Magic Trackpad
Before connecting to your Windows machine, ensure that your Magic Trackpad is charged. If you have the Magic Trackpad 2, use the Lightning to USB cable to charge it.
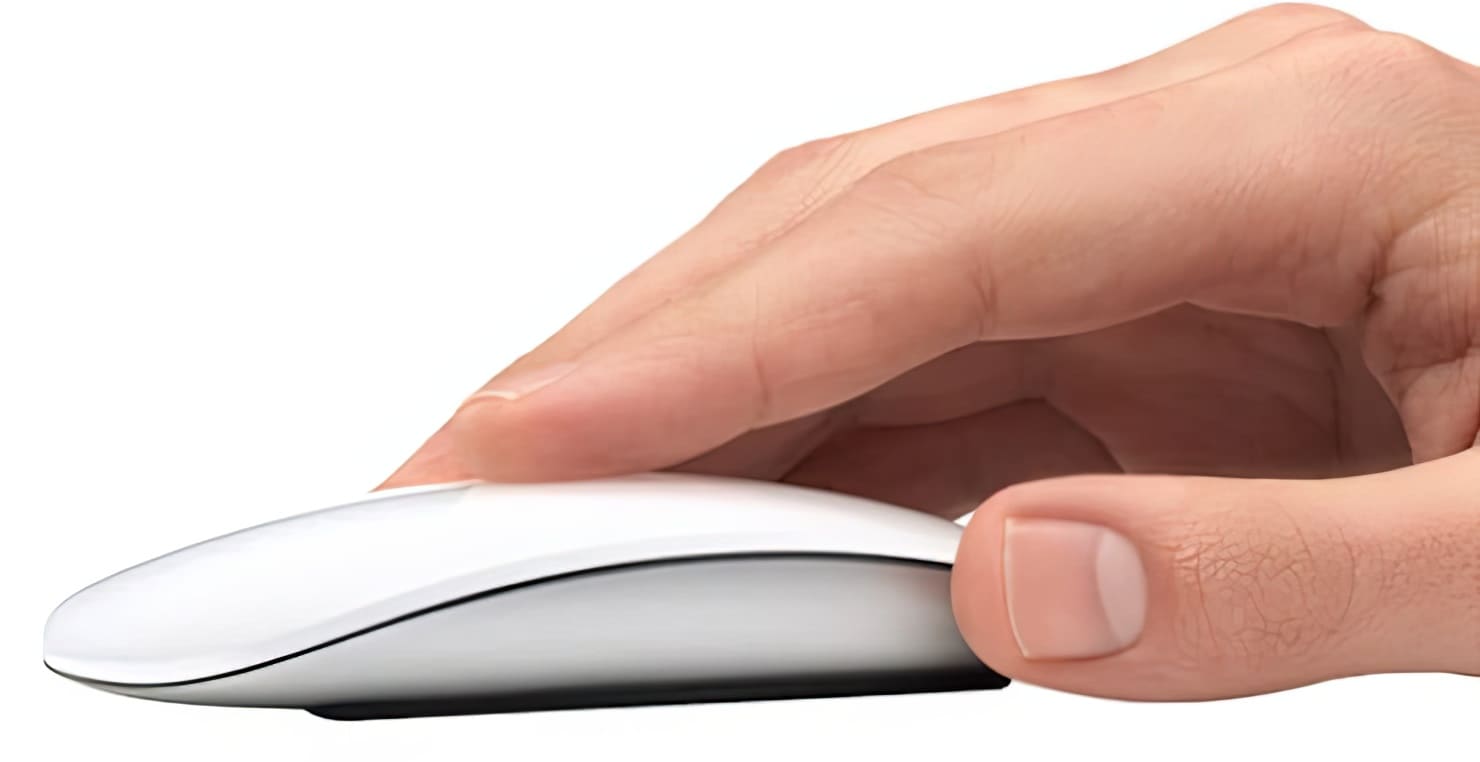
- Turn On the Magic Trackpad – To do this, locate the power switch on the back of the trackpad and slide it to the «On» position. The green LED will indicate that it’s powered on.
Step 2: Pairing the Magic Trackpad with Windows
After powering on the trackpad, the next step is to pair it with your Windows device.
-
Enable Bluetooth on Your Windows Device:
- Windows 10: Click on the Start Menu and navigate to Settings > Devices > Bluetooth & other devices. Toggle the Bluetooth switch to «On.»
- Windows 11: Go to Settings > Bluetooth & devices. Enable Bluetooth from the toggle switch.
-
Pair the Magic Trackpad:
- In the Bluetooth settings, click on “Add Bluetooth or other device.”
- Select “Bluetooth” from the options presented.
- Your Windows device will search for available Bluetooth devices. When you see «Magic Trackpad,» click on it.
- Follow any prompts that may appear to complete the pairing process.
-
Confirmation: Once successfully paired, Windows should display “Connected” under the Magic Trackpad.
Step 3: Driver Installation
Windows might not natively support all the gestures that the Magic Trackpad is capable of. To unlock its full potential, you can install drivers. While Windows may recognize the trackpad with basic functionalities immediately, to harness the extra features, you’ll need to install third-party drivers.
-
Touchpad Blocker and Magic Utilities: One of the best tools available is Magic Utilities, which is designed specifically to support Apple input devices on Windows. Here’s how to install it:
- Visit the Magic Utilities website.
- Download the Magic Utilities installer compatible with your version of Windows.
- Install following the on-screen instructions.
- Restart your computer once the installation is complete.
-
Alternative Options: Other tools like Trackpad Blocker or AnyPad might also help improve functionality and add gesture support.
Step 4: Customizing Trackpad Settings
After successfully installing the required drivers, it’s time to customize the settings.
-
Access Trackpad Settings:
- Open the Magic Utilities application. Here, you can access various customization options for your Magic Trackpad.
- Depending on the version of the utilities, you’ll generally find options to adjust tracking speed, gestures, and more.
-
Gestures Configuration:
- You can enable or disable specific gestures based on your preferences.
- Common options include two-finger scrolling, three-finger swipe, and gestures for Mission Control.
-
Adjusting Sensitivity:
- The sensitivity settings allow you to control how responsive the trackpad is to your touch.
- Typically, you can set these preferences within the same utilities application.
Common Gestures and Their Usage
Now that your Magic Trackpad is set up and customized, understanding the common gestures and how to use them will significantly enhance your productivity.
-
Scrolling: Use two fingers to scroll up or down through documents and web pages.
-
Zooming: Pinch in and out with two fingers to zoom in and out of images or web pages.
-
Swipe Between Applications: If configured, you can use three fingers to swipe left or right to navigate between open applications.
-
Mission Control: Swiping up with three fingers can trigger Mission Control, which displays all open windows.
-
Right Click: Tapping with two fingers works as a right-click.
Troubleshooting Common Issues
While using the Magic Trackpad on Windows is generally smooth, you may encounter a few issues. Here are some common problems and their solutions.
Connectivity Problems
If your Magic Trackpad isn’t connecting:
- Ensure Bluetooth is enabled on your Windows device.
- Make sure the Magic Trackpad is charged.
- Restart your Windows device and try re-pairing.
Gestures Not Working
Sometimes, gestures may not work as expected. Ensure:
- The Magic Utilities or any driver software is correctly installed and updated.
- Check the settings in the utilities application to see if the gestures are enabled.
Trackpad Response Issues
If the trackpad feels unresponsive or sluggish:
- Adjust the tracking speed in the Magic Utilities settings.
- Ensure that no other software conflicts are affecting the functionality.
Maximizing Your Magic Trackpad Experience
The Magic Trackpad isn’t just about basic navigation; it can significantly enhance your productivity when configured correctly.
-
Explore More Gestures: The more familiar you become with gestures, the smoother your workflow will be. Take time to learn various combinations and functionalities that suit your work needs.
-
Use Third-Party Applications: Consider integrating software like BetterTouchTool, which allows for even more extensive customization of gestures and shortcuts for applications.
-
Regular Updates: Keep your Windows OS and Magic Utilities updated to benefit from the latest enhancements and features available.
-
Custom Shortcuts: Customize shortcuts within specific applications you use frequently to streamline your tasks further using the Magic Trackpad.
Conclusion
Setting up and using the Magic Trackpad on Windows 10/11 may seem daunting at first, but with the right guidance and tools, it can be a seamless experience. By managing the settings and gestures effectively, you can enhance your productivity and enjoy the ergonomic benefits offered by this exceptional input device. Whether you’re a designer, writer, or casual user, integrating the Magic Trackpad into your Windows workflow can significantly improve your computing experience. Embrace the power of multi-touch technology and discover the difference it can make in your daily tasks.
Мышь Apple Magic Mouse выделяется среди собратьев тем, что позволяет на своей поверхности использовать жесты одним или несколькими пальцами.
Чтобы лучше узнать, какие именно возможности такого рода открываются при использовании мыши Magic Mouse, откройте приложение «Системные настройки» в macOS и перейдите в раздел «Мышь».

В этом разделе можно не только узнать типы поддерживаемых компьютером с macOS жестов, но и сменить их или даже отключить. Жесты мыши потребуют использования Magic Mouse.
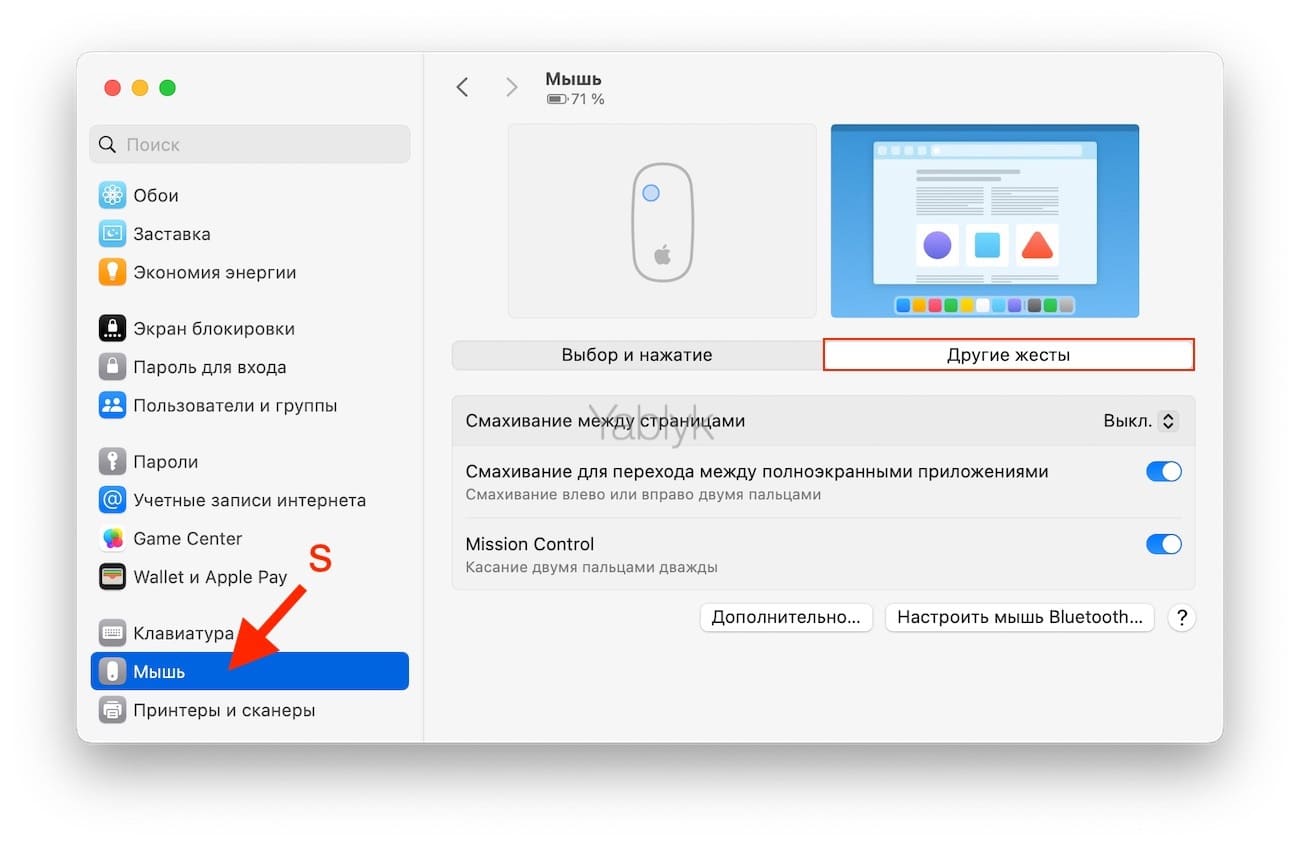
Вспомогательное нажатие. Этот жест имитирует щелчок правой кнопкой мыши. Для его реализации надо просто щелкнуть по правой стороне поверхности Magic Mouse.
Прокрутка. Надо провести одним пальцем вверх или вниз по поверхности мыши, чтобы прокрутить документ. Этот жест заменяет использование колесика прокрутки в обычной мыши.
Умное масштабирование. Чтобы увеличить или уменьшить масштаб рассматриваемой веб-страницы или PDF-документа надо просто дважды коснуться пальцем поверхности Magic Mouse.
Переход к Mission Control. Для открытия этого элемента системы достаточно дважды нажать на поверхность мыши двумя пальцами.
Переход между полноэкранными программами или рабочими столами. Этот очень полезный жест позволяет простым смахиванием двумя пальцами влево или вправо перемещаться между полноэкранными программами или рабочими столами.
Переход между страницами. А вот смахивание одним пальцем влево или вправо позволит перейти на предыдущую или следующую страницу рабочего документа.
Программы, добавляющие новые жесты для Magic Mouse
Сторонние приложения «BetterTouchTool» и «jitouch» легко позволяют создавать новые жесты для мыши Magic Mouse.
Скачать BetterTouchTool.
Скачать jitouch.
Apple’s Magic Trackpad 1 and 2 have gained popularity for their sleek design and intuitive multi-touch gestures. While these devices are primarily designed for macOS, they can also work with Windows operating systems like Windows 10 and Windows 11. This article provides a comprehensive guide on how to set up and use Apple Magic Trackpad 1 & 2 on Windows, allowing you to enjoy the unique features and functionalities they offer.
Understanding the Apple Magic Trackpad
Before we delve into the setup process, it’s essential to understand the two models of the Magic Trackpad:
-
Apple Magic Trackpad 1: Launched in 2012, this initial version is slightly bulkier and less refined than its successor. It features a glass surface and Bluetooth connectivity but lacks the rechargeable battery present in later models.
-
Apple Magic Trackpad 2: Released in 2015, this version was designed to enhance user experience further. It has a lower profile, a larger surface area, and comes with a built-in rechargeable battery, ensuring prolonged usage without the need for constant battery replacements.
Regardless of the model, using the Magic Trackpad on Windows requires a few steps, including installation, configuration, and customization.
Compatibility Check
Before starting, ensure that your Windows PC is compatible with the Bluetooth version required for the Magic Trackpad:
- Magic Trackpad 1 typically requires Bluetooth 4.0 or later.
- Magic Trackpad 2 operates on Bluetooth 4.0 or higher, with added support for advanced features.
Most Windows 10 and Windows 11 devices should meet these requirements, but it’s always good to check your hardware specifications.
Step-by-Step Guide to Setting Up Your Magic Trackpad
Step 1: Connecting Your Trackpad via Bluetooth
-
Turn on the Trackpad: For Magic Trackpad 2, use the power switch located on the back to turn it on. For the Magic Trackpad 1, ensure it has sufficient battery life. Note that this model requires AA batteries.
-
Open Bluetooth Settings on Your PC:
- Windows 10: Click on the Start Menu > Settings (Gear Icon) > Devices > Bluetooth & other devices.
- Windows 11: Right-click the Start button and select Settings > Devices > Bluetooth & devices.
-
Enable Bluetooth: Make sure the Bluetooth toggle is switched on.
-
Add a Bluetooth Device:
- Click on “Add Bluetooth or other device.”
- Select “Bluetooth” from the options.
-
Put Your Trackpad In Pairing Mode: On the Magic Trackpad, press the button until the LED light flashes. This indicates it’s discoverable.
-
Select the Trackpad: Your device should appear in the list. Click on it to initiate pairing.
-
Complete the Pairing Process: You might receive a confirmation prompt; follow the on-screen instructions. Once paired, the trackpad should work with your Windows system.
Step 2: Installing Drivers
By default, Windows might not have the necessary drivers to make the most of the Magic Trackpad’s features. Here’s how to install them:
-
Using Boot Camp Drivers:
- Download and install the Boot Camp drivers from Apple’s support page.
- Extract the downloaded files and navigate to the Boot Camp folder.
- Locate the “AppleBluetoothInstaller.exe” and run it.
- Follow the prompts to install the Bluetooth driver.
-
Using Third-Party Drivers: A popular choice among users is the «Trackpad Block» driver, which enhances functionality and gesture support for the trackpad on Windows.
Step 3: Configuring Your Trackpad Settings
Once connected, open the Control Panel to adjust settings:
- Go to Control Panel → Hardware and Sound → Mouse.
- Select the Device Settings Tab: Click on your Magic Trackpad.
- Adjust Settings: You can modify the pointer speed and configure gestures (if the third-party software is installed).
In Windows 10 and Windows 11, the touchpad settings can also be accessed via the “Settings” app:
- Navigate to Settings > Devices > Touchpad and adjust the sensitivity and gestures.
Using Gestures on Windows 10 & 11
The Magic Trackpad supports several gestures that enhance navigation on Windows. Here is a rundown of supported gestures:
- Scrolling: Swipe with two fingers to scroll vertically or horizontally.
- Zooming: Pinch to zoom in or out.
- Right-click: Tap using two fingers to perform a right-click.
- App Switching: Swipe left or right with three fingers to switch between open apps.
- Task View: Swipe up with three fingers to access the Task View.
While macOS provides extensive gesture support, Windows can sometimes require additional software to enable advanced features.
Tips for Optimizing Your Experience
To get the most out of your Magic Trackpad on Windows, consider these optimization strategies:
- Install BetterTouchTool: This third-party software enables greater customization of gestures, allowing you to set unique commands for different gestures.
- Use Precision Touchpad Features: If your Windows device supports precision touchpad features, enable these for improved responsiveness and gesture recognition.
- Regularly Update Drivers: Installing updates for your touchpad can enhance compatibility and add new features.
Troubleshooting Common Issues
1. Connection Issues
If your trackpad isn’t connecting:
- Ensure your Bluetooth is enabled and functioning on your computer.
- Restart your Bluetooth service: Go to the Services app, find Bluetooth Support Service, and restart it.
2. Trackpad Not Functioning Correctly
- Update your driver using the Boot Camp installer or check for additional driver software.
- Verify that Windows recognizes the trackpad: Navigate to the Device Manager and check if the trackpad is listed without issues.
3. Gestures Not Working
- Some gestures may require third-party applications like BetterTouchTool.
- Ensure that your drivers are up to date.
Maintaining Your Magic Trackpad
To ensure a long lifespan for your Magic Trackpad:
- Keep it Clean: Use a soft, lint-free cloth to keep the glass surface clean. Avoid using excessive moisture.
- Battery Care: For the Magic Trackpad 1, regularly check the battery levels and replace them when necessary. For the Magic Trackpad 2, ensure you charge it regularly.
Conclusion
Using the Apple Magic Trackpad 1 and 2 on Windows 10 and Windows 11 can significantly enhance your computer experience. While there might be some hurdles to overcome, the trackpad’s intuitive design and gesture capabilities make it a worthwhile investment for Windows users looking for an innovative navigation solution. By following the setup and usage guides, you can enjoy the seamless functionality of Apple’s Magic Trackpad, even on a non-Apple operating system. With persistence and the right software, you can enjoy a fully functional gesture-based interface on your Windows device.
Learn how to change the mouse and trackpad pointer color on your Mac to customize its appearance and make it easier to see on the screen.

If you’re reading this article on your Mac, you’ll notice that the macOS pointer is black and white by default. This color combination is suitable for most people. However, there are two main reasons why you might want to change the color of your mouse pointer:
- For accessibility reasons: If you are visually impaired and cannot discern the black and white pointer of your mouse very well.
- For aesthetic reasons: You simply want to change things up and add some color to your screen.
Set your mouse and trackpad pointer to any other color
- Open System Settings and select Accessibility from the left sidebar.
- Select Display under the Vision section.
- Scroll down to the Pointer section and change the Pointer outline color and Pointer fill color.

The steps are similar even if you are on a Mac running an older software such as macOS Monterey. Just select Display from the left side of the Accessibility pane in System Preferences.
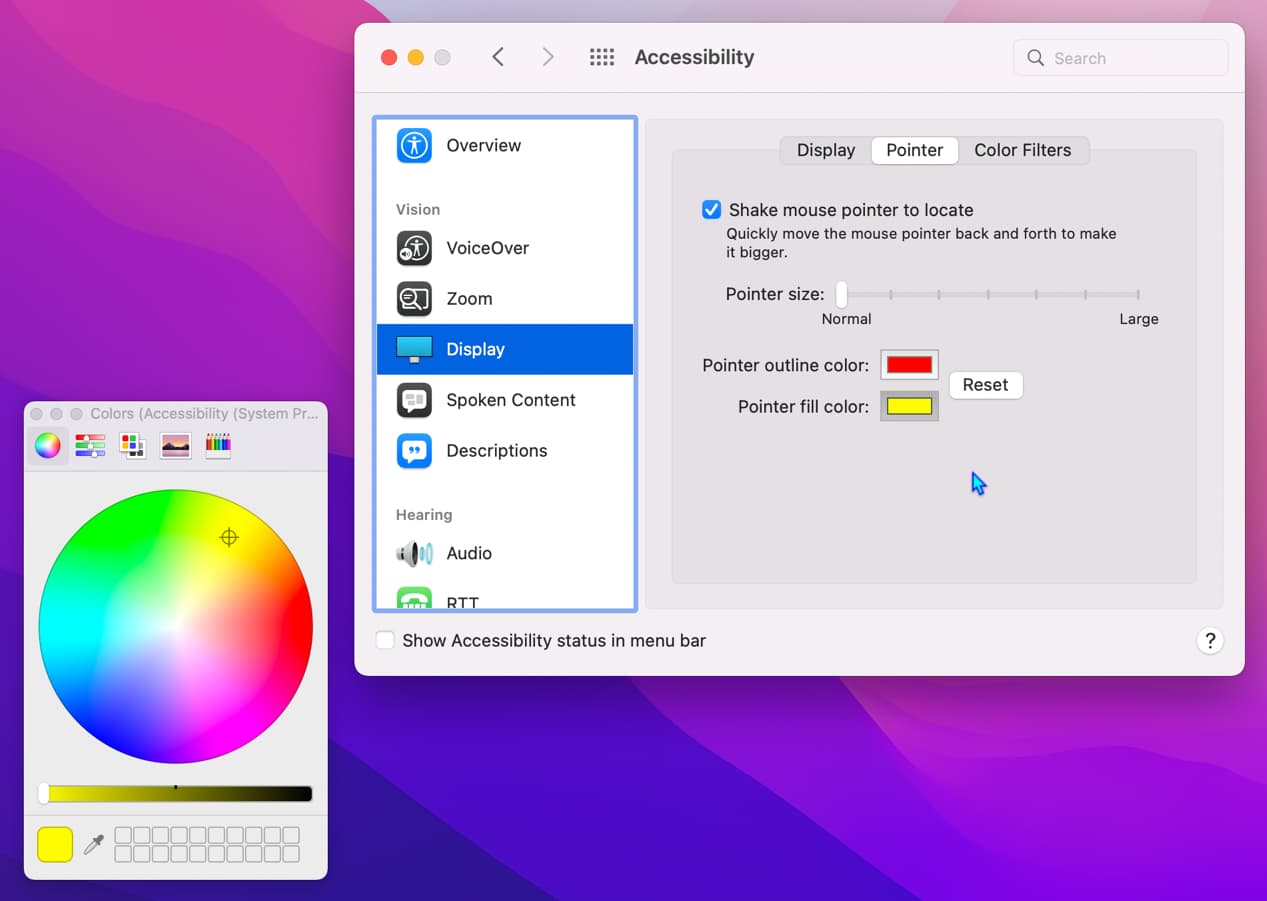
You will see the cursor color changes in real time. Use the various buttons and sliders on the small color palette window to choose from millions of colors. If desired, you can increase the pointer size to see everything properly. Once you are happy with your pointer’s overall color scheme, close System Settings/Preferences.
This is how you can personalize your Mac’s cursor color. If you ever want to go back to the default black-white pointer color, follow the same steps and hit the Reset button.
On a related note:
- How to move and control the mouse pointer using your Mac keyboard
- How to change the speed of your mouse and trackpad on Mac
- How to use your Mac camera to control the cursor with head movement

Magic Trackpad — ещё одна занятная игрушка производства Apple, необходимость которой вызывает споры на различных форумах уже многие месяцы. Судить о том, удобно ли работать с трекпадом вместо мыши на декстопе, очень трудно, тем более трудно рекомендовать его всем и каждому. Сегодня мы не хотели бы расхваливать или критиковать «волшебный трекпад» (это забота Apple), а лучше расскажем о том, как полноценно подружить его с Windows.
Хорошо маководам: им достаточно достать новенький Magic Trackpad из коробки, запустить Системные настройки на Маке и зайти в пульт «Трекпад». Вы сразу сможете без лишних проблем опробовать все вкусности в виде 12 поддерживаемых жестов. Но те, кто пользуются Boot Camp, или те, кто зачем-то купил себе трекпад для PC, столкнутся с большими проблемами и мелкими неприятностями. О том, как их избежать, мы расскажем сегодня.
Для начала ответим на два животрепещущих вопроса:
- а Magic Trackpad в Windows вообще возможно завести? Конечно! Apple для всей мейнстрим-продукции штампует и Windows-драйверы. Отдельный разговор о том, что делаются эти драйверы левой ногой, и работают так, будто специально задуманы для выработки ненависти к Windows и стимулирования полного перехода на Мак
- а какие жесты поддерживаются в Magic Trackpad под Windows? Многие. Конечно, не все, что есть на Маке, но 9, что тоже вполне приятно.
В Windows ваш Magic Trackpad будет поддерживать:
- тапание (ну а как без этого?)
- перетягивание и перетягивание с фиксацией
- имитацию левой и правой кнопки по углам трекпада
- прокрутку (как горизонтальную, так и вертикальную)
- имитацию правой кнопки при тапе двумя пальцами (как на Макбуках)
Как видите, не всё так плохо, как может показаться. По крайней мере, Magic Trackpad под Windows намного функциональнее, нежели Magic Mouse. Остаются ещё два важных вопроса: как поставить нужные драйверы и как обеспечить настройку жестов.
При ответе на данные вопросы всё снова будет зависеть от того, относитесь ли вы к когорте маководов или нет.
Если ваша Windows существует в рамках Boot Camp на Маке, то всё очень просто. Убедитесь в том, что вы поставили драйверы Boot Camp с установочного диска Mac OS X (у него есть скрытый раздел, видимый только из-под Windows). Затем запустите Пуск-Программы-Apple Software Update и обновите Boot Camp до последней версии. Затем в системном лотке выберите значок Boot Camp (серый ромб), запустите панель управления Boot Camp, и зайдите на вкладку Трекпад. Все настройки будут там.

А вот если ваша Windows работает в полевых условиях на PC, придётся попотеть:
1. Поставьте нужные драйверы, выдранные из Boot Camp. Не вздумайте ставить Boot Camp на PC целиком!!! В лучшем случае это кончится тормозной системой, в худшем — компьютер перестанет грузиться.
2. После того, как вы поставили драйверы, есть два варианта. Первый — активно потыкайте в трекпад, чтобы он начал пытаться спариться (простите за выражение  с bluetooth-адаптером компа. Если компьютер напишет, что обнаружена попытка подключения — замечательно, просто введите в качестве кода доступа 0000 (четыре нуля). Если нет, нажмите на значок Bluetooth в системном лотке и в контекстном меню выберите «Добавить устройство». С n-ной попытки вам наверняка повезёт.
3. Но на этом злоключения PC-шников не прекращаются. У вас сразу активируются все поддерживаемые жесты, причём некоторые будут работать с гипертрофированной чувствительностью. Признаемся честно, день пользования Magic Trackpad под Windows здорово портит настроение: особенно бесит перетаскивание, которое норовит активироваться в самый неожиданный момент. Как же можно отключить отдельные фишки трекпада? Почти никак. «Почти» — потому что есть одно довольно корявое, но безальтернативное решение. Утилита называется padset и лежит тут.
padset работает ну очень хитро Во-первых, вам надо будет запустить экселевский файл из архива с программой и определить 16-ричный код, который нужно будет добавить в реестр. Код зависит от такого, какие функции вам нужны, а какие — нет. Например, если вы хотите избавиться от перетаскивания и симулирования правой кнопки в углу трекпада, ваше счастливое число — 00000029. Это число нужно вписать в любой из reg-файлов в архиве. В контекстом меню reg-файла выберите «Изменить» и замените число внутри на ваше число.

Затем сохраните reg-файл и запустите его двойным щелчком. Согласитесь на внесение изменений в реестр.
Думали, что всё? А вот и нет  После внесения изменений ничего не случится, пока вы не запустите утилиту padset.exe. Она промелькнёт и исчезнет, а трекпад останется настроенным до конца сеанса работы.
Чтобы автоматически запускать padset.exe при старте системы, добавьте его ярлык в папку Пуск-Программы-Автозагрузка. Для создания ярлыка перетащите сам exe-файл в папку назначения с зажатой клавишей Alt.
Вот и все премудрости на сегодня. Желаем вам комфортной работы с Magic Trackpad под Windows!