
Apache, the world’s most widely used web server software, offers flexibility and a robust set of features. One common task that administrators often encounter is changing the server’s port number. This article provides a detailed, step-by-step guide to help you successfully change the port number in Apache.
Introduction
The default HTTP port for Apache is 80, and for HTTPS, it’s 443. However, there are various reasons you might need to change these, such as running multiple servers on one machine or avoiding conflicts with other applications. This guide assumes a basic understanding of Apache and its configuration files.
Step 1: Access the Apache Configuration File
The first step involves accessing the Apache main configuration file, typically named httpd.conf or apache2.conf. The location of this file varies depending on the operating system and Apache version:
- On RHEL-based Systems: /etc/httpd/conf/httpd.conf
- On Debian-based Systems: /etc/apache2/ports.conf
- For Windows users, it’s often located in the conf directory within the Apache installation directory.
Step 2: Locate the Listen Directive
Within the configuration file, look for lines starting with the Listen directive. This directive tells Apache on which IP addresses and ports it should listen for requests. By default, you might see something like:
Listen 80
Step 3: Change the Port Number
To change the port number, simply edit the number after the Listen directive. For instance, if you want Apache to listen on port 8080, modify the line to:
Listen 8080
If you’re running Apache with SSL/TLS and want to change the HTTPS port, change Listen 443 in configuration file as well as in Virtual hosts.
Step 4: Check for Virtual Hosts Settings
If your Apache server uses virtual hosts, you’ll also need to change the port number in each <VirtualHost> block in the configuration files. The line usually looks like this:
<VirtualHost *:80>
Change 80 to your new port number.
After making the changes, save the configuration file. Ensure you do not unintentionally change any other settings.
Step 5: Restart Apache
For the changes to take effect, restart the Apache server. This can be done via command line. On Unix/Linux systems, the command is often:
sudo systemctl restart apache2
On Windows, you can restart Apache through the Apache Service Monitor or by using the httpd.exe -k restart command in the command prompt.
Step 6: Test the New Configuration
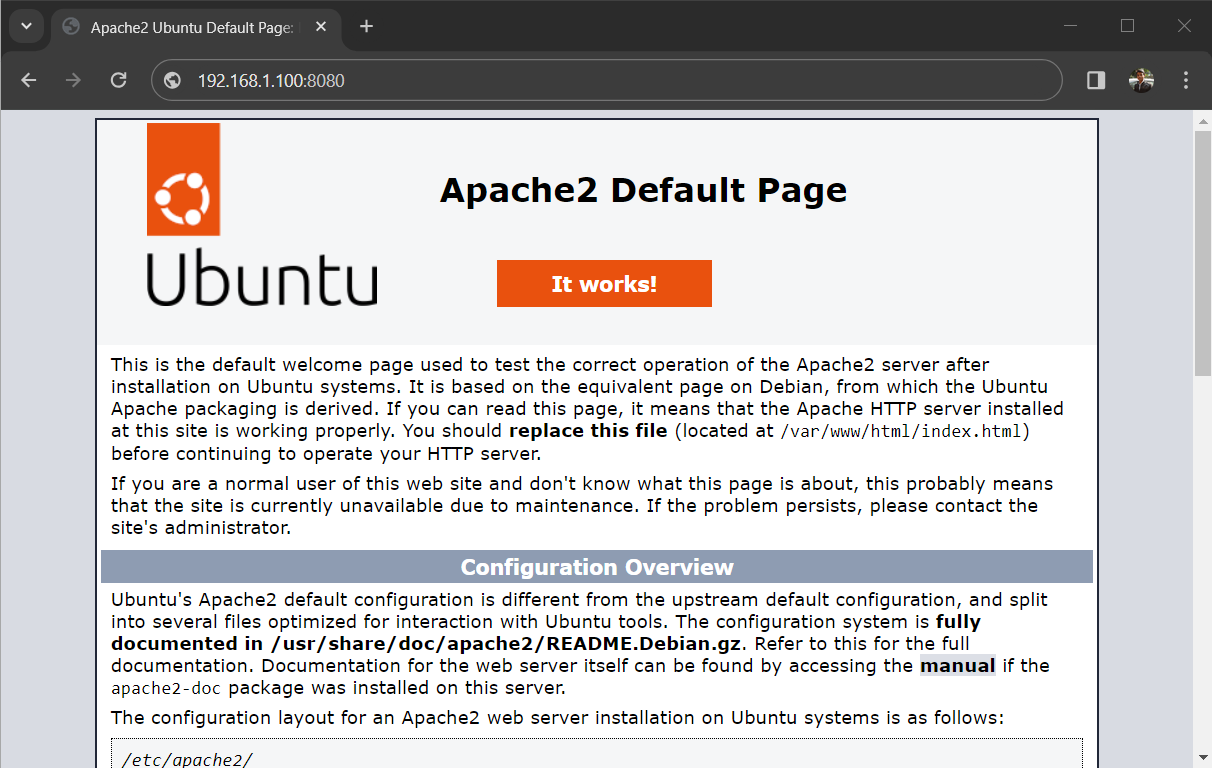
Open your web browser and try accessing your site using the new port number, for example, http://your_system_ip:8080. If everything is configured correctly, your site should load.
Conclusion
Changing the port number in Apache is a straightforward process, but it requires careful attention to detail. Always remember to back up your configuration files before making any changes. This precaution allows you to restore the original settings in case something goes wrong.
By following these steps, you can customize your Apache installation to suit your specific needs and maintain a smoothly running web server.
Зачем менять порт веб-сервера
Если какая-либо программа использует порт, то другой процесс уже не может использовать этот же самый порт. К примеру, если на вашем компьютере порт 80 уже занят, то Apache просто не запустится).
Ещё одной причиной, почему может возникнуть желание поменять порт — сделать ваш сервер менее заметным. К примеру, если вы не предприняли мер по защите, то любой в вашей локальной или глобальной сети может подключиться к вашему веб-серверу. Если скрипты содержат уязвимости или просто плохо настроены, то постороннее лицо может лазить по вашим локальным сайтам и, в случае удачной атаки, даже лазить по всему вашему компьютеру. Если поменять порт со стандартного 80 на какой-нибудь необычный, то сервер будет чуть труднее найти. Хотя сканеры портов всё равно смогут это сделать.
Итак, по умолчанию Apache использует 80 порт, это определяется директивой:
Listen 80
в конфигурационном файле httpd.conf.
Чтобы изменить порт, откройте этот файл и вместо 80 впишите любой другой незанятый в вашей системе:
Listen 48855
Для кого не подойдёт смена порта
Если ваш сайт предназначен быть публичным сервером и сайты должны быть доступны другим пользователям, то смена порта нежелательна, поскольку они смогут перейти на ваш сайт только по специальному адресу.
Как открыть сайт на нестандартном порту
Чтобы открыть сайт на нестандартных портах (не на 80 или 443), добавьте через двоеточие к адресу сайта порт, который прослушивает сервер:http://localhost:48855
Также можно делать ссылки такого вида: http://localhost:48855. Они являются работающими и вы можете перенаправить посетителя с одной страницы или сайта на другой, работающий на нестандартном порте.
Связанные статьи:
- Apache Forwarding — проброска портов веб-сервера (100%)
- Apache для Windows (52.4%)
- Как запустить Apache на Windows (52.4%)
- Документация по Apache на русском языке (52.4%)
- Как подключить PHP к Apache на Windows (52.4%)
- Настройка веб-сервера Apache для запуска программ Ruby на Windows (RANDOM — 52.4%)
Apache (сейчас Apache 2) до сих пор является WEB-сервером по умолчанию и большинство хостингов ставит его единственным HTTP-сервером. Однако, с появлением NGiNX ситуация поменялась, и на 80-м порту предполагается наличие более шустрого NGiNX тогда, как более навороченный Apache ставится уже за ним с тем, чтобы обрабатывать сложные запросы по сборке динамических страниц «на лету». А вся статика (типа картинок, JavaScript и CSS-файлов) отдаётся быстро и сразу NGiNX’ом. Так как порт 80 для всех браузеров до сих пор остался портом для http-запросов, то на этом порту на сервере должен стоять NGiNX, а Apache, как правило, вешается на дополнительный для http порт 8080. В этой статье рассмотрим, как поменять настройки Apache на сервере так, чтобы он отвечал с порта 8080, освободив 80-й порт для NGiNX.
ports.conf — основной файл конфигурации портов WEB-сервера Apache
В предыдущей статье было подробно разобрано, как найти директорию на сервере с файлами конфигурации Apache на удалённом сервере. В этой же директории должен располагаться файл ports.conf, в котором прописаны порты, с которыми работает Apache.
Содержимое файла ports.conf по умолчанию
Файл ports.conf имеет следующее содержимое сразу после установки Apache на сервер:
# If you just change the port or add more ports here, you will likely also
# have to change the VirtualHost statement in
# /etc/apache2/sites-enabled/000-default.conf

Listen 80

<IfModule ssl_module>
	Listen 443
</IfModule>

<IfModule mod_gnutls.c>
	Listen 443
</IfModule>

# vim: syntax=apache ts=4 sw=4 sts=4 sr noet
Как видим, Апач действительно слушает 80-й порт при http-запросе, а при https-запросе — порт 443.
Меняем http-порт 80 Apache на 8080
Для того, чтобы Apache перестал занимать 80-й порт, а стал отвечать с 8080-порта,
- в файле
ports.confнужно- поменять строку
Listen 80 - на строку
Listen 8080
- поменять строку
- перезапустить Apache командой
apachectl -k restart
Проверяем смену http-порта Apache на 8080
Если раньше сайт отвечал на запрос в браузере:
http://mysite.ru/то после описанных выше манипуляций, сайт по этому запросу становится недоступным. Для того, чтобы увидеть сайт, нужно обратиться к порту 8080 на сервере, указав это в явном виде в строке запроса браузера:
http://mysite.ru:8080/Резюме
Таким образом можно освободить 80-й порт, перепрописав его для Apache на порт 8080.
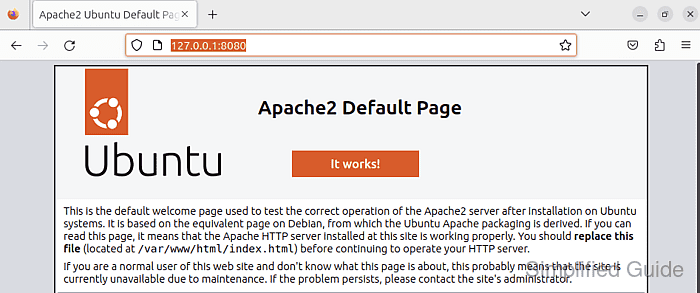
Если на сервере несколько сайтов, то для каждого виртуального хоста в папке /etc/apache2/sites-available нужно прописать порт 8080 вместо 80:
<VirtualHost 127.0.0.1:8080>И, конечно, перезагрузить Апач.
Если NGiNX ещё не установлен, остановим Apache командой
P.S.
Перед перезагрузкой Апача полезно проверять на косячность правок его конфигов командой apachectl stop. Включим после того, как установим NGiNX.
root@server:~# apachectl -t
Syntax OK
Так должна выглядеть проверка синтаксиса конфигурации Apache.
После этого можно перезагрузить NGiNX и убедиться в правильности работы обоих серверов на портах 80 и 8080 (читать по → этой ссылке).
Заберите ссылку на статью к себе, чтобы потом легко её найти!
Раз уж досюда дочитали, то может может есть желание рассказать об этом месте своим друзьям, знакомым и просто мимо проходящим?
Не надо себя сдерживать! 
Last week, I encountered a server with its HTTPS port 80 already taken by another software. The “culprit” was unsurprisingly another web server software, namely IIS. Because the IIS users are already accustomed to the default port, the Apache installation had no choice but to use a less popular port for HTTP, in this case case port 81.
You might ask why is port 80 important for http? Well, for one, it is the ease of use for the users. If you are browsing to a web server listening on a port other than port 80, you will need to include the port number along with the address.
Something like this: http://yourdomain.com:81/ if port 81 is your web server’s port. If you use port 80 then you won’t have to type in port 80 on the address since it is the standard port used for HTTP. According to http://www.tcpipguide.com
“To avoid chaos, the software that implements a particular server process normally uses the same reserved port number on every IP device, so clients can find it easily… Every Web browser just “knows” that websites are designed to listen for requests sent to port 80”.
So having that fact settled, let’s see how we can change the port of our Apache setup. First look for the httpd.conf file inside the Apache > conf folder.
httpd.conf is a text file used by all Apache implementations, so changing a Unix Apache or Windows Apache install is done the same way – thru this config file. Open the file using your favorite text editor and look for the line with “Listen 80”:
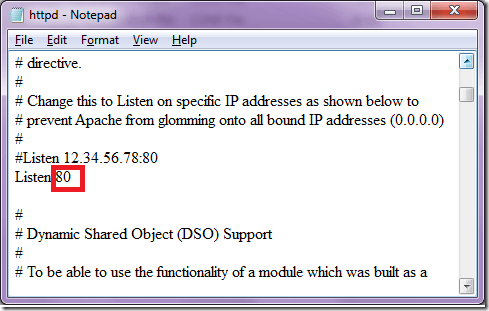
This line defines Apache to listen on port 80. All you have to do is change that port 80 to any port that you want to use. Make sure that the port that you will use is a free port and not already taken by other services. Read our guide about a free port scanner if you are not sure.
Once you have edited the file, save it and restart Apache. To test if you already are using the new port browse the URL with the port you have used. For example, if you entered port 81 as the new port, the new URL should be http://yourdomain:81.
Another method that I read about online is slightly different. If the above doesn’t work for you, try going to /etc/apache2/ports.conf and changing the Listen line there to something like Listen 81.
Next, go to /etc/apache2/sites-enabled/000-default.conf and change the first line to VirtualHost *: 81. Restart Apache and you should be able to visit the domain without having to type in the port number. Apache should redirect automatically to /var/www/html. Enjoy!
Related Posts
- HDMI Cable Types and Specifications Explained
- Flat vs Round Ethernet Cables: What’s Different and Which Is Better?
- USB-C vs HDMI: What’s Different and Which Is Best for Video Output?
- What Is Bluetooth 5 and How to Upgrade?
- What Is Mesh Network Topology?
The Apache HTTP Server typically listens on port 80 for HTTP and port 443 for HTTPS. Some environments or existing services might necessitate adjusting these ports to avoid conflicts.
In Linux, macOS, and Windows environments, changing the listen port for Apache requires root or administrative privileges to edit the relevant configuration files. A mismatch between service and firewall rules can disrupt connectivity, so thorough configuration is crucial.
The Listen directive determines which port Apache uses, and updates to firewall settings or SELinux policies may also be required to ensure the service is accessible. Careful planning and validation can help maintain uninterrupted operations when altering default ports.
Steps to change the listen port for Apache:
-
Open the terminal on your server.
-
Locate the Apache configuration file containing the Listen directive.
$ sudo grep -nr "^Listen" /etc/{httpd,apache2}/ [sudo] password for user: grep: /etc/httpd/: No such file or directory /etc/apache2/ports.conf:5:Listen 80 -
Edit the configuration file using your preferred text editor.
$ sudo vi /etc/apache2/ports.conf
-
Find the line with the Listen directive, followed by the current port number.
Listen 80
-
Replace the current port number with the desired new port number.
Listen 8080
Make sure no other services are using the port you have chosen. You can use the netstat command to check for conflicts.
-
Save and close the configuration file.
-
Edit related VirtualHost configurations to utilize the new port.
<VirtualHost *:8080>
  ##### snipped
</VirtualHost>
-
Allow the new port through your firewall.
$ sudo iptables -A INPUT -p tcp --dport 8080 -j ACCEPT
$ sudo ufw allow 8080/tcp
-
Add the new port to the list of allowed ports for HTTP traffic for SELinux.
$ sudo semanage port -a -t http_port_t -p tcp 8080
-
Restart the Apache service to apply the changes.
$ sudo systemctl restart apache2 # Ubuntu, Debian, openSUSE and SLES
$ sudo systemctl restart httpd # CentOS and Red Hat
-
Confirm that Apache is now listening on the new port by accessing the server with the updated port number in the URL.
$ curl -I 127.0.0.1:8080
HTTP/1.1 200 OK
Date: Fri, 01 Sep 2023 11:58:10 GMT
Server: Apache/2.4.55 (Ubuntu)
Last-Modified: Thu, 31 Aug 2023 09:37:27 GMT
ETag: "29af-60434cacb2109"
Accept-Ranges: bytes
Content-Length: 10671
Vary: Accept-Encoding
Content-Type: text/html
Discuss the article:
Comment
anonymously. Login not required.