
Having multiple users on a Windows 11 computer is a great way to ensure each person who uses it has a pleasant experience and keeps their files, settings, and apps separate from others. However, this leads to a problem: not everyone knows how to switch the user when it’s their turn to sign in to Windows 11, which can cause data loss and, sometimes, even family conflicts. To help with this issue, I have created this complete guide with all the methods I know for changing the user in Windows 11, whether you’re using it on a laptop, a PC, or some other type of device:
IMPORTANT: When you switch the user in Windows 11, the previously used user account stays signed in. If the new user shuts down the computer, the work of the initial user might get lost because that user may not have saved their data or closed their running apps. Furthermore, the apps opened by the first user continue to run in the background, using hardware resources that may be required for the current user and the apps they’re using. Therefore, I recommend signing out from Windows 11 and logging in with a new user instead. This ensures the initial user is logged off and all their apps are closed. However, if you’re only going to use the device for a limited amount of time and prefer using Switch user instead of Sign Out > Switch user > Sign in, keep reading this guide.
1. How to switch the user in Windows 11 on the login screen
After Windows 11 loads on your laptop (it doesn’t matter who makes it: HP, Dell, Lenovo, ASUS, etc.) or PC, it first displays the Lock screen. Here, you see the date and time and possibly a beautiful wallpaper, like the one shown below. To see the login options, click or tap anywhere on the Lock screen or press any key on your keyboard.

The Lock Screen displays beautiful wallpapers
TIP: If you want to personalize Windows 11, here’s how to change the Windows 11 Lock Screen wallpapers.
Now you see the Login screen showing the user accounts available on your Windows 11 PC, laptop, or device. Simply click or tap on the user you want to switch to, and Windows 11 will request the last sign-in method used for the selected account: the password, PIN, picture password, etc. Enter the requested information to sign in to Windows 11.
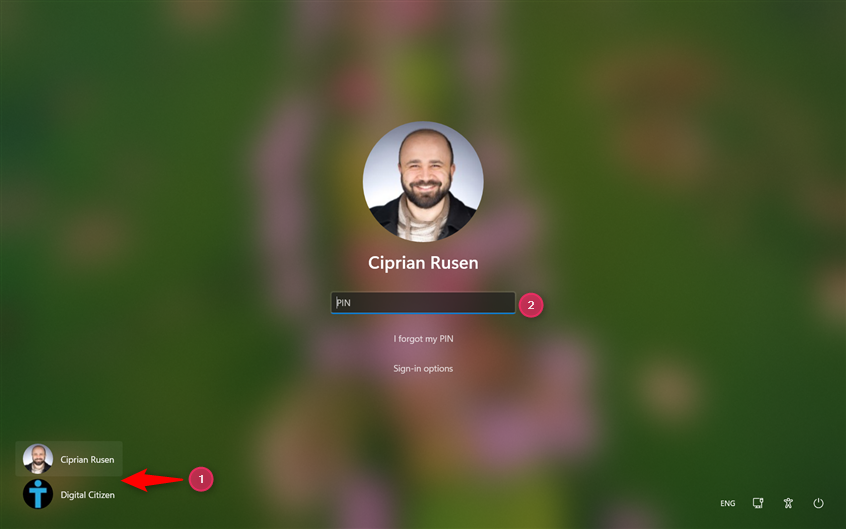
Choose the user on the Sign-in screen
IMPORTANT: If Facial recognition (Windows Hello) is enabled and your device detects your face, you may be automatically logged in. If this happens and prevents you from switching users, make sure you disable or block the camera, then try again.
In case you need to change the sign-in method for the selected user, click or tap the Sign-in options, choose the method you want to use, and enter the information required to sign in.
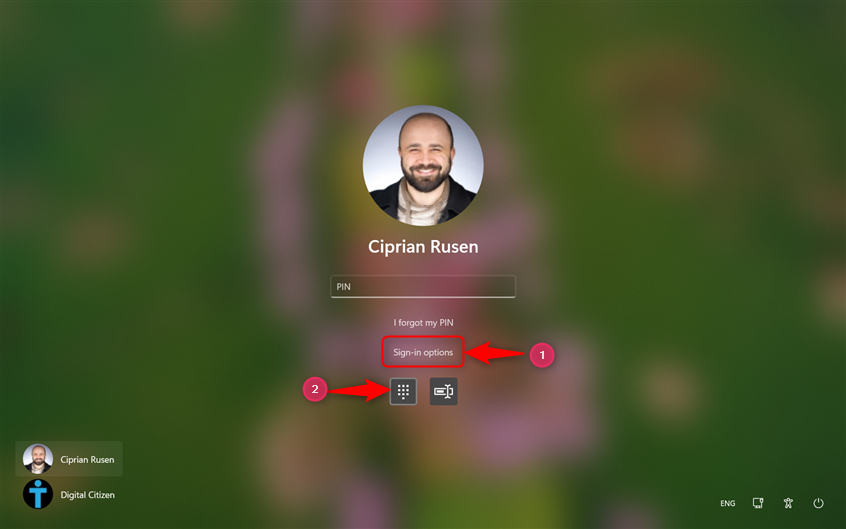
Switch the Sign-in options
After successfully signing in, Windows 11 shows you the desktop, and you can start using your PC.
2. Switch the user in Windows 11 using a keyboard shortcut (Windows + L)
If you need to leave your computer for a short while but want to make sure no one can access your data while you are away, you can lock your account by pressing these keys simultaneously:
Windows + L
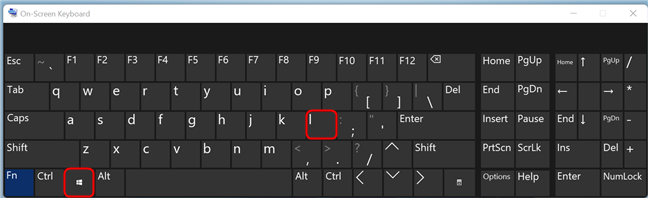
Press Windows + L
This action locks your Windows 11 computer or device and displays the Lock screen, from where you can change users. Click or tap anywhere on the Lock screen to see the Login screen and choose the account you want to switch to. Enter the necessary login information, and you’re done.🙂
3. How to switch the user in Windows 11 from the Start Menu
The Start Menu is a good place to switch users if you are already logged in. First, press the Windows key on your keyboard or click the Start button on the taskbar to open the Start Menu. Next, click or tap on your user name in the lower-left corner of the menu. This brings up a contextual menu that includes a list of all active users on your Windows 11 device. Click the user you wish to switch to, and you are immediately taken to the sign-in screen, where you are asked to enter the login information for the selected user.
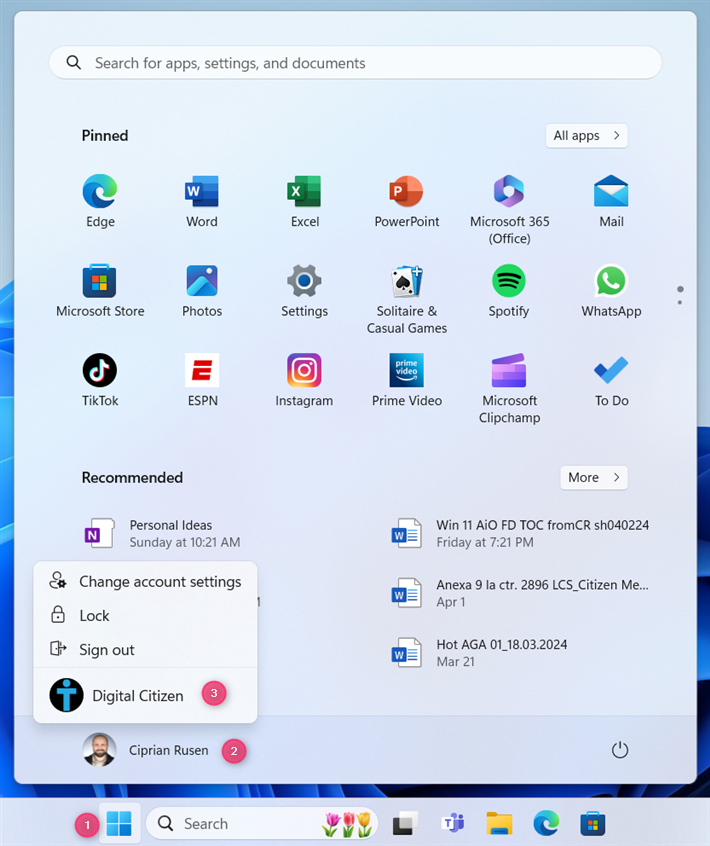
Switch the user from the Start Menu
NOTE: Remember that you can switch between sign-in options by clicking or tapping Sign-in options and selecting the one you want to use.
4. Switch the user in Windows 11 from CMD, PowerShell, or Windows Terminal
If you need to work inside the Command Prompt, PowerShell, or Windows Terminal, there are two commands you can use to switch the user. Open CMD or the command-line app you prefer, type this command, and press the Enter key to run it:
tsdiscon
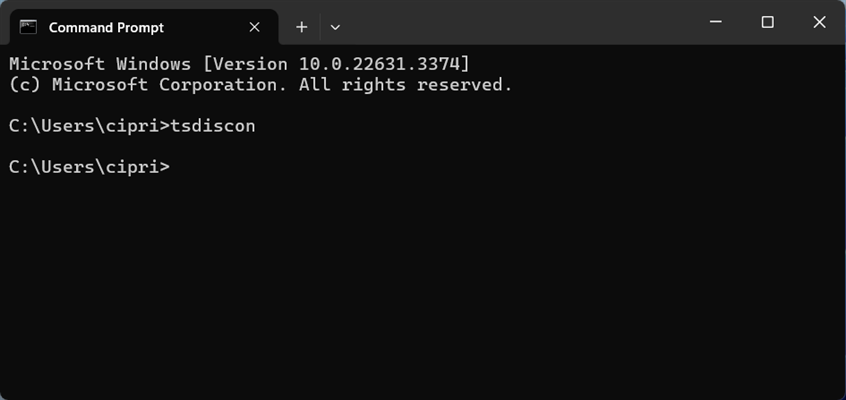
Run tsdiscon in CMD to switch the user
When you run tsdiscon, the current user is locked, and you are shown the Lock screen. Here, you can change the user and log in with a new one: click or tap anywhere on the screen, select the new user you want to use, and enter their sign-in information.
Note, however, that this method doesn’t work in Windows 11 Home. When you try to run it on this edition of Windows 11, you receive this error: “tsdiscon is not recognized as an internal or external command, operable program or batch file.” This command can be used only in Windows 11 Pro, Windows 11 Enterprise, and other editions.
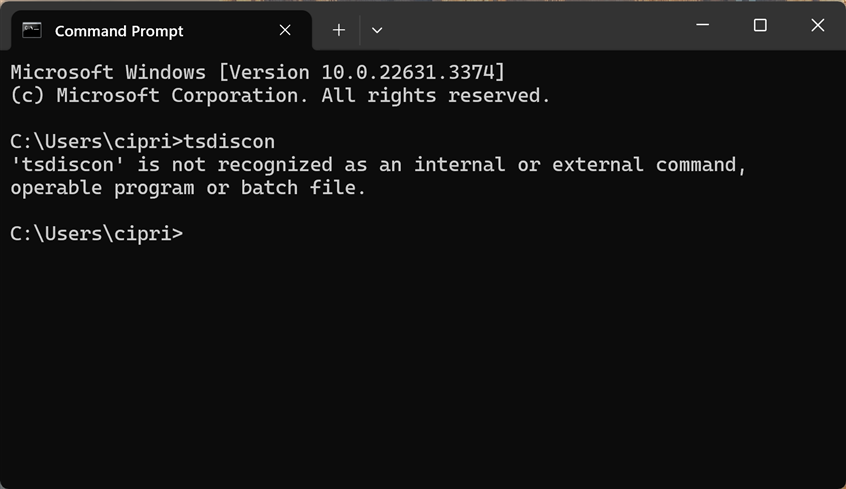
tsdiscon doesn’t work in Windows 11 Home
Luckily, you can use another command that works in all editions of Windows 11:
shutdown /l
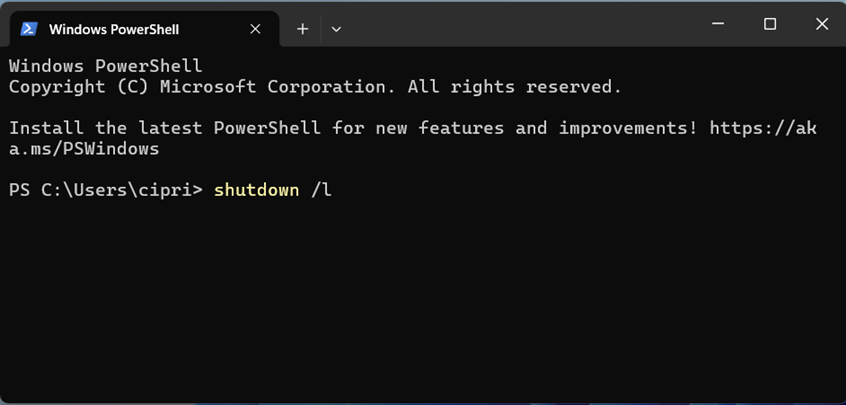
Run shutdown /l in PowerShell or CMD
This command doesn’t lock the computer. Instead, it signs you out from the current user and lets you sign in with another one. You can run it in PowerShell, Windows Terminal, or Command Prompt.
When you see the Lock screen, click or tap anywhere on the screen, and then choose the user you want to switch to.
5. How to switch the user in Windows 11 with Ctrl + Alt + Del
Another way to switch users if you are already logged in to Windows 11 is with the good old…
CTRL + ALT + DEL
Press this key combination on your keyboard, and the Ctrl Alt Delete screen pops up. Click or tap Switch user.
Select Switch user on the Ctrl Alt Delete screen
You are shown the Login screen, where you can choose the user you want to use and enter the login credentials.
TIP: If there are multiple people using your computer, and not everybody has their own user account, here’s how to create and add a new user in Windows 11.
6. Switch the user using the ALT + F4 keyboard shortcut
Although this is a useful keyboard shortcut that you can use to switch users, its downside is that it works only if you are already logged in with a user account. First, go to the Windows 11 desktop, make sure all apps are minimized, and press these keys:
ALT + F4
The Shut Down Windows prompt pops up, asking you to choose what you want Windows 11 to do. Click or tap the drop-down list to see more options.
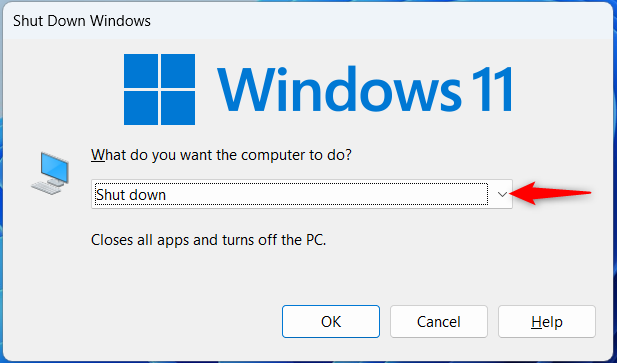
Shut Down Windows
In the list, select Switch user, and click or tap OK.
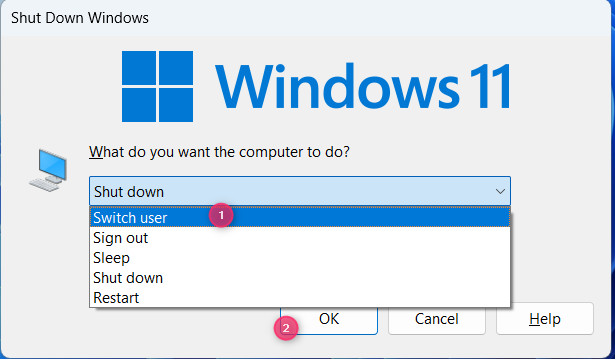
Select Switch user and press OK
You are greeted by the familiar sign-in screen. Select the user you want to switch to from the list in the lower-left corner and enter the requested login information.
7. How to switch the user in Windows 11 from the Task Manager
This method is a bit complicated, but it works, so I decided to be the last I include in this guide:
Start by opening the Task Manager (a quick way to do this is to press Ctrl+Shift+Esc on your keyboard). Then, go to the Users tab on the left, and right-click (or press and hold) the user account you want to switch to. In the menu that pops up, choose Switch user account.
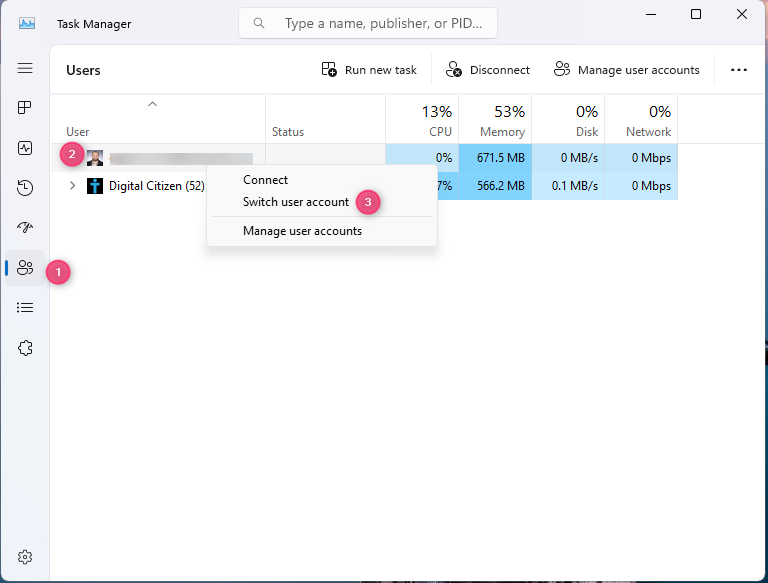
Switch user account from Task Manager
If you don’t see another user account on this list, it’s because it didn’t sign in earlier to Windows 11. In this situation, you can right-click (or press and hold) on your user, choose Disconnect, and confirm your choice. This action will sign your user out of Windows 11.
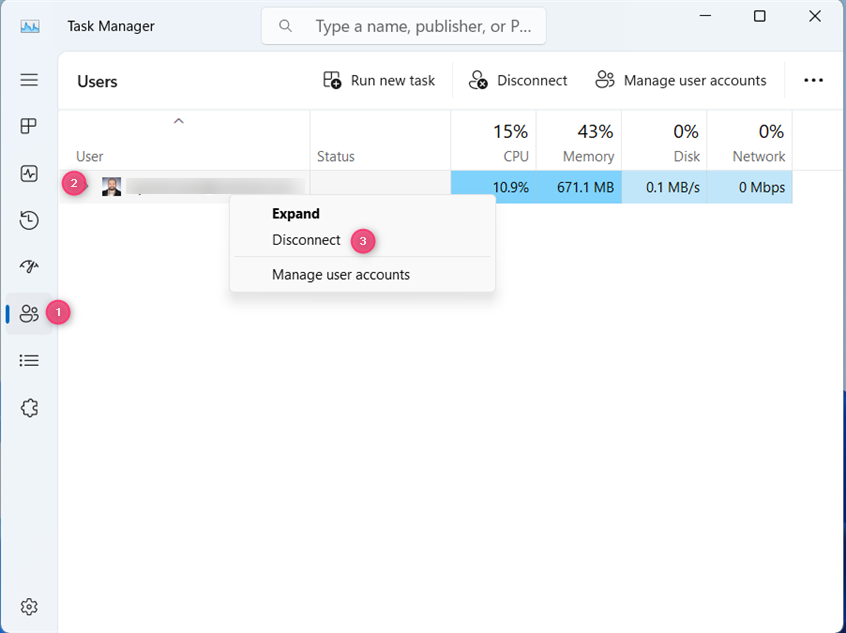
Disconnect from Task Manager
You then see the Lock screen. Click or tap on it, then choose the user you want to switch to.
TIP: If you have too many user accounts on your Windows 11 computer, here’s how to remove an account from Windows.
How do you prefer to switch users in Windows 11?
Now you know seven ways to switch users in Windows 11. These methods work on all Windows 11 devices, from standard desktop computers and laptops to tablets and 2-in-1 devices. Try them all, see which ones you prefer, and then let me know in a comment using the options below. I prefer switching users using the Windows + L keyboard shortcut. I find it fast and easy. What about you?
In this tutorial, you will learn how to use the net user command to create, delete and change user accounts in the Windows command prompt (CDM).
We can perform the following tasks using the net user command:
- View user accounts.
- Add and Remove user accounts.
- Activate and Deactivate user accounts.
- Change the user password.
If you are operating in an Active Directory domain environment, always use the /domain command switch to execute the net user command on the domain controller rather than on the local computer.
Examples
List users on the local computer:
net userList users on the domain controller:
net user /domainThis command displays detailed information about the Administrator account:
net user AdministratorCreate a user named user1 with a password of strongPassword:
net user /add user1 "strongPassword"Delete the user user1 from the computer:
net user /delete user2This command enables the built-in Administrator account on Windows 10/11:
net user Administrator /active:yesThis command sets (changes) the Administrator account password:
net user Administrator "adminPassWord"Execute the following command to disable the Administrator account on Windows 10/11:
net user Administrator /active:noThis command forces the user user1 to change the password at the next logon:
net user user1 /logonpasswordchg:yesCreate a user; the user must change the password at the next logon:
net user /add user1 "strongPassword" /logonpasswordchg:yesCreate a new user; the account expires on January 31st:
net user /add user1 "strongPassword" /expires:01/31/2023Command Options
| username | The name of the user to create, delete, view, or modify. |
| password | Password for the user. |
| * | Use this option to produce a prompt for the password. |
| /add | Use this option when you want to create a new user. |
| /delete | Use this option to remove a user from the Windows system. |
| /active:{yes | no} | Activates or Deactivates a user. The default is yes when creating a new user. |
| /expires:{date | never} | Use this option to set the expiration date (mm/dd/yy) for an account. The default is never. |
| /fullname:»name» | Full name of the user. |
| /passwordchg:{yes | no} | Specifies whether users can change their own password. The default is yes. |
| /passwordreq:{yes | no} | No means the user can log in without a password. The default is YES. |
| /logonpasswordchg:{yes|no} | Specifies whether the user should change the password at the next logon. The default is NO. |
| /homedir:path | The home directory location. |
| /comment:»text» | Use this option to add a description to the user’s account. |
You can view the manual page by typing net help user at the command prompt.
View a User
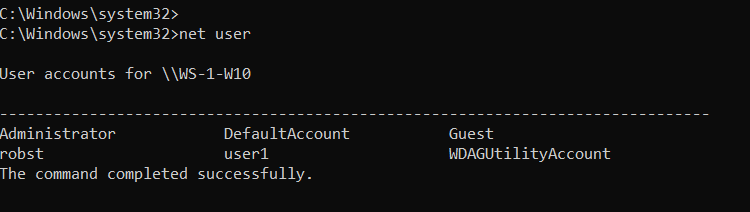
When you execute the net user command without any options, it displays a list of user accounts on the computer.
net userYou will see an output similar to the following:
Add the /domain command switch if you want to list users on the Active Directory Domain controller.
net user /domainTo see detailed information about a particular user, execute the command net user Username, where the Username is the name of the user you want to view. For example, you can view the Administrator account by running the following command:
net user AdministratorCreate and Delete User Accounts
To create a user account, use the following syntax:
net user /add UserName PasswordFor example, the following command creates a user named user1 with a password of strongPassword:
net user /add user1 "strongPassword"Use an asterisk (*) in place of the password to produce a prompt, as shown in the following example:
net user /add user1 *
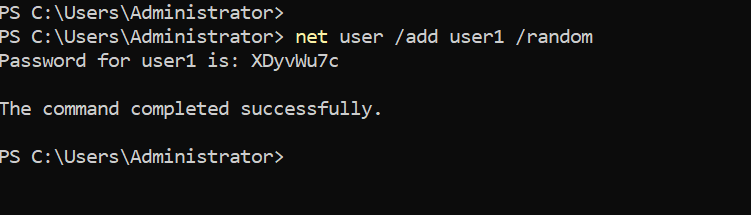
Alternatively, you can also use the /random option to generate a strong random password, as shown in the following example:
net user /add user1 /randomThe randomly generated password will be displayed on the command prompt after you execute the command.
To delete a user, use the following syntax:
net user /delete UserNameThe following command deletes the user user1 from the computer:
net user /delete user2Change Passwords
To change passwords, use the following syntax:
net user UserName New-PasswordUse an asterisk (*) or /random in place of the password to produce a prompt or generate a random password:
net user UserName *
net user user1 /random
Notes
The net user command is most of the time used in Windows Server to manage Active Directory users.
Windows 10/11 uses a new Settings pane to manage users, but the net user command is still useful for some tasks. For example, if you want to activate the built-in Administrator account, it is easy to do that using this command.
While working at the command prompt, run the net help user command to see all available command options.
In the next tutorial, we are going to learn how to manage Windows groups using the net localgroup CMD command.
If you have more than one user account on your PC then using Fast User Switching you can easily switch between different user account without needing to sign out from any user account. But to do that you need to learn different methods to switch between user accounts in Windows 10 and this post, we will learn how to do so exactly. If you don’t have Fast User Switching enabled by default, then head over here to learn How to Enable or Disable Fast User Switching in Windows 10.

Once you have enabled Fast User Switching, then you can continue with this guide. Just make sure to save any work which you might be doing before switching user. The reason behind this is that you might lose your open word document or any other work as Windows doesn’t automatically save them for you. So without wasting any time let’s see How to Switch User in Windows 10 with the help of the below-listed tutorial.
Table of Contents
Make sure to create a restore point just in case something goes wrong.
Method 1: How to Switch User from the Start Menu
If you are already signed into Windows 10 with your user account, then don’t worry you can still switch to the different user account from Start Menu. Click on the Start button from the bottom-left then click on your user account picture and from the context menu select the user account you want to switch to.

You will be directly taken to the log-in screen of the user account you selected, enter the password or PIN, and you would successfully sign-in to this user account. You can again switch back to your original user account by following the same steps.
Method 2: How to Switch User using Windows Key + L
If you want to switch to a different user account while you have already sign-in into another user account, don’t worry press the Windows Key + L combination on the keyboard.

Once you do that, you would be directly taken to the lock screen, and in the process, you will be locked from your user account. Click anywhere on the lock screen, and you would be shown the login screen from where you can choose any user account that you wish to sign into.

Method 3: How to Switch User from Login Screen
The first thing you see when you start your PC is the sign-in screen, where by default the most recent user account you used to sign-in is selected and you could directly login by entering the password or PIN.
But if you want to select another user account from the sign-in screen, click on the available user accounts from the bottom-left corner of the screen. Select the account then enter password or PIN to sign-in to that particular account.
Method 4: How to Switch User using ALT + F4
Note: Make sure you have saved all of your work and close any open application before following this method, or pressing ALT + F4 will close all your apps.
Make sure you are on the desktop, if not then go to the desktop and make sure you click in an empty area on the desktop to make it your current focused (active) window once you have done that, press and hold ALT + F4 key combination together on your keyboard. This will show you the shut down prompt, from the shutdown drop-down select “Switch User” and click OK.

This will take you to the login screen where you can select any user account you want, enter the correct login information and you are good to go.
Method 5: How to Switch User using CTRL + ALT + DELETE
This method only works if you are already logged in with a user account, and you want to switch to another user account. Now press CTRL + ALT + DELETE key combination on your keyboard then you would be taken to a new screen, click “Switch user“. Again, this would take you to the login screen where you can select any user account you wish to switch to.

Method 6: How to Switch User from Task Manager
If you are already signed into Windows 10 with your user account, don’t worry, you can still switch to Task Manager’s different user account. To open Task Manager, simultaneously press CTRL + SHIFT + ESC key combination on your keyboard.

Now make sure to switch to Users tab then right-click on the already signed in the user account that you want to switch to and then click Switch user account. If this doesn’t work, select the already signed user that you want to switch to and click on the Switch user button. You will now be directly taken on the sign-in screen of the selected user account, enter the password or PIN to successfully sign-in to the particular user account.

Recommended:
- Fix Realtek High Definition Audio Driver Issue
- Fix Start Menu Not Working in Windows 10
- Enable Enhanced Anti-Spoofing for Windows Hello Face Authentication
- Fix Bluetooth can’t turn off on Windows 10
That’s it you have successfully learned How to Switch User in Windows 10 but if you still have any questions regarding this tutorial then feel free to ask them in the comment’s section.
Как переключить пользователя Windows?
Комбинацию клавиш Win+L знают многие, но иногда удобнее переключаться минуя диалог выбора пользователя. Варианты реализации такого переключения пользователей будут рассмотрены в данной статье.
Назначение:
Если компьютером пользуются несколько человек, то удобно иметь для каждого свою учетную запись. Например, у одного пользователя могут быть изменены переменные окружения, включена автоматическая смена языка ввода, управление окнами с помощью жестов мыши, а другому пользователю ничего кроме браузера не нужно. Чтобы не вводить его в замешательство нетипичными реакциями компьютера, создается отдельная учетная запись стандартного вида и поведения.
Особенности:
Пользователи, между которыми будет происходить переключение, должны предварительно войти в свою учетную запись. Так же не затрагивается вопрос безопасности. Будем считать, что они полностью доверяют друг другу. И, в то же время, могут ограничить доступ третьих лиц, простым нажатием Win+L и вызовом диалога переключения пользователей (при условии наличия паролей на своих учетных записях).
Реализация:
Например, в системе есть два пользователя: Ivanov и Petrov.
Для переключения необходимо узнать ID сеансов пользователей. Воспользуемся командной строкой и командой query user (отображает сведения о пользовательских сеансах на сервере терминалов).
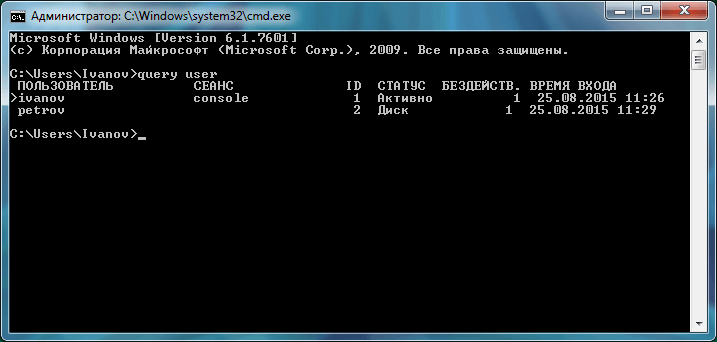
ID для Ivanov – это 1, для Petrov — 2.
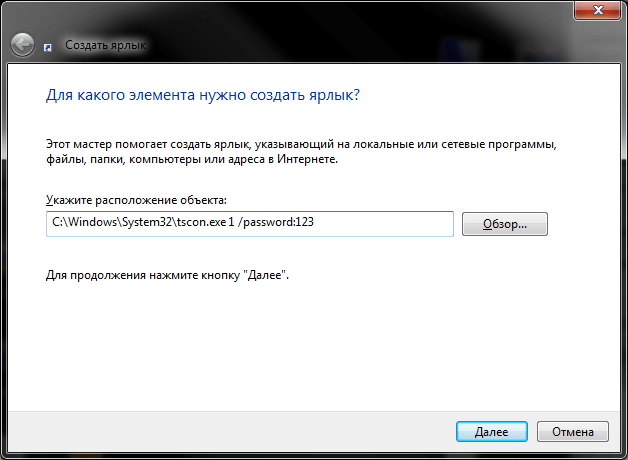
Переключение производится командой tscon (команда подключения к сеансу к терминального сервера).
Остается только создать ярлык на рабочем столе пользователя Petrov (правой кнопкой по рабочему столу → Создать ярлык с командой
C:\Windows\System32\tscon.exe 1 /password:123
где 1 – ID сеанса Ivanov, а 123 – его пароль).
Аналогичным образом создать ярлык на рабочем столе пользователя Ivanov (с командой
C:\Windows\System32\tscon.exe 2 /password:321
где 2 – ID сеанса Petrov, а 321 – его пароль).
Для переключения с клавиатуры можно задать сочетание клавиш для быстрого вызова (например, Ctrl + Num 0)
Демо:
Обычное переключение (для наглядности без горячих клавиш):
Переключение с ярлыка:
AutoIt-скрипт:
Скрипт для полной автоматизации процесса переключения пользователей userswitch.zip.
Для выполнения или компиляции необходимо скачать AutoIt.
#include <Constants.au3>
#include <Array.au3>
#include <Encoding.au3>

$users = ObjCreate("Scripting.Dictionary")
$users.Add("Ivanov", "123")
$users.Add("Petrov", "321")

Local $activeUserName
Local $activeUserId
Local $secondUserName
Local $secondUserId

Local $quser = @WindowsDir & "sysnativequery user"
Local $tscon = @WindowsDir & "sysnativetscon"

$out = ''
$query = Run($quser, '', @SW_HIDE, $STDOUT_CHILD)

While 1
$out &= StdoutRead($query)
If @error Then ExitLoop
Sleep(10)
WEnd

$out = _Encoding_866To1251($out)

$arr = StringSplit($out, @CRLF, 1)

For $i = 2 To UBound($arr) - 2

$username = StringStripWS(StringMid($arr[$i], 1, 23), 1+2)
$userid = StringStripWS(StringMid(($arr[$i]), 43, 2), 1+2)

if(StringMid($username, 1,1) == ">") Then
$username = StringMid($username, 2)
$activeUserName = $username
$activeUserId = $userid
Else
$secondUserName = $username
$secondUserId = $userid
EndIf

Next

Run($tscon & " "& $secondUserId &" /password:" & $users.Item(StringLower($secondUserName)), '', @SW_HIDE)
Рассмотрена методика создания учетных записей Windows 11. Изучены способы удаления и изменения типа аккаунта. Отражены подходы к предоставлению пользователю прав администратора. При необходимости отдельные аккаунты будут у тех, кто работает за общим компьютером:
- детей;
- членов семьи;
- гостей;
- сотрудников в офисе.
Перестанет быть нужным — удалим без проблем. Интересная фишка для общительных — создать учетную запись для друзей и родни, которые «зависают» в интернете с вашего настольного ПК или ноутбука. Даже одному человеку может потребоваться минимум три аккаунта:
- рабочий;
- личный;
- геймерский.
Опытные пользователи предпочитают не смешивать учетные записи для выполнения различных задач. Ниже риск удалить рабочие проекты, когда развлекаемся — смотрим фильмы или общаемся в соцсетях. Приложения и файлы упорядочены — выше конфиденциальность и приватность. Не отправим по ошибке личное фото коллеге или, наоборот, что-то из рабочего проекта другу. Планируем установить новую программу или игру, попробовать новые для себя настройки ОС — создадим временный аккаунт, который будет удален, когда наиграемся или оценим, насколько полезно нам приложение.
Создаем командами локального пользователя и администратора Windows 11 — быстрее справимся
Содержание
- Создаем командами локального пользователя и администратора Windows 11 — быстрее справимся
- Действуем через терминал Windows PowerShell
- В командной строке Command Prompt
- Создайте локального пользователя в Параметрах — просто, наглядно, но долго
- Удаление учетной записи пользователя Windows 11
- Быстрый метод — в PowerShell
- Визуально — в Параметрах
- Как изменить тип локальной учетной записи пользователя Windows 11 в Параметрах
Листать меню ОС — слишком долго. Начнем с методов, которые применяют опытные ИТ-специалисты.
Действуем через терминал Windows PowerShell
У древней командной строки Command Prompt есть удобная продвинутая альтернатива — терминал Windows PowerShell, с помощью которого мы сейчас и создадим учетную запись. Введите PowerShell в строке поиска на Панели задач. Запустите найденное приложение от имени администратора.

Именем пользователя в третьем примере будет: poznyaev-ru-2023-3. Поэтому мы вводим:
net user poznyaev-ru-2023-3 20242024 /add
Жмем Enter и пользователь poznyaev-ru-2023-3 успешно создан. Вы указывайте удобные и подходящие вам имя и пароль.

При необходимости наделим данного пользователя привилегиями админа:
net localgroup Администраторы poznyaev-ru-2023-3 /add
Нажимаем Enter и готово — задача успешно выполнена.

В командной строке Command Prompt
Как системный администратор предпочту создать учетную запись через командную строку — Command Prompt. Займет меньше времени, чем навигация по меню Windows. Метод выручает и тогда, когда не получается найти нужный пункт в настройках. В поле поиска на Панели задач введите «Командная строка». Выберите «Запуск от имени администратора».

Введите команду net user с указанием имени пользователя и пароля:
net user <имя-пользователя> <пароль-учетной-записи> /add
Запомнить данную команду будет несложно, особенно если знать, что «add» в переводе с английского означает «добавить». В данном примере именем будет poznyaev-ru-2023-2, а пароль: 20232023.

Указывайте подходящее вам имя пользователя, а пароль придумывайте посложнее — такой, который не будет просто подобрать. Нажимаем Enter и задача успешно выполнена, причем быстро. Так обычно и действуем, когда нужно создать аккаунты десяткам сотрудников компании-заказчика.
Вы можете предоставить ранее созданному локальному аккаунту Windows права админа. Рассмотрим на примере учетной записи poznyaev-ru-2023-2. Формат команды:
net localgroup Администраторы <имя-пользователя> /add
В данном примере:
net localgroup Администраторы poznyaev-ru-2023-2 /add
Далее надо нажать Enter. Подскажем простой способ проверить получилось ли у нас все правильно. Повторно применяем команду. Если вышло как надо, появится сообщение о том, что указанная учетная запись уже входит в эту группу.

После успешного применения команды закройте командную строку. Теперь располагаем учетной записью poznyaev-ru-2023-2 с правами администратора. Не рекомендовано «сидеть в Windows под админом», то есть — работать из учетной записи администратора. Лучше выполнять повседневные задачи в аккаунте обычного пользователя — ниже риск что-то сломать в операционной системе или подцепить вредоносный софт.
Создайте локального пользователя в Параметрах — просто, наглядно, но долго
Продолжаем и рассмотрим простой метод — через графический интерфейс (GUI) операционной системы. Способ подходит начинающим пользователям и каждому, кому неуютно в командной строке и кто предпочтет потратить немного больше времени на навигацию по меню настроек. Зато команды не придется вводить. Войдите в учетную запись администратора. Кликните правой кнопкой по «Пуску». Затем выберите «Параметры» (приложение настроек ОС) из меню опытного пользователя.

Выберите «Учетные записи» на левой панели окна настроек. Справа откройте «Семья и другие пользователи».

Кликните по кнопке «Добавить учетную запись» на плитке «Добавить другого пользователя» в разделе «Другие пользователи» в правом окне системных настроек.

Windows очень хочет, чтобы вы создали учетную запись Microsoft. На первый взгляд альтернативные варианты отсутствуют. Тем не менее, опция создания локального аккаунта сохранена — кликните «У меня нет данных для входа этого человека».

Выберите «Добавить пользователя без учетной записи Майкрософт» из предложенных системой вариантов — кликните по соответствующей ссылке.

Далее введите данные, которые требуются для создания учетной записи. Придумайте имя пользователя и надежный пароль. В данном примере имя пользователя: poznyaev-ru-2023-1. Уверены, что имя и пароль введены правильно? Тогда жмите «Далее». Выберите вопросы и дайте ответы. Данная опция позволит восстановить забытый пароль. Нажмите «Далее».

Задача успешно выполнена: созданный аккаунт присутствует в списке учетных записей.

Пароль запоминаем или записываем в таком месте, куда у посторонних точно не будет доступа. Итогом наших действий стало создание трех новых локальных учетных записей. Два аккаунта — с правами администратора. На практике привилегии админа направо и налево не раздаем. Предоставляем лишь тем пользователям, которым данные права необходимы.
Удаление учетной записи пользователя Windows 11
Удалим пользовательский аккаунт командой или в «Параметрах» системы.
Быстрый метод — в PowerShell
Предположим, аккаунт poznyaev-ru-2023-2 (в вашем случае будет любое другое имя) был создан временно и потребности в данной учетной записи более нет. Удалим простой командой в PowerShell. Первым делом открываем данный инструмент с правами администратора, как показано выше.
Затем вводим команду:
net user poznyaev-ru-2023-2 /delete
Нажимаем Enter. Появилось сообщение об успешном выполнении операции — значит, удален.

Визуально — в Параметрах
Нажмите клавиши Win + I для перехода в «Параметры». Слева выберите «Учетные записи», а справа — «Семья и другие пользователи». Справа на плитке учетной записи, которую вы хотите удалить, кликните по стрелке вниз.

Нажмите кнопку «Удалить» справа от надписи «Учетная запись и данные».

Ознакомьтесь с предупреждением операционной системы об удалении аккаунта и данных. Если принимаете — нажмите «Удалить учетную запись и данные». Если передумали или нужно сделать резервные копии фото, загруженных файлов, документов или другой информации — кликните «Отмена».

Помним, удаление учетной записи необратимо. Потеряны также связанные с аккаунтом данные и настройки. Впрочем, ценные файлы можно потерять и в результате сбоя системы или поломки диска. Поэтому не храню ценную информацию на компьютере. Предпочитаю надежный и простой в использовании сервер. Например, четырехдисковый NAS TerraMaster F4-210, обзор которого «Блог системного администратора» недавно публиковал:
Файлы доступны по сети со всех десктопов, ноутбуков, смартфонов и планшетов пользователя. Настраиваем зеркалирование и данные останутся у нас даже при выходе из строя HDD или SSD.
Как изменить тип локальной учетной записи пользователя Windows 11 в Параметрах
В дальнейшем нам может потребоваться поменять тип одной или нескольких учетных записей. Первым делом откройте «Параметры» — нажмите Win + I на клавиатуре. В категории «Учетные записи» (слева) настроек выберите подкатегорию «Семья и другие пользователи» (справа). Выберите учетную запись, в которую желаете внести изменения и кликните по стрелке справа от имени аккаунта.

Кликните «Изменить тип учетной записи».

В новом окне из списка выберите, какие права у аккаунта: стандартного пользователя или администратора. Выбираем второй вариант — пользователь получит привилегии админа. Нажмите «ОК».

Зачем вам несколько учетных записей на персональном компьютере? Напишите в комментариях.
5
2
голоса
Рейтинг статьи