
The Command Prompt application, sometimes referred to as command shell, is found in most Windows NT-based operating systems. Its purpose is to execute specific commands for troubleshooting or solving specific Windows issues, performing advanced administrative functions, and automating tasks via batch files and scripts.
That said, you can also use it to change your IP address when you want to spoof it to bypass geoblocks or online bans on sites that impose such restrictions on their content, or change your Domain Name System (DNS) servers for troubleshooting reasons or to make surfing more secure and faster.

In this guide, we’re going to show you how to change your IP address and DNS servers using the Command Prompt in Windows 10.
An IP address holds information about your device, location, your internet service provider (ISP), and browser information.
Changing it is useful when you have a malfunctioning router that’s providing addresses used by a different computer on the network or an invalid address is accidentally configured. It’s also helpful when you want to install a new router and reconfigure your home network to use the default IP address range.
The first step to changing your IP address is to find the network name for the interface you want to change.
- Open an elevated Command Prompt by typing CMD in the search bar and clicking on Run as Administrator.

- Next, type netsh interface ipv4 show config in the command prompt window, press Enter, and scroll down to the interface you want.

In our case, we’ll be modifying the WiFi interface, but you can pick the correct interface for your case. Make note of the interface name.
- To change the IP address, type this command: netsh interface ipv4 set address name=”YOUR INTERFACE NAME” static IP_ADDRESS SUBNET_MASK GATEWAY
In our example, this command would look like this: netsh interface ipv4 set address name=”Wi-Fi” static 192.168.0.173 255.255.255.0 192.168.0.0

This command will use the Wi-Fi interface, set the IP address to 192.168.0.173, set the subnet mask to 255.255.255.0 and set the default gateway to 192.168.0.0.
If you want to switch to using an IP address automatically assigned by a DHCP server instead of a static IP address, use the netsh interface ipv4 set address name=”YOUR INTERFACE NAME” source=dhcp command.
How To Change DNS Servers Using Command Prompt
A DNS server holds public IP addresses and related hostnames in a database, and is used to resolve or translate the hostnames to IP addresses. The server does this by running special software to communicate with other servers through special protocols based on certain requests from the computer.
The conversion process is thoroughly vetted and verified, and it happens quickly behind the scenes so as to obtain information corresponding to the server that the computer is looking for, and then tells the original connecting computer where to go so that it can connect to that server.
There are several reasons why you’d want to change your default DNS server, but the main ones are:
- Boost your privacy when getting around a firewall, bypassing geoblocks or ISP blocks on a website
- Increase security
- Parental controls like blocking websites from your router
- Speed your surfing, which your own ISP’s DNS servers may not offer because they’re not always reliable or up-to-date
Note: You can change DNS servers individually for your home network on your router or on computers, smartphone, and Chromebook, among other devices
How To Change DNS Servers With Command Prompt
Follow the steps below to learn how to change DNS servers using Command Prompt.
- Open an elevated Command Prompt by typing CMD in the search bar, and clicking Run as Administrator.

- Type netsh and press Enter.

- Next, type interface ip show config and press Enter.

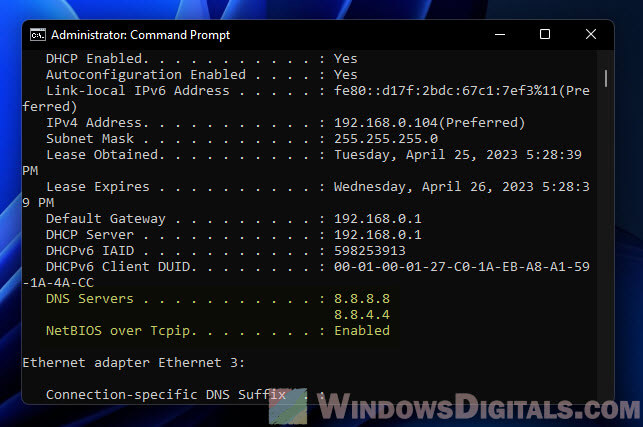
- Find the network interface whose DNS server you want to change, and enter the netsh interface ipv4 set dns name=”YOUR INTERFACE NAME” static DNS_SERVER. This will set your primary DNS server.
From our example above, we changed the IP address for the “Wi-Fi” interface, so we’ll use the same example to change DNS servers.
For purposes of this guide, we’ll use Google’s primary public DNS server, 8.8.8.8. The command will look something like this: netsh interface ipv4 set dns name=”Wi-Fi” static 8.8.8.8

- Next, type the netsh interface ipv4 set dns name=”YOUR INTERFACE NAME” static DNS_SERVER index=2 command to set the secondary DNS server. Again, we’ll use Google’s public DNS secondary server, 8.8.8.8 as an example, which will look like this: netsh interface ipv4 set dns name=”Wi-Fi” static 8.8.4.4 index=2.

Note: You can use the netsh interface ipv4 set dnsservers name”YOUR INTERFACE NAME” source=dhcp command if you want the network interface to automatically pick DNS settings from a DHCP server. Continuing with our example, this command would look like this: netsh interface ipv4 set dnsservers name”Wi-Fi” source=dhcp
Conclusion
Command Prompt is a great tool to use when you want to change IP addresses and DNS servers. It’s faster and saves you the hassle of having to click through several windows and dialog boxes from the Control Panel interface just to get to the IPv4 Properties dialog box to do the same thing.
Was this guide helpful? Let us know by dropping your comment in the section below.
Related Posts
- HDMI Cable Types and Specifications Explained
- Flat vs Round Ethernet Cables: What’s Different and Which Is Better?
- USB-C vs HDMI: What’s Different and Which Is Best for Video Output?
- What Is Bluetooth 5 and How to Upgrade?
- What Is Mesh Network Topology?
Windows Command Prompt, or CMD, can be a handy tool for tweaking network settings. It lets you change IP addresses and DNS settings with commands like “netsh interface ip set address” and “netsh interface ip set dns“. This guide will show you how to do just that in Windows 11 or 10 using either CMD or PowerShell.
Also see: How to Check IP Address in Windows 11
Getting to know the “Netsh Interface IP” command
Netsh, or “network shell,” is a command-line tool in Windows that helps you manage network settings. It’s great for working with IP addresses and DNS settings. You can use netsh interface ip to handle IP addresses and netsh interface ip set dns for DNS configuration.
Related concern: What is Netsh.exe & its Popup and Crashing issues in Windows 11
Why use the command line?
Although many would argue that it would be more convenient to just adjust things through the GUI available like the network adapter’s properties to configure things like IP addresses and DNS, using command line, particularly the Netsh tool, will give you more freedom and some benefits:
- It’s quick. Commands run faster than navigating through menus.
- Great for automation. You can script these commands to set up many computers at once.
- Handy for remote management. Manage settings on computers across your network from anywhere.
- Helpful for troubleshooting. Get detailed info that can help fix network problems.
Pro tip: How to Find The IP Address of a Website in Windows 10 / 11
How to assign a Static IP Address
Setting a static IP address is useful for devices that need a constant address, like servers. Here’s how to do it with CMD:
First up, open Command Prompt as an admin
Hit the Win key, search for cmd or Command Prompt, right-click the result, and pick Run as administrator. PowerShell works too.

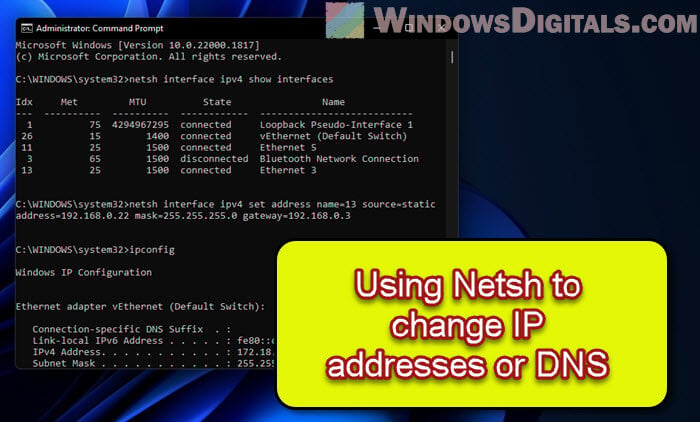
Next, see your network interfaces
Type this to list them:
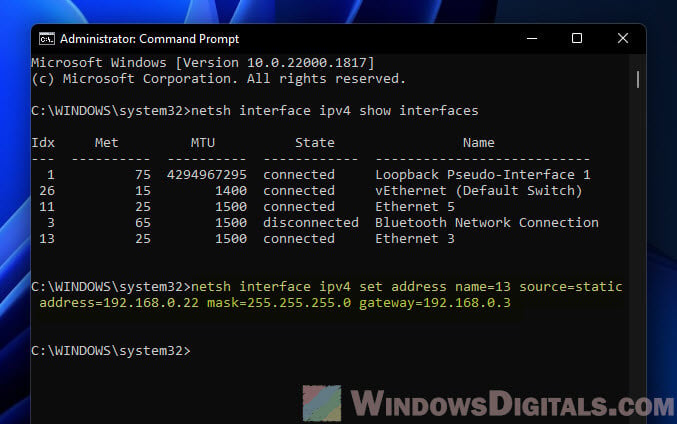
netsh interface ipv4 show interfaces
Find the one you’re working with and remember its index number.

Now, set your IP, subnet mask, and gateway
Use this template, swapping in your own values:
netsh interface ipv4 set address name=<index> source=static address=<ip_address> mask=<subnet_mask> gateway=<gateway>
For instance, to assign 192.168.1.10 to interface number 3, you’d type:
netsh interface ipv4 set address name=3 source=static address=192.168.1.10 mask=255.255.255.0 gateway=192.168.1.1
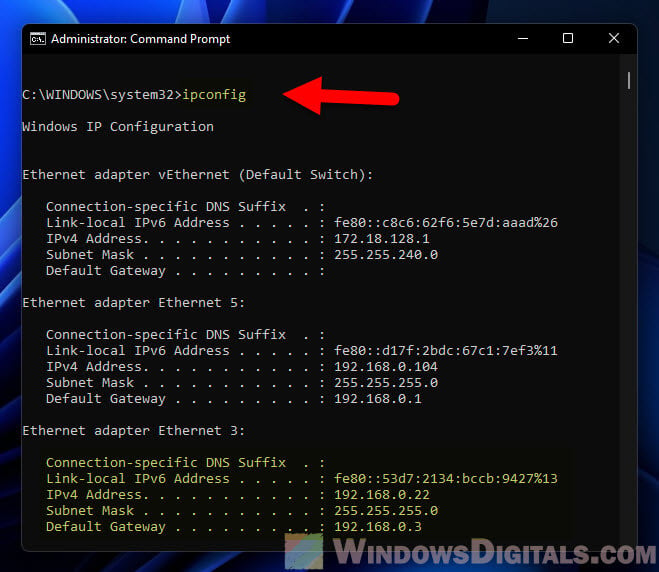
Lastly, make sure it worked
Type ipconfig to see if your new settings are listed.
Related issue: Windows 11 Ethernet “Unidentified Network” (How to Fix)
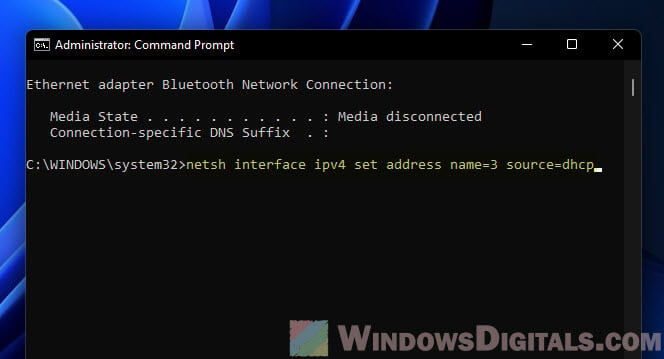
Switching to a Dynamic IP Address
Dynamic IP addresses, given out by a DHCP server, are the go-to for most networks. Here’s how to set one up:
Step 1: Open Command Prompt as an administrator
Just like before.
Step 2: View the list of network interfaces
Run netsh interface ipv4 show interfaces to see your options and pick one.
Step 3: Switch to DHCP
Here’s the command, don’t forget to use your interface’s index:
netsh interface ipv4 set address name=<index> source=dhcp
For example, for interface 3, it’s:
netsh interface ipv4 set address name=3 source=dhcp
Step 4: Verify the changes
Run ipconfig to see if it’s set to get an IP address by itself.
Additional resource: Find MAC Address on Windows 11/10 with or without CMD
Setting up DNS Settings
DNS settings are what turn website names into IP addresses. Here’s how to tweak them:
See also: Change DNS to Google or Cloudflare in Windows 11/10
Step 1: Open Command Prompt as an administrator
As mentioned earlier.
Step 2: View the list of network interfaces
Use netsh interface ipv4 show interfaces to find the one to configure.
Step 3: Pick a primary DNS server
Replace the placeholders with your actual details:
netsh interface ipv4 set dns name=<index> static <primary_dns> primary
To use 8.8.8.8 as your primary DNS on interface 3:
netsh interface ipv4 set dns name=3 static 8.8.8.8 primary

Step 4: Add a backup DNS server (if you want)
Here’s how, just change <index> and <secondary_dns> to fit your setup:
netsh interface ipv4 add dns name=<index> addr=<secondary_dns> index=2
To set 8.8.4.4 as a backup for interface 3:
netsh interface ipv4 add dns name=3 addr=8.8.4.4 index=2
Step 5: Double-check everything
Run ipconfig /all to make sure your DNS settings are spot on.
Going back to default DNS Settings
If you want your DNS settings to go back to automatic, here’s what to do:
Step 1: Open Command Prompt as an administrator
Same process as before.
Step 2: View the list of network interfaces
Check your interfaces again with netsh interface ipv4 show interfaces.
Step 3: Reset your DNS settings
Here’s how, remember to swap in your interface index:
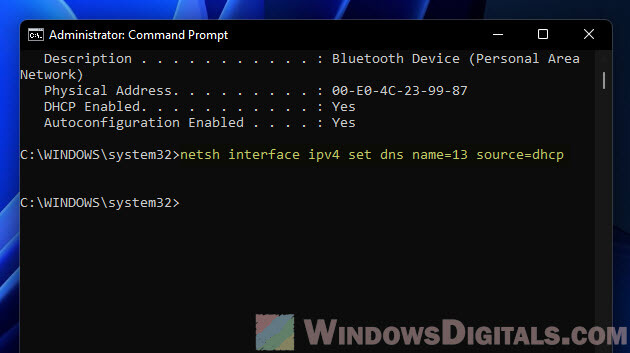
netsh interface ipv4 set dns name=<index> source=dhcp
To reset interface 3‘s DNS:
netsh interface ipv4 set dns name=3 source=dhcp
Step 4: Make sure it’s all set
Run ipconfig /all to see if your computer is back to getting DNS settings on its own.
My two cents
Using the “netsh interface ip set address” and “netsh interface ip set dns” in CMD to adjust IP and DNS settings on Windows is especially useful when you need to manage a big network. If you are looking to automate stuffs like setting IP and DNS for a lot of computers in the network, this will certainly be one of the best ways.
Быстрая смена сетевых настроек
Время на прочтение2 мин
Количество просмотров138K
Я пользуюсь личным ноутбуком на работе и дома. Для доступа к сети мне приходится дважды в день менять сетевые настройки. Причем, как дома, так и в офисе есть привязка к MAC-адресу машины. Поэтому приходится также менять MAC в свойствах сетевой платы.
Чтобы как-то автоматизировать этот процесс, была запущена командная строка и поисковик. Подробности и готовый bat-файл под катом.
Вступление
Для смены IP в командной строке windows есть утилита netsh. Подробнее, что это такое и с чем её едят на wiki.
Для смены MAC-адреса я стандартных средств не нашел (если таковые есть — укажите, буду признателен). Поэтому я использовал программу Macshift. Скачать можно с официального сайта.
Занятия bat-аникой
Создаем файл network.bat с содержимым:
@echo off

set /p mesto="Выберите настройки (1 - дом, 2 - работа): "

echo Выбраны настройки - %mesto%
if %mesto% equ 2 goto rabota
:dom
set IFACE="local"
set IP=10.160.100.9
set MASK=255.255.255.0
set GATEWAY=10.160.100.1
set GWMETRIC=1
set DNS1=10.160.100.1
set MAC=001122334455
goto smena
:rabota
set IFACE="local"
set IP=192.168.1.91
set MASK=255.255.255.0
set GATEWAY=192.168.1.1
set GWMETRIC=1
set DNS1=192.168.1.10
set MAC=221133004455
goto smena
:smena
echo Меняем MAC адрес на %MAC%
echo _____
macshift -i "local" %MAC%
echo _____
echo Устанавливаем IP адрес-%IP%
echo Маску подсети-%MASK%
echo Основной Шлюз-%GATEWAY%
netsh interface ip set address name=%IFACE% source=static addr=%IP% mask=%MASK% gateway=%GATEWAY% gwmetric=%GWMETRIC%
echo Устанавливаем основной DNS сервер %DNS1%
netsh interface ip set dns name=%IFACE% source=static addr=%DNS1% register=PRIMARY
echo Настройки сети изменены:
ipconfig /all
echo _____
pause
Обратите внимание на начало файла, после меток dom и rabota вводим свои настройки.
Примечание: «echo _____» использовано исключительно из эстетических начинаний.
Последние приготовления
Программу macshift и батник я разместил в d:\program\network. А на рабочий стол вынес ярлычок network.lnk. При запуске ярлыка командный файл начинает работу с вопроса о выборе настроек. Нажав «1», получаем настройки для дома, соответственно, «2» — для офиса.
Может быть кому-то данный топик окажется полезным.
There is no doubt that all of you, my readers, can set a static IP address on any Windows machine. It’s so easy task. However, I’ve got a trick question – can you quickly change the IP address? What’s more, can you perform this operation on multiple computers in a short time?
Yes, you can do that manually. However, doing this manually we can make a mistake. You can become bored or simply type a wrong number. Great way to make a havoc.
If you try to do this manually, you will need to access every single machine, open a Network and sharing center applet, locate your network card, open its properties, find the IP v4 settings and change them according to your needs. Then close the dialog. This will take a few minutes.
Now you need to repeat this process on every Windows host that you have. Let’s assume that you have 5, 10 or 20 servers. Or that you need to change the IP address on your laptop to the address related to each customer’s network.

A long, long time ago in a faraway land, I worked on an exciting project of the enterprise WAN network. There was 20 or 21 Windows DC servers, one per every site. I made the configuration scripts that in a split second place correct configuration for P address, DNS server(s), DNS replication, WINS servers and replication, and so on.
I recently revived this mighty trick, while working on the one of my latest projects. I needed to setup the static IP address on my laptop while working with the customer. Then I went back in the office and I needed to change the IP address back to DHCP. Furthermore, I found that I need to change addresses on some 8 servers to avoid address conflicts. With the command line, this was finished in less than 10 minutes, including logging to remote servers.
Microsoft introduced the NetSh command (shorten from NETwork SHell) with Windows 2000. This command is actually a complete shell for the network settings. All the settings you can see in the GUI are here. In addition, you can find some additional settings only through this shell.
Many users avoid using it due its complexity for learning and plethora of the options. I personally found it easy to use. Once when you picked the basics and learned to navigate through its subcommands, you will unleash the full power of the networking. You can learn a lot about this command from this Microsoft TechNet page.
In addition, you can learn a lot about this command if you set everything in the GUI and then export these settings in the netsh configuration script from the command line (I will use c:\temp folder in this example):
netsh dump > c:\temp\netshcfg.txt
Open the elevated command prompt. We need to change just the IP address on the NIC. In this example we don’t need default gateway nor DNS servers. However, we can set even these parameters.
We need to assign the IP address 192.168.38.100 with the network mask 255.255.255.192 to the NIC. We can do that with the command netsh interface ip. This is the same as IPv4.
Please, keep in mind that we need to change the existing IP address settings, not to add the new one.
What’s the difference? When we changing an existing IP settings, we replacing the current values with the new values. In case that we want to add a new value, we will keep an existing settings and add these new aside. This is useful when we need to associate more than one IP address with the same NIC.
Setting new IP address
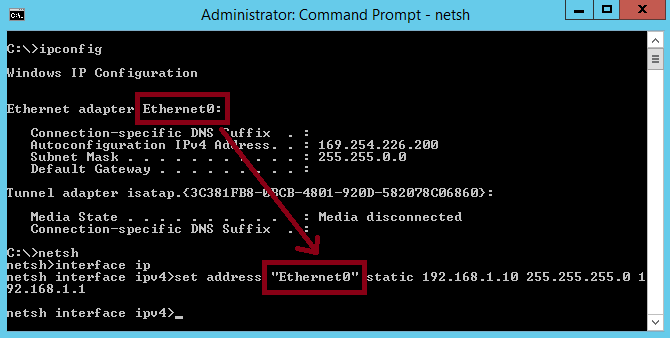
Before we can execute the command to set the new values, we need to know the name of the interface. The command is
netsh interface ip show interface
We will see the list of all available interfaces, similar to this one:
Idx     Met         MTU          State                Name
---  ----------  ----------  ------------  ---------------------------
 20          25        1500  disconnected  Wi-Fi
 26           1        1500  disconnected  Ethernet
  6          25        1500  disconnected  Local Area Connection* 2
  1          75  4294967295  connected     Loopback Pseudo-Interface 1
 24          25        1500  connected     Ethernet 2
 29          25        1500  connected     Contoso VN
 10          25        1500  connected     FabrikaM VN
  3          25        1500  connected     Virtual ISP #1
 18          25        1500  connected     Virtual ISP #2
In this case, my network card is the second in the list, named Ethernet. Knowing this and the IP address, I will execute the following command
netsh interface ip set address "Ethernet" static 192.168.38.100 255.255.255.192
That’s it. The IP address is set. The command static indicates that we want the static IP address. Then we need to specify the value of the IP address and network mask. We can use the keywords address= and mask=, but this is not necessary.
We can check it with the command ipconfig and we will see these new parameters:
Ethernet adapter Ethernet:

Connection-specific DNS Suffix . :

IPv4 Address. . . . . . . . . . . : 192.168.38.100

Subnet Mask . . . . . . . . . . . : 255.255.255.192

Default Gateway . . . . . . . . . :
Reverting to DHCP mode
When we finish our work, we can switch the NIC back to the DHCP mode. The command is similar to previous:
netsh interface ip set address "Ethernet" dhcp
This command will delete the static IP address and it will initiate a search for the IP address using the DHCP mechanism.
But I need also default gateway!
We can set this value too. Just add its value in the end of the first command.
netsh interface ip set address "Ethernet" static 192.168.38.100 255.255.255.192 192.168.38.65
The latest parameter will be recognized as the IP address of the default gateway.
If you want it permanent
The address set in this way will last until the next reboot, except that we mark it permanent. To do so, you need to add the parameter store=persistent:
netsh interface ip set address "Ethernet" static 192.168.38.100 255.255.255.192 192.168.38.65 store=persistent
And the DNS servers in the end
In case that we need to add the addresses of the DNS servers, we can use similar commands. We can assign the parameters for the DNS servers in two ways – dynamically, using a DHCP service, or statically.
For the DHCP mode we need to execute the command:
netsh interface ip set dnsservers "Ethernet" dhcp
The difference is in the subcommand dnsservers instead address. We can also use the abbreviated form – dns. In addition, we have less parameters to setup here.
For the static DNS settings we need to type a few more parameters:
netsh interface ip set dnsservers "Ethernet" static 192.168.35.10
When we need to register the name of the host with the DNS server, we can add the parameter register=primary. This will initiate the DNS registration with the DNS server that holds the DNS zone corresponding to the primary DNS suffix of our machine. You can always add this parameter when specifying the static parameters.
Let the NETSH be with you!
Now you can use this command to configure the static IP address on every Windows machine. Even more, this command can be useful during the troubleshooting process. You can export the current configuration and examine it carefully. Even more, you can reset the configuration to defaults.
Explore additional options and possibilities. You will find an exciting new world of the networking on Windows.
Stay tuned.
In this post we’ll learn the steps to assign an IP address to Windows Server 2012 R2 from command prompt. We’ll use Netsh command to change an IP. IP (Internet Protocol) is an identify of your Computer. It is required for computers to communicate with teach other. There are multiple ways to change the IP address, in addition to that you can either assign static IP address to your Computer or Dynamic IP address to your Computer. DHCP Server is required if you want Dynamic IP Address to be assigned to your Server.
1. Right click on start and select the command prompt (admin).
2. On User Account Control window click on “Yes” to open command prompt.
3. Type command “ipconfig” to check an IP address of your computer. This shows an APIPA IP address. APIPA is “Automatic Private IP Addressing“, this concludes that our computer is not able to communicate with DHCP Server as currently we don’t have any DHCP in our environment.
4. To assign an IP to our computer type “Netsh“. It will show “netsh>” console. Then type “Interface IP” this will change the console to “netsh interface ipv4“.
5. Type the command “set address “Ethernet0” static 192.168.1.10 255.255.255.0 192.168.1.1“. In this command “Ethernet0” is the name of our Ethernet Adapter. As we are assigning static IP address therefore we need to mention an IP address and a subnet mask. 192.168.1.10 is an IP address that we want to assign and 255.255.255.0 is a subnet mask. In addition to IP we are also assigning Gateway to this computer after subnet mask we can define the gateway which is 192.168.1.1 in this example.
6. Moreover we need to define DNS information. Type a command “set dnsservers “Ethernet0” static 192.168.1.10 primary” to define the primary DNS. Here, “Ethernet0” is the name of our network adapter and 192.168.1.10 is the IP of DNS.
7. Type “Exit” to exit from netsh interface ipv4 console.
8. Type “ipconfig /all” to verify that static IP address, subnet mask, default gateway and DNS server IP is assigned.
If you are not fond of commands then you can change IP address from GUI.
Related articles:
- How to promote Domain Controller
- Change IP address using GUI mode
- How to rename computer