
on July 15, 2010
To change windows desktop wallpaper what we normally do is right click on the desktop and go properties and so on. But we can do the same by editing registry key using reg command from command line. The command is given below.
reg add "HKEY_CURRENT_USER\Control Panel\Desktop" /v Wallpaper /t REG_SZ /d wallpaper_path /f
For example to set the image E:\photos\image1.bmp as the wall paper we need to run the command as below.
reg add "HKEY_CURRENT_USER\Control Panel\Desktop" /v Wallpaper /t REG_SZ /d E:\photos\image1.bmp /f
After editing the registry key we need to run the below command to make the change take effect immediately.
RUNDLL32.EXE user32.dll,UpdatePerUserSystemParameters
Note that this method works only for bmp images. If you have .jpg or .jpeg images you can’t set them as wallpaper from command line. You can use the Desktop settings UI to set a .jpg or .jpeg file as wallpaper.
Many people are interested in changing a Windows 10 theme from the command prompt without opening the Explorer window. They want to apply the custom theme they have installed from the command line. Unfortunately, Windows does not provide any native or user-friendly way to change the current theme and apply *.theme file silently. Here is a tool which is designed for that task.
Let me introduce Winaero Theme Switcher.
Winaero Theme Switcher is a lightweight portable tool available for Windows 7, Windows 8 and Windows 10. It has a GUI, but it is primarily intended to be used with the command prompt or in a batch file where you want to automate the applying of a custom theme.
Winaero Theme Switcher operates with the built-in Theme Manager of modern Windows versions and uses it to apply themes.
How to use
In Windows 10, please use version from the folder named «Windows 8». It will run in Windows 10 without issues.
The syntax is as follows:
ThemeSwitcher.exe path_to_file.theme
For example, in Windows 10 it can be:
themeswitcher.exe c:\Windows\Resources\Themes\theme1.theme
To make the Winaero Theme Switcher app more friendly, I have implemented a «theme lookup» feature: If the theme is located in one of the following folders:
C:\Windows\Resources\Themes
C:\Windows\Resources\Easy of Access Themes
C:\Users\<username>\AppData\Local\Microsoft\Windows\Themes
then you need not specify the full path to the theme file or even its extension, just specify the file name.
Examples:
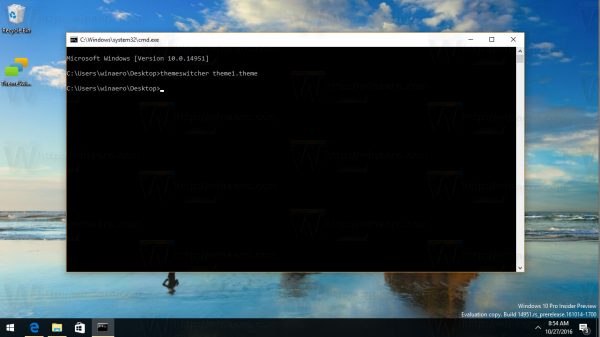
themeswitcher.exe theme1.theme — this will apply c:\Windows\Resources\Themes\theme1.theme, which is named «Windows 10»:
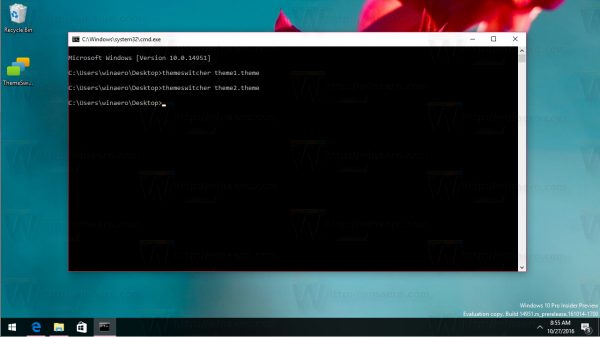
themeswitcher.exe theme1.theme — this will apply c:\Windows\Resources\Themes\theme2.theme, known as «Flowers»
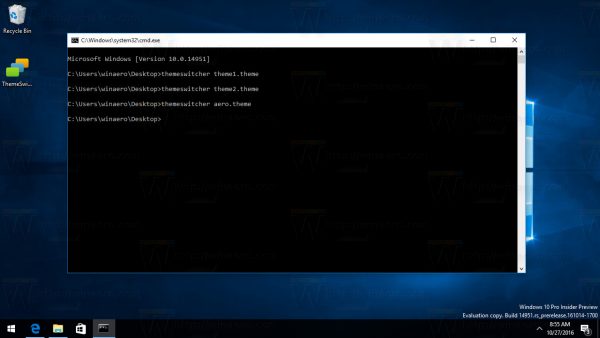
themeswitcher.exe aero.theme — this will apply the default Windows 10 theme.
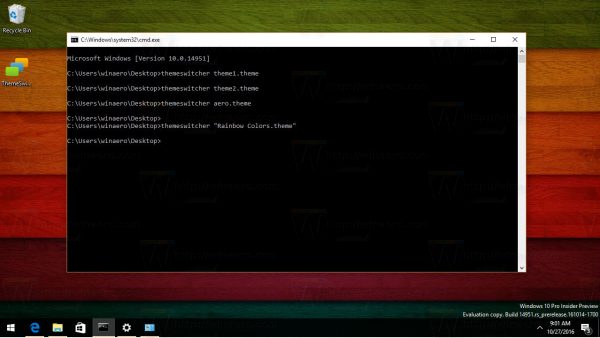
themeswitcher.exe «Rainbow Colors» — this will apply c:\Users\Sergey\AppData\Local\Microsoft\Windows\Themes\Rainbow Colors\Rainbow Colors.theme which I have installed manually from here.
The latest version of Winaero Theme Switcher is 1.1, which I released yesterday. I have fixed a bug which prevented the app from running in Windows Server.
Get the app here:
Download Winaero Theme Switcher
Support us
Winaero greatly relies on your support. You can help the site keep bringing you interesting and useful content and software by using these options:
If you like this article, please share it using the buttons below. It won’t take a lot from you, but it will help us grow. Thanks for your support!
If you are creating a Windows 10 image, you will benefit from using a PowerShell script to change the lock screen and desktop background to ensure that all the desktops in your environment are uniformly configured to have the same settings. In this particular example, our PowerShell script is going to look something like this:

The value in quotes next to $Wallpaper and $Lockscreen should match the name of the file you are planning to use for the background and lock screen.
In your C:\ drive, create a folder named ‘background’ and copy the files of the background and lock screen images into this folder. Also, copy the file containing your PowerShell script into this folder.
Next, open an administrator PowerShell prompt and type the following command:
set-executionpolicy unrestricted
Enter Y at the prompt.
Now, type the following commands in PowerShell:
cd c:\ background
./insert_script_name
(Whatever the name of your script is, simply put ./ to run it)
If successful, the PowerShell prompt should look like the following:

Once successful, restart your computer and you should see both the lock screen and desktop background change.
If you ran the script with the incorrect images, or need to undo the changes for whatever reason, search for and open regedit in the start menu to edit the Windows registry.
Then, navigate to: HKCU:\software\microsoft\windows\currentversion\policies\system
Right click on ‘wallpaper’, select ‘modify’, delete the value data, then click OK. Restart your computer, and you can attempt to run the script again with the same process above after you have made the necessary changes.

Published
-
Star
(2)
You must be signed in to star a gist -
Fork
(1)
You must be signed in to fork a gist
-
Clone this repository at <script src="https://gist.github.com/eliashussary/7f87d1e2b1a9b7ea0bc5fcdeee6cfccc.js"></script>
- Save eliashussary/7f87d1e2b1a9b7ea0bc5fcdeee6cfccc to your computer and use it in GitHub Desktop.
Clone this repository at <script src="https://gist.github.com/eliashussary/7f87d1e2b1a9b7ea0bc5fcdeee6cfccc.js"></script>
A simple batch script to change your windows wallpaper. It takes a single argument, the path of your desired wallpaper.
This file contains hidden or bidirectional Unicode text that may be interpreted or compiled differently than what appears below. To review, open the file in an editor that reveals hidden Unicode characters.
Learn more about bidirectional Unicode characters
| echo off | |
| :: Handle CLI Args | |
| IF [%1]==[] ( | |
| echo No wallpaper path provided, please provide a full qualified path. Ex: C:\dir1\dir2\wallpaper.jpg | |
| exit /b 1 | |
| ) | |
| :: Commands | |
| echo Changing wallpaper to: %1 | |
| reg add «HKEY_CURRENT_USER\Control Panel\Desktop« /v Wallpaper /t REG_SZ /d %1 /f | |
| RUNDLL32.EXE user32.dll,UpdatePerUserSystemParameters |
Skip to content
Hi Friends, this is a quick blog to show how one can set Custom backgrounds for Desktop and Lock Screen in Windows 10 Creators Update v1703 and later with PowerShell.
I am sure people have been reading about the new features that were recently introduced with the release of Windows 10 build v1703 also known as The Creators Update. The Script here uses one of those new feature additions called PersonalizationCSP that empowers IT Administrators to set custom backgrounds for the Desktop and the Lock Screen as part of their Build and Capture sequence.
# The Script sets custom background Images for the Desktop and the Lock Screen by leveraging the new feature of PersonalizationCSP that is only available in the Windows 10 v1703 aka Creators Update and later build versions #
# Note: The Image File names can be anything you wish, however the Image resolution that I have been using for my environment was 3840X2160 (not sure if that matters though) #
# Applicable only for Windows 10 v1703 and later build versions #
# Script also assumes that you have already copied over the Desktop and LockScreen Images to the C:\OEMFiles\ folder and are named as Desktop.jpg and LockScreen.jpg respectively (could vary for your environment) #
$RegKeyPath = “HKLM:\SOFTWARE\Microsoft\Windows\CurrentVersion\PersonalizationCSP”
$DesktopPath = “DesktopImagePath”
$DesktopStatus = “DesktopImageStatus”
$DesktopUrl = “DesktopImageUrl”
$LockScreenPath = “LockScreenImagePath”
$LockScreenStatus = “LockScreenImageStatus”
$LockScreenUrl = “LockScreenImageUrl”
$StatusValue = “1”
$DesktopImageValue = “C:\OEMFiles\Desktop.jpg” #Change as per your needs
$LockScreenImageValue = “C:\OEMFiles\LockScreen.jpg” #Change as per your needs
IF(!(Test-Path $RegKeyPath))
{
New-Item -Path $RegKeyPath -Force | Out-Null
New-ItemProperty -Path $RegKeyPath -Name $DesktopStatus -Value $StatusValue -PropertyType DWORD -Force | Out-Null
New-ItemProperty -Path $RegKeyPath -Name $LockScreenStatus -Value $StatusValue -PropertyType DWORD -Force | Out-Null
New-ItemProperty -Path $RegKeyPath -Name $DesktopPath -Value $DesktopImageValue -PropertyType STRING -Force | Out-Null
New-ItemProperty -Path $RegKeyPath -Name $DesktopUrl -Value $DesktopImageValue -PropertyType STRING -Force | Out-Null
New-ItemProperty -Path $RegKeyPath -Name $LockScreenPath -Value $LockScreenImageValue -PropertyType STRING -Force | Out-Null
New-ItemProperty -Path $RegKeyPath -Name $LockScreenUrl -Value $LockScreenImageValue -PropertyType STRING -Force | Out-Null
}
ELSE {
New-ItemProperty -Path $RegKeyPath -Name $DesktopStatus -Value $Statusvalue -PropertyType DWORD -Force | Out-Null
New-ItemProperty -Path $RegKeyPath -Name $LockScreenStatus -Value $value -PropertyType DWORD -Force | Out-Null
New-ItemProperty -Path $RegKeyPath -Name $DesktopPath -Value $DesktopImageValue -PropertyType STRING -Force | Out-Null
New-ItemProperty -Path $RegKeyPath -Name $DesktopUrl -Value $DesktopImageValue -PropertyType STRING -Force | Out-Null
New-ItemProperty -Path $RegKeyPath -Name $LockScreenPath -Value $LockScreenImageValue -PropertyType STRING -Force | Out-Null
New-ItemProperty -Path $RegKeyPath -Name $LockScreenUrl -Value $LockScreenImageValue -PropertyType STRING -Force | Out-Null
}
The script can also be downloaded from link below:
https://1drv.ms/t/s!AljjQEIEs7p2jWGOBHlScNgjX4-F
Cheers 🙂