
Современные версии Windows собирают информацию о состоянии жестких дисках компьютера через SMART и могут оповестить пользователя о наличии проблем. Рассмотрим, как выглядит уведомление Windows о физических проблемах с жестким диском и как с помощью PowerShell и командной строки получить SMART информацию о здоровье ваших дисков через встроенные WMI классы.
Большинство современных жестких дисков (в том числе HDD, SSD, NVMe SSD) поддерживает технологию базового самотестирования и анализа состояния S.M.A.R.T (Self-Monitoring, Analysis and Reporting Technology). Контроллер диска оценивает состояние физических характеристик диска, и Windows может получить доступ к этим данным через WMI.
Содержание:
- Ошибка “Windows обнаружила неполадки жесткого диска”
- Получение SMART параметров жесткого диска через WMI класс
Информация SMART доступна только для локальных физических дисков (ATA /SATA устройств). Внешние LUN, подключенных через Fiber Channel, iSCSI, RAID или сетевые диски в основном не сообщают статус SMART.
Ошибка “Windows обнаружила неполадки жесткого диска”
В Windows по умолчанию включен мониторинг дисков службами диспетчера дилогических дисков (Logical Disk Manager) и Diagnostic Policy Service. И если один из дисков возвращает статус Predictive Failure, ОС запускает задание планировщика Microsoft-Windows-DiskDiagnosticResolver (\Microsoft\Windows\DiskDiagnostic), которое выводит сообщение:
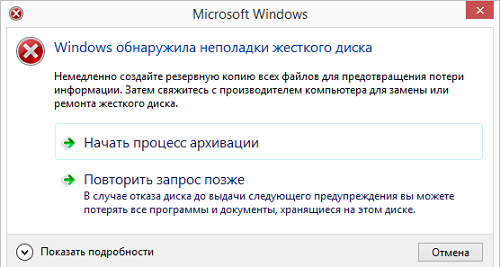
Windows обнаружила неполадки жесткого диска
Немедленно создайте резервную копию всех файлов для предотвращения потери информации. Затем свяжитесь с производителем компьютера для замены или ремонта жесткого диска.
Windows detected a hard disk problem
Back up your files immediately to prevent information loss, and then contact the computer manufacturer to determine if you need to repair the disk.
В журнале событий при этом появляются сообщения вида:
The driver has detected that device \Device\Harddisk1\DR1 has predicted that it will fail. Immediately back up your data and replace your hard disk drive. A failure may be imminent.
Windows Disk Diagnostic detected a S.M.A.R.T. fault on disk .......... (volumes E:\). This disk might fail; back up your computer now. All data on the hard disk, including files, documents, pictures, programs, and settings might be lost if your hard disk fails. To determine if the hard disk needs to be repaired or replaced, contact the manufacturer of your computer. If you can't back up (for example, you have no CDs or other backup media), you should shut down your computer and restart when you have backup media available. In the meantime, do not save any critical files to this disk.
Статус
Predictive Failure
говорит о том, что одна из характеристик диска (например, механический износ) не соответствует эталонным значениям и велика вероятность отказа этого диска в будущем.
В этом случае рекомендуется выполнить резервное копирование данных с этого диска на отдельный носитель. Затем выполните проверку диска с помощью штатной SMART утилиты от производителя (или универсальными утилитами типа CrystalDiskInfo), проверьте носитель с помощью chkdsk.
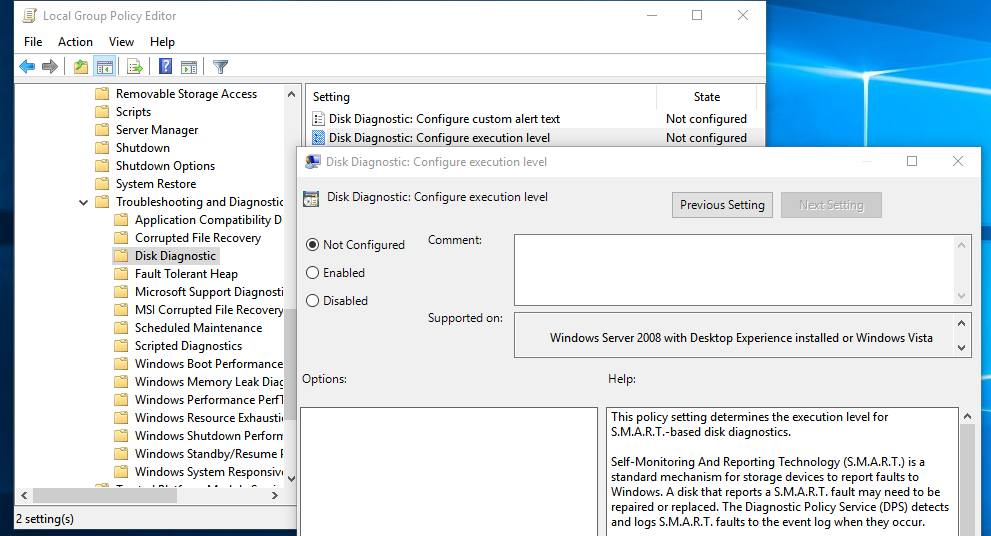
Вы можете включить или отключить вывод этого сообщения пользователя с помощью специального параметра групповой политики Disk Diagnostic: Configure execution level в разделе GPO Administrative Templates -> System -> Troubleshooting and Diagnostics -> Disk Diagnostics.
Чаще всего для получения информации о состоянии дисков в Windows используют сторонни программы (например, CrystalDiskInfo, HDTune и т.д.). Такие программы, действительно позволяют получить много информации о дисках.
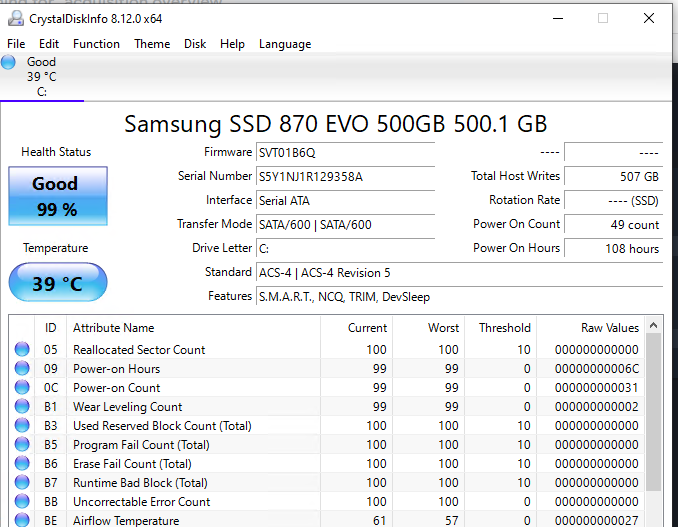
Например, я могу узнать оставшийся ресурс SSD. Текущее значение Total Host Writes – 507 Gb. Производитель гарантирует максимальный ресурс записи (TBW)для этой модели SSD 300 Тб. Значит диск изношен менее чем на 0.2%. Срок использования диска всего 108 часов.
Получение SMART параметров жесткого диска через WMI класс
В Windows вы можете получить доступ к данным SMART дисков с помощью встроенных средств.
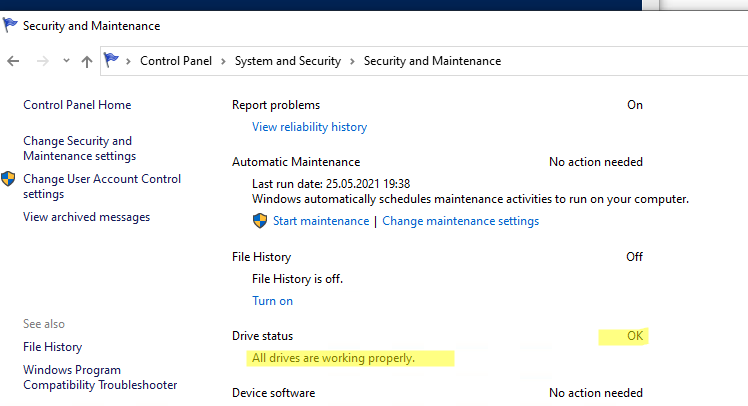
Информацию о состоянии дисков компьютера можно посмотреть через панель управления Control Panel\System and Security\Security and Maintenance (в этом же разделе есть информацию о состоянии службы Windows Error Reporting).
В моем случае с дисками все ОК, т.к. в разделе Drive Status указано:
OK, All drives are working properly
.
Как мы уже говорили выше, Windows собирает информацию SMART с дисков и позволяет получать к ней доступ через WMI.
В BIOS/UEFI для дисков должна быть включена поддержка SMART.
Откройте командную строку с правами администратора и выполните следующую команду чтобы получить состояние всех дисков:
wmic diskdrive get status

В данном случае с дисками все хорошо. Если нет – будет статус bad, unknown или caution.
Получить информацию о вероятном отказе жесткого диска можно через WMI класс MSStorageDriver_FailurePredictStatus:
wmic /namespace:\\root\wmi path MSStorageDriver_FailurePredictStatus

Если контроллер диска не видит проблем с диском, значение PredictFailure должно быть равно FALSE.
Этот же класс можно опросить с помощью PowerShell:
Get-WmiObject -namespace root\wmi –class MSStorageDriver_FailurePredictStatus
Если значение PredictFailure = True, обратите внимание на причину ошибки, код которой указывается в параметре Reason. Расшифровка кода ошибки PredictFailure зависит от вендора. Информацию по некоторым кодам ошибок можно найти в wiki (https://en.wikipedia.org/wiki/S.M.A.R.T.#ATA_S.M.A.R.T._attributes).
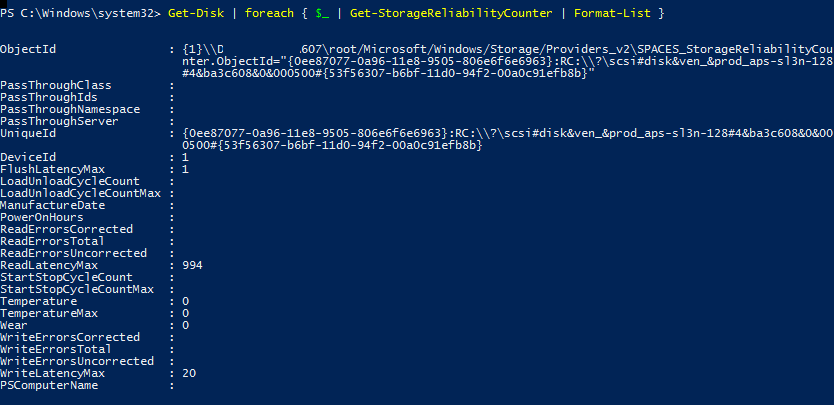
Значения некоторых счетчиков надежности дисков можно получить с помощью следующего кода PowerShell:
Get-Disk | foreach { $_ | Get-StorageReliabilityCounter | Format-List }
Можно вывести информацию только об определенных характеристиках:
Get-PhysicalDisk | Get-StorageReliabilityCounter | Select-Object -Property DeviceID, Wear, ReadErrorsTotal, ReadErrorsCorrected, WriteErrorsTotal, WriteErrorsUncorrected, Temperature, TemperatureMax | FT
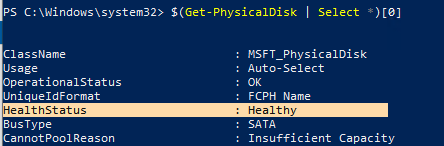
Также можно вывести общую информацию о дисках через Get-PhysicalDisk:
$(Get-PhysicalDisk | Select *)[0]
Ранее мы показывали как с помощью Get-PhysicalDisk получить информацию о неисправном диске в Windows Server S2D и заменить его:
Get-PhysicalDisk | Where-Object {$_.HealthStatus -ne ‘Healthy’}
С помощью данных WMI классов и командлетов PowerShell можно настроить сбор данных о состоянии дисков на компьютерах пользователей для проактивного мониторинга. Можно создать алерты для вашей системы мониторинга (например, zabbix, nagios, icinga и т.д.), compliance отчет SCCM через Configuration Baseline для или PowerShell Desired State Configuration (DSC), опрашивать состояние SMART на удаленных компьютерах скриптом через PowerShell Remoting (командлет Invoke-Command) или использовать что-то свое.
-
-
#1
I have two drives on Intel Rapid Storage Technology and four drives on Highpoint Rocket RAID 2300. I tried running RSTe SetupCIM.exe which didn’t seem to do anything and I also ran WebUI setup from Highpoint and the installer just hangs. Both I did with administrative rights. Is there some way to view this information in Windows Server 2012 R2 itself? I really need to check the condition of these RAIDs without restarting the computer because I heard a loud, motor-like sound this morning and it has me concerned one of them failed. I don’t doubt the RocketRAID will fix the problem itself (there’s a hot spare) but I’m not so sure RST has a means to communicate with me that a drive has failed.
-
-
#2
what about the intel tools don’t they have that?
Also you may want to enable the full storage services roles I think they have the health tools. I don’t know if a reboot is required for them.
http://www.windowsnetworking.com/ar…ook-windows-server-2012-r2-storage-part1.html
If you want to give PRTG a shot it has some disk health sensors: http://www.paessler.com/manuals/prtg/wmi_hdd_health_sensor
There could also be sensors for the RAID array as well
I can take a look and test a few but I can’t test RAID sensors and I can’t test Intel specific disk mgmt stuff.
PRTG does not require reboots for probe installation. You can also add monitoring with WMI instead of probes and that’s how I keep 2 sensors for the ACA1 (one is 5Ghz and the other is for 2.4Ghz tests)
OK: I added the sensor to my hubby’s computer and here’s what the sensor controls look like and how the data is displayed:
Last edited:
-
-
#3
what about the intel tools don’t they have that?
That’s what I tried and it seems to be a dead end. RST search on Intel’s website only returned 7 hits for 2012 and 1 hit for 2012 R2. None seem to actually install the RST software.
Also you may want to enable the full storage services roles I think they have the health tools. I don’t know if a reboot is required for them.
http://www.windowsnetworking.com/ar…ook-windows-server-2012-r2-storage-part1.html
This doesn’t look like a rabbit hole I want to venture though. I’m talking hardware RAID here, not software, so I’m not entirely sure Windows can even manage it. I really don’t get why the old tools I used previously won’t even install. I know, on Server 2003 R2, they worked and they worked very well. It is almost like R2 deliberately prevents this kind of software from working.
If you want to give PRTG a shot it has some disk health sensors: http://www.paessler.com/manuals/prtg/wmi_hdd_health_sensor
There could also be sensors for the RAID array as well
I can take a look and test a few but I can’t test RAID sensors and I can’t test Intel specific disk mgmt stuff.
PRTG does not require reboots for probe installation. You can also add monitoring with WMI instead of probes and that’s how I keep 2 sensors for the ACA1 (one is 5Ghz and the other is for 2.4Ghz tests)
OK: I added the sensor to my hubby’s computer and here’s what the sensor controls look like and how the data is displayed:
View attachment 57392
RAID blocks access to individual drives unless it knows how to communicate through the drivers/firmware to reach individual drives. PRGT may work for non-RAID drives but it isn’t going to help in my entirely RAID’d situation; moreover, I’m more concerned about the physical status of the RAID than the individual drives.
-
-
#4
It doesn’t look like there are any Intel monitors or RAID array specific sensors I guess I have another request for the PRTG team.
Arrrg!!! Not even SNMP is supported on the Intel RAID arrays through the management agent!
I would have recommended adding it as a custom SNMP sensor type on PRTG using the importer but noooooo Intel doesn’t even have that.
it seems that this tool is very limited.
Is this also the tool you tried:
http://www.intel.com/Assets/Image/prodlarge/iascfull.png
-
-
#7
smartmontools can tell you about the status of RST(e) drives.
There is a windows command line variant.
http://sourceforge.net/projects/smartmontools/
A superuser.com thread said (several years ago):
In my brief reading, it looks like this may be a common issue with that controller. Try giving smartmontools a shot. It’s supposed to have some experimental support for the Matrix controller.
Use /dev/csmi0,X as a device name to access SMART info of individual disks
Code:
smartctl.exe -a /dev/csmi0,0
-
-
#8
Does it require a reboot tho??
-
-
#9
Does it require a reboot tho??
No.
-
-
#10
smartmontools can tell you about the status of RST(e) drives.
There is a windows command line variant.
http://sourceforge.net/projects/smartmontools/A superuser.com thread said (several years ago):
That works well for getting info about the drives (here’s the batch I just wrote quick for the two drives):
Code:
@ECHO off
cd "C:\Program Files (x86)\smartmontools\bin"
smartctl -i /dev/csmi0,0
smartctl -H /dev/csmi0,0
smartctl -A /dev/csmi0,0
smartctl -i /dev/csmi0,1
smartctl -H /dev/csmi0,1
smartctl -A /dev/csmi0,1
pause
That won’t help with verification and rebuilding the array if that is necessary though. I think I may have to contact Highpoint about the RocketRAID software.
Last edited:
Have a noisy hard drive or two in your Windows Server? Experiencing less performance on your drives than usual? If so, you’ll want to check your hard drive health. In this guide, we’ll show you how you can check hard drive health in Windows Server with various tools like Disk Management, PowerShell, etc.
How to check hard drive health with the Disk Management tool
An easy way to check the health of the hard drives connected to your Windows Server is with the Disk Management tool. Disk Management is usually used to manage partitions, however, it can also tell you how your disks are.
To start, open up the Start Menu, search for “Create and format hard disk partitions,” and open it. Once it is open, look for the “Status” column. In this column, Windows will tell you if your drive is healthy or not.
If looking in the “Status” column isn’t enough, find the drive in the layout, and right-click on it. Select “Properties,” and locate the “General” tab. In this tab, find the “Device status” section. If your disk is healthy and working properly, it will say “This device is working properly.”
How to check hard drive health with PowerShell
Another way you can check hard drive health in Windows Server is via PowerShell. To start, open up a Windows PowerShell terminal. You can launch it via the Start Menu on the Windows Server desktop. Once it is open, use the “Get-PhysicalDisk” command.
Get-PhysicalDisk
After running the command above, PowerShell will output a table. This table will number all connected drives, show their serial number, media type, if they can be added to a storage pool, operational status, health status, etc.
To determine if your drives are operational, check the “OperationalStatus” column. If it says “OK,” your hard drive(s) can be utilized in Windows Server. If it says something other than “OK,” you’ll need to do some troubleshooting.
To determine if your drives are healthy, find the “HealthStatus” column. If your hard drive is healthy, it will say “Healthy” in this column. If the drive has “Unhealthy,” you may need to take a look at the drive. Lastly, if the “HealthStatus” column states “Warning,” you may want to replace the drive with a new one.
How to check hard drive health with GSmartControl
If the Disk Management tool or PowerShell doesn’t work for you, you can install a third-party program like GSmartControl. This program is useful, as it simplifies the process of checking your hard drive health. You can also use it to collect offline drive data.
To start, you must download and install GSmartControl on Windows Server. Head over to the official GSmartControl website download page. Once there, download the 64-bit installer to Windows Server. Then, open up the Explorer app.
Inside the Explorer app, find the “Downloads” folder, and click on it. Then, select the GsmartControl EXE to launch the installer. Go through the installer, and set up the software on Windows Server.
Once the software is installed on Windows Server, open up the Windows Start Menu, and launch the GsmartControl app. When it is launched, it will scan your server for connected hard drives.
Once the GSmartControl app is done scanning your server for connected hard drives, select a drive that you wish to check the health of. After selecting it, the information will appear under the “Basic health check” section.
To view an even more detailed rundown of a drive in GSmartControl, right-click on a drive and select the “View details” option. When you select “View details,” GSmartControl will show a more detailed readout of the drive.
How to error check your hard drive on Windows Server
Checking hard drive health helps to find out if something is critically wrong. However, sometimes, your hard drive isn’t in critical condition. Sometimes, there are just small errors that need to be fixed.
To run an error check on your hard drive in Windows Server, do the following. First, open up the Windows Explorer app on the Windows Server desktop. Then, find “This PC,” and select it.
On the “This PC” menu, locate the hard drive giving you issues. Then, right-click on the drive, and select “Properties.” Finally, select the “Tools” tab, and select the “Check” option to run an error check.
Selecting the “Check” button will bring up the “Error Checking” window. Click on the “Scan drive” button to scan the drive for errors. This scan may take some time to complete. When it finishes, your drive should be error-free!

If you have installed the Windows Server 8 Beta or the Windows Server 2012 Release Candidate and have tested the new version of Hyper-V, you may have seen a new feature in the Hyper-V Manager Console called Smart Paging.
What is Smart Paging and what does it do. To understand what Smart Paging is we have to go back in time, to the release of Service Pack 1 for Windows Server 2008 R2 or Hyper-V Server 2008 R2. In Service Pack 1 Microsoft added a new feature to Hyper-V called Dynamic Memory. Dynamic Memory allows to dynamically add and remove virtual memory from a Virtual Machine depending on memory demand of the VM. You can set the start up memory and the maximum memory
Now in Windows Server 2012 Hyper-V Microsoft improved the Dynamic Memory feature and also added a third option the minimum memory.
- Startup RAM – Memory during the startup process until the Dynamic Memory driver is started.
- Minimum RAM – the minimum of RAM a VM can get.
- Maximum RAM – the maximum of RAM a VM can get.
For example the VM needs 1GB of RAM to start all service properly, and after the start the memory demand can go down to 512MB you would set the Startup RAM to 1GB and the Minimum RAM to 512MB.
Now with the new Minimum RAM setting there is a new problem, if the VM is running with a minimum of RAM and for example 512MB and all other memory resources of the host are used by other Virtual Machines and you restart the VM, the VM can maybe not get the full 1GB of startup memory. In this case, and this is the only case, Smart Paging is used to allocate the additional 512MB of RAM in a page file outside the Virtual Machine so all services can start properly.
Tags: Dynamic Memory, Hyper-V, Hyper-V 2012, Hyper-V Smart Paging, Microsoft, Smart Paging, Virtualization, Windows Server, Windows Server 2012 Last modified: January 7, 2019
About the Author / Thomas Maurer
Thomas works as a Principal Program Manager & Chief Evangelist Azure Hybrid at Microsoft (Cloud + AI). He engages with the community and customers around the world to share his knowledge and collect feedback to improve the Azure hybrid cloud and edge platform. Prior to joining the Azure engineering team (Cloud + AI), Thomas was a Lead Architect and Microsoft MVP, to help architect, implement and promote Microsoft cloud technology.
If you want to know more about Thomas, check out his blog: www.thomasmaurer.ch and Twitter: www.twitter.com/thomasmaurer