
Время на прочтение10 мин
Количество просмотров85K

Кто-то из вас наверняка слышал про инцидент , который был обнародован совсем недавно. Американский производитель полупроводников Allegro MicroSystem LLC подал в суд на своего бывшего IT-специалиста за саботаж. Нимеш Пател, проработавший в компании 14 лет, уничтожил важные финансовые данные в первую неделю нового фискального года.
Как это произошло?
Через две недели после своего увольнения Пател зашел на территорию штаб-квартиры компании в Вустере (штат Массачусетс, США) с целью поймать корпоративную сеть Wi-Fi. Используя учетные данные бывшего коллеги и рабочий ноутбук, Пател авторизовался в корпоративной сети. Затем он внедрил в модуль Oracle код и запрограммировал его выполнение на 1 апреля 2016 года — первую неделю нового финансового года. Код предназначался для копирования определенных заголовков или указателей в отдельную таблицу базы данных и следующего удаления их из модуля. Ровно 1 апреля данные были удалены из системы. И поскольку злоумышленник авторизовался в сети Allegro легально, его действия были замечены не сразу.
Подробности широкая общественность не знает, но скорее всего инцидент стал возможен во многом благодаря тому, что в компании для доступа в сеть использовалась парольная аутентификация. Наверняка там были и другие проблемы с безопасностью, но именно пароль можно похитить незаметно для пользователя и факт кражи пароля не будет обнаружен, в лучшем случае вплоть до момента использования похищенных учетных данных.
Применение строгой двухфакторной аутентификации и запрет на использование паролей в сочетании с грамотной политикой безопасности могли бы помочь, если не избежать описанного развития событий, то сильно затруднить реализацию такого плана.
Мы расскажем о том, как можно значительно повысить уровень безопасности вашей компании и защитить себя от подобных инцидентов. Вы узнаете, как настроить аутентификацию и подпись важных данных, используя токены и криптографию (как иностранную, так и отечественную).
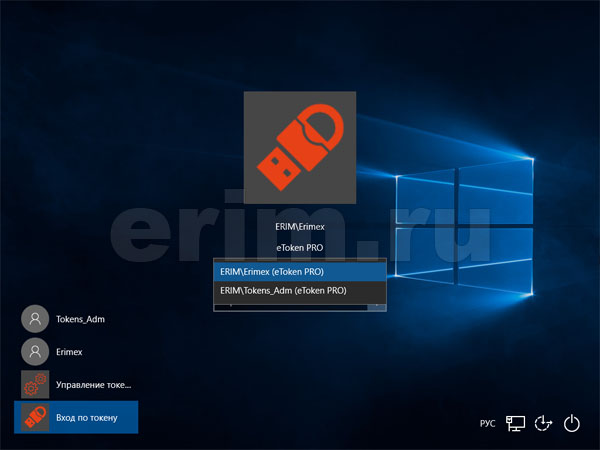
В первой статье мы объясним как настроить строгую двухфакторную аутентификацию с использованием PKI при входе в доменную учетную запись в Windows.
В следующих статьях мы расскажем вам, как настроить Bitlocker, защитить электронную почту и простейший документооборот. Также мы вместе с вами настроим безопасный доступ к корпоративным ресурсам и безопасный удаленный доступ по VPN.
Двухфакторная аутентификация
Опытным системным администраторам и службам безопасности хорошо известно, что пользователи крайне не сознательны в вопросе соблюдения политик безопасности, они могут записать свои учетные данные на стикере и приклеить его рядом с компьютером, передать пароли своим коллегам и тому подобное. Особенно часто это происходит, когда пароль сложный (содержащий более 6 знаков и состоящий из букв разного регистра, цифр и специальных символов) и его трудно запомнить. А ведь такие политики администраторами задаются не просто так. Это необходимо для защиты учетной записи пользователя от простого перебора паролей по словарю. Также администраторы рекомендуют менять пароли хотя бы раз в 6 месяцев, просто из того соображения, что за это время теоретически можно отбрутфорсить даже сложный пароль.
Давайте вспомним, что такое аутентификация. В нашем случае это процесс подтверждения подлинности субъекта или объекта. Аутентификация пользователя — это процесс подтверждения подлинности пользователя.
А двухфакторная аутентификация — это такая аутентификация, в которой необходимо использовать не менее двух различных способов для подтверждения своей личности.
Простейшим примером двухфакторной аутентификации в реальной жизни является сейф с замком и кодовой комбинацией. Чтобы открыть такой сейф необходимо знать код и владеть ключом.
Токен и смарт-карта
Наверно, самым надежным и простым в реализации способом двухфакторной аутентификации является использование криптографического токена или смарт-карты. Токен — это USB-устройство, которое является и считывателем, и смарт-картой одновременно. Первым фактором в таком случае является факт владения устройством, а вторым — знание его PIN-кода.
Использовать токен или смарт-карту, тут кому, что удобнее. Но исторически так сложилось, что в России больше привыкли использовать токены, так как они не требуют использования встроенных или внешних считывателей смарт-карт. У токенов есть и свои минусы. Например, на нем не напечатаешь фотографию.
На фотографии изображена типичная смарт-карта и считыватель.

Однако вернемся к корпоративной безопасности.
А начнем мы с домена Windows, ведь в большинстве компаний в России корпоративная сеть построена именно вокруг него.
Как известно, политики Windows-домена, настройки пользователей, настройки групп в Active Directory предоставляют и разграничивают доступ к огромному количеству приложений и сетевых сервисов.
Защитив учетную запись в домене, мы можем защитить большинство, а в некоторых случаях и вообще все внутренние информационные ресурсы.
Почему двухфакторная аутентификация в домене по токену с PIN-кодом безопаснее обычной парольной схемы?
PIN-код привязан к определенному устройству, в нашем случае к токену. Знание PIN-кода само по себе ничего не дает.
Например, PIN-код от токена можно диктовать по телефону другим лицам и это ничего не даст злоумышленнику, если вы достаточно бережно относитесь к токену и не оставляете его без присмотра.
С паролем же ситуация совершенно иная, если злоумышленник подобрал, угадал, подсмотрел или еще каким-то образом завладел паролем от учетной записи в домене, то он сможет беспрепятственно зайти, как в сам домен, так и в другие сервисы компании, в которых используется эта же учетная запись.
Токен является уникальным некопируемым физическим объектом. Им обладает легитимный пользователь. Двухфакторную аутентификацию по токену можно обойти только тогда, когда администратор намеренно или по недосмотру оставил для этого «лазейки» в системе.
Преимущества входа в домен по токену
PIN-код от токена проще запомнить, так как он может быть намного проще пароля. Каждый наверняка хоть раз в жизни видел, как «опытный» пользователь мучительно не может с нескольких попыток аутентифицироваться в системе, вспоминая и вводя свой «безопасный» пароль.
PIN-код не обязательно постоянно менять, так как токены более устойчивы к перебору PIN-кодов. После некоторого числа неудачных попыток ввода, токен блокируется.
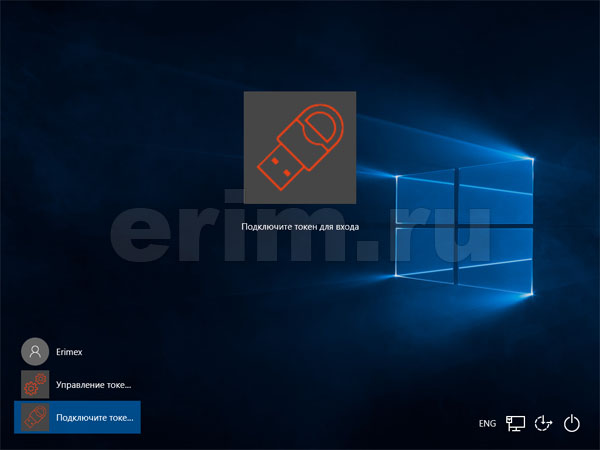
При использовании токена для пользователя вход в систему выглядит следующим образом: после загрузки компьютера, он просто подключает токен к USB-порту компьютера, вводит 4-6 цифр и нажимает кнопку Enter. Скорость ввода цифр у обычных людей выше, чем скорость ввода букв. Поэтому PIN-код вводится быстрее.

Токены позволяют решить проблему «брошенного рабочего места» — когда пользователь уходит со своего рабочего места и забывает выйти из своей учетной записи.
Политика домена может быть настроена таким образом, чтобы компьютер автоматически блокировался при извлечении токена. Также токен может быть оснащен RFID-меткой для прохода между помещениями компании, поэтому не забрав токен со своего рабочего места, сотрудник просто не сможет перемещаться по территории.
Недостатки, куда же без них
Токены или смарт-карты не бесплатные (решается бюджетом).
Их нужно учитывать, администрировать и обслуживать (решается системами управления токенами и смарт-картами).
Некоторые информационные системы могут «из коробки» не поддерживать аутентификацию по токенам (решается системами типа Single Sign-On — предназначенными для организации возможности использования единой учетной записи для доступа к любым ресурсам области).
Настройка двухфакторной аутентификации в домене Windows
Теоретическая часть:
Служба каталога Active Directory поддерживает возможность аутентификации с помощью смарт-карты и токена, начиная с Windows 2000. Она заложена в расширении PKINIT (public key initialization — инициализация открытого ключа) для протокола Kerberos RFC 4556 .
Протокол Kerberos был специально разработан для того, чтобы обеспечить надежную аутентификацию пользователей. Он может использовать централизованное хранение аутентификационных данных и является основой для построения механизмов Single Sing-On. Протокол основан на ключевой сущности Ticket (билет).
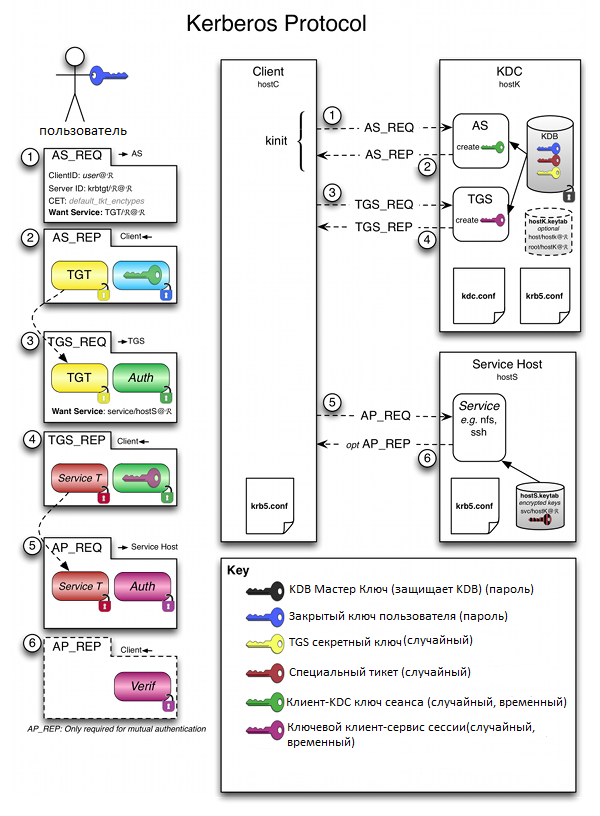
Ticket (билет) является зашифрованным пакетом данных, который выдается доверенным центром аутентификации, в терминах протокола Kerberos — Key Distribution Center (KDC, центр распределения ключей).
Когда пользователь выполняет первичную аутентификацию после успешного подтверждения его подлинности, KDC выдает первичное удостоверение пользователя для доступа к сетевым ресурсам — Ticket Granting Ticket (TGT).
В дальнейшем при обращении к отдельным ресурсам сети, пользователь, предъявляет TGT, получает от KDC удостоверение для доступа к конкретному сетевому ресурсу — Ticket Granting Service (TGS).
Одним из преимуществ протокола Kerberos, обеспечивающим высокий уровень безопасности, является то, что при любых взаимодействиях не передаются ни пароли, ни значения хеша паролей в открытом виде.
Расширение PKINIT позволяет использовать двухфакторную аутентификацию по токенам или смарт-картам на этапе предаутентификации Kerberos.
Вход в систему может быть обеспечен, как при использовании службы каталога домена, так и локальной службы каталога. TGT создается на основе электронной подписи, которая вычисляется на смарт-карте или токене.
Все контроллеры доменов должны иметь установленный сертификат Domain Controller Authentication, или Kerberos Authentication, т. к. реализуется процесс взаимной аутентификации клиента и сервера.
Практика:
Приступим к настройке.
Сделаем так, чтобы в домен под вашей учетной записью можно было зайти только по предъявлению токена и зная PIN-код.
Для демонстрации мы будем использовать Рутокен ЭЦП PKI производства компании «Актив».

1 Этап — Настройка домена Первым делом установим службы сертификации.
Дисклеймер.
Эта статья не является туториалом по внедрению корпоративного PKI. Вопросы проектирования, разворачивания и грамотного применения PKI тут не рассматриваются ввиду необъятности этой темы.
Все контроллеры доменов и все клиентские компьютеры в рамках леса, где осуществляется внедрение такого решения, обязательно должны доверять корневому Удостоверяющему Центру (Центру Сертификации).
Задача центра сертификации — подтверждать подлинность ключей шифрования с помощью сертификатов электронной подписи.
Технически центр сертификации реализован как компонент глобальной службы каталогов, отвечающий за управление криптографическими ключами пользователей. Открытые ключи и другая информация о пользователях хранится удостоверяющими центрами в виде цифровых сертификатов.
Удостоверяющий центр, выдающий сертификаты для использования смарт-карт или токенов, должен быть помещен в хранилище NT Authority.
Зайдите в Диспетчер сервера и выберите «Добавить роли и компоненты».
При добавлении ролей сервера выберите «Службы сертификации Active Directory» (Microsoft категорически рекомендует не делать это на контроллере домена, дабы не огрести проблем с производительностью). В открывшемся окне выберите «Добавить компоненты» и выберите пункт «Центр сертификации».
На странице для подтверждения установки компонентов нажмите «Установить».
2 Этап — Настройка входа в домен с помощью токена
Для входа в систему нам понадобится сертификат, который содержит идентификаторы Smart Card Logon и Client Authentication.
Сертификат для смарт-карт или токенов также должен содержать UPN пользователя (суффикс имени участника-пользователя). По умолчанию суффиксом имени участника-пользователя для учетной записи является DNS-имя домена, которое содержит учетную запись пользователя.
Сертификат и закрытый ключ должны быть помещены в соответствующие разделы смарт-карты или токена, при этом закрытый ключ должен находиться в защищенной области памяти устройства.
В сертификате должен быть указан путь к точке распространения списка отзыва сертификатов (CRL distribution point). Такой файл содержит список сертификатов с указанием серийного номера сертификата, даты отзыва и причины отзыва. Он используется для передачи сведений об отозванных сертификатах пользователям, компьютерам и приложениям, пытающимся проверить подлинность сертификата.
Настроим установленные службы сертификации. В правом верхнем углу нажмите на желтый треугольник с восклицательным знаком и щелкните «Настроить службы сертификации…».

В окне «Учетные данные» выберите необходимые учетные данные пользователя для настройки роли. Выберите «Центр сертификации».
Выберите «ЦС предприятия».
ЦС предприятия интегрированы с AD. Они публикуют сертификаты и списки отзыва сертификатов в AD.
Укажите тип «Корневой ЦС».
На следующем этапе выберите «Создать новый закрытый ключ».
Выберите период действия сертификата.
3 этап — Добавление шаблонов сертификатов
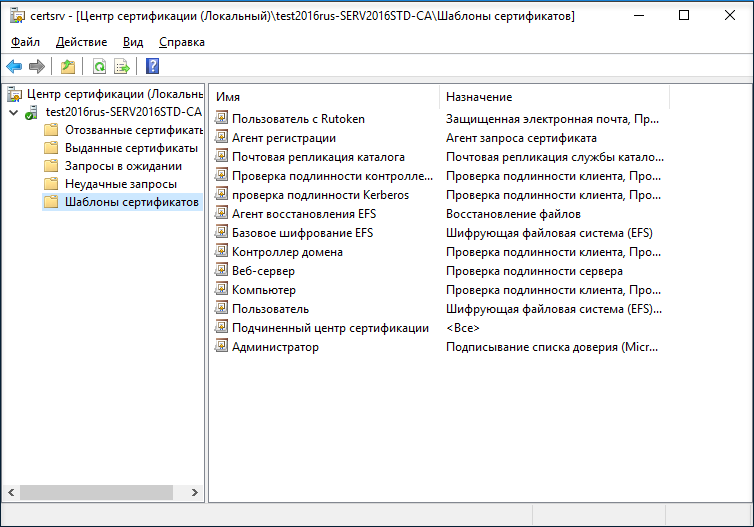
Для добавления шаблонов сертификатов откройте Панель управления, выберите пункт «Администрирование» и откройте Центр сертификации.
Щелкните по названию папки «Шаблоны сертификатов», выберите пункт «Управление».
Щелкните по названию шаблона «Пользователь со смарт-картой» и выберите пункт «Скопировать шаблон». На следующих скриншотах показано, какие параметры в окне «Свойства нового шаблона» необходимо изменить.


Если в списке поставщиков нет «Aktiv ruToken CSP v1.0», то необходимо установить комплект «Драйверы Рутокен для Windows».
Начиная с Windows Server 2008 R2 вместо специального провайдера от производителя можно использовать «Microsoft Base Smart Card Crypto Provider».
Для устройств Рутокен библиотека «минидрайвера», поддерживающая «Microsoft Base Smart Card Crypto Provider», распространяется через Windows Update.
Проверить установился ли «минидрайвер» на вашем сервере можно подключив Рутокен к нему и посмотрев в диспетчер устройств.
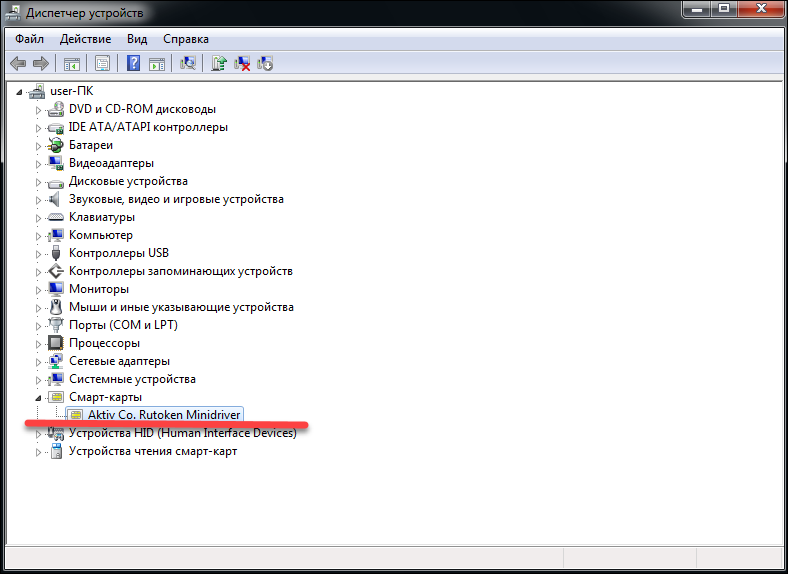
Если «минидрайвера» по каким-то причинам нет, его можно установить принудительно, инсталлировав комплект «Драйверы Рутокен для Windows», а после этого воспользоваться «Microsoft Base Smart Card Crypto Provider».
Комплект «Драйверы Рутокен для Windows» распространяется бесплатно с сайта Рутокен .


Добавьте два новых шаблона «Агент сертификации» и «Пользователь с Рутокен».
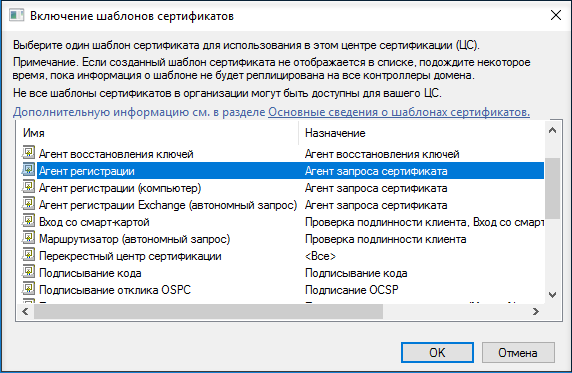
Для этого выйдите из окна «Управления шаблонами». Нажмите правой кнопкой мыши на «Шаблоны сертификатов» и выберите пункт меню «Создать» и подпункт «Выдаваемый шаблон сертификата».
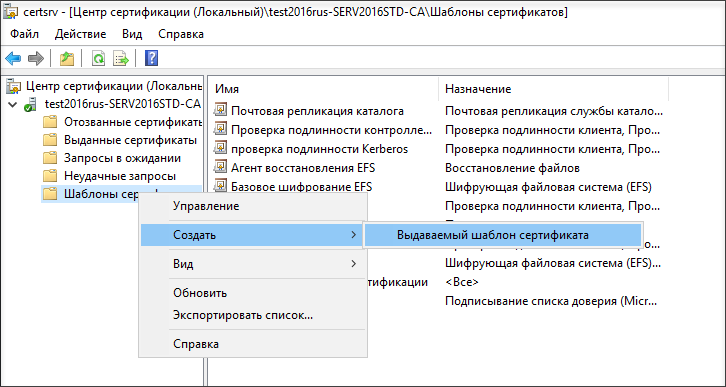
Далее выберите «Агент регистрации» и «Пользователь с Rutoken» и нажмите «ОК».
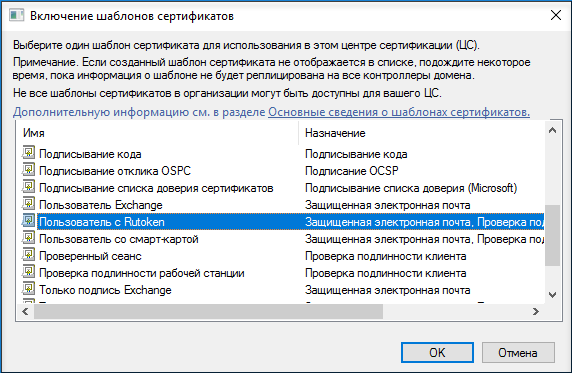
В результате названия этих шаблонов отобразятся в центре сертификации.
Далее нам необходимо выписать сертификат администратору домена. Откройте службу «Выполнить» и укажите команду mmc. Добавьте оснастку «Сертификаты».
В окне «Оснастки диспетчера сертификатов» выберите «моей учетной записи пользователя». В окне «Добавление и удаление оснастки» подтвердите добавление сертификатов.
Выберите папку «Сертификаты».

Запросите новый сертификат. Откроется страница для регистрации сертификата. На этапе запроса сертификата выберите политику регистрации «Администратор» и нажмите «Заявка».

Таким же образом запросите сертификат для Агента регистрации.
Чтобы запросить сертификат для определенного пользователя щелкните «Сертификаты», выберите пункт «Зарегистрироваться от имени…».

В окне для запроса сертификата установите флажок «Пользователь с Рутокен».
Теперь необходимо выбрать пользователя.
В поле «Введите имена выбранных объектов» укажите имя пользователя в домене и нажмите «Проверить имя».
В окне для выбора пользователя нажмите «Заявка».
В раскрывающемся списке выберите имя токена и укажите PIN-код.
Таким же образом выберите сертификаты для других пользователей в домене.
4 этап — Настройка учетных записей пользователей
Для настройки учетных записей откройте список пользователей и компьютеров AD.
Выберите папку Users и пункт «Свойства».

Перейдите на вкладку «Учетные записи», установите флажок «Для интерактивного входа в сеть нужна смарт-карта».

Настройте политики безопасности. Для этого откройте Панель управления и выберите пункт «Администрирование». Откройте меню для управления групповой политикой.
В левой части окна «Управление групповой политикой» щелкните «Default Domain Policy» и выберите пункт «Изменить».

В левой части окна «Редактор управления групповыми политиками» выберите пункт «Параметры безопасности».

Откройте политику «Интерактивный вход в систему: требовать смарт-карту».
На вкладке «Параметры политики безопасности» установите флажки «Определить следующий параметр политики» и «Включен».
Откройте политику «Интерактивный вход в систему: поведение при извлечении смарт-карты».
На вкладке «Параметры политики безопасности» установите флажок «Определить следующий параметр политики», из раскрывающегося списка выберите «Блокировка рабочей станции».
Перезагрузите компьютер. И при следующей попытке аутентификации в домене уже можно будет использовать токен и его PIN-код.

BINGO!
Двухфакторная аутентификация для входа в домен настроена, а значит существенно повышен уровень безопасность для входа в Windows домен без траты безумной суммы на дополнительные средства защиты. Теперь без токена вход в систему невозможен, а пользователи могут вздохнуть спокойно и не мучиться со сложными паролями.
Следующий шаг — безопасная почта, об этом и о настройке безопасной аутентификации в других системах читайте в наших следующих статьях.
Привычная схема авторизации пользователей в операционной системе компьютера и доменной сети компании по имени и паролю является на сегодняшний день слабым звеном в цепочке информационной безопасности предприятия и персонального компьютера в частности, так как обладает целым рядом существенных недостатков.
Зачастую, ввиду сложности запоминания, пользователями применяются несложные короткие пароли, которые, в свою очередь, ещё и крайне редко меняются. Такой пароль легко перехватить или просто подсмотреть злоумышленником в тот момент, когда пользователь вводит его с клавиатуры.
Применение более сложных по своему составу паролей не избавляет их от риска быть считанными клавиатурными перехватчиками при вводе пароля с клавиатуры. Кроме того регулярная смена сложных паролей повышает вероятность того, что пароль будет просто-напросто забыт и доступ к персональному компьютеру и в сеть компании будет невозможен.
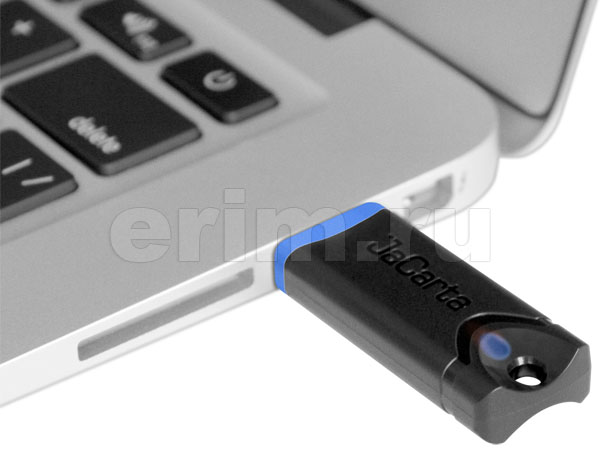
✔ Назначение JaCarta SecurLogon
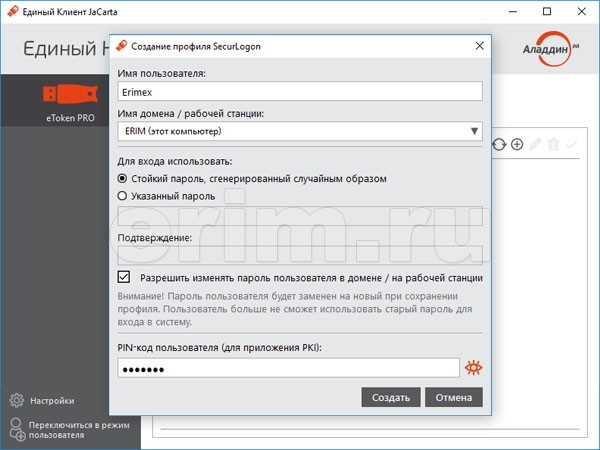
Приложение JaCarta SecurLogon обеспечивает замену привычной схемы авторизации пользователя в операционной системе Microsoft Windows и корпоративном домене по имени и паролю на более защищённый вариант усиленной аутентификации с использованием USB-токенов и контактных смарт-карт.

✔ Основные преимущества JaCarta SecurLogon
-
Двухфакторная аппаратная аутентификация без Microsoft CA и Active Directory — JaCarta SecurLogon не требует для своей работы развернутых центра сертификации и доменной структуры. Приложение одинаково просто интегрируется и в автономно-работающие персональные компьютеры и в рабочие станции, подключённые к корпоративной сети.

-
Подбор пароля является непосильной задачей — при использовании встроенной в приложение функции генерации сложных паролей. Такой пароль после создания сохраняется сразу непосредственно в памяти смарт-карты или USB-токена и может достигать длины в несколько десятков символов, на перебор которых у злоумышленника могут уйти годы.
-
Невидимость сложного пароля для пользователя — так как при генерации сложный пароль сразу сохраняется в памяти электронного идентификатора и не выводится на экран монитора, то пользователь никоим образом не имеет возможности запомнить этот пароль или же записать его на листке бумаги и тем самым пароль скомпрометировать.
-
Удобство пользования паролями — продукт позволяет сохранять в памяти одной смарт-карты или USB-ключа (токена) большое количество профилей для доступа к различным компьютерам, под различными именами пользователей, в различные корпоративные домены. Для аутентификации достаточно знать ПИН-код доступа к смарт-карте, токену.
- Блокировка компьютера при извлечении электронного идентификатора — компьютер можно настроить таким образом, чтобы при извлечении смарт-карты из карт-ридера, либо отключении токена от USB-порта, происходила его блокировка и минимизировались риски доступа к компьютеру посторонних лиц во время отсутствия пользователя.
- Использование биометрии — приложение позволяет применять третий фактор аутентификации — отпечатки пальцев. Использование продукта с идентификаторами JaCarta PKI/BIO и сканерами отпечатков пальцев даёт возможность авторизоваться по схеме Токен + PIN-код, либо Токен + отпечаток пальца, либо Токен + PIN-код + отпечаток пальца.
- Применение электронных сертификатов — если в корпоративной сети предприятия развернута инфраструктура PKI и в памяти смарт-карты или токена сохранен цифровой сертификат пользователя и соответствующий ему закрытый ключ, то для авторизации возможно применение строгой аутентификации с использованием цифровых сертификатов.
Купить JaCarta SecurLogon, а также USB-токены и контактные смарт-карты для входа в Windows вы можете непосредственно в нашей компании. Если у Вас уже есть токены или карты из списка совместимых, достаточно приобрести только необходимое количество лицензий JaCarta SecurLogon.
Поддержка
Поддерживаемые ОС
Windows 10, 8.1, 7 SP1, Server 2019, 2016, 2012 R2, 2012, 2008 R2 SP1
Прикладное ПО
Единый клиент JaCarta, драйвер карт-ридера (при использовании смарт-карт)
USB-ключи и карты
JaCarta PKI, JaCarta PKI/BIO, JaCarta PRO, JaCarta PKI/Flash, JaCarta LT
Аппаратные требования
Свободный USB-порт
Требуется при использовании USB-токенов
Наличие карт-ридера
Требуется при использовании смарт-карт
Место на диске для установки
Не менее 100 Мб
Поставка
Комплект поставки
USB-токен JaCarta PKI, файл лицензии для установки на 1 рабочую станцию
USB-токен/смарт-карта
В комплект поставки входит 1 шт. USB-токен JaCarta PKI
Отзывов: 0
Средняя оценка: 0
Нет отзывов об этом товаре.
How to Enable Smart Card Logon on Windows 10
Want to make logging into your Windows 10 computer easier and more secure? Enabling smart card logon could be the perfect solution! By following the steps below, you’ll be able to log in using a smart card, reducing the need for passwords and improving your security.
Setting up smart card logon on a Windows 10 device is a relatively simple process. The following steps will guide you through configuring your system to accept smart card credentials, ensuring that your login is more secure and efficient.
Step 1: Install the Smart Card Reader
First, connect your smart card reader to your computer.
Make sure that your smart card reader is properly installed by plugging it into a USB port. Windows 10 should automatically detect and install the necessary drivers. You might need to download specific drivers from the manufacturer’s website if automatic installation doesn’t work.
Step 2: Insert the Smart Card
Next, insert your smart card into the reader.
Ensure the smart card is inserted correctly according to the reader’s instructions. The card should have a chip facing the correct direction. Some readers have an LED indicator that lights up when the card is inserted correctly.
Step 3: Configure Smart Card Service
Go to the Windows Services to configure the Smart Card service.
Press Win + R, type services.msc, and press Enter. Locate the «Smart Card» service, right-click it, and select «Properties.» Set the «Startup type» to «Automatic» and then click the «Start» button if the service is not already running.
Step 4: Configure Group Policy
Now, configure the Group Policy to enable smart card logon.
Open the Group Policy Editor by pressing Win + R, typing gpedit.msc, and hitting Enter. Navigate to Computer Configuration > Administrative Templates > Windows Components > Smart Card. Enable the policy named «Allow Smart Card.» This ensures that your system will accept smart card logon.
Step 5: Add Smart Card Certificate to the User Account
Finally, add the smart card certificate to your user account.
Open the Control Panel, go to User Accounts, and find the option to manage your certificates. Import the certificate from your smart card into your user account. This certificate is needed to authenticate your smart card during logon.
Once you’ve completed these steps, you’ll be able to log in to your Windows 10 computer using your smart card. This method is not just more secure, but also convenient.
Tips for Enabling Smart Card Logon – Windows 10
- Ensure your smart card reader is compatible with Windows 10.
- Regularly update the drivers for your smart card reader.
- Keep your smart card in a safe place when not in use.
- Use a strong PIN for your smart card to enhance security.
- Check if your organization has specific policies regarding smart card use.
Frequently Asked Questions
Do I need special software for smart card logon?
Most smart card readers work with Windows 10 out of the box, but you might need specific drivers or software from the manufacturer.
Can I use any smart card for logon purposes?
The smart card must be compatible with Windows 10 and should contain the necessary certificates for authentication.
What happens if I lose my smart card?
If you lose your smart card, you should immediately report it and get a replacement. You might need to use alternative logon methods until you receive a new card.
Is smart card logon more secure than using a password?
Yes, smart card logon is generally more secure as it combines something you have (the card) with something you know (the PIN).
Can I enable smart card logon on multiple devices?
Yes, you can enable smart card logon on multiple devices, but each device needs to be configured separately.
Summary
- Install the Smart Card Reader.
- Insert the Smart Card.
- Configure Smart Card Service.
- Configure Group Policy.
- Add Smart Card Certificate to the User Account.
Conclusion
Setting up smart card logon on Windows 10 is a great way to enhance your computer’s security. By following the steps outlined above, you can make your logon process both secure and convenient. Remember, technology is here to make our lives easier, and smart cards are a perfect example of combining security with ease of use.
Make sure to follow the tips provided to maintain a secure environment, and don’t hesitate to reach out for support if you need it. Happy configuring!
Kermit Matthews is a freelance writer based in Philadelphia, Pennsylvania with more than a decade of experience writing technology guides. He has a Bachelor’s and Master’s degree in Computer Science and has spent much of his professional career in IT management.
He specializes in writing content about iPhones, Android devices, Microsoft Office, and many other popular applications and devices.
Read his full bio here.
Виртуальные смарт-карты предлагают предприятиям те же преимущества, что и физические смарт-карты, но по более низкой цене. Вы можете создать виртуальную смарт-карту разными способами. Они обеспечивают дополнительный уровень безопасности онлайн-транзакций и в определенных ситуациях могут использоваться вместо физических смарт-карт. В этой статье мы рассмотрим, как использовать виртуальные смарт-карты в Windows 10.
Что такое виртуальная смарт-карта?
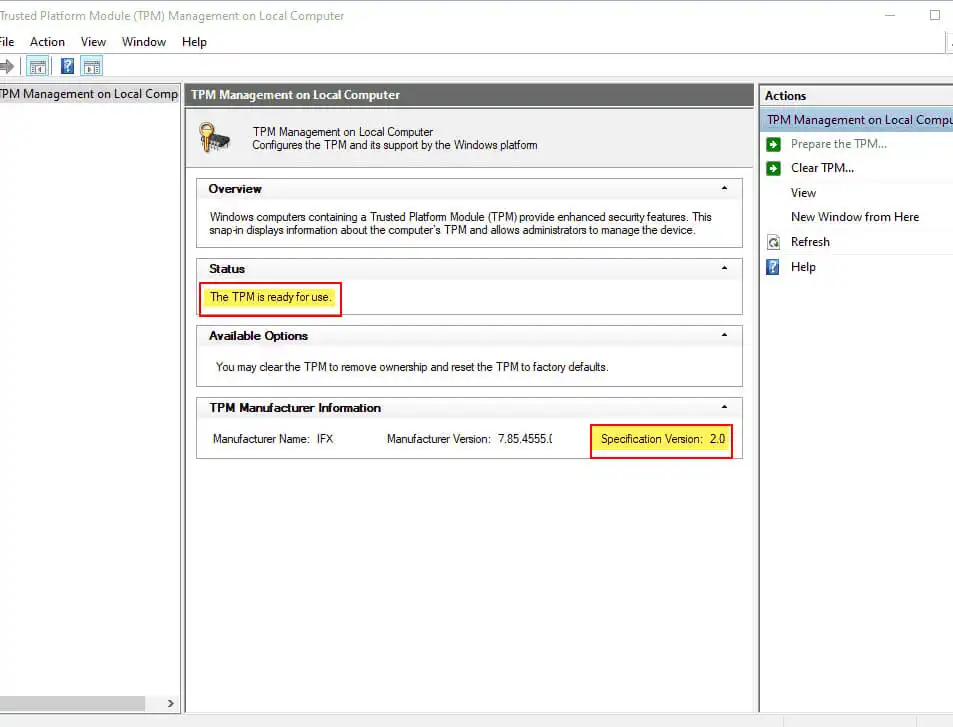
Виртуальная смарт-карта это Майкрософтрешение на основе доверенного платформенного модуля (TPM). Он предназначен для защиты оборудования путем создания ключей шифрования и сохранения части информации о ключах в TPM. Он предоставляет сертификаты для Active Directory для аутентификации устройств и пользователей.
Виртуальные смарт-карты работают аналогично большинству традиционных смарт-карт, но более эффективны. Традиционные смарт-карты используют шифрование или чипы. Виртуальная смарт-карта хранит ключевую информацию непосредственно в устройстве. Он включает двухфакторную аутентификацию (2FA) на устройстве пользователя без дополнительного оборудования. Виртуальные смарт-карты могут защитить ИТ-системы компании от внешних угроз. Эти внешние угрозы включают хакерские атаки или несанкционированный доступ с других внешних устройств.
После настройки виртуальной смарт-карты вы можете ввести правильный PIN-код на устройстве для правильного входа в систему. Он всегда будет отображаться как вставленная смарт-карта в Windows. Операционная система предоставляет приложению виртуальный смарт-ридер и виртуальную смарт-карту, когда вам нужно их использовать. Приложение имеет тот же интерфейс, что и физическая смарт-карта. Таким образом, вы можете войти в данную систему быстрее.
Виртуальная смарт-карта является виртуальной, поэтому ее использование обходится дешевле. Вы можете сэкономить на покупке дополнительного оборудования для смарт-карт.
Для функций виртуальных смарт-карт доступны следующие типы смарт-карт.
- Универсальные смарт-карты ISO – 7816
- Немецкие электронные удостоверения личности (NPA) с поддержкой EAC (PACE, TA, CA)
- Электронный паспорт с поддержкой BAC (ePass/MRTD)
- Смарт-карты Криптофлекс
Виртуальная смарт-карта доступна для устройств, оснащенных доверенным платформенным модулем (версия 1.2 или 2.0), которые были добавлены в Windows 10. Кроме того, крайне важно иметь доступную рабочую среду инфраструктуры KPI. Например, более распространенные службы сертификации Microsoft.
Далее мы разделили весь процесс на три этапа:
- Создайте шаблон сертификата (соответствующий требованиям для регистрации виртуальной смарт-карты)
- Создание виртуальной смарт-карты (поддерживается TPM)
- Регистрация сертификата виртуальной смарт-карты TPM
Кроме того, вам нужно будет убедиться, что на вашем устройстве установлен TPM. Вы можете запустить tpm. msc, чтобы попробовать это.
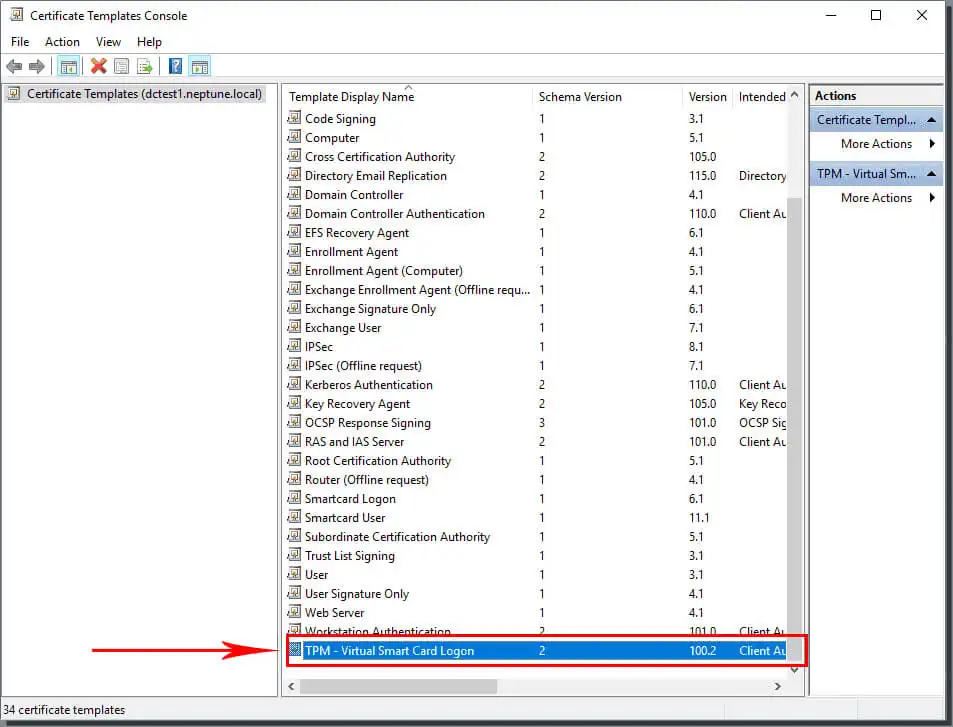
Создание шаблона сертификата
Первый шаг, который нам нужно сделать, это создать шаблон сертификата, соответствующий требованиям виртуальной смарт-карты. Давайте сделаем следующее, используя Microsoft Certificate Services в качестве примера инфраструктуры PKI в домене Windows.
- Откройте консоль управления Microsoft (MMC).
- Нажмите «Файл» и нажмите «Добавить/удалить единицы управления».
- Нажмите «Шаблоны сертификатов» в списке доступных единиц управления.
- Щелкните Добавить файл.
- Дважды щелкните, чтобы просмотреть все шаблоны сертификатов, расположенные в корневом каталоге консоли MMC.
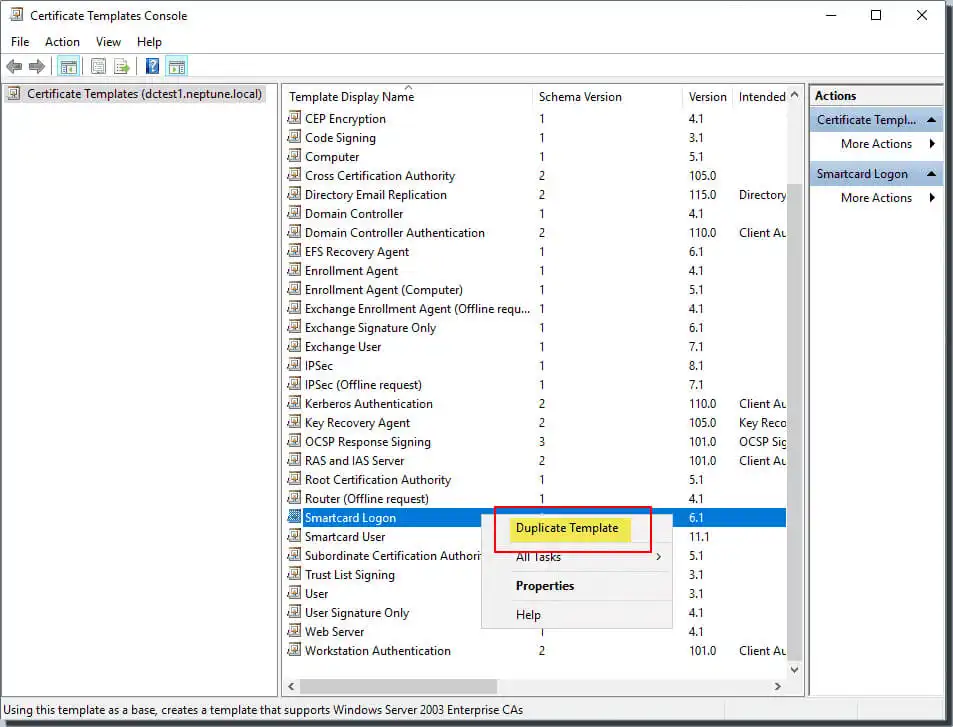
- Щелкните правой кнопкой мыши шаблон входа со смарт-картой.
- Щелкните Копировать шаблон.
Просмотрите центр сертификации на вкладке «Совместимость» и при необходимости измените его.
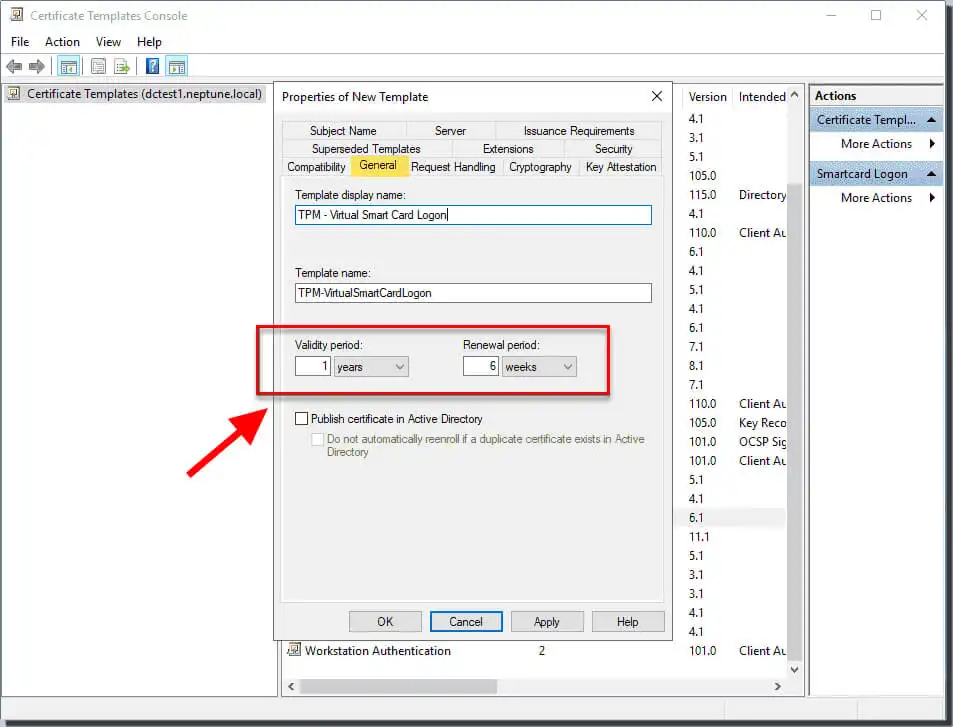
Укажите имя на вкладке Общие и установите допустимое значение на желаемое значение. Укажите имя для входа на виртуальную смарт-карту TPM.
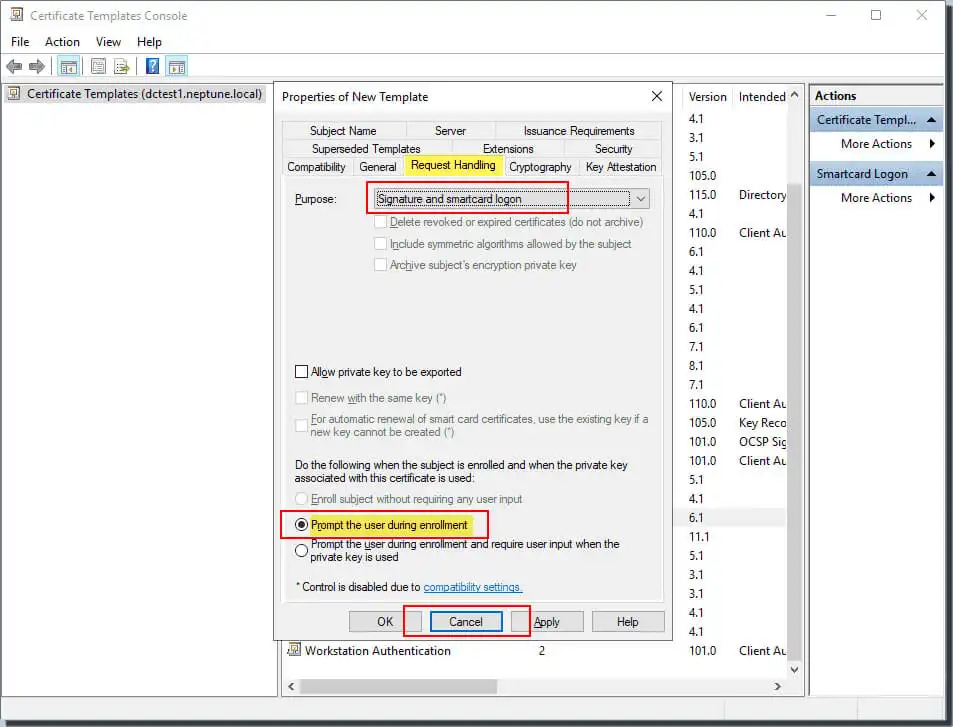
На вкладке «Запрос» установите для параметра «Использование» значение Подпись и вход по смарт-карте. Затем нажмите Подсказать пользователю при регистрации.
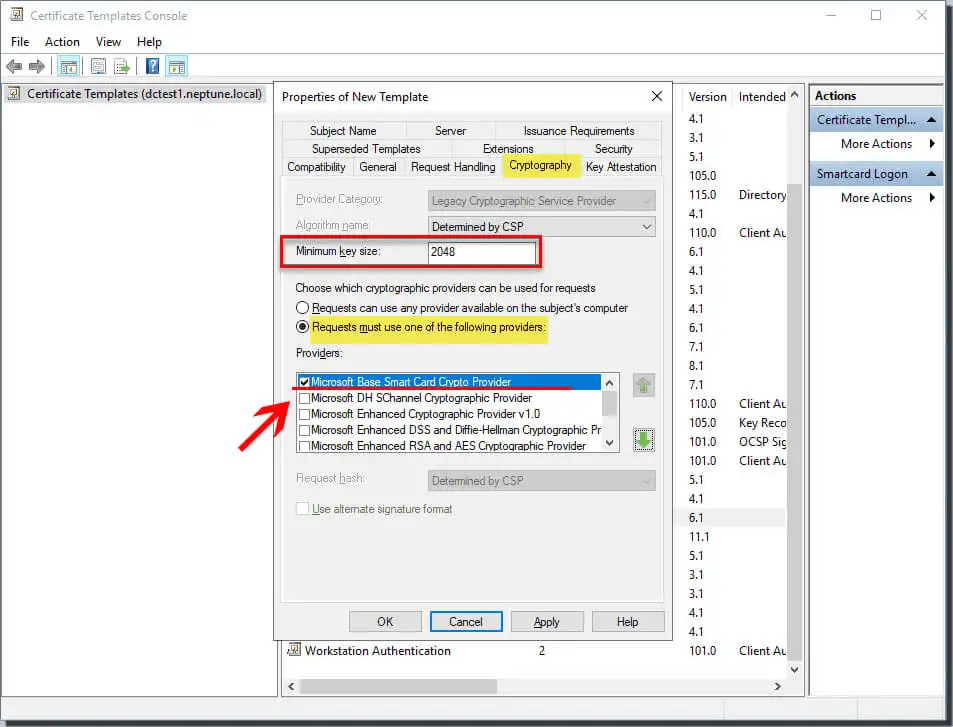
На вкладке Криптография установите Минимальный размер ключа до 2048. выбирать Запросы должны использовать одного из следующих поставщиков. Выбирать Поставщик криптографии базовой смарт-карты Майкрософт.
Добавьте группу безопасности, которой вы хотите предоставить доступ для регистрации. Этот выбор отображается на вкладке «Безопасность».

Нажмите Подтверждать для завершения изменений для создания нового шаблона. В это время ваш новый шаблон появится в списке шаблонов сертификатов.
Выберите «Файл» и нажмите «Добавить/удалить оснастку». чтобы добавить блок управления Certification Authority в консоль MMC. Затем выберите компьютер, которым система запрашивает управление, как компьютер, на котором расположен центр сертификации.
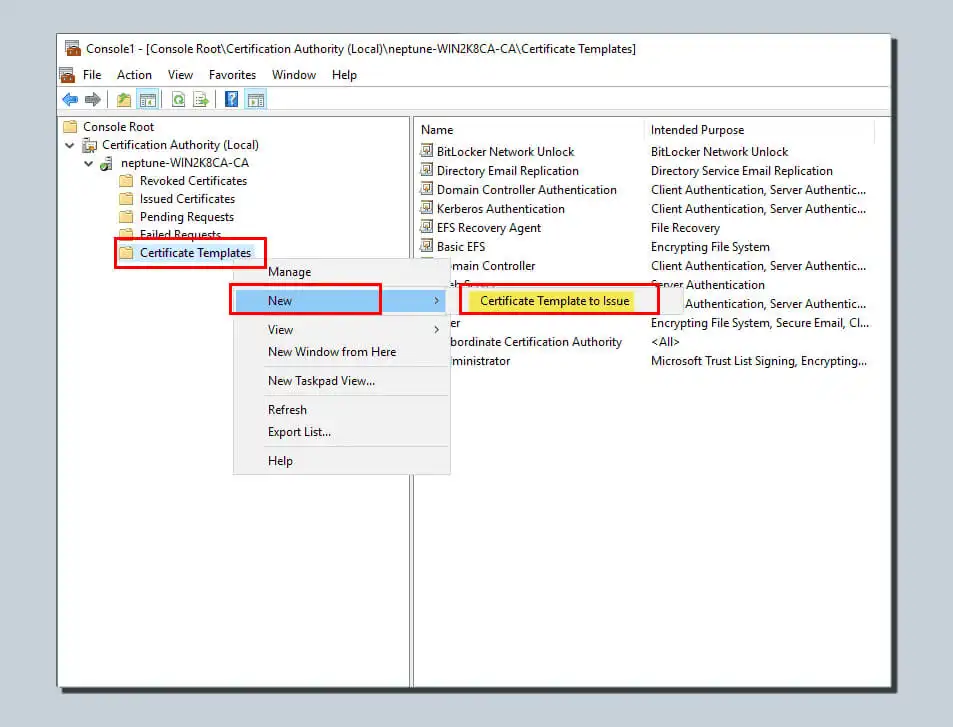
Затем разверните Центр сертификации (локальный) на левой панели MMC. Затем вы можете расширить свой ЦС в списке Центров сертификации.
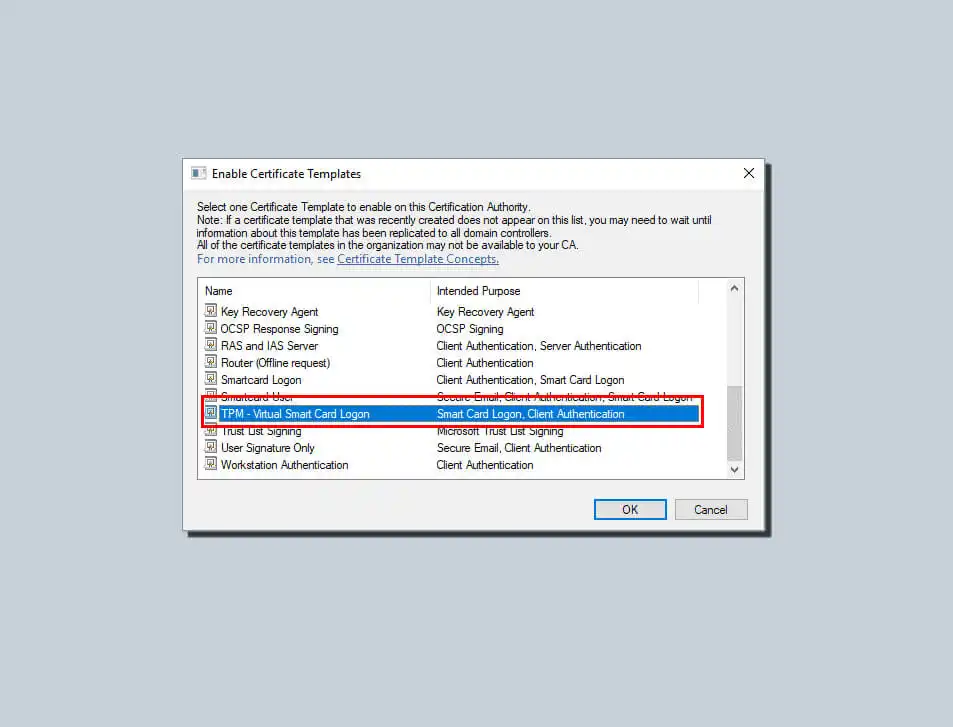
Щелкните правой кнопкой мыши шаблон сертификата. Затем нажмите «Создать» и нажмите на шаблон сертификата вы хотите оформить.
Затем вам нужно будет выберите новый шаблон вы только что создали из списка и нажмите Подтвердить.
Прежде чем продолжить, остановите и запустите службу сертификатов в ЦС.. Это делается путем возврата к MMC после успешного копирования шаблона. Щелкните правой кнопкой мыши список центров сертификации. Выберите «Все задачи» и нажмите «Остановить службы». Щелкните правой кнопкой мыши имя ЦС еще раз. Нажмите «Все задачи», а затем нажмите «Запустить службу».

Вы можете предоставить доступ всем пользователям при добавлении группы безопасности. Вам нужно щелкнуть, чтобы выбрать группы пользователей, прошедших проверку подлинности. Затем просто пропишите для них разрешения. Вы должны знать, что для репликации вашего вновь созданного шаблона на всех ваших серверах может потребоваться некоторое время. Вы можете использовать его в этом списке только после успешной репликации.
Создание виртуальной смарт-карты TPM
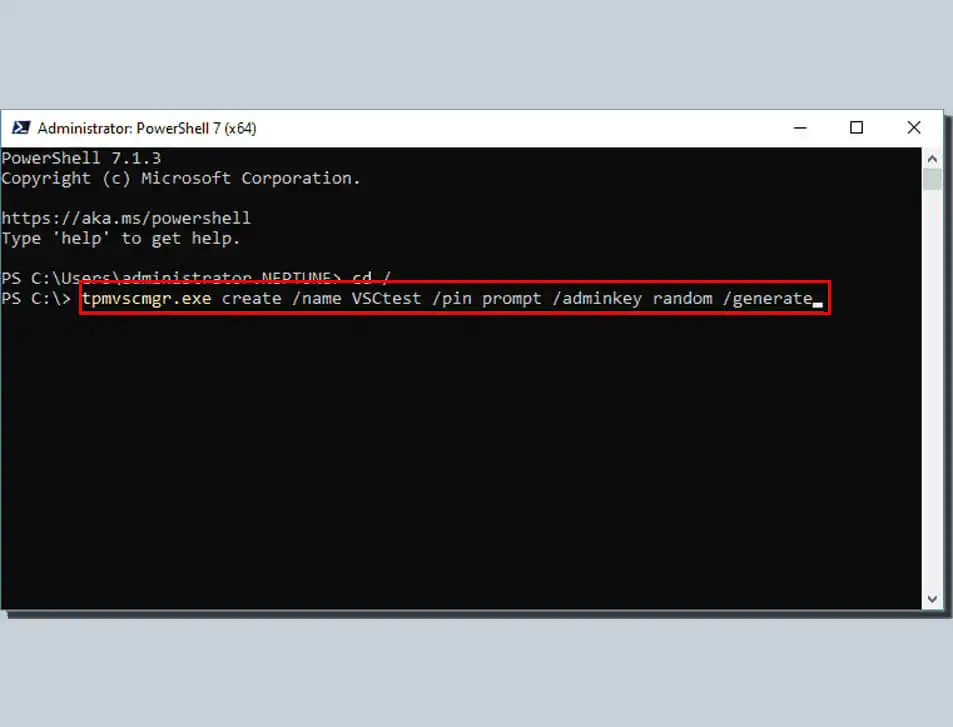
На этом шаге вы будете использовать инструмент командной строки Tpmvscmgr.exe. Это гарантирует, что вы сможете успешно создавать виртуальные смарт-карты на клиентских компьютерах. Это делается следующим образом:
- Откройте командную строку и включите присоединенный компьютер, используя учетные данные администратора.
- Введите и запустите эту команду в командной строке:
tpmvscmgr.exe create/name TestVSC/pin default/admin key random/generateЗатем он создаст виртуальную смарт-карту. Эта виртуальная смарт-карта позволит вам опустить ключ разблокировки и создать файловую систему на карте.
Подождите несколько секунд, пока процесс завершится. tpmvscmgr.exe предоставит вам идентификатор экземпляра устройства виртуальной смарт-карты TPM, когда это будет сделано. Этот идентификатор поможет вам управлять всеми вашими виртуальными смарт-картами или удалять их.
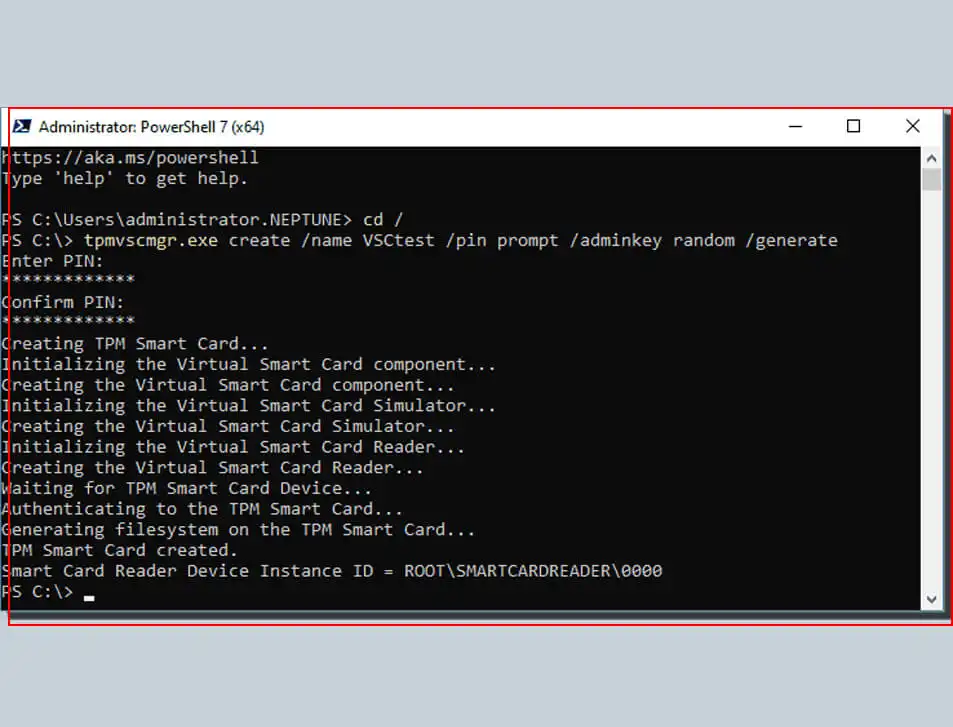
Обратите внимание, что вы должны установить PIN-код по умолчанию при выполнении вышеуказанной команды. Вам нужно ввести /pin по умолчанию вместо /pin по умолчанию, когда будет предложено ввести PIN-код.
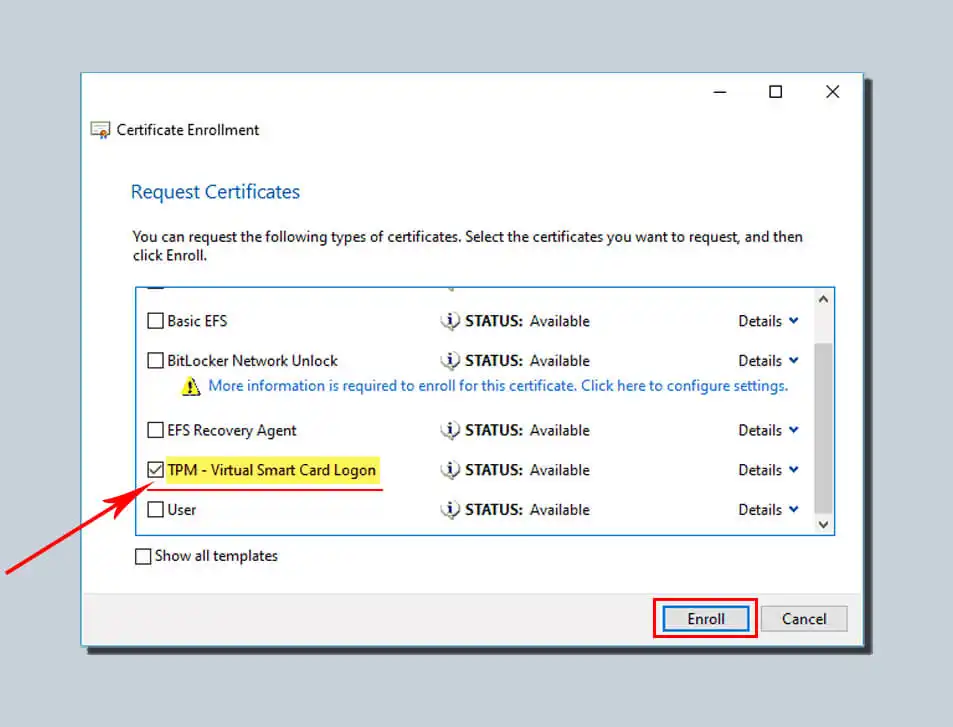
Регистрация сертификата виртуальной смарт-карты TPM
После этого вам также нужно будет предоставить ему учетные данные для входа, необходимые для завершения процесса. Он будет полностью функциональным только в том случае, если у вас есть соответствующие учетные данные для входа.
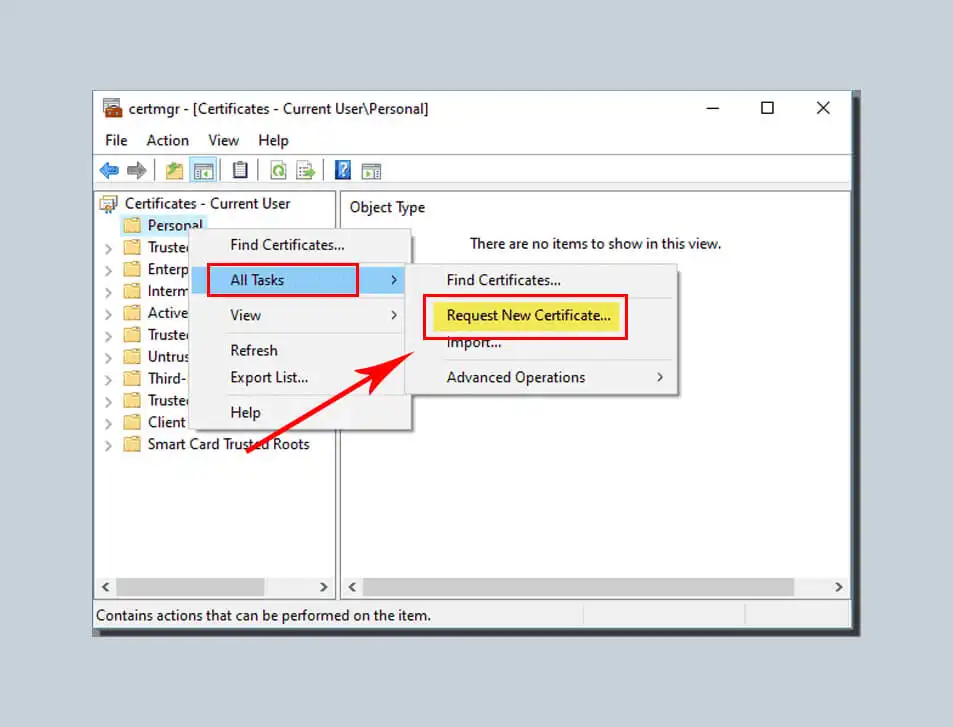
- Введите certmgr.MSC в меню «Пуск» клиента Windows 10.. Эта команда поможет вам быстро открыть консоль сертификатов.
- Затем щелкните правой кнопкой мыши диспетчер сертификатов для вашего хранилища. Щелкните правой кнопкой мыши на человеке, выберите все задачи и выберите Подать заявку на новый сертификат.
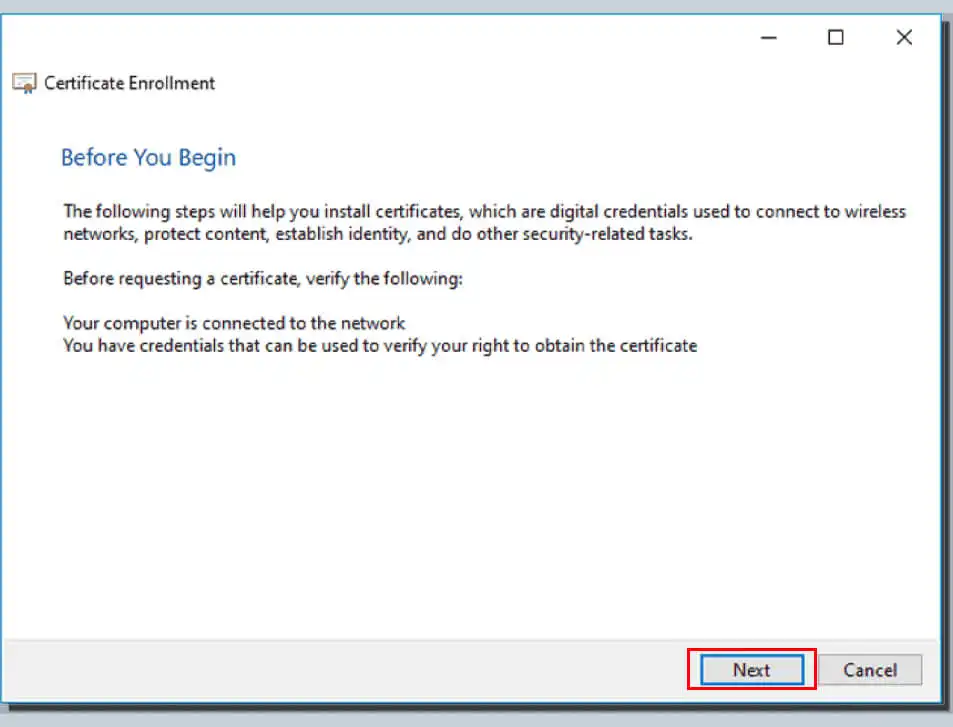
Этот шаг поможет вам запустить мастер регистрации сертификатов. Затем мы нажимаем «Следующий“
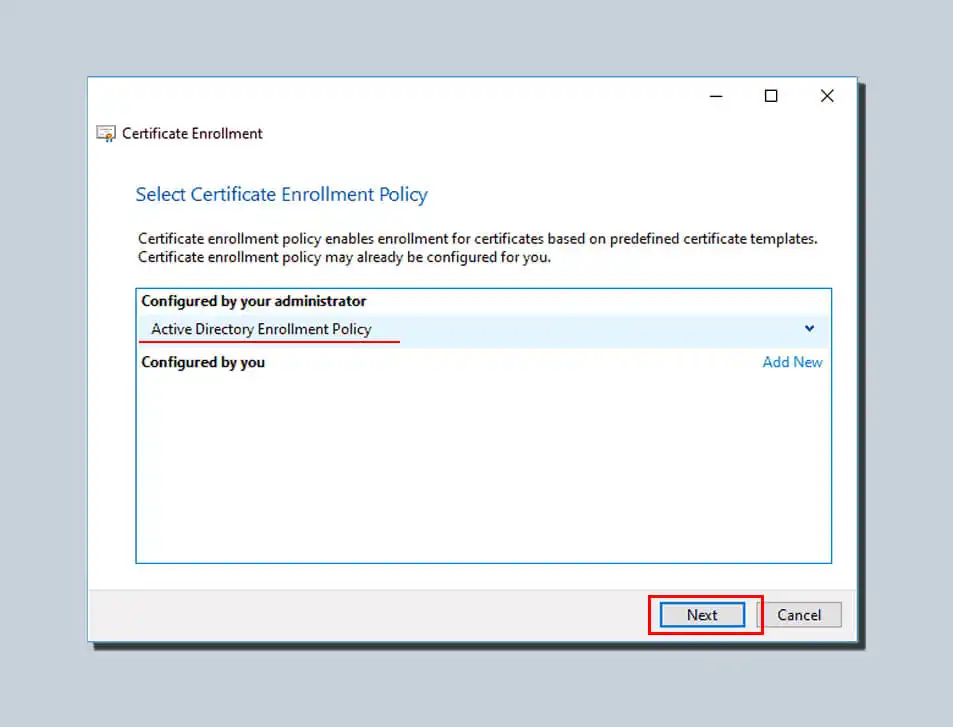
Затем Нажмите «Далее. Продолжайте нажимать Далее на Выберите политику регистрации сертификатов. экран монитора.
Выберите имя созданного шаблона сертификата. на предыдущем шаге. Затем нажмите Зарегистрироваться.
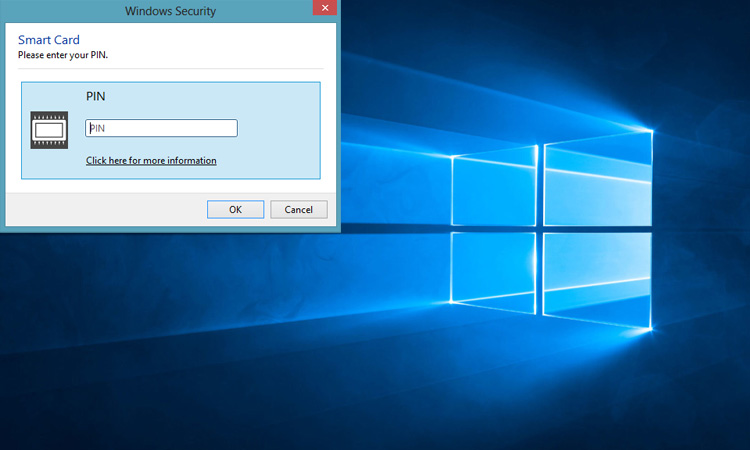
Далее введите PIN-код которую вы создали при создании виртуальной смарт-карты TPM, и нажмите кнопку ОК.
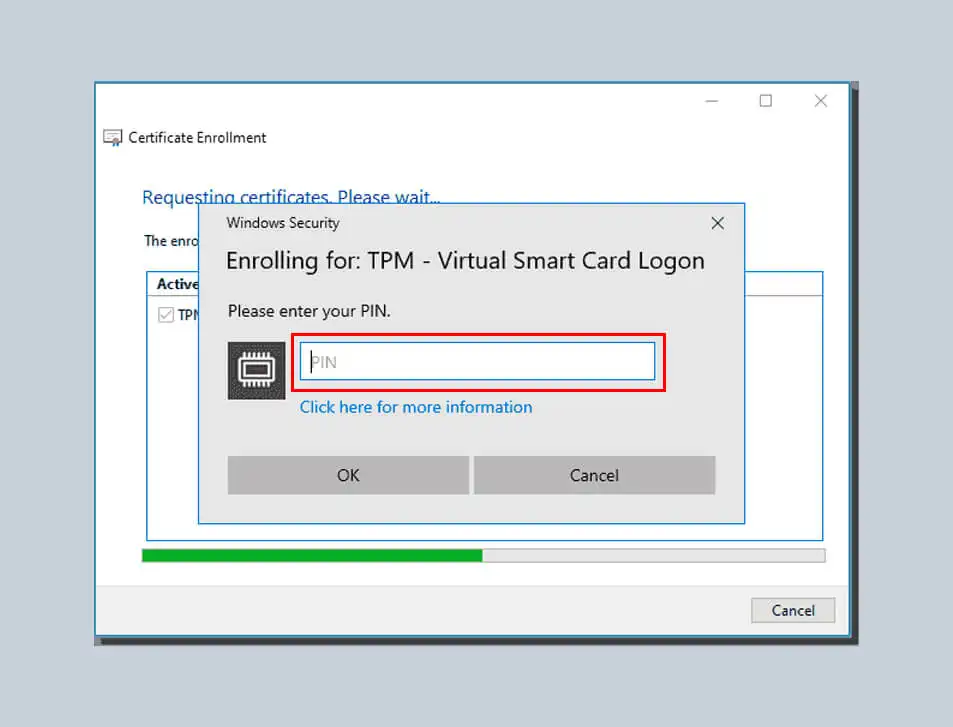
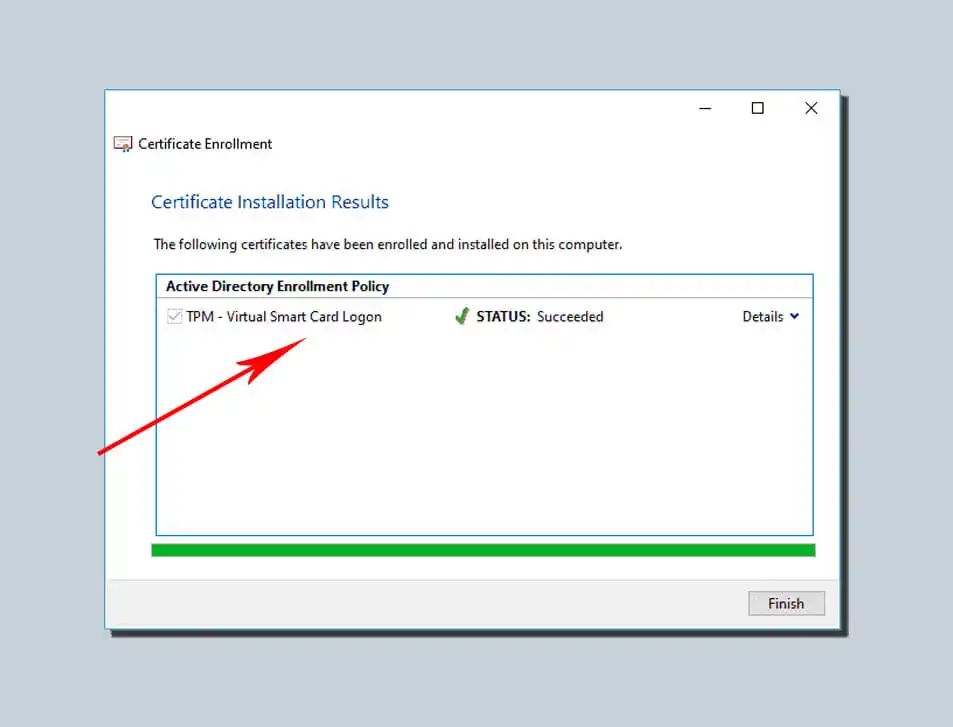
Дождитесь завершения предыдущей регистрации и нажмите «Готово».
Запрос на ввод устройства появляется в сеансе регистрации сертификата виртуальной смарт-карты TPM выше. Затем вы должны выбрать соответствующую виртуальную смарт-карту Microsoft, которую вы использовали на предыдущих шагах. Обычно он отображается как идентификационное устройство, т. е. профиль Microsoft.
Как только все вышеперечисленные процессы завершены, установка виртуальной смарт-карты windows 10 завершена. На вашем компьютере появилась новая возможность входа в систему в качестве защищенного устройства..
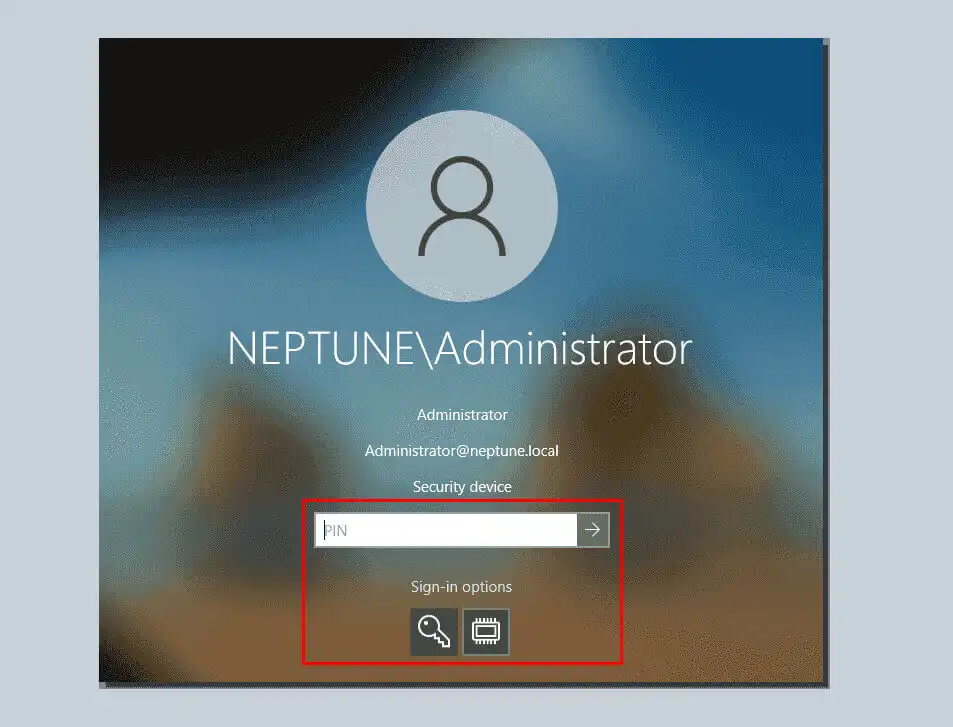
Предположим, вы хотите убедиться, что ваша виртуальная смарт-карта установлена и что регистрация сертификата прошла успешно. Вы можете выйти из текущего сеанса и войти снова. Вы можете увидеть новый значок виртуальной смарт-карты TPM на экране входа в систему на рабочем столе. Вы будете перенаправлены в диалоговое окно входа в систему с помощью смарт-карты TPM, если предыдущее действие не будет выполнено.
Нажмите на этот новый значок смарт-карты, отображаемый на экране входа в систему. Затем введите свой PIN-код. Нажмите OK еще раз, и вы быстро войдете в свою учетную запись домена.
Использование виртуальных смарт-карт с удаленным рабочим столом
Вы можете использовать виртуальные смарт-карты с удаленным рабочим столом, чтобы обеспечить дополнительный уровень безопасности при доступе к удаленным компьютерам. Чтобы использовать виртуальную смарт-карту с удаленным рабочим столом, вам потребуется устройство чтения смарт-карт и виртуальная смарт-карта с установленным цифровым сертификатом. Выполните следующие действия, чтобы использовать виртуальную смарт-карту с удаленным рабочим столом:
- Откройте подключение к удаленному рабочему столу на вашем компьютере.
- Нажмите кнопку «Параметры».
- Перейдите на вкладку «Локальные ресурсы».
- Нажмите кнопку «Еще».
- Установите флажок «Смарт-карта».
- Нажмите кнопку «ОК».
- Введите информацию об удаленном компьютере и нажмите кнопку «Подключиться».
- Вставьте устройство чтения смарт-карт и используйте виртуальную смарт-карту для аутентификации при появлении соответствующего запроса.
Использование виртуальных смарт-карт с Microsoft Passport
Microsoft Passport — это функция Windows 10, которая позволяет использовать виртуальную смарт-карту или метод биометрической аутентификации (например, отпечаток пальца или распознавание лица) для входа на компьютер или доступа к определенным ресурсам. Чтобы использовать виртуальную смарт-карту с Microsoft Passport, вам потребуется устройство чтения смарт-карт и виртуальная смарт-карта с установленным цифровым сертификатом. Выполните следующие действия, чтобы использовать виртуальную смарт-карту с Microsoft Passport:
- Откройте приложение «Настройки» на своем компьютере.
- Нажмите на вкладку «Аккаунты».
- Перейдите на вкладку «Параметры входа».
- Перейдите на вкладку «ПИН-код Windows Hello».
- Нажмите кнопку «Настроить».
- Следуйте инструкциям по настройке Microsoft Passport. Это может включать создание PIN-кода и настройку ключа восстановления.
- Вставьте устройство чтения смарт-карт и используйте виртуальную смарт-карту для аутентификации при появлении соответствующего запроса.
Использование виртуальных смарт-карт с другими приложениями
Помимо описанных выше целей, вы можете использовать виртуальные смарт-карты с другими приложениями, поддерживающими аутентификацию с помощью смарт-карт. Ознакомьтесь с документацией по соответствующему приложению, чтобы узнать, поддерживает ли оно проверку подлинности с помощью смарт-карты, и следуйте инструкциям по использованию виртуальной смарт-карты с приложением.
Где я могу использовать свою виртуальную смарт-карту?
Виртуальная смарт-карта используется в некоторых местах, где это важно. Вы можете использовать его для аутентификации пользователей на внешних ресурсах. Вы также можете использовать его для защиты данных с помощью безопасного шифрования. Многие предприятия также используют его для предоставления надежных подписей для обеспечения их целостности. Вы можете легко развернуть виртуальный проверка подлинности смарт-карты самостоятельно или путем покупки решения. Это чрезвычайно надежный метод аутентификации, который подходит для любого размера бизнеса. Ниже приведены три наиболее распространенных применения виртуальных смарт-карт в жизни.
Варианты использования на основе аутентификации
- Удаленный доступ через двухфакторную аутентификацию
- Аутентификация на стороне клиента
- Перенаправление виртуальной смарт-карты для подключения к удаленному рабочему столу
- Виртуальные смарт-карты с Windows To Go
Варианты использования конфиденциальности
- Шифрование электронной почты S/MIME
- BitLocker для томов данных
Пример использования целостности данных
- Подписанные данные
Виртуальная смарт-карта, возможно, является более надежной версией физической смарт-карты. Это значительно упрощает аутентификацию. Он также хорошо подходит для наших различных потребностей в аутентификации. Примеры включают беспроводные сети, вход в систему с рабочего стола и службы VPN.
Подробнее о виртуальной смарт-карте Часто задаваемые вопросы
-
Что такое виртуальная смарт-карта и чем она отличается от физической смарт-карты?
Виртуальная смарт-карта — это программная реализация смарт-карты. Это может быть использовано для безопасной аутентификации и управления доступом. В отличие от физической смарт-карты, которая представляет собой физическое устройство со встроенным чипом, виртуальная смарт-карта использует криптографические возможности хост-устройства (например, компьютера или мобильного телефона) для обеспечения того же уровня безопасности.
-
Каковы преимущества использования виртуальных смарт-карт вместо физических смарт-карт?
Виртуальные смарт-карты имеют ряд преимуществ по сравнению с физическими смарт-картами, например, ими проще управлять, развертывать и обновлять. Это потому, что они не требуют физического распространения. Виртуальные смарт-карты также более экономичны, поскольку не требуют покупки и обслуживания физических устройств.
-
Какие меры безопасности используются для защиты виртуальных смарт-карт от несанкционированного доступа или кражи?
В виртуальных смарт-картах используются различные меры безопасности для защиты от несанкционированного доступа или кражи, такие как защита PIN-кодом или паролем, шифрование конфиденциальных данных и политики контроля доступа. Кроме того, виртуальные смарт-карты защищены от несанкционированного доступа, поэтому любые попытки изменить их или получить к ним доступ без надлежащей авторизации вызовут предупреждения или отключат карту.
-
Как виртуальные смарт-карты работают с различными операционными системами и приложениями?
Виртуальные смарт-карты совместимы с различными операционными системами и приложениями. Это связано с тем, что они используют стандартизированные интерфейсы и протоколы для связи. Эти интерфейсы и протоколы позволяют виртуальным смарт-картам беспрепятственно работать с различными приложениями, поддерживающими проверку подлинности смарт-карт.
-
Можно ли использовать виртуальные смарт-карты для безопасной удаленной аутентификации, и если да, то как?
Да, виртуальные смарт-карты можно использовать для безопасной удаленной аутентификации. Виртуальные смарт-карты могут удаленно аутентифицировать пользователей с помощью криптографических протоколов, таких как TLS, VPN или протокол удаленного рабочего стола (RDP).
-
Каковы некоторые распространенные варианты использования виртуальных смарт-карт и как они применяются в разных отраслях?
Виртуальные смарт-карты используются в различных отраслях и приложениях, таких как государственные учреждения, финансовые учреждения, здравоохранение и электронная коммерция. Они используются для безопасного контроля доступа, защиты данных и проверки личности.
-
Как виртуальные смарт-карты вписываются в более широкий ландшафт технологий цифровой идентификации и аутентификации?
Виртуальные смарт-карты являются частью более широкого спектра технологий цифровой идентификации и аутентификации. Это включает в себя биометрическую аутентификацию, многофакторную аутентификацию и цифровые сертификаты. Виртуальные смарт-карты обеспечивают дополнительный уровень безопасности и гибкости для этих технологий, поскольку их можно использовать на разных устройствах и в разных приложениях.
-
Каков процесс подготовки и управления виртуальными смарт-картами и кто за это отвечает?
Процесс подготовки и управления виртуальными смарт-картами может различаться в зависимости от конкретной реализации и отрасли, в которой они используются. Как правило, за подготовку и управление виртуальными смарт-картами отвечает ИТ-отдел или назначенная группа безопасности.
Configure Smart Card Logon on Windows Domains
Approved AltSecID Identifiers
If your on-premise Active Directory user account mappings alreaady use X509SKI or X509IssuerSerialNumber altsecid, you will not need to take any action as a result of the September 2024 Microsoft updates.
Introduction
These Windows Domain configuration guides will help you configure your Windows network domain for smart card logon using PIV credentials.
There are many useful pages and technical articles available online that include details on configurations and using generic smart cards. The information presented here addresses common questions and configurations specific to the U.S. federal government, PIV smart cards, and U.S. federal civilian agency certification authorities.
Teamwork
Work with your Network Engineers, Domain Admins, Account Management, and Information Security colleagues to review the information, perform the configurations, and troubleshoot any issues.
Pre-Launch Checklist
Check the following items before reviewing these network guides and lessons learned:
- Users have PIV credentials and PIV card readers.
- You are using Microsoft Active Directory to manage your Windows network.
- Domain Controllers are running Microsoft Windows Server 2019 or newer.
- User workstations are joined to your network and are Windows 10 or newer.
Configuration Checklist
There are five configuration categories to review with your colleagues. All five include steps that must be completed; it’s best to review and complete the configuration categories in this order:
- Network Ports and Protocols
- Domain Controllers
- Trust Stores
- Account Linking: Associating PIV credentials with User Accounts
- Group Policies and Enforcement
There are five additional guides:
- Network Tuning
- Local Certification Authority
- Authentication Assurance
We want to add additional information for installing Online Certificate Status Protocol (OCSP) services, addressing common errors and troubleshooting, and configuring for other operating systems.
Submit an Issue to identify information that would be helpful to you, or consider contributing a page to these guides with your lessons learned.
Step 1 — Network Ports and Protocols
Your workstations, servers, network domain controllers, and applications need to validate the revocation status of the PIV certificates and all intermediate certificate authority (CA) certificates. In addition, the certificate chain path building may retrieve and download the intermediate CA certificates.
The validation occurs in real time (with some caching) and requires ensuring network traffic is open and available to the destination web services, ports, and protocols. Many U.S. federal agencies implement a layered network security model with demilitarized zones (DMZs), proxies, and Trusted Internet Connections (TICs) to monitor, defend, and protect the networks, applications and users.
Verifying and Troubleshooting
Non-accessible endpoints for the web services due to firewalls blocking access is a very common root cause for errors. If you encounter user errors including “Cannot validate” and similar domain controller errors, your first troubleshooting step should be to verify your network and access.
nslookup and certutil are your friendly tools
Restricted or denied access to Internet web services including the OCSP and CRL web services used in the certificate validations lead to common errors and issues. Collaborate with your Network Engineers to review the web services, IP addresses, ports and protocols, and verify access from all local and wide-area network segments.
It is simple to begin troubleshooting if the web services endpoints are accessible or blocked by firewall rules. You have the basic four utility tools for troubleshooting:
- certutil (Microsoft)
- openssl
- nslookup
- tracert
For the typical network domain, certutil will be your best option to identify a number of possible root causes. There are many options available in the certutil utility tool, and two are covered here.
Export your public key and certificate for PIV Authentication to a .cer file (mypiv_auth.cer), and run the following command in a command line from workstation(s) and domain controller(s):
certutil -verify -urlfetch mypiv_auth.cer >>verify_piv.txt
The text file output will include a full check against all options for CRLs, OCSP, intermediate certificates to verify a trust chain, and the root (COMMON). Review all items and ensure at least one successful verification message is included for each check. You may see errors for the LDAP verifications and these can be ignored if a CRL or OCSP check is successful.
Time is important
When reviewing the verification messages, you should pay careful attention to the time. For example, if a CRL file is not downloaded in under 15 seconds, it is very likely that you will encounter network authentication errors and will need to perform some tuning.
There is also a graphical user interface to help perform these verification checks.
certutil -v -url mypiv_auth.cer
The graphical user interface allows you to check OCSP, CRL, and AIA (intermediate certificate retrievals).
Web Services for Validating PIV Certificates
Revocation status is validated using using either Online Certificate Status Protocol (OCSP) or Certificate Revocation Lists (CRLs). To meet your initial network requirements, you should ensure the OCSP and CRL URLs included in your agency users’ PIV Credential Certificates are accessible from all workstations and domain controllers.
| Type | Certificate Extension | Protocol (Port) | Considerations |
|---|---|---|---|
| OCSP | Authority Information Access | HTTP (80) | All PIV certificates have OCSP references and OCSP URLs which are Internet accessible and provided by the issuing CA. Intermediate CAs are not required to have OCSP available for the intermediate certificates. |
| CRL | CRL Distribution Point (CDP) | HTTP (80) | All PIV certificates have CRL capabilities provided by the issuing CA. All intermediate CA certificates have CRL capabilities. CRL files have an expiration time that varies between 6 to 18 hours. CRL file sizes range from a few kilobytes to more than 30 megabytes (MB). |
Lightweight Directory Application Protocol (LDAP) for retrieving information is not preferred and has been increasingly deprecated; therefore, LDAP is not included.
There are dozens of OCSP and CRL URLs for all issued PIV credentials. If you have users with PIV credentials from other agencies or partners, identifying all the URLs to verify against your network configurations will be more complex.
Externally Issued PIV Revocation Resources
You can find end-entity CRL Distribution Point and OCSP URIs under our Active PIV Issuing CA page in the event you require revocation information for externally issued PIV CAs.
Web Services for the Federal Public Key Infrastructure
The Federal Common Policy Certificate Authority G2 (COMMON) is the root certificate authority and has web services to publish both certificate chains (p7b files) and CRLs for all intermediate certificate authorities which the root signs.
To enable communications with these Federal Common Policy Certificate Authority services, including those currently operational and any expansion, you should verify outbound communications to the base domain of http.fpki.gov. For example, a successful connection to http://repo.fpki.gov/fcpca/fcpcag2.crt will download a copy of the Federal Common Policy CA certificate.
You should consider allowing two protocols (ports): HTTP (80) and DNS (53). Although the web services for publishing CRLs are not currently served over HTTPS (443), you may want to allow HTTPS (443) to future proof for any expansion.
Step 2 — Domain Controllers
To use smart cards and PIV credentials for network authentication, all domain controllers need to have domain controller authentication certificates.
Devices authenticate too!
When your users are using certificates to authenticate to the network, the domain controllers are also authenticating as devices using certificates. Each works together to create secure connections. To learn more, search for online resources that discuss Public Key Cryptography for Initial Authentication (PKINIT) protocols.
This page contains information on domain controller certificate profiles and issuing domain controller certificates.
Domain Controller Certificate Profiles
Domain controller certificates must be issued with a set of specific extensions and values. The certificate profile for each domain controller must meet the following requirements:
-
The certificate Key Usage extension must contain:
Digital Signature, Key Encipherment -
The certificate Enhanced Key Usage extension must contain:
Client Authentication (1.3.6.1.5.5.7.3.2) Server Authentication (1.3.6.1.5.5.7.3.1) -
The certificate Subject Alternative Name extension must contain the Domain Name System (DNS) qualifier and fully qualified domain controller name. For example:
DNS Name=controller1.intranet.agency.gov -
The certificate Subject Alternative Name must also contain the domain controller’s Global Unique Identifier (GUID) (i.e., for the “domain controller object”).
- To determine the domain controller’s GUID, start Ldp.exe and locate the domain-naming context.
-
Double-click on the name of the domain controller whose GUID you want to view.
The list of attributes for the domain controller object contains “Object GUID” followed by a long number. The number is the object GUID. For example:
Other Name: 1.3.6.1.4.1.311.25.1 = ac 4b 29 06 bb d6 5d 4f e3 9c 4c ab c3 6a 55 d9The domain controller’s certificate must be installed in the domain controller’s local computer’s personal certificate store.
Supported Domain Controller Identifiers
Many Domain Controllers are issued device certificates via Active Directory Certificate Services (ADCS) that may be operating an Only Locally Trusted PKI also known as an “Enterprise” PKI. Those ADCS implementers will want to include the Microsoft proprietary Security Identifier (SID) in their DC certificate profile to ensure compliance with recent Microsoft changes. For other AD implementers who receive DC certificates from their PIV Shared Service Provider, you may want to work with that provider to include the SID in any renewed or rekeyed DC certificates.
-
It is also recommended to include a non-critical Security Identifier (ObjectSID) extension in your DC certificates, for example:
1.3.6.1.4.1.311.25.2 = S-1-5-domain-516
Issue Domain Controller Certificates
U.S. federal civilian agencies have a variety of information security policies. These policies cover whether you should use a domain controller certificate issued from your agency’s local enterprise certification authority (CA) or whether the certificate must be issued from a CA managed and certified under the Federal Public Key Infrastructure (FPKI). Each agency’s information security policy should be followed.
It is not recommended to set up a local enterprise CA just to issue domain controller certificates without ensuring the proper management and security protections are enabled. Your Chief Information Security Officer (CISO) must have awareness and oversight established for the CA management.
Collaborate with your CISO or Information Security Office for a definitive answer and direction.
If you do have a local enterprise CA, here are some tips.
Step 3 — Trust Stores
Follow Step 3 — Distribute to Operating System from the distribute FCPCA configuration guide.
Mutual Trust
Note that both the client machine and domain controller trust stores must be configured for mutual authentication. As a result, the domain controller issuing and root CA certificates needs to be included in the client trust store and the client PIV authentication issuing, intermediate and root certificates need to be able to be trusted by the domain controller.
Step 4 — Account Linking
Account linking refers to the process of associating a certificate on a user’s PIV credential with their domain account.
Comparing altSecurityIdentities and User Principal Name
There are two account linking attributes to choose from:
- altSecurityIdentities (recommended)
- User Principal Name (UPN)
It’s not possible to configure a domain to use both altSecurityIdentities and User Principal Name mapping. You must choose one of these options and configure its use for all domain users.
altSecurityIdentities Approach
- Each PIV credential can be associated with more than one account.
- This flexibility allows for the association of a single PIV credential certificate to an individual’s end-user and privileged user account(s).
- Users are presented with an additional field during network authentication to identify which account the user wants to access. This field is known as the User Name Hint.
- The User Name Hint informs Windows which account the user is trying to log in to if the mapped certificate is associated with multiple accounts.
- Entering a User Name Hint is optional if the user’s PIV Authentication certificate UPN matches their Windows logon name.
- You can choose from one of six options to map a certificate to a given account.
- There is more flexibility for accepting PIV credentials issued by other government agencies or partners, including PIV-Interoperable (PIV-I) credentials.
User Principal Name Approach
- Each PIV credential can only be associated with one account.
- The UPN value from the Subject Alternate Name in the PIV Authentication certificate is required.
- There is no flexibility for associating the PIV credential to separate privileged accounts.
- There is less flexibility for accepting PIV credentials issued by other government agencies or partners, including PIV-I credentials.
Transitioning from UPN Mapping to altSecurityIdentities Mapping
If you have a large network with many domains, you should carefully plan the migration from User Principal Name to the altSecurityIdentities account linking method.
Use of UPN by Applications
You may find that you have many applications that rely on User Principal Name values. There is no need to remove existing or stop populating new User Principal Name values in your transition to altSecurityIdentities.
There are three steps to implement altSecurityIdentities account linking:
- Link the PIV Authentication Certificate
- Enable User Name Hints
- Disable User Principal Name Mapping
Option 1. Link the PIV Authentication Certificate
First, you need to link each user’s PIV Authentication certificate to their domain account(s). This is accomplished by populating data extracted from the user’s PIV Authentication certificate into their Active Directory record, specifically into the altSecurityIdentities attribute.
Adding altSecurityIdentities attributes will not break existing UPN account linking or cause smart card logon to fail. It’s possible to plan your transition carefully and to take your time populating the altSecurityIdentities attribute for domain users.
There are six altsecid mapping options to choose from; however, three of these are considered to be “weak” identifiers that will either need to be migrated to a “strong” identifier or policy table mappings will need to be implemented to allow for use of an Issuer/Subject altsecid.
Depricated Mappings
As of September 2024, Microsoft has depricated the use of Subject and RFC822 altsecid mappings as they were considered vulnerable to spoofing attempts.
| Options | Tag | Example | Strength | Considerations |
|---|---|---|---|---|
| Issuer and Subject | X509:<I><S> | X509: <I>C=US,O=U.S. Government, OU=Certification Authorities,OU=Government Demonstration CA <S>C=US,O=U.S. Government, OU=Government Agency, CN=JANE DOE OID.0.9.2342.19200300.100.1.1= 47001003151020 |
Supported with Policy Tuple | Implementers will need to leverage a policy tuple to accomodate this altsecid. Note the spaces carefully when testing machine-readable formats of the certificate extensions versus the human-readable formats. |
| Issuer and Serial Number | X509:<I><SR> | X509: <I>C=US,O=U.S. Government, OU=Certification Authorities, OU=Government Demonstration CA <SR>46a65d49 |
Supported | Serial number is stored in a reversed byte order from the human-readable version, starting at the most significant byte. |
| Subject Key Identifier | X509:<br/> | X509:<SKI>df2f4b04462a5aba81fec3a42e3b94beb8f2e087 | Supported | Highly unique; may be difficult to manage. |
| SHA1 hash of public key | X509:<SHA1-PUKEY> | X509: <SHA1-PUKEY>50bf88e67522ab8ce093ce51830ab0bcf8ba7824 |
Supported | Highly unique; may be difficult to manage. |
| Subject | X509:<S> | X509: <S>C=US,O=U.S. Government, OU=Government Agency, CN=JANE DOE OID.0.9.2342.19200300.100.1.1=25001003151020 |
Deprecated | This field is no longer supported for altsecid mapping as of Sept 2024. |
| RFC822 name | X509:<RFC822> | X509: <RFC822>john.smith@hhs.gov |
Deprecated | This field is no longer supported for altsecid mapping as of Sept 2024. |
Use of Security Identifiers (SID)
Although it is not mandated by FPKI PIV certificate profiles, an SID is a Microsoft priorietary identifier that can be asserted as a non-critical extension in a PIV authentication certificate and used for AD user account mapping.
Policy tuple mappings to accomodate some weak identifier mappings are available in Windows Server 2019 and later as of September 10th, 2024. Tuple mappings are defined via group policy, specifically Administrative Settings / System / KDC under an entry titled “Allow name-based strong mappings for certificates” wherein administrators can define three things to include:
- Trusted issuing CA — identified by its certificate thumbprint, each tuple will be unique to each issuing CA thumbprint
- Trusted certificate policy OID — ensures that the client certificate is issued acording to a certain policy or policies, and
- Name matching — defines what field to extract from the certificate that meets the previous two conditions for correlation to AD user accounts, this will generally be UPN suffix and/or altsecid IssuerSubject
Note that if you authenticate PIV certificates from multiple issuing CAs you will require several registry entries with the tuple mapping to account for the unique thumbprints of each issuing CA.
The following examples provide a few options for various potential policy tuple values that can be used to identify a few types of certificate based network authentication credentials.
-
UPN only policy tuple for a standard internal PIV user (Entrust Managed Services SSP CA, PIV Authentication OID, Department of Health and Human Services UPN Suffix)
19fea49c468760edce9600a9da9657b484734d24; 2.16.840.1.101.3.2.1.3.13; UPNsuffix=hhs.gov -
Altsecid policy tuple for a priviledged administrator with an ALT token (Entrust Managed Services SSP CA, Common-Hardware Token, Issuer/Subject altsecid)
19fea49c468760edce9600a9da9657b484734d24; 2.16.840.1.101.3.2.1.3.7; IssuerSubject -
Altsecid policy tuple for an external PIV or dPIV user (NASA Operational CA, PIV Authentication and dPIV Authentication OIDs, Issuer/Subject altsecid)
67ddd6f4be3b69568f591bf999db2ef3085f7c5bl, 2.16.840.1.101.3.2.1.3.13, 2.16.840.1.101.3.2.1.3.40; IssuerSubject
Identity certificates used for Windows logon can generally be found:
- On the smart card itself.
- By requesting the certificates directly from the smart card issuer (either the CA or RA).
- By exporting the certificates from a third party application in which the certificates are already registered.
Each of these options is discussed below.
Gather Certificate from Smart Card
To gather the certificate from the smart card using a Windows workstation, have the cardholder do the following:
- Open the Start Menu, located in the bottom left corner of the screen.
- Type command prompt.
- In the prompt, type certutil -scinfo.

- Press Enter.
- The cardholder will be prompted several times for a PIN, but a PIN is not required for this operation. Have the cardholder press cancel each time they are prompted for a PIN until they see the Certificate List.
- Have the cardholder click Click here to view certificate properties. The appropriate certificate will list “Smart Card Logon” in the intended purposes on the General tab. If the certificate has this purpose listed, have the cardholder proceed to Step 7. Otherwise, have the cardholder close the certificate, click more choices on the Certificate List, click another certificate in the list, and click Click here to view certificate properties until the correct certificate has been identified.
- Have the cardholder select the Details tab and then proceed with the steps below.
- Click copy to file to start the certificate export wizard.
- Click Next.
- Click Next again to indicate that the cardholder does not wish to export the private key.
- Click Next again to use the default DER encoding.
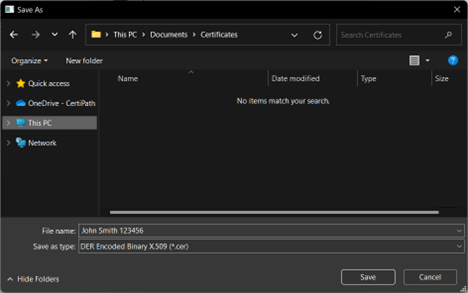
- Click Browse to select where to save the certificate. Have the cardholder select a location that he or she has permission to save to, such as Desktop or Documents.
- Enter a meaningful name for the certificate (such as the cardholder’s name or employee ID).
- Click Save.
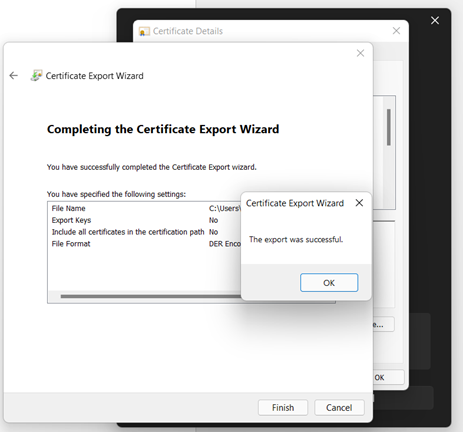
- Click Next.
- Click OK.
- Click OK to close the Certificate Details window.
- Click OK to close the Certificate List.
- Close the command prompt.


- Have the cardholder send the exported .cer file to your organization’s Network Administrator in a way that aligns with the organization’s security policies.

Request Certificates from the Smart Card Issuer
Your organization’s credential issuer may have a copy of certificates issued to current users. You will need to specifically request from the issuer the most recent valid identity certificates suitable for smart card logon. The issuer will produce these certificates in a variety of ways, based on the certification authority or the Card Management System in use.
PIV Authentication Certificate Sources
USAccess customers can recieve PIV authentication certificates via their SIP interface. Reach out to usaccess at gsa dot gov for additional information.
Export Certificates from a Third Party System
Your organization may have already collected the relevant certificates as part of the enrollment process for a third party application, such as a FIPS 201-compliant PACS system. Depending on the system and configuration in use, you may be able to export your cardholders’ certificates from the database where they are enrolled. Speak with your PACS integrator to understand what options are available to you.

Methods for Linking the PIV Authentication Certificate
System administrators can leverage one of the approaches below to link PIV Authentication certificates with user accounts. Run these steps from a domain controller with elevated privileges.
A. Use the Active Directory Users and Computers Graphical User Interface
The following steps are useful if you only need to update a small number of user accounts:
- Start > Server Manager
- Tools > Active Directory Users and Computers
- View > Advanced Features
- Expand your domain to reveal the Users directory
- Right-click on the user whose certificate you’d like to map and select Name Mappings
- Click Add and browse to a local copy of the user’s PIV Authentication certificate
- Click Apply and then OK
B. Use Automation
If you are designing an automated process to transition users from Principal Name to altSecurityIdentities mapping, consider the following functionality:
- Load and process multiple certificates at once (for example, reading a directory of user certificates)
- Extract the UPN from each certificate and ensure a corresponding user record exists in Active Directory
- For certificates that contain a UPN that matches a record in Active Directory:
- Extract and format the certificate Issuer and Subject attributes in preparation for publishing to Active Directory
- Update the user’s Active Directory record with the altSecurityIdentities attribute and corresponding Issuer and Subject data
- For certificates that do not contain a UPN that matches a record in Active Directory:
- Set aside for manual review (e.g., these users may be no longer affiliated with your organization)
- Evaluate accounts in Active Directory that do not contain an altSecurityIdentities attribute after process execution for manual review and further remediation
Collaborate with us!
We’re working with a small number of agencies to pilot a simple PowerShell script to help with some of the functional requirements above. Check out the script in our
public scripts repository
or contact icam@gsa.gov for more information.
Option 2. Enable User Name Hints
You need to enable User Name Hints for your network domain. This will modify the logon prompts for Windows workstations and servers joined to the network domain. Your users will be prompted to provide both the PIV credential PIN value and a User Name Hint value.
For Windows Server 2012 and later:
- Computer Configuration > Administrative Templates > Windows Components, and then expand Smart Card.
- Select Allow User Name Hint
Management of smart card settings should be deployed using a group policy object for the domain.
Option 3. Disable User Principal Name Mapping
To transition from UPN mapping to altSecurityIdentities account linking, you will need to configure a registry setting on all domain controllers. Only configure the registry setting below once you have completed the above steps and are ready to disable UPN mapping.
Note: Organizations should carefully plan their transition to the altSecurityIdentities account linking approach and test interoperability before implementing changes in their production IT environments. The registry configuration below will cause smart card logon to fail for any user missing the altSecurityIdentities attribute.
- Key: HKEY_LOCAL_MACHINE\SYSTEM\CurrentControlSet\Services\Kdc
- Name: UseSubjectAltName
- Type: DWORD
- Data (Value): 00000000
This setting tells your network domain I don’t always want to use the Subject Alternate Name values for my user certificates. More information on the setting is available here.
It’s possible to revert to UPN account linking by removing the registry setting above.
Use group policy objects or other centralized management options to manage registry options.
Step 5 — Group Policies and Enforcement
Group Policy to Support «Weak» Identifiers
Administrators can enable Allow name-based strong mappings for certificates, in conjunction with policy tuple mappings mentioned in Step 4, to continue to use “weak” PIV alternate security identifiers for user account correlation.
The U.S. federal government publishes the United States Government Configuration Baseline (USGCB) for use by Executive Branch agencies to promote uniform configurations for commonly used operating systems. The USGCB configuration guidelines for specific operating systems include references to some configurations related to smart card (PIV) logon and should be referenced first.
The information on this page is intended to answer questions and identify the most commonly used configuration options. For a full reference of options for each operating system, please refer to configuration guides published by other sources online.
Machine Based Enforcement Versus User Based Enforcement
There are two options for requiring users to use PIV credentials to authenticate to the network domain:
- Machine Based Enforcement (MBE)
- User Based Enforcement (UBE)
These options are controlled by group policy applied to either Machine or User objects in your network domain. Planning is required to move to full User Based Enforcement and agencies are often using a combination of both Machine and User enforcement in their deployments.
User Based Enforcement
The user’s password will no longer be known by the user. Look for agency internal applications that are still using username and password and performing Form Based Authentication against the network directories. Fix these using Kerberos, SAML, or direct x509 authentication.
Impacts and considerations are identified to help you plan and execute according to your agency network and user needs.
| Type | Impacts | Considerations |
|---|---|---|
| Machine Based Enforcement | The user is required to use their PIV credential to authenticate to each device where the policy is applied. | The user password is maintained. |
| User Based Enforcement | The password stored for the user is removed and changed to a long hash value unknown to the user. Your users no longer have passwords for the network. | Any applications which were implemented to prompt your users for a username and password and which are using your network domain directories will no longer be accessible. |
Your applications impacted by User Based Enforcement are designed or deployed using:
- Form Based or Basic Authentication
- or LDAP simple binds
The user will be presented with the application form to enter a username and password and the user will no longer have the password.
You want to analyze your applications and identify which are configured to use your users’ network domain passwords. There are methods to fix the applications by enabling Kerberos, SPNEGO (web applications), direct x509 authentication (client certificate authentication), or the SAML and Open ID Connect (OIDC) protocols. These topics will be covered in the Applications section of the guides that are in-development and we invite all to contribute to them!
Defining the Policies for Machine Based Enforcement or User Based Enforcement
The setting to enforce PIV logon is controlled by scforceoption in your network domain user and workstation policies.
- Machine Based Enforcement is when you apply the scforceoption to a workstation or server object in your network domain.
- User Based Enforcement is when you apply the scforceoption to a user in your network domain.
This is the only difference when implementing the policy: which objects in your domain you apply the policy to.
You can set the policy option on a single user by checking the Smart Card is required for interactive logon check box in the user account properties. You can also apply this setting using group policy objects. When the scforceoption setting is applied, the SMARTCARD_REQUIRED flag is added to the UserAccountControl (UAC) and the DONT_EXPIRE_PASSWORD attribute is set to true.
Defining Kerberos Policies for Re-authentication
Although users can PIV authenticate to domain controllers, the client and the domain controller maintain those sessions using kerberos tickets.
Group policies can be configured by domain administrators to align with local security policies for maximum lifetimes of kerberos user tickets. This may cause users to be prompted to re-authenticate with their PIV when prompted with one of the following options:
- Windows Needs Your Current Credentials
- Please Lock this computer, then unlock it using your most recent password or smart card
These prompts happen when the kerberos ticket lifetime expires and a new authentication event is required. User is set to user based enforcement, which requires a new PKINIT event with the domain controller.
You can find additional information on configuring kerberos policies given the following reference documentation.
Step 6 — Network Tuning
You can tune the network domain settings to help you and your users have a better experience and reduce errors. This section highlights some of the common tuning configurations for network domain logon. There are additional tuning configurations and we encourage you to start with these first and contribute others.
You can also send questions to the ICAM Technology listserve (icam-community-tech-request@listserv.gsa.gov) to ask your government colleagues for their additional tips and tricks!
Cached Logon Credential Limit
When a user authenticates to a Windows system, their logon credentials are cached to enable logon in the event the domain controller is unavailable. The United States Government Configuration Baseline (USGCB) for Windows 7 specifies that Interactive logon: Number of previous logons to cache (in case domain controller is not available) should be set to 2.
There are no required USGCB settings for Windows 8 or Windows 10.
You should configure the cached logon credential limit to be at least “2” and possibly more depending on the mission needs.
The Number of previous logons to cache can be modified in local or group policy in the following location
Computer Configuration\Windows Settings\Security Settings\Local Policies\Security options
More information is available on Microsoft TechNet
CRL Retrieval Timeout Settings
By default, Windows will time out when downloading Certificate Revocation List(s) after 15 seconds. A number of CRLs in the government environment are large, greater than 20 MB in size, which will lead to the timeout happening. This example scenario can be common and a source of frustration to you and your users:
- The first or the 51st user will attempt to log on in the morning in a region
- The validity period and cache of the previous CRL will have expired on the domain controller
- The domain controller will attempt to download the large CRL file and will hit the timeout limit
- The user will receive an authentication failure (unable to log on)
- The user will be able to try again and be successful
- You will try to determine the root cause to diagnose the failures (i.e., chasing ghosts on the network)
- This process will repeat
You want to tune both the OCSP Response Caching Behavior setting and the CRL Retrieval Timeout Settings.
The default timeout value can be modified using local or group policy by modifying the Default URL retrieval timeout value found in the Certificate Path Validation Settings, Network Retrieval tab, located in Computer Configuration\Windows Settings\Security Settings\Public Key Policies
Consult these step-by-step instructions: Manage Network Retrieval and Path Validation
OCSP Response Caching Behavior
By default, Microsoft Windows will retrieve and cache 50 OCSP Responses for any one issuing CA before switching to CRL mode. Depending on the size of the CRL, this may be a poor performance decision. For environments where workstations routinely interact with large CRLs, a large value may significantly reduce network bandwidth consumption. This value can be increased by setting the CryptnetCachedOcspSwitchToCrlCount DWORD value in the following registry key:
HKEY_LOCAL_MACHINE\Software\Policies\Microsoft\SystemCertificates\ChainEngine\Config
Source: Optimizing the Revocation Experience
This page provides some tips for using a local certification authority (CA) to issue a domain controller certificate. This is for local Microsoft CAs. Other platforms may be used and have different procedures.
These procedures are accurate for using Microsoft 2012 Server, Standard Edition, for CA and domain controller servers as of March 2017.
Prerequisites
- The server that hosts the CA must be joined to the domain.
- The CA should never reside on the same server(s) that are acting as domain controller(s).
- You must be an Enterprise Administrator in the domain to perform these steps.
Install CA Role
- Log into the CA server as a member of the Enterprise Administrators group.
- Open the Server Manager and click on Manage > Add Roles and Features.
- Proceed through the Add Roles and Features Wizard options. Choose the following:
Server Roles: Active Directory Certificate Services
AD CS Roles Services: Certification Authority - On the Results page, click on Configure Active Directory Certificate Services on the destination server.
- Proceed through the AD CS Configuration options. Choose the following values, as required:
Role Service: Certification Authority
Setup Type: Enterprise CA
CA Type: Root CA
Private Key: Create a new private key
Cryptography: RSA#Microsoft Software Key Storage Provider, 2048 bit, SHA-256 6e
CA Name: Use the naming convention: dc=[AD suffix], dc=[AD domain], cn=[certification authority name]
(e.g., dc=gov, dc=[AgencyName], cn=[AgencyName] NPE CA1)
Validity Period: 6 years
Certificate Database: <your preference>
Configure Certificate Template for Domain Controller
The domain controller(s) certificate must contain valid information. These steps provide recommended options and settings.
- Log into the CA server as a member of the Enterprise Administrators group.
- Open the certificate template’s MMC snap-in (i.e., certtmpl.msc).
- Right-click on the Domain Controller Authentication template. Then, click on Duplicate Template.
- Under the Compatibility tab, modify the Compatibility Settings for both the CA and certificate recipients to the highest compatible version (e.g., Windows Server 2012 R2 or Windows 2008 R2).
- Under the General tab, use these recommended settings:
Template Name: <Your organization> — Domain Controller Authentication.
Validity Period: 3 years.
Renewal Period: 6 weeks. - Under the Cryptography tab, set these values:
Minimum Key Size: 2048.
Request Hash: SHA256 - Open the CA console (i.e., certsrv.msc).
- In the console tree, click on the [CA’s name].
- In the details pane, double-click on Certificate Templates.
- In the console tree, right-click on Certificate Templates. Then, click on New > Certificate Template To Issue.
- Select and enable the certificate template that was created. Click on OK.
Auto-Enroll Domain Controllers Using Group Policy Object (GPO)
- Log into a Domain Controller server as a member of the Enterprise Administrators group.
- Open the GPMC: gpmc.msc
- Within the appropriate GPO applied to the Domain Controllers, go to Computer Configuration\Policies\Windows Settings\Security Settings\Public Key Policies\
- Configure Certificate Services Client – Auto-Enrollment with the following options:
Configuration Model: Enabled.
Renew Expired Certificates, Update Pending Certificates, Remove Revoked Certificates: Check_all checkboxes.
Update Certificates That Use Certificate Templates: Check the checkbox. - Replicate the group policy. Use the command: gpupdate /force at the command line, or wait for the group policy to replicate based on your replication time and settings.
- Open MMC.exe -> File -> Add/Remove Snap-in -> Certificates -> Computer account -> Local computer.
If successful, you will see a new domain controller certificate in the Certificate (Local Computer) -> Personal -> Certificates folder. At the Certificate Template tab, you will also see a certificate generated with the custom certificate template.
Step 8 — Authentication Assurance
When a user authenticates to your network and you’ve enabled Single Sign-on to applications inside your network domain, you need to know which of these authenticators was used:
- A username and password
- A PIV credential
- An alternate authenticator
You need to know the type of authenticator to implement increasingly granular authorization policies and to grant or deny a user access to information available from applications and shared network resources.
To grant a user access, based on the type of authenticator used, you can use a Windows Active Directory (AD) feature called Authentication Mechanism Assurance (AMA). AMA allows you to add a group membership identifier to the user’s Kerberos token.
Do not uses AMA to provide privileged access
Privileged users should not rely on single sign-on and should always use the highest assurance credential. Their account should be separate and distinct from their normal user account. See the
Privileged Identity Playbook
for best practices in reducing risk associated with privileged accounts and access.
AMA is available for Windows Server 2008 R2 domains and later versions.
Implementation
You can use this PowerShell script CertificateIssuanceOIDs.ps1 to import and set up a list of certificate issuance policies. This script:
- Contains a list of certificate issuance policy object identifiers (OIDs) used by U.S. federal government agencies
- Creates security groups with the same names as the policies
- Links the policies to the security groups
You can run the script with a few simple steps.
-
You’ll need to specify the Group Distinguished Name (GroupDN) within the script. This targets where you want to create the security groups in your network directory:
CertificateIssuanceOIDs.ps1 -GroupDN \<group DN string>- For example:
CertificateIssuanceOIDs.ps1 -GroupDN 'OU=Groups,OU=Administrators,DC=agency,DC=gov'
-
After downloading this script, you may need to change the PowerShell script execution policy to execute the script or sign the script to execute it.
A sample output from the script is shown below:
  PS C:\> C:\AMA\Script\CertificateIssuanceOIDs.ps1
  -GroupDN 'ou=groups,ou=security,dc=agency,dc=gov'

  Created CN=id-fpki-common-authentication,ou=groups,
  ou=security,dc=agency,dc=gov
  2.16.840.1.101.3.2.1.3.13 -- Unknown ObjectId

  Localized name added to DS store.
  0: 1033,id-fpki-common-authentication
  CertUtil: -oid command completed successfully.

  Created CN=13.255922318A2AF32EC47D5B70735D4DB3,
  CN=OID,CN=Public Key Services,CN=Services,
  CN=Configuration,DC=agency,DC=gov
  AD AMA set for 2.16.840.1.101.3.2.1.3.13  id-fpki-common-authentication
Note: If the GroupDN is not entered in the command line when executing the script, it will prompt for the input.
  PS C:\> C:\AMA\Script\CertificateIssuanceOIDs.ps1
  cmdlet ama-script.ps1 at command pipeline position 1
  Supply values for the following parameters:
  GroupDN: ou=groups,ou=security,dc=agency,dc=gov
==============================================
  GroupDN entered is ou=groups,ou=security,dc=agency,dc=gov
Testing
To test the output on your network domain, log in with your PIV credential and check the groups assigned.
- Authenticate with your PIV credential
- From the command line:
C:\whoami /groups
  agency\id-fpki-common-authentication   Group  S-1-5-21-179144328
  1-1764752353-2202401552-1113
  Mandatory group, Enabled by default, Enabled group
Use Case Scenarios
Authentication Pass-Through to a Federation Service
A federal employee authenticates to the agency’s intranet using a PIV credential and attempts to access an application hosted by a different federal agency.
- The application is restricted to allow access only for users who have authenticated with a valid PIV Authentication certificate.
- All other users are denied access to the application.
This federal employee successfully accesses the other federal agency’s application with minimal inputs. The employee is successful because:
- The employee’s home agency has a Federation Service installed, and
- The employee’s home agency has integrated with the other agency’s Federation Service
During and after the employee’s logon to the network, the following steps were executed without the employee’s intervention:
- The PIV authentication certificate is parsed
- The certificate policy OID asserted allows Microsoft AD on the home agency’s network to assign the user to a group specifically for PIV authenticated users
- The user’s session is granted a Kerberos ticket that includes the additional group membership
- The user browses to the other federal agency’s application
- The user’s browser is redirected to his/her home agency’s Federation Service
- The Federation Service at the home agency finds the Kerberos ticket for the user’s session
- A Security Assertion Markup Language (SAML) assertion is created by the Federation Service (This is a token translation.)
- The SAML assertion includes the AD group membership information that identifies that this user authenticated with a PIV credential
- The user’s browser is redirected back to the other federal agency’s application
- The user is successfully authenticated with the valid SAML assertion
- The other federal agency’s application is configured to allow access to only those users who have authenticated using a PIV credential
In this use case and steps, the user did not have to authenticate directly with a PIV credential to the other agency’s application. A federation model was used.
One example for viewing this implementation pattern is Max.gov. If you click the upper left-hand Login button, you’ll see the Max.gov Login page. The bottom section allows you to select an agency. Each of these icons redirects the user back to that agency’s Federation Service.
Authentication Pass-Through for Integrated Windows Authentication
A federal employee authenticates to his/her agency’s intranet using a PIV credential and attempts to access a local SharePoint site.
- The SharePoint site is restricted to allow access only for those users who have authenticated with a PIV Authentication certificate.
- All other users are denied access to the SharePoint site.
The federal employee successfully accesses the local SharePoint site.
During and after the employee’s logon to the network and attempt to access the SharePoint site, the following steps were executed without the employee’s intervention:
- The PIV authentication certificate is parsed
- The certificate policy OID asserted allows Microsoft AD on the home agency’s network to assign the user to a group specifically for PIV authenticated users
- The user’s session is granted a Kerberos ticket that includes the additional group membership
- The SharePoint site is configured to only allow access to only those users who have authenticated using a PIV credential
Other Considerations and References
Use the Windows Registry Editor to set the AMA Priority above Most Recently Issued Superior Certificate Heuristic:
[HKEY_LOCAL_MACHINE\SYSTEM\CurrentControlSet\services\kdc]"ChainWithIssuancePolicyOIDs"=dword:00000001
Refer to the AMA Step-by-Step Guide to understand the implementation of AMA.
Troubleshooting PIV Logon
Within the federal enterprise, Windows smart card logon with a PIV card (PIV logon) is one method to satisfy Federal Information Security Management Act (FISMA) and National Institute of Standards and Technology (NIST) Risk Management Framework security controls for authentication. A PIV card enables Authenticator Assurance Level 3, two-factor authentication to a Windows desktop. Under normal conditions, this system is simple and easy for an end user to use. However, if this logon mechanism breaks, it can be difficult to troubleshoot logon and authentication errors. This page includes common symptoms and suggested steps to diagnose and solve these issues.
Logon Process Overview
The figure below, from the “Smart card sign-in flow in Windows” section of the Microsoft Certificate Requirements and Enumeration article, provides a detailed overview of how smart card logon works in supported versions of Windows.
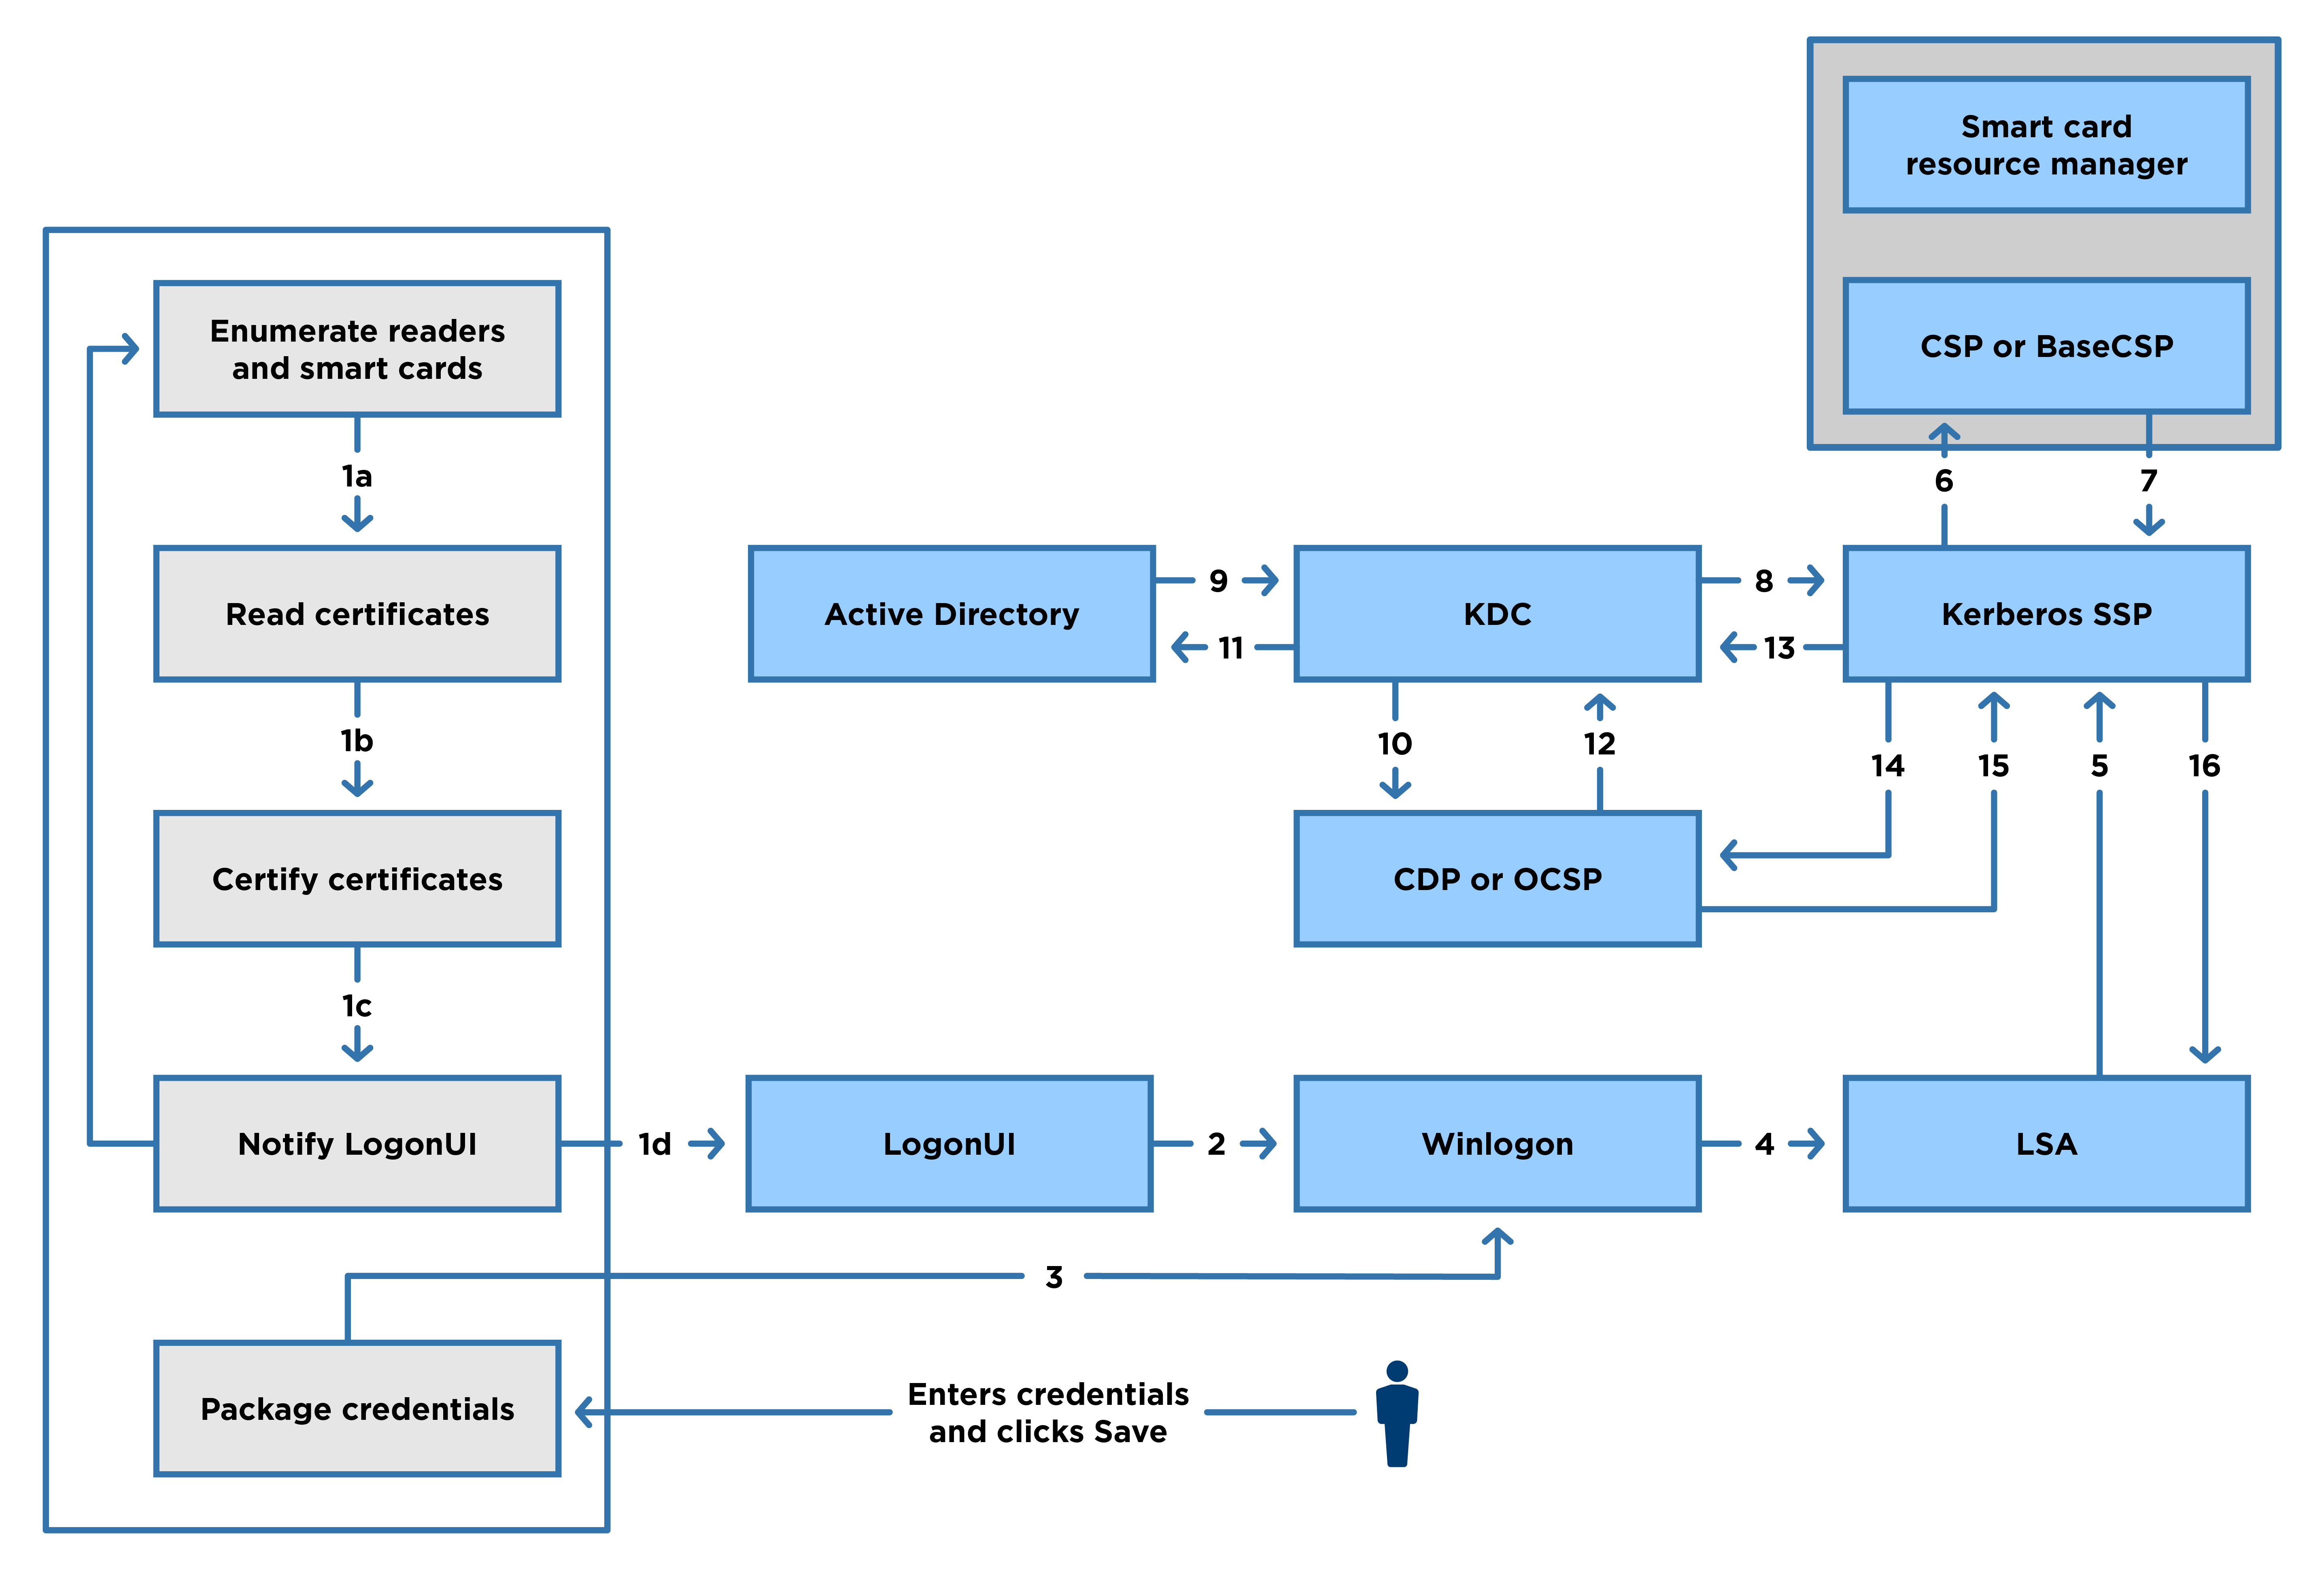
For our use, this complex process is simplified into the following workflows:
PIV logon begins at the client workstation. First, the system discovers smart card reader devices that are built into or attached to the workstation. Next, acceptable smart card logon certificates from any connected cards are provided to the Windows logon screen. In general, PIV cards are engineered to have one authenticate certificate marked eligible for smart card logon. However, in some instances, more than one certificate may have been inadvertently made eligible, meaning the user may first be asked to select the correct certificate for smart card logon. Conversely, the user may have a Facility Access Card (FAC) that omits access to any workstation. For more details on what is in use at your organization, speak with your agency’s credential issuer or Identity, Credential, and Access Management (ICAM) office.
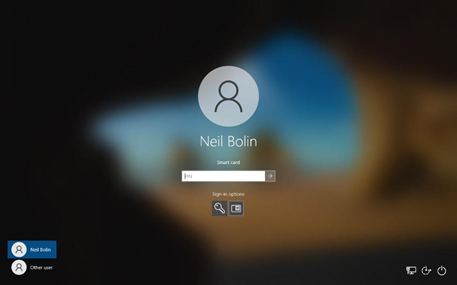
Back to Process Overview
When the logon screen appears, if the system has detected a smart card reader and an attached (inserted) smart card with suitable certificates, the smart card logon option is displayed and the user is prompted to enter a PIN. Use the information below to troubleshoot symptoms encountered with card selection before PIN entry.
Symptom
Smart card icon is not displayed; user is not prompted for PIN.
Possible Cause 1 — Reader or Card Not Detected
Windows does not detect either the reader or the card due to a software or hardware issue with the card reader.
Diagnosis
- Ask the user to make sure that the PIV card is fully inserted in the reader.
- If the smart card reader is an external USB device, ask the user to remove the device and try inserting it into a different USB port.
- Ask the user to try rebooting their workstation.
- Ask the user to try using their PIV with their PIN elsewhere.
- If the issue persists through reboot, and the PIV with PIN works elsewhere, the smart card reader may need to be replaced or the workstation may need to be serviced.
Resolution
Replace the smart card reader if it is an external device. Otherwise, schedule workstation repair.
Possible Cause 2 — Card Damaged
The PIV is damaged.
Diagnosis
If faulty workstation hardware or software is ruled out, and the card does not work on other readers, the PIV may need to be replaced.
To confirm that the card is functional, you can use the Certutil Tool, listed on the Useful Tools page, on a known working Windows workstation.
On the client:
- Log in to Windows using a password.
- Open the Start Menu, located in the bottom left corner of the screen.
- Type cmd.
- Click Command Prompt, shown under Best Match.
- In the command prompt, type certutil -scinfo and press Enter.
- A functioning card will return information on the card type and reader, begin polling for keys and validating certificates, and prompt for PIN entry. If this is the case with the card you are testing, click Cancel and close out of the command prompt.
- If the card is malfunctioning, certutil will recognize that a reader is connected and a card is present but will display an error and will not prompt for PIN entry.

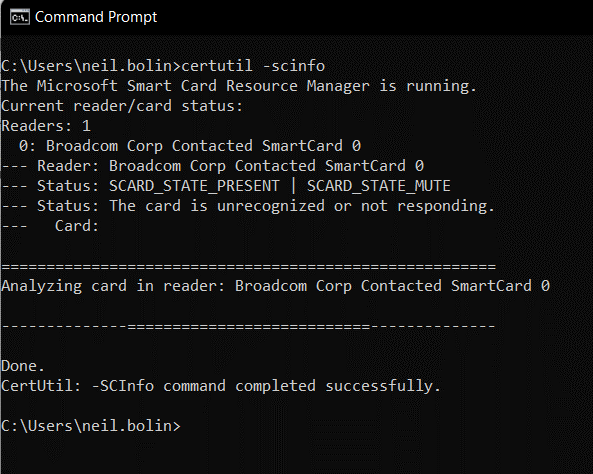
Resolution
Replace the PIV card if necessary.
Back to Process Overview
After the user enters their PIN, Windows tries to unlock the card using the PIN entered. After the card has been unlocked, the workstation packages the user’s PIV authentication certificate and sends it to the logon server, also known as a domain controller. The workstation must be able to trust the domain controller so that the workstation can securely connect to it. Use the information below to troubleshoot symptoms encountered after the PIN is entered but before logon occurs.
Symptom
After PIN entry, the following error is displayed on the logon screen:
Signing in with a smart card isn’t supported for your account. For more information, contact your administrator.
Possible Cause — Domain Controller Certificate
A suitable domain controller authentication certificate is not installed on the domain controller.
Diagnosis
On the client:
- Log in to Windows using a password.
- Open the Start Menu, located in the bottom left corner of the screen.
- Type event viewer.
- Click Event Viewer, shown under Best Match.
- On the left side of the Event View, expand Applications and Services Logs, Microsoft, Windows, and Security-Kerberos on the tree.
- Click Operational.
- On the right side of the window, under Actions, click Enable Log (skip this step if the option reads ”Disable Log”; the log is already enabled).
- Log out of Windows.
- Try having the user log in to their workstation again using their PIV.
- Log in to Windows using a password.
- Repeat Steps 2 through 6 to return to the Security-Kerberos log in Event Viewer.
- Click in the center of the window where ”Error” is shown. The following log will appear.
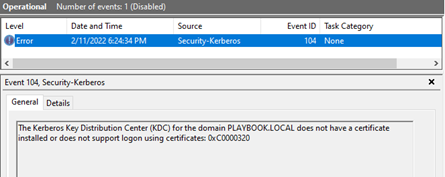
Resolution
On the domain controller:
- Log in as a Domain Administrator.
- Open the Start Menu.
- Type mmc.exe.
- Click MMC, shown under Best Match.
- If prompted by a User Account Control pop-up, click Yes.
- Click the MMC window and press and hold Ctrl. Then press M and release both keys.
- In the Add or Remove Snap-ins window, click the following:
- From the Available Snap-ins on the left, click Certificates.
- In the center of the window, click the Add button.
- In the Certificates snap-in window, click Computer account. Then click Next.
- In the Select Computer window, click Finish.
- In the Add or Remove Snap-ins window, click OK.
- On the left side of the MMC window, click the > symbol to expand these items on the tree:
- Certificates (Local Computer)
- Personal
- Under Personal, right-click Certificates.
- Click All Tasks.
- Click Request New Certificate.
- In the Certificate Enrollment window, click Next.
- Click Next.
- Click the box next to the Domain Controller Authentication template. If you do not see this, ask your CA Administrator to publish this template.
- Click Enroll.
- Click Finish.
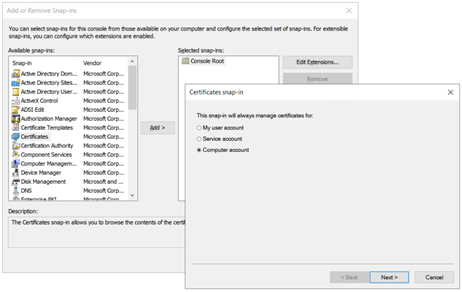
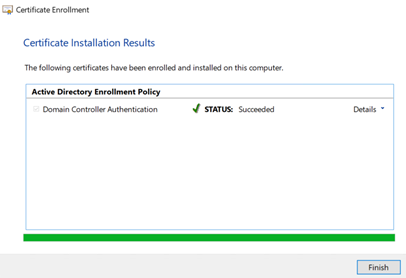
Back to Process Overview
After the domain controller’s authentication certificate is used to make a secure link from the workstation to the domain controller, the certificate data for the user’s smart card is sent to the domain controller for validation. The domain controller does the following to validate the credential:
- The domain controller looks up the user’s account in Active Directory (AD) using information found in the user’s PIV authentication certificate. This process is known as name mapping. More information about user name mapping can be found in the Account Linking Playbook
- The certificate is sent to the Microsoft Crypto-API (CAPI) service running on the domain controller for path discovery and validation. CAPI performs basic certificate checks through Path Discovery and Validation (PDVal).
- The domain controller checks its local copy of the Enterprise NTAUTH store for the presence of the issuing certification authority (CA) for the PIV authentication certificate. Steps for adding a certificate to this store can be found in the Trust Stores Playbook
Note: Certificate validation of the PIV authentication certificate for smart card logon only occurs on the individual domain controller processing the logon request. The client computer does not check the validity of the logon certificate. Other applications outside of Windows logon may perform certificate validation locally, so it may still be a good idea to have a valid path installed on your organization’s client computers. if you have multiple logon servers in your environment, only the one responding to the individual logon request performs validation. Therefore, it is important to maintain a consistent configuration across your domain controllers.
Use the information below to troubleshoot additional symptoms encountered after the PIN is entered, but before logon occurs.
Symptom
After PIN entry, one of the following errors displays on the logon screen:
- An untrusted certification authority was detected while processing the smart card certificate used for authentication.
- The smart card used for authentication has been revoked.
- In some environments, under some circumstances, distribution of the root by GPO can sometimes cause PIV certificates to appear to be untrusted intermittently.
Microsoft has published
a description of the issue and identified a workaround.
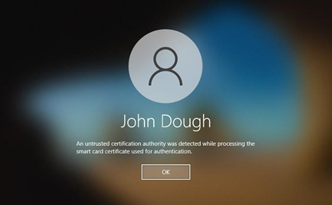

</p>
</div>
</div>
Possible Cause 1 — Certificate Fails Path Discovery and Validation
The user’s PIV authentication certificate fails path discovery and validation on the domain controller.
Diagnosis
On the client:
- Log in to Windows using a password.
- Open the Start Menu, located in the bottom left corner of the screen.
- Type cmd.
- Click Command Prompt, shown under Best Match.
- In the command prompt, type echo %logonserver% and press Enter.
- The current domain controller being used for Windows logon is displayed. This is the best domain controller to check first for troubleshooting invalid smart card logon events.
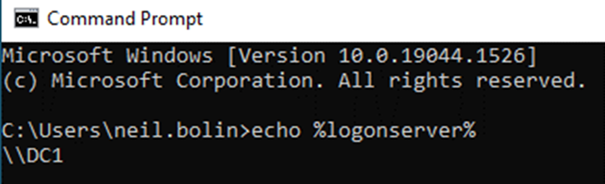
On the domain controller indicated above:
- Log in as a Domain Administrator.
- Open the Start Menu.
- Type mmc.exe.
- Log in to Windows using a password.
- Open the Start Menu, located in the bottom left corner of the screen.
- Type event viewer.
- Click Event Viewer, shown under Best Match.
- On the left side of the Event View, click the > symbol to expand each of these items on the tree:
- Applications and Services Logs
- Microsoft
- Windows
- CAPI2
- Click Operational.
- On the right side of the window, under Actions, click Enable Log (skip this step if the option reads ”Disable Log”; the log is already enabled).
- Log out of Windows on the client workstation.
- Have the user try to log in using their PIV, taking note of the time. The error should be shown on the logon screen.
- On the domain controller, still in Event Viewer, on the right pane, click Refresh.
- New log events will be shown. Look for the events with an “Error” status and the task category “Build Chain.”
- Click the Details tab. In the UserData section, look for the user’s name in the Certificate [subjectName] field. If you do not see the user’s name, continue scrolling through the list of events to find the next event with an “Error” status and the task category “Build Chain.” Using results filtering may help to narrow this list down.
- Once you find the event, scroll down through the details. You will see sections that say “-ChainElement.” These indicate each of the certificates in the path that was built. Within each chain element, look again for the ”- Certificate [ subjectName ],” indicating which certificate is being checked, and below it, a ”- TrustStatus” with an ”- Error Status” which will give more details about the failing validation.
Example 1: A certificate in the path is revoked.
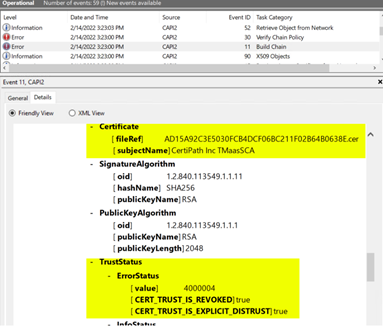
Example 2: The path does not build to a trust anchor
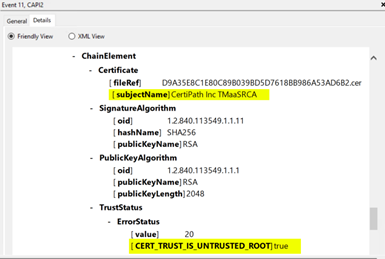
Example 3: The revocation status is unreachable, or the revocation status signature cannot be validated due to an invalid trust path.
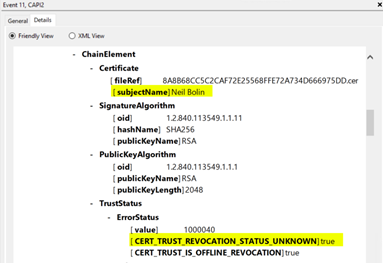
Note: The error status in Example 3 will occur for any certificate lower in the path than the above Examples for 1 and 2. For example, if a trusted root cannot be found at the top of the path, no valid revocation status will be found for any certificate issued below the trusted root, including the issuing CA certificate and the end user’s PIV authentication certificate. This situation occurs because the revocation data cannot have its signature verified for the same reasons that the certificate itself cannot.
You can also use the PKI Interoperability Test Tool (PITT), listed on the Useful Tools page, to validate the certificate path on the logon server. The PITT Usage Guide contains procedures for using the tool.
Resolution
- On the domain controller, work through any path validation issues identified in the above steps and examples. Keep in mind that that path building comes before validation and that a path is built from the bottom up. In this instance, the PIV authentication certificate chains to a trust anchor, such as Federal Common Policy G2. Ensure that the correct trust anchor for your organization’s PIV credentials is installed on every domain controller. If you also trust certificates from other agencies and organizations, the appropriate roots and cross-certificates may need to be installed to complete the path.
- Find expired and revoked certificates that may be installed in your domain controller certificate store and delete them as appropriate. In a Windows environment, unexpected errors often result if you have duplicates of a certificate installed in a given store or have accidently installed an intermediate CA in the trusted root store or vice versa.
- Lastly, you will need to allow outbound access over port TCP 80 from each domain controller to each of the CRL, OCSP, and AIA distribution points listed in the certificates in the path. For more information, see Path Discovery and Validation (PDVal).
Possible Cause 2 — CA Not in the NTAuth Store
- Follow Steps 1 through 15 for diagnosing Possible Cause 1.
- Confirm that there is no error logged for the task category ”Build Chain” with matching certificate subjectName for the user.
- Look for an error logged for task category ”Verify Chain Policy” with matching certificate subjectName for the user.
- Confirm that the result logged is ”A certification chain processed correctly, but one of the CA certificates is not trusted by the policy provider.”
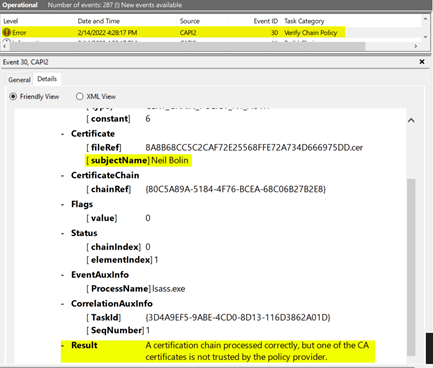
Resolution
Follow the steps in the Trust Stores Playbook to add the appropriate issuing CA for the PIV card to the Enterprise NTAuth trust store.
Symptom
During smart card logon attempt, the following error is displayed on the logon screen:
The system could not log you on. Your credentials could not be verified.
Possible Cause 1
The incorrect certificate was selected for smart card logon.
Resolution 1
- In the logon screen, select a different certificate from the sign-in options. Note: Logon certificates generally display an account name in the form of an email address or user principal name.
- Try entering the PIN again.
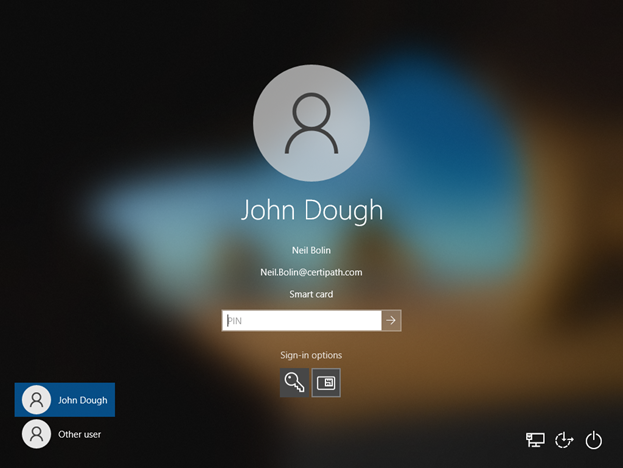
Possible Cause 2
The identifiers listed in the Smart Card Logon certificate on the card cannot be matched to an AD account.
Resolution 2
Follow the suggestions in the Account Linking Playbook to ensure that the card identifier can be linked to the AD account. This may require User Principal Name (UPN) mapping, adding alternate security identifiers added to the AD record, or domain hinting.
Back to Process Overview
Once name mapping and PIV validation are complete, the domain controller sends a logon package to the client computer with the user’s domain permissions and a token that allows desktop logon for that user. If the user is permitted to log in to the computer, they will now be logged into their Windows desktop.
The first logon must always occur while the system has a network connection to the domain controller, whether it is directly attached to the organization’s network or via a VPN. After the first logon, if the Group Policy setting pictured below is set to a value greater than 0, the user’s logon token will be permanently cached by their workstation as long as the number of subsequent users to log in does not exceed this number.
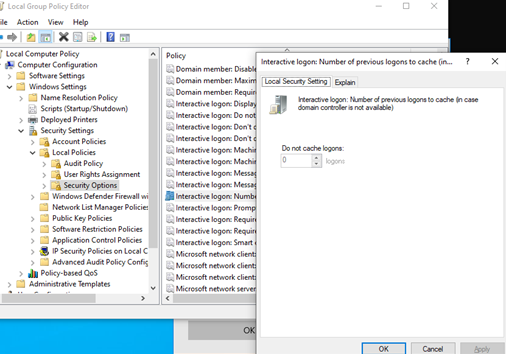
If a future logon is attempted while the user’s workstation is disconnected from the organization’s network, and the logon token is cached, the workstation will only authenticate the PIV authentication certificate via PIN and, upon successful entry, will log the user into their desktop using their cached token and permissions. If the value is set to 0, caching does not occur and logon will only occur when the workstation is connected to the network and can communicate with a domain controller.
Back to Process Overview