
-
Home
-
News
- How to Delete, Remove, Uninstall, or Disable Xbox Apps Windows 11?
By Helen | Follow |
Last Updated
This article produced by MiniTool introduces 4 methods to uninstall the Xbox app from Windows 11. Also, it shows you the way to remove Xbox Game Bar and the guide to turn off Xbox-involved services. Find the details below!
Although the Windows operating system (OS) built-in apps have brought great convenience for many of its users, there are still some people who don’t like part of the self-contained applications, Xbox for example, especially for non-game lovers. Then, how to get rid of this issue? The direct way is to delete Xbox app from your computer.
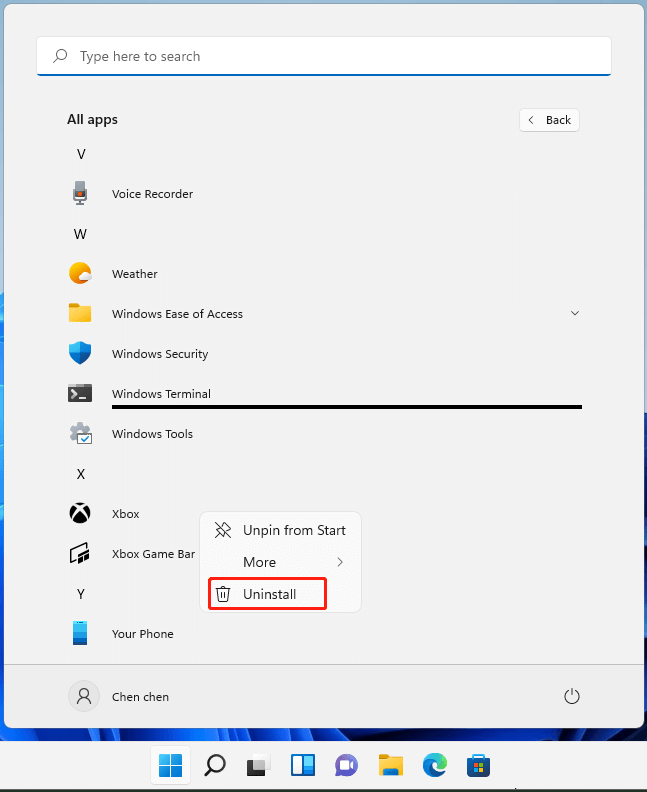
The first and easiest way to remove Win11 Xbox is to uninstall it directly from the Windows Start menu.
- Click on the Start menu to find the target Xbox software icon.
- If you can see the Xbox tool directly, click on the All apps
- Right-click on the Xbox icon and select Uninstall.
- Then, it will prompt asking whether you would like to uninstall the target program or not. Just click Yes to confirm.
Wait until the process completes.
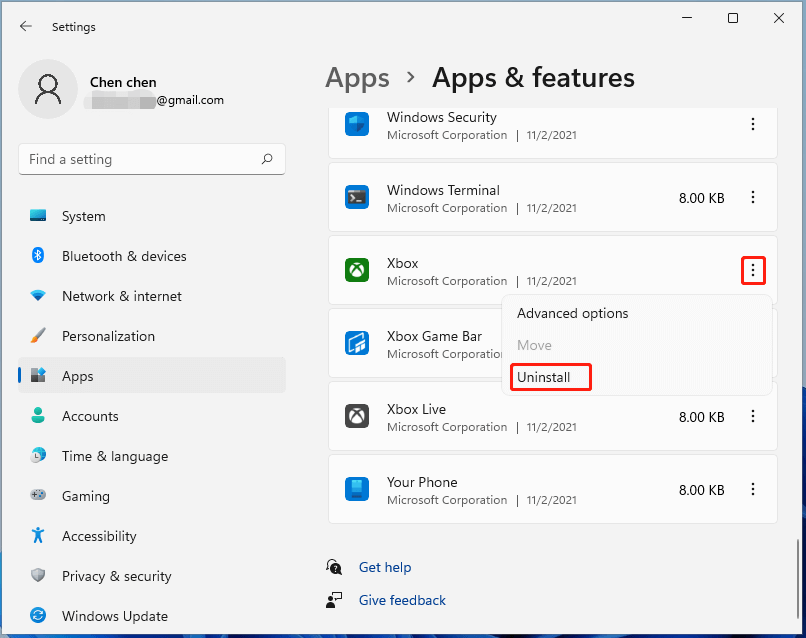
#2 How to delete Xbox App Windows 11 Within Settings?
You can also delete the Xbox application from the system Settings app.
- Open Windows 11 Settings.
- Click Apps & Features in the left menu.
- In the right area, click on the More (three vertical dots) option next to the target app and choose Uninstall.
Wait patiently until the procedure finishes.
#3 How to Uninstall Xbox Windows 11 Using Command?
Finally, you can also try to delete Xbox from Win 11 with the help of a command-line. Yet, please do it carefully for a little mistake may cause a great problem in the command. Run Windows 11 PowerShell as administrator. Then, type one of the following commands to remove Xbox.
- get-appxpackage *xboxapp* | remove-appxpackage (Only delete Xbox for current user account.)
- get-appxpackage -allusers *xboxapp* | Remove-AppxPackage (Uninstall Xbox for all user accounts.)
- get-appxprovisionedpackage –online | where-object {$_.packagename –like “*xboxapp*”} | remove-appxprovisionedpackage –online (Remove Xbox for all user accounts for now and in the future.)
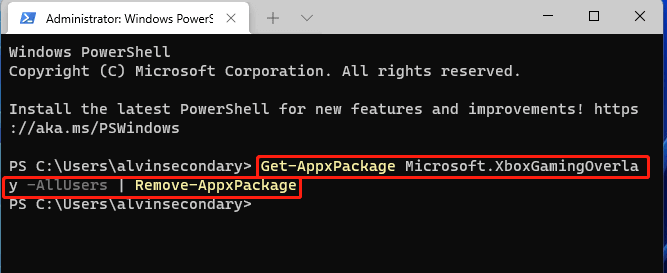
How to Delete Xbox Game Bar Windows 11?
Furthermore, you may also need to delete the Xbox Gamer Bar in your Windows eleven. To do that, you can rely on Windows PowerShell or Windows Terminal. Run Windows Terminal as administrator and type this command into it and press Enter:
- Get-AppxPackage Microsoft.XboxGamingOverlay | Remove-AppxPackage (Only for the current user)
- Get-AppxPackage -AllUsers *Microsoft.XboxGamingOverlay* | Remove-AppxPackage (For all users)
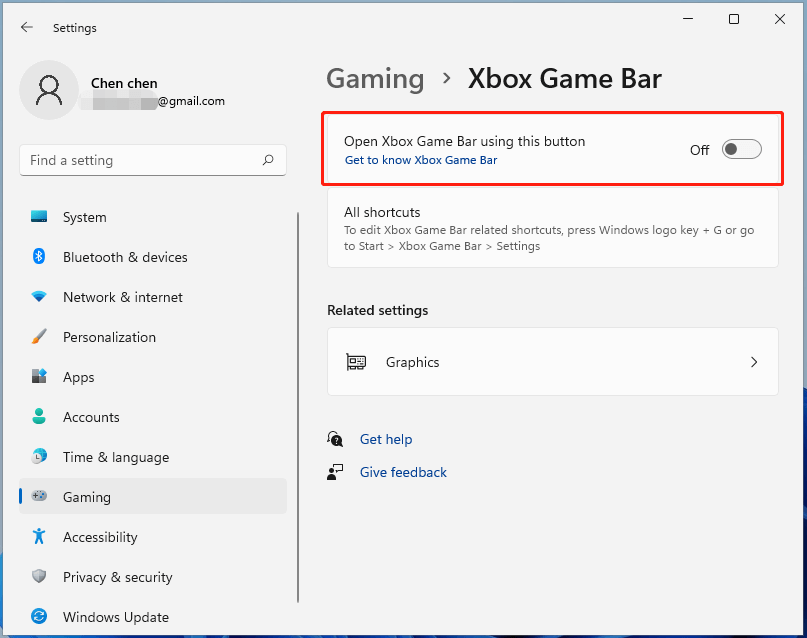
How to Disable Xbox Game Bar in Windows 11?
If you simply want to stop Xbox Game Bar from working to occupy computer resources, you can just disable it. Just go to Settings > Gaming > Xbox Game Bar and turn off the Open Xbox Game Bar using this button on a controller option.
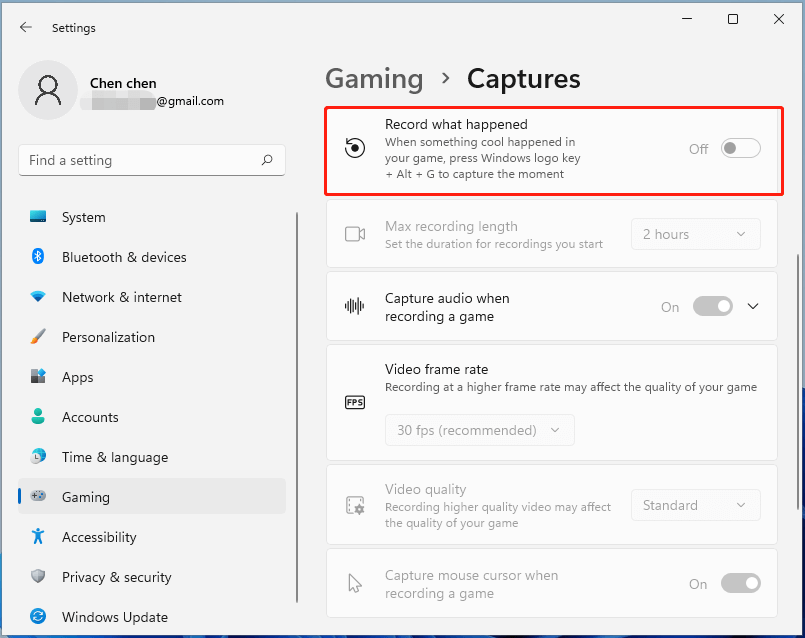
Or, navigate to Settings > Gaming > Captures and switch off the Record what happened option.
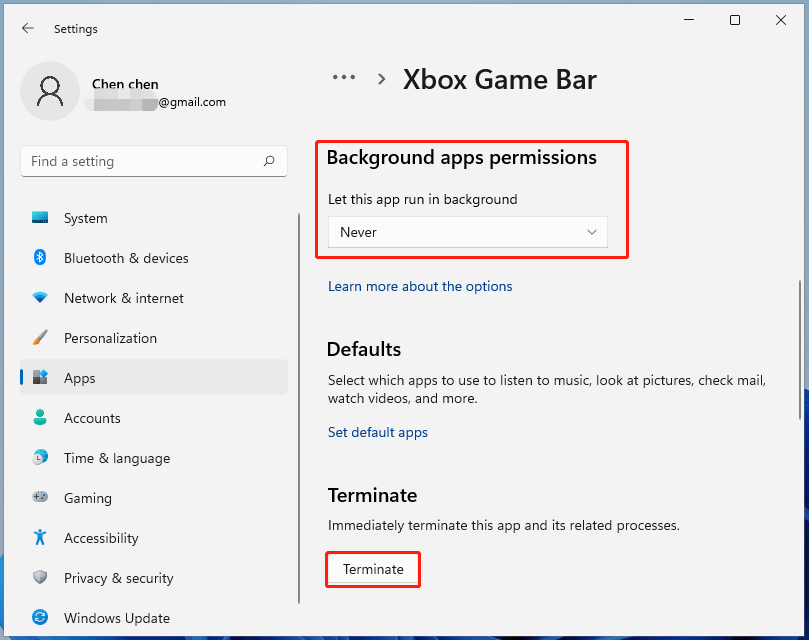
To ensure Game Bar does not run any background processes, move to Settings > Apps > Apps & features, scroll down to find Xbox Game Bar, click on the more (vertical ellipsis) option besides and choose Advanced options. On the next screen, scroll down to find the Background apps permissions section and select Never. Furthermore, continue to scroll down to click the Terminate button to close the app and its related processes immediately.
Tip: Besides the Xbox app and Xbox Game Bar, there are several other Xbox-involved apps that are preinstalled in Windows 11, including Xbox Gaming Services, Xbox Identify Provider, and Xbox Speech To Text Overlay.
How to Disable Xbox Game DVR App Capture via Registry Editor?
You may keep receiving a “You’ll need a new app to open this ms-gamingoverlay link – Look for an app in the Microsoft Store” message each time you try to open a game after you have successfully deleted Xbox Game Bar. The reason is that Windows is still trying to run Xbox Game DVR (ms-gamingoverlay) on the game. To solve this problem, you have to turn off the Game DVR App Capture through Registry manually.
- Open Windows 11 Registry Editor.
- Move to HKEY_CURRENT_USER\SOFTWARE\Microsoft\Windows\CurrentVersion\GameDVR.
- Right-click on AppCaptureEnabled and select Modify.
- In the popup, change the Value data from 1 to 0.
- Click OK to save the changes.
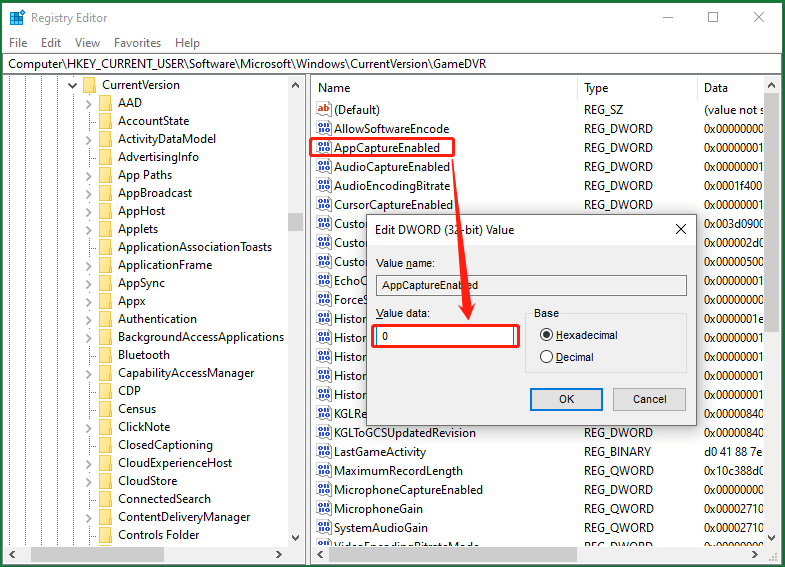
Finally, you need to restart your machine.
How to Reinstall Xbox for Windows 11?
It is easy to reinstall Xbox on your Win11. Just go to Microsoft Store, search for Xbox app or Xbox Game Bar and install them from there.
Windows 11 Assistant Software Recommended
The new and powerful Windows 11 will bring you many benefits. At the same time, it will also bring you some unexpected damages such as data loss. Thus, it is strongly recommended that you back up your crucial files before or after upgrading to Win11 with a robust and reliable program like MiniTool ShadowMaker, which will assist you to protect your increasing data automatically on schedules!
MiniTool ShadowMaker TrialClick to Download100%Clean & Safe
Related Articles
- Best 4K Games on PC/Consoles & Is 4K Gaming Worth It
- 4K Switch Review: Definition, Benefits, & Nintendo Switch Prospect
- The Evolution of Xbox: Embracing 4K Gaming and Entertainment
- Xbox One/360 Compatible Video Formats & How to Play Video on Them
About The Author
Position: Columnist
Helen Graduated from university in 2014 and started working as a tech editor in the same year. Her articles focus on data backup & recovery and disk management. Through an in-depth exploration of computer technology, Helen has successfully helped thousands of users solve their annoying problems.
Какие службы можно отключить для оптимизации Windows
Для повышения производительности системы можно так же достичь с помощью отключения служб Windows, в данной статье разберем какие службы можно отключить в ручную.
К отключению ненужных служб можно подходить только для оптимизации слабых/старых компьютеров и ноутбуков, так как работающие службы работают в фоновом режиме и потребляют ресурсы компьютера и тратить вычислительные возможности процессора или оперативной памяти на службу допустим факса, если у вас нет этого устройства, не хочется.
Внимание, отключение служб несёт в себе большие угрозы в работоспособности Windows, поэтому необходимо аккуратно подходить к отключению служб.
Открываем списоск служб
Запускаем команду services.msc в диалоговом окне Выполнить, для этого нажимаем комбинацию кнопок Windows + R и жмем Enter.

Какие службы в Windows 10 или Windows 11 можно отключить

- Факс — служба обеспечивающая работу факса, подключённого к компьютеру, если нет факса, то можно Отключить;
- Служба шифрования дисков BitLocker — служба обеспечивает работу шифрования диска BitLocker, которая обеспечивает защищенный запуск операционной системы, а также полное шифрование тома ОС, фиксированных и съемных томов. Если не используется, можно Отключить;
- Служба поддержки Bluetooth — если не используете Bluetooth, то можно Отключить;
- Служба звукового шлюза Bluetooth — если не используете Bluetooth, то можно Отключить;
- Служба географического положения — служба определяющая ваше местоположение по ГЛОНАСС, GPS и IP, если не нужно географическое определение на ПК и не используете соответствующий софт, то можно Отключить;
- Все службы связанные с виртуальной машиной Hyper-V — службы поддерживающие работу виртуальной машины Microsoft Hyper-V, большенство пользователей ею не пользуются, можно Отключить;
- Служба обмена данными (Hyper-V);
- Служба завершения работы в качестве гостя (Hyper-V);
- Служба пульса (Hyper-V);
- Служба сеансов виртуальных машин Hyper-V;
- Служба синхронизации времени Hyper-V;
- Служба обмена данными (Hyper-V);
- Служба виртуализации удалённых рабочих столов Hyper-V;
- Служба запросов на теневое копирование томов Hyper-V;
- Служба наблюдения за датчиками — служба отвечающая за яркость экрана благодаря показателям датчиков на планшете/смартфоне под управлением Windows, если у вас настольный компьютер или ноутбук, можно Отключить;
- Служба данных датчиков — служба определяющая количество датчиков на планшете под управлением Windows, если у вас настольный компьютер или ноутбук, можно Отключить;
- Служба датчиков — служба занимающаяся определением планшета в пространстве, если у вас настольный компьютер или ноутбук, можно Отключить;
- Функциональные возможности для подключённых пользователей и телеметрия — служба занимающиеся сбором данных о прогррамах и действий пользователя, можно Отключить;
- Сетевая служба Xbox Live — основная служба игрового сервиса Xbox Live от Microsoft, можно Отключить;
- Сохранение игр на Xbox Live — служба отвечающая за сохранения игр в сервисе Xbox Live, можно Отключить;
- Xbox Accessory Management Service — служба необходима для корректного определения необходимых для Xbox устройств, можно Отключить;
- SysMain(Superfetch) — служба предназначенная повысить скорость работы Windows за счёт кэширования данных, которые использует пользователь, если у Вас SSD диск, можно Отключить;
- Биометрическая служба Windows — служба предназначена для сбора, сравнения, обработки и хранения биометрических данных в клиентских приложениях, можно Отключить;
- Удалённый реестр — служба позволяющая администрировать системный реестр с помощью удалённого доступа, можно Отключить;
- Определение оборудования оболочки — служба позволяющая определять тип подключённого к компьютеру устройства, чтобы предлагать связанные с этим устройством действия в окне Автозапуска, нужно Отключить.
Как отключить службу
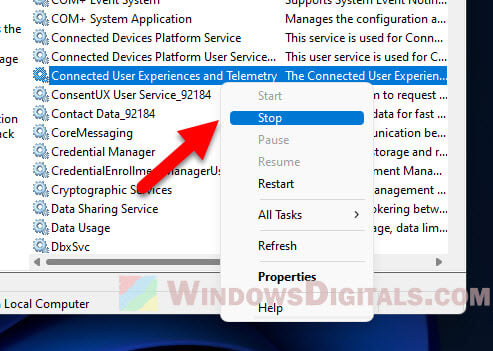
Двойным кликом по выбранной службе, нажимаем Остановить если она работает и меняем тип запуска на Отключена, далее жмем Ок.
Поддержать развитие блога
Отправить Донат

- To disable Xbox app startup option, open Xbox Settings > General.
- Then turn off the “Automatically launch app at startup” option.
When you install the Xbox app on Windows 11 (or Windows 10), you will notice that the app will start automatically every time you reboot your computer. This is because, by default, the Xbox app registers itself to run a startup.
Although it is convenient to get your games quickly, it’s not something that everyone needs. If you do not want the Xbox app launching automatically, you can change its settings to stop this behavior.
In this guide, you will learn the steps to stop the Xbox app from starting on Windows 11.
Disable Xbox app from starting automatically on Windows 11
To prevent the Xbox app from launching during startup, use these steps:
-
Open Xbox app on Windows 11.
-
Click the profile menu in the top-left and select the Settings option.

-
Click on General.
-
Under the “Startup settings” section, clear the “Automatically launch app at startup” option.

-
(Optional) Clear the “Keep the app running in the background when I close it” option to prevent the app from running after closing the app.


Once you complete the steps, the Xbox app will no longer launch automatically as you sign in to your Windows 11 after a reboot or cold start.
Mauro Huculak is a
Windows How-To Expert and founder of
Pureinfotech
(est. 2010). With over 21 years as a technology writer and IT Specialist,
Mauro specializes in Windows, software, and cross-platform systems such as Linux, Android, and macOS.
Certifications:
Microsoft Certified Solutions Associate (MCSA),
Cisco Certified Network Professional (CCNP),
VMware Certified Professional (VCP),
and
CompTIA A+ and Network+.
Mauro is a recognized Microsoft MVP and has also been a long-time contributor to Windows Central.
You can follow him on
YouTube,
Threads,
BlueSky,
X (Twitter),
LinkedIn and
About.me.
Email him at [email protected].
Windows 11, when it comes to background services, is still more or less the same as its previous version, Windows 10. One well known fact is that not all of these services are needed for gamers. In fact, for computers that aren’t very fast or have older parts, every little bit of performance counts.
In this guide, we’ll talk about the Windows 11 services you can turn off to improve your gaming and overall performance. We’ll also share some tips on some very widely used tools to further improve your PC’s performance on Windows 11.
What to do before disabling services in Windows 11
Before you turn off any services in Windows, make sure to do a few things first so you don’t accidentally break something important and mess up your computer. Here’s what you should do:
Create a system restore point
Creating a system restore point before you disable services is a must. This makes sure you can get your system back to how it was if something goes wrong after you turn services off. Just search for “Create a restore point” in the Windows search bar, then click on “Create” to set it up.
Research the service
Before you disable a service, make sure you understand what it does and if your system really needs it. You can look up the service name online to get more details about what it does and if it’s okay to turn it off.
Related service: .NET Runtime Optimization Service High CPU Usage in Windows 11/10
Disable services one at a time
It’s safer to turn off services one by one and check your system after each change. This way, if something goes wrong, you’ll know which service caused it and you can switch it back on easily.
Monitor your system
After turning off services, keep an eye on how your computer is doing. If there are any problems, you can go back to the last restore point you created and turn any services you stopped back on.
What could actually go wrong when disabling Windows services?
Although turning off unnecessary services can sometimes help give your computer a little boost in terms of performance, doing so recklessly and disabling the wrong services can have some consequences.
For example, there are some services that handle security stuff that features such as Windows Defender and Windows Firewall rely on. If you accidentally disable these services, your PC can be open to viruses and other threats.
Besides, some services are actually there to increase your computer performance. Disabling these would be counterproductive and can actually make your computer slower.
Also, if you disable a service that a program requires, that program will either not start or crash after starting.
Related issue: How to Fix Game Stuttering on Windows 11
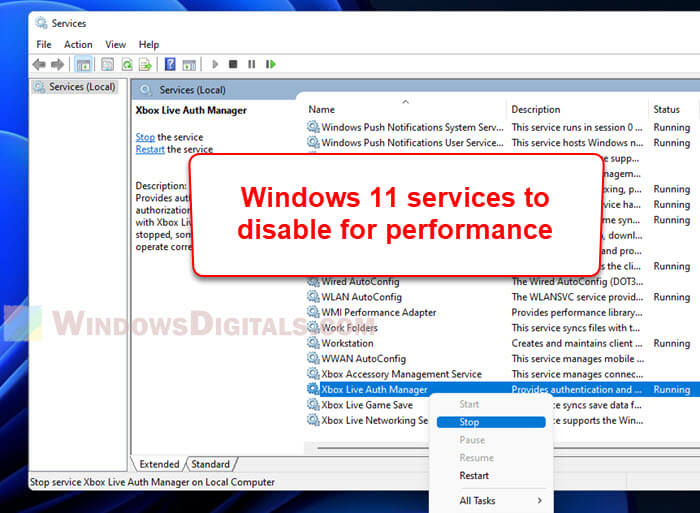
30+ Windows 11 services you can safely disable
Disabling Windows 11 services that you don’t need to improve gaming performance is a standard practice for many gamers to squeeze as much speed as possible from their PC. However, it’s utterly important to know which services you can actually safely disable without hurting your system or stopping things you shouldn’t.
Some Windows 11 services are very important for Windows’ basic functions, which we won’t list here. In the following list, we’ll only focus on services that you can disable if you don’t need what it does.
Please know that even among the services we’ll list below, some may still be required in many cases. Please double-check or at least read their basic descriptions first to understand what they do and if you need them.
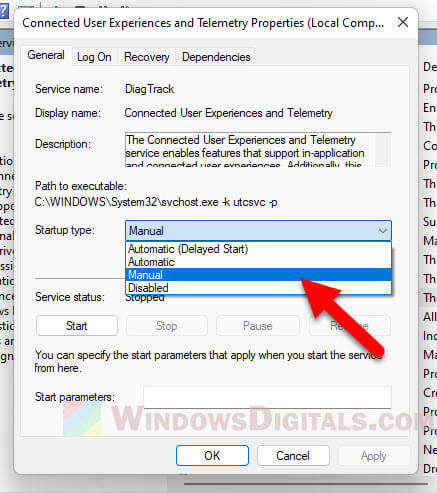
- Connected user experiences and telemetry: This service gathers your usage data and sends it to Microsoft for analysis. If you’re worried about your privacy, feel free to turn it off.
- Touch keyboard and handwriting panel service: This service lets you use the touch keyboard and handwriting features on touch-screen devices. If your screen doesn’t support touch, you can turn this off.
- Netlogon: This service helps set up secure links between your computer and the domain controller. If you aren’t connected to a domain or network, you can turn this off without any problem.
- Xbox live services: These services power Xbox app features like managing accessories, saving games, and networking. If you don’t use the Xbox app, you might want to disable them.
- Windows image acquisition: You need this service to use scanners and digital cameras. If you don’t have these devices, or don’t plan to use them, you can disable this service.
- Geolocation service: This service lets apps offer location-based services and notifications. If you prefer not to be tracked, you can turn it off.
- Program compatibility assistant service: This service finds problems with old games and software. If you don’t use older software, you can turn it off.
- Device management wireless application protocol (WAP) push message routing service: This service collects and sends your data to Microsoft. If privacy is important to you, you can disable it.
- Retail demo service: This is meant for vendors and retailers to show off Windows features to customers. If that’s not you, you can safely turn it off.
- Windows error reporting service: This lets you report problems and logs them when programs stop working. Usually, you can turn this off safely.
- Internet connection sharing: This service is for sharing your internet in small home or office networks. If that’s not your situation, you can turn it off.
- Print spooler: This service is needed for printing. If you don’t need to print, you can turn it off.
- Certificate propagation: Related to the Smart Card service, it detects when a Smart Card is connected and installs the necessary drivers. If you don’t use Smart Cards, feel free to disable it.
- Enterprise app management service: Needed for managing enterprise apps provided by companies. If you aren’t part of a company that uses these apps, you can disable it.
- Windows biometric service: This service is for devices with fingerprint sensors. If yours doesn’t have one, you can turn it off.
- Windows insider service: This is for Windows Insiders who test new features. If you’re not one, you can disable it.
- Network connection broker: Allows Microsoft Store apps to receive notifications from the internet. If you don’t use these apps, you can turn it off.
- Remote desktop configuration and remote desktop services: These let you connect to other PCs nearby. If you don’t need this, you can disable them.
- Portable device enumerator service: This service makes changes to group policy for removable drives and helps synchronize content for applications like Windows Media Player and Image Import Wizard.
- Parental control: This service lets parents limit what their kids can access online. If you don’t need to manage this, you can turn it off.
- Windows mobile hotspot service: Needed for sharing your mobile’s internet connection with your PC. If you don’t use this feature, you can disable the service.
- Windows connect now: This service helps desktops and laptops connect to wireless networks and devices. If you don’t have a wireless setup, you can disable it.
- Smart card and other related services: Enables the use of Smart Cards for security in big organizations. If you’re a regular home user or your workplace doesn’t need Smart Cards, you can turn them off.
- Windows event log: Generates logs about Windows events. You might not need this, but be careful if you decide to disable it—some users say it can mess up Windows Explorer. If you have issues with Explorer after turning it off, turning it back on should fix them.
- Windows event log: This service creates logs about Windows events. If you don’t need it, you can disable it. Note: Some users reported issues with Windows Explorer after disabling this service. If you encounter any problems, turning it back on should fix them.
- Remote registry: Allows anyone to access and change your Windows registry. For better security, it’s a good idea to turn this off. Your own access won’t be affected.
- Phone service: Needed for the Your Phone app and its features. If you don’t use the app, you can disable it.
- Downloaded maps manager: Only necessary for Bing Maps. If you don’t use Bing Maps, you can turn it off.
- AllJoyn router service: Lets you connect to the Internet of Things and communicate with smart devices. If you’re not using IoT devices, you can turn it off.
- FAX: Needed if you plan to send or receive faxes. If not, you can disable it.
- Secondary logon: Allows standard users to run specific applications as admins. If you’re the only user of your PC, you can turn this off.
Also see: GPU 100% Usage When Idle or Gaming (Good or Bad)
How to disable services in Windows 11
There are different ways to turn off services in Windows 11. Here are two popular methods you can use:
Using Services.msc
Services.msc is a built-in tool in Windows 11 that lets you see and change system services. Here’s how to use Services.msc to disable a service:
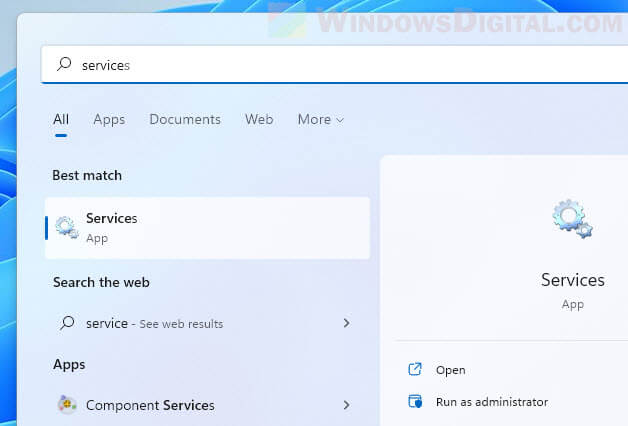
- Open the Start menu and search for “Services“.

- Click on the “Services” app to open it.
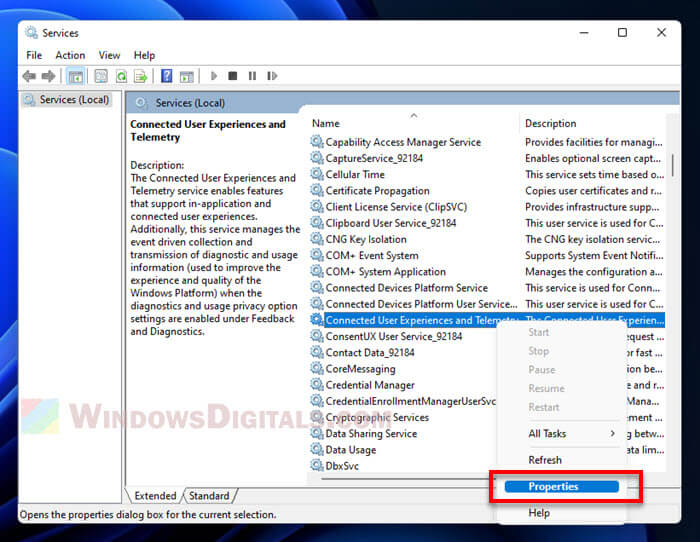
- Find the service you want to disable in the Services window.
- Right-click on the service and choose “Properties“.

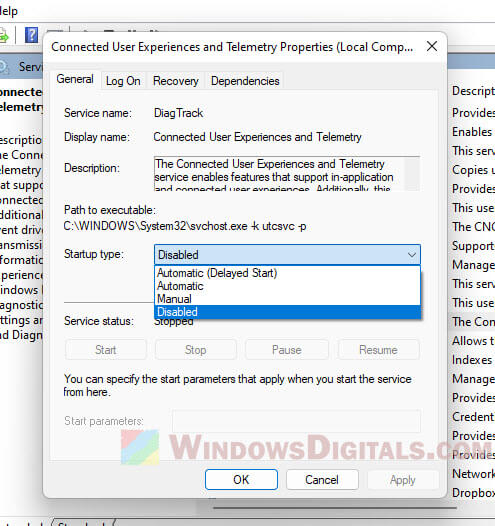
- In the Properties window, under the “General” tab, set the “Startup type” to “Disabled“.

- Click on the “Apply” button to save your settings.
- Restart your computer to apply the changes.
Suggested read: How to Disable Superfetch and Prefetch in Windows 11 or 10
Although you can just set the Startup type to “Disabled”, it might be better to stop the service and set it to manual. This way, the service won’t start automatically with Windows, but you can still start it manually if you need to. Here’s how to do it:
- Follow steps 1-3 from the instructions above.
- Right-click on the service and choose “Stop“.

- Right-click on the service again and choose “Properties“.
- In the Properties window, under the “General” tab, change the Startup type to “Manual“.

- Click on the “Apply” button to save the changes.
- Restart your computer to apply the changes.
Using MSConfig
MSConfig is another built-in tool in Windows 11 that you can use to modify system services.
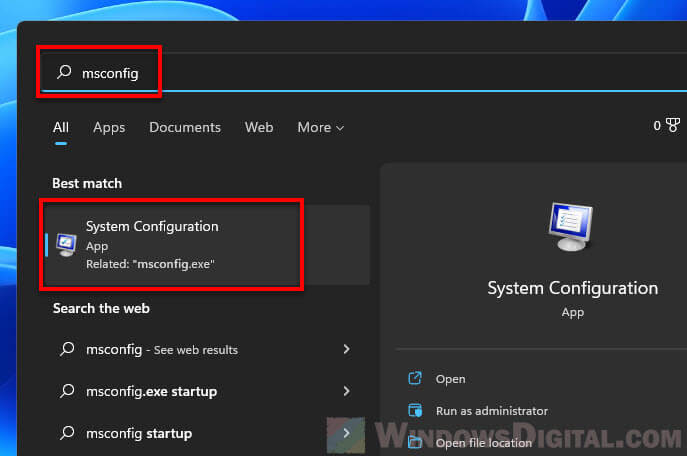
- Open the Start menu and search for “msconfig“.

- Click on the “System Configuration” app to open it.
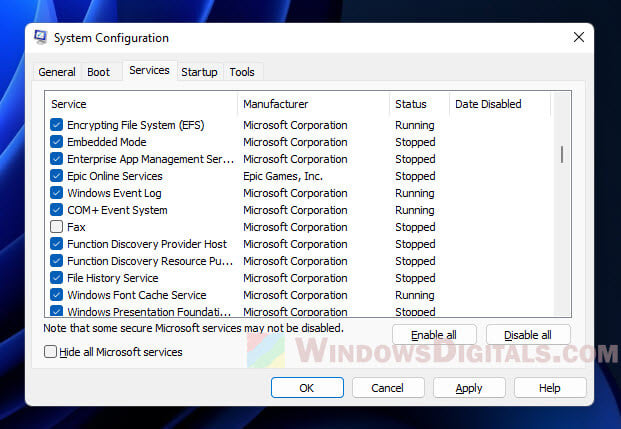
- Go to the “Services” tab in the System Configuration window.
- Find the service you want to disable.
- Uncheck the box next to the service.

- Click on the “Apply” button to save your settings.
- Restart your computer to apply the changes.
Please know that not all services can be safely turned off. Some are very important for your system to work properly. Always check the service’s function before disabling it.
Also, it’s best to turn off services one at a time and check your system after each change. This helps you spot any problems and easily undo changes if needed.
Some other tips to improve your PC’s gaming performance in Windows 11
Turning off unnecessary services is just one of many ways to slightly boost your computer’s performance for gaming. The below are some more tips you can try.
See also: Why is My Memory Usage So High When Nothing is Running?
Using O&O ShutUp10++
O&O ShutUp10++ is a free tool that lets you turn off privacy-related features and services in Windows 11 that you don’t need for gaming. Turning these off can make more system resources available and potentially improve your gaming performance.
Here’s how to use O&O ShutUp10++:
- Download and install O&O ShutUp10++ from the official website.
https://www.oo-software.com/en/shutup10
- Start the program.
- Look through the list of features and services that can be turned off and choose the ones you want to disable.
- To use recommended settings, click the “Actions” menu and select “Apply only recommended settings” (or another option that fits your needs). To undo changes, choose “Undo all changes“.

- Restart your computer to apply the changes.
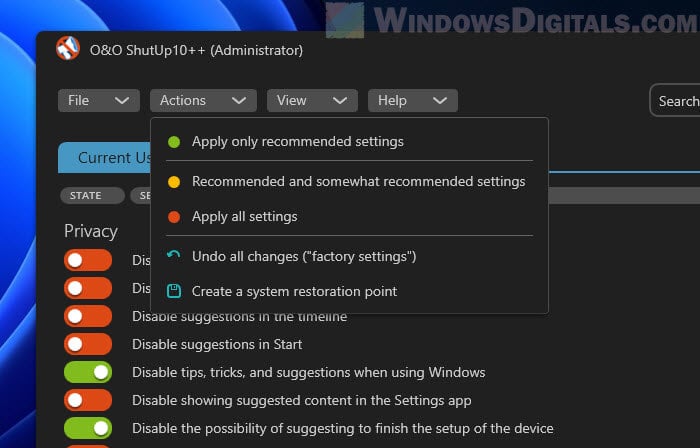
Be careful when turning off certain privacy-related features and services as it might affect other programs and services. Only turn off what you really don’t need.
Using Optimizer
Optimizer by hellzerg is another free tool that you can use to tweak your system’s settings to free up resources and improve performance.
- Download and install Optimizer from its GitHub releases page.
- Start the program and check out each tab.
- Go through the list of settings to be optimized and select the ones you want to apply.

- Restart your computer to apply the changes.
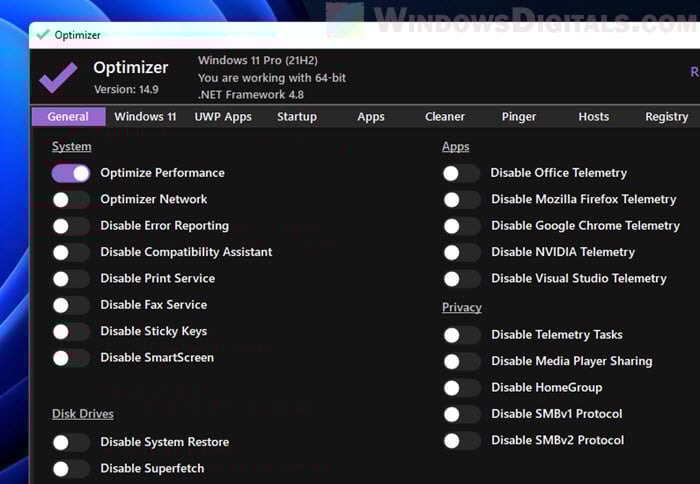
Be cautious when optimizing settings as it may affect other programs and services. Only optimize what is not needed for your system.
Have you ever checked which services are running on your Windows 11? I bet there must be several services that you rarely use, yet they are running in the background and consuming system resources. If you are not using a high-end laptop or system, you must be cautious of how system resources are being spent. In this post, we will discuss in length the services that are completely safe to disable on Windows 11.

Nine Services that are Safe to Disable on Windows 11
Certain services on your Windows 11 only waste system resources as they are not being used, yet they are running in the background. We will present a list of such services that you need not require running, and you may disable them on your Windows 11 PC. They are as follows –
1. Fax Service
If you don’t work in a corporate, or rarely send or receive Fax, you may choose to disable the Fax service running in the background. To disable the Fax service on Windows 11, do the following –
- Press Win + R to launch the Run dialog.
- Type “
services.msc” and hit OK. - When the Services window launches, scroll down to the Fax Service.
- Right-click on it and select Properties.
- Change its startup type to “Disabled” on its properties window and hit Apply > OK.

Note: If you ever receive a fax, you need to reverse the above steps i.e. change the startup type to “Enabled“.
2. Downloaded Maps Manager
Windows 11 has a native map application and for this to work accurately, there’s a service running in the background. If you don’t use this navigation feature by Windows, you must disable this service on your PC.
Open the Services window and search for Downloaded Maps Manager by scrolling down. When found, right-click on it and choose Properties. Change its startup type to “Disabled” and hit Apply > OK.

That’s it, downloaded maps manager will stop running in the background when you restart your PC.
3. Universal Telemetry Client (UTC)
The universal telemetry Client is a service that runs in the background and accumulates data on how well your device is operating or functioning. It runs different diagnostic services in the background and sends the full report to the Microsoft servers. Though it sends info for the betterment of Windows, it unnecessarily consumes system resources and makes your device slow.
If you do want to disable a service because your device is running slow, you must disable it. To do so, launch Services and look for a Universal Telemetry Client on it. When found, right-click on it and select Properties. Change its startup type to “Disabled” and hit Apply then OK.

Note: Disabling it will free up some system resources and unnecessary data waste when sending information from your computer to Microsoft Servers.
4. Windows Biometric Service
Windows biometric service is useful on laptops where you do have a fingerprint scanner. If you are using an old system, it must be lacking a fingerprint scanner. Well, in that case, one may opt to disable Windows biometric service on his/her device.
To disable Windows Biometric Service on Windows 11, do the following –
- Launch the Services window first.
- Look for the Windows Biometric Service on the Services window.
- When found, right-click on it and hit Stop.

By default, Windows Automatic Service is set to start automatically when you power On your PC. This is so because you need to unlock your computer using your fingerprint. Stopping this service one time will not resolve this problem as this can restart the moment you reboot your PC.
To permanently disable Windows Biometric Service, reach out to its Properties window and change its Startup type drop-down menu to “Disabled”. Don’t forget to click Apply and then OK to confirm this change.
5. Windows Mobile Hotspot Service
Windows Mobile Hotspot Service is a very useful service that can make your device a hotspot for nearby devices. This indeed is a great thing, however, what if you never make your device a hotspot? Well, then it is unnecessarily running and consuming system resources. It is completely safe to disable this service as you won’t be missing anything on your computer. To do so, follow these steps –
- Right-click on the Windows icon and select Run.
- Type “
services.msc” on it and hit OK to enter the Services window. - Scroll down to Windows Mobile Hotspot Service and right-click on it.
- Select Properties on the context menu.
- Change its startup type to “disabled” and hit Apply > OK.

- After successfully disabling the Mobile hotspot service, do reboot your PC.
Sign back into your device again and the Windows Mobile hotspot Service must not be running on your computer. If you ever wish to re-enable this service, re-open the Services and change its Startup type to “Enabled” on its Properties window.
6. OneSyncSvc
OneSyncSvc is a sync service by Microsoft and it keeps all Windows apps in sync when used on two or more devices. It could be your Microsoft account, Mail & Calendar, and several other apps. If you do use these apps on your laptop or personal computer only, there’s no need to keep these apps in sync.
So, it is quite safe to disable this OneSyncSvc on your Windows PC. Open Services and come down looking for this service. When you locate this service, right-click on it and select Properties. On its properties window, use the drop-down menu next to the Startup type and change it to “Disabled“.
7. Security Center
Security Center seems to be a service having something to do with system security. Well, it isn’t. All it does is keep running in the background and check if any new update is available for your operating system. This definitely sounds like a not-important service, isn’t it?
If you are not concerned about system resources being wasted, you may keep this service On and running. Else, follow the below steps to disable it permanently on your computer.
- Press Win + S, and type “Service” in the search bar.
- Click on the top result to launch the Services window.
- Scroll down to Security Center, and right-click on it.
- Click Properties and change its startup type to “Disabled”, followed by Apply > OK.

After you disable this service, restart your PC. You will find your computer running more efficiently from the next login.
8. Print Spooler
Print Spooler is an essential service when you use a printer attached to your computer. However, if you don’t print anything from your system, there’s no point in keeping this service On and running.
To disable this service, launch the Services window first. Scroll down and locate the Print Spooler service over here. When found, right-click on it and select the option – Stop.

To ensure this doesn’t start automatically when you restart your PC, double-click on the Print Spooler service. Change its startup type to “Disabled” and hit OK. Doing so will keep this service disabled even when you reboot your device.
How to Fix Print Spooler Service Issues on Windows 10
9. Disable Windows Defender Firewall
Windows Defender Firewall prevents your device from installing untrusted applications, software from malicious sites, etc. This is a good thing but it is non-relevant if you are already using a third-party antivirus on your computer.
Keeping a Windows Firewall running along with an external antivirus will only consume unnecessary system resources. So, you better disable Windows Defender Firewall by following the below steps –
- Launch Control Panel.
- Click Windows Defender Firewall.
- Select “Turn Windows Defender Firewall on or off” on the left pane.

- On the next screen, turn off Windows Firewall for both Private as well as Public networks. See the Snapshot below.

- Click OK to confirm disabling the Windows Defender Firewall.
Note: If you don’t use any other antivirus on your computer, restarting your computer will re-enable Firewall.
Can I disable the Windows Update Service?
Microsoft releases new security updates every second Tuesday of a month and one shouldn’t restrict such updates. This is because they include several bug fixes along with features to improve your device’s security. However, as they come too often, you may delay installing such updates.
Even in cases where you don’t want to delay Windows updates, you may wait to know about the features a new update holds. When a new update is available for your PC, you may visit Windows 11 Update history and read its changelog. If it does satisfy you, you may proceed ahead with its manual installation from the Microsoft Update Catalog.
Apart from security patches, Microsoft also releases non-security updates or optional updates which contain more bugs than any new feature. So, when you disable unnecessary scanning for new updates on your computer, it saves system resources and your device may last longer. Here’s how to put a stop to Windows updates automatically.
- Press Win + R to launch Run.
- Type “
services.msc” on it and hit OK. - Locate Windows Update on the Services window.
- When found, right-click on it and select Properties.
- On its properties window, change the Startup type drop-down menu to “Disabled“, and hit Stop.

If an update comes after disabling Windows Update and you do wish to install that, check for the same over Microsoft’s Update Catalog. Microsoft releases standalone packages for all new updates (security, non-security, out-of-band, or optional). Here’s a complete guide on how to install pending updates manually on your PC –
- Manually install updates on Windows 11
- Manually install updates on Windows 10
Apart from the above list, you may disable these services safely on your Windows 11. It is to be noted that these services will restart the next time you restart your computer. So, you must change their Startup types to “Disabled” on their properties window.
- Application Layer Gateway Service
- Alljoyn Router Service
- AVCTP Service
- Bitlocker
- Bluetooth Support Service
- Certificate Propagation
- Diagnostic Policy Service
- Diagnostic Service/System Host
- Distributed Link Tracking Client
- Enterprise App Management Service
- File History Service
- GameDVR and Broadcast
- Geolocation Service
- IP Helper
- Internet Connection Sharing
- Netlogon
- Offline Files
- Parental Control
- Payments and NFC/SE Manager
- Phone Service
- Program Compatibility Assistant Service
- Remote Registry
- Retail Demo Service
- Secondary Logon
- Smartcard
- TCP/IP NetBIOS Helper
- Windows Error Reporting Service
- Windows Insider Service
- Windows Image Acquisition
- Windows Camera Frame Server
- Windows Media Player Network Sharing Service
- Xbox Accessory Live Auth Manager
- Xbox Live Networking Services
That would be all. I hope by now, you get a fair idea of which services to disable on your Windows 11 PC.