
Не удалось запустить службу центра обеспечения безопасности — как исправить?
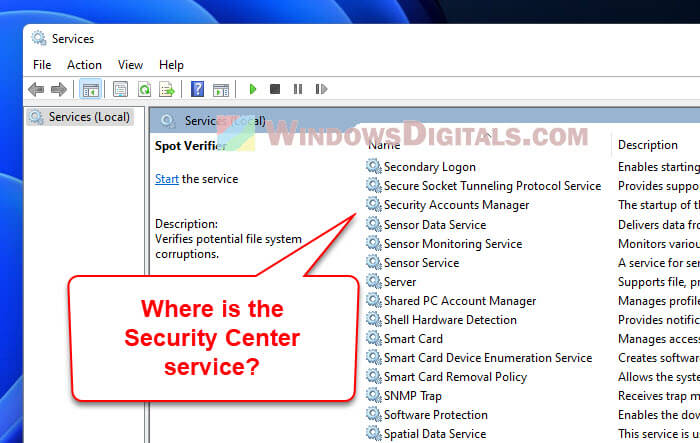
Пользователи всех актуальных версий Windows могут столкнуться с уведомлением о том, что «Служба центра обеспечения безопасности Windows отключена», а при попытке её включить — сообщение об ошибке «Не удалось запустить службу центра обеспечения безопасности» (Security Center service cannot be started).
В этой инструкции подробно о том, что делать в такой ситуации и как включить указанную службу в Windows 11, 10 и предыдущих версиях ОС.
Включение в оснастке «Службы»

Первое, что следует попробовать — включить соответствующую службу в окне «Службы», для этого:
- Нажмите клавиши Win+R на клавиатуре, введите services.msc и нажмите Enter.
- В списке служб найдите «Центр обеспечения безопасности» (Security Center) и дважды нажмите по этой службе.
- В поле тип запуска установите «Автоматически (отложенный запуск)», нажмите кнопку «Применить», а затем — «Запустить».

- Дополнительно имеет смысл проверить, что на вкладке «Вход в систему» в параметрах службы запуск выполняется с учетной записью «Локальная служба» (Local Service).

Если выполнить 3-й шаг удалось успешно, с большой вероятностью служба центра обеспечения безопасности будет запущена.
Однако, может оказаться, что изменить тип запуска в окне «Службы» невозможно, так как поле не активно. В этом случае можно использовать следующий метод для решения проблемы.
Редактор реестра
Настроить автоматический запуск службы центра обеспечения безопасности можно в реестре. Необходимые шаги:
- Запустите редактор реестра: нажмите клавиши Win+R на клавиатуре, введите regedit и нажмите Enter
- Перейдите к разделу реестра
HKEY_LOCAL_MACHINE\SYSTEM\CurrentControlSet\services\wscsvc
- Дважды нажмите по параметру Start и установите значение 2 для него.

- Нажмите «Ок», закройте редактор реестра и перезагрузите компьютер.

Если это не сработало, вы можете создать REG-файл со следующим кодом и добавить его в реестр (путем простого запуска и подтверждения), после чего так же выполнить перезагрузку компьютера:
Windows Registry Editor Version 5.00

[HKEY_LOCAL_MACHINE\SYSTEM\CurrentControlSet\Services\wscsvc]
"DelayedAutoStart"=dword:00000001
"DependOnService"=hex(7):52,00,70,00,63,00,53,00,73,00,00,00,00,00
"Description"="@%SystemRoot%\\System32\\wscsvc.dll,-201"
"DisplayName"="@%SystemRoot%\\System32\\wscsvc.dll,-200"
"ErrorControl"=dword:00000001
"FailureActions"=hex:80,51,01,00,00,00,00,00,00,00,00,00,03,00,00,00,14,00,00,\
  00,01,00,00,00,c0,d4,01,00,01,00,00,00,e0,93,04,00,00,00,00,00,00,00,00,00
"ImagePath"=hex(2):25,00,53,00,79,00,73,00,74,00,65,00,6d,00,52,00,6f,00,6f,00,\
  74,00,25,00,5c,00,53,00,79,00,73,00,74,00,65,00,6d,00,33,00,32,00,5c,00,73,\
  00,76,00,63,00,68,00,6f,00,73,00,74,00,2e,00,65,00,78,00,65,00,20,00,2d,00,\
  6b,00,20,00,4c,00,6f,00,63,00,61,00,6c,00,53,00,65,00,72,00,76,00,69,00,63,\
  00,65,00,4e,00,65,00,74,00,77,00,6f,00,72,00,6b,00,52,00,65,00,73,00,74,00,\
  72,00,69,00,63,00,74,00,65,00,64,00,20,00,2d,00,70,00,00,00
"LaunchProtected"=dword:00000002
"ObjectName"="NT AUTHORITY\\LocalService"
"RequiredPrivileges"=hex(7):53,00,65,00,43,00,68,00,61,00,6e,00,67,00,65,00,4e,\
  00,6f,00,74,00,69,00,66,00,79,00,50,00,72,00,69,00,76,00,69,00,6c,00,65,00,\
  67,00,65,00,00,00,53,00,65,00,49,00,6d,00,70,00,65,00,72,00,73,00,6f,00,6e,\
  00,61,00,74,00,65,00,50,00,72,00,69,00,76,00,69,00,6c,00,65,00,67,00,65,00,\
  00,00,00,00
"ServiceSidType"=dword:00000001
"Start"=dword:00000002
"Type"=dword:00000020

[HKEY_LOCAL_MACHINE\SYSTEM\CurrentControlSet\Services\wscsvc\Parameters]
"ServiceDll"=hex(2):25,00,53,00,79,00,73,00,74,00,65,00,6d,00,52,00,6f,00,6f,\
  00,74,00,25,00,5c,00,53,00,79,00,73,00,74,00,65,00,6d,00,33,00,32,00,5c,00,\
  77,00,73,00,63,00,73,00,76,00,63,00,2e,00,64,00,6c,00,6c,00,00,00
"ServiceDllUnloadOnStop"=dword:00000001

[HKEY_LOCAL_MACHINE\SYSTEM\CurrentControlSet\Services\wscsvc\Security]
"Security"=hex:01,00,14,80,1c,01,00,00,28,01,00,00,14,00,00,00,30,00,00,00,02,\
  00,1c,00,01,00,00,00,02,80,14,00,ff,01,0f,00,01,01,00,00,00,00,00,01,00,00,\
  00,00,02,00,ec,00,08,00,00,00,00,00,18,00,9d,00,02,00,01,02,00,00,00,00,00,\
  05,20,00,00,00,21,02,00,00,00,00,14,00,9d,01,02,00,01,01,00,00,00,00,00,05,\
  12,00,00,00,00,00,18,00,9d,01,02,00,01,02,00,00,00,00,00,05,20,00,00,00,20,\
  02,00,00,00,00,14,00,9d,00,02,00,01,01,00,00,00,00,00,05,04,00,00,00,00,00,\
  14,00,9d,00,02,00,01,01,00,00,00,00,00,05,06,00,00,00,00,00,28,00,fd,01,02,\
  00,01,06,00,00,00,00,00,05,50,00,00,00,e5,fe,79,5f,a0,ae,0d,3b,22,fa,0a,c9,\
  01,5a,41,3a,e5,a6,4a,b7,00,00,28,00,ff,01,0f,00,01,06,00,00,00,00,00,05,50,\
  00,00,00,b5,89,fb,38,19,84,c2,cb,5c,6c,23,6d,57,00,77,6e,c0,02,64,87,00,00,\
  28,00,ff,01,0f,00,01,06,00,00,00,00,00,05,50,00,00,00,db,8c,74,0f,c2,72,73,\
  f3,2b,26,b9,44,77,1e,4f,02,76,63,b5,21,01,01,00,00,00,00,00,05,12,00,00,00,\
  01,01,00,00,00,00,00,05,12,00,00,00
Если вы столкнулись с ошибкой «Не удалось запустить службу центра обеспечения безопасности» недавно, после каких-либо действий по настройке системы, установки обновлений или аналогичных событий, могут сработать точки восстановления системы на дату, когда проблема не наблюдалась.
Если служба отключается «сама», а действия по её включению отменяются, имеет смысл проверить компьютер на наличие вирусов, например, с помощью KVRT (Kaspersky Virus Removal Tool) и различных средств удаления вредоносных программ.
Download Windows Speedup Tool to fix errors and make PC run faster
The Windows Security Center makes it easier for you to view and control the security protections you choose and better understand the security features already protecting your Windows 11/10 device. In this post, we will show you how to manually enable or disable Windows Security via the Registry in Windows 11/10.

Disabling the Windows Security Center service will not disable Windows Defender AV or disable Windows Defender Firewall.
However, Windows Defender AV will be disabled automatically when a third-party antivirus product is installed and kept up to date.
Warning: It is highly recommended to not disable Windows Security – doing so, will significantly lower the protection of your device and could lead to malware infection.
Since this is a registry operation, it is recommended that you back up the registry or create a system restore point as necessary precautionary measures.
The intended registry operation will modify the DWORD value in the registry keys below for Windows Defender Security Center Service and Security Center service respectively.
HKEY_LOCAL_MACHINE\SYSTEM\CurrentControlSet\Services\SecurityHealthService
HKEY_LOCAL_MACHINE\SYSTEM\CurrentControlSet\Services\wscsvc
To disable Windows Security Center for all users on Windows 10, do the following:
- Press Windows key + R to invoke the Run dialog.
- In the Run dialog box, type
notepadand hit Enter to open Notepad. - Copy and paste the syntax below into the text editor.
[HKEY_LOCAL_MACHINE\SYSTEM\CurrentControlSet\Services\SecurityHealthService]
"Start"=dword:00000004

[HKEY_LOCAL_MACHINE\SYSTEM\CurrentControlSet\Services\wscsvc]
"Start"=dword:00000004
- Now, click the File option from the menu and select Save As button.
- Choose a location (preferably desktop) where you want to save the file.
- Enter a name with .reg extension (eg; Disable_WSC.reg).
- Choose All Files from the Save as type drop-down list.
- Double-click the saved .reg file to merge it.
- If prompted, click on Run > Yes (UAC) > Yes > OK to approve the merge.
- You can now delete the .reg file if you like.
To enable Windows Security Center for all users on Windows 10, do the following:
- Open Notepad.
- Copy and paste the syntax below into the text editor.
[HKEY_LOCAL_MACHINE\SYSTEM\CurrentControlSet\Services\SecurityHealthService]
"Start"=dword:00000002

[HKEY_LOCAL_MACHINE\SYSTEM\CurrentControlSet\Services\wscsvc]
"Start"=dword:00000002
- Now, click the File option from the menu and select Save As button.
- Choose a location (preferably desktop) where you want to save the file.
- Enter a name with .reg extension (eg; Enable_WSC.reg).
- Choose All Files from the Save as type drop-down list.
- Double-click the saved .reg file to merge it.
- If prompted, click on Run > Yes (UAC) > Yes > OK to approve the merge.
- You can now delete the .reg file if you like.
That’s it on how to enable or disable the Windows Security Center in Windows 11/10.
Obinna has completed B.Tech in Information & Communication Technology. He has worked as a System Support Engineer, primarily on User Endpoint Administration, as well as a Technical Analyst, primarily on Server/System Administration. He also has experience as a Network and Communications Officer. He has been a Windows Insider MVP (2020) and currently owns and runs a Computer Clinic.
If you’ve recently been hit by a virus or malware attack and notice that the Windows Defender Security Center Service is gone from the services.msc on your Windows 11 or 10 PC, it’s a pretty serious issue you’re facing right now. This means that Windows Defender is not active at the moment to protect your computer and you might be at risk for more attacks.
In this post, we’ll talk about why this happens and show you some steps to get the missing Windows Security Center Service back.
What is the problem?
Here’s the issue: you try to turn on Windows Defender after a malware mess, and get a message saying, “Security at a glance – Page not available” when you try to look at the Windows Security settings. When you peek into Services.msc, the Windows Security Center Service isn’t there, which means you can’t turn on Windows Defender.
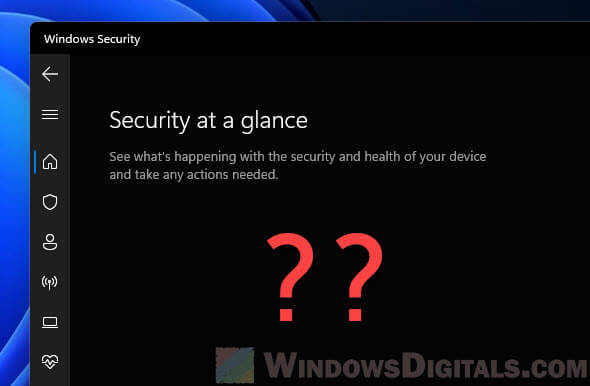
Sometimes, you might even see a pop-up saying “You’ll need a new app to open this windowsdefender link” when trying to open the Windows Security settings.
Well, there are a few things that can cause this issue. In most cases, it’s because of a very intelligent virus or malware that has messed up your Security Center service and making it disappear so you cannot turn it on. The very first thing you should try is to restart your computer and see if the service comes back. If not, proceed to the following solutions.
Related issue: Windows 11 Security Tab Missing in Properties
How to fix Windows Security Center Service not found issue
Well, there are a few workarounds to fix the missing Windows Security Center Service issue. We’ll go through the fixes below.
Reinstall Windows Defender
First off, try reinstalling Windows Defender. This can bring back all the needed services for Windows Defender and Security Center. You can do this with a few methods, like using a simple PowerShell command. Give this a shot first and see if it sorts out the problem. If not, move on to the next step.
Restore Windows Defender Service using registry
If reinstalling didn’t help, you can get the Windows Defender Service back in Windows 11 or 10 using a registry file. But, you’ll need to start regedit.exe as TrustedInstaller first.
Also see: Windows Registry Key “Access is Denied” Error
Run regedit.exe as TrustedInstaller using Advanced Run
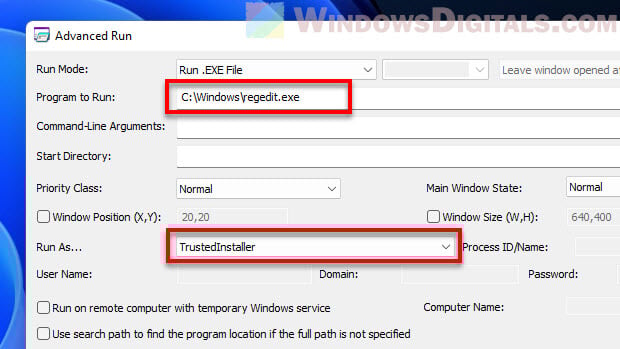
Advanced Run is a very useful tool from Nirsoft that lets you run programs with extra permissions, like as an administrator or TrustedInstaller. It’s great for when you need special access to run certain programs, such as this situation now. With Advanced Run, you can start regedit.exe as TrustedInstaller to add the registry key needed to get the Windows Defender Service back.
- Get Advanced Run from Nirsoft and unzip it somewhere on your computer.
https://www.nirsoft.net/utils/advanced_run.html
- Open the folder and double-click on the “AdvancedRun.exe” file.
- Hit the “Browse” button and find the Registry Editor executable file (regedit.exe) or type in the path: “C:\Windows\regedit.exe“.
- In the “Run As” section, pick “TrustedInstaller” from the list.
- Press the “Run” button to open regedit.exe as TrustedInstaller.

Import the Windows Defender Service restoration registry file
With regedit.exe running as TrustedInstaller, you can now add the registry file to get the Windows Defender Service back.
Warning: Messing with the registry can be risky. If you’re not sure, it might be better to ask for help from someone who knows what they’re doing. Always make a system restore point or back up the registry before changing anything, just to be safe.
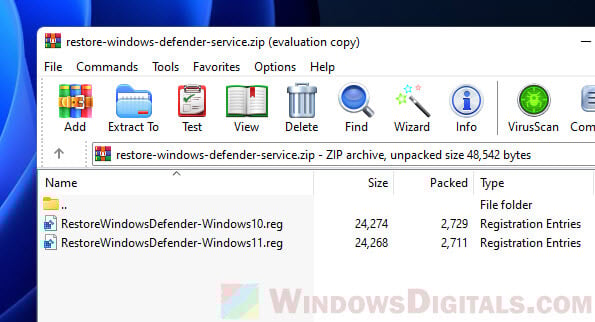
- Download our restore Windows Defender service registry fix.
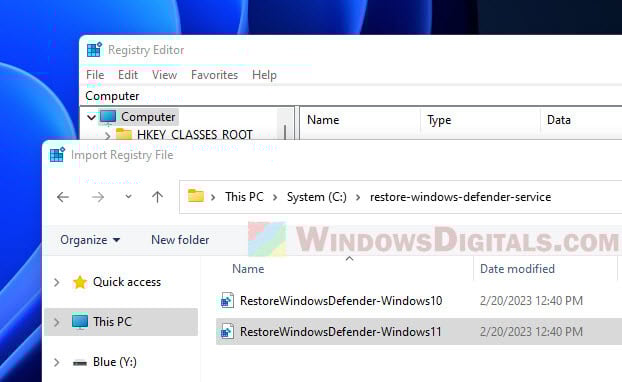
- Unzip the file (better to do it on the C: drive).

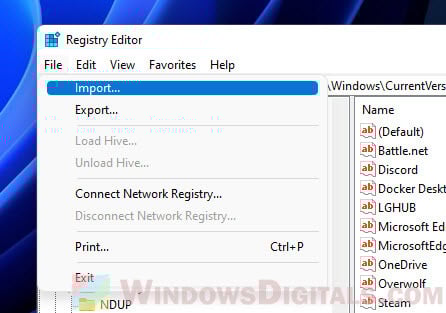
- In the Registry Editor, click File and choose Import.

- Find the registry file for your version of Windows. If you’re on Windows 11, pick the RestoreWindowsDefender-Windows11.reg file.

- Click Yes when asked for confirmation.
- Close the Registry Editor and restart your computer.
After a restart, check if the Security Center Service is back. If it is, make sure to update Windows Defender right away.
If the Security Center Service is still missing, you might have to think about resetting or doing a clean install of Windows 11/10.
Reset or clean reinstall Windows 11/10
If nothing else worked, you might need to reset or do a clean install of Windows 11 or 10. Resetting Windows lets you keep your files (not all files) but removes apps and drivers, while a clean install wipes everything and starts fresh. These steps might take some time but can help restore the missing Windows Defender or Security Center service.
But, a clean install should always only be considered as a last resort. And always back up your important files that you couldn’t afford to lose before doing so.
Repair Windows Security services with SFC and DISM
When things like this happen, it’s a common practice to try running the SFC (System File Checker) and DISM (Deployment Image Servicing and Management). This is to fix any corrupted or missing system files, which include things like the Windows Defender Security Center Service.
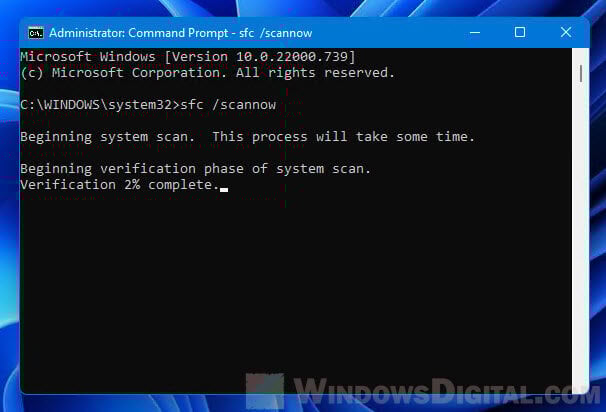
To run SFC, open Command Prompt as an admin and type “sfc /scannow” then press Enter. It might take a while, but it will tell you if it found and fixed any issues.
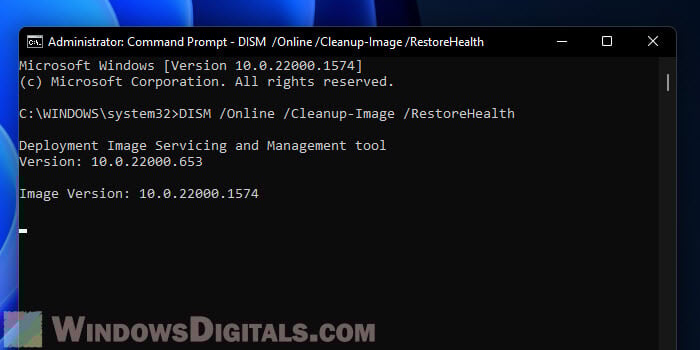
To run DISM, open Command Prompt as admin and type “dism /online /cleanup-image /restorehealth” then press Enter. This scan can also take a bit but can help fix system image issues.
What to do if the Windows Security Center Service disappears again
If the Windows Security Center service vanishes again, it might mean your computer is still under attack by the same or different malware. In this situation, you’ll have to react quickly and use a trusted antivirus to run a full scan on your system. Pick a well-known antivirus that’s good at finding and getting rid of malware and viruses.
If it finds anything, follow the antivirus’s advice to remove the malware. After the threats are gone, you can try to get the Windows Security Center service back again.
Some final words
To prevent similar issue from happening again, keep everything updated, use reliable antivirus software, and be careful online. Avoid sketchy websites, don’t download stuff from people you don’t trust, and watch out for scams. We hope this guide helps you fix the missing Windows Defender Security Center Service issue.
Introduction
The Windows Security Center Service is an integral component of your system’s protection, monitoring the overall health of your computer. But what happens when this essential service is turned OFF or is missing altogether? It might seem like a daunting issue to tackle, but don’t worry; the solution is simpler than you might think. Whether you’ve stumbled upon this problem through a random system check or noticed that your Windows Security is behaving oddly, this guide will walk you through the exact steps to get your Security Center Service up and running again. From resetting app settings to manipulating registry files, we’ve got you covered, ensuring your Windows environment stays secure and functional.
Reset the Windows Security App
Encountering issues with the Windows Security Center Service? Follow these streamlined steps to restore it to full functionality:
-
Search and Access Settings: In your start menu, search for «Windows Security.» Right-click the app to open its settings.
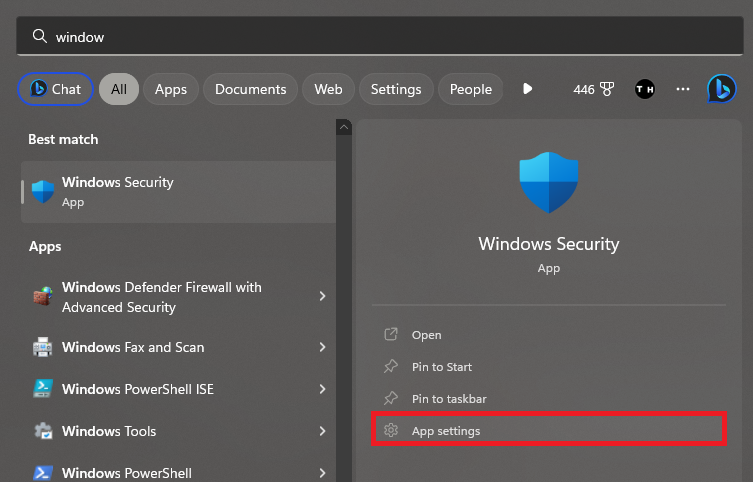
Windows Security > Reset
-
Find and Use the Reset Option: Scroll to find the «Reset» option. Underneath it, click on «Repair and Reset.» This quick process will revert the app settings to default and rectify any corrupted system files tied to the application.

Reset the Windows Security App
Download & Extract wscsvc.zip
Once the above is completed, let’s focus on retrieving essential files:
-
Download Required Files: Navigate to the WSCSVC.DLL page to download the wscsvc.reg.zip and wscsvc64.zip files. Your browser’s download section will usually house these files.
-
Extract the .ZIP Files: Right-click each file and select “Extract All.” A couple of seconds later, new folders with the extracted content will appear.

Download the DLL file
Extract the ZIP file
Run the wscsvc Command
Your journey to resolution is almost complete. Here’s the final stretch:
-
Access the wscsvc.reg Folder: Inside, you’ll find files named “Commands” and “wscsvc.”
-
Execute the wscsvc File: Double-click it and select «Run,» then click «Yes» if prompted with a User Access Control window.
-
Follow On-screen Prompts: Registry Editor warnings might show up; click «Yes» as needed to proceed.
These steps are tailored to get your Windows Security Center Service functioning again. In the realm of Windows, such nuanced solutions are vital to maintain the integrity and security of your system.

Run the Registry Editor modification command
Run the Provided Commands
After setting up the required files, it’s time to execute the specific commands to address the Windows Security Center Service issue:
-
Open Command Prompt as Administrator: Type “cmd” in your start menu search, right-click the Command Prompt app, and select “Run as administrator.”
-
Execute the Commands: Inside the Commands file, you will find two essential lines of code. Copy and paste the first, then the second, into the command window, hitting enter after each.

Run Command Prompt as Admin
Copy wscsvc.dll to your System Files
Integrating the right file into your system is the next crucial step:
-
Access the wscsvc64 Folder: Find the wscsvc.dll file, right-click it, and choose copy.

Navigate and Paste: Head to Local Disk C > Windows > SysWOW64, open it, and paste the copied file.

Paste the DLL file to SysWOW64
Run the Windows Security Service
Finally, you must make sure the service is up and running:
-
Open Services Manager: Search for “Services.msc” in your start menu to launch the Windows Services Manager.
-
Find the Service: Click in the list, press ‘W’ to locate services starting with ‘W’, and scroll to “Windows Security Service.”
-
Check or Start the Service: Ensure the service is running or start it if it’s off. If options are greyed out, simply restart your PC.
By meticulously following these steps, you’ll reinstate the Windows Security Center Service, fortifying your system’s integrity and safety. With a blend of simplicity and precision, these instructions guide you through the technical path to resolve a common Windows challenge.

Start the Windows Security Service
-
The Windows Security Center Service is a crucial part of the Windows operating system, responsible for monitoring and reporting security issues. It might be turned off due to system errors, malware, or misconfigured settings.
-
You can check by searching for “Services.msc” in the start menu, locating the «Windows Security Service,» and checking its status. If it’s not running, you can start the service from there.
-
Yes, the wscsvc.dll is a legitimate file necessary for the Windows Security Center Service. Make sure to follow the guide carefully to copy it to the correct location.
-
Ensure that you are running the Command Prompt as an administrator and that you’ve correctly copied and pasted the commands from the guide. If the problem persists, a system restart or expert assistance may be required.
-
This guide specifically addresses issues related to the Windows Security Center Service in the version mentioned. Applying these steps to other versions might not have the desired effect and is done at your own risk.
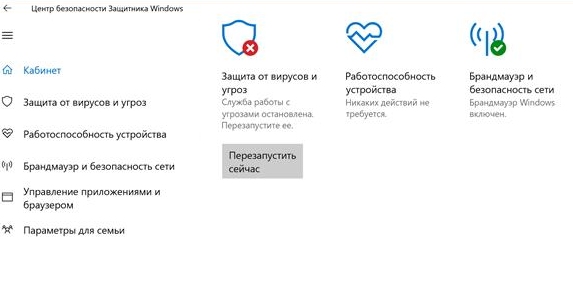
Привет, админ! Пытаюсь в Windows 10 включить Windows Defender, но в Центре безопасности Защитника Windows у компонента Зашита от вирусов и угроз висит надпись: «Служба работы с угрозами остановлена. Перезапустите ее». При попытке перезапустить Защитника Windows с помощью соответствующей кнопки появляется надпись: “
Непредвиденная ошибка. Извините, мы решаем проблему. Попробуйте еще раз
”. Как мне починить Windows Defender? Заранее спасибо!

Ответ
Давайте разберем типовые причины, из-за которых в Windows 10 может не работать функция зашиты от вирусов и угроз (встроенный антивирус Windows Defender). Последовательно проверьте все пункты.
Обратите внимание, что начиная с билда Windows 10 2004, Windows Defender Antivirus был переименован в Microsoft Defender Antivirus.
Содержание:
- На компьютере установлен сторонний антивирус
- Проверьте и включите службы Защитника Windows
- Включение Защитника Windows 10 в реестре
- Проверьте, что Защитник Windows включен в групповых политиках
- Перерегистрация библиотек Microsoft Defender
- Проверьте и установите обновления Windows
На компьютере установлен сторонний антивирус
Проверьте, возможно у вас на компьютере установлен сторонний антивирус, который препятствует работе Microsoft Defender. Антивирус Microsoft Defender автоматически отключается, если на компьютере установлена сторонняя антивирусной программа.
Решите, какой антивирус вы хотите использовать – сторонний или Microsoft Defender.
Если сторонний антивирус вам не нужен, отключите или удалите его.
Проверьте и включите службы Защитника Windows
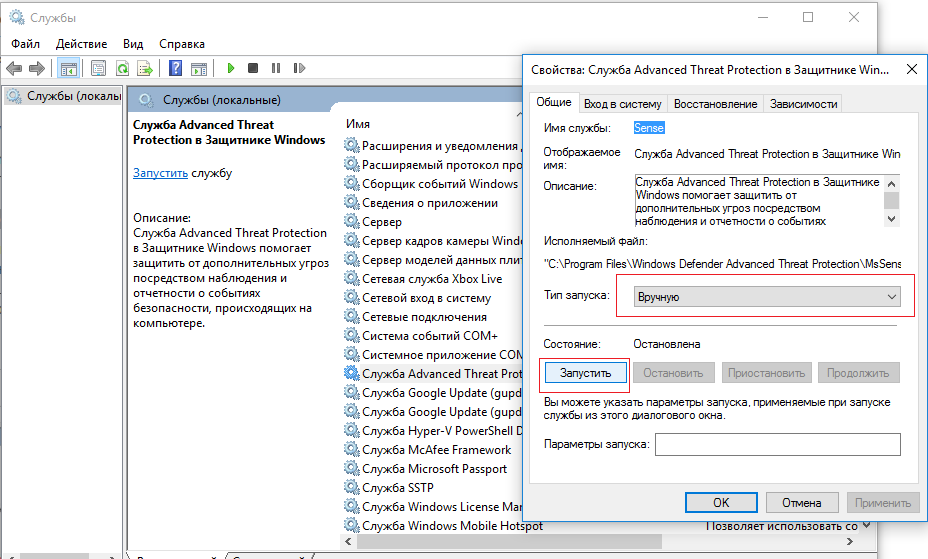
Для корректной работы Microsoft Defender в Windows 10 нужно проверить нескольких служб. Откройте консоль управления службами (services.msc) и проверьте, есть ли в списке служб следующие элементы:
- Служба Advanced Threat Protection в Защитнике Windows (Windows Defender Advanced Threat Protection Service) —
Sense
; - Служба проверки сети Защитника Windows (Microsoft Defender Antivirus Network Inspection Service) —
WdNisSvc
; - Служба Защитника Windows (Microsoft Defender Antivirus Service)
WinDefend
; - Служба Центра безопасности Защитника Windows (Security Center) —
WSCSVC
(Windows Security Center).
Состояние служб можно проверить с помощью PowerShell:
get-service Sense, WdNisSvc, WinDefend, wscsvc | select name,status,starttype

Для служб Sense и WdNisSvc тип запуска должен быть Manual.
Службы Security Center (WinDefend) и Microsoft Defender Antivirus (wscsvc) должны быть обязательно запущены. Если эти службы отключены, вы не сможете использовать Microsoft Defender.
Проверьте, что тип запуска у служб – Автоматический. Если какая-то служба остановлена, запустите ее вручную. Если все службы запущены, перезапустите их.
Включение Защитника Windows 10 в реестре
В версиях Windows 10 до билда 2004 можно было отключить защитник Windows через реестр. Для этого использовался параметр реестра DisableAntiSpyware. Этот параметр обычно включался OEM производителями или системными администраторами, когда на устройстве предполагалось использовать стороннее антивирусное приложение.
Запустите редактор реестра (regedit.exe) и перейдите в ветку HKEY_LOCAL_MACHINE\SOFTWARE\Policies\Microsoft\Windows Defender. Если в этой ветке есть параметры DisableAntiVirus и DisableAntiSpyware (хотя бы один), удалите их или измените значение на 0.

После этого, попробуйте перезапустить службу Защита от вирусов и угроз.
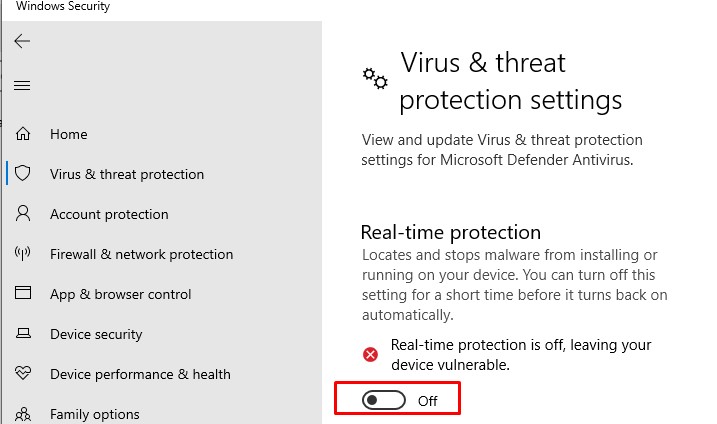
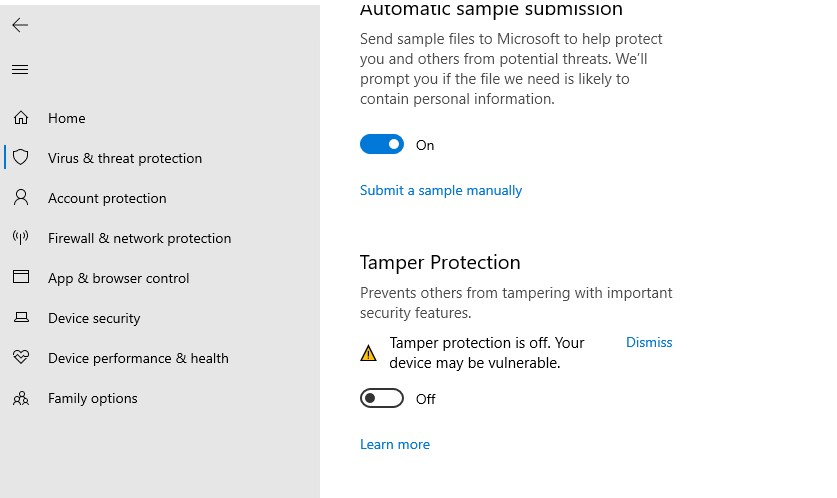
Затем перейдите в Settings -> Windows Security и нажмите на кнопку Virus & threat protection -> Turn on.

Также проверьте, что включена опция Real-time protection в Windows Security -> Virus & threat protection -> Manage settings.
В современных билдах Windows 10 нельзя отключить Microsoft Defender через параметр реестра
DisableAntiSpyware
(этой лазейкой пользовались многие вредоносы).
Microsoft Defender теперь автоматически отключается Windows 10, если он обнаруживает на компьютере сторонний антивирус. Если у вас не установлен сторонний антивирус и вам нужно отключить Microsoft Defender, сначала вам нужно отключить функцию защиты Microsoft Defender Tamper Protection. Данная защита от изменений в системе безопасности Windows помогает предотвратить изменение вредоносными приложениями важных параметров антивируса Microsoft Defender, включая защиту в реальном времени и облачную защиту. Отключить Tamper Protection можно только через приложение Windows Security, и для подтверждения отключения появится запрос User Account Control (UAC).
Отключить Tamper Protection можно и через реестр. Для этого в ветке HKEY_LOCAL_MACHINE\SOFTWARE\Microsoft\Windows Defender\Features нужно создать параметр типа DWORD с именем TamperProtection и со значением 0. Но перед этим сначала придется предоставить своей учетной записи права владельца на ветку Features.
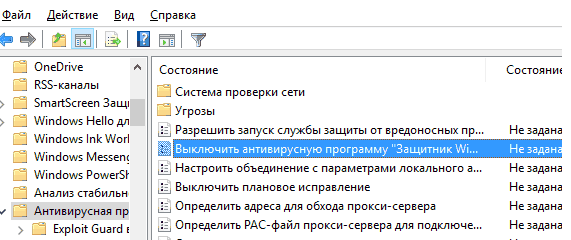
Проверьте, что Защитник Windows включен в групповых политиках
Откройте редактор локальной групповой политики (gpedit.msc) и проверьте, не отключен ли Windows Defender через GPO. Для этого, перейдите в раздел Computer Configuration -> Administrator Templates -> Windows Components -> Windows Defender Antivirus (Конфигурация компьютера -> Административные Шаблоны -> Компоненты Windows -> Антивирусная программа Защитник Windows). Проверьте, что политика Выключить антивирусную программу Защитник Windows (Turn off Windows Defender Antivirus) находится в состоянии Не задано или Отключена.
В Windows 10 2004 и выше ветка GPO с настройками Defender называется Microsoft Defender Antivirus.
Перерегистрация библиотек Microsoft Defender
Попробуйте выполнить перерегистрацию библиотек Защитника Windows. Для этого, откройте командную строку с правами администратора и выполните команды
regsvr32  atl.dll
regsvr32  wuapi.dll
regsvr32  softpub.dll
regsvr32  mssip32.dll
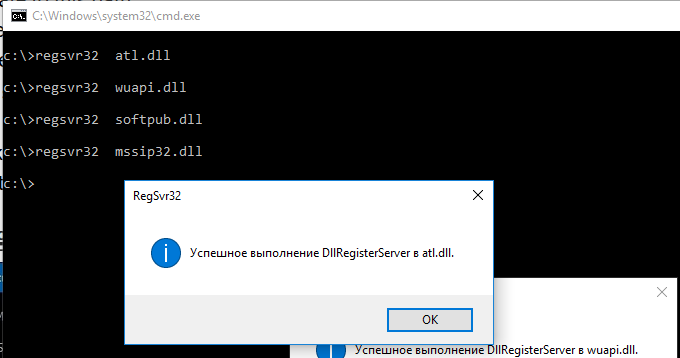
Перезапустите Windows Defender и проверьте, исправлена ли проблема.
Проверьте и установите обновления Windows
В редких случаях после установки ежемесячных обновлений Windows может перестать антивирус защитника Windows 10. Проверьте наличие новых обновлений и установите их через Settings -> Update & Security -> Windows Update -> Check for updates или с помощью PowerShell. Скорее всего, они исправят ситуацию.
Если ничего не помогло, проверьте целостность системных файлов и образа Windows командами:
sfc /scannow
и
DISM /Online /Cleanup-Image /RestoreHealth
Надеюсь, эта краткая инструкция помогла вам решить проблему с невозможностью запуска (остановкой) службы работы с угрозами.