
When you try to access data from a hard drive, DVD drive, SD card, USB flash drive, pen drive, etc, “The device is not ready” error may occur. In fact, this error is caused by different reasons. Here we are going to share some solution to fix it.
Fix 1: Reinstall or Update your driver
Changes done to your computer will be able to disorder your driver. If that occurs, you are able to reinstall your driver or update it. To do that, just do the following.
- If you get a Device Manager error code, please take note of the description so you are able to pinpoint the driver or the component which is causing the error.
- Launch device manager by searching for Device Manager or running devmgmt.msc.

- After that, you have to find the driver on the list and then right click on it.
- Please click Uninstall if you want to reinstall the driver, or Update Driver Software if you are attempting to update it.
- Next, you are going to see a confirmation window, ensure that the Delete driver software item is unchecked.
- Lastly, you are able to click ok then reboot/restart your computer.
Alternatively, you are able to do this:
- Manually download the driver from the manufacturer.
- Then, run it to replace the current driver which you are using.
- Once done, just reboot your computer.
Fix 2: Repair Corrupted or missing system files
For your information, System File Checker is a tool that works pretty much like a registry checker however this helps you discover and repair corrupted or missing system files so it takes a bit longer to run.
- To run the command, you have to open the elevated Command prompt by typing it on the search window.
- After that, right clicking Command Prompt and selecting run as administrator

- Now, you are able to type sfc /scannow on the prompt and wait until the verification process is completed successfully.

Run Checkdisk: Chkdsk repairs lots of inconsistencies with the OS. Also, the System errors may be repaired by using this utility. To run it, do these steps below:
- At the first step, you have to open Command Prompt by typing it on the search box. When you see the result on the list overhead, please right click on it and select Run as Administrator
- Your system may say you cannot run it at the moment as you are still processing data and will prompt you if you want to run it before the next startup, only click y for yes and then exit the screen and reboot/restart your computer.
- After the computer reboots, you are going to see chkdsk running outside of Windows. Let it finish until it provides a report of what was found, fixed or marked.
- Lastly, you are able to exit the window and allow your computer to reboot normally.
Fix 3: Utilize System Restore
For Window 7
- Firstly, you are able to click Start, choose All Programs -> Accessories and then click the System Tools.
- After that, you have to click System Restore and then click Next.
- The next step that you have to do is to select your restore point when you know your computer is doing well.
- Please keep clicking Next and click Finish.
- Usually, it will bring a few minutes, so patiently you have to wait for the operation to completely stop.
For Windows 8, or 10
- Please right-click the Start button, then click System.
- In the System window, you are able to click System and Security.

- After that, you have to tap System. On the left side, click System protection.

- Now, you are able to click System Restore. Please follow the instructions to choose your restore point and then click Next until you see the Finish button.

- Lastly, you only need to wait for the restore process until finished completely.
Fix 4: Roll back your driver
Also, you may go back to the original driver your computer came with. To do that, do these steps below:
- On the Device Manager, you have to find the problematic driver.
- After that, you are able to right click the device and click Properties.

- When you see the Properties window, simply click the Driver tab.
- You are going to see the Roll Back Driver button, click that.

- Please confirm the rollback by clicking Yes when you see a question which says “Are you sure you would like to roll back to the previously installed driver software?”
- Lastly, you only have to restart your computer.
Fix 5: Repair reinstall by using your OS CD or flash drive
- The best method to repair your system software is still reinstalling it. Repair reinstall process can help you keep your files as you repair the operating system. You have to ensure that you backup your file if you indeed need to clean reinstall your computer. You are going to need to insert your installation media and restart your computer.
- Access BIOS. The process is different from one computer model to another. It can be F1, F2, or Del button.
- When there, you are able to go to the boot section, set boot to the installation disk and save settings.
- For earlier versions of Windows, you will need to tap your keyboard while you wait for the computer to access the installation disk.
- Select the repair utility first instead of clean installing the OS. This can save you many hassles. But, if the problem continues after rebooting your computer, then you have to back up files and do the clean reinstall.

Causes of the Error 21
we get information that Windows system errors can be caused by hardware or software breakdown. Occasionally, your software is not working in consistency with the hardware due to the changes or hardware failures. In some cases, you might have already installed conflicting drivers or the OS got corrupted. Probably a component had some abnormal power surge that can breakdown parts and affect its operation. Some factors may have occurred that caused the system to display a System error. Of course, the issue with software and hardware is easily resolved if you are able to know the portion which is causing the failure.
AUTHOR BIO
On my daily job, I am a software engineer, programmer & computer technician. My passion is assembling PC hardware, studying Operating System and all things related to computers technology. I also love to make short films for YouTube as a producer. More at about me…
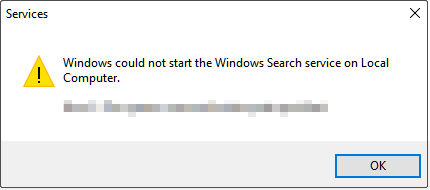
Encountering the error message “Windows could not start the Windows Search service on Local Computer”? Now read this post from MiniTool to know what should you do when the Windows Search service cannot be started in Windows 10/11.
Windows Could Not Start the Windows Search Service on Local Computer
The Windows search bar helps you quickly find videos, pictures, other files, or applications. However, the search bar sometimes exhibits some bugs. Recently, many users reported that they received the “Windows could not start the Windows Search service on Local Computer” error message when trying to search for something.
This error is generally caused by Windows search related services not being enabled, too many cache files, incorrect group policy settings, system file corruption, etc. Keep reading to see how to get rid of this problem.
How to Fix Windows Could Not Start the Windows Search Service
Fix 1. Restart Windows Search Related Services
If Windows search related services are disabled, you may receive the error message “Windows could not start the Windows Search service on Local Computer”. So, to fix it, you need to restart relevant services.
Step 1. Press Windows + R keyboard shortcut to open the Run window.
Step 2. In the text box, type services.msc and press Enter.
Step 3. In the services window, scroll down to select the Windows Search service. Then click the Restart button as shown in the figure below.
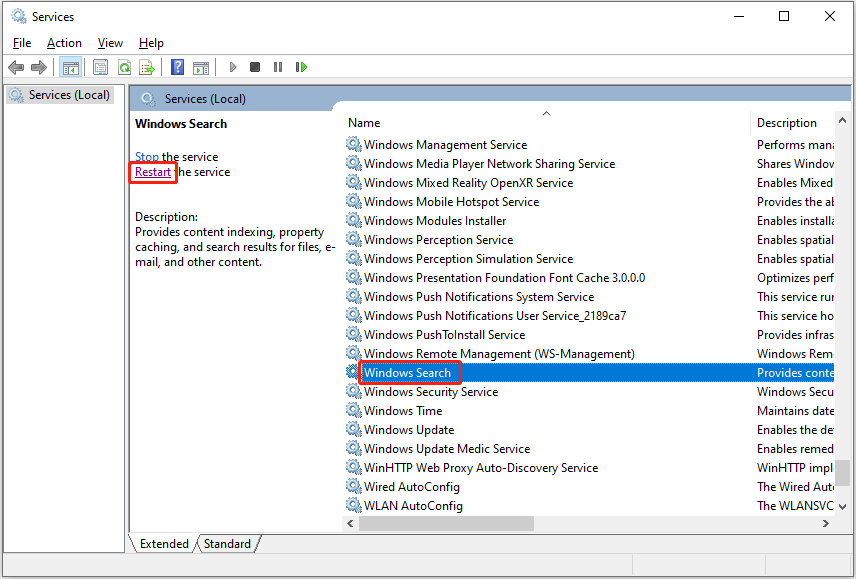
Step 4. Repeat the same steps to restart the Background Tasks Infrastructure Service.
After that, restart your computer to check if the issue has gone.
Fix 2. Enable Windows Search Related Policies
Misconfigured group policy settings can cause many issues such as background apps permissions missing and Windows Search service not starting Windows 10/11. Therefore, you need to follow the instructions below to edit relevant policies.
Step 1. Press Windows + R key combination to open the Run dialog box.
Step 2. Type gpedit.msc in the input box and press Enter.
Step 3. In the new window, navigate to Computer Configuration > Administrative Templates > Windows Components > Search.
Step 4. In the right panel, find and double-click Do not allow web search. Then select the Disabled or Not Configured option.
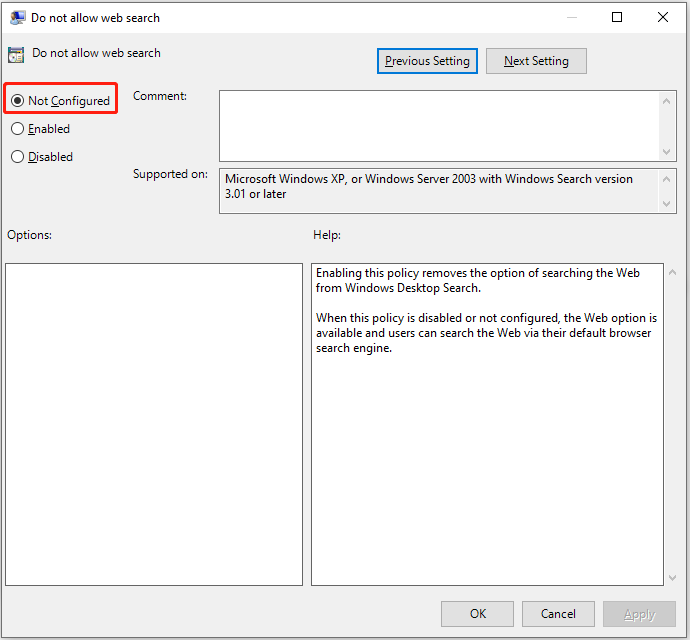
Step 5. Click Apply and OK sequentially to make this change take effect.
Step 6. Repeat the steps to disable the Don’t search the web or display web results in Search policy.
Fix 3. Run the Search and Indexing Troubleshooter
Windows built-in troubleshooters can help with various Windows issues. For instance, you can run the System Maintenance troubleshooter to fix the “apps and programs automatically minimize” issue. Here, since the Windows Search service cannot be started, you need to run the Search and Indexing troubleshooter.
Step 1. Press Windows + I key combination to open Settings.
Step 2. Click Update & Security, then move on to the Troubleshoot section and click Additional troubleshooters.
Step 3. In the new window, scroll down to click Search and Indexing > Run the troubleshooter.
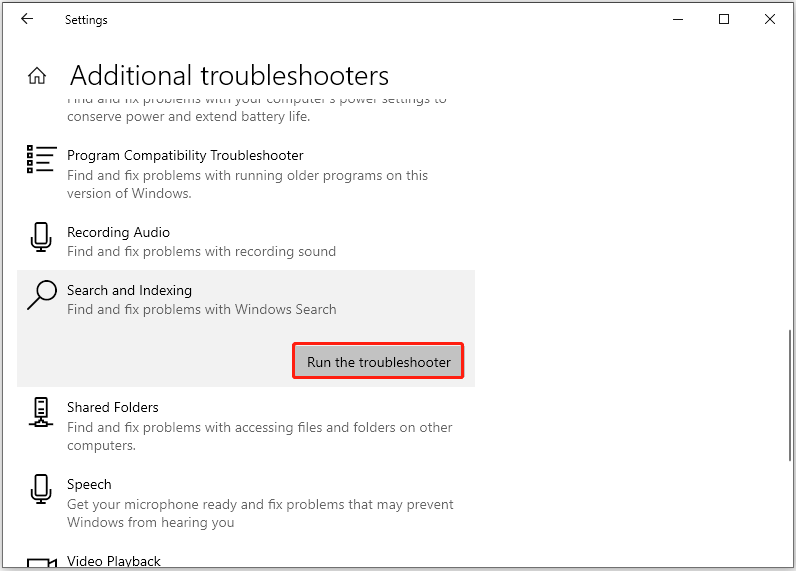
Wait patiently until the error detection and repair process is complete. Then check if the “Windows could not start the Windows Search service on Local Computer” error persists.
Fix 4. Delete Temporary Files
Abandoned temporary files not only take up a lot of hard disk space, and reduce system performance, but may also cause Windows search to fail to start. In this case, you need to delete Windows temporary files.
Step 1. Press Windows + R key combination to open Run.
Step 2. Type %temp% in the text box and press Enter. This operation will lead you to the folder where temporary files are stored.
Step 3. Select all temporary files and right-click them to select Delete.
Top Recommendation
If your important files are deleted by mistake, you can use MiniTool Power Data Recovery, the best free data recovery software, to recover deleted files.
MiniTool Power Data Recovery supports disappeared USB copied files recovery, SD card data recovery, computer hard drive recovery, external hard drive file recovery, and so on.
Free download MiniTool Power Data Recovery and give it a try.
MiniTool Power Data Recovery FreeClick to Download100%Clean & Safe
Fix 5. Run System File Checker
As mentioned before, corrupted system files can also cause the “Windows could not start the Windows Search service on Local Computer” error. To scan and repair corrupted system files, you can run the System File Checker tool by referring to this page.
Final Words
Facing the Windows Search service not starting Windows 10/11 issue, you can try the solutions listed above.
Should you have found any other effective fixes for this error message, welcome to contact us via [email protected]. Thank you so much.
Все способы:
- Решаем проблему с «Поиском» Windows 10
- Способ 1: Сканирование системы
- Способ 2: Запуск службы «Windows Search»
- Способ 3: Использование «Редактора реестра»
- Способ 4: Сброс настроек приложений
- Вопросы и ответы: 7
У некоторых пользователей Windows 10 прекращает работать «Поиск». Часто это сопровождается неработоспособностью меню «Пуск». Есть несколько действенных методов, которые помогут устранить данную ошибку.
Решаем проблему с «Поиском» Windows 10
В данной статье будут рассмотрены варианты решения проблемы с помощью «Командной строки», Powershell и других системных инструментов. Некоторые из них могут быть сложными, поэтому будьте внимательны.
Способ 1: Сканирование системы
Возможно, какой-то системный файл был поврежден. С помощью «Командной строки» можно провести сканирование целостности системы. Также вы можете просканировать ОС с помощью портативных антивирусов, ведь вредоносное программное обеспечение часто становится причиной повреждения важных компонентов Виндовс.
Подробнее: Проверка компьютера на наличие вирусов без антивируса
- Кликните правой кнопкой мыши на иконку «Пуск».
- Перейдите к «Командная строка (администратор)».
- Скопируйте такую команду:
sfc /scannowи выполните ее, нажав Enter.
- Система будет просканирована на предмет наличия ошибок. После обнаружения неполадок они будут исправлены.


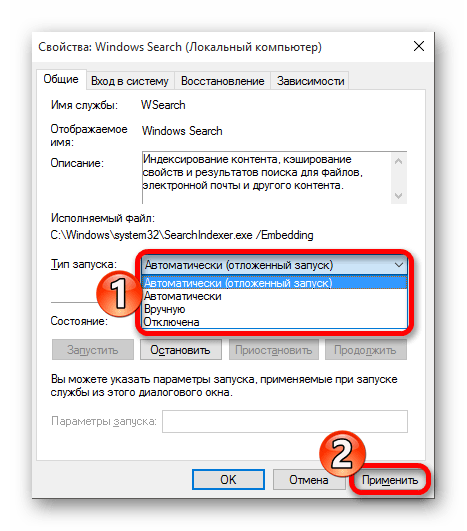
Способ 2: Запуск службы «Windows Search»
Возможно, служба, которая отвечает за функцию поиска Виндовс 10, отключена.
- Зажмите Win+R. Скопируйте и вставьте в поле ввода следующее:
services.msc - Кликните «ОК».
- В списке служб найдите «Windows Search».
- В контекстном меню выберите «Свойства».
- Настройте автоматический тип запуска.
- Примените изменения.


Способ 3: Использование «Редактора реестра»
С помощью «Редактора реестра» можно решить множество проблем, в том числе и неработоспособность «Поиска». Данный метод требует особой внимательности.
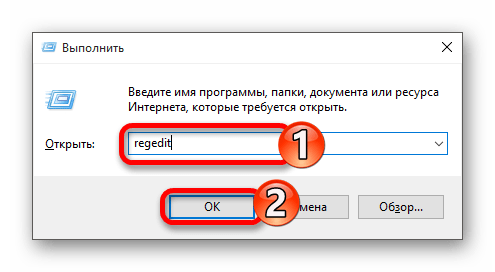
- Зажмите Win+R и напишите:
regedit - Запустите, нажав «ОК».
- Перейдите по пути:
HKEY_LOCAL_MACHINE\SOFTWARE\Microsoft\Windows Search - Найдите параметр «SetupCompletedSuccesfuly».
- Откройте его двойным кликом и измените значение «0» на «1». Если стоит второе значение, ничего менять не нужно.
- Теперь раскрываем раздел «Windows Search» и находим «FileChangeClientConfigs».
- Вызываем на директории контекстное меню и выбираем «Переименовать».
- Впишите новое имя «FileChangeClientConfigsBak» и подтвердите.
- Перезагрузите устройство.


Способ 4: Сброс настроек приложений
Сброс настроек может решить задачу, но будьте осторожны, ведь в некоторых случаях этот метод может стать причиной других проблем. Например, нарушить работоспособность «Windows Store» и его приложений.
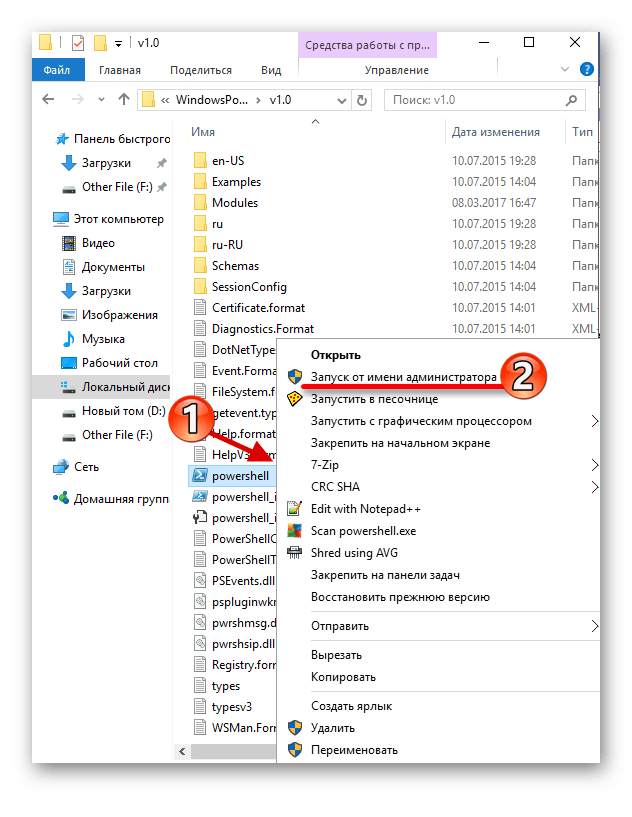
- По пути
C:\Windows\System32\WindowsPowerShell\v1.0\найдите Powershell.
- Запустите его с привилегиями администратора.
- Скопируйте и вставьте следующие строки:
Get-AppXPackage -AllUsers | Foreach {Add-AppxPackage -DisableDevelopmentMode -Register “$($_.InstallLocation)\AppXManifest.xml”} - Запустите нажатием клавиши Enter.

Windows 10 все ещё имеет недочеты и недостатки. Проблема с «Поиском» не новая и иногда все же дает о себе знать. Некоторые из описанных методов несколько сложные, другие проще, но все они довольно эффективные.
Наша группа в TelegramПолезные советы и помощь
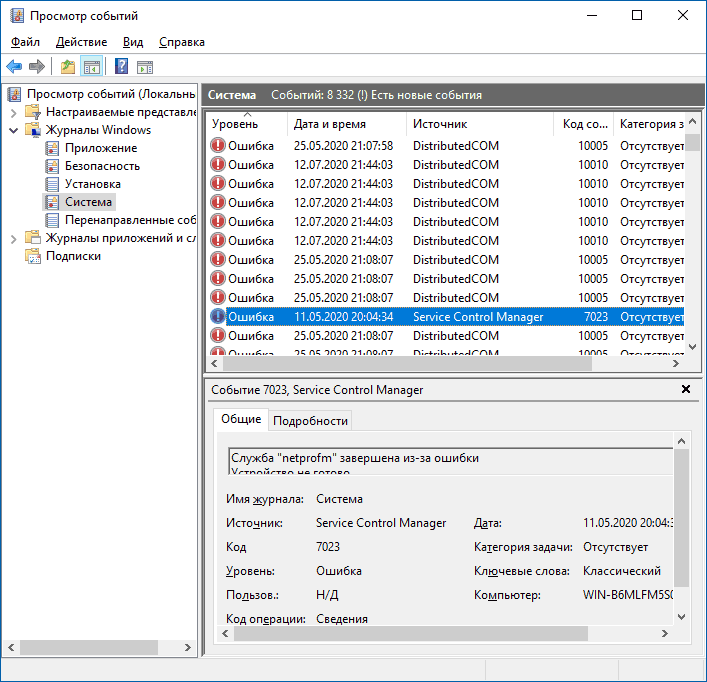
Если вы из тех пользователей, которые заглядывают в просмотр событий Windows 10 (Win+R — eventvwr.msc) для анализа ошибок, с большой вероятностью вы там обнаружите ошибки, имеющих код события 7000, 7001, 7009, 7011, 7023, 7031, 7034, а возможно и некоторыми другими похожими. Сообщения об ошибках могут быть разными, но всегда связаны со службами Windows, например:
- 7000 Служба не ответила на запрос своевременно
- 7001 Служба является зависимой от службы, которую не удалось запустить из-за ошибки Не удалось запустить дочернюю службу
- 7001 Служба является зависимой от службы, которую не удалось запустить из-за ошибки Присоединенное к системе устройство не работает
- 7011 Превышение времени ожидания (60000 мс) при ожидании ответа транзакции от службы
- 7023 Служба завершена из-за ошибки Устройство не готово
- 7031 Служба была неожиданно завершена. Это произошло (раз): 1
- 7034 Служба неожиданно прервана. Это произошло (раз): 1
- 7043 Служба не завершила работу должным образом после получения управления для выполнения предзавершающих операций
В этой инструкции подробно о том, что может вызывать такие ошибки в Windows 10, как исправить ошибки с указанными кодами от источника Service Control Manager в Windows 10, стоит ли это делать и дополнительная информация, которая может оказаться полезной.
Ошибки с источником Service Control Manager — причины, необходимость исправления
Прежде чем вы решите переживать и пытаться исправить ошибки с кодами события 7000, 7001, 7009, 7011, 7023, 7031, 7034, 7043 и источником Service Control Manager, учитывайте следующий важный момент: такие ошибки вы встретите на любой, даже самой чистой и беспроблемной системе Windows 10. Если в просмотре событий эти ошибки появляются время от времени, а не ежедневно при включении компьютера, работе и завершении работы, причинами могут быть обычные процессы работы Windows 10 связанные с:
- Установкой обновлений (при этом некоторые службы могут завершаться, а другие, зависимые от них, вызывать ошибку).
- Установкой новых версий драйверов (в том числе и самой Windows 10, в этих случаях мы можем получить ошибки, связанных с тем, что устройство не готово или не работает).
- Установкой сторонних программ, взаимодействующих со службами (иногда лишь временно, для успешного выполнения установки).
- Автоматическим обслуживанием системы (редко).
Во всех случаях появление ошибок возможно не при самом процессе, а после повторного включения компьютера или ноутбука, так как многие процессы установки завершаются лишь после перезагрузки.
В случае же если у вас эти ошибки возникают ежедневно, причины могут быть самыми разными, среди них:
- Ручное вмешательство в тип запуска служб, отключение служб, использование различных программ «для оптимизации», «ускорения» и «отключения слежки» Windows Получить представление о том, как отключение одних служб может влиять на работу других можно получить из статьи Не удалось запустить дочернюю службу — как исправить.
- В случае, если ошибок нет после перезагрузки компьютера или ноутбука, но присутствуют после завершения работы и последующего включения (особенно по прошествии некоторого времени), можно попробовать отключить быстрый запуск Windows 10. Желательно также вручную установить все оригинальные драйверы чипсета с сайта производителя ноутбука или материнской платы, в случае если у вас ПК.
- Нестабильная работа каких-либо устройств (плохое подключение, неисправности). Иногда — проблемы при задействовании устройства после перехода в режим энергосбережения. Можно попробовать отключить экономию энергию для устройств в дополнительных параметрах схемы электропитания в панели управления и в свойствах устройства в диспетчере устройств на вкладке «Управление электропитанием» (присутствует не для всех устройств). Особенно часто это касается USB устройств, сетевых и Wi-Fi адаптеров.
- Иногда ошибки могут появляться при завершении работы, если какие-то сторонние программы (например, клиенты для загрузки файлов из Интернета) мешают завершиться какой-либо сетевой службе.
Также при регулярном появлении указанных ошибок стоит проверить, а появляются ли они, если выполнить чистую загрузку Windows 10 — если нет, можно предположить, что правильному запуску служб мешают какие-то сторонние программы или антивирусы. Также может оказаться, что эти программы инициируют запуск служб, которые не могут быть запущены из-за отключенных дочерних служб.
Если проблема появилась недавно, вам могут помочь точки восстановления системы на дату, предшествующую появлению ошибок.
Увеличение времени ожидания запуска служб для ошибок с кодами 7000, 7009 и 7011
Ошибки типа «Превышение времени ожидания» или «Не ответила на запрос своевременно» при запуске служб c кодами события 7000, 7009 и 7011 могут появляться на медленных компьютерах и ноутбуках с HDD. В таких ситуациях мы можем увеличить время ожидания запуска службы:
- Запустите редактор реестра, для этого нажмите клавиши Win+R на клавиатуре, введите regedit и нажмите Enter.
- Перейдите в раздел реестра
HKEY_LOCAL_MACHINE\SYSTEM\CurrentControlSet\Control
- В правой панели редактора реестра найдите параметр с именем ServicesPipeTimeout. Если такой параметр отсутствует, нажмите правой кнопкой мыши в пустом месте панели справа, выберите «Создать» — «Параметр DWORD» и задайте имя ServicesPipeTimeout для этого параметра.
- Дважды нажмите по параметру ServicesPipeTimeout, выберите «Десятичный» и задайте значение 60000.
- Нажмите Ок, закройте редактор реестра и перезагрузите компьютер.
Указанные действия установят время ожидания для запуска службы равным 60 секунд. Если этого окажется недостаточно, можно попробовать увеличить значение.
Надеюсь, предложенный материал поможет разобраться с ошибками Service Control Manager в просмотре событий Windows 10 и предпринять действия для исправления ситуации при необходимости.
It seems like after upgrading to Windows 8.1, the various issues regarding to different classic features has been reported. Few days back, we posted about the issue of “Print Spooler” service failing to start in Windows 8.1, previous to this we also shared the fix for failure of Bluetooth drivers in this same iteration of Windows. Today, yet again, we came around another issue which is related to indexing. Actually, whenever we tried to start Windows Search in an issued; upgraded copy of Windows 8.1, following error resulted us back:
Page Contents
Windows could not start the Windows Search service on Local Computer.
Error 2: The system cannot find the file specified.
As a tip, remember whenever you’re resulted Error code 2 regarding services, you must give a try to System File Checker (running SFC /SCANNOW command in administrative Command Prompt). In most of cases, System File Checker fixes the issue after a reboot. If the problem isn’t fixed by it, then the fix may be different depending upon the service on which you’re facing trouble. Well, to fix the issue for Windows Search; that is still not fixed by System File Checker, you can try this fix:
FIX : Windows Could Not Start The Windows Search Service On Local Computer In Windows 10/8/7
Registry Disclaimer: The further steps will involve registry manipulation. Making mistakes while manipulating registry could affect your system adversely. So be careful while editing registry entries and create a System Restore point first.
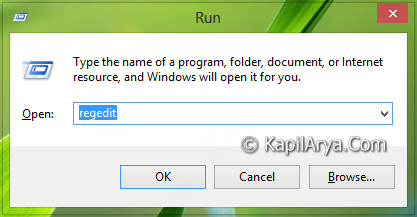
1. Press + R and put regedit in Run dialog box to open Registry Editor (if you’re not familiar with Registry Editor, then click here). Click OK.
2. Navigate here:
HKEY_LOCAL_MACHINE\SOFTWARE\Microsoft\Windows Search
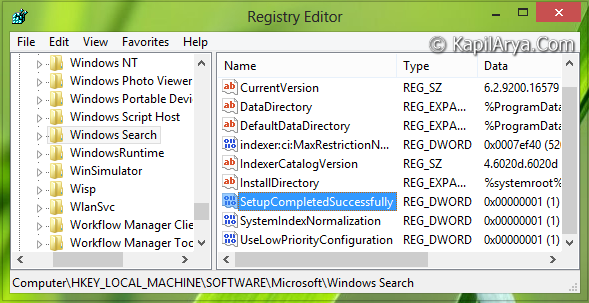
3. In the right pane of this location, look for the registry DWORD named SetupCompletedSuccessfully, it must be having its Value data set to 1. Double click on the same DWORD to modify its Value data:
4. In the above shown window, replace the Value data to 0 from 1. Click OK then, you may now close the Registry Editor and reboot the system to get your problem fixed. If still, the issue is not cleared; then go to next step.
5. Navigate to following registry key:
HKEY_LOCAL_MACHINE\SOFTWARE\Microsoft\Windows Search\FileChangeClientConfigs
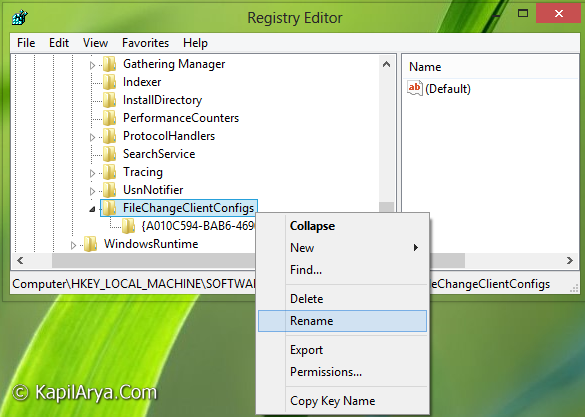
6. As shown in the above screenshot, right click over the key FileChangeClientConfigs and select Rename. Now rename the key by adding BAK at the end part, that is : rename it to FileChangeClientConfigsBAK.
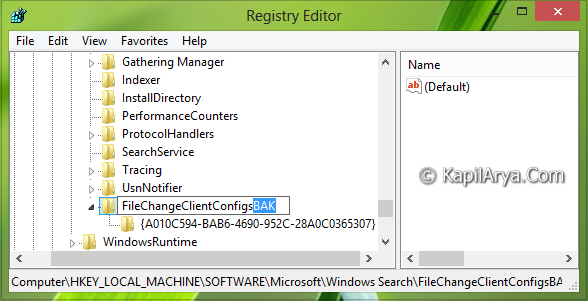
7. Now try to start Windows Search service in Services window, it should work now. After a reboot the Windows will automatically change the key name which we renamed in the above step to FileChangeClientConfigs as was earlier; but the good thing is that issue has been fixed so far!
That’s it!
FYI: If you’re facing this issue on Windows 8, then step 5-7 are not applicable as the key mentioned in these steps doesn’t exist in Windows 8.
Related: The Windows Search service on local computer started and then stopped.