
Среди различных советов на тему оптимизации Windows 10 или работы системы с SSD вы можете встретить рекомендацию отключить индексирование. Сам метод оптимизации неоднозначный, но, если вы решили, что это требуется сделать, а поиск не используете, вполне можете применить его.
Отключение индексирования возможно путем изменения соответствующих параметров системы в панели управления, в том числе и для каждого диска отдельно, так и путем отключения соответствующей службы. В этой простой инструкции подробно о том, как отключить индексирование Windows 10 различными способами. Также может быть интересным: Настройка SSD для Windows 10, Программы для SSD.
- Отключение индексирования в панели управления Windows 10 и свойствах диска
- Отключить службу индексирования (Windows Search)
Отключаем индексирование Windows 10 в параметрах панели управления
Стандартный метод настройки и отключения индексирования Windows 10 — использование соответствующего раздела в панели управления:
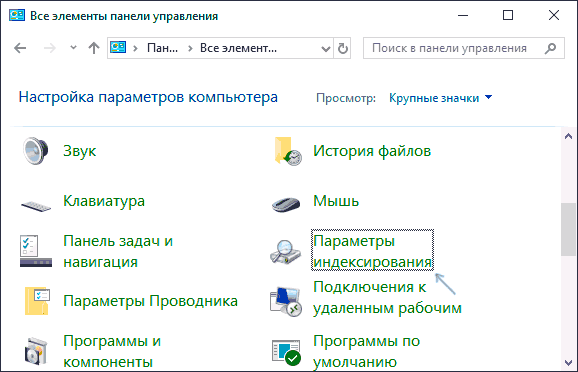
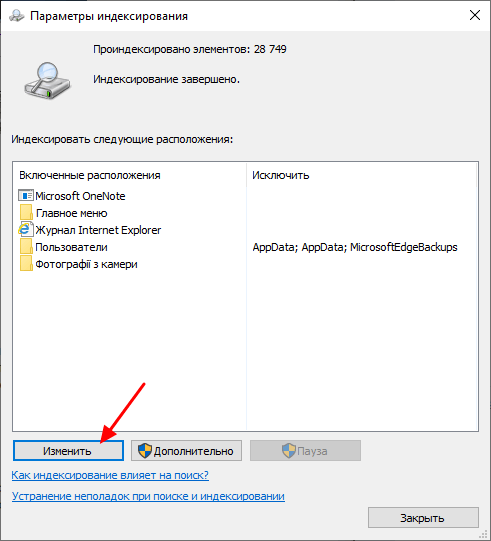
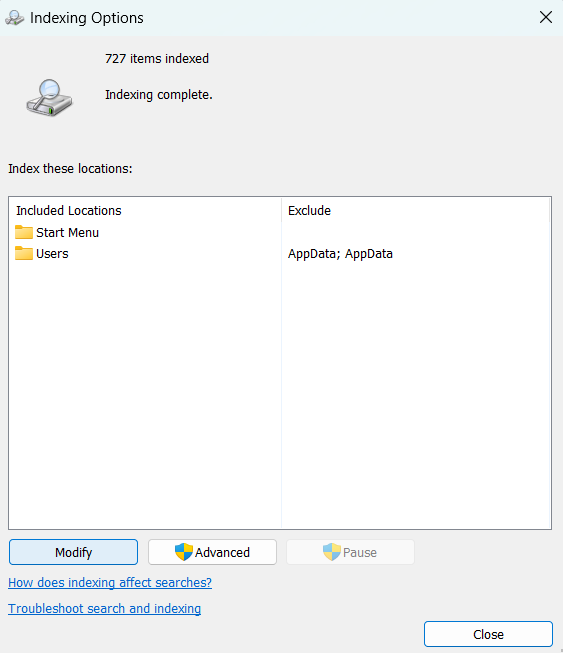
- Откройте панель управления, а затем — Параметры индексирования. Можно просто начать набирать в поиске на панели задач слово «Индексирование», чтобы быстро открыть нужный пункт.

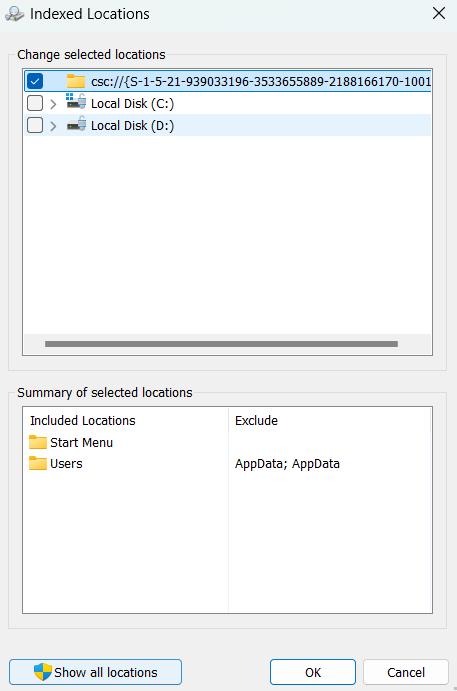
- В открывшемся окне вы увидите список расположений, для которых включено индексирование. Чтобы изменить этот список нажмите кнопку «Изменить».

- Снимите отметки с тех расположений, которые не требуется индексировать и примените настройки.


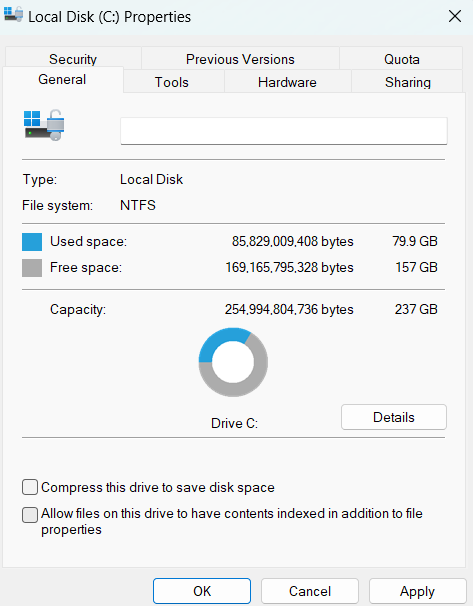
Дополнительно, вы можете отключить индексирование содержимого файлов на отдельных дисках (например, только для SSD) как самую затратную по ресурсам операцию индексирования. Для этого достаточно выполнить следующие шаги.
- Откройте свойства нужного диска.
- Снимите отметку «Разрешить индексировать содержимое файлов на этом компьютере в дополнение к свойствам файлам» и примените сделанные настройки.
Как видите, все сравнительно несложно, но при этом сама служба индексирования на компьютере продолжает работать.
Отключение службы индексирования Windows 10 (Windows Search)
Если вам требуется полностью отключить индексирование Windows 10, сделать это можно путем отключения соответствующей системной службы, которая называется Windows Search:
- Нажмите клавиши Win+R на клавиатуре, введите services.msc
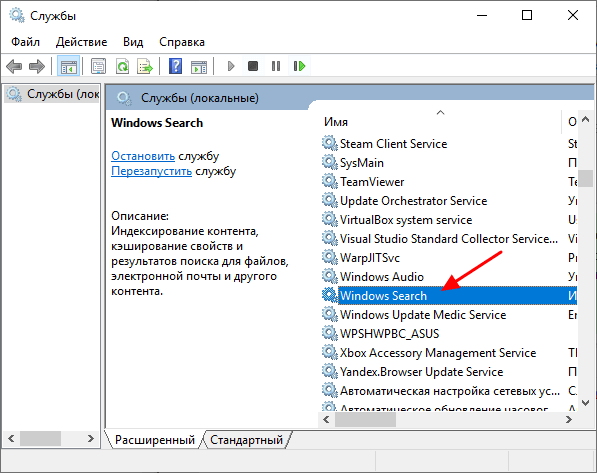
- Найдите в списке служб «Windows Search».

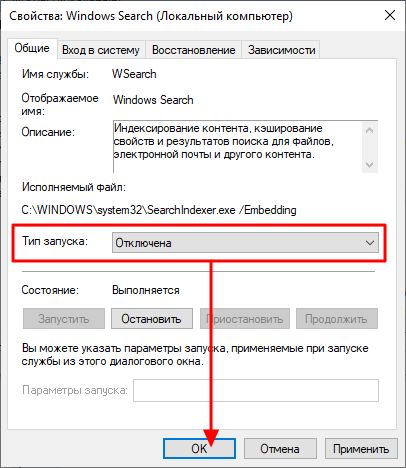
- В типе запуска установите «Отключена», примените настройки и перезагрузите компьютер (если просто отключить и остановить, она запустится снова).


После этого индексирование в Windows 10 будет полностью отключено, но поиск по параметрам, системным элементам и установленным программам в панели задач продолжит работать, равно как и поиск по файлам, если использовать окно поиска в проводнике (в последнем случае вы будете видеть уведомление о том, что поиск может быть медленным, так как индексирование не выполняется).
Содержание
- Windows Search что это за служба и как ее отключить? (служба индексирования)
- Служба поиска, индексатор службы Microsoft Windows Search и его влияние на нагрузку процессора
- Индексатор службы Microsoft Windows Search грузит процессор?
- Как можно уменьшить нагрузку службы Microsoft Windows Search на процессор?
- Определяем папки, которые служба поиска должна индексировать
- Устанавливаем классический режим поиска
- Активируем привязку производительности индексатора к параметрам питания устройства
- Отключаем службу Windows Search
- Как отключить (включить) индексирование поиска (службу Windows Search) в Windows
- Как отключить индексирование
- Включение индексирования поиска
- Управление через командную строку
- Как отключить индексирование Windows 10
- Отключаем индексирование Windows 10 в параметрах панели управления
- Отключение службы индексирования Windows 10 (Windows Search)
- Как отключить индексирование в Windows 10
- Отключение через Панель управления Windows 10
- Отключение для отдельных дисков
- Отключение через службы Windows 10
Windows Search что это за служба и как ее отключить? (служба индексирования)
Привет друзья Если у вас на компьютере много файлов, то я вас понимаю, ибо у меня такое было недавно. Короче у меня было очень много всяких файлов, папок, а часть их я упаковал в архив, чтобы сэкономить место на диске. То есть упаковал часть бардака в архив. Но потом конечно я все таки взял и сделал порядок со всем этим, и кстати времени ушло совсем не много
Разработчики Windows сели и начать думать, что делать таким пользователям, у которых очень много всякого на компе есть и они не хотят наводить порядок. Как сделать так, чтобы они могли быстро получить доступ к какому-то файлу, зная его только имя. И вот тут они создали службу Windows Search, которая помогает находить любые файлы за считанные секунды.
Как она работает? Ну, я думаю что описывать тонкости ее работы на программистском языке просто нет смысла, ибо это вряд ли вам будет интересно. Если по простому, то все происходит примерно так. Когда вы за компьютером не работаете или занимаетесь каким-то легкими задачами, то Windows начинает смотреть жесткий диск. В прямом смысле начинает его сканировать. Но не просто.. а очень медленно, потихонечку, чтобы не мешать вам или программам которые работают.
Сканирует она его до тех пор, пока не просканирует полностью. Все результаты, что где лежит, какой файл, все это она записывает в свою специальную базу. Эта база, это такое быстрое место, там все операции выполняются очень быстро. И вот когда вы пытаетесь что-то найти на компьютере, то используется эта база и находится все просто мгновенно. Но косяк службы в том, что она добавляет новые данные в эту базу. И бывает что добавляет часто. Так что это вызывает тормоза, но мной эта инфа не была проверена
Служба Windows Search работает под управлением процесса SearchIndexer.exe, так что если вы его заметили в диспетчере, то теперь будете знать что это за процесс.
Когда стоит отключать службу Windows Search? В том случае, если у вас на компьютере все файлы и папки упорядочены, в общем порядок со всем. И вы редко когда что-то ищите. Да и вообще, не всем эта служба нравится, все таки я не один раз встречал мнение в интернете, что она замедляет работу жесткого диска, что грузит немного Windows ну и все в этом духе.
Итак, давайте теперь я покажу как ее отключить. Открываем диспетчер задач, идем там на вкладку Службы и нажимаем эту кнопку:

Откроется список служб (сразу рекомендую переключить на стандартны вид, это внизу окна есть опция), в этом списке ищем Windows Search:

Нажимаем два раза по этой службе, откроется такое окно свойств. Так вот, что тут нужно сделать, чтобы службу отключить? Тип запуска выбираем Отключена, а потом нажимаем на кнопку Остановить, чтобы текущая работа службы была прекращена. Вот что и где нужно нажимать:

Все, теперь служба Windows Search уже не работает. Кстати, отключение данной службы также отключит и сервис индексации файлов, ну хотя это наверно одно и тоже. То есть скорее всего используется для этого та же технология.
То есть если в панели управления открыть значок Параметры индексации:

То вы увидите, что индексирование файлов не выполняется:

Так что теперь вы знаете и как отключить индексирование файлов в Windows
Вообще разработчики из Microsoft говорят что в принципе отключать эту службу Windows Search не стоит. Но при этом они согласны с тем, что таки да, могут быть глюки или тормоза, в случае если очень мало оперативной памяти.
Есть еще одна опция по поводу индексирования файлов.
В общем смотрите, заходим в свойства диска вот так:

Теперь тут будет галочка, которую можно снять:
Данную опцию рекомендуют отключать для SSD и оставлять для обычных жестких дисков. Если будете отключать эту функцию, там будет окошко, где нужно выбрать к чему применить это действие. Выбирайте что к диску и ко всем вложенным папкам и файлам:

Потом будет еще такое окошко:
И потом начнется применение атрибутов:

Если будет сообщение что мол там что-то сделать нельзя, и если будет кнопка пропустить все, то нажимаете ее Процесс может быть немного длительным, в это время лучше ничего не делать за компом, ну это просто мой совет.
Ну вот вроде бы все что касается индексирования, то мы отключили.
Хотите мое мнение? На современных Windows и на современном железе все эти штуки отключать не стоит, это уже не те времена, когда что-то глючило. Нет, ну может быть в Windows 7 некоторые глюки и есть, хотя я думаю что они уже исправили многое что в обновлениях. Но вот Windows 10 лично у меня работает четко. Ни одного глюка и все эти технологии включены, и индексирование, и SuperFetch, и все остальное. Я просто их не отключал, поэтому не помню что там еще есть И у меня реально работает все быстро, программы запускаются быстро, браузеры работают очень быстро. И все эти плюшки остаются включенными. Это просто мой опыт, вы сами решайте что отключать а что нет.
Ну все, теперь вы знаете что это за служба Windows Search и как ее отключать. Ну а нужно это делать или нет, я думаю вы сможете решить для себя сами, я инфу для раздумий предоставил. Удачи вам
Источник
Служба поиска, индексатор службы Microsoft Windows Search и его влияние на нагрузку процессора
Служба Windows Search отвечает за поиск файлов и папок на устройстве. Она способна искать данные не только по наименованию файлов, но и по содержанию этих файлов (метаданным, свойствам и т.д.). Например, поиск по содержанию файлов по умолчанию активирован для текстовых и офисных документов (txt, doc, docx, xls, xlsx, pdf).
На компьютере может быть очень много файлов и папок. Чтобы поиск по устройству не занимал много времени, служба Windows Search использует индексацию файлов. Процесс индексирования представляет собой чтение диска с данными и запись информации о просканированных файлах в базу данных. Индексирование осуществляется в фоновом режиме. Когда вы сохраните новый документ в индексированном расположении, служба Windows Search проиндексирует его и сохранит собранную информацию о нём в своей базе.
Индексатор службы Microsoft Windows Search грузит процессор?
Обычно индексатор службы Microsoft Windows Search не грузит процессор. В нашем случае, когда все файлы проиндексированы, нагрузка на центральный процессор составляет 0%, а объём используемой оперативной памяти составляет порядка 80МБ.
Поэтому, если на вашем устройстве индексатор службы Microsoft Windows Search грузит процессор, это означает, что в настоящее время идёт индексирование файлов. Если вы активно пользуетесь устройством, нажимаете на клавиши клавиатуры, водите мышкой, служба Windows Search замедляет скорость сканирования. В нашем случае при сниженной скорости индексирования нагрузка на процессор составляет 0,6-1,2%.
Конечно, нагрузка будет больше, если процессор относительно старый и имеет одно-два логических ядра. Поэтому приведённые значения нагрузки индексатора службы Microsoft Windows Search на процессор следует считать условными.
Как можно уменьшить нагрузку службы Microsoft Windows Search на процессор?
Определяем папки, которые служба поиска должна индексировать
Несколько простых способов в отдельной статье
Уменьшив количество папок и дисков в окне “Индексируемые расположения”, вы сможете сократить нагрузку индексатора службы Microsoft Windows Search на процессор. Но имейте в виду, что поиск в исключенных расположениях будет долгим. А в случае использования кнопки поиска в панели задач поиск в неиндексированных расположениях осуществляться не будет. Поэтому не старайтесь исключать все папки. Оставьте папки, в которых вы часто используете функцию поиска.
Устанавливаем классический режим поиска
В Windows 10 предусмотрено 2 режима поиска: классический и расширенный. При классическом режиме поиск осуществляется только в библиотеках пользователя и на рабочем столе. Расширенный режим позволяет искать файлы по всему компьютеру, за исключением системных папок. Расширенный режим, как предупреждает операционная система, может снизить уровень заряда и увеличить нагрузку на центральный процессор. Особенно это актуально для владельцев ноутбуков, которым важно, чтобы их устройство проработало в автономном режиме как можно дольше.

Активируем привязку производительности индексатора к параметрам питания устройства
Изменять режим производительности индексатора стало возможным с момента появления Windows 10 версии 2004 (майское обновление 2020 года). Если включить параметр “Использовать параметры режима питания устройства”, служба Windows Search будет оценивать, запущен ли на компьютере режим энергосбережения, пониженного электропотребления или игровой процесс. Если да, то служба поиска приостановит индексацию в фоновом режиме.
Также при включении производительности индексатора служба поиска приостановит индексацию файлов в фоновом режиме, если загрузка центрального процессора превысит 80% или загрузка жесткого диска поднимется свыше 70%.
Отключаем службу Windows Search
Отключая службу Windows Search, вы отключите индексирование папок и файлов в фоновом режиме.
Вы сможете осуществлять поиск по устройству, но он будет медленным.


А как у вас работает служба поиска в Windows? Испытываете ли вы проблемы при ее работе в фоновом режиме?
Расскажите о своем опыте в комментариях 😉
Источник
Как отключить (включить) индексирование поиска (службу Windows Search) в Windows

В данной статье показаны действия, с помощью которых можно отключить или включить индексирование поиска (службу поиска Windows Search) в операционной системе Windows.
По умолчанию Windows использует индекс при поиске, чтобы ускорить результаты поиска. Индекс поиска выполняет индексирование контента, кэширование свойств и результатов поиска для файлов, электронной почты и другого контента.
Индекс использует службу поиска Windows Search и выполняется в фоновом режиме как процесс SearchIndexer.exe. Индекс автоматически перестраивается и обновляется при изменении, внесенных с момента последнего перестроения индекса, чтобы повысить точность результатов поиска.
Если вы предпочитаете выполнять поиск без использования индекса, можно полностью отключить индексирование поиска (службу поиска Windows Search). Если отключить индексацию поиска, то поиск займет немного больше времени, но результаты поиска всегда будут актуальными и точными.
Как отключить индексирование
Чтобы отключить индексирование поиска (службу поиска Windows Search), откройте консоль «Службы», для этого нажмите сочетание клавиш + R, в открывшемся окне Выполнить введите services.msc и нажмите клавишу Enter↵.


В открывшемся окне Свойства: Windows Search (локальный компьютер) остановите службу нажав кнопку Остановить.

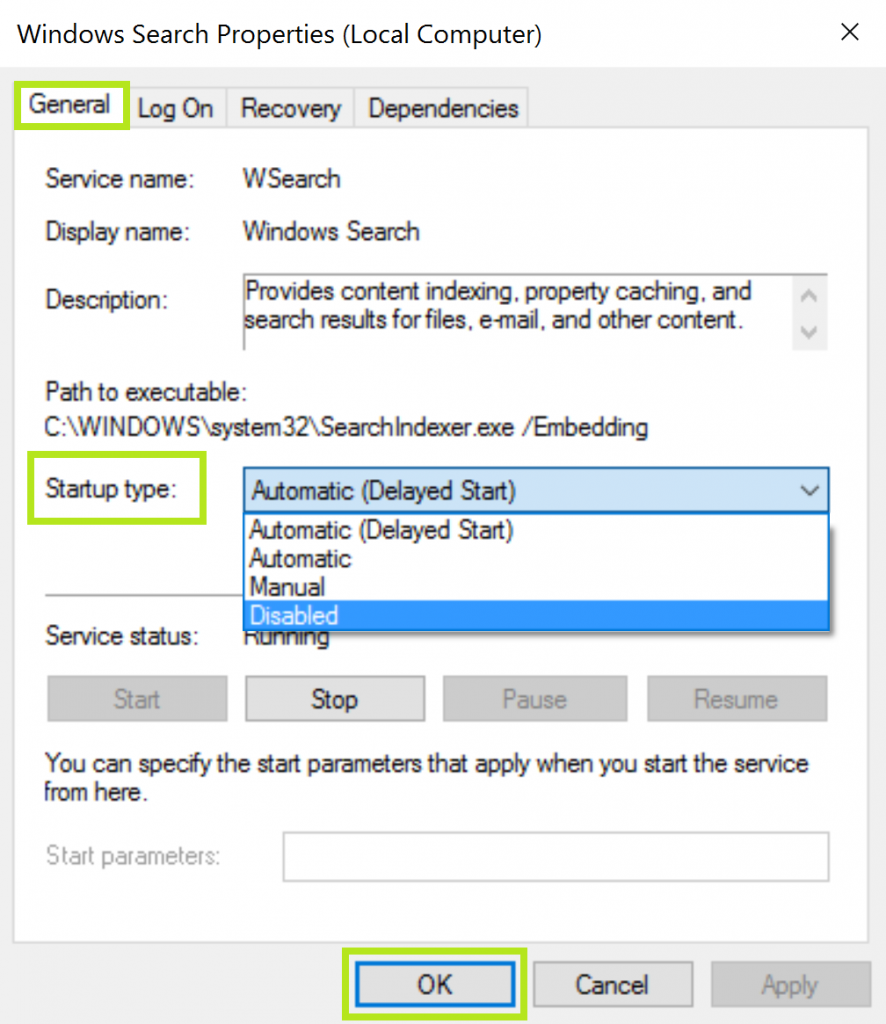
Затем в выпадающем списке Тип запуска: выберите пункт Отключена и нажмите кнопку OK.

Включение индексирования поиска
Чтобы включить индексирование поиска (службу поиска Windows Search), откройте консоль «Службы», для этого нажмите сочетание клавиш + R, в открывшемся окне Выполнить введите services.msc и нажмите клавишу Enter↵.


В открывшемся окне Свойства: Windows Search (локальный компьютер) в выпадающем списке Тип запуска: выберите пункт Автоматически (отложенный запуск) и нажмите кнопку Применить.

Затем запустите службу нажав кнопку Запустить.

Управление через командную строку
Также отключить или включить индексирование поиска (службу поиска Windows Search) можно используя командную строку.
Чтобы отключить индексирование поиска (службу поиска Windows Search), запустите командную строку от имени администратора и выполните следующую команду:
sc stop «wsearch» && sc config «wsearch» start=disabled

Чтобы включить индексирование поиска (службу поиска Windows Search), запустите командную строку от имени администратора и выполните следующую команду:
sc config «wsearch» start=delayed-auto && sc start «wsearch»
Источник
Как отключить индексирование Windows 10
Среди различных советов на тему оптимизации Windows 10 или работы системы с SSD вы можете встретить рекомендацию отключить индексирование. Сам метод оптимизации неоднозначный, но, если вы решили, что это требуется сделать, а поиск не используете, вполне можете применить его.
Отключение индексирования возможно путем изменения соответствующих параметров системы в панели управления, в том числе и для каждого диска отдельно, так и путем отключения соответствующей службы. В этой простой инструкции подробно о том, как отключить индексирование Windows 10 различными способами. Также может быть интересным: Настройка SSD для Windows 10, Программы для SSD.
Отключаем индексирование Windows 10 в параметрах панели управления
Стандартный метод настройки и отключения индексирования Windows 10 — использование соответствующего раздела в панели управления:
Дополнительно, вы можете отключить индексирование содержимого файлов на отдельных дисках (например, только для SSD) как самую затратную по ресурсам операцию индексирования. Для этого достаточно выполнить следующие шаги.
Как видите, все сравнительно несложно, но при этом сама служба индексирования на компьютере продолжает работать.
Отключение службы индексирования Windows 10 (Windows Search)
Если вам требуется полностью отключить индексирование Windows 10, сделать это можно путем отключения соответствующей системной службы, которая называется Windows Search:
После этого индексирование в Windows 10 будет полностью отключено, но поиск по параметрам, системным элементам и установленным программам в панели задач продолжит работать, равно как и поиск по файлам, если использовать окно поиска в проводнике (в последнем случае вы будете видеть уведомление о том, что поиск может быть медленным, так как индексирование не выполняется).
А вдруг и это будет интересно:
Почему бы не подписаться?
Рассылка новых, иногда интересных и полезных, материалов сайта remontka.pro. Никакой рекламы и бесплатная компьютерная помощь подписчикам от автора. Другие способы подписки (ВК, Одноклассники, Телеграм, Facebook, Twitter, Youtube, Яндекс.Дзен)
Как бы странно это не звучало — но есть много желающих выстрелить себе в ногу. Индексирование и службу поиска крайне нежелательно отключать, но — каждый сам себе админ.
Эта служба люто мучает хард, поэтому владельцам HDD лучше отключить наоборот, а если у тебя не много мелких нужных файлов на компьютере то и вовсе не нужна.
В 2020 году еще остались владельцы HDD.
Остались. Не выкидывать же) Правда у меня, например, только во внешних боксах уже остались, как архивные хранилища.
У меня 80 Тб дискового пространства на домашнем компьютере, хотелось бы посмотреть, как вы на SSD это организуете.
Владею 20Tb, думал это много )
Тем, кто еще не пробовал индексацию от windows, но у кого уже руки чешутся все поотключать-пооптимизировать, советую — попробуйте прежде.
Я вот без WinSearch обойтись не могу. С файлами работаю с Total Commander и дела максимально каталогизированы и четко систематизированы.. Ан, нет… Очень часто включаю старый добрый проводничок и задаю поиск… Иного пути найти инфу, особливо в документах …летней давности просто нет..
Обалденно я вам скажу работает поиск с индексацией.. Никакие плагины-ускорители поиска для TC тут и рядом не стояли..
Ну, это я тем, кто кроме танчиков еще для чего-то комп использует… ;)))
Всё именно так, Total Commander прекрасен, но про системные инструменты забывать не стоит.
А что ее пробовать, она по умолчанию включена! Я знаю что когда все проиндексируется, она не будет доставать. Но раньше приходилось часто переустанавливать Виндовс и это индексация конкретно доставала, при каждом открытии проводника приходилось ждать. С тех пор, всегда отключаю индексацию на диске С: (SSD). На современных компах поиск длится не более 10-20 сек.
Не только в танчики не играю, но и в прочие, ну скажем исключая косынку для перекура. С компьютерами профессионально связан почти 30 лет. Если вы не можете обойтись без WinSearch, это не значит, что он другим для выполнения работ по кругу служебных обязанностей сильно требуется, а где-то и не только поиск не нужен как зайцу пятая нога.
80 Тб дискового пространства, не всё заполнено, разумеется, на индексация на десятке была отключена сразу. Вообще за 25 лет работы с компьютерами её не использовал, отключал во всех системах, так же как обновление доступа к файлам при открытии папки. В TC и его аналогах никаких «ускорителей» не использовал, поиском крайне редко пользоваться приходится, и так знаю, где что искать в этой бездне файлов.
В десятке служба поиска не только файлы ищет, но необходимости в ней вообще не ощущаю, тем более что она грубо нарушает приватность и отправляет информацию о всех результатах поисковых запросов на внешние сервера.
Первым делом ставлю на комп прогу Everything — и отключаю индексации, не знаю на чем уж она там написана (видимо на с) но ресурсы не жрет, удобство и скорость +100
Индексирование настолько хорошая штука что в новой обнове винды ее удалят, м-да, очень хорошая штука
Индексирование полезно отключать, если на на компьютере сотни тысяч мелких файлов, на диске С: мало свободного места, а поиском пользуешься редко. У меня так освободилось порядка 20 гб на системном ssd (120gb). Переносить индекс на с ssd на hdd посчитал бесполезной затеей
Я для поиска использую Everything, моментально ищет, т.к индексирует сразу весь диск, но в озу занимает 450 мегабайт.
Источник
Как отключить индексирование в Windows 10
Индексирование в Windows 10 – это процесс, который позволяет ускорить поиск файлов на компьютере. Система заранее проходит все имеющиеся файлы и составляет индекс. В дальнейшем поиск сначала выполняется в уже подготовленном индексе и уже после этого непосредственно в файловой системе. Это позволяет значительно ускорить поиск, особенно если на компьютере много файлов.
Недостатками индексирования является повышенная нагрузка на процессор и накопитель. Если на компьютере используется SSD, то это также приводит к сокращению его ресурса. Из-за этого многие пользователи предпочитают отключать данную функцию.
Отключение через Панель управления Windows 10
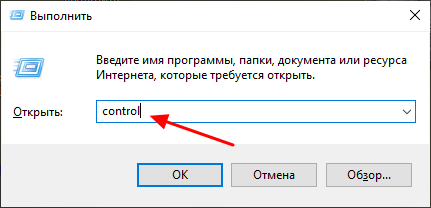
Если вы решили отключить индексирование в Windows 10, то оптимальный вариантом будет стандартный способ с использованием старой « Панели управления ». Чтобы открыть « Панель управления » нажмите комбинацию клавиш Win-R и выполните команду « control ».
После открытия «Панели управления» нужно воспользоваться поиском в верхней части окна и найти раздел « Параметры индексирования ».
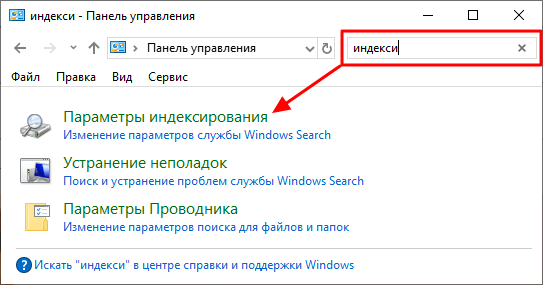
Дальше открываем раздел « Параметры индексирования » и нажимаем на кнопку « Изменить ».
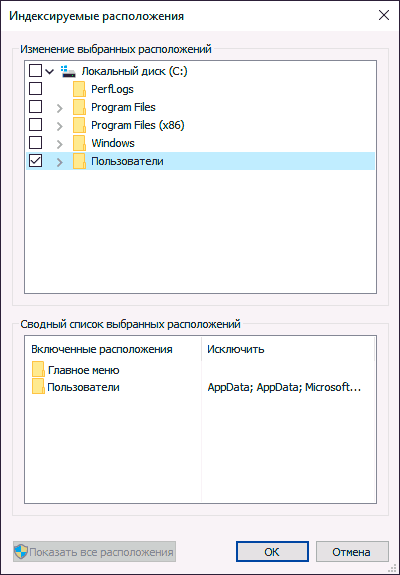
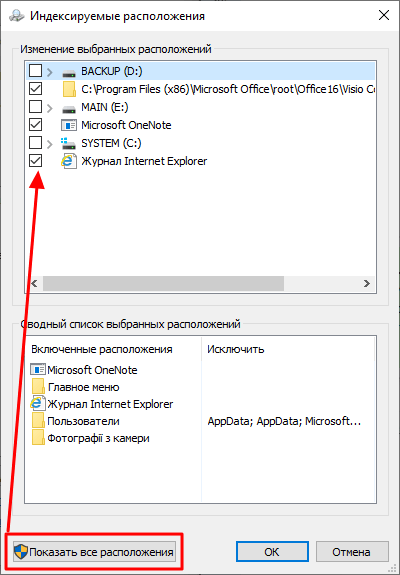
В результате перед вами появится окно, в котором можно изменить список расположений, которые используются для индексирования. Для того чтобы отключить данную функцию нажмите на кнопку « Показать все расположения », снимите все отметки и сохраните настройки нажатием на кнопку « ОК ».
Отключив все расположения, вы фактически прекратите работу индексации.
Отключение для отдельных дисков
Кроме описанного выше способа есть альтернативный вариант, вы можете отключить индексирование в свойствах диска. Для этого откройте окно « Этот компьютер », кликните правой кнопкой мышки по любому диску и выберите « Свойства ».
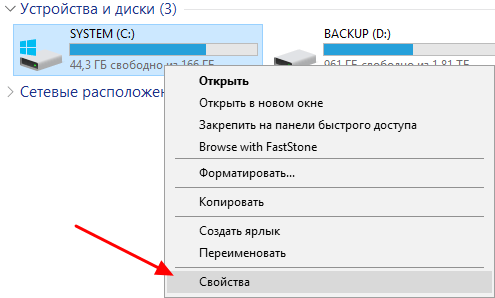
В открывшемся окне нужно снять отметку напротив пункта «Р азрешить индексирование » и после этого закрыть окно нажатием на кнопку « ОК ».
Эту процедуру можно повторить для всех дисков и таким образом полностью отключить индексирование.
Отключение через службы Windows 10
Описанные выше варианты отключают индексирование, но служба, которая отвечает за этот процесс, будет продолжать работать. Если вы хотите избавиться и о нее, то это можно сделать через оснастку « Службы ». Чтобы ее открыть нужно нажать комбинацию клавиш Win-R и в появившемся окне выполнить команду « services.msc ».
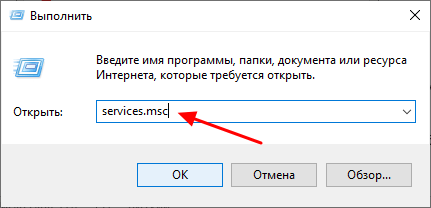
В окне « Службы » нужно найти и открыть службу « Windows Search ».
В появившемся окне нужно выбрать « Тип запуска – Отключена », закрыть окно нажатием на кнопку « ОК » и перезагрузить компьютер.
Обратите внимание, даже после полного отключения индексирования в системе продолжит работать поиск в меню « Пуск », « Панели управления », « Параметрах », а также поиск по файлам и папкам (в медленном режиме).
Источник
Table of contents
- What Is Microsoft Windows Search Indexer?
- Should I Disable Windows Search Indexing on Windows 10/11?
- How to Disable Windows Search Indexing in Windows 10/11
- Method 1: Disable Windows Search
- Method 2: Use the Command Prompt
- Method 3: Disable indexing for specific areas
- Method 4: Disable Windows Search indexing by hard drive
- Method 5: Turn off indexing for Microsoft Outlook
- Method 6: Rebuild your index
- How to Disable Indexing in Windows 10/11: Explained
- FAQ
There’s an ongoing conversation about whether to disable Windows Search indexing or keep it running. Microsoft introduced Microsoft Windows Search Indexer in Windows 2000 and hasn’t thought about dropping it. While you had to enable it in Windows 2000, it now comes enabled by default.
So, if you’re one of those who are against the service, you’ll have to disable it. Thankfully, this article shows you how to do that.
However, if you’re wondering whether you should disable indexing or not, you’re also in the right place. We’ll explain the concept of Windows Search indexing and tell you when it’s ideal to keep or disable the feature.
What Is Microsoft Windows Search Indexer?
Microsoft Windows Search Indexer (or simply Windows Search indexing) is a background service that scans and catalogs files, emails, and other content on your computer to speed up search results. Basically, it saves you from looking through every file manually each time you search. Instead, Windows uses this index—like a digital table of contents—to deliver faster, more accurate results.
Here’s how it works:
⇢ When Windows builds an index, it registers information for email messages, files, documents, and other content on your PC. The info it catalogs for the index includes things like file data, metadata, and contents.
⇢ After indexing, when you search for something, your PC refers to the created index rather than going through the actual file locations—this way, you get faster results.
So, for example, if you’re looking for a file, Windows checks its indexed information and pulls it up instead of going through your hard drive.
⇢ As you add, delete, or modify files, the index is updated in real time, keeping it current. Windows attempts to track all the changes on your computer. So, whenever you create or delete a file, the indexing service notes the changes. The same goes for new downloads and app installation and uninstallation.
Download Auslogics BoostSpeed
Your one-stop PC maintenance and optimization tool, this program will clean, speed up, repair and tweak your system to ensure maximum speed and efficiency.
Should I Disable Windows Search Indexing on Windows 10/11?
The answer to this question depends on your system. If you’re using a low-end PC or notice high disk or CPU usage , disabling Microsoft Windows Search Indexer might improve performance. The constant indexing may use up processing power and slow down your computer.
Also, depending on the type, number, and size of files on your computer, indexing may take up a significant chunk of your hard drive . But if you often search for files, keeping Microsoft Windows Search Indexer enabled ensures faster results and may be the more convenient option.
For example, Outlook uses indexed data to search your emails. Microsoft Edge uses it to display browser history results when you type in the address bar. In addition, the Settings app depends on it to show up-to-date results.
More so, some apps you download through the Microsoft Store rely on indexed data to search for your files and other PC content. Disabling indexing will increase the time it takes for Windows and other apps to return search results. So, if you have a fast CPU and a standard hard drive, you can keep indexing on. Since hard drives are slow to read, Windows will take longer searching for files without indexed data.
And with a fast CPU, you won’t have to worry about continuous background indexing. However, if you don’t rely on search a lot and are using a slow CPU and an SSD , it will be a good idea to turn indexing off. Windows can quickly look up files on SSDs since these drives are fast.
Also read:SSD vs. HDD: What’s the Difference and What to Choose?
Note
Microsoft Windows Search Indexer uses your RAM and CPU, so you may have to turn off the service if your RAM is low and your CPU is slow.
Let’s sum this up:
Pros of disabling Windows Search indexing
- Improved performance on low-end PCs: It frees up system resources like CPU, RAM and disk, especially noticeable on older or slower machines
- Reduced disk usage: It can help reduce constant disk activity, particularly useful for HDD users
- Less background activity: You will be minimizing background processes, leading to smoother performance for gaming or intensive tasks
- Fewer heat and noise issues: Lower disk activity can mean cooler temperatures and less fan noise
Cons of disabling Windows Search indexing
- Slower file searches: Searching for files, emails, or apps may become noticeably slower without indexing
- Real-time results may lag: Newly added or changed files won’t show up as quickly in search results
- Limited search features: Some advanced search features in File Explorer or Outlook may not work properly
- Not ideal for frequent searchers: If you rely heavily on Windows Search, the experience may become frustrating
PRO TIP
You might be considering disabling search indexing because you believe it’s the reason for your system’s poor performance. While that may be true, it’s not always the case. Your computer could be running slow for lots of other reasons.
For example, the accumulation of junk files could clog your hard drive, unnecessary background applications could weigh down your CPU and RAM, and leftover or faulty registry keys could cause glitches. Fortunately, you can use an optimizer such as Auslogics BoostSpeed to manage these issues.
This way, you don’t necessarily have to turn off indexing. The program deletes junk and bad registry keys and protects your hard drive against spyware.
So, how do you disable search indexing? Let’s get right to it.
How to Disable Windows Search Indexing in Windows 10/11
There are different ways to manage search indexing. If you rely on it, you can limit the amount of system resources such as your RAM and CPU. For example, you can disable search indexing for specific folders and drives or partitions.
We’ll show the different ways to disable and modify Microsoft Windows Search Indexer.
Method 1: Disable Windows Search
If you don’t need Windows Search, you can disable it. However, once disabled, you will no longer be able to use search functions across the OS. These areas include the Settings app, Microsoft Store, and the Start menu. It also means Windows will no longer run indexing operations in the background. So, follow these steps to turn off the service:
- Go to the Start menu and type services .
- Click on the Services application’s icon once the search panel brings it up.
- After the Services application opens, scroll down to the Windows Search entry and double-click it.
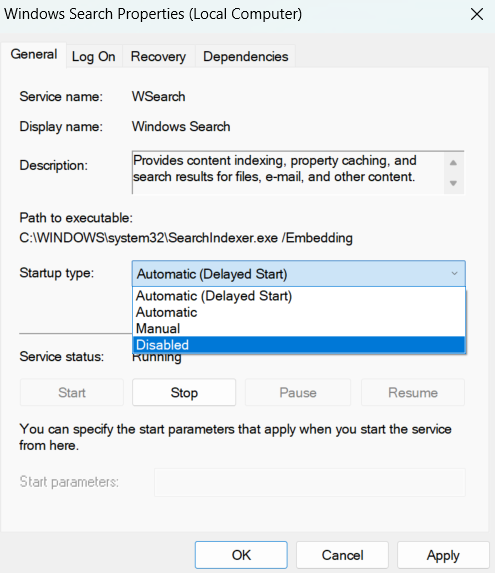
- The Windows Search Properties window will now open.
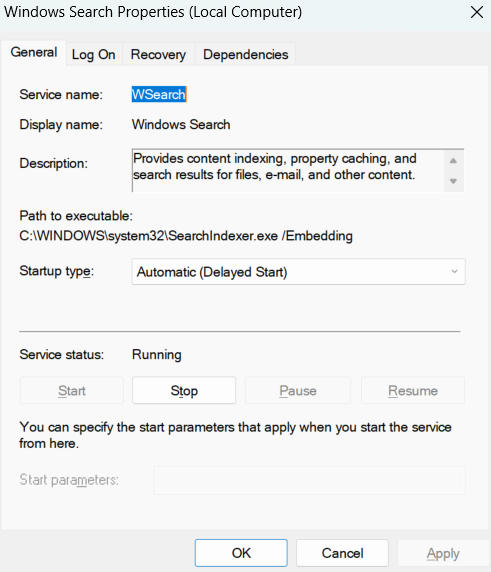
- Under the General tab, select Disabled in the Startup type drop-down.
- Click on the Stop button.
- Click OK .
- Restart your PC.
Method 2: Use the Command Prompt
You can enter a code in the Command Prompt to disable the Windows Search service and prevent it from launching on startup.
Note
This method is faster than going through the Services app. However, if you’re not comfortable using the Command Prompt, follow the steps above. You can also move on to the next solution to find a different method.
Follow these steps:
- Open the Run dialog window using the
Windows + Rcombo. - After the Run box opens, type CMD and tap
CTRL + Shift + Enteron your keyboard. - Click on Yes in the pop-up.
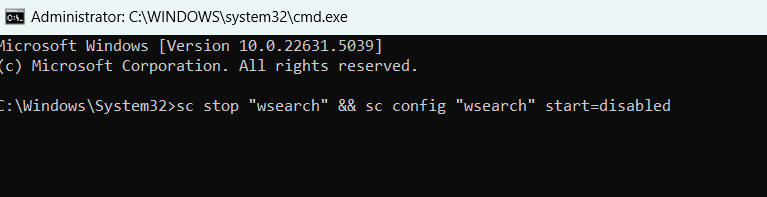
- Now, type the line below into the Administrator: Command Prompt window and hit the Enter key:
sc stop “wsearch” && sc config “wsearch” start=disabled
You can enable Windows Search again using this line:
sc config “wsearch” start=delayed-auto && sc start “wsearch”

That’s it.
PRO TIP
Ensure your PC runs smoothly and efficiently by keeping all your drivers updated. Auslogics Driver Updater automatically detects outdated drivers and installs the latest versions with just a few clicks. Prevent hardware issues and improve overall system performance.
Method 3: Disable indexing for specific areas
Windows provides the option to turn off indexing for specific folders. So, if there are areas where you don’t use search, you can disable indexing for them.
On the other hand, you can keep Microsoft Windows Search Indexer on for regularly used folders.
This option allows you to save RAM and CPU resources without completely getting rid of indexing.
Also, since the size of indexed data depends on the number and size of files Windows indexes, this option will reduce the storage strain.
So, follow these steps:
- Open the Start menu and type indexing .
- Click on Indexing Options.
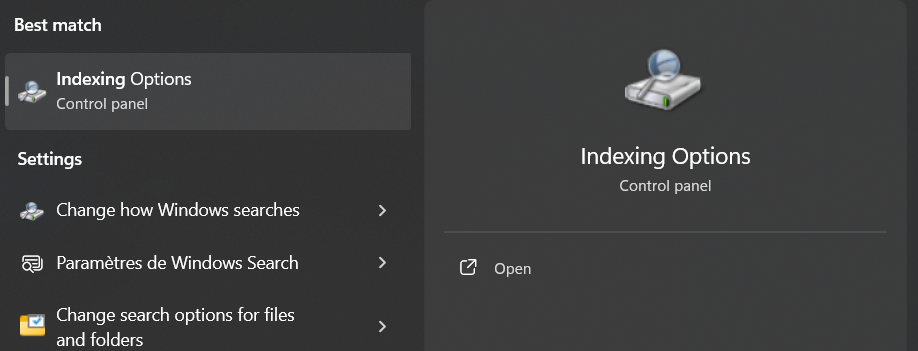
Note
You can also go through the Control Panel to open the Indexing Options dialog:
Windows + R to open Run, then type control panel in the Run dialog box and hit Enter.) After the Control Panel opens, go to the top-right corner and select Large icons in the View by drop-down. Click on Indexing Options .
- Click on Modify in the Indexing Options dialog window.
- Your indexing locations will now show up. Click on Show all locations if you can’t see your hard drive.
- Now, expand your hard drive by clicking on the arrow beside it.
Note
If you click on the checkbox beside the drive, you tell Windows to index the entire drive.
- After expanding the drive, navigate to the folders you don’t want Windows to index and check the boxes beside them.
- After completing this exercise, click on the OK button.
- You’ll see the included and excluded locations under corresponding columns in the lower segment of the Indexed Locations dialog window.
Method 4: Disable Windows Search indexing by hard drive
You can turn off indexing on a particular hard drive or partition if you don’t search for files on it. This substantially reduces the resources indexing takes from your CPU and RAM.
Follow these steps:
- Use the
Windows + Ecombo to open File Explorer. - Once File Explorer shows up, head over to the left pane and click on This PC .
- Now, click on the hard drive you want indexing turned off for and right-click it.
- Click on Properties .
- Under the General tab, uncheck the box next to Allow files on this drive to have context indexed and click on the OK button.
Windows will ask if you want the changes to apply to the root directory only or all the subfolders in the drive. Choose your option and select OK .
Download Auslogics BoostSpeed
Your one-stop PC maintenance and optimization tool, this program will clean, speed up, repair and tweak your system to ensure maximum speed and efficiency.
Method 5: Turn off indexing for Microsoft Outlook
As we mentioned, Microsoft Outlook uses indexed data to search for emails. If you don’t want that, you can turn off the feature for the program. And since Outlook doesn’t show up in the Indexed Locations dialog, you’ll have to make the changes in the app. Here’s how to disable Outlook’s indexing:
- Launch Outlook.
- Click on File and select Options .
- Once you get to the Options screen, go to the left pane and select Search .
- Now, go to the main page and click on Indexing Options .
- The Indexing Options dialog will now show up with Outlook included on the list.
- Next, click on Outloo k and click on the Modify button.
- After the Indexed Locations window appears, uncheck the box beside Outlook and click on the OK button.
What about apps like Microsoft Edge or apps from the Microsoft Store?
If they are installed and use indexing, they’ll usually appear in the Indexing Options window. Simply return to the Control Panel , go to Indexing Options , click Modify , and then uncheck any apps you don’t want indexed. Keep in mind that turning off indexing for certain apps may affect how quickly and accurately they return search results, especially for browsing history or in-app content.
Method 6: Rebuild your index
If you use search regularly but keep getting slow results, something is wrong with your search index. The problem could be due to a corrupt or malfunctioning index. In this case, you need to rebuild the index.
Follow this guide:
- Open the Start menu and type indexing .
- Click on Indexing Options in the search results.
- After the Control Panel opens, go to the top-right corner and select Large icons in the View by drop-down. Click on Indexing Options .
- Click on Advanced in the Indexing Options dialog window.
- Click on the Rebuild button and select OK.
How to Disable Indexing in Windows 10/11: Explained
So, there you have it. If you have made up your mind to turn off indexing on Windows, there are several ways in which you can do that. Let’s recap:
- You can disable Windows Search via Services or the Command Prompt.
- You can also disable indexing for specific folders via Indexing Options or disable indexing on a specific hard drive via File Explorer.
- Additionally, you can turn off indexing for Microsoft Outlook and other specific apps.
There is also a chance that there may be an issue with your search index—if it’s working particularly slow. In this case, you can rebuild the search index using the steps above. Remember that you can always reverse your changes if you’re not comfortable with the way your search works. In the end, what matters is up to you. If you don’t mind waiting a few seconds—or minutes—more for your search results to show up, you can do without Windows indexing.
FAQ
Yes, it’s safe. Disabling indexing won’t harm your system, but it may slow down file searches.
In a lot of cases, yes. SSDs are already fast, so turning off indexing can reduce unnecessary wear and free up resources without affecting search speed too much.
No. You can still search for files, but the process will be slower and less efficient without the index.
Yes, it can. Start menu results may take longer to load, especially if you’re searching for apps, settings, or documents.
Yes. You can use third-party search tools like Everything or manually browse folders—but these may lack Windows integration.
Go to Control Panel > Indexing Options > Modify and uncheck the boxes for apps listed under your user profile. Not all Store apps use indexing, but those that do will appear there.
Try pausing or restarting the indexing service, limiting indexed locations, or disabling it entirely. You can also troubleshoot it under Settings > Search > Searching Windows in Windows 10 or Settings > Privacy & security > Searching Windows in Windows 11.
Want to disable Windows Search but still find files quickly? See what Lookeen can do.
While indexing speeds up the search process, it may take up a lot of system resources from your computer, so you may contemplate disabling Windows Search for this and maybe other reasons. Continue reading to find out how to disable Windows Search in Windows 8 and 10.
Disabling Windows Search in Windows 8 and Windows 10
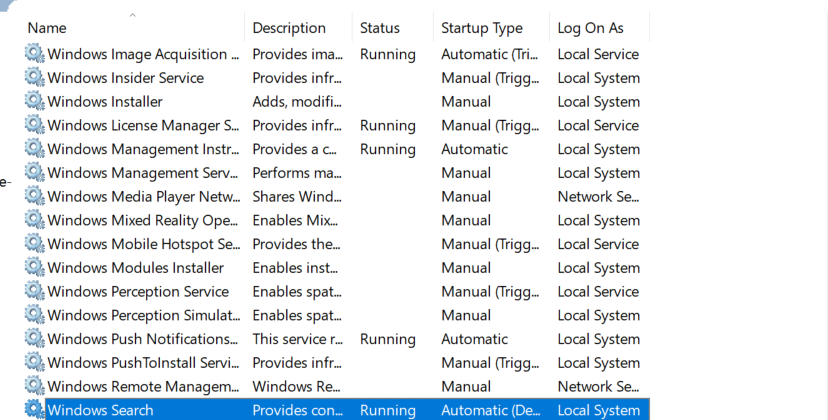
First, check if you have Windows Search service running from your Task Manager: Look for Microsoft Windows Search Indexer in the list, then expand using the small arrow to find Windows Search.
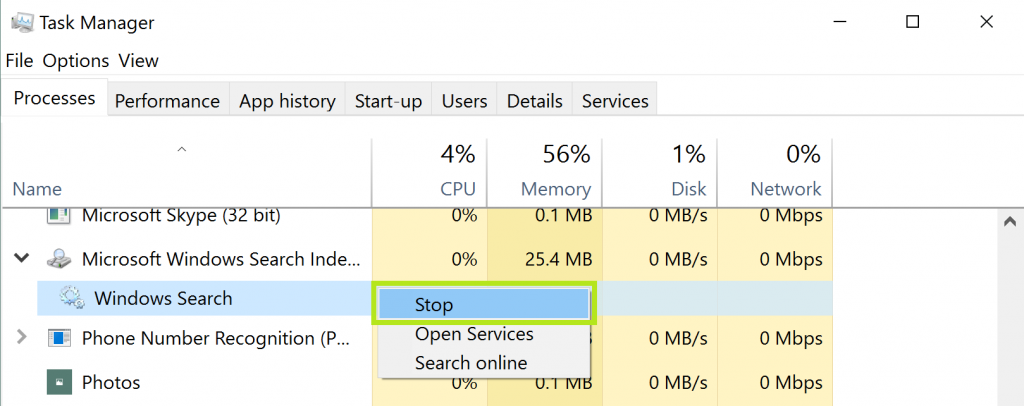
To temporarily stop the service, right-click and select Stop —next time you start up your computer, it will start running once again. This is great if the indexing process is affecting work you’re doing now, but doesn’t generally cause any trouble otherwise.
If you want to disable Windows Search permanently then follow these steps:
- In Windows 8, go to your Start Screen. In Windows 10 just enter the Start Menu.
- Type msc into the search bar.
- Now the services dialog box will open up
- In the list, look for Windows Search, right-click and choose Properties
- Under the General tab within the Properties box, look where it says Startup Type
- The Startup Type is always set to automatic, this is where you open the drop down menu and choose Disabled. Click Apply
- Restart your computer.
These steps should disable Windows Search completely, and remove the Windows Search bar from your Start Screen/Start Menu.
Re-Enabling Windows Search
If you want to re-enable the Windows Search Service, obviously searching for services.msc will no longer work. Here are a few ways to return to the Services window without searching for it:
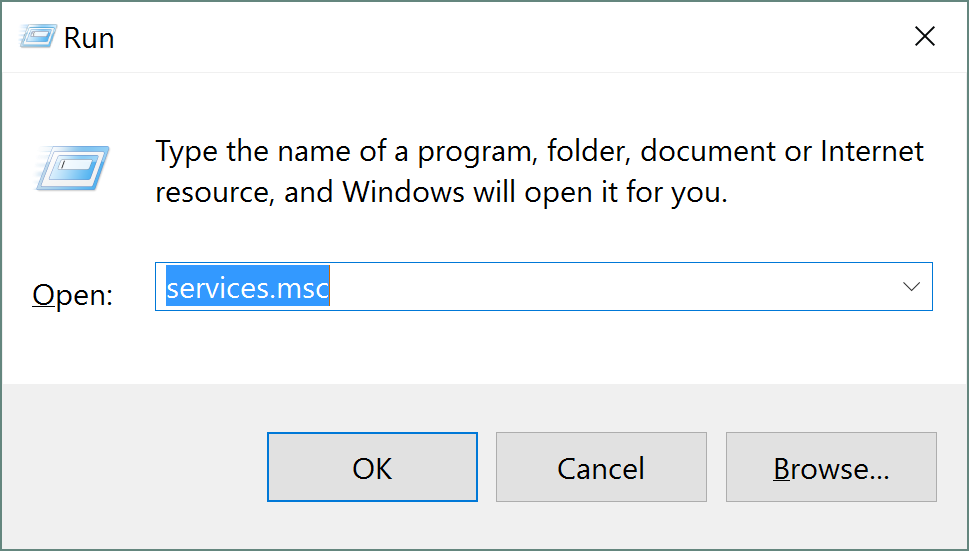
Use the Windows Key + R shortcut to open the Run dialogue, then type services.msc.
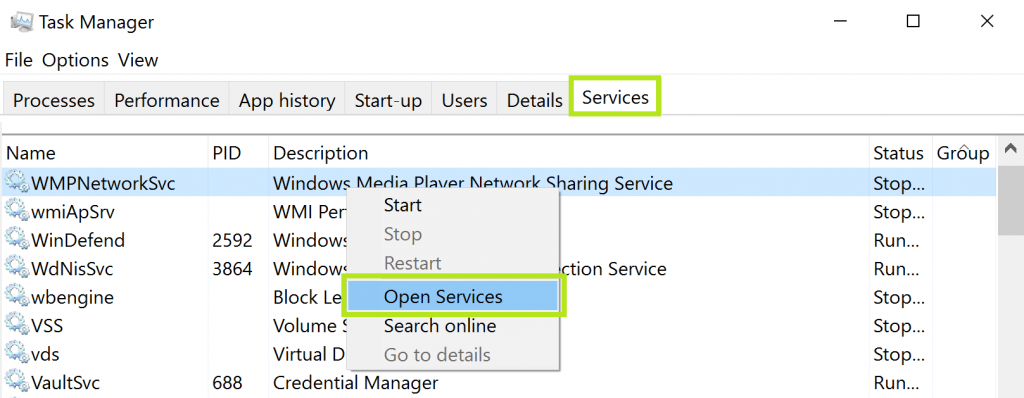
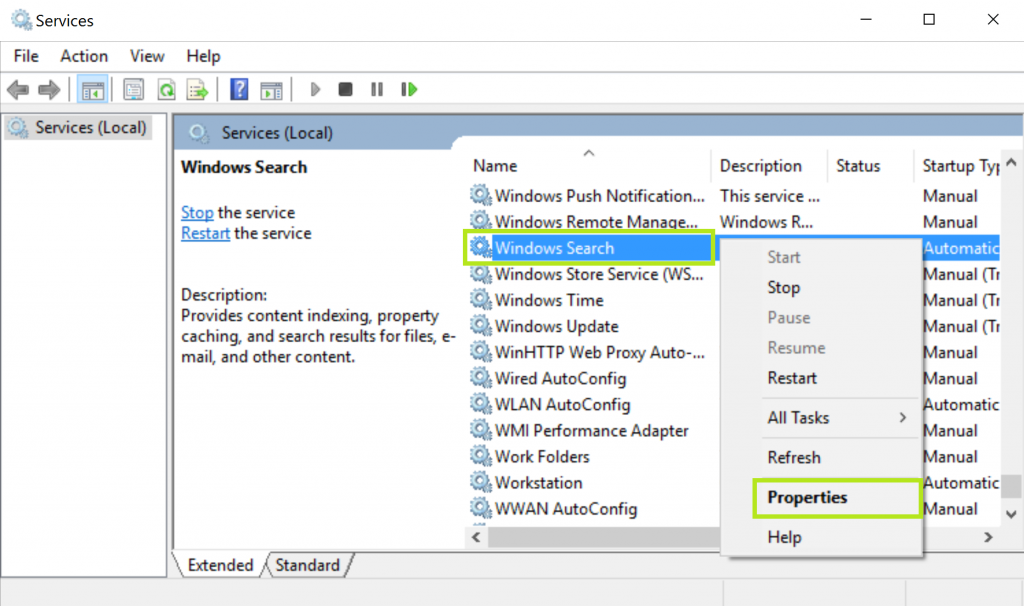
Go to Task Manager (Ctrl+Alt+Del) and navigate to the Services tab. Right click on any service and click Open Services.
From the Services manager, you simply reverse the previous process:
- Find Windows Search in the list
- Right click and select Properties
- In the General tab, next to Startup type: select Automatic or another startup type.
- Click Apply and restart your computer
Disable Windows 7 Search
You can also disable Windows 7 search. The steps may be fairly similar, but it’s best to follow the following instructions if you are using Windows 7, and not 8 or 10, and want windows search disabled. Here’s what you need to do:
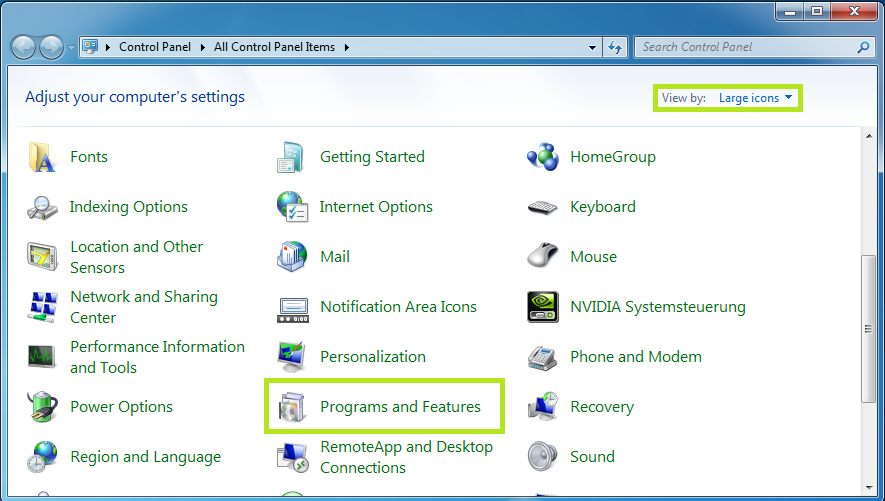
1. The first step is to click Start and head right into your Control Panel.
2. It might be easier if you choose to view the icons within Control Panel in Large Icons View, and then click where it says Programs and Features.
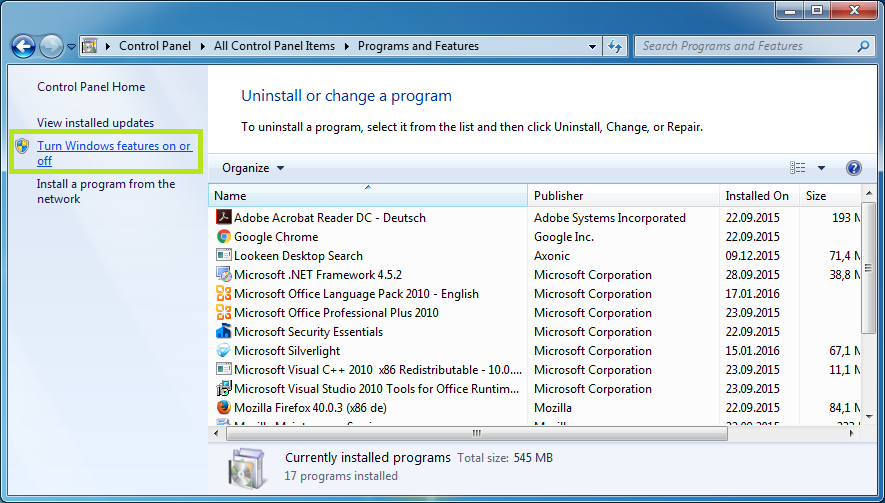
3. Within Programs and Features, click on Turn Windows features on or off which is found on the left hand panel.
4. Find Windows Search in the list, and uncheck the box next to it.
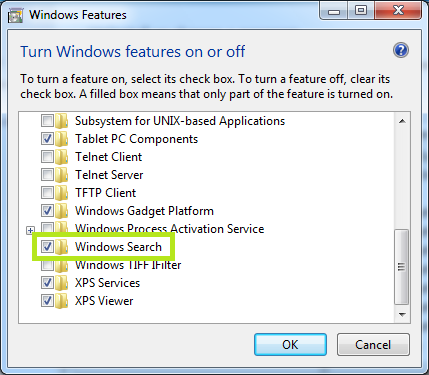
5. A message will pop up that will ask for confirmation that you want to continue. Click Yes.
6. Back in the features window, click OK.
7. Another window will pop up, showing the progress of the changes you just made, then another that will require you to restart your system.
Once you start your computer up again, you will see that the search box is gone from the Start Menu – meaning that you have successfully disabled Windows 7 search.
That’s all there is! As you see, it’s pretty easy to disable Windows Search, and get it up and running again if you decide you want it back.
Updated 25.04.16 to include instructions for Windows 7
Home
Windows
By
Abhishek Silwal

Windows Search is a great feature that helps you avoid having to go through all the path directories to access a file or a folder.
However, you may have to disable this feature in some scenarios. For instance, you may want to restrict user access to search if you want to create a limited environment domain.
Many search features are also redundant and you may want to disable those instead of the search application altogether.
So, we have created this article to help you enable/disable Windows Search or its specific features.
How to Enable/Disable Windows Search
There are mainly two ways to enable or disable Windows Search. They actually have different outcomes, so read carefully and pick one according to your need.
Change Search Service Behavior
The most convenient method to enable or disable Windows Search is by changing its service configuration. The Windows Search service handles indexing, caching, and search results for files, e-mail, etc.
So, disabling this service turns off indexing altogether. However, keep in mind that you can still use the search app. It can’t find your files and folders unless you enter the exact name or the initial part of the name. But you can still use the Start menu to search for apps and web results.
Regardless, here are some of the ways to disable your search service:
Through Services App
The Services app is the default program you can use to change the configuration of your system services, including the Windows Search service.
Here’s how you can enable/disable Windows Search Service:
- Open Run by pressing Win + R.
- Type
services.mscand press Enter to open the Services app. - Look for Windows Search and double-click on it.
- To Disable Search, set the Startup type to Disabled and click Stop.

- To Enable Search, set the Startup type to Automatic (Delayed Start) and click Start.
- Click on Apply and OK.

Using Command Prompt
Another easy way to enable or disable the Windows Search service is by using the Command Prompt. You only need a single command in both cases, so copying and pasting the command is more convenient.
Here’s what you need to do:
- Open Run.
- Type
cmdand press Ctrl + Shift + Enter to open the Elevated Command Prompt. - Enter the following commands depending on whether you want to disable or enable Search:
- Disable:
sc config "wsearch" start=disabled && sc stop "wsearch" - Enable:
sc config "wsearch" start=delayed-auto && sc start "wsearch"
- Disable:

With Registry Editor
You can also modify the service’s settings by changing its configuration in your registry settings. In fact, all the above methods change the values in the relevant registry entries and your system directly looks at these entries to check the service configuration.
To use the Registry Editor to change such entries,
- Open Run and enter
regeditto open the Registry Editor. - Navigate to
Computer\HKEY_LOCAL_MACHINE\SYSTEM\CurrentControlSet\Services\WSearch\ - To disable Windows Search, change the value of Start to 4. And, to enable Windows Search, change the value of Start to 2 and DelayedAutoStart to 1.
- You need to double-click on the entry, change the Value data and click OK to change its value.


Restart your PC after changing the values for your system to apply the changes.
Rename Search Folder
Renaming the system folders and files used in the search feature is a great way to disable the feature from your File Explorer as well as the Start menu. Here, renaming is the same as deleting the files while creating backups. It effectively stops your system from using such files altogether, making search impossible unless you change the folder back to their default names.
However, this method requires you to change the permission settings for the folders and files. So we recommend you create a restore point beforehand to account for any issues due to improper permissions.
The complete method is as follows:
- Open Run and enter
%WinDir%\SystemApps - Click on Microsoft.Windows.Search_cw5n1h2txyewy and press F2 to rename it. You can set its name to anything you want, but we recommend just appending
.bakor.oldto make renaming it again easier. - Open this folder, select
SearchApp.exe, and press Alt + Enter to open its Properties. - Go to its Security tab and check whether any users other than TrustedInstaller allow Full Control.
- If Users, Administrators (if your account is an admin) or your current user has such permission, you can directly rename the file.
- Otherwise, click on Advanced.
- Select Change under Owner.

- Click on Advanced and on the next page, Find Now.
- Select your current user from the list and click OK. Selecting any other users is not recommended. Click OK again to change the owner.
- Keep on clicking OK until you close the Properties.
- Open the
SearchApp.exeProperties and go to Security > Advanced. - Click on Add and then, Select a principal.

- Perform steps 7-9 to select your current user as a principal.
- Set Type to Allow and tick Full Control.
- Keep on Pressing OK till you close Properties while applying the changes.
- Rename
SearchApp.exein a similar manner to its parent folder. For example,SearchApp.exe.old. - Now, go inside the
%WinDir%\SystemApps\MicrosoftWindows.Client.CBS_cw5n1h2txyewyfolder. - Look for
SearchHost.exeand perform steps 3-16 for this file too. - If the SystemApps folder contains Microsoft.Windows.Cortana_cw5n1h2txyewy folder, you also need to change the name of the folder and the executable file inside this folder as well.


You need to restart your Windows Explorer to apply the changes. To do so,
- Press Ctrl + Shift + Esc to open the Task Manager.
- Go to the Details tab.
- Select
explorer.exeand click End Task. Confirm with End process.
- Click on File > Run new task from the menu and enter explorer.

If a window with the name, Search, keeps popping up and closing continuously, you need to restart Windows Explorer again.
Through Group Policy Management Editor
This method is a safer alternative to renaming the search files and folders. However, you can only use it by creating a Software Restriction Group Policy Object for a domain. Here’s how you can do so:
- Open the Group Policy Management Editor.
- Go to Computer Configuration > Policies > Windows Settings > Security Settings > Software Restriction Policies > Additional Rules.
- If Software Restriction Policies does not expand to Additional Rules, right-click on it and select New Software Restriction Policy.
- Right-click on Additional Rules and select New Path Rule.

- Enter the following paths on the Path text box, set the Security level to Disallowed, and click OK:
%WinDir%\SystemApps\Microsoft.Windows.Search_cw5n1h2txyewy%WinDir%\SystemApps\Microsoft.Windows.Cortana_cw5n1h2txyewy(if the folder exists)%WinDir%\SystemApps\MicrosoftWindows.Client.CBS_cw5n1h2txyewy\SearchHost.exe

How to Enable/Disable Windows Search Web Results
Showing web results in Windows Search does not have many advantages. In fact, many users unknowingly open the web result when they actually want to run an app or any file in their local drive.
So, if you want to disable this feature, you can do so easily using the steps below:
- Open Run and enter
regedit. - Navigate to
Computer\HKEY_CURRENT_USER\SOFTWARE\Policies\Microsoft\Windows - Right-click on Windows and select New > Key.

- Name it as
Explorer. - Right-click on Explorer and select New > DWORD (32-bit) Value.
- Set its name to DisableSearchBoxSuggestions and double-click on it to change its value.
- Change the Value data to 1 to disable web results and click OK.
- If you want to enable it, you can change its value to 0.


Restart Windows Explorer (see above) to apply the changes.
How to Enable/Disable Search Highlights
Another possible search feature you might want to delete is the search highlights. It distracts you from your work and many users prefer customizing the start or search menu to their liking instead of automatically getting highlights based on Bing searches.
You can use the methods we have mentioned below to enable or disable this feature. Some of the methods overwrite other methods, so we recommend performing all of them.
Change Search Settings
The usual way to enable or disable search highlights is through the search permission Settings. The methods differ between Windows 10 and 11, so we have included both of them
On Windows 11
- Open Run and Enter
ms-settings:search-permissions. - Scroll down to Show search highlights and set its switch to On/Off per your need.


On Windows 10
- Right-click on the taskbar or the search bar.
- Click on Search and select Show search highlights to toggle this option.
Using Group Policy Editor
You can also change the group policy settings to enable or disable search highlights. This option overrides the settings so make sure to check it as well.
- Open Run and enter
gpedit.msc. - Go to Computer Configuration > Administrative Templates > Windows Components > Search.
- Double-click on Allow search highlights.

- Check Disabled or Enabled according to your preference and click OK.

Through Registry Editor
Another way you can change this setting is by modifying the relevant registry entry. Here’s how you can do so:
- Open Run and enter
regedit. - Navigate to
Computer\HKEY_CURRENT_USER\Software\Microsoft\Windows\CurrentVersion\SearchSettings - If IsDynamicSearchBoxEnabled exists, double-click on it to edit its value.

- If not, right-click on SearchSettings and select New > DWORD (32-bit) Value. Set its name to
IsDynamicSearchBoxEnabledand double-click on it. - Set the Value data to 0 to disable and 1 to enable the feature and click OK.

Related Questions
How to Hide and Unhide Search Icon on Windows
If you have disabled Windows Search, you might as well hide its icon to save space on the Taskbar. Here’s how you can do so:
On Windows 11
- Open Run and Enter
ms-settings:taskbar. - Click on the switch next to Search to hide or show its icon.

On Windows 10
- Right-click on the taskbar or the search bar.
- Click on Search and select Show search box to toggle the option.
How to Enable/Disable Win + S Search Shortcut?
Here’s how you can enable or disable the Win + S shortcut for Search. However, keep in mind that it also disables other hotkeys that include Win + S, such as Win + Shift + S for the snipping tool.
To enable or disable this shortcut:
- Open Run and enter
regedit. Computer\HKEY_CURRENT_USER\Software\Microsoft\Windows\CurrentVersion\Explorer\Advanced- Right-click on Advanced and select New > String Value.
- Set its name to
DisabledHotkeysand double-click on it. - Change the value data to
Sand click OK.
You don’t need to create this value if it already exists. You can also add S to any other keys already present in the value by separating them with a comma.