
The Windows operating system has a feature called «Mobile Hotspot» which lets you share your internet connection with other devices. If you have this feature turned on, anyone with the right password can connect to your hotspot.
Although it is a handy tool for sharing your internet connection, it can also be a security risk. If you’re not careful, someone could connect to your hotspot without your knowledge. If you’re concerned about security, this guide will help you disable the Mobile Hotspot remote feature on your Windows device. Here’s how to do it.
How to Disable the Mobile Hotspot Remote Access Feature on Windows
Mobile Hotspot is a feature that allows your device to share its internet connection with other devices nearby. If you have this feature turned on, anyone within range can connect to it and use your data. To keep your privacy protected, there are a number of ways you can disable the ability to remotely enable Mobile Hotspot.
These include editing the registry, using system settings, or via the local group policy. Each of these methods will be discussed in the following paragraphs, and you will be able to see how they work.
1. How to Disable the Mobile Hotspot Remote Access Feature Using System Settings
If you want to disable the remote feature on your Windows Mobile Hotspot, you need to go to system settings and toggle off the Mobile hotspot. This is how you do it:
- Open the Settings app on your Windows PC. We have a guide on opening Windows System Settings with all the information you need on this topic.
- Select Network & Internet from the left-hand sidebar.
- Then go to the right and click Mobile hotspot.
-
On the following screen, turn the toggle off next to the Mobile hotspot.

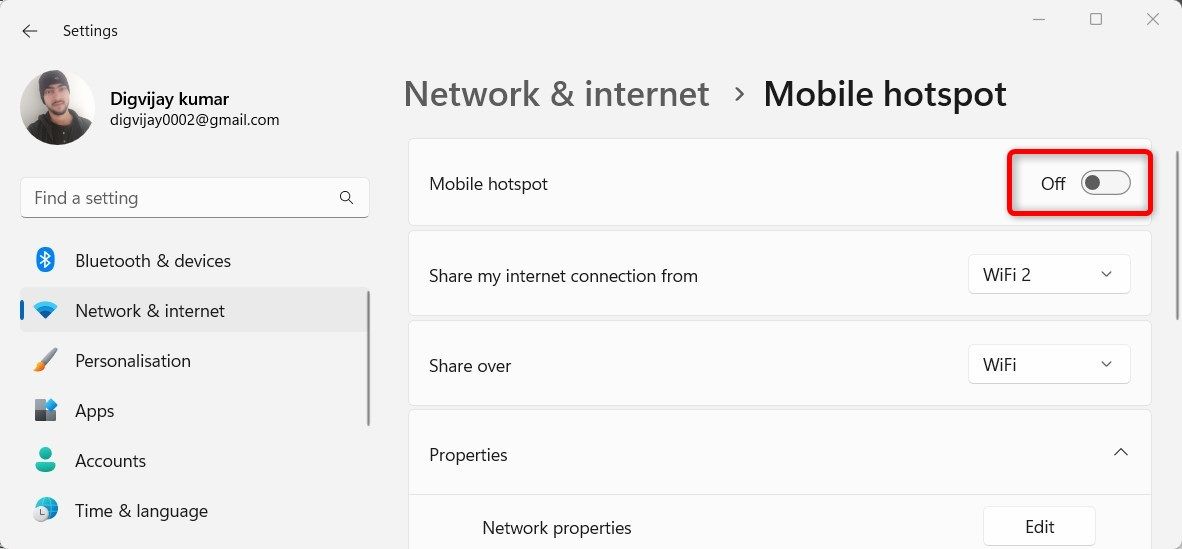
That’s all you need to do! After completing these steps, the Mobile Hotspot remote access feature will be disabled and your internet connection will now be secured from all unauthorized access.
2. How to Disable the Mobile Hotspot Remote Access Feature Through Registry Editor
There are only a few steps involved in this process, and it is easy to do. However, you should avoid accidentally corrupting the Windows registry. If you make a mistake when editing the keys, your device could be severely damaged.
This is why it is always a good idea to back up the registry before making any changes. If you find it too complicated, you can skip this method and move on to the next one.
To disable the Mobile Hotspot remote access toggle, follow these steps:
- Press the Win + R keys to launch the Run Command dialog box.
- Type «regedit» in the text box and click the OK button.
- When UAC appears on the screen, click Yes to continue.
-
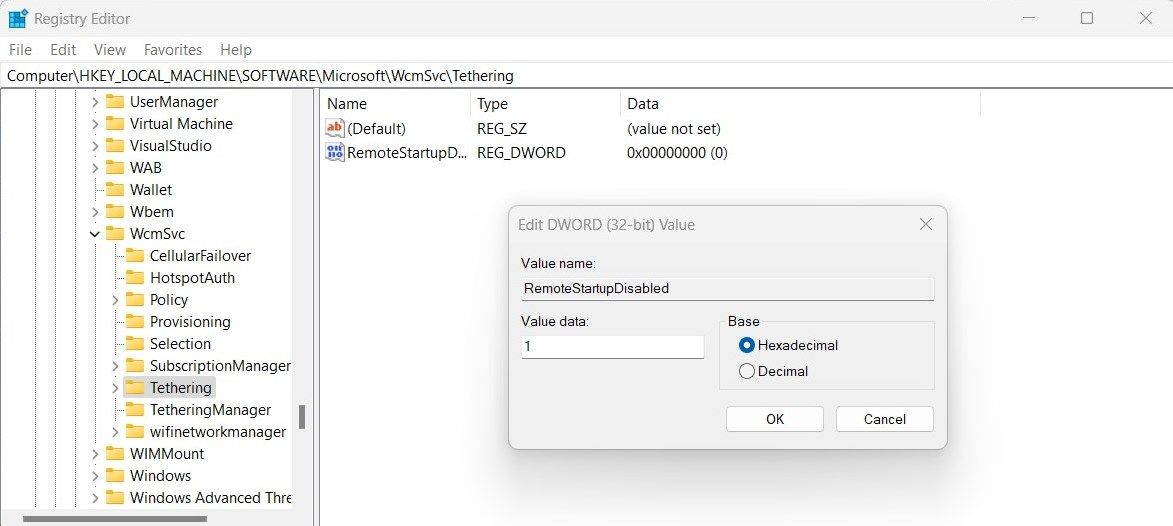
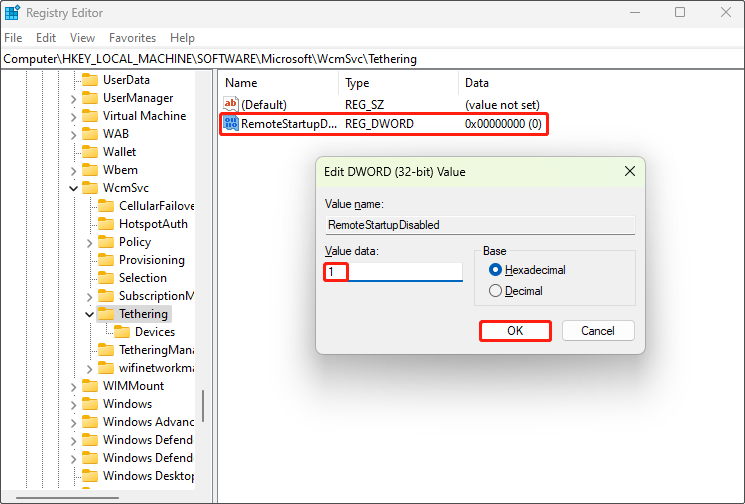
Once the Registry Editor is open, navigate to the path:
HKEY_LOCAL_MACHINE\SOFTWARE\Microsoft\WcmSvc\Tethering -
On the right side of the window, double-click on RemoteStartupDisabled and change the value from 0 to 1.

- Click OK and then close the Registry Editor.
After you have completed the above steps, you will need to exit the Registry Editor and restart your computer. The Mobile Hotspot Remotely feature should now be disabled. This will prevent other people from being able to connect to your hotspot without your permission.
If you ever need to enable the feature again on your computer, go to the Registry Editor (see how to open the Registry Editor for more information,) double-click on RemoteStartupDisabled, and set Value Data 0. Once that has been done, restart your computer to make the changes take effect.
3. How to Disable the Mobile Hotspot Remote Access Feature Via the Local Group Policy Editor
You can also disable the Mobile Hotspot remote access feature on Windows using the local editor group policy, which is the most efficient way to disable this feature. This process is relatively straightforward and does not require a lot of time to complete, so you can get started right away.
One thing you should note before moving on to the steps is that the tool is only compatible with Windows 11 Professional and Enterprise editions. Therefore, if you’re using Windows Home edition, you might not have access to the Local Group Policy editor. In such a case, you must first enable the Local Group Policy Editor in Windows Home.
To disable the Mobile Hotspot remotely feature on Windows using the local editor group policy, follow these steps:
- Click on Start, search for «Group Policy Editor», and press Enter. You can also launch it through the Run Command dialog box. For this, type «gpedit.msc» in the dialog box and click the OK option.
-
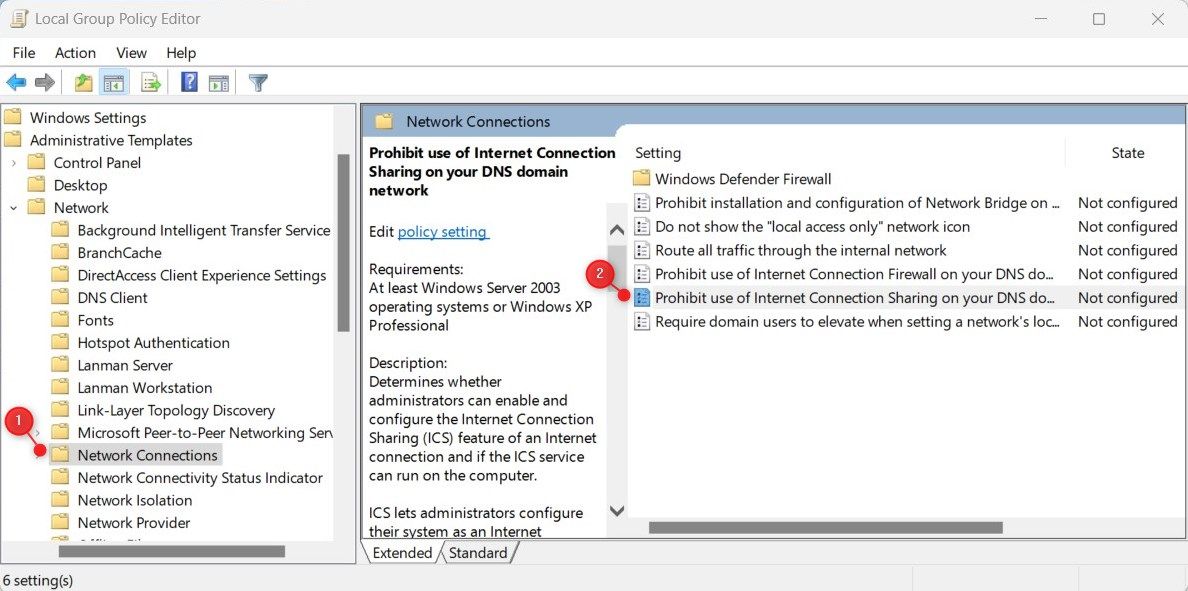
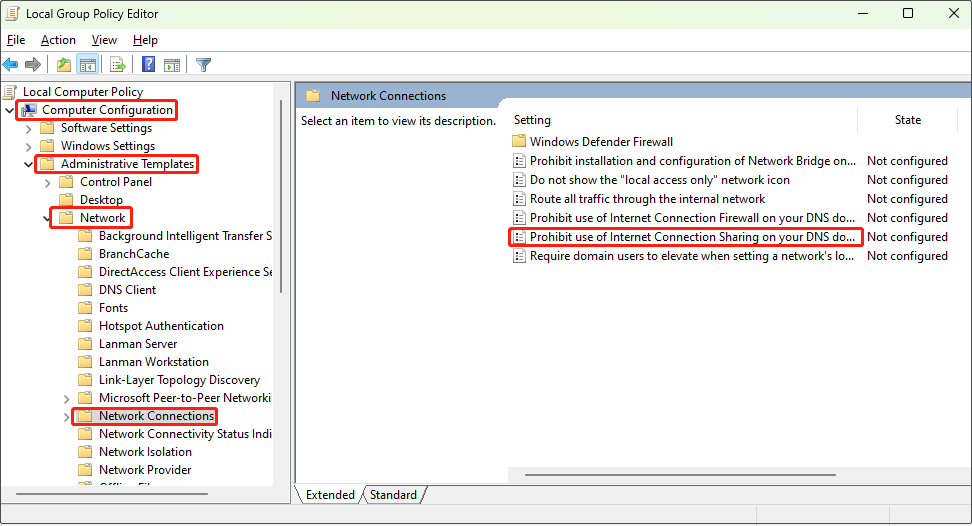
When you are in the Group Policy Editor window, navigate to the following path:
Computer Configuration > Administrative Templates > Network > Network Connections -
Select the Network Connections from the left pane, then double-click the Prohibit use of Internet Connection Sharing on your DNS domain network option.

-
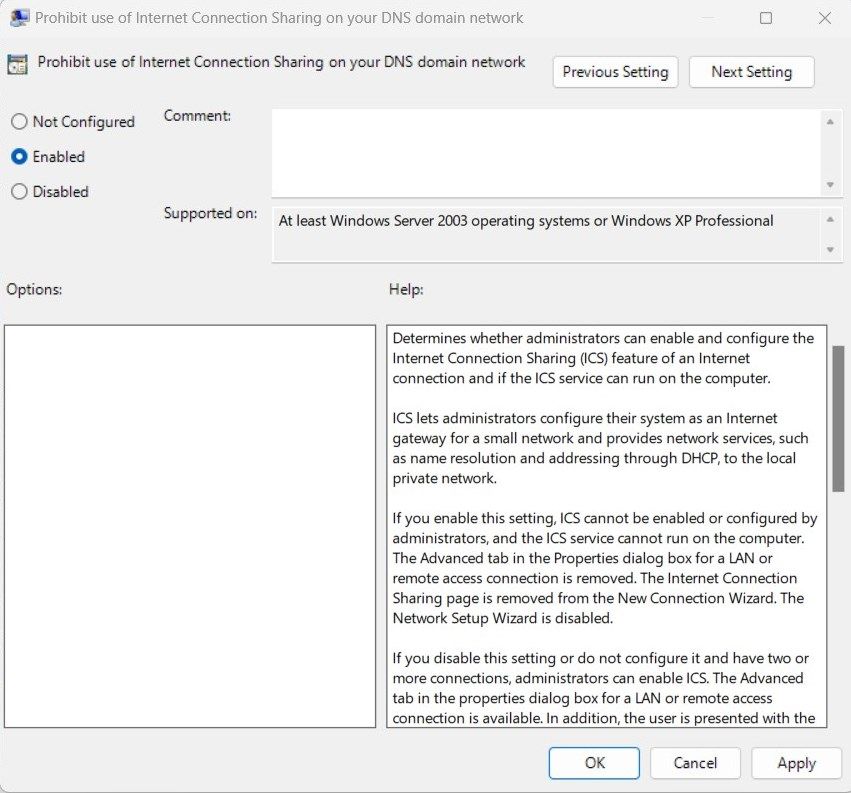
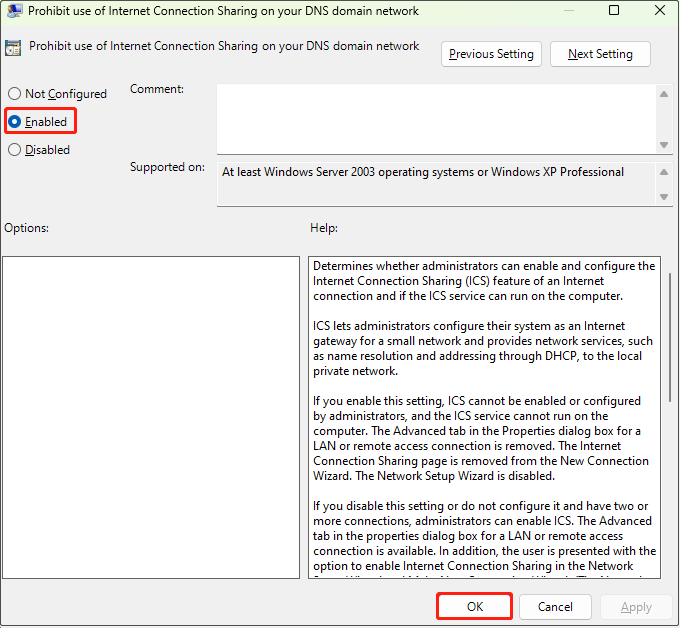
By default, the settings are Not Configured on the next page. Select the Enabled option to prohibit the use of Internet connection sharing.

- After you’ve made the changes, click Apply and OK to save it.
Once you have performed the above steps, you will need to restart the computer in order to make sure the changes have been applied correctly. When you disable this feature, no one will be able to access your Windows PC hotspot.
The next time you need to re-enable the feature, open the Local Security Policy as explained earlier. Then navigate to «Computer Configuration > Administrative Templates > Network > Network Connections» and double-click on Prohibit use of Internet Connection Sharing on your DNS domain network.
In order to enable the feature, simply check the Disabled radio button and click Apply > OK. This is how you can enable or disable the Mobile Hotspot Feature on Windows via the Group Policy Editor.
Disable Mobile Hotspot Remote Access With Ease
The Mobile Hotspot feature allows other devices to connect to the internet using the Windows device as a Wi-Fi router. Even though this feature is helpful, you might not want to keep it on all the time as anyone could access your internet through your device’s name. If so, you can turn it off in Windows Settings or through the Registry Editor, whichever method makes sense to you.
Home
Windows 10
How to disable the Mobile hotspot feature in Windows 10 1607 using GPO or MDM
August 4, 2016
Windows 10
In Windows 10 v1607 Anniversary Update there is a brand new UI for sharing your internet connecting and creating a mobile hotspot. The feature has been there in Windows before but has previously required administrative privileges to activate. Starting with Windows 10 v1607 this is exposed in the modern interface under Network > Mobile Hotspot and can be activated as a standard user, posing a security threat if you for instance have network security in place which can then be circumvented.
Solution
Using GPO, you can disable Mobile Hotspot in the UI by settings the GPO setting Prohibit use of Internet Connection sharing on your DNS domain network to Enabled. This settings is located under Computer configuration > (Policies) > Administrative templates > Network > Network Connections.
If you are using MDM, you can also configure this with this setting:
URI full path: ./Vendor/MSFT/Policy/Config/WiFi/AllowInternetSharing
Data type: Integer
Allowed values:
0 – Do not allow Internet Sharing.
1 – Allow Internet Sharing (default)
Result when this setting is changed wither via GPO or MDM:

About Author
Andreas Stenhall
I’m Andreas Stenhall and my work passion is the Windows client in combination with Microsoft 365 security and management services. I do consulting, I produce and teach my own courses, I lecture and I present and my formal work title is prinicipal workplace advisor and architect at Coligo in Stockholm, Sweden. I’m also proud to be an Microsoft MVP since 2009. I have presented at BUILD, TechEd in the US and Europe and regional TechDays. Follow me on twitter @AndreasStenhall.
The Windows Mobile Hotspot Service (icssvc) is a feature in Windows that allows you to turn your computer into a mobile hotspot, enabling other devices to connect to the internet through your computer’s internet connection. While this feature can be convenient in certain situations, there may be times when you want to disable it. You can disable the Windows Mobile Hotspot Service using PowerShell easily:
$ServiceName = “icssvc”
if (Get-Service $ServiceName -ErrorAction SilentlyContinue) {
Stop-Service $ServiceName
Set-Service $ServiceName -StartupType Disabled
Write-Host “The Windows Mobile Hotspot Service ($ServiceName) has been disabled.”
}
else {
Write-Host “The Windows Mobile Hotspot Service ($ServiceName) is not installed.”
}
-
Home
-
News
- How to Disable Mobile Hotspot on Windows 11? 3 Ways for You
By Chelsea |
Last Updated
Mobile hotspot is a handy feature on Windows 11 that allows your cell phones or other electronic devices to share your computer internet connection. Sometimes, your mobile hotspot can be risky as it can be vulnerable to unauthorized access. If you want to prevent this situation, you can disable the mobile hotspot. You may wonder how to disable mobile hotspot on Windows 11. Get three ways in MiniTool to do that.
A Brief Introduction to Mobile Hotspot on Windows
The mobile hotspot is a feature that allows your Windows 11 computer to share its internet connection with other devices nearby. If you enable this feature, then anyone near you who has the password can connect to it and use your data.
To protect your privacy, you can disable it to prevent other people from being able to connect to your hotspot without your permission. How to do that? Use the following ways.
How to Disable Mobile Hotspot on Windows 11
Method 1: With System Settings App
The system Settings app is a component of Microsoft Windows. It allows you to adjust your preferences, configure the operating system, and manage connected devices. You can use it to turn off mobile hotspot on Windows 11. Here are the operating instructions.
Step 1: Right-click on the Start button and choose Settings to open it. There are also other ways to open and use the Settings app on Windows 11.
Step 2: In Settings, select Network & Internet from the left pane.
Step 3: In the right pane, find and click on Mobile hotspot.
Step 4: When entering the new interface, switch the Mobile hotspot button to Off.
Once you have completed these steps, it means you disable the mobile hotspot remote access feature successfully.
Method 2: Through Registry Editor
Registry Editor is a powerful tool that you can use to view and modify the system registry. The registry is a database used to store low-level settings for Windows and the applications that choose to use the registry. It allows you to change settings that are not displayed in the user interface, including system policies, installed applications, and the types of files that certain applications can open. Here you can see how to disable mobile hotspot Windows 11 regedit.
Tips:
If you make a mistake in editing the registry, your device may be damaged seriously. Therefore, you are supposed to back up your registry before making any changes. However, if uexpected accidents such as data loss still occur, you can use this free data recovery software, MiniTool Power Data Recovery, to recover data. One of the advantages is that it can be used freely if the total size of the files you want to recover does not exceed 1 GB.
MiniTool Power Data Recovery FreeClick to Download100%Clean & Safe
Step 1: Press the Win + R keys or right-click on the Start button and choose Run to open the Run dialog,
Step 2: Type regedit in the Open box and press Enter or click on OK.
Step 3: When prompted by UAC, hit the Yes button to continue.
Step 4: Input the following path in the address bar and press Enter.
HKEY_LOCAL_MACHINE\SOFTWARE\Microsoft\WcmSvc\Tethering
Step 5: Right-click on RemoteStartupDisabled and choose the Modify… option.
Step 6: Change the Value data from 0 to 1 and hit the OK button.
Close the window and restart your computer. You have disabled the mobile hotspot.
Method 3: Via the Local Group Policy Editor
You can also disable the mobile hotspot remote access feature on Windows using the Local Group Policy Editor. How to disable Windows 11 mobile hotspot using Group Policy? Here are the steps.
Tips:
This tool is only compatible with Windows 11 Professional and Enterprise editions. Before performing these steps, you need to confirm your edition. If you use the Home edition, you may not access the Local Group Policy Editor. You should enable the Local Group Policy Editor in Windows Home first.
If your edition is prepared, you can get started.
Step 1: Click on the Search box, type Group Policy Editor, and press Enter to open Group Policy Editor.
Step 2: In the left pane, click on Computer Configuration > Administrative Templates > Network > Network Connections.
Step 3: In the right pane, right-click on the Prohibit use of Internet Connection Sharing on your DNS domain network option, and choose Edit.
Step 4: On the new page, choose the Enabled option and hit the OK button to save changes.
Conclusion
This post lists some ways on how to disable mobile hotspot on Windows 11, including using system settings, editing the registry, and via the Local Group Policy Editor. Each of these ways can help you turn off mobile hotspot on Windows.
About The Author
Position: Columnist
Chelsea graduated from university with a major in English. She has a strong interest in English writing. It is this passion for writing that led her to become an English editor. Her articles mainly focus on data recovery and other computer industry news. As an energetic and outgoing girl, Chelsea enjoys listening to music, singing, riding bikes, and eating in her spare time.
Windows 10 operating system comes with support for a feature that enables users to turn the device into a Wi-Fi hotspot to share the internet connection with other devices within the range.
No matter how the Windows 10 computer is connected to the internet — Wi-Fi, Ethernet, or Cellular Data, the device can be turned into a hotspot. We have already published a guide on how to use this feature.
In this guide, we will show you a step-by-step processor about how the mobile hotspot feature can be disabled using the Registry Editor.

Step 1: Open the Registry Editor on your Windows 10 computer. To do this, just press the Windows + R keys on your keyboard. In the Run dialog box, type “Regedit” and hit enter. This will open the Registry Editor window.
Step 2: In the Registry Editor, navigate to the following location:
HKEY_LOCAL_MACHINE\SOFTWARE\Policies\Microsoft\Windows\Network Connections
Step 3: In the Network Connections key, on the right-side pane, right-click anywhere in the empty area and select New > DWORD (32-bit) Value.
Step 4: Name the newly created registry “NC_ShowSharedAccessUI” and keep its value as “0” to disable the Mobile Hotspot feature on your laptop.
Step 5: To enable the feature, just change the value of the NC_ShowSharedAccessUI registry from 0 to 1 and the feature will be enabled again.
When the functionality has been disabled, the feature will still appear in the Network & Internet settings but it cannot be enabled or configured. To use the feature, the registry needs to be edited again and enable the functionality.