
Provides the ability to share a cellular data connection with another device.
This service also exists in Windows 10.
Startup Type
| Windows 11 version | Home | Pro | Education | Enterprise |
|---|---|---|---|---|
| 21H2 | Manual | Manual | Manual | Manual |
| 22H2 | Manual | Manual | Manual | Manual |
| 23H2 | Manual | Manual | Manual | Manual |
| 24H2 | Manual | Manual | Manual | Manual |
Default Properties
| Display name: | Windows Mobile Hotspot Service |
| Service name: | icssvc |
| Type: | share |
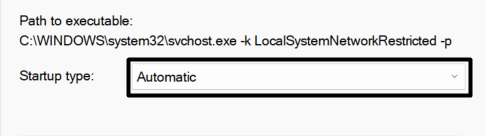
| Path: | %WinDir%\system32\svchost.exe -k LocalServiceNetworkRestricted -p |
| File: | %WinDir%\System32\tetheringservice.dll |
| Error control: | normal |
| Group: | TDI |
| Object: | NT Authority\LocalService |
| Privileges: |
|
Default Behavior
The Windows Mobile Hotspot Service is running as NT Authority\LocalService in a shared process of svchost.exe. Other services might run in the same process. If Windows Mobile Hotspot Service fails to start, the error is logged. Windows 11 startup proceeds, but a message box is displayed informing you that the icssvc service has failed to start.
Dependencies
Windows Mobile Hotspot Service is unable to start, if at least one of the following services is stopped or disabled:
- Remote Procedure Call (RPC)
- Windows Connection Manager
Restore Default Startup Type for Windows Mobile Hotspot Service
Automated Restore
1. Select your Windows 11 edition and release, and then click on the Download button below.
2. Save the RestoreWindowsMobileHotspotServiceWindows11.bat file to any folder on a local drive such as SSD or a hard disk.
3. Right-click the downloaded batch file and select Properties.
4. Check the Unblock checkbox and click OK.
5. Right-click the batch file again and select Run as administrator.
6. Restart the computer to save changes.
Note. Make sure that the tetheringservice.dll file exists in the %WinDir%\System32 folder. If this file is missing you can try to restore it from your Windows 11 installation media.
Yea, though I walk through the valley of the shadow of death, I will fear no evil: for thou art with me; thy rod and thy staff they comfort me.
Applies ToWindows 10 Windows 11
Превратите устройство с Windows в мобильную точку доступа, предоставив доступ к интернет-подключению с другими устройствами через Wi-Fi. Можно предоставить подключение к Wi-Fi, Ethernet или подключение для передачи данных. Если устройство имеет подключение к сотовой сети и вы используете его совместно, оно будет использовать данные из вашего плана передачи данных.
Открытие параметров мобильного хот-спота
Включение мобильного хот-спота в разделе «Параметры»
-
В приложении «Настройки» на устройстве с Windows, выберите Сеть & Интернет > мобильный хот-спот.
-
В поле Поделиться подключением к Интернету выберите подключение к Интернету, к которому вы хотите предоставить общий доступ.
-
Для параметра Поделиться через выберите способ предоставления общего доступа к подключению — по Wi-Fi или Bluetooth. Wi-Fi обычно выполняется быстрее и по умолчанию.
-
(Необязательно) Разверните раздел Свойства , затем выберите Изменить и введите новое сетевое имя, пароль и сетевой диапазон. Нажмите Сохранить.
-
Включите переключатель Мобильный хот-спот в верхней части страницы.
Примечание: Вы можете включить мобильный хот-спот удаленно, если устройство имеет сотовую связь. Чтобы разрешить компьютеру с Windows включить мобильную хот-точку доступа, оба устройства должны иметь Bluetooth и быть сопряженными.
-
Чтобы подключиться на другом устройстве, перейдите в параметры Wi-Fi на этом устройстве, найдите имя сети, выберите его, введите пароль или отсканируйте QR-код, а затем подключитесь.
Включение мобильного хот-спота с помощью быстрых параметров
-
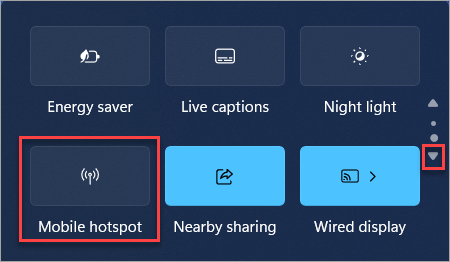
Выберите кластер быстрых параметров на панели задач, а затем найдите быстрое действие Мобильный хот-спот. Для этого может потребоваться щелкнуть стрелку Следующая страница , чтобы перейти на вторую страницу быстрых действий.

-
При выборе быстрого действия Мобильный хот-хот-хот-спот будет включен и отключен. Он начинается со свойств по умолчанию или того, что в последний раз использовалось в параметрах.
-
Если этот параметр включен, в быстром действии отобразится количество устройств, подключенных к мобильной хот-точке доступа.
-
Чтобы подключиться на другом устройстве, перейдите в параметры Wi-Fi на этом устройстве, найдите имя сети, выберите его, введите пароль или отсканируйте QR-код, а затем подключитесь.
-
Чтобы просмотреть или управлять параметрами, такими как сетевой пароль, или, если вы еще не настроили свою мобильную точку доступа и вам нужно сделать это, щелкните правой кнопкой мыши (или долго нажмите) в быстром действии мобильной хот-спот и выберите Перейти к параметрам.
Нужна дополнительная помощь?
Нужны дополнительные параметры?
Изучите преимущества подписки, просмотрите учебные курсы, узнайте, как защитить свое устройство и т. д.
В этой статье затронем извечный вопрос, мучающий пытливые умы, пытающиеся выжать последнюю каплю производительности из компьютера.
Что такое службы Windows
Службы Windows – это практически такие же приложения, только без пользовательского интерфейса. Они работают в фоне и предоставляют операционной системе различные возможности и функции. Не все службы разработаны Microsoft и не все доступны сразу же после установки. Многие приложения и драйверы устанавливают в систему свои собственные службы. Службами активно пользуются антивирусы, так как они постоянно мониторят состояние здоровья вашей системы и предоставляют защиту от вредоносного ПО. Преимуществом служб является возможность старта во время запуска операционной системы еще до старта приложений, а также возможность следить за всем, что работает на вашем компьютере. Именно поэтому антивирусы могут надежно защищать компьютер, на котором работают.
Многие «компьютерные специалисты» рекомендуют отключить часть служб Windows 10, преследуя при этом самые разнообразные цели. Кто-то корячит список служб операционной системы в попытках улучшить свою конфиденциальность (шапочка из фольги, к сожалению, в комплекте с Windows 10 не поставляется), кто-то пытается выжать последнюю каплю производительности. Отключение служб Windows 10 – палка о двух концах. Да, отключение служб действительно может частично улучшить производительность вашей системы, но эффект будет крайне малым, если будет заметен вообще. Часто разгон оперативной памяти, разгон видеокарты, покупка SSD-диска для компьютера или апгрейд любого другого компонента дает куда более заметный прирост производительности, чем эксперименты со службами Windows.
Вообще говоря, мы против отключения служб Windows 10. Видите ли, разработчики Microsoft иногда выпускают в релиз кривой софт, но они не дураки – знают гораздо больше, чем среднестатистический «тыжпрограммист». Сервисы, службы, процессы и компоненты Windows за годы полировались и улучшались. Они оптимизированы достаточно хорошо, чтобы минимально нагружать ресурсы вашего компьютера (здесь мы не говорим об исключениях, когда баг или вирус приводит к аномальным нагрузкам на процессор, диск, память или сеть). В этом случае действует принцип «не сломано – не чини». Часто пользователи скорее вредят компьютеру, чем улучшают его работу, слепо пытаясь отключить часть служб Windows 10. Если нашего заявления об оптимизации служб Windows 10 вам недостаточно, и вы все равно хотите поэкспериментировать, в этой статье мы собрали список служб, которые можно безопасно отключить, не сделав при этом своему компьютеру хуже.
Справедливости ради стоит сказать, что вместе со сторонним программным обеспечением в систему попадают сторонние службы. Их иногда стоит отключать, если становится известно о вредоносных практиках разработчиков или при просто кривом коде. Также отключать службы Windows стоит в том случае, если вы пытаетесь провести диагностику компьютера и обнаружить причины просадки производительности, зависаний или других аномалий.
Отключение служб Windows 10
Прежде чем переходить непосредственно к отключению служб Windows, настоятельно рекомендуем вам создать точку восстановления Windows. Это ваша страховка от непредвиденных последствий отключения той или иной службы. Если вы что-то сделали не так и система стала работать хуже, откат на предыдущую точку восстановления быстро вернет все на свои места и избавит вас от головной боли и временных затрат на софтверный ремонт компьютера.
Как отключить службу в Windows 10
Делается все достаточно просто:
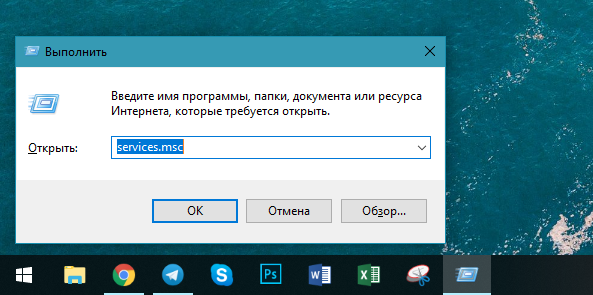
- Нажмите Win + R и введите services.msc. Сразу откроется окно служб Windows 10. Как вариант, можете просто нажать Пуск и ввести Службы или же нажать Win + R – control, а затем на окне Панели управления открыть Система и безопасность – Администрирование – Службы. Все три способа работают на всех актуальных версиях Windows.

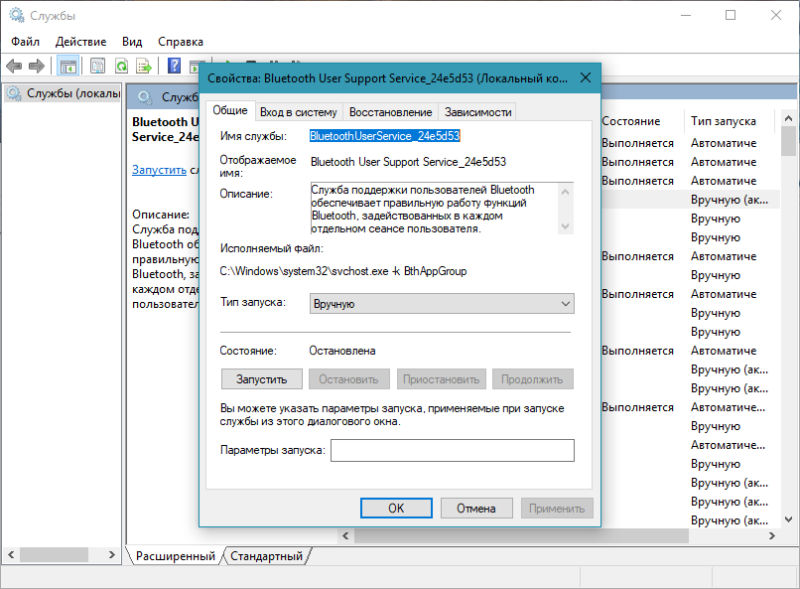
- В окне Службы вы увидите большой список служб, установленных в вашем компьютере. Столбец Имя содержит в себе название службы, что часто помогает ориентироваться в ее предназначении. Столбец Описание часто содержит в себе объяснение службы и указывает на ее связи с определенным ПО на вашем компьютере. Столбец Состояние показывает текущее состояние службы, а Тип запуска объяснит вам, каким образом служба запускается (об этом ниже). Вход от имени – это пользователь, от имени которого запускается служба.
- Найдите нужную вам службу, дважды щелкните на нее и нажмите Остановить.
- После этого из выпадающего списка Тип запуска выберите опцию Вручную или Отключена. Параметр «Автоматически» и «Автоматически – Отложенный запуск» позволяют службе запускаться в момент входа пользователя в систему. Вручную – только когда служба понадобилась пользователю или приложений. Отключена – служба остановлена перманентно.

- Активируются службы обратно точно таким же образом. Просто нажимаете Запустить и изменяете Тип запуска службы.
Важно: существуют так называемые «оптимизаторы», которые берут на себя задачу по отключению служб операционной системы. Не используйте их! Не позволяйте стороннему софту решать, какие службы будут работать на вашем ПК, а какие нет. Внимательно изучайте службы, которые вы хотите отключить, а также сами решайте, стоит отключать их или нет. Кроме того, не используйте сторонний софт для их отключения или включения. Эта процедура предельно простая и, если вы уж взялись за это дело, лучше всего самому знать, как настраивать столь щепетильный раздел операционной системы.
Какие службы можно выключить в Windows 10
Учтите, что часть этих служб может отсутствовать на более старых версиях Windows, вроде Windows 7 или Windows 8 / 8.1. Кстати, многие из действительно лишних и ненужных обычному пользователю служб уже находятся в режиме «Вручную». Здесь мы возвращаемся к пункту выше, где говорили, что разработчики Windows не дураки и не пихают обычным потребителям ненужные им службы.
- Служба маршрутизатора AllJoyn. Эта служба отвечает за общение операционной системы с ближайшими IoT-устройствами.
- Факс. Объяснения тут излишние. Не пользуетесь факсом в паре с компьютером – можете смело отключить службу.
- Служба шифрования дисков BitLocker. Если вам не нужно шифрование ваших дисков, и вы не пользуетесь программным обеспечением для работы с BitLocker, можете отключать эту службу.
- Служба звукового шлюза Bluetooth. Если у вас на компьютере нет Bluetooth или вы не собираетесь разговаривать с Cortana через гарнитуру, отключайте эту службу.
- Служба поддержки Bluetooth. Отключайте только в том случае, если вы не пользуетесь Bluetooth в принципе (или его вообще нет). Отключение этой службы при наличии подключенных устройств может привести к тому, что они перестанут работать с вашим компьютером.
- Служба лицензий клиента. Отключать эту службу мы рекомендуем только тем, кто не пользуется приложениями из магазина вообще. Если у вас есть установленные из Microsoft Store программы, после отключения этой службы они могут перестать запускаться.
- Смарт-карта. Вряд ли ваш домашний ПК настроен на работу со смарт-картами. Отключайте эту службу, если вы не пользуетесь смарт-картами. Тем более, если не знаете вообще, что это такое. Сюда же относится Служба перечисления устройств чтения смарт-карт, Политика удаления смарт-карт.
- Диспетчер скачанных карт. Можно отключить, если вы не пользуетесь встроенным приложением Карты. Если пользуетесь, отключение службы может привести к проблемам в работе приложения.
- Шифрованная файловая система (EFS). Нужна для работы технологии шифрования данных внутри файловой системы NTFS. Не нужна, если вы не используете и не планируете использовать шифрование данных.
- Служба инициатора Майкрософт iSCSI. iSCSI – это аббревиатура от Internet Small Computer System Interface. Эта служба позволяет компьютеру пользователя получать доступ к информации на сильно удаленных дата-центрах с использованием существующей инфраструктуры. Можете отключать.
- Автономные файлы. Можно отключить, если не пользуетесь функцией автономных файлов или не знаете, что это такое. Кстати, эта функция недоступна в домашней редакции Windows.
- Диспетчер платежей и NFC / Защищенных элементов. Делает именно то, как называется, а именно обрабатывает платежи с помощью NFC. Полезно, на устройствах с соответствующим чипом, но на подавляющем большинстве планшетов и ноутбуков (и уж подавно на стационарных ПК) таковых чипов нет, поэтому можете отключить ее.
- Родительский контроль. Если вам некого контролировать, отключайте эту службу.
- Диспетчер печати. Отключать надо только в том случае, если у вас нет принтера, вы не пользуетесь сетевыми принтерами, а также виртуальными принтерами. С этой службой напрямую связана служба Факса.
- Nvidia Stereoscopic 3D Driver Service. Сия служба доступна на компьютерах с видеокартами Nvidia. Позволяет работать со стереоскопическими изображениями. Можно отключить, если вы не пользуетесь ею.
- Интерфейс гостевой службы Hyper-V. Отключайте, если не пользуетесь виртуальными машинами. Сюда же можно отнести Службу Hypwer-V PowerShell Direct, Службу пульса, Службу синхронизации времени Hyper-V, Службу обмена данными, Службу виртуализации удаленных рабочих столов Hyper-V, Службу виртуализации удаленных рабочих столов, Службу завершения работы в качестве гостя.
- Служба удаленных рабочих столов. С помощью этой службы пользователи могут удаленно подключаться к другим компьютерам и управлять ими. Отключайте, если не представляете себя в подобных сценариях.
- Служба географического положения. Отключение этой службы приведет к тому, что приложения не смогут получать информацию о местоположении.
- Служба демонстрации магазина. До тех пор, пока вы не выставите свой компьютер на продажу в розничном магазине, эта служба вам точно не понадобится.
- Служба диспетчера подключений служб Wi-Fi Direct. Эта служба нужна для подключения компьютера к беспроводным экранам и док-станциям при помощи технологии Miracast и ее аналогов.
- Служба предварительной оценки Windows. Если вы не планируете тестировать ранние версии Windows 10 в программе предварительной оценки, смело отключайте эту службу. Не забудьте включить, если измените свое решение.
- Служба общих сетевых ресурсов проигрывателя Windows Media. Эта служба позволяет делиться библиотеками медиа с вашего компьютера с другими устройствами воспроизведения в рамках вашей сети.
- Служба Windows Mobile Hotspot. Служба нужна только устройствам с сотовыми модулями и позволяет раздавать мобильный Интернет. Если в ваш компьютер не вставляется сим-карта, значит и служба вам не нужна.
- Вторичный вход в систему. С помощью этой службы пользователи могут выполнять задачи от имени администратора с учетной записи с обычными правами. Если компьютером пользуетесь только вы, эта служба вам не нужна.
- SuperFetch. Эта служба описана подробно в статье «Служба узла SuperFetch в Windows 10».
- Удаленный реестр. Эта служба дает возможность пользователям удаленно редактировать реестр операционной системы. Кто-то считает, что ее активация ставит под угрозу безопасность пользователя, поэтому отключает ее.
- Служба датчиков, Служба данных датчиков и Служба наблюдения за датчиками. Смело выключайте эти службы, если у вас стационарный ПК. Они нужны для ноутбуков и планшетов, где используются вспомогательные датчики, вроде датчика освещения, поворота экрана и так далее.
Если вы хотите отключить какую-то службу, не упомянутую в этом списке (смело можно сказать, что мы много чего не включили в эту статью), мы рекомендуем вам поискать информацию о ней в Интернете. Лучше всего в официальной документации Microsoft. Как вариант, почитайте несколько ресурсов, чтобы собрать несколько мнений об оправданности работы той или иной службы.
Sometimes, when we travel or our phone’s cellular data stops working, we simply turn on the mobile hotspot on our Windows 11 PC and connect our device to it. This immediately turns our computer into a hotspot and shares the system’s WiFi connection with other connected devices. Usually, it works properly. But sometimes, it suddenly stops working.
Sadly, a huge number of users are facing issues with their Windows 11 PC’s Mobile Hotspot functionality, where they can’t enable it or can’t connect other devices to it. Thankfully, there are some fixes that can eliminate all kinds of issues with this feature and make it work again. To help you fix it, we’ve mentioned some possible workarounds in this guide to fix the mobile hotspot not working issue in your Windows 11 PC.
Why Is My Mobile Hotspot Not Working in Windows 11?
These are some of the most common causes of the mobile hotspot not working issue. You can check them below:
- Airplane Mode Is Enabled
- Enable Bluetooth
- Outdated Network Drivers
- Interruptions by System’s Built-In Firewall
- Third-Party Antivirus Program
- Issues With Windows Updates
Fix Mobile Hotspot Not Working in Windows 11
You can try all possible workarounds mentioned in this section to get your system’s mobile hotspot back to work. Let’s move ahead and try the first solution.
1. Restart Your PC
One of the most obvious yet effective workarounds to make the Mobile Hotspot feature work again is to restart the system. Doing so will definitely fix the issue if it’s occurring because of interruption by a third-party program or service.
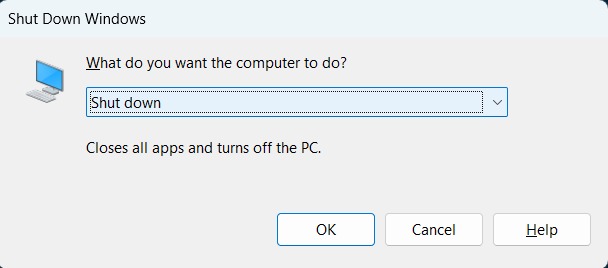
To restart your Windows 11 PC, use the Alt + F4 key combination to open the Shut Down Windows prompt. Then, select the Restart or Restart and update option from the prompt’s dropdown menu and wait for it to restart.
Once your system is restarted, try re-enabling the mobile hotspot again to check whether it’s working properly now.
2. Make Sure Airplane Mode Is Disabled
Some users reported that keeping the Airplane mode enabled in the system while using the mobile hotspot can also create this issue. According to them, it can weaken the connectivity and can cause connectivity issues, which most users are currently experiencing with the mobile hotspot.
Keeping this in mind, we suggest you make sure that your device’s Airplane Mode is turned off. You can follow the below steps to know how to disable Airplane Mode in Windows 11:
1. First, use the Windows + I shortcut to open the Settings app and then move to Network & Internet from the left navigation pane.
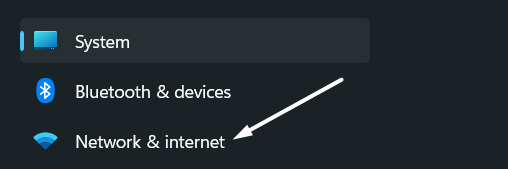
2. In the Network & Internet section, search for Airplane mode and make sure the switch next to it is disabled.
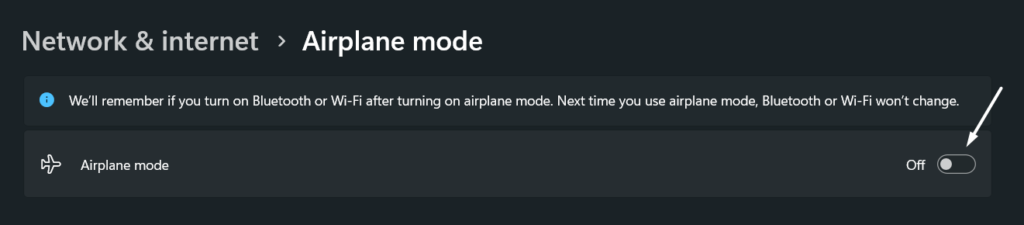
Once you’ve disabled the Airplane mode, check whether the mobile hotspot is now functioning properly.
3. Disable Bluetooth on Your Device
If switching off the computer’s Airplane mode function doesn’t resolve the mobile hotspot not working issue, then make sure Bluetooth is disabled on your system. In some cases, users have said that their system’s Bluetooth was enabled, which was causing this issue.
To check whether it’s the same in your case, we recommend you disable Bluetooth on your system. You can follow the below steps to disable Bluetooth on your PC:
1. To start, open the Settings app on your Windows PC, and select Bluetooth & devices from the left sidebar.
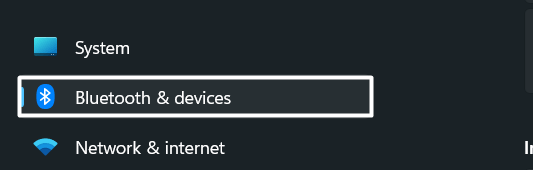
2. Lastly, make sure the Bluetooth toggle is disabled in the Bluetooth & devices section. After disabling Bluetooth, check whether the mobile hotspot is working fine now.

4. Turn Off Windows Defender Firewall
In the official Microsoft support forum, some users mentioned that when they try to connect their secondary device to it, they get the “Security or Firewall settings might be blocking the connection” error message on their computer. This error message shows that the system’s firewall is preventing it from working properly.
If you’re also getting the same error while trying to connect your other devices with the mobile hotspot, then the reason is pretty clear. In that case, we recommend you disable Windows Defender Firewall on your system to check whether it’s causing this issue. We’ve explained the steps to do the same below:
1. Firstly, open the Control Panel on your Windows 11 PC using the Windows Search Box and select System & Security.
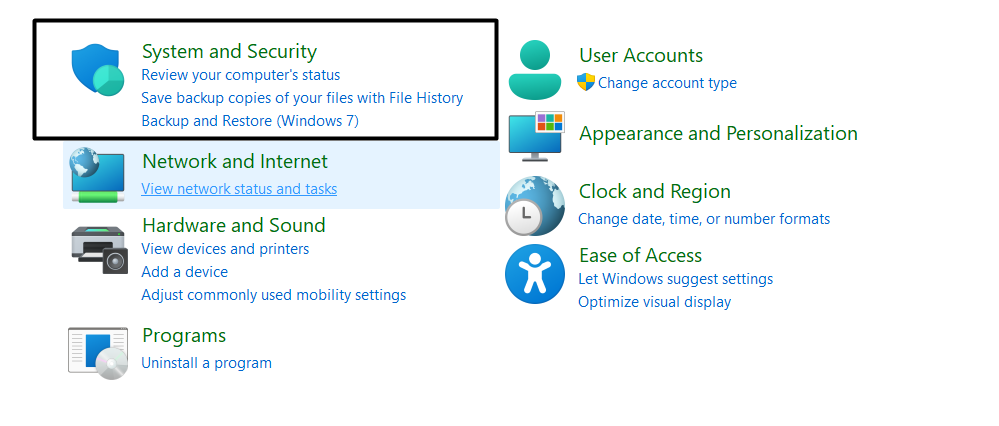
2. Now, select the Windows Defender Firewall option from the System & Security window to move ahead.
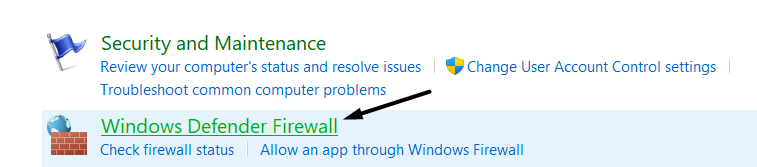
3. After that, click on the Turn Windows Defender Firewall on or off option from the left navigation pane.
4. Finally, set the Private network settings and Public network settings options to Turn off Windows Defender Firewall ( not recommended).
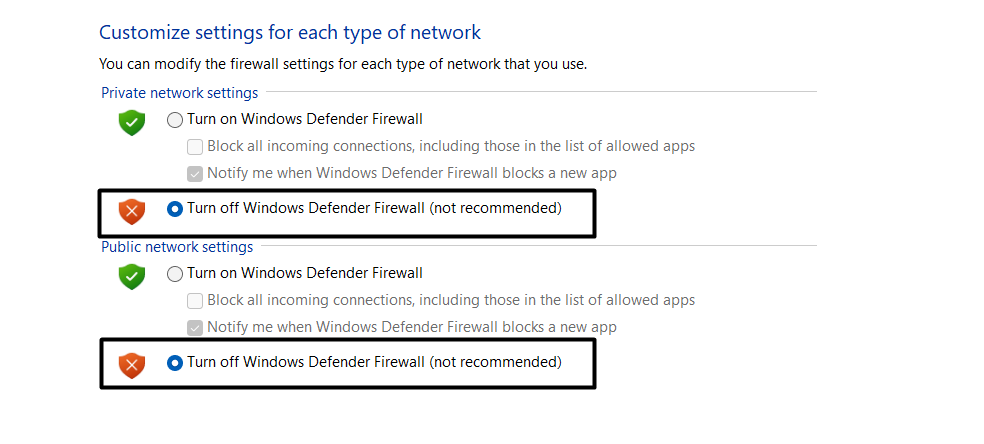
Once you’ve disabled Windows Defender Firewall on your system, check whether the mobile hotspot is working correctly. If the issue is still there, re-enable Windows Defender Firewall by following the same steps and try other workarounds.
5. Disable Antivirus Program
We often find antivirus programs causing such issues in the system. Sadly, this could be the same again in this case. It could be possible that your antivirus classified the Mobile Hotspot function as potentially harmful.
Due to this, it’s facing issues in working. Keeping this in mind, we suggest you remove the antivirus program from the system to check if it resolves the issue. You can follow the below steps to know how to remove programs from your PC:
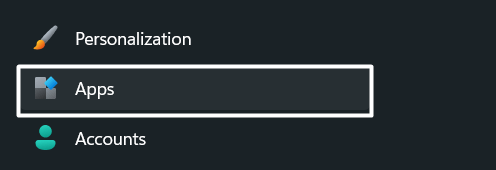
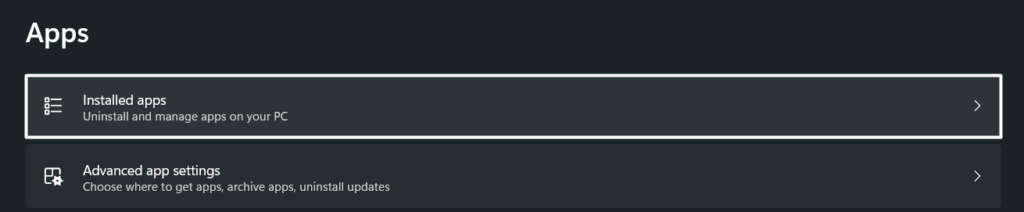
1. Firstly, open the Settings app on your Windows 11 PC, go to the Apps section, and then click on Installed apps.
2. Now, search for the antivirus program in the Installed apps section and click on the three dots (…) next to it.
3. In the end, select Uninstall from the dropdown menu, and then again select the Uninstall option from the prompt to remove it from your Windows system.

After deleting the antivirus from your system, verify whether everything is fine now. If you don’t want to remove the antivirus from your system, we suggest disabling the antivirus shields to check whether it’s working.
6. Enable Allow Other Network Users To Connect Through This Computer’s Internet Connection
Some users said that keeping the Allow Other Network Users To Connect Through This Computer’s Internet Connection option disabled will prevent other devices from joining your system’s mobile hotspot. So, if you can’t connect your secondary device to your computer’s mobile hotspot, then it could be possible that the above option isn’t enabled in your system.
We recommend you follow the below steps to check whether it’s enabled or disabled. If you find it disabled, simply enable it to let other devices easily join your computer’s mobile hotspot. So, follow the below steps to do so:
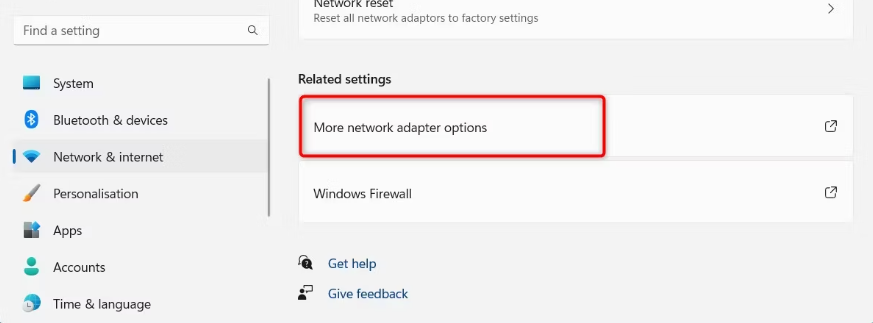
1. Press the Windows logo, and I key concurrently to open the Settings app and then select the Network & Internet option from the left sidebar.
2. In the Network & Internet section, go to the Advanced network settings section and then click on More network adaptor options.

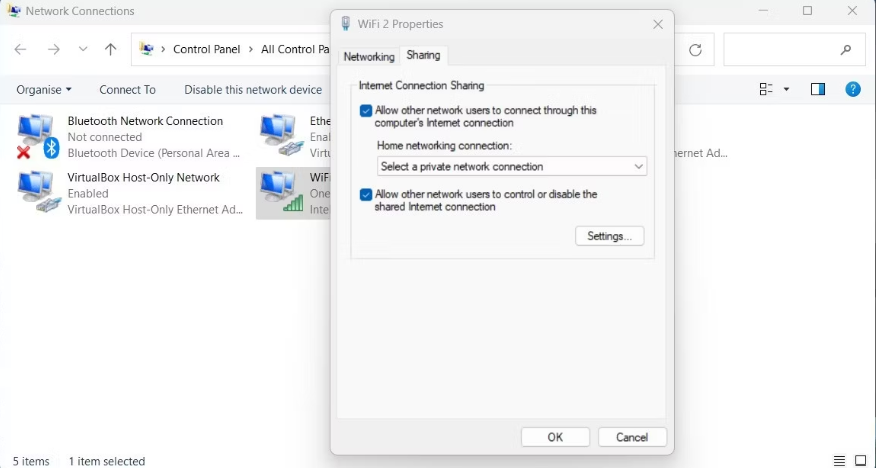
3. After that, right-click your WiFi network and select the Properties section to open the selected network’s properties section.
4. At last, proceed to the Sharing section of the Wi-Fi Properties prompt and make sure the Allow other network users to connect through this computer’s Internet connection checkbox is checked.
Once you’ve enabled the Allow other network users to connect through this computer’s Internet connection option, verify whether the mobile hotspot is working fine. If the issues with the Mobile Hotspot feature are still there, try other workarounds.
7. Delete Hosted Network Settings in the Registry Editor
During the research, we found that some users resolved the issues with mobile hotspot by deleting a particular key from the Registry Editor. They mentioned that removing the Hosted Network Settings key from the Registry Editor fixed the issue for them. You can also try the same by following the below-mentioned steps and check the issue’s status:
1. To start, use the Windows + R shortcut to open the Run dialog and type regedit in the Run dialog’s search bar.
2. Once the Registry Editor is opened, go to the below-mentioned manual by pasting the below location in the top navigation bar.
HKEY_LOCAL_MACHINE\SYSTEM\CurrentControlSet\Services\WlanSvc\Parameters\HostedNetworkSettings\3. Lastly, right-click on the HostedNetworkSettings key in the right pane and select Delete from the menu.
8. Reinstate Windows Mobile Hotspot Service
Windows Mobile Hotspot Service is an essential Windows service that helps the mobile hotspot feature work properly. It allows the system to share the system’s WiFi or cellular data with other devices with ease. To let the mobile hotspot work properly, you need to make sure that the above Windows service is working fine.
It’s possible that the Windows Mobile Hotspot service isn’t working properly, which is why this issue is appearing. In that case, we suggest you reinstate the Windows Mobile Hotspot service in the Services utility to make sure it’s working fine and not causing this issue. Here are the steps to restart this service with ease:
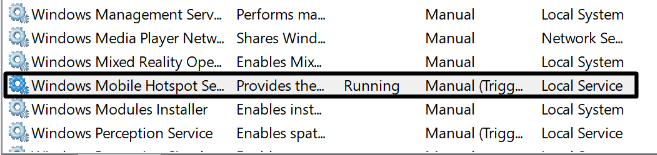
1. First, use the Windows + R keyboard shortcut to open Run and type Services.msc in the Run dialog’s search bar.

2. In the Services tab, locate the Windows Mobile Hotspot Service and right-click on it to open the context menu.
3. Now, select Refresh from the popup menu to immediately restart the selected service and then click on Properties from it.
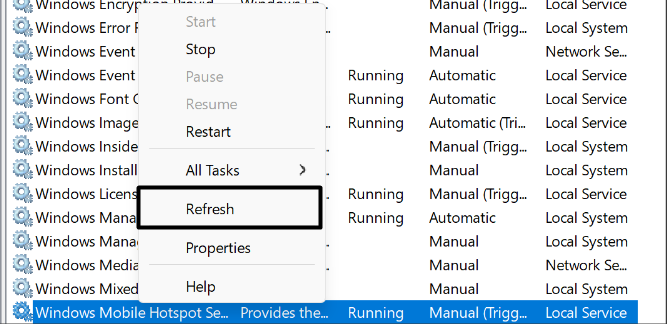
4. Once you’re in the Properties section, set the Startup type to Automatic so it can automatically start at the boot.
After making sure that the Windows Mobile Hotspot service is working properly, check the status of the issue.
9. Using WLAN Start Command
Some users said that they fixed the issues with their mobile hotspot by changing their mobile hotspot’s name and password. Therefore, we also recommend doing the same for you.
You can simply change your mobile hotspot’s name and password by running a few commands in the console. Follow the below steps to run the WLAN Start command and edit the mobile hotspot’s name and password:
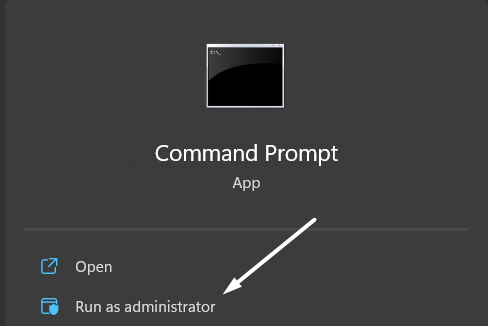
1. To do so, open the Windows Search Box using the Windows key and type Command Prompt in the Run’s search box.

2. Now, select the Run as administrator option to open the Command Prompt with admin rights.
3. Next, select the Yes option in the UAC and run the following command in it to get details about your PC’s network drivers.
netsh wlan show drivers4. After executing the above command, copy-paste the below command in it to change the name and password.
Note: Replace your ssid name and your password in the command with the new username and password, respectively, you want to set.
netsh wlan set hostednetwork mode-allow ssid=your ssid name key=your password5. Finally, execute the following command in the same elevated console to save the change and restart the mobile hotspot.
netsh wlan start hostednetworkAfter doing so, check whether it’s working properly.
10. Update Your Device’s WLAN Network Adapter
If changing the mobile hotspot’s username and password doesn’t improve the situation, then you should check your system’s network adapters. It could be possible that your WLAN network adapter has some bugs which are causing this issue.
In that case, the best workaround is to search for new network driver updates and install them to see if it eliminates the issues. We suggest following the below-mentioned steps to learn how to update the drivers on Windows 11:
1. To start, open Run, type devmgmt in it, and press the Enter key to open the Device Manager utility on your PC.

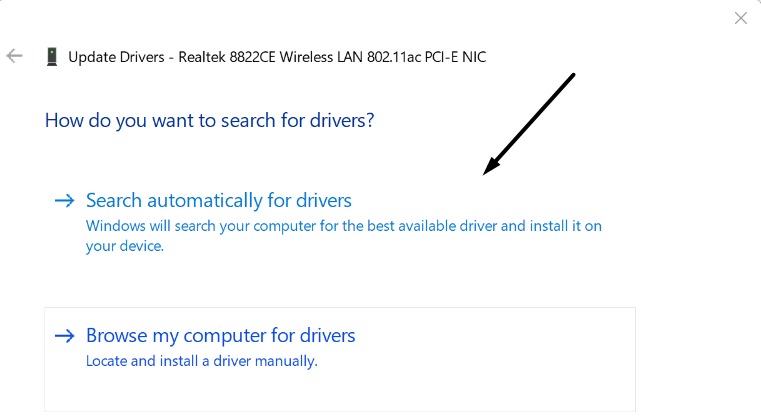
2. Now, double-click on Network adapters in the same window, right-click on the WLAN network adapter, and select Update driver from the menu.
3. After that, select the Search automatically for drivers option from the How do you want to search for updates? tab.
4. In the end, follow the on-screen instructions to update the selected WLAN network adapter and then check the issue’s status.
11. Reset the Network Adapters
If updating the device’s network WLAN adapter doesn’t eliminate the mobile hotspot not working issue, we recommend you reset them by reinstalling them. This will revert your network adapters to default and fix all issues with them.
Doing so will definitely fix the issues with mobile hotspot if they appear because of incorrect settings. So, do the same to check if it fixes the issue. You can check the below steps to reset your system’s WLAN network adapter:
1. First, launch the Device Manager utility and expand the Network adapters section to view all the network adapters installed on your Windows device.
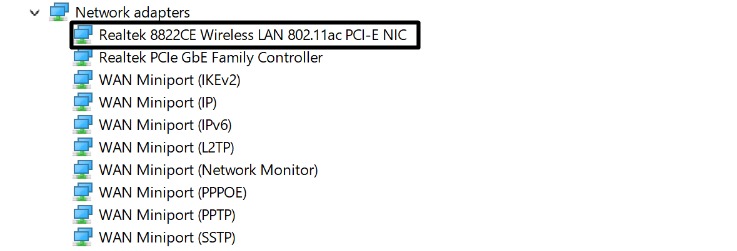
2. Now, right-click on the network adapter to get the popup menu and select the Uninstall device option from it.
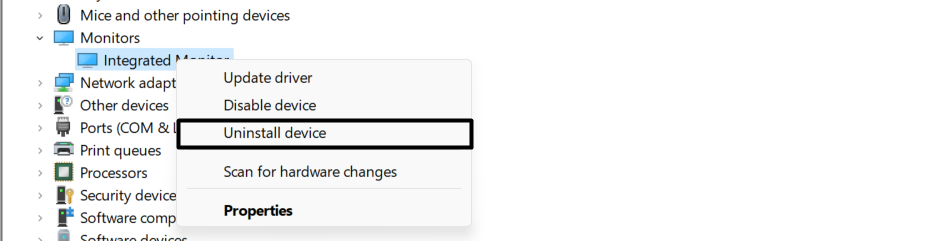
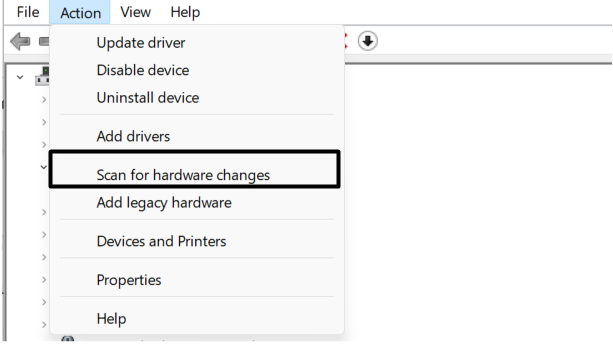
3. Lastly, select the Search for hardware changes option from the Action menu at the top to re-add it to your device.
After reinstalling the WLAN network adapter, check whether the mobile hotspot is functioning properly now.
12. Reset Your PC’s Network Settings
In case even updating and resetting the system’s network drivers doesn’t eliminate the issue, then you should consider resetting your system’s network settings. This is because it could be possible that the system’s network settings have some faults which are causing these issues with mobile hotspot.
In that case, the best solution is to reset the network settings. Doing so will send all the network settings to the default state and fix all kinds of issues with it. We’ve mentioned the steps below to reset Windows 11 PC’s network settings:
1. Firstly, open the Settings app using Windows + I shortcut, and then open the Network & Internet section from the left sidebar.
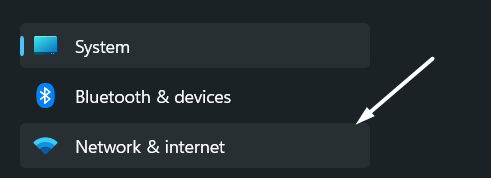
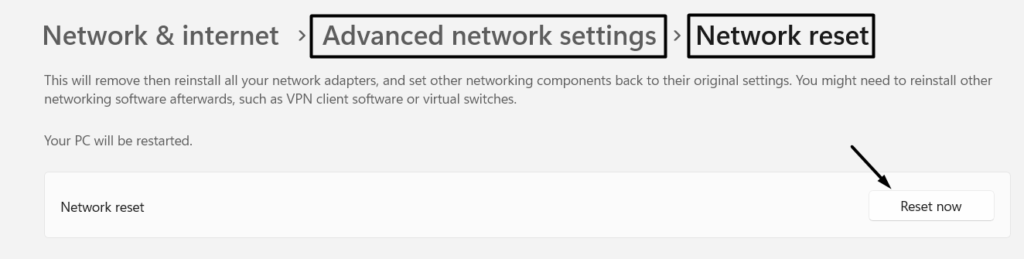
2. Select the Advanced network settings option from the Network & Internet window and choose Network reset.
3. Finally, click on Reset now in the Network reset section to factory reset your computer’s network settings to the default state.
13. Run Network Adapter Troubleshooter
The new Windows 11 comes with more than 17 integrated troubleshooters to find and fix issues with the system’s components, including network components. Some users reported that they used the system’s integrated Network Adapter troubleshooter to find and fix issues with their system’s network components.
Because of this, they were able to make the mobile hotspot work again. You can also try running this troubleshooter to see if it fixes the issues. So, follow the below instructions to know how to access and run the Network Adapter troubleshooter:
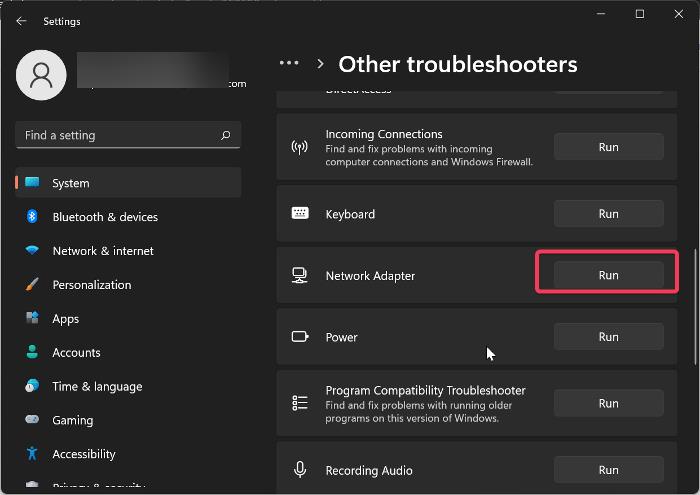
1. First, open the Settings app on your PC and select the Troubleshoot option from the System category.

2. Once you’ve opened the System section, move to Other troubleshooters from the Troubleshoot section and search for Network Adapter.
3. In the end, click on the Run button next to Network Adapter troubleshooter and follow the on-screen prompts to run it.
14. Troubleshoot the Problem in a Safe Mode
In some cases, users have found a third-party program causing this issue with their system’s mobile hotspot. So, it could be the same in your case, and you can easily verify this by simply booting your system into Safe mode.
Booting the system into Safe mode will only start essential Microsoft services and programs. You can check the below-mentioned steps to restart your Windows 11 PC into Safe mode and know whether a third-party program is the real culprit:
1. Firstly, open the Run program using search, type msconfig in it, and press Enter to launch the System Configuration utility.

2. Once the System Configuration utility is opened, move to the Boot section and check the Safe boot checkbox.

3. Next, go to the Services section, and tick the Hide all non-Microsoft services checkbox to view all the third-party services.
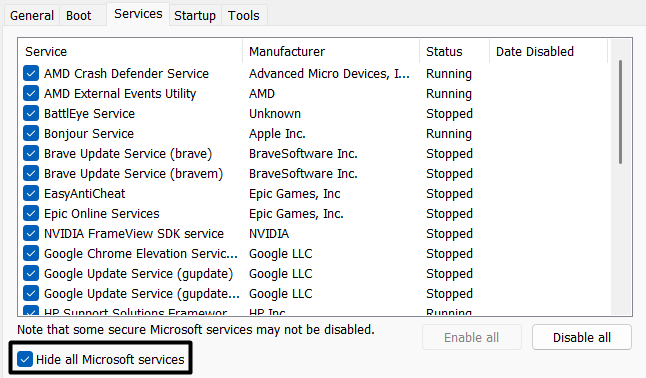
4. After that, click on the Disable all option at the bottom right corner of the tab and then proceed to the Startup tab.

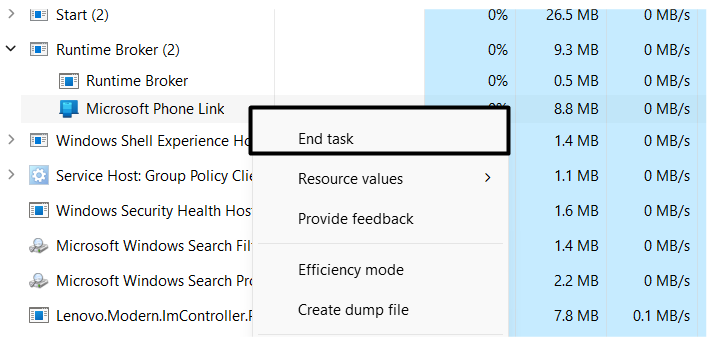
5. Lastly, click the Open Task Manager button in the Startup tab, and end all the non-Microsoft services in the Task Manager.
Once the Safe mode is enabled, check if the mobile hotspot is working fine. If yes, then the culprit is a third-party app. In that case, we recommend you exit the Safe mode by unticking the Safe boot option in the Boot section of the System Configuration utility. Lastly, uninstall all the third-party apps and check the issue’s status simultaneously.
15. Reset Your PC
Unfortunately, if nothing works for you, then you’ve no other option than factory resetting your computer. This will completely clean your system and revert all the system’s settings to the default state. There is a high chance that this will resolve the issue and make the mobile hotspot work again.
But some users may not be comfortable attempting this solution, as they have to reset the complete PC. Those users can try restoring their PC using System Restore. But if you’re good to reset your Windows 11 PC, check the below-mentioned instructions to do the same:
1. You need to first open the elevated Command Prompt on your Windows 11 PC and execute the following command.
systemreset - factoryreset2. After running the above-mentioned command, you’ll see the Choose an option prompt with some options on it.
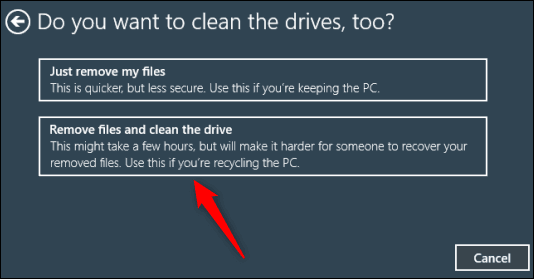
3. You need to select the Remove everything option from the Choose an option prompt to clear everything stored on your system.
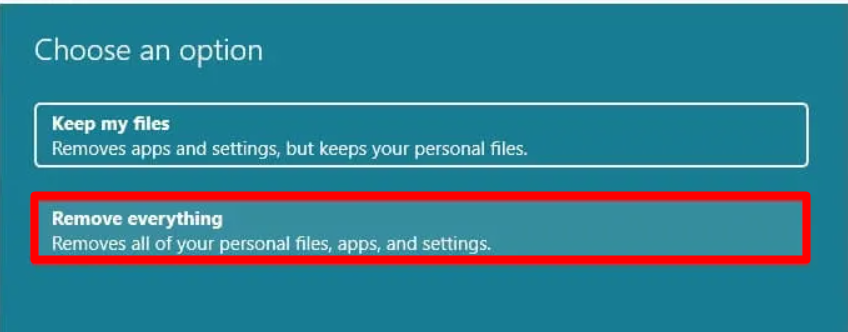
4. Lastly, select the Remove files and clean the drive option to factory reset your Windows 11 PC to default.
Once you’ve restored your system, try using the mobile hotspot again.
FAQs
How Do I Make My Hotspot Work on Windows 11?
If you can’t use your system’s mobile hotspot, then it could be possible that the integrated firewall is causing this problem. To check whether it’s causing the issue, we recommend you disable Windows Defender Firewall and then check the issue’s status. If it’s not the real culprit, you can try updating your system’s WLAN network adapters.
Why Is My PC Not Seeing My Phone Hotspot?
There could be several possible reasons for not being able to see your computer in your mobile phone’s hotspot. But one of the most common reasons is the outdated WLAN network adapters. In that case, you can try updating your system’s WLAN network drivers to check whether it resolves the issue. If this doesn’t fix the issue, consider enabling and disabling Airplane mode on both devices and then check the issue’s status.
How Do I Use Mobile Data on Windows 11?
You can check the below-mentioned steps to use cellular data on your Windows 11 PC:
1. First, insert your SIM card into your Windows 11 PC. Else, make sure you’ve an eSim profile installed in it.
2. Once done, click on the Network icon on the left side of your taskbar and then select Manage Cellular connections from the menu.
3. In the Cellular settings section, enable the Let Windows keep me connected option. Keeping this option enabled will automatically connect your computer to cellular data when it isn’t connected to WiFi or other networks.
Why Windows 11 Cannot Connect to Wi-Fi?
If you can’t use your system’s WiFi to join your WiFi connection network, then it could be possible that the WLAN AutoConfig service isn’t working properly. Keeping this in mind, we recommend you reinstate this service to check if it fixes the issue. You can also try clearing the existing system’s DNS cache.
How Do I Turn On Mobile Hotspot on Windows?
Follow the below steps to enable the mobile hotspot on your Windows 11 PC:
1. Press the Windows + I shortcut to open Settings and go to the Network & Internet section from the left menu.
2. Once you’ve entered the Network & Internet section, search for Mobile hotspot and make sure the toggle next to it is enabled.
That’s it! You can now use your Windows 11 PC as a mobile hotspot.
Try Using the Mobile Hotspot Again
Mobile Hotspot is one of the most interesting and useful features of Windows 11. We all use it a lot while traveling or sometimes when our mobile’s internet stops working. But for some Windows users, their system’s mobile hotspot has stopped working. They said that they can’t connect their secondary device to their system’s mobile hotspot.
Fortunately, this problem can be fixed by trying all the possible troubleshooting methods mentioned in this article. We hope the methods mentioned in this guide helped you resolve it. If yes, then don’t hesitate to share which solution fixed your mobile hotspot not working issue on your Windows 11 PC.
×
Leave your contact information
Submit email that we contact you
Headquarters:
12-A, Building E4, TCL International E-City, Zhongshanyuan Rd, Nanshan, Shenzhen, Guangdong Province, China, 518051
General Information:
Service hotline:+86 158-1736-7432
Email:info@kingtoptec.com
In today’s fast-paced, digitally connected world, having access to a reliable internet connection is more important than ever. Whether you’re on the go or in a location without Wi-Fi, creating a mobile hotspot with your Windows device can keep you connected. In this blog post, we will explore the benefits of using a Windows mobile hotspot and guide you through the setup process.
Why Use a Windows Mobile Hotspot?
A Windows mobile hotspot allows you to share your device’s internet connection with other devices, such as laptops, smartphones, or tablets. This feature proves especially useful in various scenarios:
- On the Go: When you’re away from home or office and need to access the internet, a mobile hotspot can ensure you stay connected.
- Poor Wi-Fi Signal: In areas with weak or unreliable Wi-Fi signals, creating a mobile hotspot can provide a stable and faster connection.
- Multiple Devices: If you have multiple devices that need internet access, using a mobile hotspot can save you from purchasing separate data plans for each device.
Setting up a Windows Mobile Hotspot
Setting up a mobile hotspot on your Windows device is simple. Follow these steps:
- Open the «Settings» app on your Windows device.
- Select the «Network & Internet» option.
- Choose the «Mobile hotspot» tab.
- Toggle the «Share my Internet connection with other devices» switch to the «On» position.
- Adjust the network name and password as per your preference.
- Click on the «Edit» button to change network settings like network band, IP address, etc. (optional).
- Once the settings are configured, turn on the mobile hotspot using the «On» button.
That’s it! Your Windows device is now broadcasting its internet connection as a mobile hotspot. You can connect other devices by searching for available Wi-Fi networks and selecting your device’s hotspot from the list.
Tips for a Reliable Mobile Hotspot Experience
To ensure a smooth and uninterrupted mobile hotspot experience, consider the following tips:
- Keep your device plugged in: Creating a mobile hotspot consumes battery power. To avoid your device running out of charge, connect it to a power source.
- Manage connected devices: Regularly check the list of devices connected to your mobile hotspot to ensure that only authorized devices are using your internet connection.
- Be mindful of data usage: Using a mobile hotspot consumes data from your cellular plan. Keep track of your data usage to avoid unexpected surprises on your bill.
- Secure your hotspot: Protect your mobile hotspot with a strong password to prevent unauthorized access to your personal internet connection.
By following these tips, you can enjoy a reliable and secure mobile hotspot experience with your Windows device.
Stay Connected Anywhere You Go
With a Windows mobile hotspot, staying connected is now easier than ever. Whether you’re traveling, working remotely, or simply experiencing internet connection issues, follow our guide to set up a Windows mobile hotspot and enjoy uninterrupted access to the online world. Stay connected, stay productive!
5G WiFi Hotspots Supplier for Telecom
·Stable Wireless connectivity
·Large Battery and Strong Signal Coverage
·High-performance and Advanced 4G/5G Full-network Solutions
·Suitable for Telecom Network Construction and Wholesaler Procurement
·Flexible MOQ and Customization
Stay Connected Anywhere, Anytime
With built-in enterprise-grade security, fast 5G speeds, quick charging, and long-lasting battery life, Kingtop
Mobile Hotspots keep you connected all day long—no matter where the day takes you.
Remote workers
Stay connected to your
work no matter where you are.
Mobile entertainment
Stream movies, music, and other
content on multiple devices.
Transportation
Stay in contact with dispatch
and communicate with customers.
Government & Public safety
Secure access to critical
information and applications.
Remote learning
Connect to online classes, access
course materials, and online discussions.
Retail
5G network uptime and failover
solutions
Why Choose Us?
We’re here to help
tailor our comprehensive business solutions to your specific needs.
5G Fast Connectivity
Our tablet devices are equipped with advanced 5G modules that support various network bands and protocols, which allows you to enjoy fast and stable internet access anytime and anywhere.
Rich Production Experience
We have been focusing on the production of intelligent mobile devices for 15 years, and we have a deep understanding of the industry trends and customer needs. We can provide you with high-quality products that meet your expectations and requirements.
Trouble Shooting
We have a professional and responsive customer service team that can solve any problems you encounter within 24 hours. You can also contact our engineers directly for technical support and guidance.
OEM
We can customize your tablet devices according to your specifications and preferences. You can choose the size, color, logo, software, hardware and accessories of your tablet devices. We will offer you the best solution that suits your budget and needs.
Prouduct Selection
We have a wide range of tablet devices for you to choose from, with different features, functions and prices. Our professional sales team will recommend the most suitable and cost-effective products for you based on your needs and preferences.
ODM
We have a professional R&D and design team that can develop innovative and unique tablet devices for you. We have 15 years of experience in software and hardware development, and we can create solutions that satisfy your customers and the market.Don’t miss this opportunity to get the best 5G tablet device for your business or personal use. Contact us today and get a free quote and sample!
Which 5G device is right for you?
Stable network performance for all your devices.
KT-M2C
576hours
Standby time: 576hours
KT-M2A
576hours
Standby time: 576hours
KT-M3A
720hours
Standby time: 720hours
10000mAh
1W mAh, 5V/2A, ultra long use time
Full specs→
KT-M4A
565hours
Standby time: 565hours