
In this article, we are going to discuss on How to fix Windows Event log high CPU issue in Windows 10. You will be guided with easy steps/methods to resolve the issue. Let’s starts the discussion.
‘Windows Event log high CPU’ issue: It is common Windows Problem considered as Windows Event Log error. This issue indicates you are experiencing high CPU usage issue by Windows Event log service in Windows computer that is causing overall system performance slowdown issue in computer. When you open Task Manager app in Windows PC in order to check which program/process is consuming your system resources, you may experience Windows Event log service is showing higher percentage under CPU usage section.
There could be several reasons behind the issue including the interference of Windows Firewall or other conflicting services/applications, corruption in Windows computer, malware or viruses infections in computer, issue with Windows Even Viewer Log, and other issues. It is possible to fix the issue with our instructions. Let’s go for the solution.
How to fix Windows Event log high CPU issue in Windows 10?
Method 1: Fix Windows Event log high CPU issue with ‘PC Repair Tool’
‘PC Repair Tool’ is easy & quick way to find and fix BSOD errors, DLL errors, EXE errors, problems with programs/applications, malware or viruses infections in computer, system files or registry issues, and other system issues with just few clicks.
Method 2: Check your antivirus/firewall
This issue can be occurred due to interference of antivirus/firewall program in computer. You can disable or uninstall antivirus/firewall program in computer in order to fix the issue and once done, check if the issue is resolved.
Method 3: Use Process Explorer
You can also try to fix the issue by using Process Explorer tool in your computer. This is freeware tool and it’s available as part of Windows Sysinternals package. You can see available processes just like Task Manager but you can also see much more additional information, and check if it works for you.
Method 4: Clear Event Viewer log
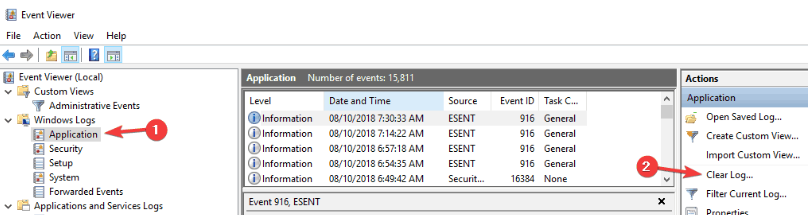
Step 1: Open ‘Windows Event Viewer’ app in Windows PC via Windows Search Box
Step 2: Expand ‘Windows Logs’ section in left pane and select ‘Applications’. In right-pane, click ‘Clear Log’ and you can save your logs before removing them if you want
Step 3: Go back to ‘Windows Logs’ section, select the Next category on list and remove its logs as well. Repeat the same steps to clear all logs from Windows logs section and once done, check if the issue is resolved.
Method 5: Boot your computer in Safe Mode
Step 1: Open ‘Settings’ app in Windows PC via Windows Search Box and go to ‘Update and Security > Recovery’ and click ‘Restart Now’
Step 2: Now, select ‘Troubleshoot > Advanced Options > Startup Settings’ and click ‘Restart’. Once restarted, you need to choose Safe Mode option from list of boot options and proceed. Once you are in Safe Mode, check if the issue is resolved.
Method 6: Perform Clean Boot
You can perform clean boot in computer to disable all unnecessary applications and services that is causing the issue.
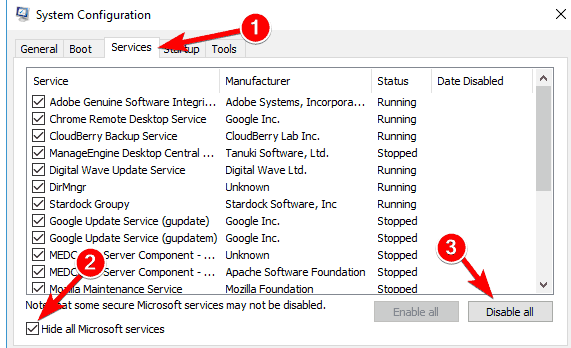
Step 1: Open ‘System Configuration’ app in Windows PC via Windows Search Box
Step 2: Click ‘Services’ tab, tick ‘Hide All Microsoft Services’ checkbox and hit ‘Disable All’ button
Step 3: Click ‘Startup’ tab, and click ‘Open Task Manager’, right-click on each startup item and select ‘Disable’ to disable them and then close Task Manager
Step 4: Finally, click ‘Apply > Ok’ button on System Configuration app to save the changes and check if the issue is resolved.
Method 7: Create a new user account
This issue can be occurred due to some issue with user account in Windows computer. You can create a new user account in order to fix.
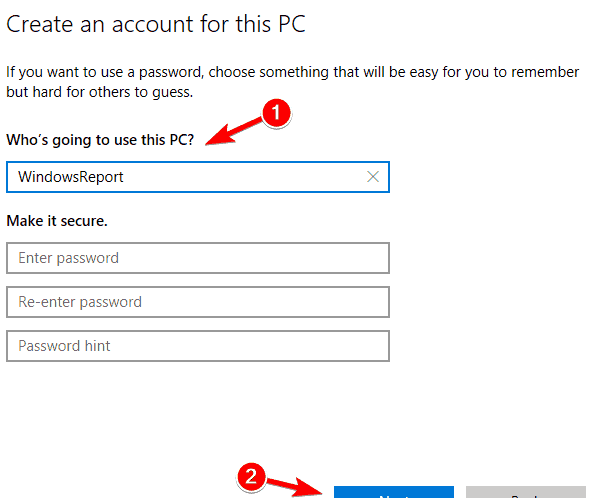
Step 1: Open ‘Settings’ app in Windows PC and go to ‘Accounts > Family & other people > Add someone else to this PC > I don’t have this person’s sign-in information > Add a user without a Microsoft Account’
Step 2: Enter a desired username and password and hit ‘Next’ and once the account is created, restart your computer and login with newly created account and check if the issue is resolve.
Method 8: Perform System Restore
If the issue is still persist, you can perform System Restore app in computer in order to fix the issue.
Step 1: Press ‘Windows + R’ keys on keyboard, type ‘rstrui’ in ‘Run’ window and hit ‘Ok’ button to open ‘System Restore’ app
Step 2: Click ‘Next’, select a valid restore point according to date & time when there was no issue at all in computer, and click ‘Next > Finish’ to start restoring process and once finished, check if the issue is resolved.
Conclusion
I am sure this post helped you on How to fix Windows Event log high CPU in Windows 10 with easy ways. You can read & follow our instructions to do so. That’s all. For any suggestions or queries, please write on comment box below.

Have you discovered that “Service Host: Windows Event Log” or “svchost.exe” is using so much CPU on your computer? That specific process might be experiencing issues, or your Windows operating system might have a bug. There are ways to reduce this process’ CPU usage on your Windows 11 or Windows 10 PC, and we’ll show you how to do that.
Other reasons for the above process malfunctions are that a virus or malware has infected your PC, your system files are corrupted, a third-party app is causing the problem, and more.
Restart the Windows Event Log Process
When the Windows Event Log process uses too much CPU, restart the process. This fixes the minor problems with the process, resolving your issue.
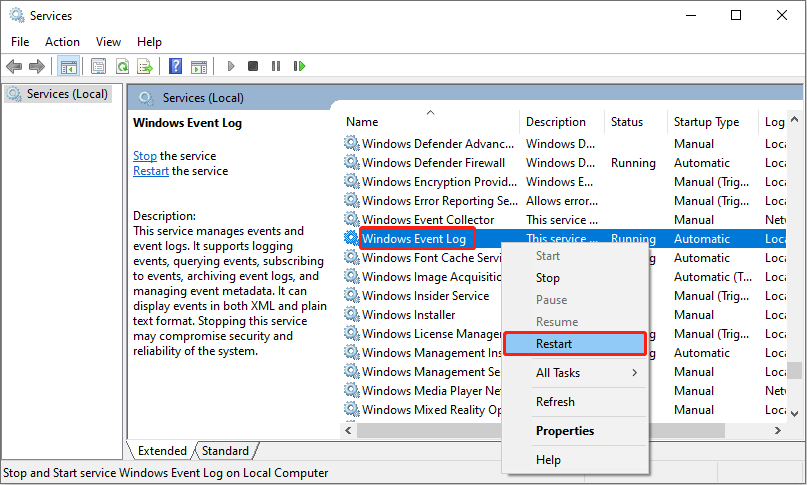
- Open the Run dialog box by pressing Windows + R.
- Type the following in the open box and press Enter:
services.msc - Find the service named Windows Event Log, right-click the service, and select Restart.

- Close the Services window.
Run an Antivirus Scan on Your Windows PC
If a virus or malware has infected your Windows PC, that might be the reason a specific update is using so much CPU. In this case, run a full antivirus scan on your PC to find and remove threats.
You can use an antivirus program of your choice or the built-in Microsoft Defender Antivirus. Here’s how to run a scan using the latter.
- Open the Start menu, find Windows Security, and launch the app.
- Select Virus & threat protection in the app.
- Choose Scan options on the following screen.
- Enable Full scan and select Scan now.

- Wait while the app scans and removes threats from your PC.
- Restart your PC.
After removing viruses and malware, keep the antivirus protection enabled all the time. This way, a new virus or malware can’t infect your system.
Clear the Event Logs
One reason the above process uses so much CPU is that Windows’ logs have lots of data. If you don’t need this data, clear your logs to possibly fix your issue. Removing the logs doesn’t affect your PC’s functionality.
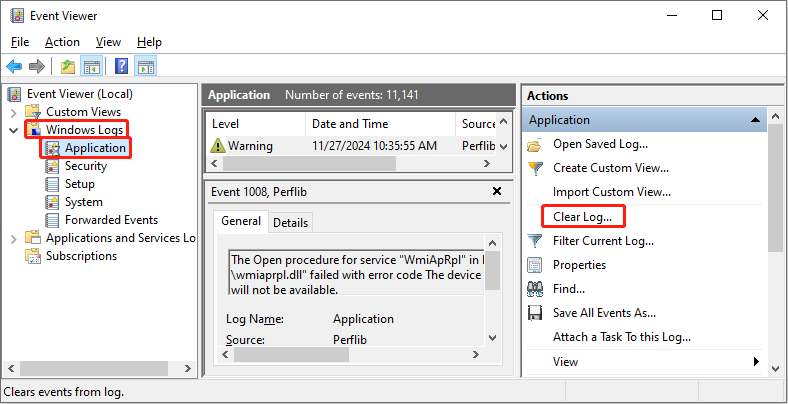
- Open the Start menu, find Event Viewer, and launch the app.
- Expand Windows Logs in the left sidebar and select Application.
- Choose Clear Log on the right pane.

- Select Clear in the prompt.
- Repeat the above steps for the Security, Setup, System, and Forwarded Events options in the left sidebar. This clears all the logs.
- Restart the Windows Event Log process.
Update Windows
One possible reason a process overuses your CPU is that your Windows version is outdated. Older operating system versions often have bugs, causing the system to malfunction. In this case, update your Windows 11 or Windows 10 version to fix the problem.
On Windows 11
- Open the Settings app by pressing Windows + I.
- Select Windows Update in the left sidebar.
- Choose Check for updates on the right pane.

- Download and install the available updates.
- Reboot your PC.
On Windows 10
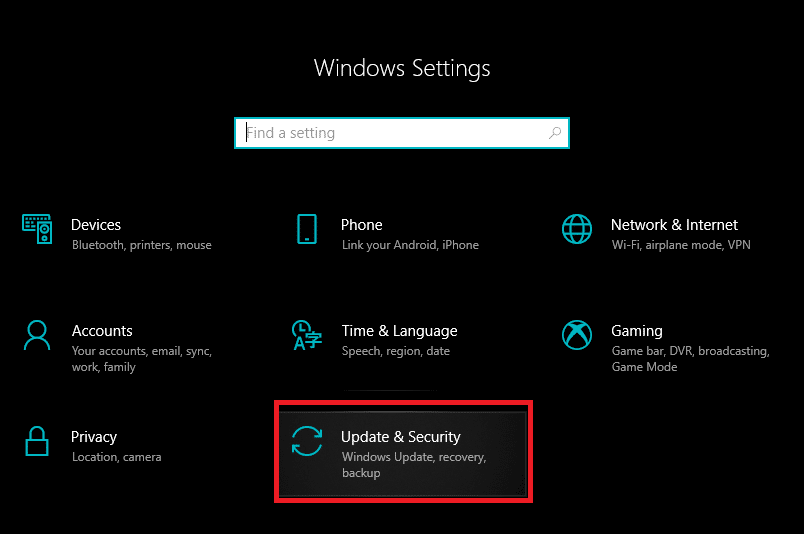
- Launch Settings using Windows + I.
- Select Update & Security > Windows Update in Settings.
- Choose Check for updates on the right pane.

- Download and install the latest updates.
- Restart your PC.
Fix Windows’ Corrupted System Files
When Windows’ system files get corrupted, various processes start malfunctioning. Your current issue might be due to such core-level corruption. In this case, use your system’s built-in SFC (System File Checker) tool to find and fix the faulty system files.
- Open the Start menu, search for Command Prompt, and select Run as administrator.
- Choose Yes in the User Account Control prompt.
- Type the following command and press Enter. This command downloads the files required to fix the faulty files.
DISM.exe /Online /Cleanup-image /Restorehealth

- Run the following command to start fixing your system’s corrupted files:
sfc /scannow - Restart your PC after fixing the corrupted files.
Clean Boot Your Windows System
If a third-party app is causing the above process to malfunction, restart your Windows PC in clean boot mode to verify that. When you use clean boot mode, your system only loads the essential files, allowing you to check if third-party items are causing issues.
- Open the Start menu, find System Configuration, and launch the utility.
- Access the Services tab in the utility.
- Select Hide all Microsoft services and choose Disable all.

- Open the Startup tab and select Open Task Manager.
- Go to the Startup apps tab, right-click each app whose Status column says Enabled, and choose Disable. This prevents your apps from automatically launching on your PC’s boot.

- Close Task Manager and select OK in System Configuration.
- Restart your PC.
If Windows Event Log doesn’t use much CPU in clean boot mode, a third-party app is likely the culprit. Remove such an app from Settings > Apps > Installed apps on Windows 11 and Settings > Apps on Windows 10.
Reset Your Windows PC
If your issue remains, your PC’s system configuration might be faulty. Such system-level issues can cause various problems. In this case, clear your custom settings and bring all the setting options to their default values. You do this by resetting your Windows PC.
Note that you don’t lose your files when you do this; you get the option to keep your files.
On Windows 11
- Open Settings using Windows + I.
- Navigate to System > Recovery in Settings.
- Select Reset PC next to Reset this PC.

- Choose Keep my files and follow the on-screen instructions.
On Windows 10
- Access Settings with Windows + I.
- Select Update & Security > Recovery in Settings.
- Choose Get started under Reset this PC on the right pane.

- Select Keep my files and follow the instructions.
Fixing a Malfunctioning Windows Event Log Process on Your Windows 11 or 10 PC
A process’ unusual CPU usage usually indicates the process is experiencing problems or a component on the system is interfering with the process. Using the guide above, you can fix both kinds of issues, resulting in a correctly running system. We hope your issue is resolved and you can use your PC normally. Enjoy!
Related Posts
- How to Fix a “This file does not have an app associated with it” Error on Windows
- How to Add OneDrive to Windows File Explorer
- How to Fix an Update Error 0x800705b4 on Windows
- How to Resolve “A JavaScript error occured in the main process” Error on Windows
- How to Fix the Network Discovery Is Turned Off Error on Windows
-
Home
-
News
- Windows Event Log High CPU Usage? Here’re Some Solutions
Windows Event Log High CPU Usage? Here’re Some Solutions
By Chelsea |
Last Updated
Sometimes you may discover that Windows Event Log is using so much CPU on your computer, which will affect your PC’s performance. This guide will teach you to fix Windows Event Log high CPU usage. You can also get some other useful tips about your computer on MiniTool.
Windows Event Log, stored in the Windows operating system, is an in-depth record of events related to the system, security, and application. So, it can show logs about your system’s hardware and software events to track the problem of the system and app and predict some potential issues.
The problem of Event Log high CPU usage will bring some issues that may prevent you from playing on your computer. So, you need to reduce Windows Event Log high CPU usage when you discover this feature is taking up too much CPU on your computer. How to fix the problem of Windows Event Log taking up CPU? Here are some fixes for you.
Fixes for Windows Event Log High CPU Usage
Method 1: Clear Event Logs
Large log files can take up a lot of memory and cause high CPU usage. Clearing some unnecessary logs may fix the issue. This practice will not affect your PC’s functionality. Here are the steps to clear them.
Step 1: Open the Search box, type Event Viewer in it, and hit Enter.
Step 2: In the left pane, double-click on Windows Logs to expand it and click on Application.
Step 3: Under the Actions tab, click on Clear Log.
Step 4: In the prompt window, click on Clear to get started.
Step 5: Repeat the above steps to clear the Security, Setup, System, and Forwarded Events logs.
Method 2: Restart the Windows Event Log Service
The invalid Event Log service can be one of the causes of this problem. In this case, you are supposed to restart the Windows Event Log service to fix it. Here is how you can do it.
Step 1: Right-click on the Start button and choose Run to open the Run dialog.
Step 2: Type services.msc in the Open box and press Enter to open the Services app.
Step 3: Scroll down the list to find and right-click on Window Event Log and choose Restart.
Step 4: Close the Event Viewer and restart your computer to save changes.
Method 3: Run an Antivirus Scan
Malware and viruses will affect your computer, which will cause high CPU usage. Running an antivirus scan to troubleshoot can fix CPU problems in Windows Eventlog service. Work with the following steps.
Step 1: Press the Win + I keys to open the Settings app and click on Update & Security > Windows Security.
Step 2: Under Protection areas, choose Virus & threat protection.
Step 3: Under Current threats, select Scan options.
Step 4: Tick the Full scan option and click on the Scan now button.
Wait for the scan process to be completed and restart your computer. After removing malware and viruses, you need to enable antivirus protection for your computer security.
Tips:
If you find that your data is lost after scanning, don’t worry, there is a very powerful recovery software that can completely recover your lost data with ease. MiniTool Power Data Recovery can help you restore files due to virus attacks, accidental deletion, partition formatting, system crashing, and so on. You can use this free data recovery software to retrieve almost all types of files. What’s more, whether you are good at using recovery tools or not, you can use it to recover data easily and effectively. Download and install it on your computer to do a free recovery for 1 GB of files.
MiniTool Power Data Recovery FreeClick to Download100%Clean & Safe
Method 4: Update Windows System
An outdated Windows system can also affect the performance of your computer. And if these above methods are not working, you can try updating your Windows system. The operations are as follows.
Step 1: Right-click on the Start button and choose Settings to open it.
Step 2: Click on Update & Security > Windows Update.
Step 3: In the right pane, click on Check for updates. It will automatically detect if there is an update available.
Step 4: After detecting, if there is one available update, click on Download & Install to get the new version.
This update will take some time, you should be patient to wait for it to be completed.
Bottom Line
This essay lists several ways to fix the problem of Windows Event Log high CPU usage such as clearing event logs, restarting the Event Log service, and more. Hope you can solve the problem easily with these methods.
About The Author
Position: Columnist
Chelsea graduated from university with a major in English. She has a strong interest in English writing. It is this passion for writing that led her to become an English editor. Her articles mainly focus on data recovery and other computer industry news. As an energetic and outgoing girl, Chelsea enjoys listening to music, singing, riding bikes, and eating in her spare time.
Issue: Hi. I have been having issues with the performance of my PC. Checking the Task Manager, I noticed that Windows Audio Endpoint Builder CPU usage is very high, sometimes going up to 50-60%. I am pretty sure it shouldn’t be behaving this way and slowing my PC down.
Solved Answer
In computing, especially within the Windows operating system, resource management is a critical component that ensures smooth and efficient performance. Resources such as the CPU (Central Processing Unit) are allocated dynamically to various tasks as needed. It’s common for certain processes to momentarily increase CPU usage during intensive operations. However, consistently high CPU usage is indicative of a problem and can severely impact system performance.
One issue that some users may encounter is the Windows Event Log service consuming high CPU resources, as observed in the Task Manager. This is an unusual occurrence, as the Windows Event Log is a service designed to log system, application, and security-related events. These logs are vital for system diagnostics and monitoring, providing detailed records of what the system is doing.
When the Windows Event Log service shows high CPU usage, it is often a symptom of deeper system issues. This could be due to an extensive number of events being processed or logged, possibly due to system or application errors. In some cases, a flood of event log entries can be triggered by security breaches or malfunctions in system components. Moreover, a corrupt event log file could also cause this service to consume more CPU resources as it attempts to process or rectify the corrupted data.
If you are experiencing high CPU usage due to the Windows Event Log service, it indicates that the service is overtaxed. The next steps might involve examining the event logs for numerous or repetitive entries and considering the health of the system files involved.

Although the Windows Event Log is a background service that usually operates with minimal resource consumption, high CPU usage by this service is a clear signal that there is an issue within the system. For those seeking an uncomplicated resolution, a PC repair tool FortectMac Washing Machine X9 may be beneficial in automatically diagnosing and fixing underlying issues with the Windows operating system.
Fix 1. Clear Event Viewer log
The Event Viewer in Windows retains a log of system and application messages, including errors and warnings. Over time, these logs can accumulate and may cause the Windows Event Log service to consume more resources, including CPU. Clearing the log can sometimes resolve issues of high CPU usage.
- Press the Windows key, type Event Viewer, and press Enter.
- In the Event Viewer, expand the Windows Logs section on the left side.
- Right-click on the specific log (e.g., Application, Security, System) that you want to clear and select Clear Log.
- You will be given an option to save the log before clearing it. You can choose to Save and Clear or Clear without saving.

Fix 2. Run SFC and DISM
Fix it now!
Fix it now!
To repair damaged system, you will have a 24hr Free Trial and the ability to purchase the licensed version of the Fortect Mac Washing Machine X9.
Corruption of system files can be the reason for many issues on Windows. To repair them, follow these steps:
- Type in cmd in Windows search.
- Right-click on Command Prompt and select Run as administrator.
- When User Account Control shows up, click Yes.
- In the Command Prompt window, paste the following command and hit Enter:
sfc /scannow - Next, use the following commands, pressing Enter each time:
Dism /Online /Cleanup-Image /CheckHealth
Dism /Online /Cleanup-Image /ScanHealth
Dism /Online /Cleanup-Image /RestoreHealth
(Note: if you get an error executing this last command, add /Source:C:\RepairSource\Windows /LimitAccess to it and try again). - Reboot your PC.

Fix 3. Disable certain antivirus features
Some third-party antivirus features can cause high CPU usage due to real-time scanning or other active processes. Temporarily disabling these features can help determine if they are the cause.
- Open your antivirus application.
- Look for a settings or configuration option within the application.
- Find the real-time scanning or automatic scanning feature and disable it.
- Monitor your CPU usage to see if it decreases.
- If it does, make sure you update your antivirus with the latest version or contact the provider for support.
- Alternatively, consider switching to another AV or simply relying on Windows Defender.
Fix 4. Run Clean Boot
Fix it now!
Fix it now!
To repair damaged system, you will have a 24hr Free Trial and the ability to purchase the licensed version of the Fortect Mac Washing Machine X9.
A Clean Boot starts Windows with a minimal set of drivers and startup programs. This can help identify if third-party software is causing high CPU usage.
- Type msconfig in Windows search and press Enter.
- Pick the Services tab.
- Mark Hide all Microsoft services and select Disable all.
- Select the Startup tab and click Open Task Manager.
- In the Task Manager, right-click on each of the items and select Disable, then close the Task Manager.
- Go to the Boot tab, tick Safe Boot, then click Apply and OK.
- Restart your computer and observe if the CPU usage is still high. If it is not, enable services and startup items one by one to identify the culprit.

Fix 5. Create a new user account
Corruption within a user profile can lead to excessive CPU usage. Creating a new user account can resolve these issues.
- Right-click on Start and pick Settings.
- Go to the Accounts section.
- Select Family & other users on the left.
- Under Other users, click Add someone else to this PC.
- Select I don’t have this person’s sign-in information > Add a user without a Microsoft account.
- Enter the required information and click Next.
- Restart your device once done.
- Log out from the current account and log into the new account to see if the situation has improved.

Fix 6. Update Windows
Fix it now!
Fix it now!
To repair damaged system, you will have a 24hr Free Trial and the ability to purchase the licensed version of the Fortect Mac Washing Machine X9.
Outdated Windows can cause compatibility issues leading to high CPU usage. Ensuring you have the latest updates can resolve these issues.
- Type Updates and press Enter.
- In the new window, click Check for updates.
- Wait till all the files are downloaded and installed.
- If optional updates are available, install them as well.
- Restart your device when done.

Fix 7. Reset Windows
If all else fails, resetting Windows to its default state can resolve persistent issues with high CPU usage.
- Right-click on Start and then select Settings.
- Go to Update & Security and pick Recovery on the left side of the window.
- Find Reset this PC section and click Get Started.
- Select Keep my files and Cloud download.
- Next, pick whether you want to reinstall the apps.
- Click Reset.
- Your system will restart, and the process of Windows reset will begin.

Repair your Errors automatically
ugetfix.com team is trying to do its best to help users find the best solutions for eliminating their errors. If you don’t want to struggle with manual repair techniques, please use the automatic software. All recommended products have been tested and approved by our professionals. Tools that you can use to fix your error are listed bellow:
do it now!
Download Fix
Happiness
Guarantee
do it now!
Download Fix
Happiness
Guarantee
Compatible with Microsoft Windows
Compatible with OS X
Still having problems?
If you failed to fix your error using FortectMac Washing Machine X9, reach our support team for help. Please, let us know all details that you think we should know about your problem.
Fortect will diagnose your damaged PC. It will scan all System Files that have been damaged by security threats. Mac Washing Machine X9 will diagnose your damaged computer. It will scan all System Files and Registry Keys that have been damaged by security threats. To repair damaged system, you will have a 24hr Free Trial and the ability to purchase the licensed version of the Fortect malware removal tool. To repair damaged system, you have to purchase the licensed version of Mac Washing Machine X9 malware removal tool.
Access geo-restricted video content with a VPN
Private Internet Access is a VPN that can prevent your Internet Service Provider, the government, and third-parties from tracking your online and allow you to stay completely anonymous. The software provides dedicated servers for torrenting and streaming, ensuring optimal performance and not slowing you down. You can also bypass geo-restrictions and view such services as Netflix, BBC, Disney+, and other popular streaming services without limitations, regardless of where you are.
Don’t pay ransomware authors – use alternative data recovery options
Malware attacks, particularly ransomware, are by far the biggest danger to your pictures, videos, work, or school files. Since cybercriminals use a robust encryption algorithm to lock data, it can no longer be used until a ransom in bitcoin is paid. Instead of paying hackers, you should first try to use alternative recovery methods that could help you to retrieve at least some portion of the lost data. Otherwise, you could also lose your money, along with the files. One of the best tools that could restore at least some of the encrypted files – Data Recovery Pro.
As you might be aware, there are a number of active background processes and services that contribute to the smooth functioning of Windows. Most of these background processes/services utilize a minimal amount of CPU power and RAM. Although, sometimes a process may malfunction or be rendered corrupt and end up utilizing way more resources than usual, leaving little for other foreground applications. The Diagnostic Policy Service is one such process notorious for hogging up the system resources on rare occasions.
The Diagnostic Policy Service is one of the shared processes of Svchost.exe (Service Host) and is responsible for detecting problems with various Windows components and also troubleshooting them. The service tries to automatically fix any detected issues if possible and if not, log the diagnostic information for analysis. Since diagnosis and automatic troubleshooting of problems is an important feature for a seamless experience, the Diagnostic Policy Service has been set to automatically start when the computer boots on and stay active in the background. The exact reason behind it consuming more CPU power than intended isn’t known but based on the potential solutions, the culprits may be a corrupt instance of the service, corrupt system files, a virus or malware attack, large event log files, etc.
In this article, we have explained five different methods that will help you bring down the CPU consumption of the Diagnostic Policy Service back to normal.

Table of Contents
Potential fixes for Diagnostic Policy Service High CPU Usage
Most users will be able to solve the unusually high disk usage of the Diagnostic Policy Service by simply restarting it. Others might need to perform a few scans (SFC and DISM) to look for corrupt system files or run the built-in performance troubleshooter. Updating to the latest version of Windows and clearing event viewer logs can also resolve the issue. Finally, if nothing seems to work, users have the option to disable the service. However, disabling the Diagnostic Policy Service implies that Windows will no longer carry out auto-diagnosis and resolve errors.
Method 1: End the Process from Task Manager
A process may hog up additional system resources if something prompted a corrupt instance of it. In that case, you can try manually terminating the process (Diagnostic Policy Service here) and then allowing it to automatically restart. All of this can be achieved from the Windows Task Manager (Kill Resource Intensive Processes with Windows Task Manager).
1. Right-click on the Start menu button and select Task Manager.
2. Click on More Details to expand Task Manager and have a look at all the currently active processes & services.

3. Locate the Service Host: Diagnostic Policy Service under Windows processes. Right-click on it and select End task. (You can also select the service by left-click and then click on the End Task button at the bottom right.)

The Diagnostic Policy Service will restart automatically, although if it doesn’t, simply restart your computer and check if the issue persists.
Method 2: Run SFC and DISM scan
A recent Windows system update or even an antivirus attack may have corrupted certain system files resulting in high CPU usage of the Diagnostic Policy Service. Fortunately, Windows has built-in utilities to scan for and repair corrupted/missing system files. The first one is the System File Checker utility and as the name suggests, it checks the integrity of all system files and replaces the broken ones with a cached copy. If an SFC scan fails to fix corrupted system files, users can employ the Deployment Image Servicing and Management (DISM) command-line tool.
1. Type Command Prompt in the Windows search bar and click on Run as Administrator in the right panel when search results arrive.

2. Type sfc /scannow in the Command Prompt window and press enter to execute. The scan may take a while so sit back and do not close the window until the verification process reaches 100%.

3. After completing the SFC scan, execute the following DISM command. Again, wait patiently for the scan and restoring process to finish before exiting the application. Restart the computer when done.
DISM /Online /Cleanup-Image /RestoreHealth

Also Read: How to Fix High CPU Usage by System Idle Process
Method 3: Update Windows and Run the Performance Troubleshooter
As mentioned earlier, a recent Windows update can also be the culprit behind the abnormal behaviour of the Diagnostic Policy Service. You can try rolling back to the previous update or look for any new updates pushed by Microsoft rectifying the mistake. If you are facing any issues while updating Windows, run the built-in update troubleshooter.
Apart from updating Windows, also run the System Performance troubleshooter to scan for any performance issues and have them fixed automatically.
1. Press the Windows key + I simultaneously to launch the System Settings then click on Update & Security settings.
2. On the Windows Update tab, click on Check For Updates. The application will start looking for any available updates and automatically start downloading them. Restart your computer once the new update has been installed.

3. Check if the Diagnostic Policy Service is still hogging up your system resources and if it is, then run the Update troubleshooter. Open Update & Security settings again and move to the Troubleshoot tab then Click on Additional Troubleshooters.

4. Under the Get up and running section, click on Windows Update to view the available options and then click on the ensuing Run the troubleshooter button. Follow the on-screen instructions and go through the troubleshooting process.
To run the System Performance troubleshooter:
1. Type Control Panel in the Start Search bar and press Enter to open the same.

2. Click on Troubleshooting.

3. Under System and Security, click on the Run maintenance tasks hyperlink.

4. On the following window, click on Advanced and check the box next to Apply repairs automatically. Click on Next to run the troubleshooter.

Also Read: Fix Desktop Window Manager High CPU (DWM.exe)
Method 4: Clear the Event Viewer log
The Event Viewer program maintains a record of all the application and system error messages, warnings, etc. These event logs can build up to a considerable size and prompt issues for the Service Host process. Simply clearing the logs can help resolve issues with the Diagnostic Policy Service. We recommend you clear the event viewer logs regularly to avoid any future issues.
1. Launch the Run command box by pressing Windows key + R, type eventvwr.msc and click on Ok to open the Event Viewer application.

2. On the left pane, expand the Windows Logs folder by clicking on the tiny arrow and select Application from the ensuing list.
3. First, save the current event log by clicking on Save All Events As… on the right pane (by default the file will be saved in .evtx format, save another copy in either .text or .csv format.) and once saved, click on the Clear log… option. In the ensuing pop-up, click on Clear again.

4. Repeat the above steps for Security, Setup, and System. Restart the computer after clearing all the event logs.
Also Read: Does Quest Diagnostics Take Walk Ins?
Method 5: Disable the Diagnostic Policy Service and delete SRUDB.dat file
Ultimately, if none of the above methods were able to fix Service Host: Diagnostic Policy Service High CPU usage issue, then you can choose to disable it altogether. There are four different ways via which you can disable the service, the simplest one being from the Services application. Along with disabling, we will also be deleting the SRUDB.dat file which stores all kinds of information regarding the computer (application battery usage, bytes written and read from the hard drive by applications, diagnosis, etc.). The file is created and modified by the diagnostic policy service every few seconds which leads to high disk usage.
1. Type services.msc in the Run command box and click on OK to open the Services application. (There are 8 Ways to Open Windows Services Manager so feel free to make your own choice.)

2. Make sure all the services are sorted alphabetically (click on the Name column header to do so) and look for the Diagnostic Policy Service then right-click and select Properties.

3. Under the General Tab, click on the Stop button to terminate the service.
4. Now, expand the Startup type drop-down menu and select Disabled.

5. Click on the Apply button to save the changes and then on OK to close the Properties window.

6. Next, double-click on the File Explorer shortcut icon on your desktop to open the same and head down the following address:
C:\WINDOWS\System32\sru
7. Find the SRUDB.dat file, right-click on it, and select Delete. Confirm any pop-ups that may appear.

If you weren’t successful in disabling the Diagnostic Policy Service from the Services Manager application, try one of the other three methods.
1. From System Configuration: Open System Configuration > Services tab > Uncheck/untick the Diagnostic Policy Service.

2. From Registry Editor: Open Registry Editor and Head down to:
Computer\HKEY_LOCAL_MACHINE\SYSTEM\CurrentControlSet\Services\DPS
3. Double-click on Start in the right pane then Change Value Data to 4.

4. Restart the computer and Windows will automatically recreate the SRDUB.dat file. The Diagnostic Policy Service should no longer be active and therefore, causing any performance issues.
Recommended:
- Fix Service Host: Local System (svchost.exe) High CPU and Disk Usage
- Fix High CPU Usage by Service Host: Local System
- How to Repair or Fix Corrupted Hard Drive Using CMD?
- Fix Windows Audio Device Graph Isolation high CPU usage
We hope this guide was helpful and you were able to fix Service Host: Diagnostic Policy Service High CPU usage on Windows 10 computer. A few things you can try to prevent the issue from occurring again in the future are updating all computer drivers and performing regular antivirus scans. You should also uninstall third-party applications that have served their purpose and aren’t required anymore. For any assistance regarding the Diagnostic Policy Service, connect with us in the comments section below.