
Superfetch is a Windows system process that has had multiple names throughout the years. On Windows XP it was known as Prefetch. Superfetch was introduced in Windows Vista, and on the latest versions of Windows 10 it’s now known as Sysmain.
Ultimately, the purpose of every generation of Superfetch has been the same: to increase the performance of Windows by preloading apps you frequently use into RAM before you need to use them. But what is Superfetch?

How Does Superfetch (Sysmain) Work?
In the latest versions of Windows 10, the Superfetch service now shows up under the name SysMain. In the Task Manager, it shows up as Service Host: SysMain.
If you’re running an older version of Windows 10 or any version of Windows 7 or 8, this will show up in the Task Manager as Service Host: Superfetch.

This service runs in the background (using very little CPU power) and analyzes how much RAM you’re using and what apps you run most frequently. Any apps the service recognizes as “frequently used”, it’ll start preloading the app into RAM. This way, the next time you run the app, it’ll launch much more quickly.
You may be concerned that this means Superfetch is using up all of your RAM, but it isn’t. The service focuses on pre-loading apps into unused RAM. This doesn’t register as consumed memory. You’ll see this if you open Task Manager to the Processes tab and look at your Memory usage.

Even though Superfetch is consuming all unused RAM with preloaded apps, consumed RAM usage still doesn’t show 100%. This is because Superfetch is running in the background, and it’ll release any unused RAM it’s using whenever you need to use that memory for other active tasks.
Should You Kill Superfetch (Sysmain)?
Generally, there’s no need to stop Superfetch from running. It uses a very miniscule amount of CPU, and only uses unused RAM. All of this is unnoticeable to the general user.
However, there have been some reports throughout Microsoft user forums that sometimes the Superfetch (Sysmain) process actually causes performance issues. Some of these reported issues include:
- Constant 100% disk utilization.
- Overheating leading to system shutdown.
- Slow bootup time when you start your computer.
- On weak hardware, Superfetch could use more CPU and RAM than you might like.
- Has been known to cause performance issues while gaming.
The most common problem people report is the 100% disk utilization issue. If this is you, then disabling Superfetch or Sysmain may resolve the problem.
Since Superfetch is only a system optimization feature, you won’t hurt Windows by stopping the service. However, you may notice that launching your favorite apps may take a little longer than usual.
Is it safe to disable Superfetch?
If you aren’t experiencing performance issues or other problems, it’s a good idea to leave Superfetch (Sysmain) running. It is a useful process that significantly cuts down on the time it takes you to launch programs that you use frequently.
However, if you are experiencing high hard drive utilization, constant memory issues, or overall poor performance, you can try disabling Superfetch to see if it resolves the problem. If it does, then leave the service disabled. Otherwise, turn it back on and continue troubleshooting.
To disable Superfetch (Sysmain) on Windows 10:
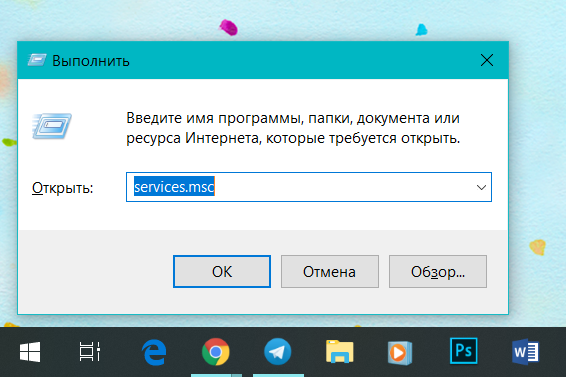
- Select the Start menu, type services, and select the Services app. You could also press Windows + R, type services.msc and press Enter.
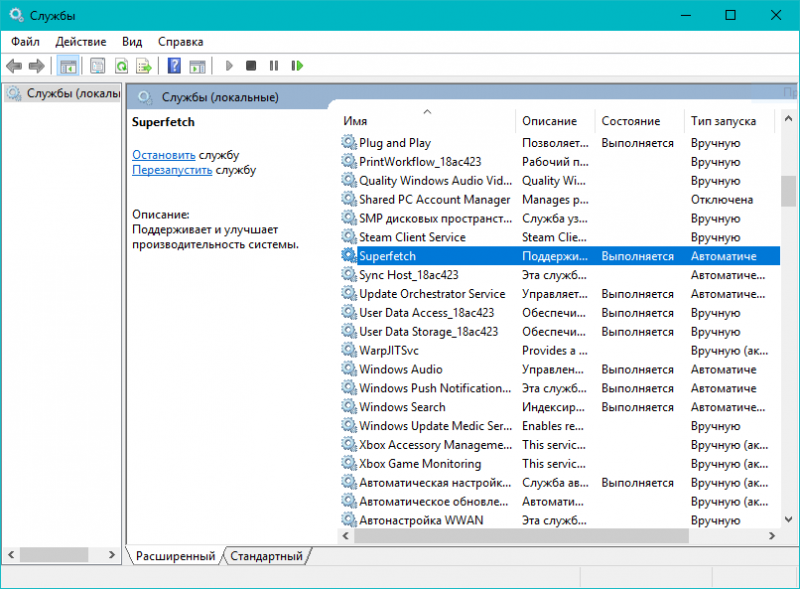
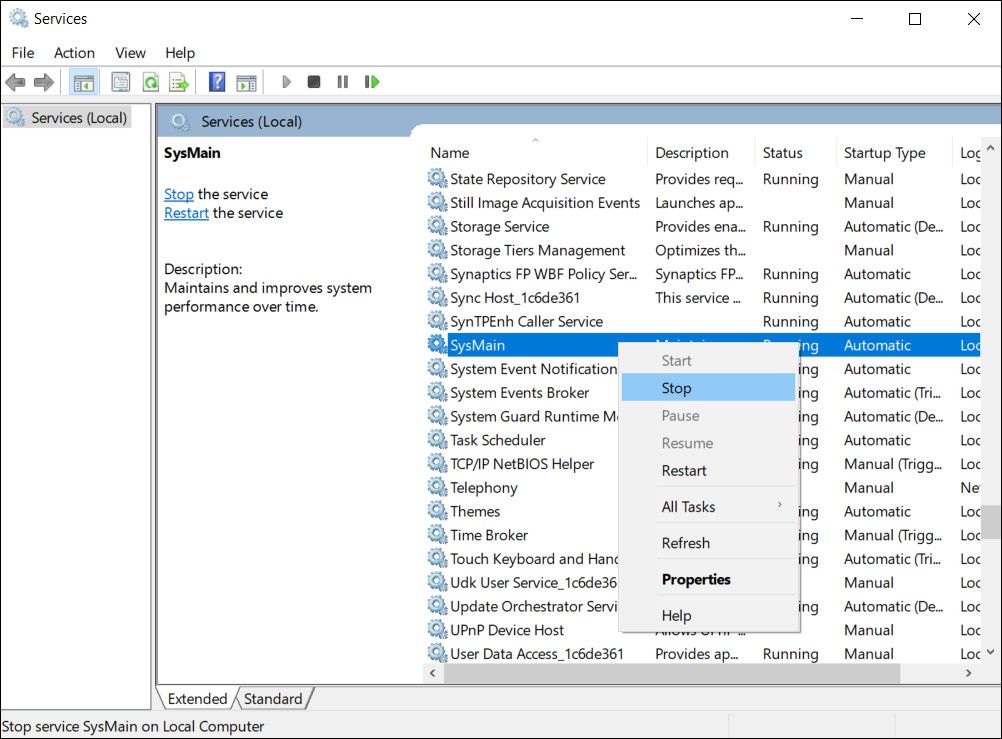
- In the Services app, scroll down to SysMain, right-click on the service and select Stop. If you’re running an older version of Windows, right-click on the SuperFetch service and select Stop.

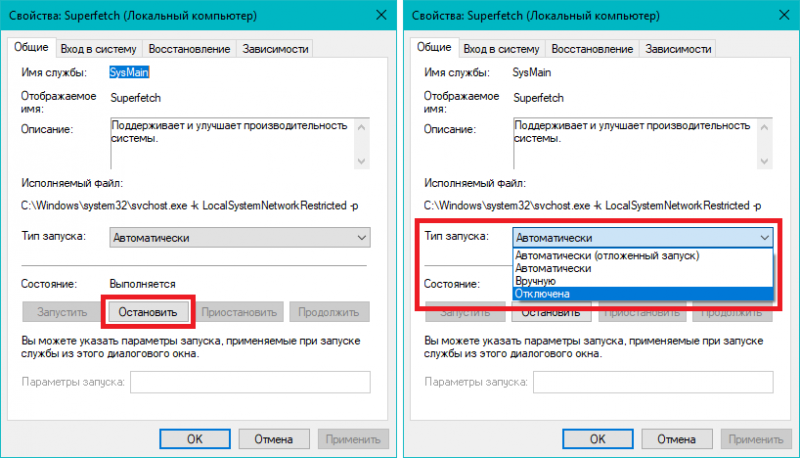
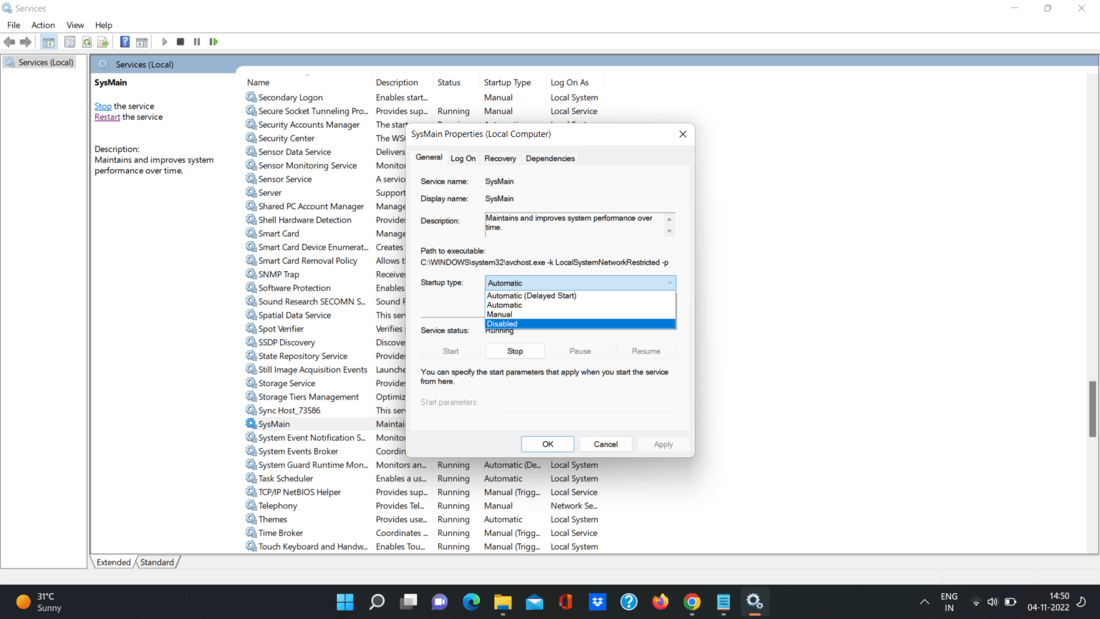
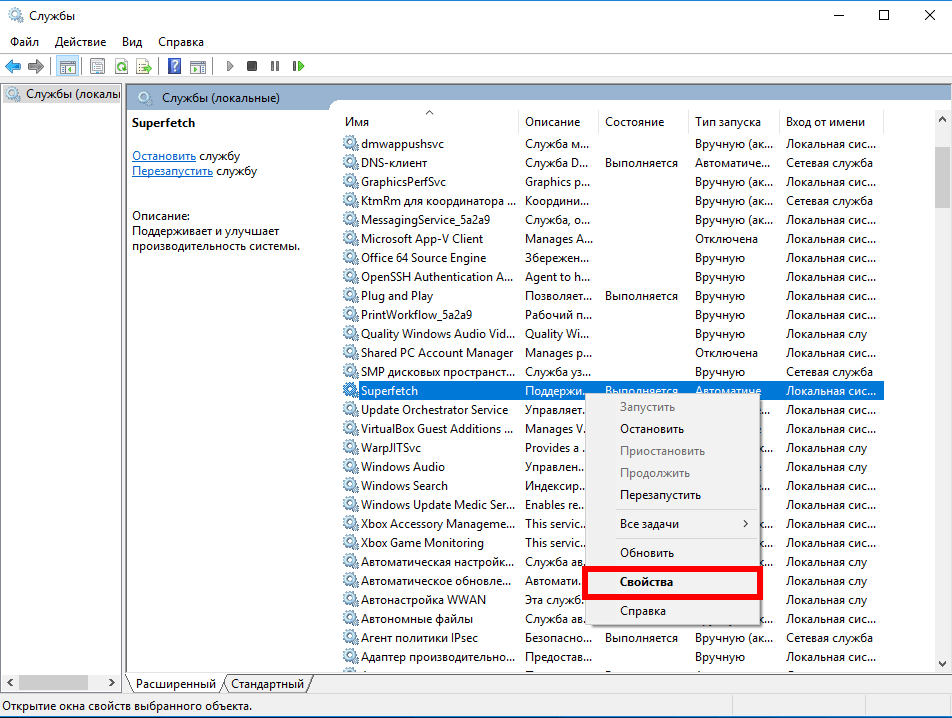
- Now you need to prevent the service from restarting when you start Windows. Once the service is stopped, right-click on the service again and select Properties.
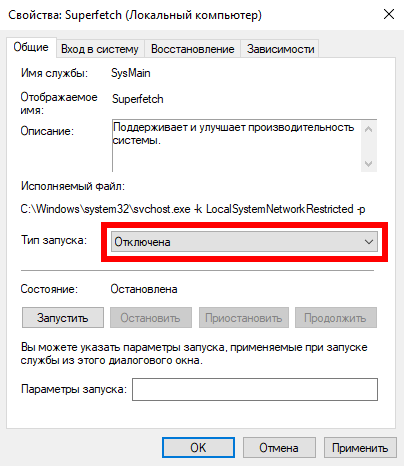
- In the Startup type dropdown, select Disabled.

Now the SuperFetch (SysMain) service is permanently disabled and will not restart the next time you start your computer.
Disable Superfetch (Sysmain) With Registry Editor
An alternative to using Task Manager to disable Superfetch on Windows 10 is using the Registry Editor.
Before you start doing anything inside the registry, make sure you take a full backup of the registry first, just in case anything goes wrong.
When you’re ready:
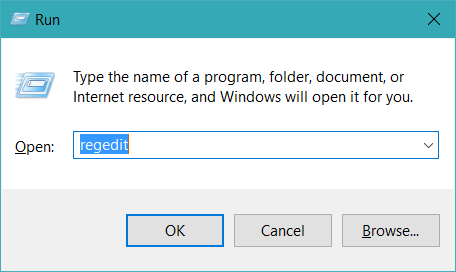
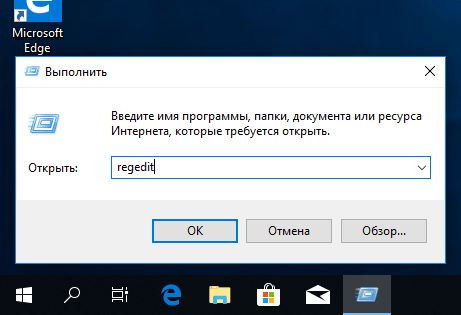
- Select the Start menu, type regedit, and select the Registry Editor app.
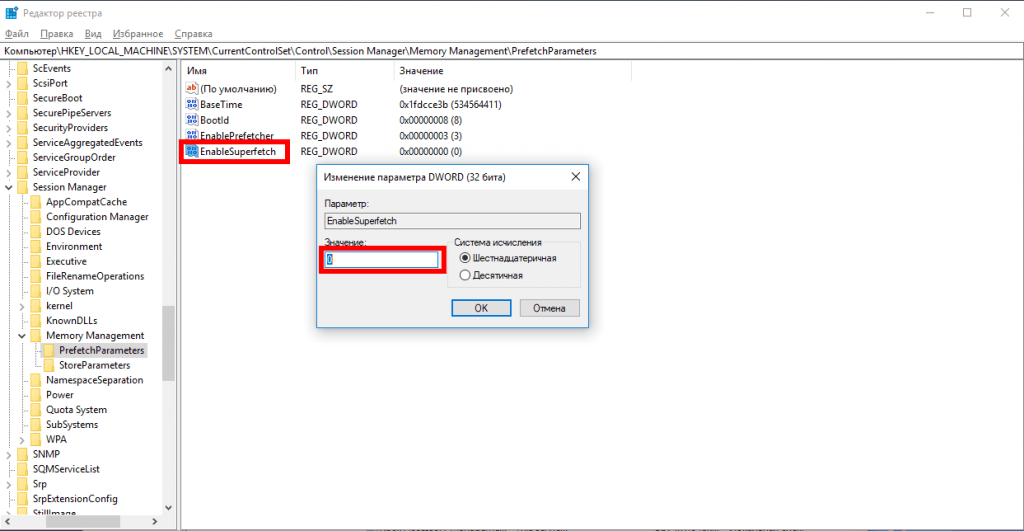
- In the Registry Editor, navigate to HKEY_LOCAL_MACHINE > SYSTEM > CurrentControlSet > Control > Session Manager > MemoryManagement > PrefetchParameters.

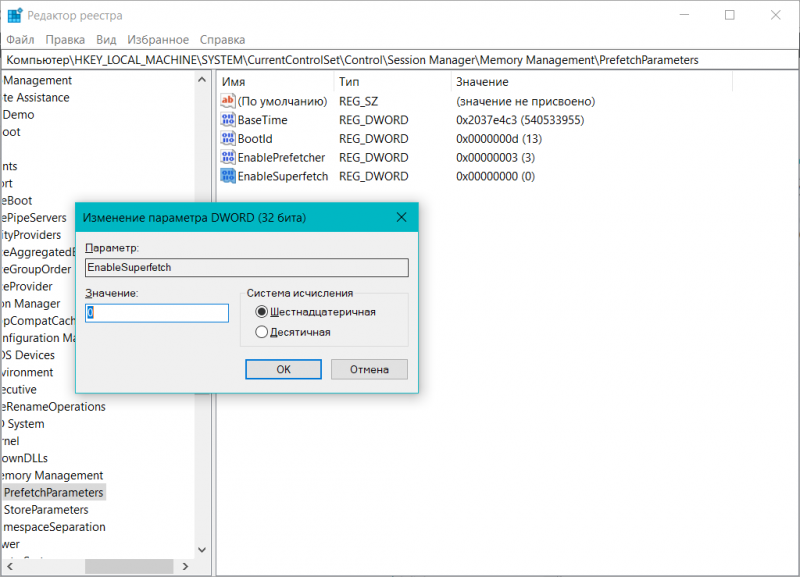
- In this section, you should see a key called EnableSuperfetch. Right-click this key and select Modify.
- In the Edit DWORD window that pops up, change the Value data field to 0 and select OK.

You can close the Registry Editor when you’re finished.
This registry entry will disable the SuperFetch (SysMain) service on your system. However, you may need to restart your Windows machine before this registry setting takes effect.
Enable Or Disable SuperFetch (SysMain) With Command Prompt
If you prefer working with the command prompt, there are some simple commands you can use to enable or disable the SuperFetch service.
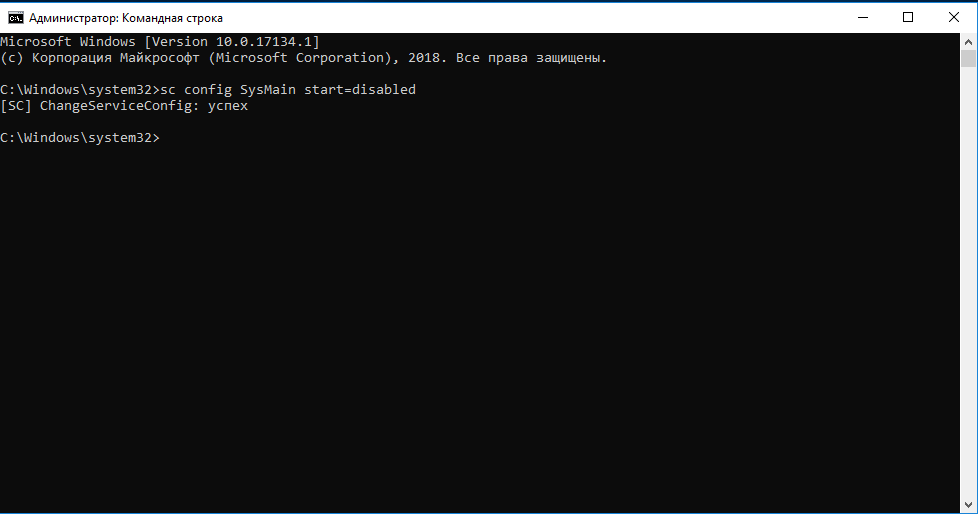
Open the command prompt in administrator mode first, and then use the following commands:
- Enable: sc config “SysMain” start=auto & sc start “SysMain”
- Disable: sc stop “SysMain” & sc config “SysMain” start=disabled
Note: If you’re using an older version of Windows, replace “SysMain” with “SuperFetch” in the commands above.
If you prefer PowerShell, open it with administrator rights and use the following commands:
- Enable: Set-Service -Name “SysMain” -StartupType Automatic -Status Running
- Disable: Stop-Service -Force -Name “SysMain”; Set-Service -Name “SysMain” -StartupType
This approach can be much faster and simpler than clicking around in the Task Manager or the Windows registry.
What If This Doesn’t Fix The Problem?
If disabling SuperFetch (SysMain) doesn’t resolve your issue, then something else may be the source of the problem.
If you’re still having 100% disk utilization, you may need to upgrade to a larger hard drive, or opt to upgrade to an SSD drive. SSD drives are very affordable now, and have data-transfer rates far above that of traditional hard drives.
If you’re having CPU utilization issues, then explore other CPU troubleshooting tips to nail down the culprit that’s chewing up all of your CPU resources.
Related Posts
- How to Fix a “This file does not have an app associated with it” Error on Windows
- How to Fix an Update Error 0x800705b4 on Windows
- How to Resolve “A JavaScript error occured in the main process” Error on Windows
- How to Fix the Network Discovery Is Turned Off Error on Windows
- How to Change Folder Icons in Windows
Windows 10 создана таким образом, чтобы работать как можно стабильнее прямо из коробки, без необходимости в каких-то глубинных настройках. Необходимость в последних возникает в тот момент, когда пользователь сталкивается с какими-то странностями или аномалиями в работе компьютера. Причиной сильной нагрузки на процессор или оперативную память может быть «Служба узла: SuperFetch». Это системный компонент, о котором подробнее расскажет эта статья.
Что это за Служба узла SuperFetch
Официальное описание сервиса SuperFetch не предоставит вам много полезной информации. Microsoft лишь сообщает, что этот сервис «поддерживает и улучшает производительность системы». Весьма поверхностное описание. Вряд ли оно поможет решить проблемы с вашим компьютером.
SuperFetch появился еще во времена Windows Vista. Он тихоньку работает в фоне и постоянно анализирует потребление оперативной памяти различными приложениями на вашем компьютере. Сервис обучается тому, какие программы вы используете чаще всего, и со временем обозначает эти программы как «часто используемые». После этого приложения предварительно загружаются в память, чтобы пользователь мог быстрее начать с ними работу. Проще говоря, приложение гораздо быстрее открывается, так как уже находится в оперативной памяти.

Найти следы работы SuperFetch можно в Диспетчере задач.
По умолчанию SuperFetch создан таким образом, чтобы потреблять всю свободную память системы и загружать ее вашими приложениями. Паниковать не стоит, поскольку в распоряжении SuperFetch находится лишь неиспользуемая память. Как только системе надо больше RAM для какой-то другой задачи (к примеру, загрузить приложение, которое не обозначено как часто используемое), SuperFetch отдаст нужный объем.
К вашему сведению: не многие знают, но неиспользуемая память – зря потраченная память. Проблема многих приложений не в том, что они занимают память, а в том, как они с нею работают. Так что не пугайтесь заявлений о том, что SuperFetch занимает свободную память предварительной загрузкой приложений. Все работает так, что чаще всего пользователи даже не замечают работы этой службы.
Также обратите внимание, что Prefetch и SuperFetch – разные понятия. Prefetch использовался во времена Windows XP, а SuperFetch пришел ему на смену. Разница между двумя сервисами в том, что ранняя версия не анализировала привычки пользователя и не подстраивала параметры предварительной загрузки под сценарии использования компьютера.
Cлужба узла SuperFetch грузит диск в Windows 10
Как и другие системные компоненты Windows 10, SuperFetch создан на благо пользователя. На более-менее современных компьютерах с адекватными компонентами SuperFetch будет работать настолько хорошо, что обычных пользователь даже не будет догадываться о нем. Есть большая вероятность, что SuperFetch работает на вашем ПК прямо сейчас, но ничего страшного из-за этого не происходит.
К сожалению, так бывает не всегда. Порой SuperFetch становится причиной ряда проблем, одна из которых упомянута в заголовке выше. Вот несколько проблем, причиной которых может быть SuperFetch:
- SuperFetch постоянно работает в фоне, а потому всегда потребляет часть ресурсов процессора и памяти (радикально мало). Иногда нагрузка может быть аномально высокой.
- Старт системы может быть медленнее, поскольку SuperFetch загружает информацию с диска в память. Если ваш диск загружен на 100% после каждого запуска на протяжении нескольких минут, причина может скрываться именно в сервисе SuperFetch.
- SuperFetch может быть также причиной просадки производительности компьютера в играх. Чаще всего это актуально для систем с 4 Гб системной памяти и меньше. Пока что не совсем понятно, почему у разных пользователей это проявляется по-разному. Возможно, это из-за того, что игры постоянно запрашивают много памяти из-за чего SuperFetch приходится постоянно загружать и выгружать информацию.
К вашему сведению: в первую очередь вся эта статья актуальна для устройств, операционные системы которых работают на традиционных жестких дисках, а не твердотельных накопителях. На SSD-системах преимущества SuperFetch практически нивелируются скоростью работы системного диска.
Стоит отключать SuperFetch или нет
Ответ предельно простой: если ваш компьютер работает нормально и на нем не наблюдаются проблемы с чрезвычайной нагрузкой процессора, памяти или диска, оставьте все как есть. Не сломано – не чини. На адекватно работающей системе вы не увидите абсолютно никакого прироста производительности от отключения SuperFetch.
К вашему сведению: мы никогда не рекомендуем отключать системные компоненты Windows, если для этого нет логично обусловленных причин, вроде диагностики.
Отключать SuperFetch, как и другие системные сервисы и службы, стоит только в том случае, если вы диагностируете неполадки. К примеру, диск постоянно загружен, не освобождается оперативная память или сильно падает производительность при интенсивных задачах с высокой нагрузкой на RAM. В этом случае стоит отключить SuperFetch и посмотреть на результат. Если не помогло, включите его обратно. Подробнее об этом в следующем абзаце.
Как отключить SuperFetch
Отключить службу SuperFetch можно несколькими способами. Традиционно начинаем от самого простого и движемся к самому сложному.
Для справки: для выполнения этой инструкции вам понадобится учетная запись с правами Администратора. Если у вас нет таковой, система попросит ввести пароль Администратора на экране UAC. Как вариант, вы можете сделать пользователя Администратором, о чем описано в отдельной статье.
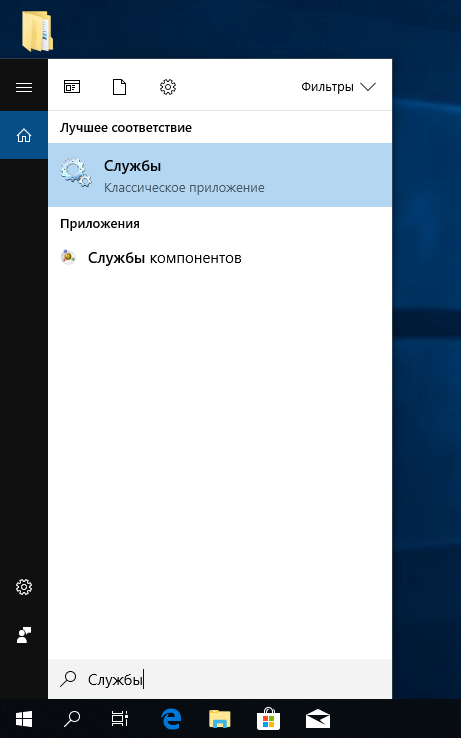
- Нажмите Win + R и введите services.msc. Как вариант, нажмите Пуск и введите Службы. Откроется окно управления службами.

- В большом списке (по умолчанию включена сортировка по имени) найдите службу SuperFetch. Здесь же находится и весьма убогое описание.

- Нажмите на кнопку Остановить, после чего сервис прекратит свою работу.
- Теперь надо запретить сервису автоматический запуск. Так как это системный компонент, работающий по умолчанию, Windows быстро обнаружит вмешательство и восстановит работу SuperFetch, что нежелательно при диагностировании компьютера. Для отключения автоматического запуска из выпадающего меню Тип запуска выберите Отключена.

- Нажмите Ок и закройте все окна.
- Перезагрузите компьютер (для чистоты эксперимента) и понаблюдайте за использованием ресурсов. Если вы не заметили никакой разницы, значит вы ищите проблему там, где ее нет. Включите обратно SuperFetch и продолжите свои поиски в другом месте.
- Чтобы включить SuperFetch, откройте Службы аналогичным описанному выше способу, найдите в списке SuperFetch и щелкните дважды по службе.
- Нажмите Запустить, а из выпадающего списка Тип Запуска выберите пункт Автоматически.
- Нажмите Ок и закройте все окна.
Если по каким-то причинам вы не можете отключить SuperFetch из окна служб, попробуйте воспользоваться редактором реестра.
- Нажмите Win + R и введите regedit. Открыть Редактор реестра можно также десятком других способов.

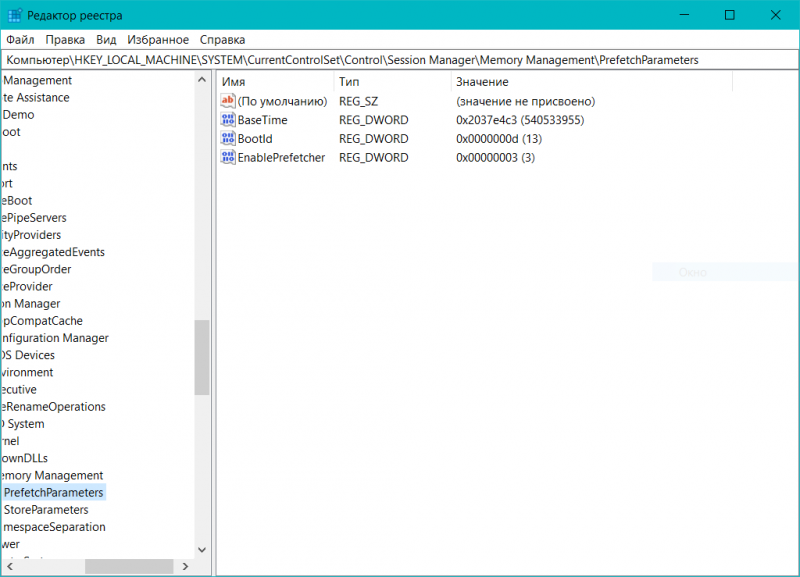
- В адресную строку Редактора реестра вставьте путь Компьютер\HKEY_LOCAL_MACHINE\SYSTEM\CurrentControlSet\Control\Session Manager\Memory Management\PrefetchParameters. По этому адресу можно также перейти вручную. Кстати, обратите внимание, что ветка все еще называется PrefetchParameters – Microsoft не позаботилась переименовать этот раздел реестра еще со времен Windows XP.

- В правой части экрана должен отображаться параметр EnableSuperfetch. Дважды щелкните на него и измените параметр на 0. Если параметра нет, создайте таковой, кликнув правой кнопкой мыши по пустому полю, и выбрав Создать – Параметр DWORD (32 бита). Назовите его EnableSuperfetch и установите значение 0.
- После отключения сервиса перезагрузите компьютер и последите за работой системы.
Если у вас есть дополнительные соображения относительно работы SuperFetch, расскажите об этом в комментариях. Возможно, мы забыли учесть что-то важное, что поможет пользователям исправить проблемы в работе этого сервиса.
Last Updated :
07 Nov, 2022
Windows Vista introduced the Superfetch (SysMain) capability, which is still a part of the Windows operating system. It is a built-in service designed to speed up startup times and enhance performance by preloading frequently used apps in RAM. It was, however, primarily developed for older PCs. For contemporary PCs running Windows 10 and Windows 11, it is less necessary. You may easily stop Superfetch on Windows 11 if you’re experiencing sluggishness (such as 100% disc use). Windows 11’s Superfetch feature can be disabled to potentially increase overall PC speed.
We’ll show you how to turn off Windows 11’s Superfetch if you’re having a sluggish experience.
What is Superfetch?
A service that monitors your PC usage is called Superfetch, or SysMain as it is presently known. Windows chooses the app you’ll use based on the data the service collects. The speed at which your most frequently used apps launch is consequently enhanced.
With Windows Vista, the function known as Superfetch was added. The Superfetch service’s official description claims that it «maintains and enhances system performance over time,» yet this is ambiguous and doesn’t cover all the bases. It silently monitors RAM consumption trends in the background while learning the kind of programs you often use. These programs are «often utilized» over time, therefore Superfetch preloads them into RAM in advance.
While keeping SysMain enabled should be acceptable, you might want to turn it off to determine whether your PC is running slowly. Speeds and boot times can be increased by disabling it. Superfetch is referred to as «Service Host: SysMain» in the Windows Task Manager. The idea is that by having the app cached in memory, it will start much more quickly when you want to use it.
Is Disabling Superfetch Safe?
Yes! If you want to turn it off, there are no negative side effects. Keep your system on if it’s functioning properly. However, try turning it off and see if it helps if you are experiencing high HDD utilization difficulties, high RAM usage, or performance degradation during RAM-heavy tasks. Keep it off if it does. If not, switch it back on.
How to disable superfetch in windows 10/11?
Speed can be increased and 100% disc utilization can be resolved by disabling Superfetch or SysMain. Disabling it, however, could have problems on older PCs. It’s a good idea to turn it off and see whether your PC performs better. Turn it back on if there isn’t a discernible difference.
There are 2 different methods for disabling superfetch in windows 10/11:
- Method 1: Disable Superfetch on Windows 10/11 via Service Manager
- Method 2: Disable Superfetch on Windows 10/11 via Terminal
Let’s go through both methods.
Method 1: Disable Superfetch on Windows 10/11 via Service Manager
Step 1: To open the Run dialogue, use the keyboard shortcut Windows key + R.

Step 2: After entering services.msc, click OK.

Step 3: Double-click the SysMain option when the Services console appears, then click the Stop button.

Step 4: Then choose Disabled from the dropdown menu next to Startup type by clicking it.
Step 5: To exit the Services panel, click Apply and OK.

You should experience a boost in system speed now that Superfetch (SysMain) is off. It should also become better if your disc consumption is large.
After making the changes, you might wish to restart Windows 11 to be sure the problem is resolved.
Method 2: Disable Superfetch on Windows 10/11 via Terminal
Using the Windows Terminal, PowerShell, or an earlier command prompt will also disable Superfetch. All three tools can be used with these directions.
On the command line or in the Terminal, deactivate Superfetch by typing the following command: Alternatively, you may use your keyboard’s Windows key or click the Start button.
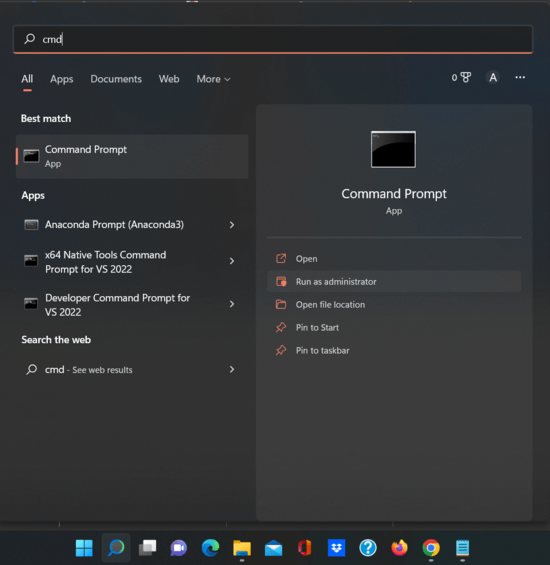
Step 1: Look for Windows Terminal or cmd.
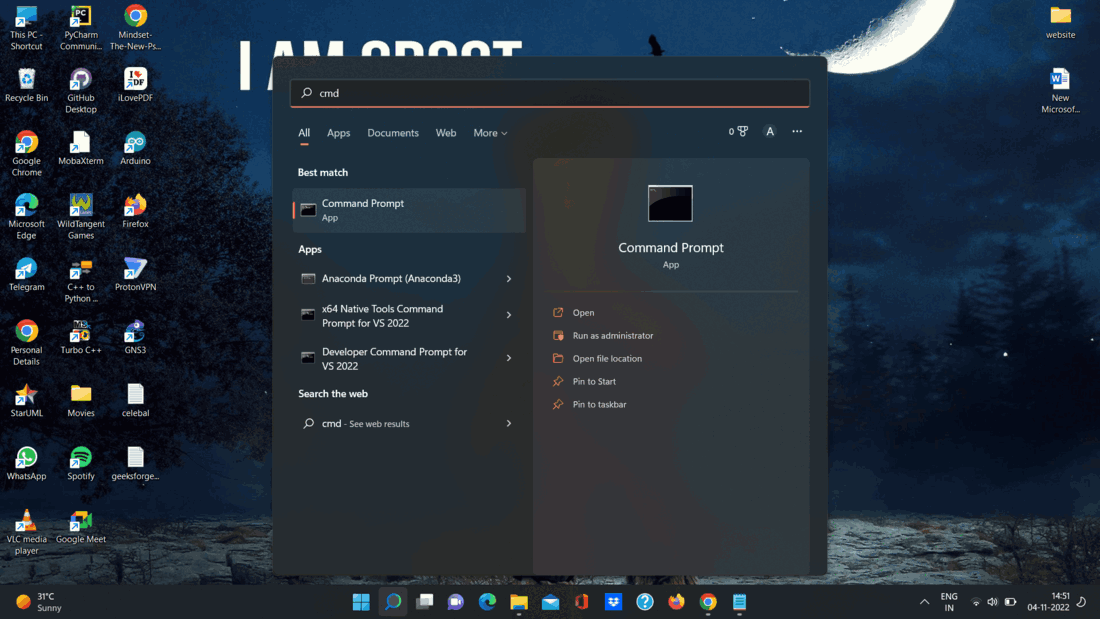
Step 2: On the right, select Run as Administrator.
Step 3: Run the following command in the prompt:
sc stop «SysMain» & sc config «SysMain» start=disabled
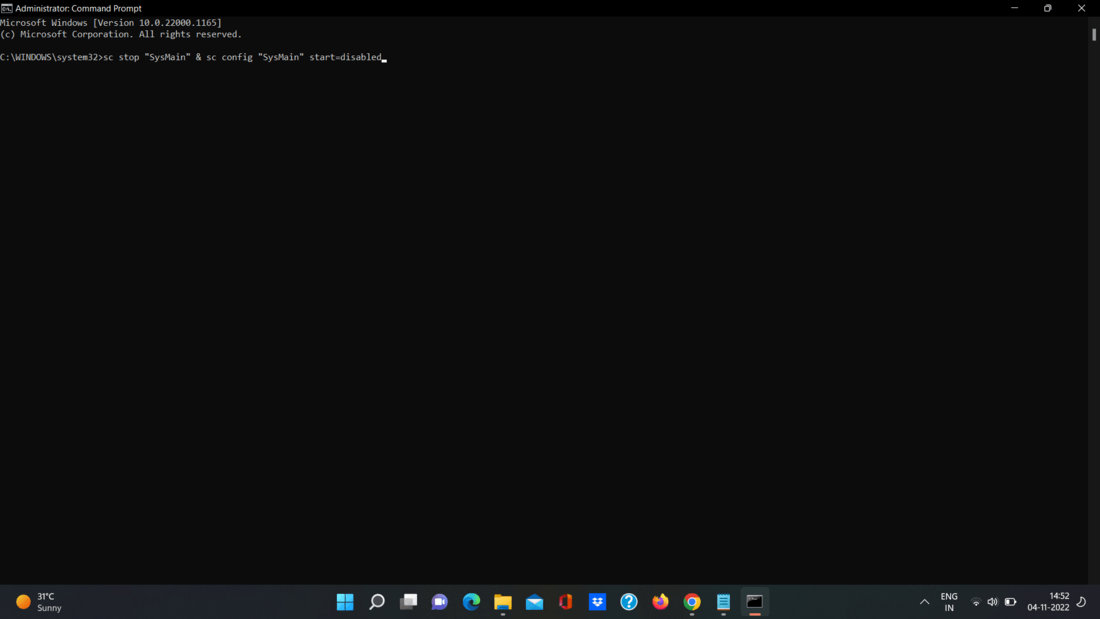
Step 4: The following screen should appear after you perform the command, indicating that it was successful.

When you run the command, Superfetch will be turned off and won’t launch when you restart your computer.
-
Что это за служба
-
Отключение SuperFetch
-
Через «Службы»
-
С помощью реестра
-
Через командную строку
-
Выводы
Производительность компьютера напрямую зависит от его аппаратной части, управляемой операционной системой. Иногда пользователи сталкиваются с замедлением работы ПК. Одна из известных причин зависаний — служба SuperFetch в Windows 10 грузит диск. О том, что это за узел системы и можно ли его отключить, рассказано в этой статье.
Что это за служба
SuperFetch ускоряет работу ОС с помощью загрузки часто используемых программ или файлов в оперативную память, чтобы они запускались быстрее. Это называется кэширование. В списке запущенных процессов может называться SysMain.
Во время работы служба обращается к диску для считывания данных, которые загружаются в ОЗУ. Таким образом ускоряется работа памяти. Но частые обращения грузят диск, и он начинает работать медленнее, что сказывается на всей системе и запущенных приложениях.
Служба эффективна для ПК, в которых используются жесткие диски (HDD) и небольшой объем оперативной памяти. При использовании твердотельных накопителей (SSD) эта функция не нужна, поэтому ее стоит отключить.
Существует несколько способов деактивировации сервиса.
Обратите внимание! Все действия выполняются в Windows 10. В других версиях системы может отличаться название или расположение элементов, но принцип работы тот же.
Через «Службы»
SuperFetch можно выключить через раздел администрирования системы «Службы».
- Нажмите «Поиск» → введите «Службы» → откройте классическое приложение.

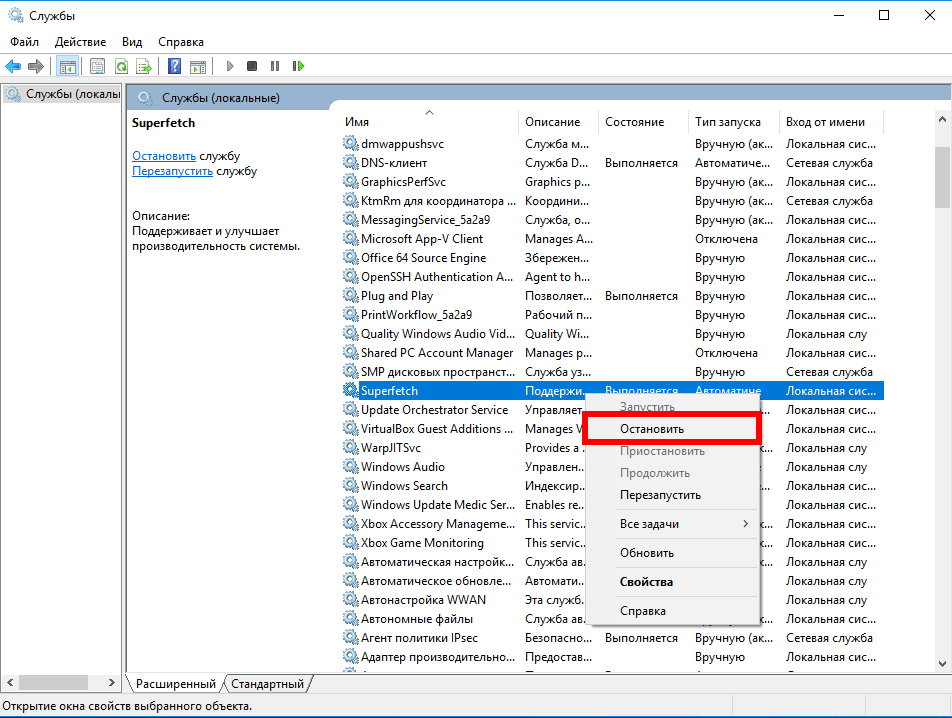
- Щелкните ПКМ по «SuperFetch» →«Остановить».

- Снова откройте контекстное меню сервиса → «Свойства».
- В поле «Тип запуска» в выпадающем списке выберите «Отключена» → «OK».

- Перезапустите ПК.
С помощью реестра
Отключение сервиса доступно также через системный реестр.
- Откройте программу «Выполнить» сочетанием клавиш Win + R → введите «regedit» → «OK».

- Перейдите в ветку
HKEY_LOCAL_MACHINE \ SYSTEM \ CurrentControlSet \ Control \ Session Manager \ Memory Management \ PrefetchParameters. - Дважды щелкните по параметру «EnableSuperfetch» → введите значение 0 → «OK».

- Перезагрузите компьютер.
Через командную строку
Деактивировать службу можно в командной строке, запущенной от имени администратора.
- Откройте «Поиск» → введите «Командная строка» → щелкните ПКМ по классическому приложению → «Запуск от имени администратора».
- Введите команду
sc config SysMain start=disabled.
- Перезагрузите ПК.
Выводы
Служба SuperFetch необходима в случае использования на компьютере жесткого диска (HDD) и малого объема оперативной памяти (до 4 ГБ). Современные комплектующие позволяют отключать сервис, чтобы не замедлять работу ПК.
Windows 10 is a definite improvement over previous versions in many ways—but it can also feel slow and sluggish when it isn’t configured properly. Of the many ways to improve Windows 10 performance, there’s one lesser-known feature you should know about: Superfetch—now referred to as SysMain after the Windows 10 1809 update.
In this article, you’ll learn everything you need to know about what Superfetch (SysMain) is, how it works, why it might be problematic, and how to disable it if it’s causing issues.
What Is Superfetch (SysMain)?
Superfetch is a feature introduced with Windows Vista. The official description of the Superfetch service says that it «maintains and improves system performance over time,» but that’s vague and doesn’t explain the whole story.
It sits quietly in the background, constantly analyzing RAM usage patterns and learning what kinds of apps you often run. Over time, Superfetch marks these apps as «frequently used» and preloads them into RAM ahead of time.
Superfetch appears as «Service Host: SysMain» in the Windows Task Manager. The idea is when you want to run the app, it will launch much faster because it’s already preloaded in memory.
.jpg)
By default, Superfetch is designed to take up all your available RAM space with preloaded apps. Don’t worry: it only deals with unused memory. As soon as your system needs more RAM (e.g., to load an app that wasn’t preloaded), it relinquishes the needed memory as necessary.
Note that Superfetch is not the same as Prefetch; the preloading memory manager was introduced back in Windows XP. Superfetch is actually the successor to Prefetch. What’s the difference? Prefetch did not analyze usage patterns over time and adjust its preloading parameters accordingly.
Is Superfetch (SysMain) Really Necessary?
For the most part, Superfetch is useful. If you have a modern PC with average specs or better, Superfetch most likely runs so smoothly you don’t even notice it. There’s even a good chance Superfetch is running on your system right now, and you didn’t even know.
But there are some «problems» that can arise with Superfetch (SysMain):
- Since Superfetch is always running in the background, the Superfetch service itself is always using some CPU and RAM.
- Superfetch doesn’t eliminate the need to load apps into RAM. Rather, it relocates the loading to an earlier time. Whenever that loading happens, your system still experiences the same slowdown as if you were launching the app without Superfetch.
- System startup can be sluggish because Superfetch is preloading a bunch of data from your HDD to RAM. If your HDD runs at 100% for a few minutes every time you start or restart your computer, Superfetch could be the culprit.
- The performance gains of Superfetch may be unnoticeable when Windows 10 is installed on an SSD. Since SSDs are so fast, you don’t need preloading. There are several ways to check the speed and performance of your SDD on Windows and other operating systems.
Superfetch has also been known to cause performance issues while gaming, particularly on systems with 4GB of RAM or less. It’s unclear why this happens because it doesn’t occur for everybody, but we suspect it has to do with RAM-heavy games that constantly request and free up memory, which may cause Superfetch to load and unload data constantly.
Is it Safe to Disable Superfetch?
Yes! There are no side effects if you decide to turn it off. If your system is running well, leave it on. But if you have high HDD usage issues, high RAM usage, or degraded performance during RAM-heavy activities, try turning it off and see if it helps. If it does, keep it off. Otherwise, turn it back on.
How to Disable Superfetch (SysMain) on Windows 10
To reiterate, we don’t recommend disabling Superfetch except as a troubleshooting measure for the potential issues mentioned above. Most users should keep Superfetch enabled because it helps with overall performance. If you aren’t sure, turn it off temporarily. If you don’t notice any improvements, turn it back on.
Again, Superfetch is referred to as SysMain in Windows 10. So that’s what users should be looking for when disabling it.
1. Using the Services App
The most straightforward way of disabling this feature is by stopping its service via Windows Service.
- Open the Start Menu, search for services, then launch the Services app. Alternatively, open the Run prompt by pressing Windows key + R, then type services.msc and click OK.
-
Scroll down until you see SysMain, right-click on it, and click Stop. Superfetch is now disabled.

- Still, in the Services app, right-click on SysMain and select Properties. Under the General tab, look for Startup type and change it to Disabled. (Or Manual if you’d like the option to turn it on when you need it.)
2. Using the Registry Editor
The Services app is the preferred method for this, but if it doesn’t work for some reason, you can always edit the registry key directly. Before you do this, back up the registry if something goes wrong.
Please note that creating a System Restore point is crucial before making any Registry changes. You can revert to this restore point in case of any mishap.
2.1 Creating a Restore Point
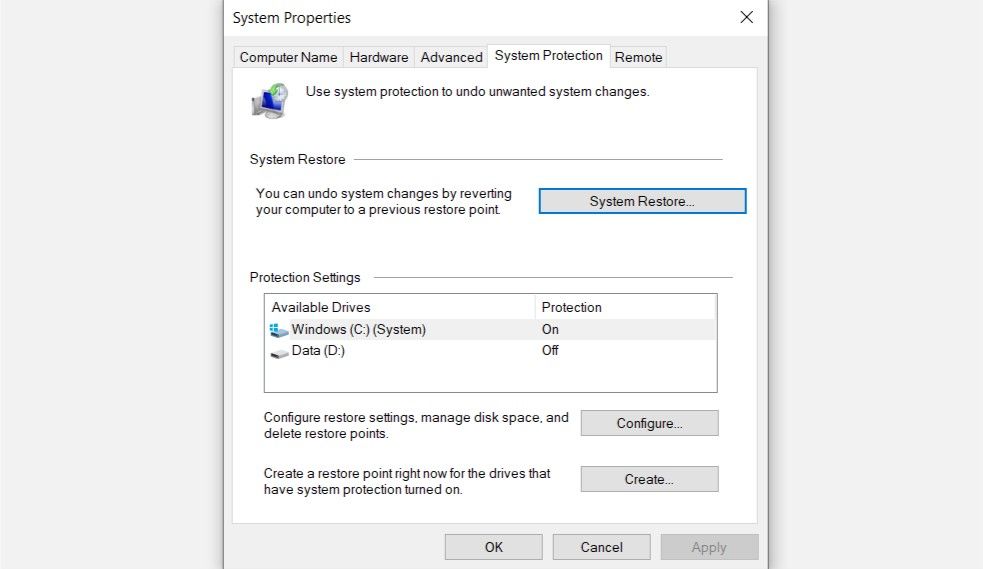
- In the Start menu search bar, type Create a restore point and click on it from the search results.
- If the System Restore button is greyed out, System Protection is disabled.
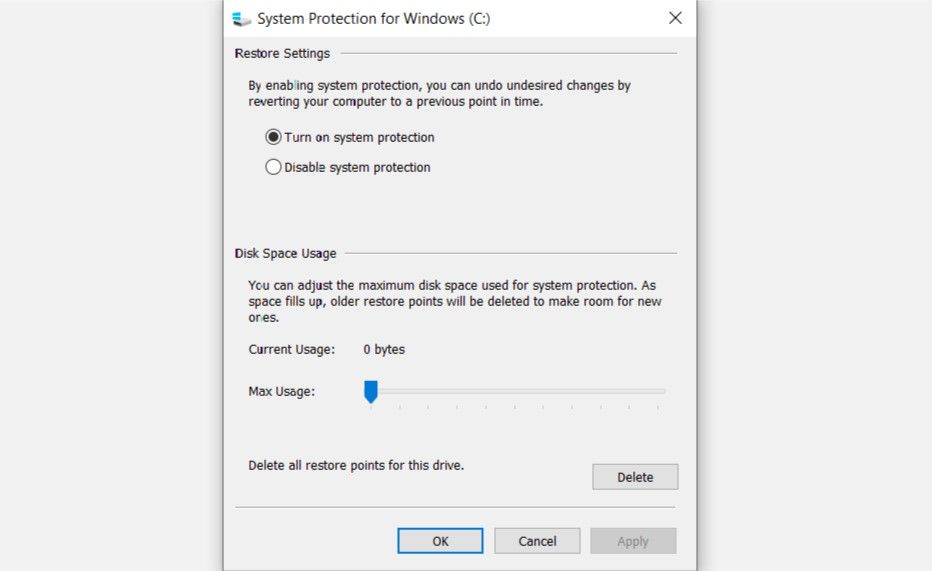
- To enable System Protection, click on the C:\ drive in the same window. Then click on Configure and click on Turn on System Protection. Click OK.
- To create a Restore Point, simply click on Create and enter a name for the Restore Point.
2.2 Disabling Superfetch (SysMain)
Once done, it is time to disable Superfetch via the Registry Editor.
- In the Start menu search bar, search for regedit, then select it from the results. Alternatively, open the Run prompt by pressing Windows key + R, then type regedit and click OK.
-
In the following window, using the left sidebar, navigate to the following:
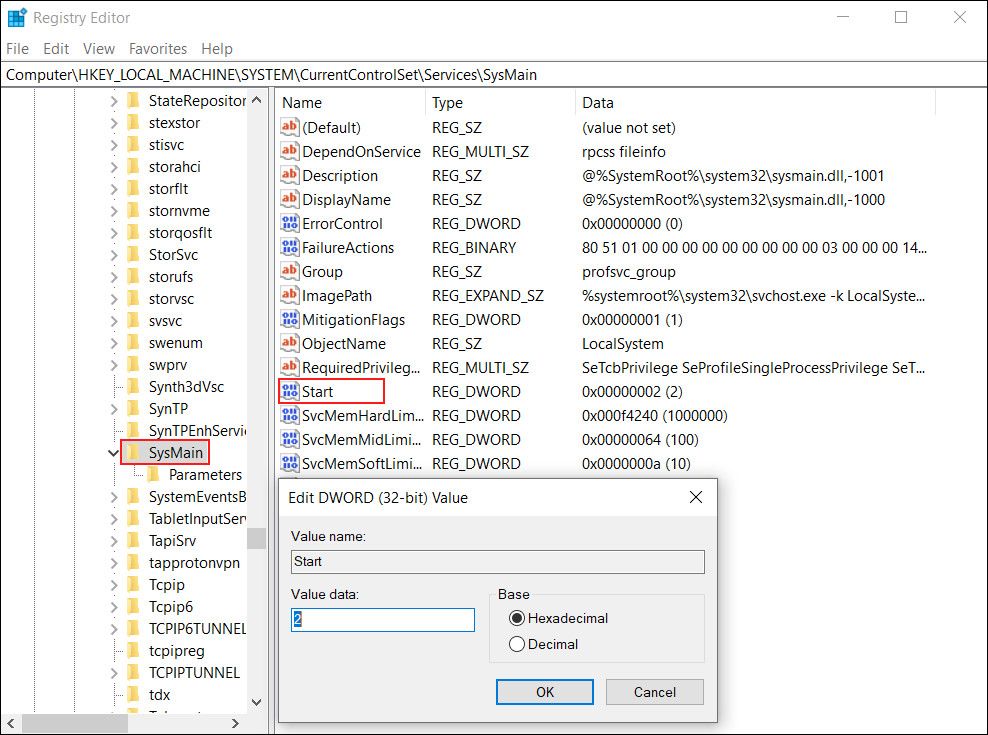
HKEY_LOCAL_MACHINE \ System \ CurrentControlSet \ Services \ SysMain
- In the section on the right, double-click on Start and set Value data to 4. Save changes and reboot your computer.
3. Using Command Prompt
The fastest way to disable Superfetch and feel like a Windows power user while doing so is to use the Command Prompt.
- In the Start menu search bar, type cmd and right-click on Command Prompt > Run as administrator.
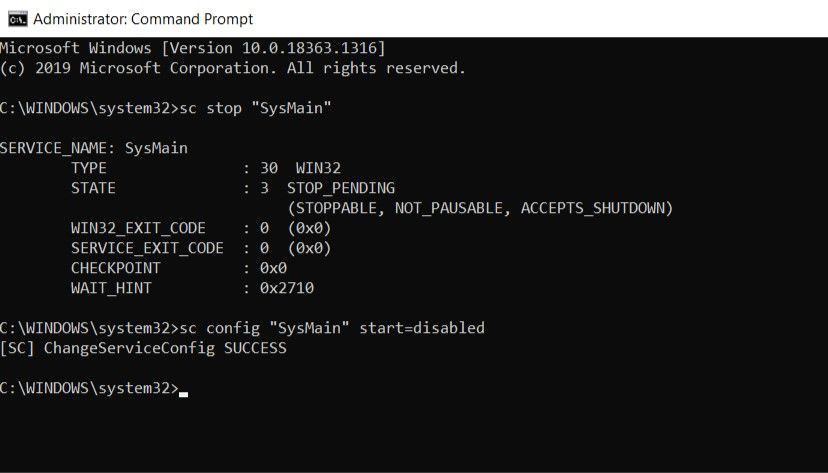
- In the console, type: sc stop «SysMain» and press Enter.
- After this, type: sc config «SysMain» start=disabled and press Enter.
- Close Command Prompt and reboot your computer.
Alternate Ways to Fix Issues Related to SysMain
If disabling the feature is not an option for you, then there are other ways to fix the problems Sysmain might be causing on your system.
The easiest way of doing so is by running system scans using the troubleshooting utilities like the System File Checker (SFC) and Disk Cleanup tools. Apart from this, you can troubleshoot in a Clean Boot state, which starts the system with the basic set of drivers and applications.
If the problem occurs because the system configuration is low, consider upgrading your computer.
Other Windows 10 Features You Can Disable
By now, you should have been able to disable Sysmain successfully by following one of the above methods. However, do you know that Superfetch isn’t the only example of a feature that might be better off disabled? Many other Windows features are better left disabled due to the performance trade-off!