
So the other day, my desktop suddenly started lagging for no apparent reason. I checked the task manager and saw that “Service Host: Windows Push Notifications User Service” had the highest RAM usage. The worst part was the memory usage was continuously increasing and it was using multiple gigabytes of memory.
I tried to end the service, but it started again after some time. First I thought it was malware, then I tried the malware removal guide to scan for malware and viruses, but no luck.
I tried almost every solution available on the internet but still no luck. I was almost going to reset my PC then I finally found a solution which actually worked.
Table of Contents
Why WpnUserService use high RAM?
Actually, the notification database in Windows gets corrupted that’s why it starts to use all the available RAM. This can be easily fixed by deleting the corrupt database. To do so follow the below guide.
- First, you need to boot Windows in safe mode.
- To do so search for msconfig in the start menu and launch it.
- Here switch to the boot tab, and select the safe boot option.

- In the safe boot option select Minimal and apply the settings.
- Now restart your PC and your PC will boot into safe mode.
- Once you’re in safe boot. Right-click the start menu and select Run.
- In the run Windows type %localappdata% and press enter.
- In App data folder navigate to Microsoft -> Windows.
- In the Windows folder, you will find a folder named notification.
- Just delete or rename and folder, don’t worry the notification database folder will regenerate after restarting.
- Now you need to exit safe boot. Again search for msconfig and open it.
- Switch to the boot tab and uncheck safe boot.
- Now restart your PC and windows push notifications user service high memory usage will be fixed.
Here are a few other methods using which you can fix this error.
Recommended – What is Service Host SuperFetch? Fix Its High Disk Usage
Disable Notification Services
You can disable the notification since you will disable the notification you won’t get important notifications about Windows Defender and Windows Update.
- Right-click the Start menu and select settings.
- In Settings search for notification and action.
- Here under notification turn off everything.

- Restart you’re PC and you won’t face high memory usages in windows push notifications user service.
Disable WpnUserService Service
You can also try to completely disable this service.
- Search for services.msc in the start menu and launch it.
- Here look for Windows Push Notification Service and double click it.

- Stop the service and from the startup type select disable.
- Apply the changes and reboot your PC.
I hope you have fixed Windows Push Notifications User Service High Memory Usage. If you face any problems then let me know in the comment section.
-
Home
-
News
- Windows Push Notification User Service High CPU/Memory Usage
By Aurelie | Follow |
Last Updated
What is Windows Push Notification User Service? How to fix Windows Push Notification User Service high CPU or memory usage? Read this post from MiniTool Website carefully, and you will be enlightened.
Windows Push Notifications User Service High CPU Usage
Windows Push Notifications User Service is a background system process that manages push notifications from different services and applications. Usually, it might consume some system resources and the impact is minimal.
However, what should you do if you find this process is using excessive resource usage on Windows 10/11? In this post, we will explore how to fix Windows Push Notification User Service high CPU, disk, or memory usage for you.
Tips:
High CPU issues like Windows Push Notification User Service high CPU usage might slow down your computer, even making your computer freezing and unresponsive. Therefore, it is strongly recommended to create a daily backup when you are using your computer. To do so, MiniTool ShadowMaker is worth trying. This free PC backup software is aimed to provide easy and professional data protection and disaster recovery solutions for individuals and companies. Get the free trial and have a whirl!
MiniTool ShadowMaker TrialClick to Download100%Clean & Safe
How to Fix Windows Push Notifications User Service High CPU Usage on Windows 10/11?
Fix 1: Terminate the Process Manually
Most of the time, a simple restart of this process might help to solve some problems like Windows Push Notification User Service high CPU usage. To do so:
Step 1. Press Ctrl + Shift + Esc to launch Task Manager.
Step 2. In the Details tab, locate Service Host: Windows Push Notification User Service and then right-click on it to choose End task.
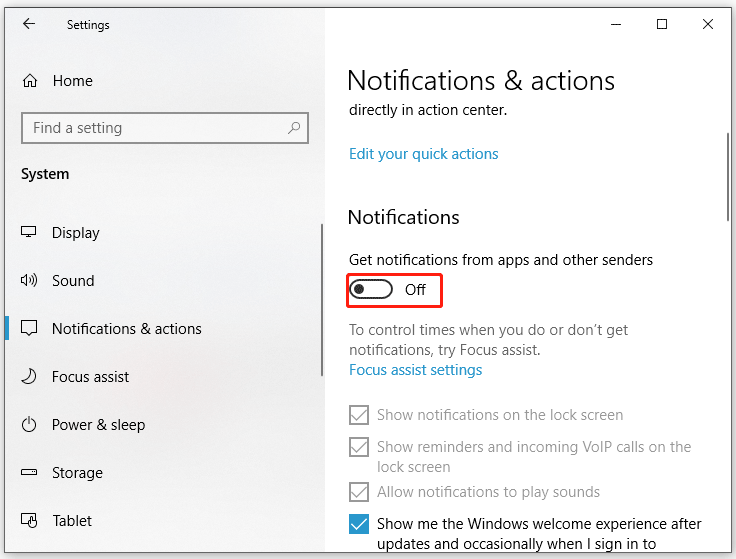
Fix 2: Disable All Notifications
If there are so many notifications from different apps, no wonder you will receive Windows Push Notification User Service high CPU usage. In this condition, you can choose to stop receiving all notifications to fix this issue.
Step 1. Press Win + I to open Windows Settings.
Step 2. Go to System > Notification & actions > toggle off all notifications.
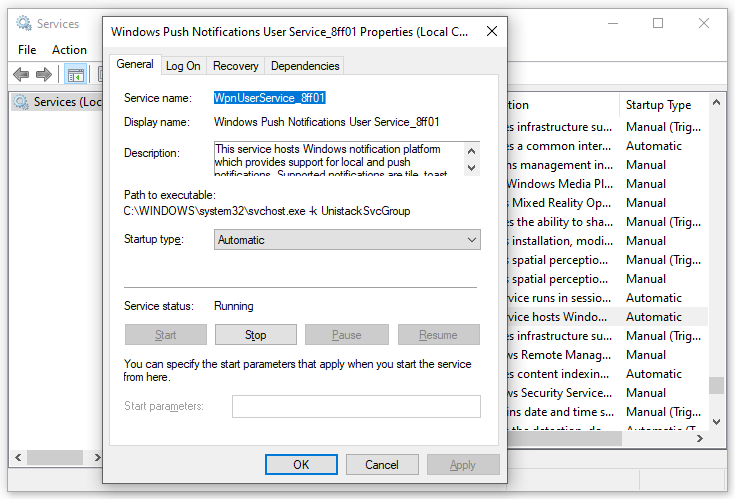
Fix 3: Restart Windows Push Notifications User Service
When certain background services or applications can not work properly, you can consider restarting them. Follow these steps:
Step 1. Press Win + R to open the Run box.
Step 2. Type services.msc and hit Enter to launch Services.
Step 3. In the services menu, find Windows Push Notification User Service and right-click on it to choose Properties.
Step 4. If this service is running, hit Stop and then restart it. If it is stopped, hit Start to run it.
Fix 4: Perform a Clean Boot
Third-party programs might be responsible for issues like Windows Push Notification User Service high CPU usage. If this is the case, you can perform a clean boot to exclude their interference. To do so:
Step 1. Type system configuration in the search bar and hit Enter.
Step 2. In the Services tab, tick Hide all Microsoft services and hit Disable all.
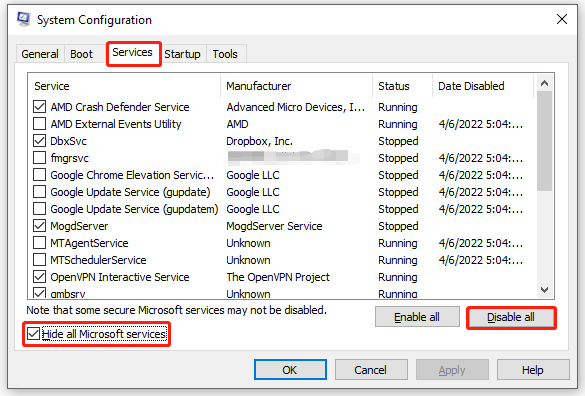
Step 3. Head to the Startup tab, click on Open Task Manager and then disable all third-party apps & programs.
Step 4. Go back to the Services tab and hit Apply & OK to save the changes.
Step 5. Restart your computer to enter the clean boot state to check if Windows Push Notification User Service high memory or CPU usage persists. If not, a third-party could be to blame. Then you need to uninstall all recently installed applications to see if it works.
Fix 5: Run SFC & DISM
Chances are that some system files are corrupted or missing. Therefore, you can run SFC and DISM in sequence to detect and repair these system files. Here’s how to do it:
Step 1. Launch Command Prompt with administrative privilege.
Step 2. In the command window, type sfc /scannow and hit Enter.
Step 3. After completion, restart your computer.
Step 4. Launch an administrative Command Prompt and run the following commands one by one.
DISM /Online /Cleanup-Image /CheckHealth
DISM /Online /Cleanup-Image /ScanHealth
DISM /Online /Cleanup-Image /RestoreHealth
Final Words
After reading through this post, Windows Push Notification User Service high resource consumption will not be a concerning problem and your operating system will run smoothly.
About The Author
Position: Columnist
Aurelie is a passionate soul who always enjoys researching & writing articles and solutions to help others. Her posts mainly cover topics related to games, data backup & recovery, file sync and so on. Apart from writing, her primary interests include reading novels and poems, travelling and listening to country music.
Issue: Hello. I noticed in Task Manager that the Windows Push Notifications User Service uses about 20% or 30% of CPU and RAM. What should I do?
Solved Answer
High CPU[1] or memory usage in Windows can occasionally be caused by the Windows Push Notifications User Service, a background system process that manages push notifications from different apps and services. Many users have experienced this problem, which can be very annoying because it affects the responsiveness and functionality of the system.
Although it doesn’t happen frequently, one user noticed that it seems to happen more often after they have been in full-screen mode. Although the precise cause of this behavior may not always be known, it appears that specific circumstances or actions are what cause the high CPU or memory consumption that is related to this service. This finding could point to a possible relationship between the graphics or display settings in full-screen apps and the Windows Push Notifications User Service.
The effects of this problem on users may be profound. Applications that are unresponsive and slow system performance can be caused by high CPU or memory use. Additionally, it may impair multitasking abilities, making it difficult for users to efficiently use other applications. Furthermore, excessive use of system resources can shorten the lifespan of computer components by causing overheating.
Users can investigate a few possible solutions to deal with this issue. Disabling the Windows Push Notifications User Service is one way, but doing so can prevent you from getting notifications from other programs. Updating Windows and the impacted apps is an additional strategy to make sure that any known problems are fixed. These kinds of issues are occasionally fixed by system updates. In order to see if there are any conflicts preventing the service from operating normally, users can also look for conflicts with antivirus, drivers, or third-party applications.
In this guide, you will find 6 steps that should help you fix Windows Push Notifications User Service high CPU or memory usage in Windows. You can also run a maintenance tool like FortectMac Washing Machine X9 that can fix most system errors, BSODs,[2] corrupted files, and registry[3] issues. Otherwise, follow the step-by-step instructions below.

Solution 1. Fix Corrupted System Files
Use Command Prompt commands to repair system file corruption:
- Open Command Prompt as administrator
- Use the following command and press Enter:
sfc /scannow

- Reboot your system
- If SFC returned an error, then use the following command lines, pressing Enter after each:
DISM /Online /Cleanup-Image /CheckHealth
DISM /Online /Cleanup-Image /ScanHealth
DISM /Online /Cleanup-Image /RestoreHealth
Solution 2. Install Windows Updates
Fix it now!
Fix it now!
To repair damaged system, you will have a 24hr Free Trial and the ability to purchase the licensed version of the Fortect Mac Washing Machine X9.
- Click Start and select Settings.
- Go to the Windows Update section.
- Click Check for updates and wait.

- Go to the Advanced options and install optional updates.
- Reboot your system.
Solution 3. Disable Notification Services
- Right-click the Start menu and select Settings.
- In Settings, search for notification and action.
- Here, under notification, turn off everything.
- Restart the PC.

Solution 4. Disable WpnUserService Service
Fix it now!
Fix it now!
To repair damaged system, you will have a 24hr Free Trial and the ability to purchase the licensed version of the Fortect Mac Washing Machine X9.
- Search for services.msc in the Start menu and launch it.
- Here, look for Windows Push Notification Service and double-click it. Stop the service and, from the startup type, select disable.
- Apply the changes and reboot your PC.

Solution 5. Try Clean Boot
- Open the Search menu, type in system configuration, and press Enter.
- Under the Services tab, tick the Hide all Microsoft services box.
- Click on Disable all button.

- Head over to the Startup tab and click on Open Task Manager.
- Select a third-party program and click on Disable at the top.
- Repeat this step to disable all third-party apps and programs.
- Restart your PC to enter the clean boot state and see if the issue persists.
- If the issue disappeared in the clean boot state, then you can be certain that a third-party app is causing it.
- Go through all recently installed apps or programs and remove them one by one.
Solution 6. Use System Restore
Fix it now!
Fix it now!
To repair damaged system, you will have a 24hr Free Trial and the ability to purchase the licensed version of the Fortect Mac Washing Machine X9.
System Restore is a feature in Microsoft Windows that allows users to revert their computer’s state to a previous point in time. This can be helpful if you have made changes to your system that are causing problems.
- Press the Windows key + R on your keyboard to open the Run box.
- Type SystemPropertiesProtection and press Enter.
- Go to the System Protection tab.

- You will see the System Restore… button. Click it to run System Restore.
- Follow the prompts until you can select a restore point.
- Select the one you want (ideally before the issue started occurring) and go ahead with the process.
Repair your Errors automatically
ugetfix.com team is trying to do its best to help users find the best solutions for eliminating their errors. If you don’t want to struggle with manual repair techniques, please use the automatic software. All recommended products have been tested and approved by our professionals. Tools that you can use to fix your error are listed bellow:
do it now!
Download Fix
Happiness
Guarantee
do it now!
Download Fix
Happiness
Guarantee
Compatible with Microsoft Windows
Compatible with OS X
Still having problems?
If you failed to fix your error using FortectMac Washing Machine X9, reach our support team for help. Please, let us know all details that you think we should know about your problem.
Fortect will diagnose your damaged PC. It will scan all System Files that have been damaged by security threats. Mac Washing Machine X9 will diagnose your damaged computer. It will scan all System Files and Registry Keys that have been damaged by security threats. To repair damaged system, you will have a 24hr Free Trial and the ability to purchase the licensed version of the Fortect malware removal tool. To repair damaged system, you have to purchase the licensed version of Mac Washing Machine X9 malware removal tool.
Protect your online privacy with a VPN client
A VPN is crucial when it comes to user privacy. Online trackers such as cookies can not only be used by social media platforms and other websites but also your Internet Service Provider and the government. Even if you apply the most secure settings via your web browser, you can still be tracked via apps that are connected to the internet. Besides, privacy-focused browsers like Tor is are not an optimal choice due to diminished connection speeds. The best solution for your ultimate privacy is Private Internet Access – be anonymous and secure online.
Data recovery tools can prevent permanent file loss
Data recovery software is one of the options that could help you recover your files. Once you delete a file, it does not vanish into thin air – it remains on your system as long as no new data is written on top of it. Data Recovery Pro is recovery software that searchers for working copies of deleted files within your hard drive. By using the tool, you can prevent loss of valuable documents, school work, personal pictures, and other crucial files.
Windows 10: Windows Push Notifications User Service Issue — Process Maxes Out CPU and Memory
Discus and support Windows Push Notifications User Service Issue — Process Maxes Out CPU and Memory in Windows 10 BSOD Crashes and Debugging to solve the problem; After updating Windows 10 today, I’ve run into a strange issue: a single process, Windows Push Notifications User Service, will regularly start and…
Discussion in ‘Windows 10 BSOD Crashes and Debugging’ started by OliverBackes, Mar 20, 2019.
-
Windows Push Notifications User Service Issue — Process Maxes Out CPU and Memory
After updating Windows 10 today, I’ve run into a strange issue: a single process, Windows Push Notifications User Service, will regularly start and then slowly use nearly all my available CPU and Memory until either I end the process or the computer ceases to function. When I end the process, it is dormant for a while but always restarts again and goes through the same cycle of using up all available CPU and Memory.
From what I can tell, the issue is not with any particular app trying to send a push notification but rather with the Windows Push Notification Service itself. I have all notifications turned off; however, I find that the process always starts up when I got to the Notification Settings tab. When I do that, no apps are shown under «Get notifications from these senders» nor are any of the lower down options shown either; instead, I just get the loading circular dots animation under «Get notifications from these senders» while the Windows Push Notifications process slowly uses up all available CPU and Memory. When I forcibly end the task using the Task Manager, the loading dots are replaced by the following text: «No senders have provided notifications yet.»
Does anyone know how to prevent this from happening? I spoke with Windows technical support but they were unable to fix the problem — nearly as soon as I got off the phone with them (thinking the issue was fixed), it happened again. Any help would be greatly appreciated.

-
Runaway push notification process using multiple GB of memory
1. Have been able to get a hint about which App might be running and causing the issue?
Start — Settings — type in —> Notifications
Or Start — Settings — System — Notifcations
See if turning off ALL notifications or even particular ones stop the problem.
Even with «get notificaitons from apps and other senders» and all the other toggles in «notifications & actions» turned off, it still does that.
When I scroll down to «get notifications from these senders» I just get the spinning dots (left it running for several minutes without it displaying any apps).
2. While that is showing Right Click the Taskbar — Task Manager — find it and if there is a little arrow on the left expand it to see what is causing it to run.
The process says «Service Host: Windows Push Notifications User Service_49b3a» and when you click the arrow next to it a sub entry of «Windows Push Notifications User Services_49b3a» shows up.
3. Try Process Explorer while it is running to also see if that help determine cause.
Process Explorer says the hog is svchost.exe using 20,xxx,xxx k private bytes, 9,xxx,xxx k working set and 12.xx cpu.
If needed you can also try a Clean Boot.
No luck with clean boot. Still happens with all non-microsoft services disabled as well as all startup items disabled.
Autoruns
Just installed and ran it. Not really sure what I’m looking for on it that is not in the task manager startup list. Nothing really jumps out as being inappropriate.
-
Runaway push notification process using multiple GB of memory
In Windows 10 Home, the «Windows Push Notifications User Service 4e086» begins using up multiple gigabytes of memory after running for a few minutes. I can end task the process, but it comes back later or on reboot. I have tried disabling the process by
unchecking it in msconfig, but it still starts when I restart the computer. I have tried running a clean boot by disabling all non-microsoft services in msconfig and disabling all startup entries in task manager, but the issue still occurs.I have run virus scan and Malwarebytes anti-malware scan and found nothing. This has been ongoing for multiple weeks.
I’d like to resolve the issue, but if the best I can get is somehow disabling push notifications entirely and stopping that process from ever starting, I would be happy with that too.
-
Windows Push Notifications User Service Issue — Process Maxes Out CPU and Memory
High Memory Usage by «Service Host: Windows Notifications User Service_3c1f5»
For us to know if it’s a faulty or outdated driver, can you send us a screenshot of associated file. Here are the steps:
- Type in Task Manager in the search bar
- Right-click Service Host: Windows Push Notifications User Service_3c1f5
- Click Properties and go to the General tab
- Send us a screenshot of the Properties
We’ll wait for your response.

Windows Push Notifications User Service Issue — Process Maxes Out CPU and Memory
-
Windows Push Notifications User Service Issue — Process Maxes Out CPU and Memory — Similar Threads — Push Notifications User
-
Windows Push Notifications User Service High Memory or CPU usage
in Windows 10 News
Windows Push Notifications User Service High Memory or CPU usage: [IMG]If Windows Push Notifications User Service is consuming high Memory or CPU usage in Windows 11/10, here is how you can eliminate this problem. It likely happens when you start your computer or connect it to the internet after a long time since all the apps try to show… -
CPU is maxed out
in Windows 10 BSOD Crashes and Debugging
CPU is maxed out: I’ve been experiencing my CPU being maxed out the past couple of weeks. During this time I have equally been trying to find a resolution. Everything I’ve done is a temporary fix and the issue comes right back.My processor is: IntelR CoreTM i7-10510U CPU @ 1.80GHz 2.30 GHz… -
Windows Push Notifications User Service — High CPU usage
in Windows 10 BSOD Crashes and Debugging
Windows Push Notifications User Service — High CPU usage: Hi. For several weeks now, I have been having a problem with my laptop, running Windows 10 Home Edition, in that there is high amount of CPU usage, even when the computer is supposedly idling; so much so the cooling fans have to run all the time.When I look on Task…
-
service host: windows push notification user service
in Windows 10 BSOD Crashes and Debugging
service host: windows push notification user service: greetingsI notice that every couple of days the laptop becomes very slow and it hangs up, while its cooling van noise becomes very high and the laptop temperature becomes high,
service host: windows push notification user service 10d367f4 consumes most of the ram 98%…
-
Windows Push Notifications User Service has stopped working
in Windows 10 News
Windows Push Notifications User Service has stopped working: [ATTACH]
[ATTACH]Sometimes, when you start your PC, Windows 10 throws up an error message bearing the following description – Windows Push Notifications User Service has stopped working or The Windows Push Notifications User Service terminated unexpectedly. If you face this… -
Windows push notifications user service
in Windows 10 BSOD Crashes and Debugging
Windows push notifications user service: Please helpAll new pc parts :
Motherboard : Asus prime H310M-A
CPU : Intel i5 8400
RAM : G.Skill ( xmp to 2400mhz)
PSU : cooler master 450w masterwatt
except HDD : Toshiba DT01ACA100 1TB SATA 6Gb/s
Scanned with no bad sectors or errors
All drivers up to date…
-
Windows Push Notification User Service always crashing
in Windows 10 BSOD Crashes and Debugging
Windows Push Notification User Service always crashing: For the past week, I’ve continually found this critical error in my reliability monitor — Windows Push Notifications User Service stopped working. I have used sfc /scannow, chkdsk /f C: and DISM and they all have shown no problems. I have also done multiple virus/malware… -
Windows Push Notification User Service stopped working
in Windows 10 Software and Apps
Windows Push Notification User Service stopped working: Constant critical event in Reliability Monitor. Seems to happen at boot. Anyone have any solutions?Faulting Application Path: c:\Windows\System32\svchost.exe
Problem signature
Problem Event Name: APPCRASH
Application Name: svchost.exe_WpnUserService
Application…
Users found this page by searching for:
-
wpnuserservice windows 10
,
-
OS/osswconfig/services/wpnuserservice
Readers help support Windows Report. We may get a commission if you buy through our links.
Read our disclosure page to find out how can you help Windows Report sustain the editorial team. Read more
For those who are not familiar, Windows Push Notification User Service offers support for push and local notifications on Windows 10 OS.
Sometimes the notification service might stop working and there are numerous reports that it keeps crashing on their systems. Windows 10 users can’t receive any notification on their PCs in that case.
This issue is reported on the official Microsoft forum in the following manner:
The problem is when the computer starts it shows an error called windows push notification user service has stopped working. Besides different windows store apps are not working. I reinstalled a few and they worked then but most apps didn’t. Hope to get a solution from you soon.
Here below we have listed some common solutions that helped many Windows 10 users to get rid of this error.
What to do if Windows Push Notification User Service doesn’t work
1. Scan for Memory Leaks
- Head towards the Start menu and search for Command Prompt.
- Righ-click on the first result and select Run as administrator.
- Type the following command press the Enter key:

- Wait for the process to complete and reboot your system.
- Check if the problem is resolved.

2. Restart WpnUserService Manually
- To manually restart the service, open Command Prompt from the Start menu.
- Type the following commands and hit the Enter key:
- sc config WpnUserService start= auto
- sc start WpnUserService

Restart your system to apply the changes.
3. Rename or Delete the Notifications Folder in Safe Mode
- The latest Windows 10 update might have corrupted the notifications database and you need to delete or rename its folder.
- Press the Windows + R keys to open Run dialog on your system.
- Type msconfig and click the OK button.

- Once the System Configuration window opens on your screen, go to the Boot tab and click the checkbox beside the Safe Boot option.
- Click OK and reboot your system. Your system will now boot into the Safe Mode.
- Open This PC and navigate to the following location:
C:\Users\YOURUSERNAME\AppData\Local\Microsoft\Windows
- If you can’t see the AppData folder, navigate to the FileExplorer menu and click the View tab.
- From the Show/hide section, click the Hidden items checkbox to show the hidden files in the File Explorer.
- Once you are insider the Windows folder, find the Notifications folder and right-click on it.
- Click Rename, type a random name and restart your system.

4. Install the latest updates
- Open the Settings app from the Start menu and click Update & security.
- Click the Check for updates button from the Windows Update tab.
- Finally, reboot your system once Windows finishes the update process.
Were you able to fix Windows Push Notification User Service has Stopped Working error using any of these solutions? Comment down below.
RELATED ARTICLES YOU NEED TO CHECK OUT:
- How to fix error 1713 in Windows 10
- Windows 10 fix: Error communicating with Kernel
- FIX: Remote desktop authentication error on Windows 10/7
Milan Stanojevic
Windows Toubleshooting Expert
Milan has been enthusiastic about technology ever since his childhood days, and this led him to take interest in all PC-related technologies. He’s a PC enthusiast and he spends most of his time learning about computers and technology.
Before joining WindowsReport, he worked as a front-end web developer. Now, he’s one of the Troubleshooting experts in our worldwide team, specializing in Windows errors & software issues.