
Среди работающих в фоне процессов Windows 10, 8.1 или Windows 7 вы можете заметить WmiPrvSE.exe или WMI Provider Host, причем иногда этот процесс активно использует ресурсы процессора компьютера или ноутбука.
В этой статье подробно о том, что за процесс WmiPrvSE.exe, о причинах возможной высокой нагрузки на процессор и способах исправить ситуацию. Схожие темы: Что за процесс csrss.exe, Процесс dwm.exe в Windows.
Что такое WmiPrvSE.exe
Процесс WmiPrvSE.exe или WMI Provider Host — один из необходимых системных процессов Windows, позволяющий программам на компьютере получать различную информацию о системе. При обычной работе этот процесс не вызывает высокой нагрузки на процессор, но это не всегда так.
WMI означает Windows Management Instrumentation и служит в качестве стандартного метода, позволяющего различному ПО получать сведения о состоянии системы и ее характеристиках. Помимо сторонних программ, такие сведения можете получать и вы: например, когда в командной строке вы выполняете команды WMIC для получения тех или иных данных об оборудовании компьютера или ОС (например, такой метод описан в инструкции Как узнать, какая материнская плата на компьютере), задействуется именно MI Provider Host.
При условии, что речь именно о системном процессе (находящемся в папке wbem внутри System32 или SysWOW64), отключить или удалить WmiPrvSE.exe нельзя (вернее, вы можете отключить службу, однако это может привести к проблемам в работе некоторых, в том числе системных, программ в дальнейшем), но при высокой нагрузке на процессор, проблему обычно можно решить.
Что делать, если WMI Provider Host грузит процессор
Кратковременная высокая нагрузка со стороны WmiPrvSE.exe является нормальным явлением: например, если вы запустите какую-либо программу определения характеристик компьютера, нагрузка со стороны этого процесса на некоторое время возрастет. Однако, если нагрузка является постоянной и процессор всегда нагружен, можно предположить, что что-то не так.
Чтобы исправить ситуацию, вы можете использовать следующие методы:
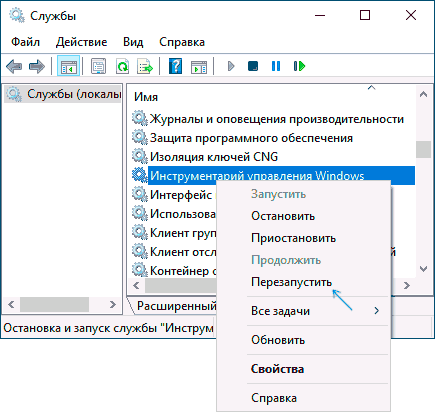
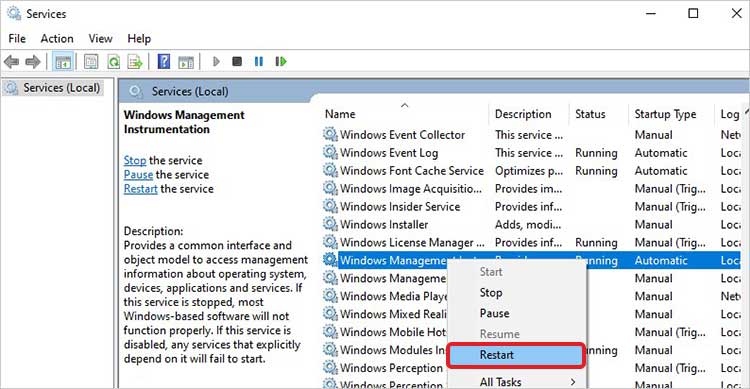
- Перезапуск службы «Инструментарий управления Windows». Нажмите клавиши Win+R, введите services.msc, найдите указанную службу (или Windows Management Instrumentation Service), нажмите по ней правой кнопкой мыши и выберите пункт «Перезапустить».

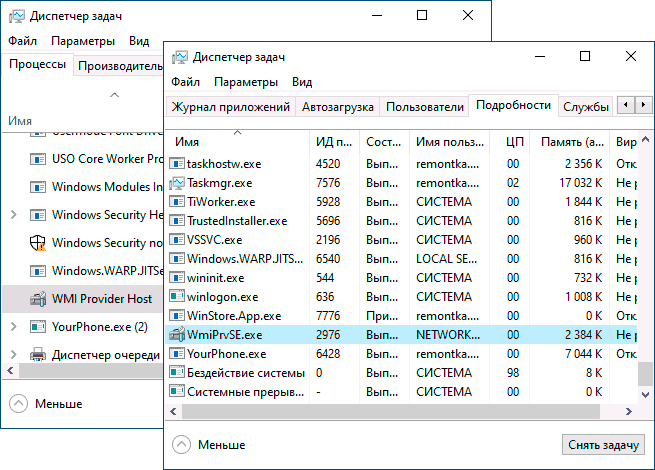
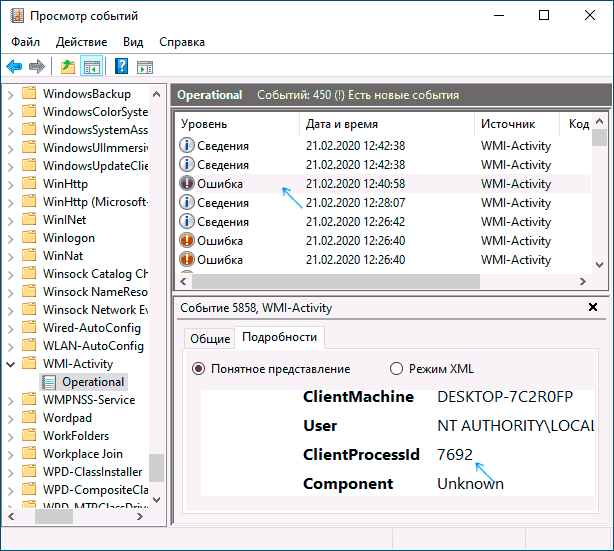
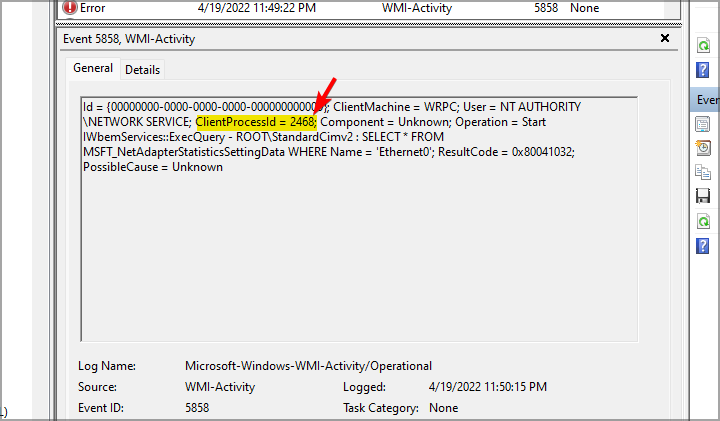
- Используйте «Просмотр событий», чтобы определить какая программа вызывает нагрузку при использовании WMI Provider Host. Зайдите в «Просмотр событий» (Win+R — eventvwr.msc), зайдите в «Журналы приложений и служб» — Microsoft — Windows — WMI-Activity — Operational. Просмотрите последние сообщения с уровнем «Ошибка» (некоторое количество ошибок нормально и при обычной работе). После выбора ошибки в подробностях найдите параметр «ClientProcessID», затем откройте диспетчер задач и найдите процесс с тем же значением в столбце ИД (в Windows 10 — на вкладке «Подробности»). Это позволит узнать, что за программа вызывает нагрузку. Если под этим ID оказался svchost, то речь идет о какой-то службе, подробнее: Что делать, если svchost.exe грузит процессор.

- Если выяснить службу или программу не удалось, но нагрузка появилась недавно, с большой вероятностью виной тому недавно установленное ПО, особенно если оно как-то связано с оптимизацией системы и подобными функциями. Можно попробовать отключить или удалить такие программы, а также использовать точки восстановления системы.
Надеюсь, материал помог разобраться с процессом WmiPrvSE.exe и высокой нагрузкой, если она имеет место быть.
A sudden spike in CPU usage is common when you’re playing a video game or performing a resource-intensive task. However, there are times when, after installing Windows updates, a third-party application, or even while watching online videos, you may see CPU utilized at 100% with the WMI Provider Host.
The WMI (Windows Modules Installer) Provider Host (WmiPrvSE.exe) is a critical Windows component that enables applications to connect with system hardware and information. High CPU usage issues with this service are usually caused by some particular app or service running in the background and developing excessive WMI queries.
When the WMI Provider Host high CPU usage issue occurs, your system may freeze for a few seconds or become sluggish, disrupting the workflow. Other reasons include a large or corrupted WMI repository, faulty RAM, or malware infection on your system.
Fortunately, the error is fixable. We have compiled proven workarounds to solve the Windows Management Instrumentation High CPU issue. Let’s try out these fixes right away!
Methods to Fix WMI Provider Host High CPU Usage Issue
Before proceeding with the methods, ensure that you have a data backup available. Any mistake while following the methods might damage your system and put data at risk.
#1 Perform Clean Boot
Clean boot starts your system with limited startup applications and drivers to help you identify if any background program is causing the issue. It is somewhat similar to booting your PC in Safe Mode but gives you more control over which service or program runs at startup. This way you may find out and isolate the cause of the problem.
In case fixing the WMI provider host is reflecting a High CPU Usage issue, performing a clean boot can help you identify the background program interfering with the TiWorker.exe process. To do so, follow the given steps:
Sign in to your system with admin credentials, or if you have admin rights, follow the given steps immediately. (Without admin rights, you’ll not be able to perform the following steps.)
- Press Windows + S, and it will open the Windows Search.
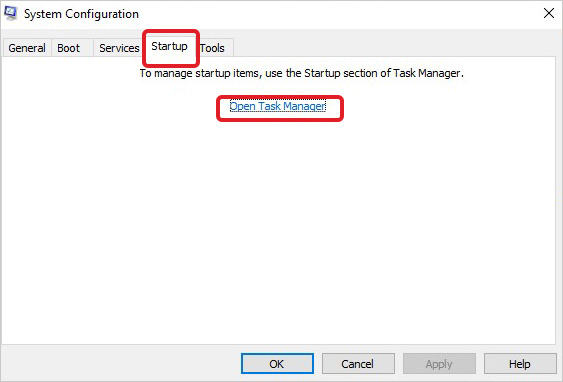
- Type msconfig in the Search bar, and when you see System Configuration in the result, click Open.

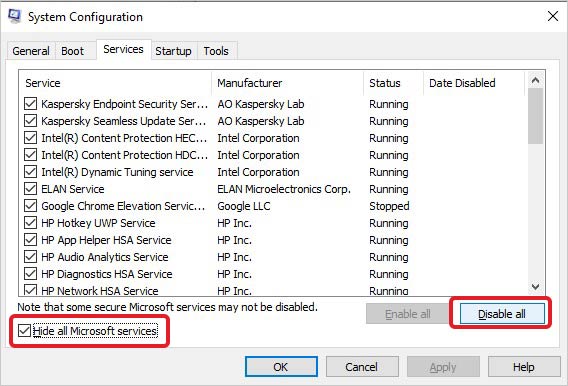
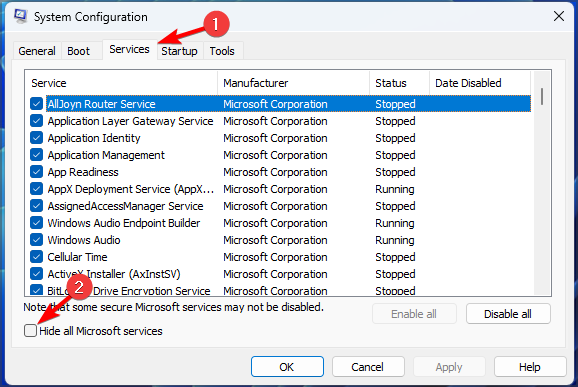
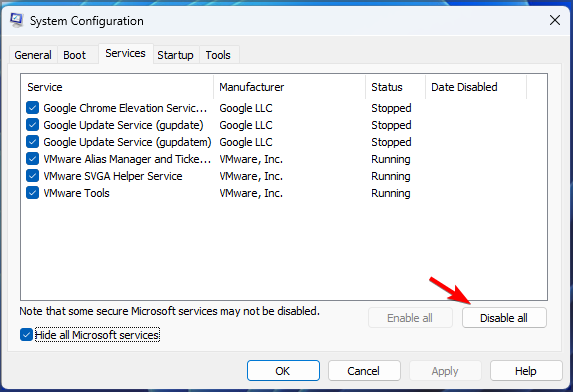
- Go to the Services tab of the System Configuration, select Hide all Microsoft services, and then select Disable all. Click Apply and then OK.
- Now, move to the Startup tab and click Open Task Manager.
- Now, select each Enabled item and click Disable one by one.
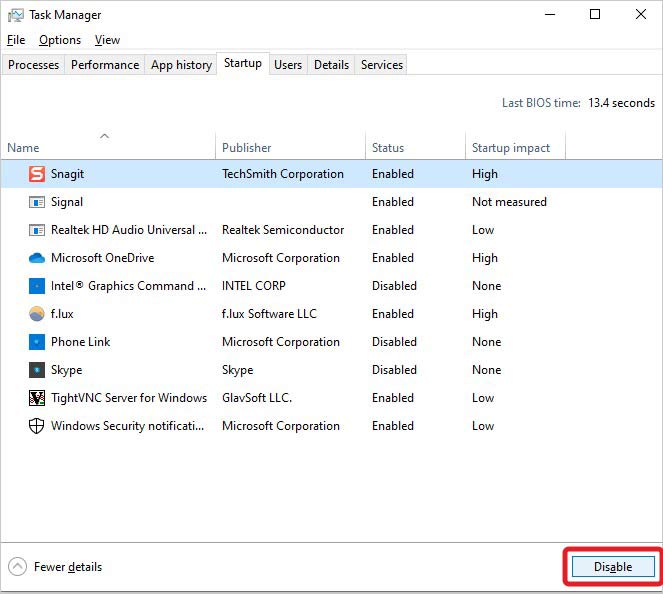
- Now, close Task Manager. On the Startup tab of System Configuration, select OK and reboot your system.
- After reboot, your system will be in a clean boot environment.
#2 Use Event Viewer to identify WMI queries
High CPU usage by WMI Provider host service can be due to any application or service in your system creating unnecessary WMI queries. You can check the Event Viewer to find the WMI queries related to a particular application or service that may be causing high CPU usage. To do so, follow the steps given below:
- Open Event Viewer from Search.

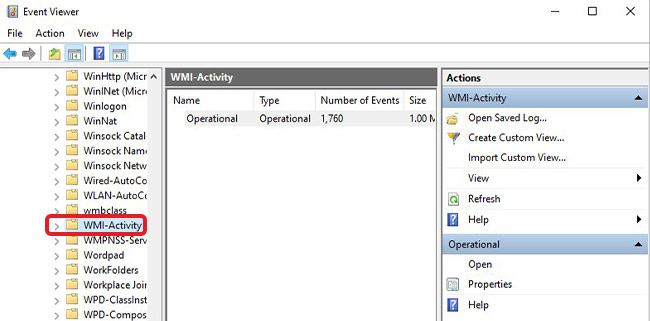
- Go to Applications and Services Logs.

- Now, navigate to Microsoft and then select Windows.

- Expand the Windows category there, and then open WMI-Activity.
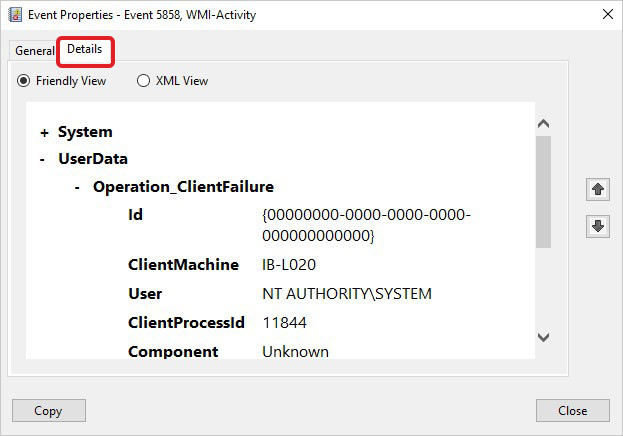
- Next, open Operational logs under WMI-Activity and look for Errors there.
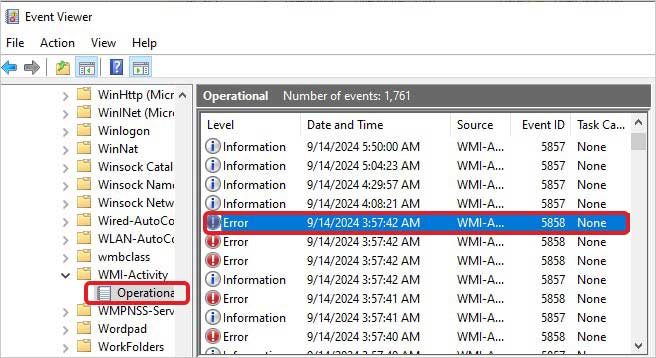
- You can double-click the Error and then go to the Details tab to learn more about what specific application or service failed or is making problematic queries.
#3 Restart WMI Provider Host Service
Sometimes, WMI Provider Host Services may occupy too much of your system resources, leading to crashes in the worst scenarios. However, since it is a crucial Windows component that works as an intermediary between the hardware and software, allowing applications to access the system information. So, stopping it is not advised. But you can restart it and see if it impacts CPU usage. To do so, follow the given steps:
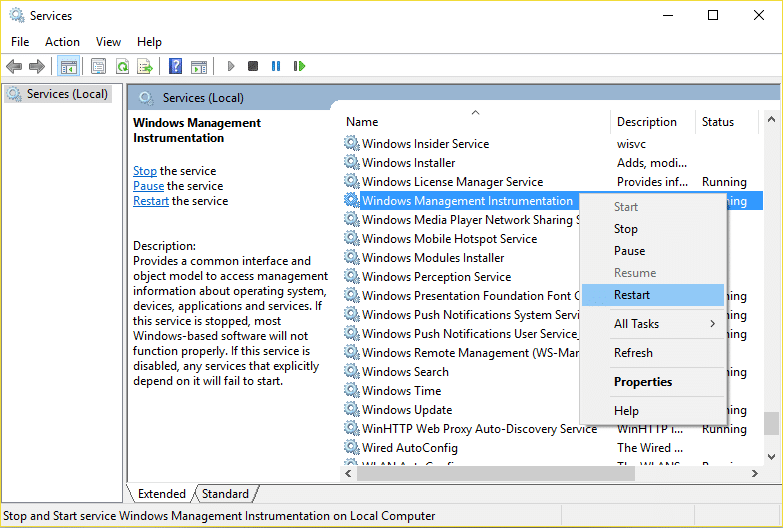
- Go to Search, and Open the Services from the result.
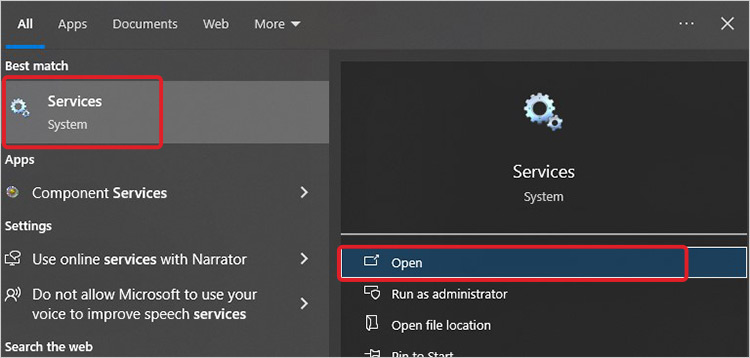
- Locate Windows Management Instrumentation services, right-click on it, and select Restart.
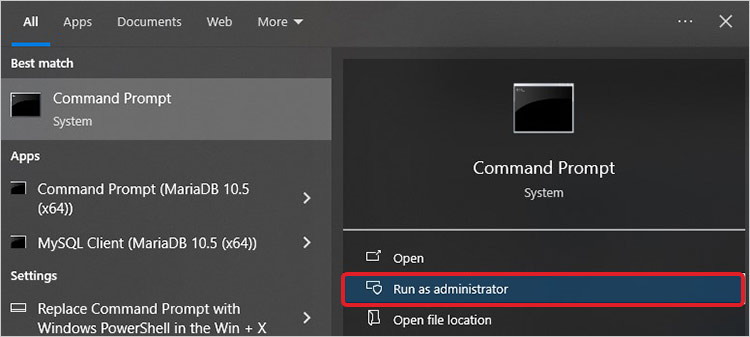
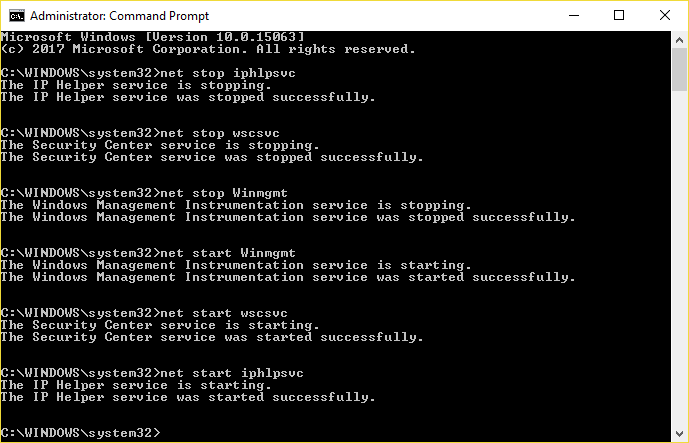
- Now, open Command Prompt and run it as administrator.
- Type the following commands one by one and hit Enter after each command.
net stop iphlpsvc
net stop wscsvc
net stop Winmgmt
net start Winmgmt
net start wscsvc
net start iphlpsvc

Once done, reboot your system and see if the WMI Provider Host High CPU usage issue is fixed now.
Note: Be careful while running these commands, as one mistake can disrupt the whole process and cause system to malfunction. Ensure that you have a backup ready. Else, use a professional data recovery software, such as Stellar Data Recovery Professional. This DIY software efficiently recovers all data types from Windows PCs and supported storage media drives. It can also restore data from unbootable, crashed, or BSoD-affected systems.
#4 Set Windows Installer Startup to Manual
Windows Modules Installer Worker updates automatically, leading to high CPU consumption. To prevent this, you can set WMI Startup to Manual. This will help you get important updates at your convenience or when you have the system resources to spare. Windows automatically notifies you when an update is available to install.
The steps to set Windows Modules Installer Startup to Manual are as follows:
- Open Run dialog box (press Windows + R), and type services.msc. Click OK or press Enter. (You can also access Services from Windows Search).
- Locate Windows Modules Installer there, right-click on it, and select Properties.
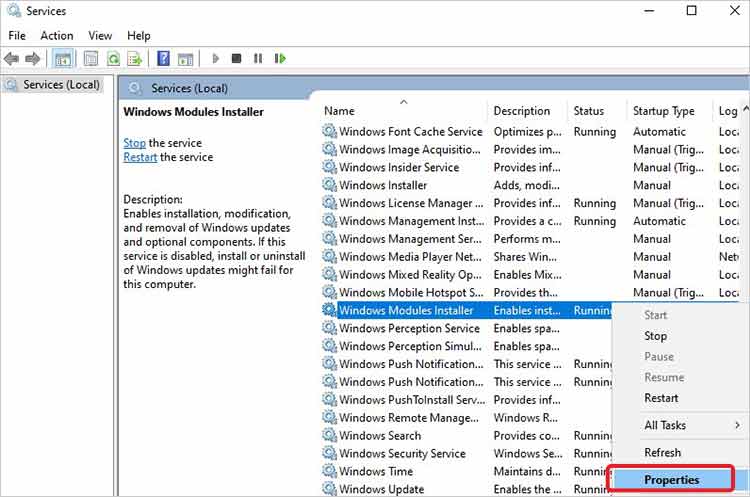
- Now, in the Startup type, select Manual from the drop-down list. Click Apply to confirm the changes.
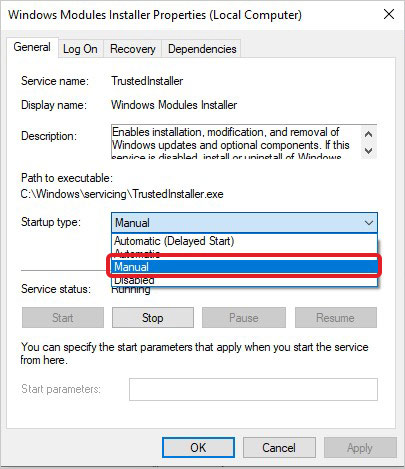
Once done, reboot your system and see if the issue is resolved.
#5 Run Memory Diagnostics
Some users stated that faulty RAM was the real culprit behind Windows Modules Installer Worker’s high CPU usage issue. You can also run Windows Memory Diagnostics, a built-in tool to test the RAM and rectify the problem.
Steps to run Windows Memory Diagnostics are as follows:
- Go to Search, type Memory Diagnostics and click Open when you see Windows Memory Diagnostic in the search result.

- You can alternatively open Memory Diagnostic by running it from the Run dialog box by typing mdsched.exe command and Enter.
- Select Restart now and check for the problems on the following prompt.

- Now, the system will reboot with the test window.
- Let the test complete and see if any issues are found in the result.
If the result shows that your RAM has gone bad, replace it with a new one. If its status appears fine, proceed with the next method and try to resolve the issue.
#5 Run a malware scan on your system
Sometimes, malware or virus on your system can be the real culprit behind the WMI provider host high CPU usage. You can run a malware scan on your system to ensure that there is a virus causing the problem. To do so, follow the steps below:
- Open Settings, go to Update & Security, and then go to Windows Security.
- There, click Virus & threat protection.

- Follow the further prompts to scan your system for malware.
- If there are no signs of malware, proceed with the following method.
#6 Uninstall Problematic Windows Update
Many users have reported that after installing some Windows updates, they started experiencing issues with WMI provider host consuming high or even 100% CPU usage. This even led to the system freezing completely, disrupting the whole work. So, in this case, boot your system into Safe Mode with Networking and then uninstall all the recent Windows updates.
Steps to uninstall the recently installed Windows Updates are given below:
- Go to Settings (Windows + I), and then go to Update & Security.

- Now, go to Windows Update and then open View update history.
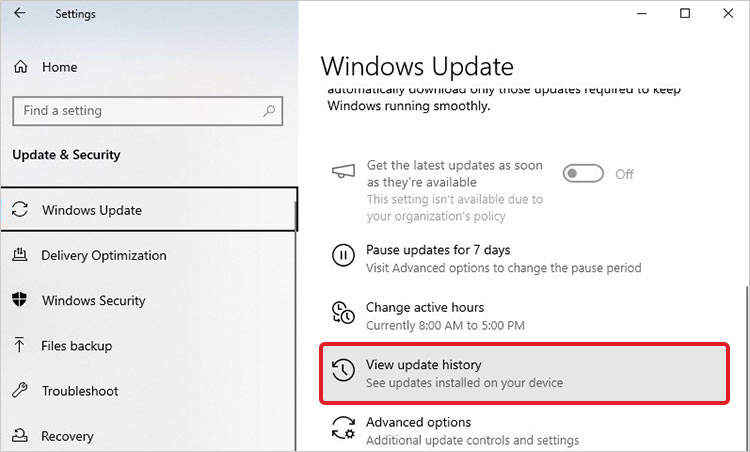
- On the next prompt, click Uninstall updates.

- Select the update you installed recently, right-click on it, and then click Uninstall.
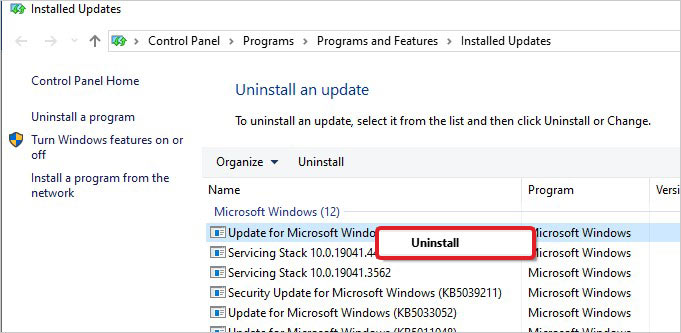
Once installed, check if the Windows Modules Installer Provider Host High CPU Usage consumption issue is resolved.
#7 Uninstall Buggy Drivers
Outdated or incompatible drivers may also cause this problem. If you have started facing the issue after installing a particular device driver, try uninstalling it and see if it gets resolved.
- Access the Start Menu by pressing Windows + X, and then open Device Manager.
- Now, select and expand the category for which you might have installed the drivers recently. For example, we’ve expanded the Disk Drives category.
- Right-click the driver in the category and then click Uninstall device.
- On the next prompt, click Uninstall again.
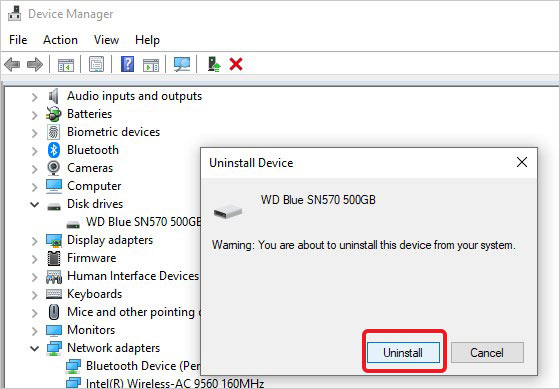
The driver for the selected device will be uninstalled. Once done, see if the issue is resolved.
Conclusion:
The WMI Provider Host’s High CPU Usage issue can be fixed with the methods discussed above. However, if a particular WMI provider seems to be causing a high CPU usage issue, isolate it using the wmic command to run it in its own process. If there is a large or corrupted WMI Repository, don’t start rebuilding it right away, as it may severely damage your system, putting data at risk. First, back up your system data and then proceed with the troubleshooting methods. If you encounter data loss after performing any troubleshooting method, use professional data recovery software to recover data efficiently.
Let us know which methods helped you fix the issue. If you have any queries or suggestions, let us know in the comment section below!
Was this article helpful?
YES0
NO
WMI allows administrators to monitor system events, manage system settings, retrieve performance data, and perform various administrative tasks remotely or locally through scripting languages like PowerShell or VBScript. However, if the WMI Provider Host encounters issues or conflicts with certain applications, it can lead to high CPU usage, affecting system performance. If you are facing High CPU or memory usage because of WMI i.e. Windows Management Instrumentation Provider Host, don’t worry as today we will see how to resolve this issue using this guide.
Table of Contents
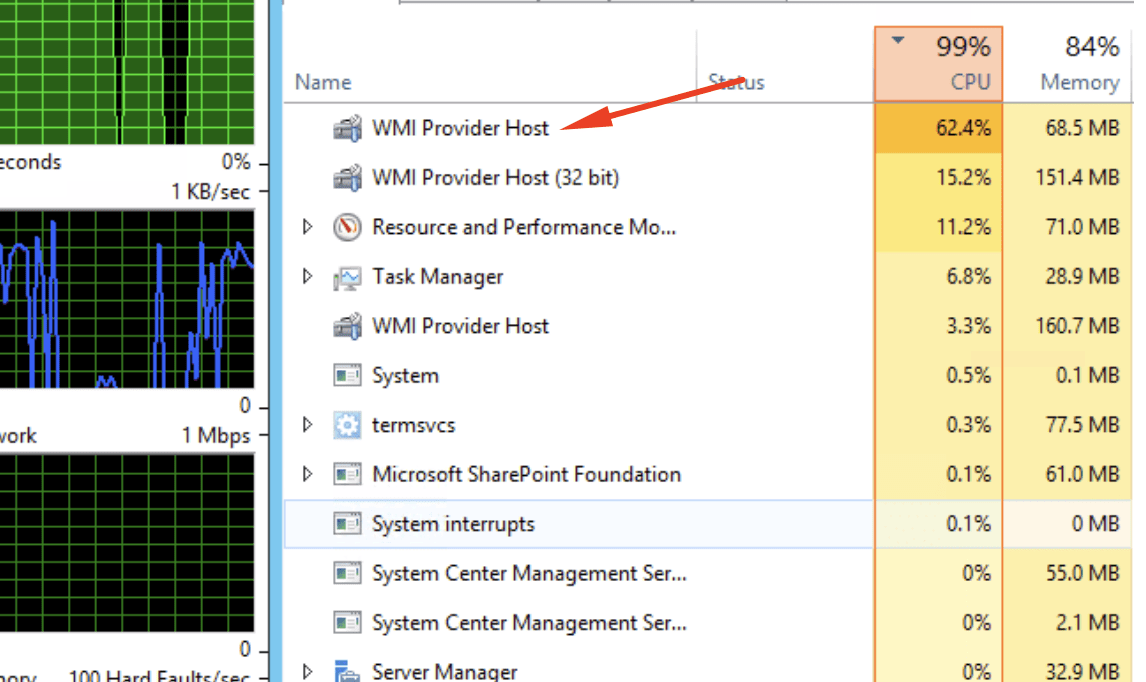
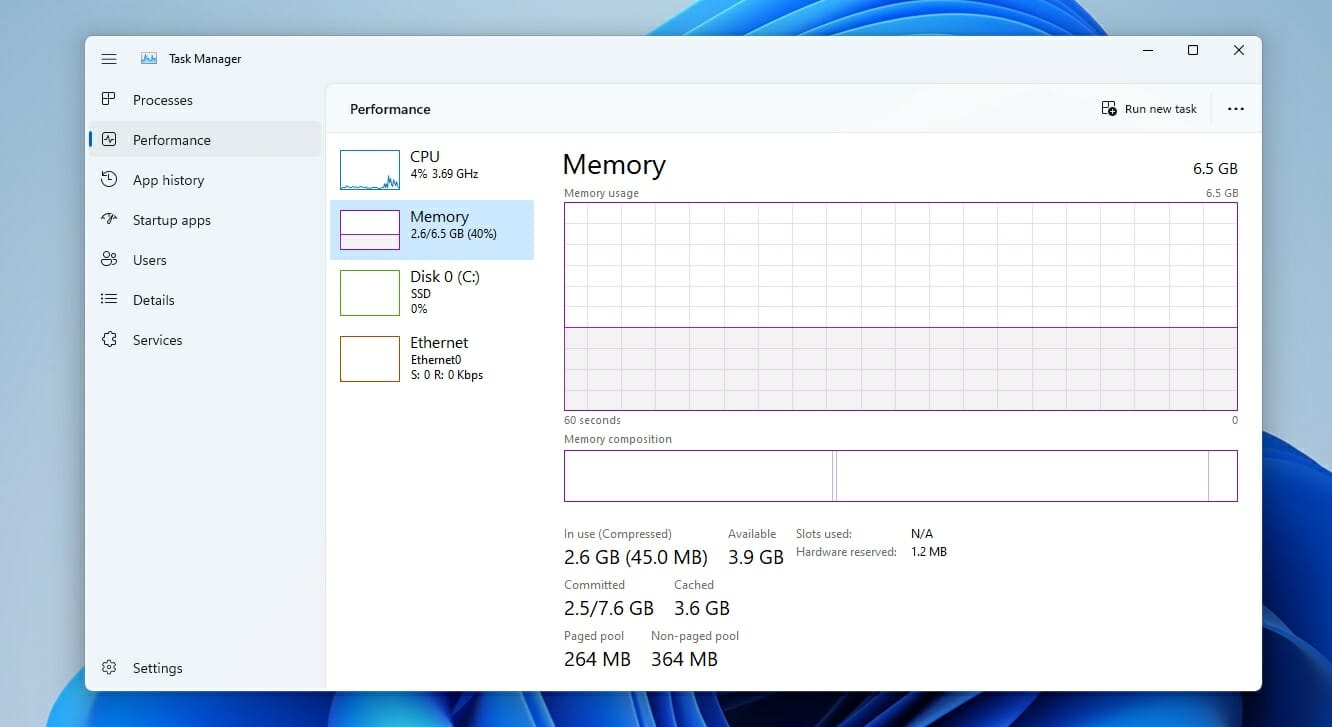
WMI High CPU usage can be checked using Task Manager. Simply Press left Ctrl + Shift + Esc keys together to open Task Manager where you will find that a process WmiPrvSE.exe (acronym for Windows Management Instrumentation Provider Service) causing High CPU Usage and in some cases, High Memory usage also as depicted below.

What is WMI Provider Host (WmiPrvSE.exe)?
WMI Provider Host (WmiPrvSE.exe) stands for Windows Management Instrumentation Provider Service. Windows Management Instrumentation (WMI) is a component of the Microsoft Windows operating system that provides management information and control in an enterprise environment. WMI Provider Host is used by the developer for Monitoring Purposes as it acts as a mediator between the Management Application Programming Interface (API) and the actual providers that supply the data.
You might face the above issue when you have recently updated or upgraded to Windows 10. Some other causes include virus or malware infection, corrupt system files, the incorrect configuration for WMI Provider Host Service
Make sure to create a restore point just in case something goes wrong.
Method 1: Run System Maintenance Troubleshooter
1. Press Windows Key + R then type control and hit Enter to open Control Panel.
2. Search Troubleshoot in the Search box and click on Troubleshooting.

3. Next, click on View all in the left pane.
4. Click on System Maintenance to run the Troubleshooter for System Maintenance.

5. The Troubleshooter may be able to Fix WMI Provider Host High CPU Usage on Windows 10.
Method 2: Restart Windows Management Instrumentation Service (WMI)
1. Press Windows Key + R then type services.msc and hit Enter.
2. Find Windows Management Instrumentation Service in the list then right-click on it and select Restart.
3. This will restart all the service associated with WMI services and Fix Fix WMI Provider Host High CPU Usage on Windows 10.
Method 3: Restart Other Services associated with WMI
1. Open Command Prompt. The user can perform this step by searching for ‘cmd’ and then press Enter.

2. Type the following into cmd and hit Enter after each one:
net stop iphlpsvc
net stop wscsvc
net stop Winmgmt
net start Winmgmt
net start wscsvc
net start iphlpsvc
3. Reboot your PC to save changes.
Method 4: Run CCleaner and Malwarebytes
1. Download and install CCleaner & Malwarebytes.
2. Run Malwarebytes and let it scan your system for harmful files. If malware is found, it will automatically remove them.

3. Now run CCleaner and select Custom Clean.
4. Under Custom Clean, select the Windows tab and checkmark defaults and click Analyze.
![Select Custom Clean then checkmark default in Windows tab | Fix WMI Provider Host High CPU Usage [Windows 10]](https://techcult.com/wp-content/uploads/2017/07/Select-Custom-Clean-then-checkmark-default-in-Windows-tab.png)
5. Once Analyze is complete, make sure you’re certain to remove the files to be deleted.
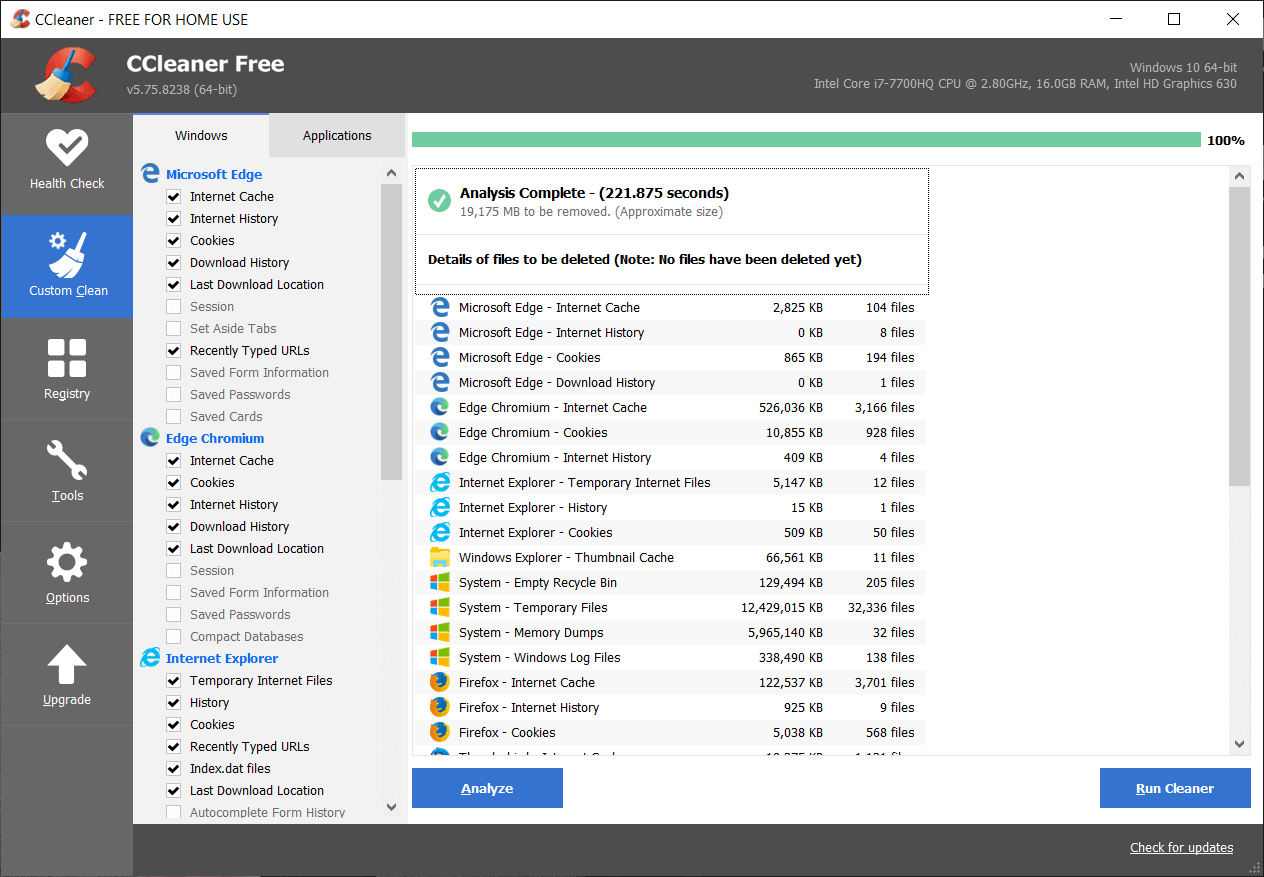
6. Finally, click on the Run Cleaner button and let CCleaner run its course.
7. To further clean your system, select the Registry tab, and ensure the following are checked:
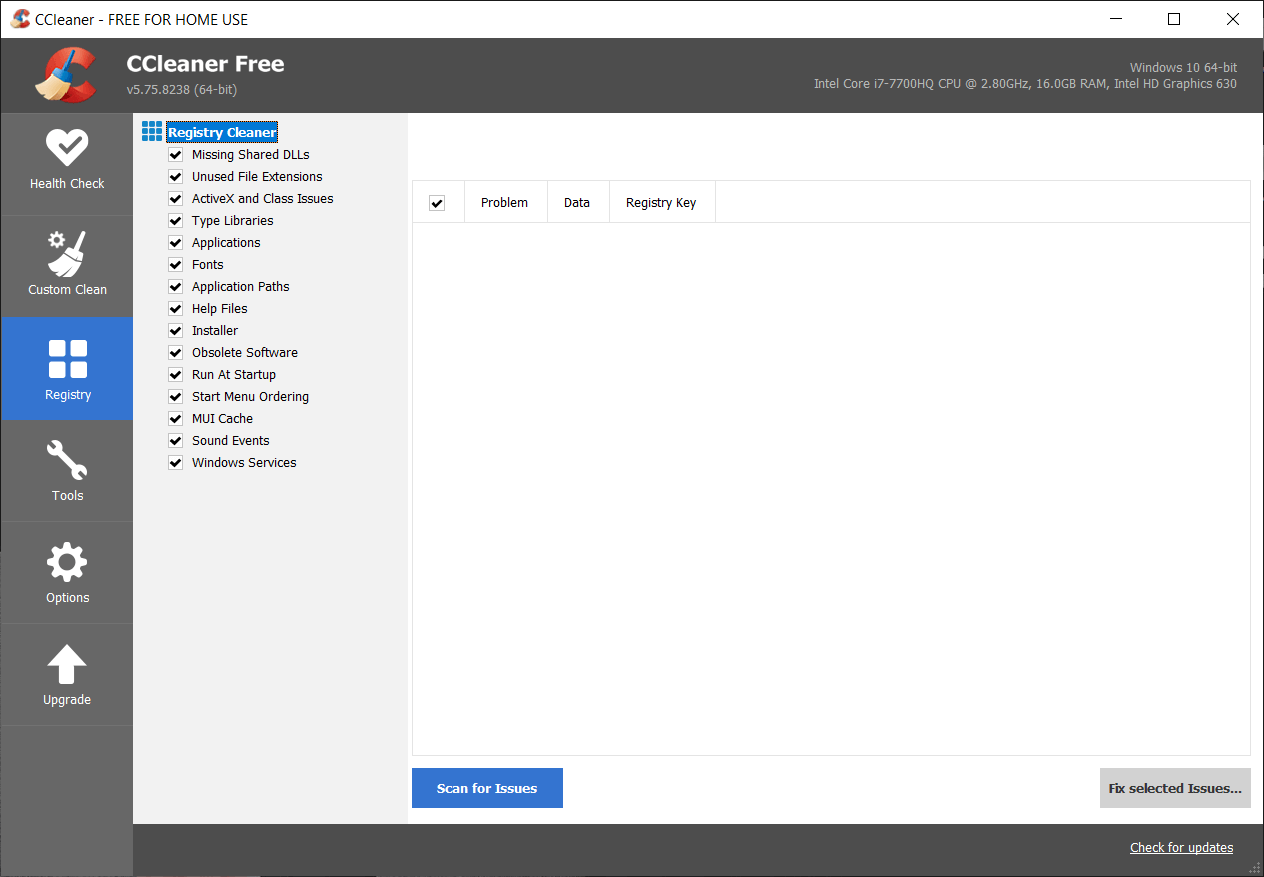
8. Click on the Scan for Issues button and allow CCleaner to scan, then click on the Fix Selected Issues button.
![Once scan for issues is completed click on Fix selected Issues | Fix WMI Provider Host High CPU Usage [Windows 10]](https://techcult.com/wp-content/uploads/2017/07/Once-scan-for-issues-is-completed-click-on-Fix-selected-Issues.png)
9. When CCleaner asks “Do you want backup changes to the registry?” select Yes.
10. Once your backup has completed, click on the Fix All Selected Issues button.
11. Restart your PC to save changes.
Method 5: Troubleshoot the issue in Safe Mode
1. Boot into Safe Mode with Networking using this guide.
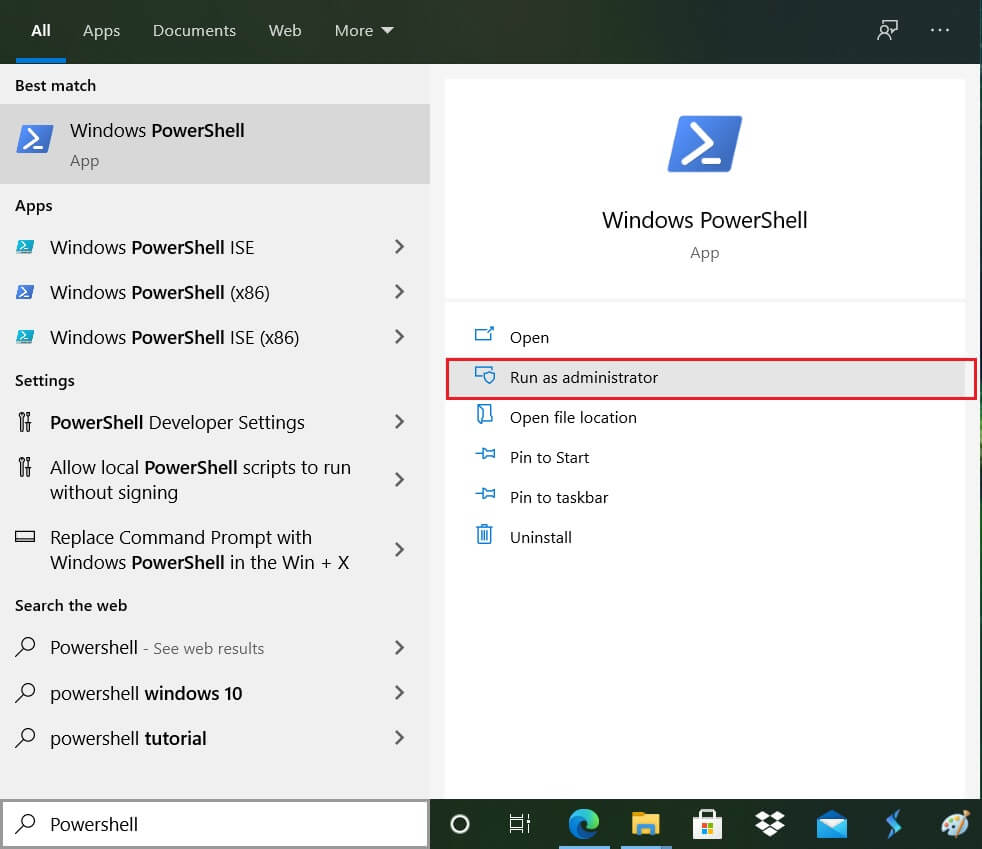
2. Once in Safe Mode, type PowerShell in the Windows Search then right-click on Windows PowerShell and select Run as administrator.
3. Type the following command into PowerShell and hit Enter:
msdt.exe -id MaintenanceDiagnostic

4. This will open System Maintenance Troubleshooter, click Next.

5. If some problem is found, then make sure to click Repair and follow on-screen instructions to finish the process.
6. Again type the following command in PowerShell window and hit Enter:
msdt.exe /id PerformanceDiagnostic
![Type msdt.exe /id PerformanceDiagnostic in PowerShell | Fix WMI Provider Host High CPU Usage [Windows 10]](https://techcult.com/wp-content/uploads/2019/01/Type-msdt.exe-id-PerformanceDiagnostic-in-PowerShell.png)
7. This will open Performance Troubleshooter, click Next and follow the on-screen instructions to finish.

8. Exit from Safe Mode and boot to your Windows normally.
Method 6: Locate the troubling process manually using Event Viewer
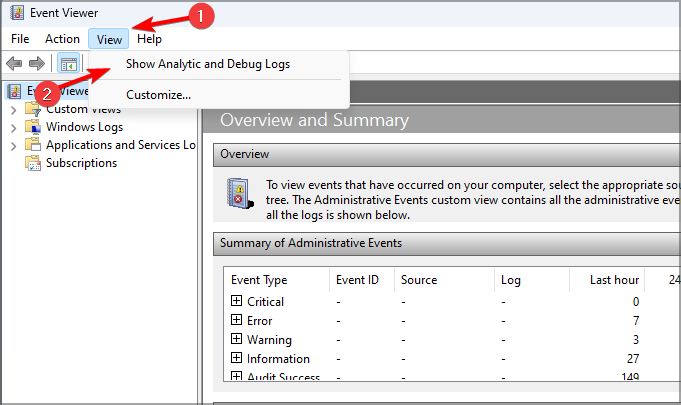
1. Press Windows Key + R then type eventvwr.MSc and hit Enter to open Event Viewer.
2. From the top menu, click on View and then select Show Analytic and Debug Logs option.

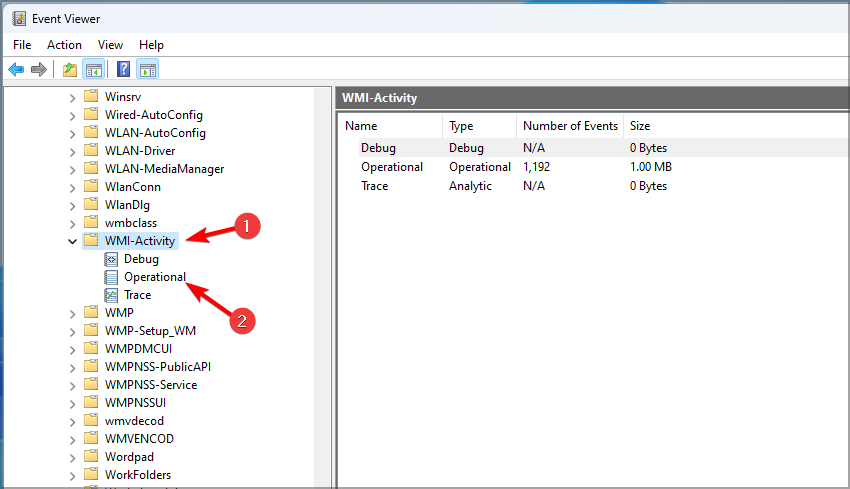
3. Now, from the left pane navigate to the following by double-clicking on each of them:
Applications and Services Logs > Microsoft > Windows > WMI-Activity
4. Once you are under WMI-Activity folder (make sure you have expanded it by double-clicking on it) select Operationally.
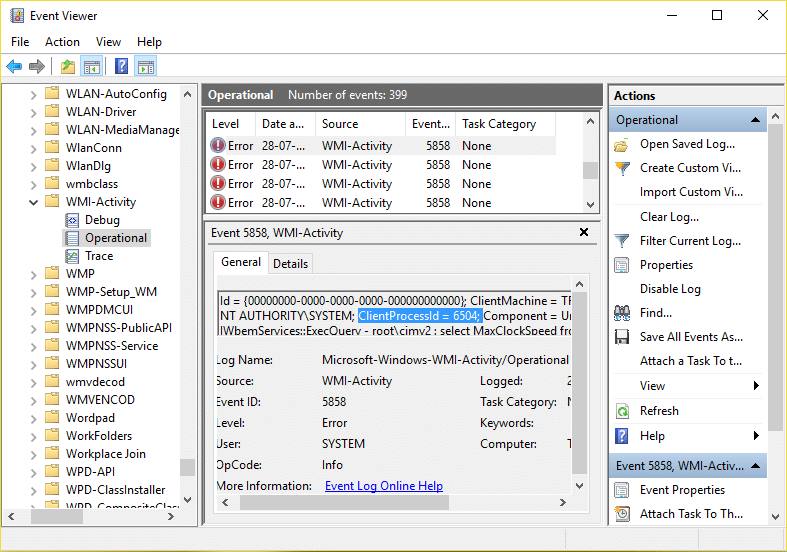
5. In the right window pane select Error under Operational and General tab look for the ClientProcessId for that particular service.
6. Now we have the Process Id of the particular service causing High CPU usage, we need to disable this particular service to Fix WMI Provider Host High CPU Usage.
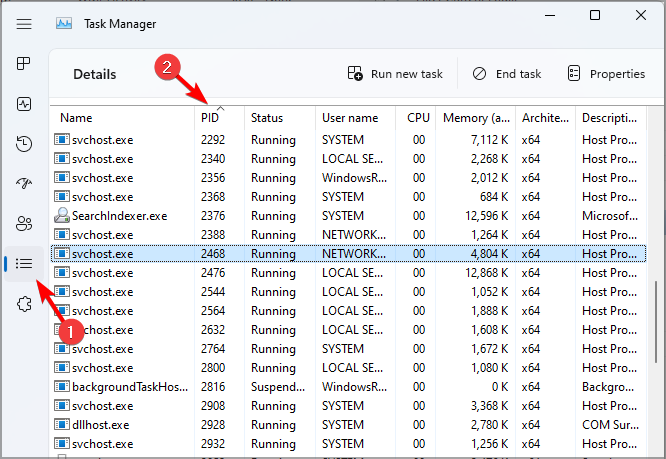
7. Press Ctrl + Shift + Esc together to open Task Manager.

8. Switch to Service tab and look for the Process Id which you noted above.
![Switch to Service tab and look for the Process Id which you noted | Fix WMI Provider Host High CPU Usage [Windows 10]](https://techcult.com/wp-content/uploads/2017/08/Switch-to-Service-tab-and-look-for-the-Process-Id-which-you-noted-above.png)
9. The service with the corresponding Process ID is the culprit, so once you find it go to Control Panel > Uninstall a Program.
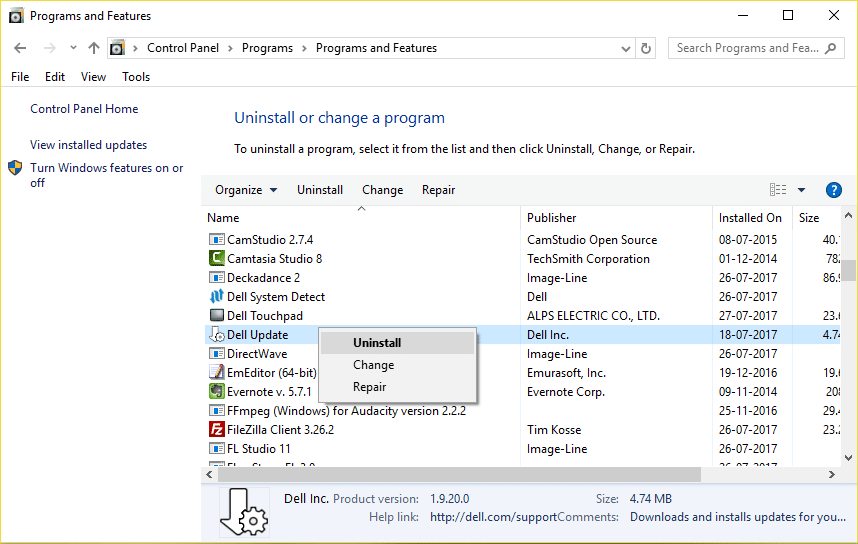
10. Uninstall the particular program or service associated with above Process ID then reboot your PC.
Recommended: Fix Taskbar Disappeared from the Desktop
That’s it you have successfully Fix WMI Provider Host High CPU Usage on Windows 10 but if you still have any queries regarding this post then feel free to ask them in the comment’s section.
If you are facing WMI Provider Host issue on your Windows 10 then read this guide. You will learn what is WMI Provider Host and why it is using high CPU usage. Also, we mentioned some quick solutions to fix this WMI Provider Host high CPU issue.
What is WMI Provider Host High?
Before we try the below solutions, let us discuss as to what WMI provider host in Windows really is? When I researched, then I found out that it is a component of Microsoft Windows OS (Operating System) which controls the enterprise environment and gets management information.
Using the WMI, the manager can work to set or query data on the system components, networks, programs with other enterprise components.
This is because WMI is a host and it allows all the management services to function. What’s more, is the fact that users won’t get any notification if at all any errors take place.
Method 1: Scan your computer for Viruses and Malware
Sometimes, viruses or malware could be the reason why these wmiprvse.exe high CPU windows 10 is happening.
If you don’t know which antivirus to go for then you can try downloading Malwarebytes or Norton Power Eraser.
Method 2: Restart Windows Management Instrumentation Service
Restarting Windows Management Instrumentation Service is the best option to fix this high CPU issue. In this, the first step would be to restart the WMI service.
If you want to do then you will have press Windows + R, type: services.msc without the quote, of course.
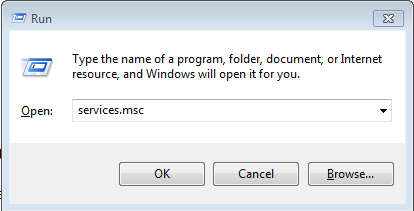
When you have done that, then press enter.
Reach the Services window and then search for Windows Management Instrumentation, followed by right-clicking on it and choosing to restart.
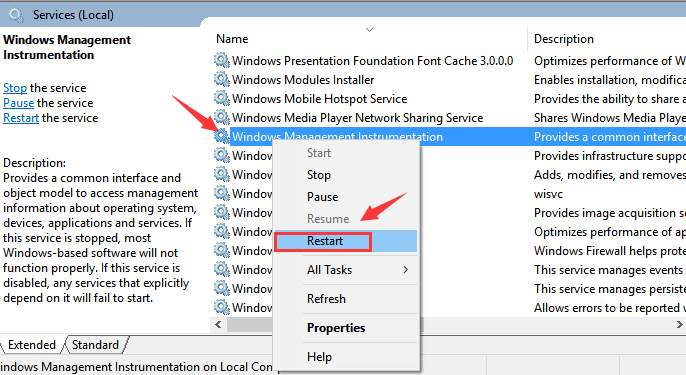
Go ahead and restart WmiPrvSE.exe WMI Provider Host in Windows Services.
You should know that in most cases, by just restarting the WMI services, it will help to fix the WMI provider host high CPU usage issue in Windows 10.
Method 3: Scan and repair corrupted system files
Scan and repair corrupted system files can fix many issues in your system. As mentioned before, corrupted Windows System files can be a reason for the occurrence of such an issue.
If you want to scan and repair the corrupted files, press Windows + X, and then A to open up the Command Prompt application with some administrative privilege.
In the command prompt, type sfc/scannow and then press Enter.
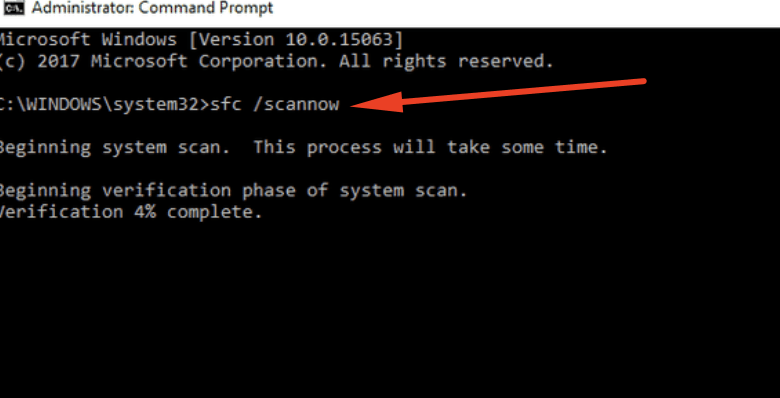
Once done, type another command and press Enter,
DISM/Online/Cleanup-Image/RestoreHealth
Method 4: Restart your IP Helper and Security Center
Restart IP Helper and Security Center services in Windows 10. There are two Windows services along with Windows Management Instrumentation, which would help you fix the issue at hand. And, they are as follows:
- IP Helper (iphlpsvc)
- Security Center (wscsvc)
After this, you will need to restart both and then also restart Windows Management Instrumentation to fix WMI provider host high CPU usage issue in Windows 10.
Method 5: Uninstall any or all incompatible programs
You might encounter the problem of wmiprvse.exe high CPU windows 10 after installing or updating a program in Windows.
This could be because the program is not compatible with WmiPRvSE.exe and leads to the issue.
So, dear reader, if you have updated or installed any new program lately then disable the services in Windows Service or uninstall to check if this is the reason behind the issue or not.
If you have some more ways or want to share something with me then you can leave a comment in the comment section down below.
Readers help support Windows Report. We may get a commission if you buy through our links.
Read our disclosure page to find out how can you help Windows Report sustain the editorial team. Read more
The WMI Provider Host process plays a crucial role in Windows 11. It makes it possible for other applications to request information about your computer.
Processes associated with the WMI Provider Host typically run in the background; as such, they usually don’t consume many system resources.
However, it has been reported that this service can sometimes use more than 50% of the CPU power because of other applications.
It’s worrisome that your computer’s processor runs almost at its maximum capacity for extended periods, which can lead to overheating and damage to system components.
Today’s guide will examine why WMI Provider Host has high CPU usage on Windows 11 and how you can fix this problem.
Why does WMI take up so much CPU?
As stated earlier, the WMI Provider Host process should not register high CPU usage usually. However, some factors, like the activities of third-party apps, can make it deviate from the norms.
Also, the high CPU usage might be due to problems with the associated services. Restarting these services should help fix this issue.
Why is WMI Provider Host causing high memory usage?
In most cases, this is caused by third-party applications or services associated with the WMI Provider Host, so you need to find the cause of the problem and remove it.
Sometimes a quick restart of associated services can help; you make sure you try that as well.
How can I fix the WMI Provider Host’s high CPU usage on Windows 11?
1. Initiate a Clean Boot
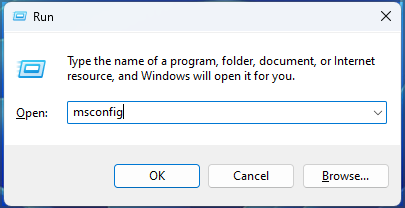
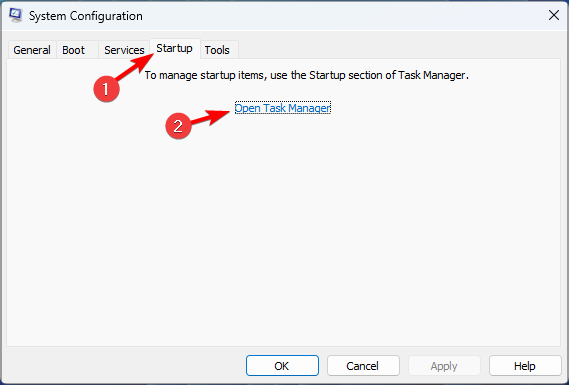
- Launch the Run menu by pressing Windows key + R and entering msconfig. Once done, press Enter.

- Upon opening the System Configuration window, navigate to the Services tab and select Hide all Microsoft services.

- Next, click on Disable all.

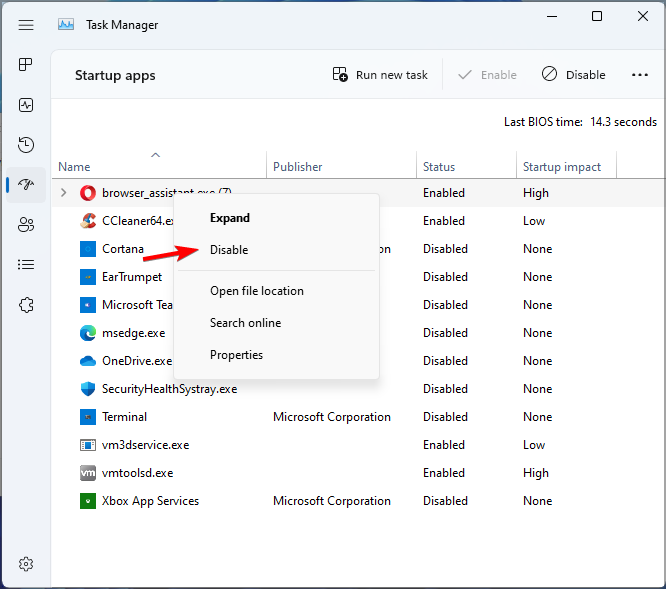
- Next, click on the Startup tab and select Open Task Manager.

- An overview of all startup applications will appear. Disable the first application in the list using the right-click menu and click Disable.

- Repeat this process for all applications.
- Once all applications have been disabled, close the Task Manager and return to the System Configuration window.
- Save the changes by clicking OK and Apply.

- Restart your PC.

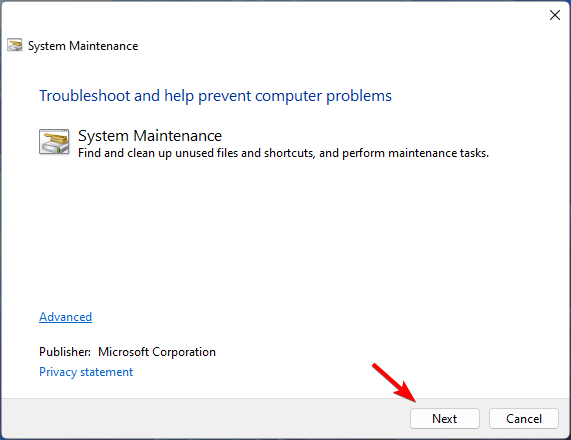
2. Launch System Maintenance Troubleshooter
- Open the Run dialog box by pressing the Windows key + R.
- Type msdt.exe -id MaintenanceDiagnostic and click OK.
- The System Maintenance window will appear. Click on Next and follow the on-screen instructions.

- After running the System Maintenance tool, verify that the problem has been fixed.
- How to fix high CPU usage in Windows 11
- How to fix Explorer.exe high CPU usage Windows 11
- Recent Windows 11 update lets you disable profanity filter in voice typing
- Microsoft wants Windows 10 users to upgrade to Windows 11 or Copilot + PCs
- Windows 11 KB5055627 update makes File Explorer more fluid
3. Use Event Viewer
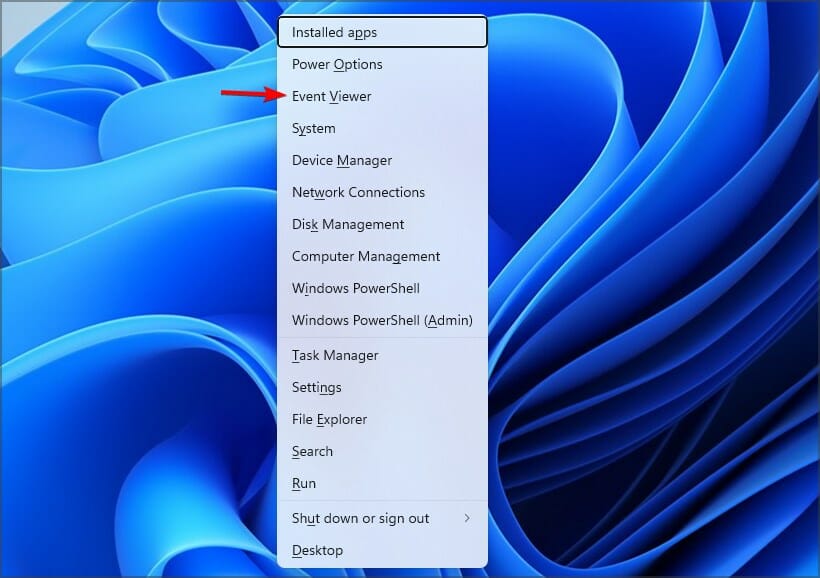
- Press Windows key + X and select Event Viewer from the list.

- Upon launching Event Viewer, click on View from the menu at the top and select Show Analytic and Debug Logs.

- On the left side, select Applications and Service Logs and then Microsoft. Navigate to Windows and expand WMI Activity. Select Operational.

- Click on any available error to find out more information.

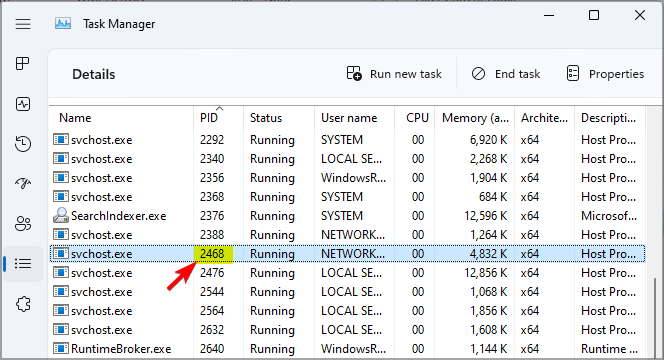
- Locate ProcessId and remember its value. You will likely run into multiple errors, so check each and note down each ProcessId value.

- Next, press Ctrl + Shift + Esc to launch Task Manager.
- Once Task Manager is launched, click the Services tab and check each service’s PID.

- Once you find a service that corresponds to the value from Step 5, you need to uninstall the application related to that service or stop the service.


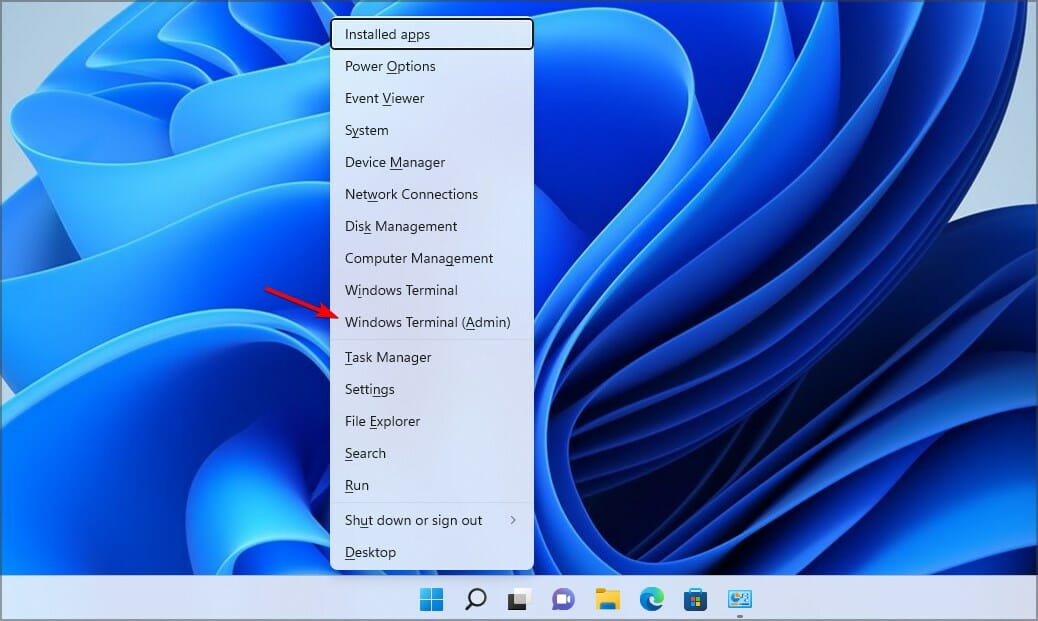
4. Restart associated services
- Press the Windows key + X and select Windows Terminal (Admin).

- Run the following commands:
net stop iphlpsvcnet stop wscsvcnet stop winmgmnet start winmgmtnet start wscsvcnet start iphlpsvc - After the commands are completed, restart your PC.
Can I disable WMI Provider Host?
The WMI Provider Host process is a critical system service that ensures your Windows 11 PC runs smoothly. In addition, it serves as the link that allows other applications to request the necessary information from your PC.
So, it can not be disabled, nor can it be stopped from running. You can only try to fix things that might be causing issues with it, as shown in this guide.
Is WMI Provider Host a virus?
WMI Provider Host is a core Windows component that provides management information and control, making it an essential part of Windows.
You can rest assured that the service is entirely safe and malware-free. However, in some rare instances, malware can cause issues with it, most notably high CPU usage.
If that happens, it’s advised to scan your PC with antivirus software for Windows 11.
This can be a tricky issue, but we hope our solutions helped you fix the problem on your Windows 11 PC.
We also have a detailed guide on fixing WMI provider host high CPU usage in Windows 10, so you can take a closer look at it for additional solutions.
What solution did you use to fix this problem? Let us know in the comments section below.
Radu Tyrsina
Radu Tyrsina has been a Windows fan ever since he got his first PC, a Pentium III (a monster at that time).
For most of the kids of his age, the Internet was an amazing way to play and communicate with others, but he was deeply impressed by the flow of information and how easily you can find anything on the web.
Prior to founding Windows Report, this particular curiosity about digital content enabled him to grow a number of sites that helped hundreds of millions reach faster the answer they’re looking for.