
-
Home
-
News
- How to Enable/Disable Windows Installer Service on Windows 11
By Daisy | Follow |
Last Updated
If you want to enable or disable Windows Installer Service on Windows 11 but don’t know how to do that, then, you come to the right place. Besides, this post from MiniTool introduces other information about the Windows Installer Service. Now, keep on your reading.
What Is Windows Installer Service
Windows Installer Service is also called msiserver. The installation processes of the Windows operating system are managed by this service. Windows Installer Service is used to store application settings and installation information. In addition, it helps to track the locations of file groups, registry keys, and shortcuts that have been installed in the system. What’s more, it can add, modify, and delete applications, functions, and much other content.
Also see:
- 2 Ways to Enable Windows Installer in Safe Mode Windows 10
- Top 4 Ways to Windows Installer Service Could Not Be Accessed
How to Enable/Disable Windows Installer Service on Windows 11
Now, let’s see how to enable or disable Windows Installer Service on Windows 11. There are 3 ways available.
Way 1: Via Services
How to enable Windows Installer Service on Windows 11? The first method is to use Services. Here are steps:
Step 1: Press the Windows + R keys together to open the Run dialogue box, type services.msc and press the Enter key.
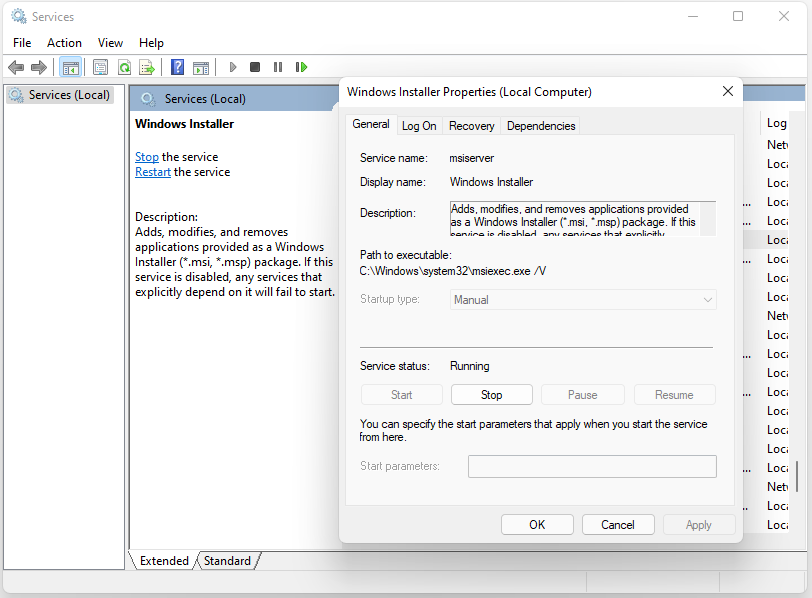
Step 2: The list of services will be displayed. Right-click the Windows Installer Service and select Properties.
Step 3: Under Startup type, select Automatic and click the Start button to enable it.
How to disable Windows Installer Service on Windows 11? You can follow the steps below:
Step 1: Open the Services application again. Find the Windows Installer Service and select it.
Step 2: Choose Properties and select Disabled from the Startup type box.
Step 3: Restart the computer.
Way 2: Via Registry Editor
The second method to enable or disable Windows Installer Service on Windows 11 is via Registry Editor. Follow the guide below:
Step 1: Press the Windows logo key and the R key at the same time to open the Run dialog.
Step 2: Type regedit and then press Enter to open Registry Editor. You’ll be prompted for permission and please click Yes to open it.
Step 3: Follow the path to locate the correct system files:
HKEY_LOCAL_MACHINE\SYSTEM\CurrentControlSet\Services\msiserver
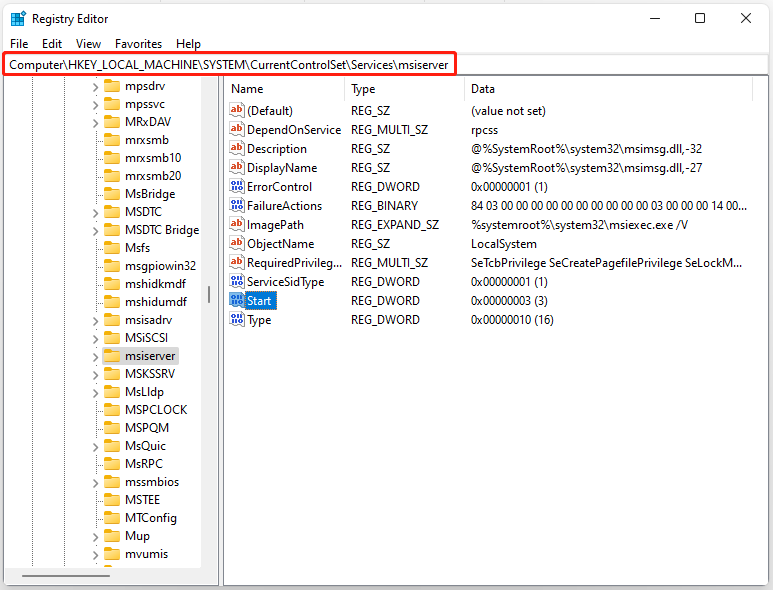
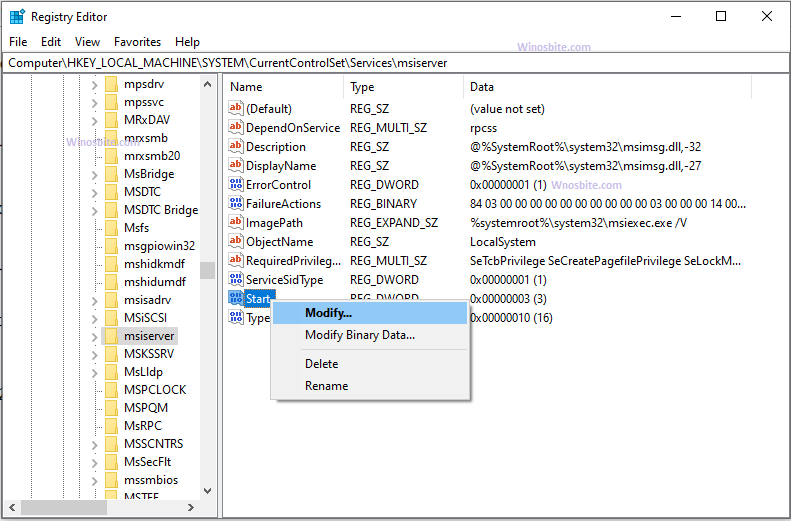
Step 4: Right-click the Start item in the right panel to choose the Modify… option.
Step 5: Set the Value data to the following based on your needs:
Automatic: 2
Manual: 3
Disabled: 4
Automatic (Delayed Start): 2
Step 6: You need to click OK to save the changes.
Way 3: Via Command Prompt
You can also try to enable or disable Windows Installer Service via Command Prompt. Here is how to do that:
Step 1: Press Windows + R, type cmd in Run box, and press Ctrl + Shift + Enter. Click Yes in the pop-up User Account Control window to run Command Prompt as administrator.
Step 2: Type the following command and press Enter to enable the Windows Installer service.
net start MSIServer
Step 3: You can change the startup type of Windows Installer Service with the following command.
Automatic: REG add “HKLM\SYSTEM\CurrentControlSet\services\MSIServer” /v Start /t REG_DWORD /d 2 /f
Manual: REG add “HKLM\SYSTEM\CurrentControlSet\services\MSIServer” /v Start /t REG_DWORD /d 3 /f
Disabled: REG add “HKLM\SYSTEM\CurrentControlSet\services\MSIServer” /v Start /t REG_DWORD /d 4 /f
Automatic (Delayed Start): REG add “HKLM\SYSTEM\CurrentControlSet\services\MSIServer” /v Start /t REG_DWORD /d 2 /f
Final Words
This post has introduced information about Windows Installer Service. You can know how to enable Windows Installer Service and how to disable Windows Installer Service.
About The Author
Position: Columnist
Having been an editor at MiniTool since graduating college as an English major, Daisy specializes in writing about data backups, disk cloning, and file syncing as well as general computer knowledge and issues. In her free time, Daisy enjoys running and going with friends to the amusement park.
The Windows Installer service is a background process that manages installing, uninstalling and updating the software on a Windows computer. This service is designed to stop itself to conserve system resources whenever it is inactive for ten minutes. However, in rare instances, you may check the running services on your computer and find that the Windows Installer service is running when you do not want it to be. If this is the case, you can use the Windows Services screen to stop the Windows Installer service manually.
Step 1
Click the Windows logo at the bottom of the screen, and then click «Control Panel.»
Step 2
Click the pull-down menu at the top of the window next to «View by,» and select «Small icons.» You can change the menu back to «Category» after completing the steps in this article, if desired.
Step 3
Click the «Administrative Tools» icon.
Step 4
Double-click the «Services» icon.
Step 5
Scroll down the list of services until you find «Windows Installer» listed under the «Name» column. Double-click «Windows Installer.»
Step 6
Click the «Stop» button. Windows stops the Windows Installer service.
Step 7
Click the «OK» button, and close any remaining open windows to return to the desktop.
If you have noticed that Windows Installer Service is running in the background and wanted to disable it then follow these steps. Basically, it is a background process that is used to install and uninstall software on the system. The Windows operating system is developed the Windows Installer service in such a way that it will stop automatically when it is inactive for 10 minutes.
Few users complaint that the Windows Installer Service is running in the background and consuming CPU resources. In that case, you may disable the Windows Installer service manually.
Quick Overview
- Service name: msiserver
- Display name: Windows installer
- File Location: C:\Windows\system32\msiexec.exe
Method 1: Disable using Service Console
I am going to show you a quick way to Start/Stop the Windows Installer service which works with Windows 10 and 7, let’s start:
1) Press Windows+R button together
2) Type services.msc and click on OK
3) Scrawl down and double click on Windows Installer
4) Under Startup type, choose Manual, click on Apply and OK

This will pause running the Windows Installer and run only when it is required.
Method 2: Enable or Disable using Registry Editor
This is another way to disable the Windows Installer, however, you will need some patience to do that.
Please note that any error might cause damage to your system, so do it at your own risk. Also, suggest taking Registry backup manually or using software like CCleaner.
1) Press Windows + R button together
2) Type regedit and click on OK

3) Pop-up windows will open, click on Yes
4) Now navigate to
HKEY_LOCAL_MACHINE\SYSTEM\CurrentControlSet\Services\MSIServer
5) On right-hand-side, right-click on Start and click on Modify
6) Now, inside the box, you can enter any one of below number based on your requirement:
- Automatic – 2
- Manual – 3
- Disabled – 4
I hope, the above-provided steps, will help you to disable or enable the Windows Installer Service on your system. Feel free if you have any queries, I will try my best to answer your questions.
You are able to Disable and Enable Windows Installer Service in Windows 11 or 10 aka msiserver using Services console, Command prompt, and Registry editor. Basically, the service works to store application setup along with installation information. Moreover, it helps to track the location of groups of files, registry entries, and shortcuts that are already installed in your system. Apart from this, msiserver can add, modify and remove applications, features, and many other things.
As msiserver manages all the installation processes of Windows 11 or 10, things become difficult if the service becomes faulty. In that case, you may need to disable or enable Windows Installer Service. If you keep it in disabled state, services depending on Windows Installer will not start properly. You may also conflict with several errors such as Windows installer service could not be accessed.
Ways to Disable or Enable Windows Installer Service in Windows 11 AND 10
Here is How to Disable or Enable Windows Installer Service in Windows 11 or 10 –
Use Service Console
Step-1: Right-click on Start button and select Run from the visible list.
Step-2: When the dialog appears, type Services.msc in the provided text field and hit the Enter key.
Step-3: Locate Windows Installer on Services console. Once found, right click on the same and select Properties.
Step-4: This will open the General tab by default. Click on the dropdown hereabouts Startup type and select Automatic.
Step-5: Hover the cursor to Service status section and click Start button in order to enable Windows Installer Service.
Step-6: If you want to disable the service, simply click the Stop button.
Step-7: Finally, click on Apply and subsequently OK to save the changes.
Disable or Enable msiserver through Registry Editor
Note – Try this workaround at your own risk as incorrect registry may cause permanent or temporary damage.
- Press Win+S, type regedit, and Select Registry Editor from the appearing result.
- A UAC will prompt up; hit Yes button to give consent.
- When Registry Editor comes into the view, navigate the following path –
HKEY_LOCAL_MACHINE\SYSTEM\CurrentControlSet\Services\MSIServer- Once you reach there, shift to the corresponding right pane and locate Start.
- Double click on the same to edit the value.
- In the value data box, set your preferred value.
Automatic – 2
Manual – 3
Disabled – 4
Automatic (Delayed Start) – 2
Enable Windows Installer Service using Command Prompt
- Launch Elevated Command Prompt.
- Once it turns up on the screen, copy and paste the below command after the blinking cursor and hit Enter –
net start MSIServer
Note: You can’t start a service if Startup type is Disabled.
To Stop Windows Installer service –
net stop MSIServer
- It will immediately start Windows Installer service.
To change the Startup type of the same service, you can execute the following command –
Automatic –
REG add "HKLM\SYSTEM\CurrentControlSet\services\MSIServer" /v Start /t REG_DWORD /d 2 /fManual
REG add "HKLM\SYSTEM\CurrentControlSet\services\MSIServer" /v Start /t REG_DWORD /d 3 /fDisabled –
REG add "HKLM\SYSTEM\CurrentControlSet\services\MSIServer" /v Start /t REG_DWORD /d 4 /fAutomatic (Delayed Start) –
REG add "HKLM\SYSTEM\CurrentControlSet\services\MSIServer" /v Start /t REG_DWORD /d 2 /fThat’s all!
Readers help support Windows Report. We may get a commission if you buy through our links.
Read our disclosure page to find out how can you help Windows Report sustain the editorial team. Read more
Whether you are using an old computer or need your PC to run many tasks simultaneously, you probably want to disable the Windows modules installer worker.
The reason is that the Windows modules installer worker puts a high load on your disks, CPU, and memory. You may use the best software to fix high CPU usage, yet some reports show that it might even take 100% of them to itself.
While it helps you maintain a more secure and reliable system, it takes its toll. So, you are the one who can decide to keep it or disable it to avoid performance issues.
In this article, we will explore in detail what a Windows modules installer worker is and how you can enable or disable it. We will also see if it is necessary for your system or not.
What is the Windows modules installer?
If you are a Windows user, you must see that Windows updates itself automatically occasionally. However, you most probably do not know how it does so.
Windows modules installer (also known as Windows Modules Installer Worker, WMIW, or TiWorker.exe) is the system process that enables automatic installation and modifications of Windows updates.
You owe your bug-free system to this core Microsoft component because it automatically checks for updates and installs the necessary ones to give you a more seamless experience.
However, it is not the perfect component due to its huge resource usage. It can take up to 100% off your Central Processing Unit (CPU), your memory, and your disk.
Windows modules installer worker high disk usage, combined with high memory and CPU usage, can cause too much friction in your system and slow down all your processes.
How can I disable the Windows modules installer worker?
- Open Task Manager by pressing Ctrl + Alt + Delete and go to Services. Next, tap on Open Services.

- Afterward, right-click on the Windows Modules Installer Worker and head over to its Properties section.

- Finally, select Disabled from the Startup field and tap on OK.


Is a Windows modules installer worker necessary?
It’s best to not disable the Windows modules installer worker and let it do its work. After it is done, you can have your functional system back.
- Windows 11 24H2 is now broadly available, but there’s a catch
- Gamers are migrating to Windows 11 even more as Windows 10 EoS nears
- Windows 11 will soon add ‘Advanced’ settings page with lots of useful options
- Microsoft’s forced BitLocker encryption causing Windows 11 users lose their data
- Mail and Calendar app now stops syncing your Outlook/Hotmail account in Windows 11
This is because the Windows modules installer worker has a crucial role in keeping your system safe from malware such as the WannaCry ransomware.
It updates your system with security patches that can resist the attacks of different viruses and malware from different sources worldwide.
Microsoft is keen when it comes to security and always prioritizes its users’ security over the new features it wants to add. So, TiWorker.exe will mostly increase your computer’s stability.
If you do not want to permanently disable the Windows modules installer worker, you can disable it temporarily by ending its task from Task Manager. However, it will come back on reboot.
It may be helpful to change your Internet connection type to Metered Connection. If you’re wondering why it’s because it turns off Windows Automatic Updates and reduces resource usage.
Also, use Windows Update Troubleshooter to ensure that Windows Automatic Updates work properly.
You should take advantage of a system file checker tool as well to scan your computer and ensure that none of your files are corrupted and fix them if they are.
Many users want to disable this process because of Windows Modules Installer Worker high CPU usage, and we covered this issue in detail in a separate guide, so don’t miss it.
Let us know whether you were able to successfully disable the Windows modules installer worker in the comments section below.
Farhad Pashaei
As a technophile, Farhad has spent the last decade getting hands-on experience with a variety of electronic devices, including smartphones, laptops, accessories, wearables, printers, and so on.
When he isn’t writing, you can bet he’s devouring information on products making their market foray, demonstrating his unquenchable thirst for technology.