
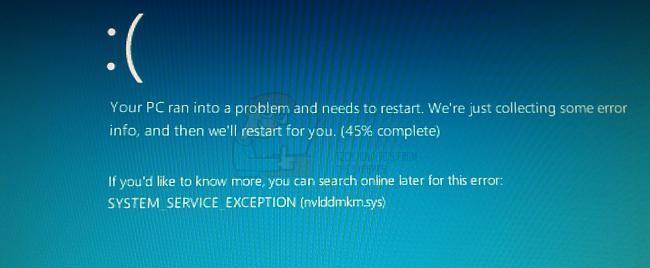
You’ve come across the System Service Exception nvlddmkm.sys error, which usually triggers a Blue Screen of Death (BSOD) and forces your computer to restart.
This Windows error is often related to NVIDIA graphics card drivers or other system files. Don’t worry; I’ve got you covered with a list of solutions to help you fix this error and get your computer back to normal.
What causes the System Service Exception Nvlddmkm.sys error?
The main reason behind the system service exception Nvlddmkm.sys error is an outdated graphics driver. However, after searching for fixes, I also stumbled across several other reasons why this error can occur:
- Incomplete Windows Update: This happens following an unstable Windows update. Running Windows Update again to install missing or corrupt patches fixes it.
- Corrupted System Files: Whether it’s a power surge or failing hardware, Windows system files can be corrupted in many ways. Running the System File Checker (SFC) can help resolve this.
- Hardware Overheating: Poor ventilation and overclocking can cause components to overhead. Improving the cooling system resolves this issue.
- Faulty RAM Modules: A malfunctioning or incorrectly installed RAM stick can cause this. Running a RAM test and replacing the faulty module may be the only solution.
- Antivirus Software Conflict: Sometimes, an overactive antivirus can cause errors. Disabling the antivirus and running other fixes solves the problem.
- External Device Driver Conflict: Connecting new external devices can cause a conflict with existing devices like your GPU. Disconnecting the troublesome device and updating your drivers can fix this.
- Outdated BIOS Firmware: Over time, even your BIOS firmware can become outdated and cause problems on Windows. You can solve this by downloading the latest firmware from the manufacturer’s site and running an update during a reboot.
How to fix System Service Exception Nvlddmkm.sys?
- Update Graphics Drivers
- Run Windows Update
- Use a third party repair tool
- Run System File Checker (SFC)
- Check for Hard Drive Errors
- Run DISM
- Update BIOS
- Perform a Clean Boot
- Check for Overheating
- Disable Hardware Acceleration
- Restore Your System
- Check for Software Conflicts
- Run a Virus Scan
- Reinstall Windows
1. Update the Graphics Drivers
1. Right-click on the Windows Start button and navigate to Device Manager.
2. Locate the Display adapters section and expand it.
3. Right-click on your GPU graphics card and select Update driver.
4. Follow the on-screen instructions to search for and install the latest driver.
Additionally, you can rollback your GPU drivers to a more stable version if you encounter any problems.

2. Run Windows Update
1. Open Settings from the Start menu.
2. Navigate to Update & Security.
3. Click on Check for updates and install any available Windows updates.
Advice: Learn more about Windows Update disadvantages.
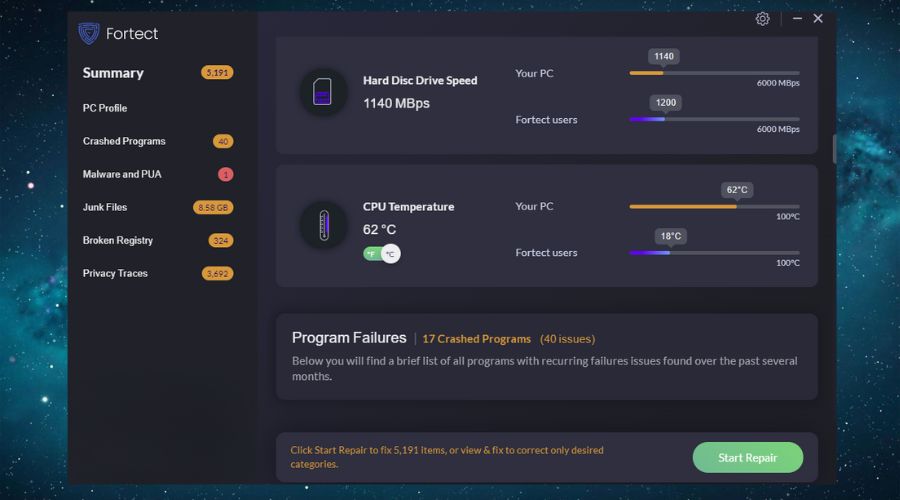
3. Use a third party repair tool
It is great to have a PC tune-up tool around at all times. After all, you’ll never know when something comes up and needs to be dealt with quickly. I prefer Fortect, but there are other great tune-up tools too.
1. Install Fortect on your PC.
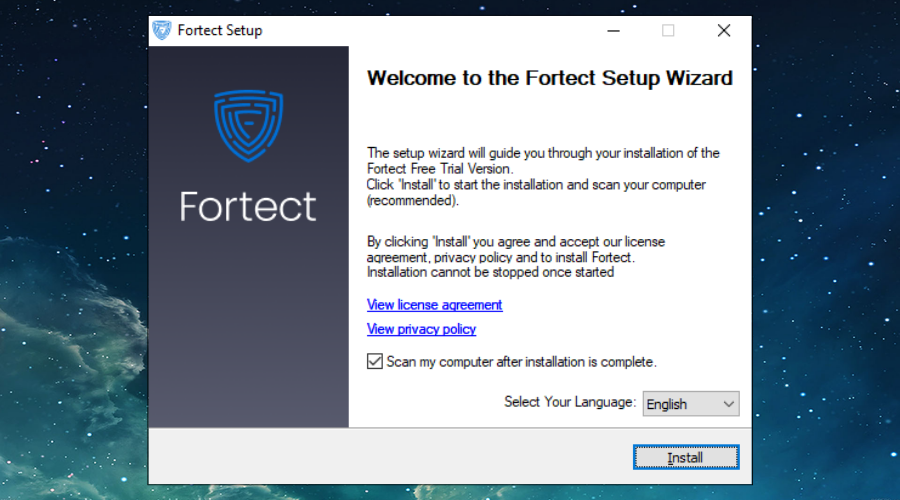
2. Install and Launch the software and Start scanning.
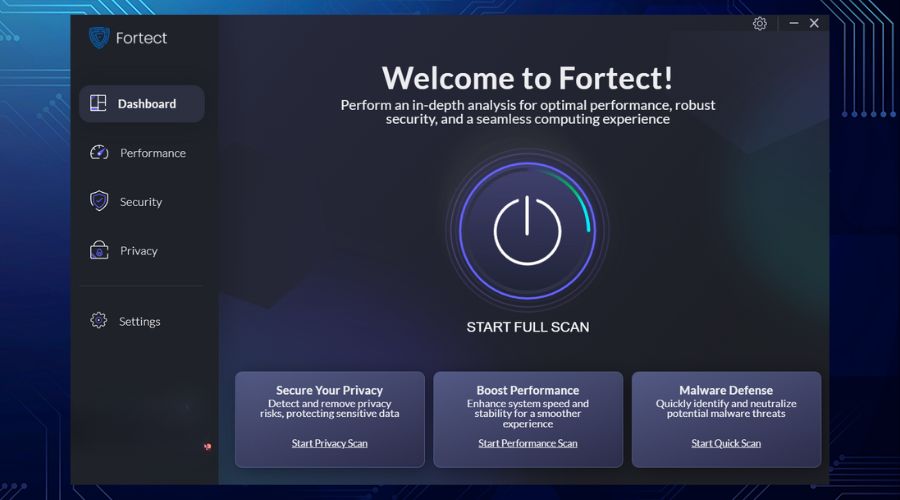
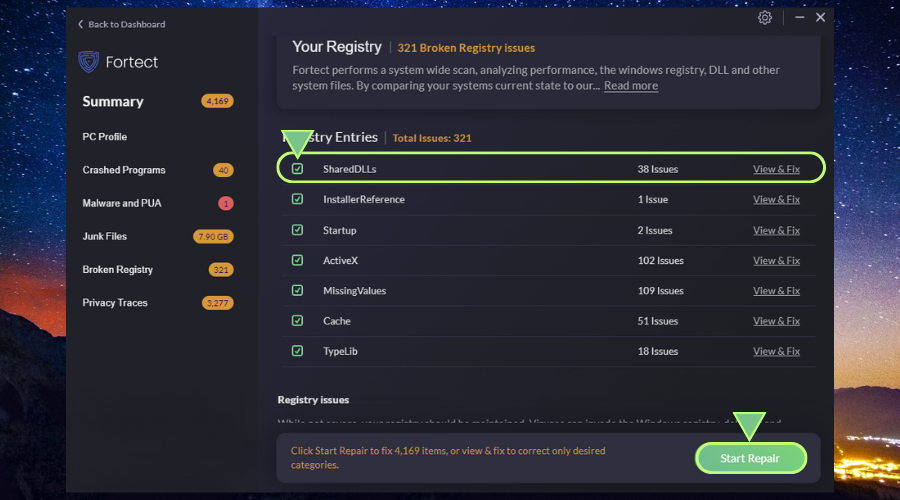
3. Fortect will detect the irregularities in your system and feature them for you.
4. Click on Start Repair to start the process of fixing your system’s errors.
5. Once the process is over, restart your PC.
Tip: Stay away from the following malware prone tune-up software.
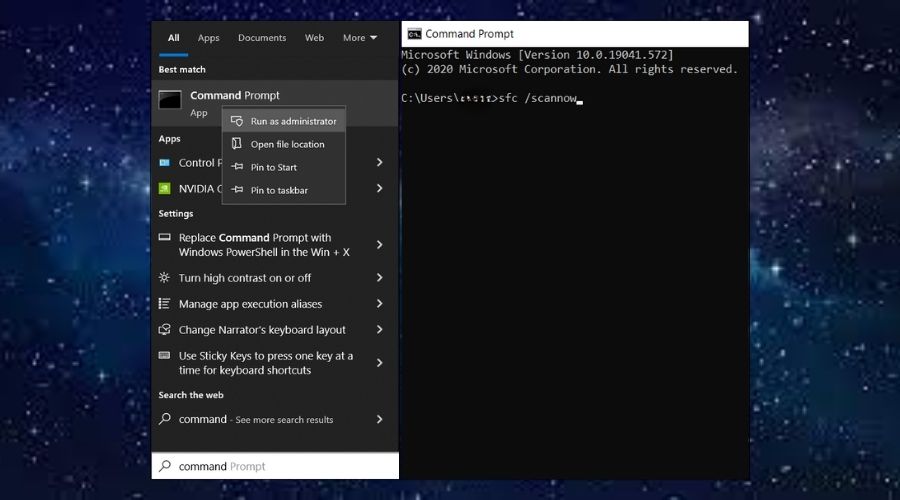
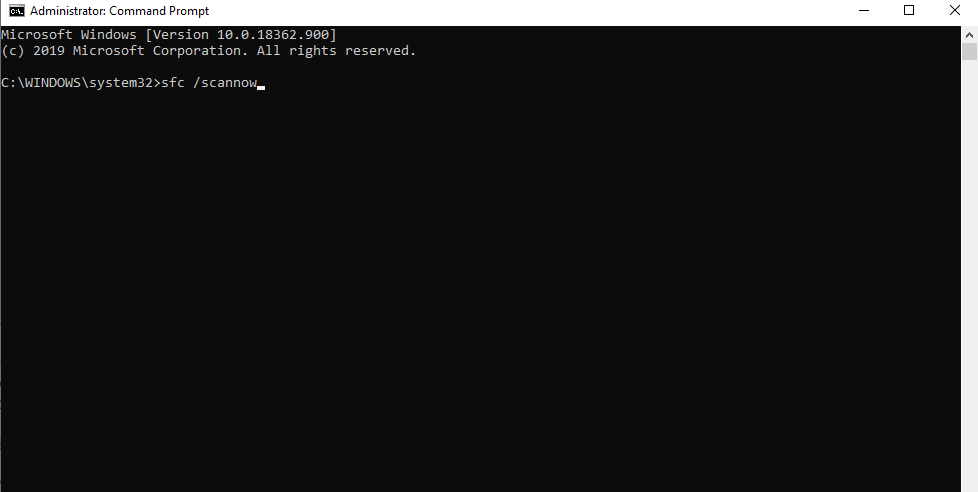
4. Run System File Checker (SFC)
1. Open Command Prompt as an administrator from the Start menu.
2. Type sfc /scannow and hit Enter.
3. Wait for the scan to complete and follow any on-screen instructions.
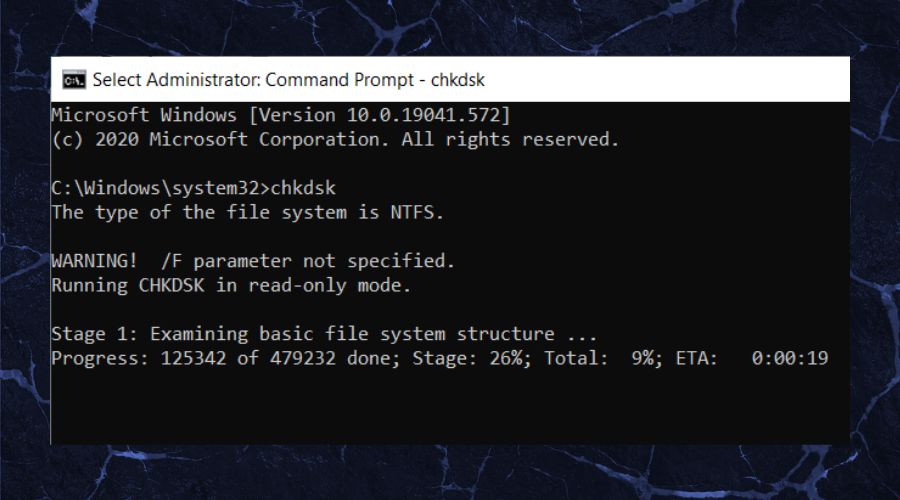
5. Check for Hard Drive Errors
1. Open Command Prompt as an administrator.
2. Type chkdsk /f and hit Enter.
3. Restart your computer to allow the check disk to run.
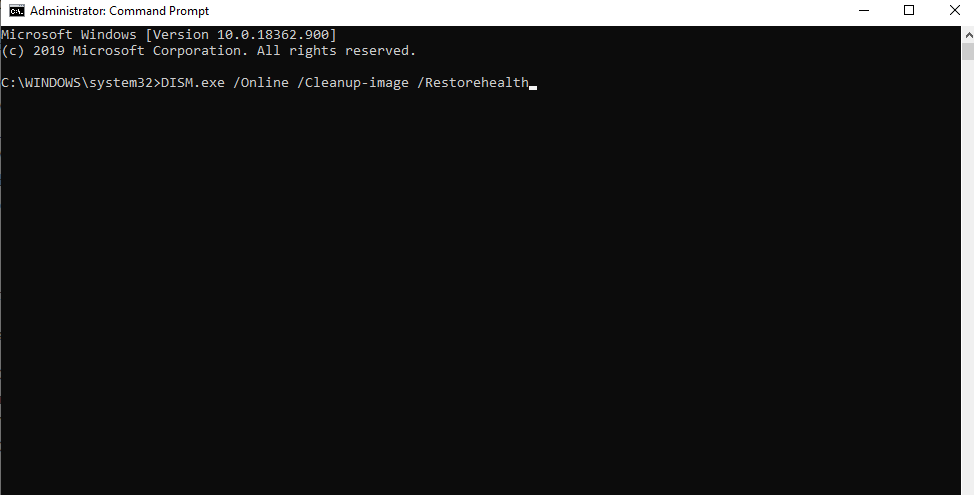
6. Run DISM
1. Open Command Prompt as an administrator.
2. Type DISM /Online /Cleanup-Image /RestoreHealth and hit Enter.
3. Wait for the process to complete.
7. Update BIOS
1. Visit your motherboard manufacturer’s website.
2. Download the latest BIOS update.
3. Follow the installation instructions carefully.
8. Perform a Clean Boot
1. Type msconfig in the Windows search bar and hit Enter.
2. Navigate to the Services tab.
3. Check the box for Hide all Microsoft services.
4. Click Disable all, apply the changes, and restart your computer.
Tip: Do not use this method if you tweaked your Windows updates, some people had problems with it.
9. Check for Overheating
1. Use software like Fortect to check your computer’s temperature.
2. Make sure your computer is in a well-ventilated area, the fans are working, and there is no dust build-up.
Overheating can cause BSOD on your device, thus you shouldn’t allow it to reach high temperatures.
10. Disable Hardware Acceleration
1. Open the settings menu of your web browser.
2. Locate and disable the Hardware Acceleration option.
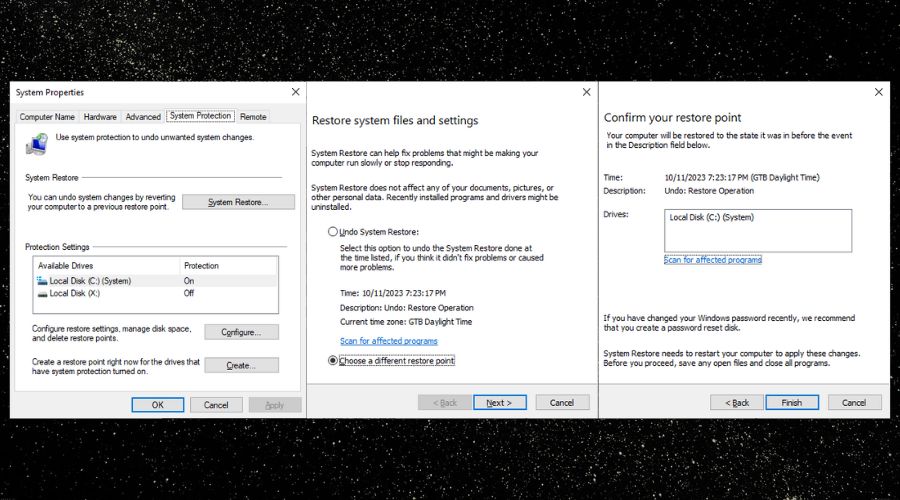
11. Restore Your System
1. Type restore in the Windows search bar.
2. Select Create a restore point.
3. Click on System Restore and follow the on-screen instructions to choose a restore point.
12. Check for Software Conflicts
1. Open Control Panel from the Start menu.
2. Navigate to Programs and Features.
3. Uninstall any recently installed or suspicious software.
13. Run a Virus Scan
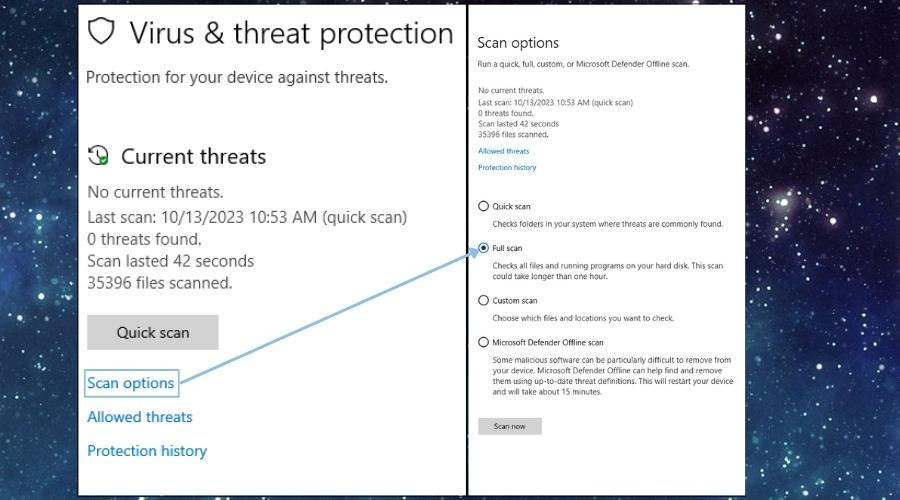
1. Open the Virus & threat protection menu
2. Select scan options and then tick the Full Scan.
3. Press Scan now and wait, it might take a while and your device might lag meanwhile.
Did you know that your antivirus can delete DLL files?
14. Reinstall Windows
1. Backup all your important files to an external drive.
2. Create a bootable USB drive with Windows installation files.
3. Restart your computer and boot from the USB drive to reinstall Windows.
The System Service Exception nvlddmkm.sys error can be a daunting issue, especially when it leads to the dreaded Blue Screen of Death. However, it’s important to remember that this error is usually symptomatic of underlying issues that are often straightforward to resolve. Whether it’s outdated drivers, software conflicts, or hardware issues, there’s usually a clear path to a solution. I’ve provided a comprehensive list of potential causes and corresponding solutions based on personal experiences, aiming to cover all the bases for you.
nvlddmkm.sys is the Nvidia driver for Windows. It helps your graphics card interact with the operating system and is an essential Windows file. Even though it is known to cause issues, it should not be deleted or modified in any way.
Getting a Blue Screen of Death with a message saying SYSTEM_SERVICE_EXCEPTION (nvlddmkm.sys) can lead you to believe that this is an error with the graphics card or its drivers, due to the system file it says caused the issue. However, various users have reported that this is not the case, as this specific message, followed by a BSOD, can appear even if the graphics card and drivers are working completely fine.
There are a few things that you can do to check what specifically is causing this issue in your system, and what follows is a guide to each of them, so you can solve your issues and continue using your computer as soon as possible.
Method 1: Check for incompatible software, such as Xsplit and MSI Live Update
When you take into consideration the sheer number of software apps that are available for the Windows operating system nowadays, it is no surprise that some of those can cause problems with certain versions of Windows. Such is the case with Xsplit and MSI Live Update, and Windows 10. Even though these might be apps that you actually use, it is worth removing them for a few days, to see if that solves the problem if nothing else. Removing them is fairly easy and can be done in a few steps.
First, press the Windows key on your keyboard and type Change or remove a program.
Open the result, and you will be presented with a list of software currently installed on your system. In the list, you should locate both Xsplit and MSI Live Update. Select either of them, click the Uninstall button and follow the wizard until the software is uninstalled.
Once done with that, reboot your system and do the same with the other software, if you have both. Reboot your device once again when you’re done with the second one, and you shouldn’t be facing Blue Screens of Death again.
Method 2: Check your PSU, and replace it if necessary
This is another situation where the BSOD has nothing to do with the graphics card, nor its drivers. You might have a failing PSU which doesn’t deliver enough power to all your components, and your graphics card might be malfunctioning due to that, or you might have upgraded your system with new components that require more power than your PSU can deliver. Whichever the case, you will need to look into getting a new PSU.
The easiest way to check this is to replace the PSU with another, more powerful one. It would be great if you can borrow one so you don’t buy a new one outright, just to see if the error persists. If it does, then the PSU is okay. However, if the error is gone, that means that your current power supply is failing and doesn’t deliver all its power, or it merely isn’t powerful enough to give all your components enough juice.
If this is the case, there are a few things to know when buying a new power supply. First of all, don’t let the PSU be the component you’re going cheap on. If a PSU dies on you, it might pull other components such as the motherboard or the graphics card with it, and you will regret buying a cheap one. Second, see how much power your system needs. There are a number of online calculators that give you a number based on your components. Keep in mind, though, that this isn’t the number you’ll be buying. Most power supplies work best and last longest when used at 60-80% of their power, so if for example your system needs a 700W power supply, you’ll be best off with buying a 1000W one. And last, but not least, take a look at the rating of the supply you’re buying, the higher the rating, the better the power supply is.
Method 3: Update/reinstall your graphics card drivers
In the end, if you don’t have any of the aforementioned software and your hardware is working properly, you might want to try different graphics card drivers from Nvidia. You can either update them, or uninstall them completely and download new ones from Nvidia’s website.
Option 1: Update your drivers
To update your drivers, you will need to open the Device Manager. You can do that by pressing the Windows key on your keyboard and typing Device Manager, then clicking on the result.
Once inside, expand Display Drivers and locate your Nvidia graphics card. Right-click it, and select Update Driver Software from the dropdown menu. Follow the wizard that will download and install the latest available drivers. Reboot your system when you’re done.
Option 2: Completely remove the drivers and download new ones from Nvidia’s website
This option requires you to open the Device Manager again, as previously described, and locate your Nvidia graphics card. Only, this time, when you right-click it, you will choose Uninstall instead. Again, follow the wizard and uninstall the drivers. Reboot your system when you’re done.
Once your system is back on, head to Nvidia’s Site and select the appropriate product, operating system and language from the dropdown menus, then click Search.
When you’ve found the driver, download it and install it using the setup wizard. Reboot your system again for the changes to take effect. When all this is done, you shouldn’t be facing any issues.
The error messages associated with the Blue Screens of Death can oftentimes be unrelated to the actual error, so as mentioned earlier, it is worth checking a few things that might seem unrelated, as that might solve your problem as in this specific case.
You can also check out our general how-to guide here which addresses this issue in general
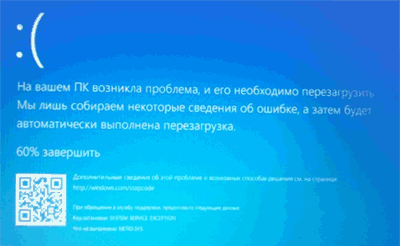
Одна из распространенных ошибок у пользователей Windows 10 — синий экран смерти (BSoD) SYSTEM_SERVICE_EXCEPTION и текстом «На вашем ПК возникла проблема и его необходимо перезагрузить. Мы лишь собираем некоторые сведения об ошибке, а затем будет автоматически выполнена перезагрузка».
В этой инструкции — подробно о том, как исправить ошибку SYSTEM SERVCIE EXCEPTION, чем она может быть вызвана и о самых часто встречающихся вариантах этой ошибки с указанием первоочередных действий по её устранению.
Причины ошибки SYSTEM SERVICE EXCEPTION
Наиболее частой причиной появления синего экрана с сообщением об ошибке SYSTEM_SERVICE_EXCEPTION являются ошибки работы драйверов оборудования компьютера или ноутбука.
При этом, даже если ошибка возникает при запуске определенной игры (с сообщениями об ошибках SYSTEM_SERVICE_EXCEPTION в файлах dxgkrnl.sys, nvlddmkm.sys, atikmdag.sys) сетевых программ (с ошибками netio.sys) или, что является распространенным случаем, при запуске Skype (с сообщением о проблеме в модуле ks.sys) дело, как правило, именно в неправильно работающих драйверах, а не в самой запускаемой программе.
Вполне возможно, что до этого на вашем компьютере всё работало нормально, вы не устанавливали новые драйверы, но Windows 10 сама обновила драйверы устройств. Однако, возможны и другие варианты причин ошибки, которые также будут рассмотрены.
Распространенные варианты ошибки и основные способы исправления для них
В некоторых случаях при появлении синего экрана смерти с ошибкой SYSTEM SERVICE EXCEPTION в информации об ошибке сразу указывается вызвавший сбой файл с расширением .sys.
Если этот файл не указан, то придется посмотреть информацию о вызвавшем BSoD файле в дампе памяти. Для этого можно использовать программу BlueScreenView, загрузить которую можно с официального сайта https://www.nirsoft.net/utils/blue_screen_view.html (ссылки на загрузку находятся внизу страницы, там же есть файл русского перевода, который достаточно скопировать в папку с программой, чтобы она запустилась на русском языке).
Примечание: в случае, если появление ошибки не дает работать в Windows 10, попробуйте выполнять следующие действия, зайдя в безопасный режим (см. Как зайти в безопасный режим Windows 10).
После запуска BlueScreenView посмотрите информацию о последних ошибках (список в верхней части окна программы) и обратите внимание на файлы, сбои в которых привели к появлению синего экрана (в нижней части окна). Если список «Файлы дампа» пуст, то по всей видимости, у вас отключено создание дампов памяти при ошибках (см. Как включить создание дампов памяти при сбоях Windows 10).

Часто по именам файлов можно найти (поискав имя файла в интернете) частью какого драйвера они являются и предпринять действия по удалению и установке другой версии этого драйвера.
Типичные варианты файлов, вызывающих сбой SYSTEM_SERVICE_EXCEPTION:
- netio.sys — как правило, проблему вызывают сбойные драйверы сетевой карты или Wi-Fi адаптера. При этом, синий экран может появляться на определенных сайтах или при высокой нагрузке на сетевое устройство (например, при использовании торрент-клиента). Первое, что следует попробовать при появлении ошибки — установить оригинальные драйверы используемого сетевого адаптера (с сайта производителя ноутбука для вашей модели устройства или с сайта производителя материнской платы именно для вашей модели МП, см. Как узнать модель материнской платы).
- dxgkrnl.sys, nvlddmkm.sys, atikmdag.sys — вероятнее всего, проблема с драйверами видеокарты. Попробуйте полностью удалить драйверы видеокарты с помощью DDU (см. Как удалить драйверы видеокарты) и установить последние доступные драйверы с сайтов AMD, NVIDIA, Intel (в зависимости от модели видеокарты).
- ks.sys — может говорить о разных драйверах, но наиболее распространенных случай — ошибка SYSTEM SERVICE EXCEPTION kc.sys при установке или запуске Skype. В данной ситуации причиной чаще всего являются драйверы веб-камеры, иногда — звуковой карты. В случае с веб-камерой возможен вариант, что причина — именно в фирменном драйвере от производителя ноутбука, а со стандартным всё работает исправно (попробуйте зайти в диспетчер устройств, нажать правой кнопкой мыши по веб-камере — обновить драйвер — выбрать «Выполнить поиск драйверов на этом компьютере» — «Выбрать из списка доступных драйверов на компьютере» и проверить, есть ли в списке другие совместимые драйверы).
Если же в вашем случае это какой-то другой файл, прежде всего попробуйте найти в Интернете, за что он отвечает, возможно, это позволит вам предположить, драйверы каких устройств являются причиной появления ошибки.
Дополнительные способы исправить ошибку SYSTEM SERVICE EXCEPTION
Далее описаны дополнительные шаги, которые могут помочь при появлении ошибки SYSTEM SERVICE EXCEPTION, если выяснить проблемный драйвер не удалось или его обновление не решило проблемы:
- Если ошибка стала появляться после установки антивирусного ПО, фаервола, блокировщика рекламы или иных программ для защиты от угроз (особенно нелицензионных), попробуйте удалить их. Не забудьте перезагрузить компьютер.
- Установите последние обновления Windows 10 (правый клик по кнопке «Пуск» — «Параметры» — «Обновление и безопасность» — «Центр обновления Windows» — кнопка «Проверить наличие обновлений»).
- Если до недавнего времени всё работало исправно, то попробуйте посмотреть, есть ли на компьютере точки восстановления и использовать их (см. Точки восстановления Windows 10).
- Если вы примерно знаете, какой драйвер вызвал проблему, можно попробовать не обновить (переустановить его), а откатить (зайти в свойства устройства в диспетчере устройств и использовать кнопку «Откатить» на вкладке «Драйвер»).
- Иногда ошибка может быть вызвана ошибками на диске (см. Как проверить жесткий диск на ошибки) или оперативной памяти (Как проверить оперативную память компьютера или ноутбука). Также, если на компьютере установлено более одной планки памяти, можно попробовать работу с каждой из них по отдельности.
- Выполните проверку целостности системных файлов Windows 10.
- Помимо программы BlueScreenView можно использовать утилиту WhoCrashed (бесплатная для домашнего использования) для анализа дампов памяти, которая иногда может предоставить полезную информацию о модуле, вызвавшем проблему (правда, на английском языке). После запуска программы нажмите кнопку Analyze, а затем ознакомьтесь с содержимым вкладки Report.

- Иногда причиной проблемы могут служить не драйверы оборудования, а само оборудование — плохо подключенное или неисправное.

Надеюсь, какой-то из вариантов помог исправить ошибку в вашем случае. Если же нет, опишите в комментариях подробно, как и после чего появилась ошибка, какие файлы фигурируют в дампе памяти — возможно, мне удастся помочь.
“System Thread Exception not Handled Nvlddmkm.sys” bug checking is a general problem for Windows computers having Nvidia graphics cards installed. This fatal error suddenly appears causing system crash when using an application that involves a large extent of GPU. Nvlddmkm.sys refers to the kernel mode driver (a small program) directly associated with NVIDIA Graphics that allows your computer to establish communication with hardware. When system thread generated an exception that the error handler didn’t catch, this BSOD occurs leading to system crash and unexpected restart of computer.
Nvlddmkm.sys System Thread Exception not Handled Nvlddmkm.sys is generally triggered because of obsolete or incompatible NVIDIA graphics card driver. Furthermore, conflicts with third-party applications, corrupt system files, malware, and Windows update bugs are potential reasons behind this BSOD. However, you can easily solve this stop error with the help of solutions in the coming part of this post. What failed: nvlddmkm.sys is commonly accompanied by VIDEO_TDR_FAILURE, PAGE_FAULT_IN_NONPAGED_AREA, DRIVER_IRQL_NOT_LESS_OR_EQUAL, and more.
Nvlddmkm.sys System Thread Exception not Handled Error in Windows 11 or 10
Here is how to fix System Thread Exception not Handled Nvlddmkm.sys Error in Windows 11 or 10 –
Ways-1: Update NVIDIA Graphics Driver
Since this Blue Screen Error has a direct relation with NVIDIA Graphics, the outdated driver version might be the most authentic reason. The driver may be incompatible, buggy, corrupt, underdeveloped, or unable to compete with the running big or high-resolution running game or application.
As a result, when Windows calls nvlddmkm.sys and does not find it in return, System thread creates an exception and the bug check is triggered. Therefore, updating the driver is the most prior solution to fix the BSOD –
- Press Windows and R keys.
- Type devmgmt.msc.
- Click on OK.
- When Device Manager appears, double-click on Display adapters.
- Right click on NVIDIA GeForce (the existing version).
- Select Update driver.
- When another window prompts; click on Search automatically for drivers option.
- Restart your computer and check if the error is resolved.
- In case, the BSOD still persists, navigate to – https://www.nvidia.com/en-us/geforce/drivers/.
- Search the latest version using the dropdown on the web page and download the driver.
- Launch the setup file and follow the onscreen instructions to complete installation.
- Reboot the device and the error should be fixed.
Way-2: Roll Back the driver
If the previous method fails to solve System Thread Exception not Handled Nvlddmkm.sys blue screen problem then it indicates that there are any bugs in the latest version. Therefore, rolling back the driver to an earlier version may help to withdraw the BSOD occurring. Follow the steps for the same –
- Right-click on the Start button and select “Device Manager”.
- Go to the “NVIDIA GeForce” Display adapter.
- Then, right click on it and select – Properties.
- Click on the Drivers tab.
- Select – Roll Back Driver.
- Click Yes on the confirmation dialog box.
- Restart the device and check if the issue is corrected.
- Sometimes, Rol Back Driver is greyed out (presently also on my laptop). In this case, there is a manual way to downgrade the driver; follow –
- Right-click on the NVIDIA GeForce and choose “Update driver”.
- On the ‘Update drivers’ wizard, select Browse my computer for drivers.
- Click on – Let me pick from a list of available drivers on my computer.
- Uncheck the box – Show compatible hardware.
- This will show multiple older driver versions in a list under Models. Note: on my computer, AMD driver is installed so the screenshot is showing AMD’s older version of drivers. On yours, you will see NVIDIA drivers.
- Select the previous version and click on Next.
- Follow the guide on the screen and finish the rollback.
- Finally, restart the PC and ensure that the error doesn’t show up.
Way-3: Uninstall and then reinstall the driver
Both the methods are not working or supporting getting rid of the bug check means the driver is corrupted or involved in any conflict. This may be the consequence of any third party program which has been recently installed or updated or buggy Windows update. Furthermore, malware or virus can cause this annoyance which we will address in the later part of this article.
Whatever the reason be, to deal with What failed: nvlddmkm.sys blue screen you need to uninstall and reinstall the NVIDIA driver. This process is likely to properly install the software, so, proceed with the steps:
- Click on Start.
- Type – “devmgmt.msc” (without quotes).
- Press Enter.
- On Device Manager, right-click on the NVIDIA display adapter and select – Uninstall device.
- Click on “Uninstall” when a popup shows.
- Restart the computer which will automatically reinstall the application.
Or,
- Click on Search and type appwiz.cpl.
- Press Enter in order to launch the Programs and Features window.
- Locate NVIDIA in the list and click on it.
- Click on ‘Uninstall’.
- Choose Yes on the confirmation pop-up.
- Go with the Uninstallation wizard if appears to conclude the procedure.
- Then, install the driver you have downloaded during following the Way-1.
Follow the guide – How to Reinstall NVIDIA Drivers in Windows 11 or 10
Way-4: Run System File Checker and DISM successively
Corruption in the system files and Windows image format may cause to generate the nvlddmkm.sys system_thread_exception_not_handled. Windows built-in tools (that exclude the risk of less trustworthy software) can help you to repair the Blue Screen error Nvlddmkm.sys.
These are SFC and DISM that can work on both glitches and help you come out, hence, deploy them one by one by moving forward with the instructions –
- Press – Winkey+R.
- Type – cmd.exe.
- Then, press – Ctrl+Shift+Enter.
- Select the Yes option on the User account control pop-up.
- Once the Command prompt appears, type the syntax
Sfc /Scannowand hit Enter. - After the execution is completed reboot the computer and see if the bug checking does not initiate.
- But if nvlddmkm.sys error still persists then open the Command prompt once again and run the below codes one line at a time –
Dism /Online /cleanup-image /checkhealth
Dism /Online /cleanup-image /scanhealth
Dism /Online /cleanup-image /restorehealth- When these 3 commands finish running then reboot the device.
These are 4 basic solutions so the BSOD should be fixed after following the above-mentioned methods. If the error still continues then there is possibility of more factors forcing this bug check so we recommend following How to Use BlueScreenView to Detect the Cause of Blue Screen and WhoCrashed: A Tool to analyze Dump and reveal culprit driver on Windows to explore more files that are causing the system break. Now, have a look at some more solutions –
Way-5: Use Microsoft Defender Offline scan or Full Scan
Malware and virus are other factors that create messes that end up with nvlddmkm.sys error windows 11 error. However, no room for frustration is here because Windows provides strong tools to completely and quickly remove or quarantine them. You only need to use them –
- Press Winkey and type Windows Security.
- Click on “Windows Security” app from the result.
- Select Virus & threat protection.
- Then, click the Scan options link.
- Save your work because the system will restart and close all the running tasks when using this option.
- Check the option – Microsoft Defender Offline scan.
- Click on “Scan now”.
- When a pop-up is prompted, click on “Scan”.
- Wait until the computer restarts and detects threats thoroughly.
- Now go to Windows Security > Virus & threat protection > Protection History.
- Select the found threats and remove them using Action dropdown.
- To use full scan, check the option “Full scan” and click on “Scan now”.
Way-6: Disable Hardware acceleration in browser
Enabled Hardware acceleration setting in web browsers causes compatibility issues with the graphics card driver, leading to the “System Thread Exception not Handled Nvlddmkm.sys” error on the cost of PC performance improvement. To solve this, disable the setting. Here’s how:
1] In Google Chrome or Microsoft Edge
- Launch the browser.
- Click on 3-dots icon (ellipsis) from the top right corner and select Settings.
- In the Search box, type Hardware Acceleration.
- Turn off “Use hardware acceleration when available” from the result.
- Click on Relaunch.
2] In Firefox
- Click on “hamburger menu (3-lines) icon “and select “Settings”.
- Type – hardware.
- Uncheck the option Use recommended performance settings.
- And then remove the tick from Use hardware acceleration when available.
Way-7: Install pending Windows Updates
System Thread Exception not Handled Nvlddmkm.sys BSOD or Blue Screen error, when triggered due to bugs in Windows update, this method will give you relief. Redmond is known to push patches to kill the bugs and issues when informed. Therefore, head to the steps:
- Press Windows+S.
- Type – updates.
- Hit – Enter.
- On the Settings page that appears, click on – Check for updates.
- Wait for some time and allow the system to scan and download the update (if found).
- When asked, click on Restart now.
- Run Windows Update
Way-8: Disable Nvidia ShadowPlay
Sometimes, Nvlddmkm.sys error may show due to Nvidia ShadowPlay, a graphics card (GPU) integrated feature, that allows users to record and share gameplay footage. Although, you have the privilege to disable this using a few quick steps –
- Right-click on Desktop.
- Select – NVIDIA Control Panel.
- Click on the Preferences tab
- Then select – GeForce Experience.
- Click on the Settings cog icon.
- In the General tab, scroll down and disable the In-Game Overlay.
- Restart your computer and check if the error is resolved.
Way-9: Enable Clean boot
Nvlddmkm.sys blue screen error can go to a dead end after enabling Clean boot because this feature has the capability to run the system with a minimal set of drivers and applications. Thus, the programs interfering with the normal functionalities of the system are disabled and the Blue screen is fixed. Follow the steps:
- Click on the Search and type – msconfig.
- Press “Enter” to launch System Configuration window.
- Switch to the Services tab.
- Check the box for – Hide all Microsoft Services.
- Click on – Disable all.
- Then, go to the Startup tab.
- Click on Open Task Manager.
- Go to the “Task Manager”, right click on the apps one by one, and select Disable each time.
- Close the tool and come back to the System Configuration window.
- Click on Apply and OK.
Way-10: Perform Clean install
This is a foolproof method that provides immunity to Windows 11 against any BSOD bugcheck or any other issue. System Thread Exception not Handled Nvlddmkm.sys will have no trace after you clean install the software on your device. Hence, go with the guide –
- Navigate to – https://www.microsoft.com/software-download/windows11
- Scroll down to the “Create Windows 11 Installation Media” section and click on Download now.
- Launch the setup file and follow the instructions to complete the installation.
- For a step-by-step method, follow How to Use Rufus to Install ‘Windows 10 or 11’.
Methods:
Ways-1: Update NVIDIA Graphics Driver
Way-2: Roll Back the driver
Way-3: Uninstall and then reinstall the driver
Way-4: Run System File Checker and DISM successively
Way-5: Use Microsoft Defender Offline scan or Full Scan
Way-6: Disable Hardware acceleration in browser
Way-7: Install pending Windows Updates
Way-8: Disable Nvidia ShadowPlay
Way-9: Enable Clean boot
Way-10: Perform Clean install
That’s all!!
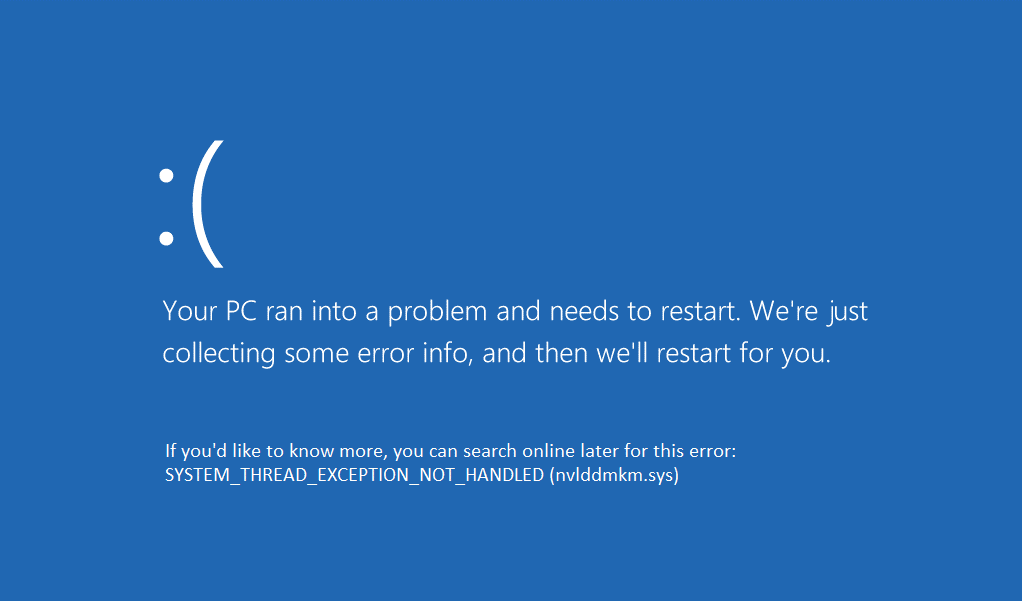
System Thread Exception Not Handled is a Blue Screen of Death or BSOD error that indicates that a system thread generated an exemption that the error handler didn’t catch. This error is usually due to faulty drivers. An outdated, corrupted, or incompatible driver may cause your system to display this error.
This may also be caused by system incompatibility, memory conflicts IRQ conflicts, overclocking softwares, etc. The immediate approach to this issue should be to uninstall a recently installed driver or program since it is not compatible with your system and is causing your system to show the BSOD.
When you see the Blue Screen of Death then it means that something is wrong with your PC. After you see the BSOD, your computer shutdowns and usually reboots itself. Depending on the severity of the error, the Windows will try to repair it but usually, this isn’t fixed until you do it manually.
Sometimes, you get stuck in a loop where after the Windows starts up, you will see the blue screen with the error message and stop code, and then the computer reboots. Then again the Windows starts up, the blue screen appears, reboot and this process repeats on and you’re stuck in a reboot loop.
If you are facing a similar situation then here are some fixes that you can try that will help you fix this issue:
Fix 1: Rollback / Uninstall Malfunctioning Drivers
You can skip the first step if you are able to log in to the Windows
Step 1: Booting into Safe Mode
When you get stuck in a reboot loop then you can’t access the Windows components and can’t make any required changes. A simple fix for this to just boot the Windows into the Safe Mode. In Safe Mode, you can make changes and uninstall any program/driver which may be causing this issue. Here is how you can boot into Safe Mode when you are stuck in a reboot loop:
- Open System Recovery by pressing F11 when the PC reboots.
- You will see a recovery menu with different options. Go to Troubleshoot > Advanced options > Startup Settings.
- Select Safe Mode or Safe Mode with Networking/Command Prompt to access Windows. (F5 for Safe Mode, F6 for Safe Mode with Networking, F7 for Safe Mode with Command Prompt)
- Once the PC boots in the Safe Mode, you have to identify the device or driver which is causing this error.
Step 2: Identifying the malfunctioning driver
To identify the malfunctioning driver here is what you should do:
- Open the RUN box by pressing Windows + R keys.
- Type “eventvwr” and press Enter.
- Go to Windows Logs > System.

- Find the error log to see the related information.
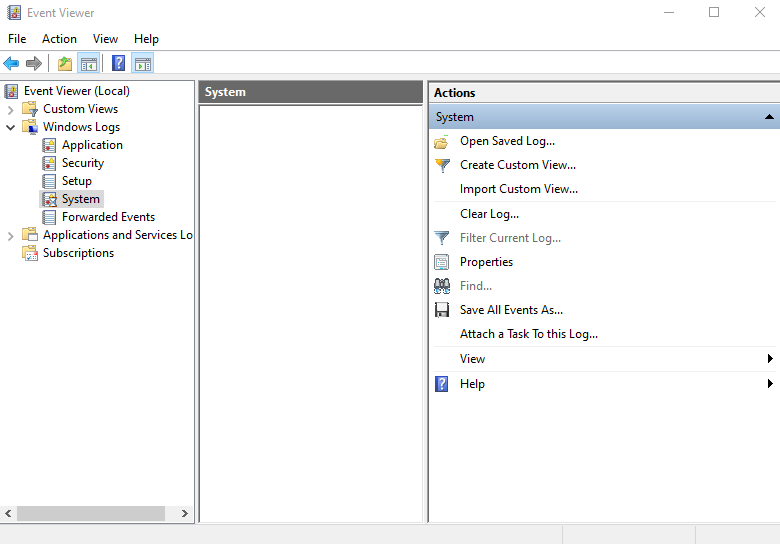
You will see that the error SYSTEM_ THREAD_EXCEPTION_NOT_HANDLED is followed by atikmdag.sys, nvlddmkm.sys, nwifi.sys, or CMUDA.sys. This means that the mentioned driver is the culprit behind this error and you will have to either roll back the driver or reinstall it.
- Atikmdag.sys and nvlddmkm.sys are related to the display card.
- Nwifi.sys is a driver file related to the network card.
- CMUDA.sys is a driver file related to the USB Device Audio capacity.
Step 3: Rollback / Uninstall driver(s).
Once you identify the malfunctioning driver, you will have to either roll back the driver to its previous version which was compatible with Windows or uninstall and re-install it again. Here’s what you have to do:
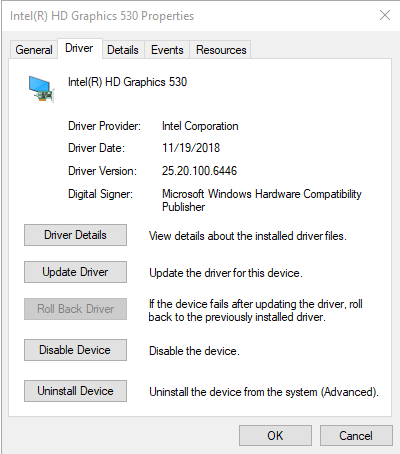
- Go to Device Manager and select the malfunctioning Driver.
- Right-click on the driver and select Properties.
- Switch to the Driver tab.

- To roll back, click on Roll Back Driver. Choose a reason and click Yes.
- To uninstall, click on Uninstall Device.
- Now, reinstall a compatible version of the driver.
Fix 2: Fixing Corrupted or Damaged Files
Sometimes the problem is not with drivers but rather with system files that are corrupted and could lead to this error. You can try and find out if there is any corrupted file(s) available and then try to fix them.
Using CHKDSK
CHKDSK is a built-in Windows tool that scans & analyzes hard drive errors and fixes the related file system errors.
To check for corrupted files on your system using CHKDSK, you should:
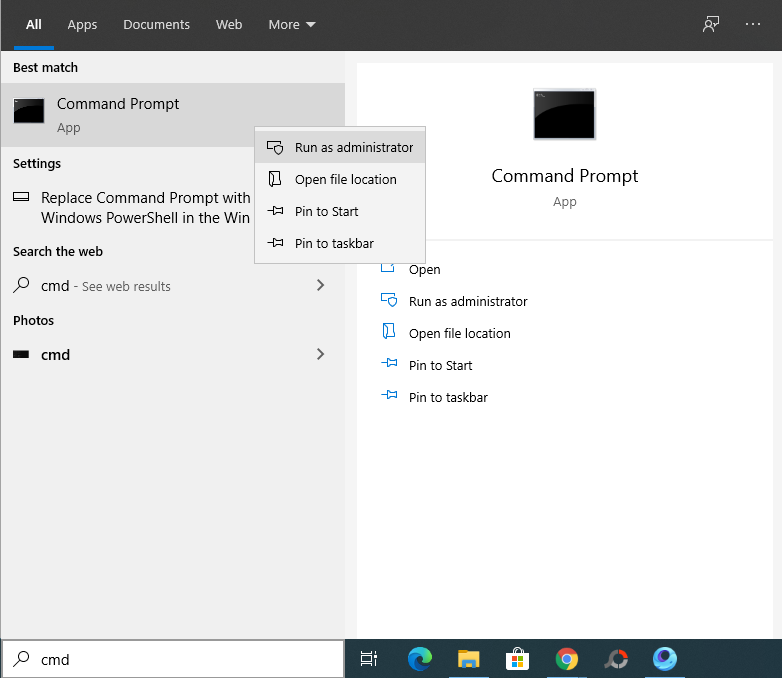
- In the Start menu search box, type cmd, or command prompt.
- Right-click on the command prompt search result and select Run as administrator.

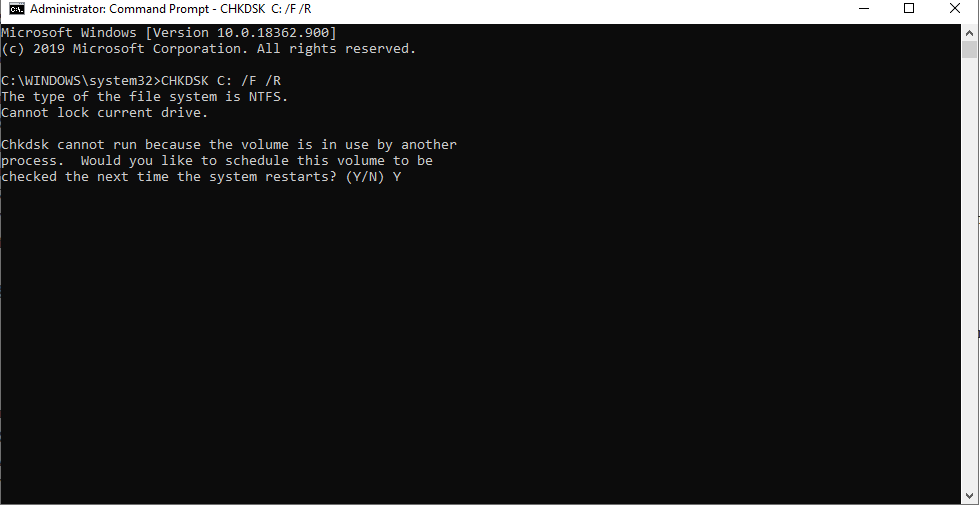
- After the Command Prompt has opened, type CHKDSK C: /F /R and press Enter.
- In the next step, the command prompt will ask you to schedule a check disk next time you restart your PC. Type Y and press Enter.

- Now, restart your PC.
- Your PC will boot up and after that, it will perform a full system scan to find any corrupted file. This process will take some time so, be patient and don’t turn off your PC during the process.
- If there are any corrupted files available then CHKDSK will try to fix those.
Using System File Checker
SFC or System File Checker is another Windows’ built-in utility that also scans and fixes Windows system files and resolves the issues that you were facing.
To run SFC on your PC:
- In the Start menu search box, type cmd, or command prompt.
- Right-click on the command prompt search result and select Run as administrator.
- After the Command Prompt has opened, type SFC /scannow and press Enter.

- The process will start. It will perform a scan and automatically fix any corrupted or damaged files on your PC.
Using DISM
DISM is also a system that can help you restore missing or damaged corrupted files. Where SFC just replaces damaged or lost system files, DISM restores system files and can also be used to fix such errors.
Here is how you can use the DISM tool:
- Open Command Prompt with admin privileges as mentioned above.
- In the Command Prompt window, type the following command; DISM.exe /Online /Cleanup-image /Restorehealth and press Enter.

- The process may take some time, so be patient. After it completes, it will most likely fix your issue.
You can read more about SFC and DISM here.
Fix 3: Reinstalling Windows
In case none of the aforementioned fixes worked, you can try reinstalling Windows to solve this issue. Performing a clean reinstallation of Windows fixes all the issues.
Was this article helpful?
YesNo