
SNMP (
Simple Network Management Protocol
) — это классический протокол для мониторинга и сбора информации о сетевых устройствах (сервера, сетевое оборудование, рабочие станции, принтеры и т.д.). Протокол SNMP довольно легкий, быстрый, для передачи данных использует UDP порты 161 и 162. В этой статье мы рассмотрим, как установить и настроить службу SNMP в Windows Server 2022/2019 и Windows 10/11.
Содержание:
- Установка службы SNMP в Windows Server 2022/2019
- Установка SNMP агента в Windows Server Core
- Установка службы SNMP в Windows 10/11
- Настройка службы SNMP в Windows Server и Windows 10/11
Установка службы SNMP в Windows Server 2022/2019
В Windows Server службу SNMP можно установить с помощью Server Manager.
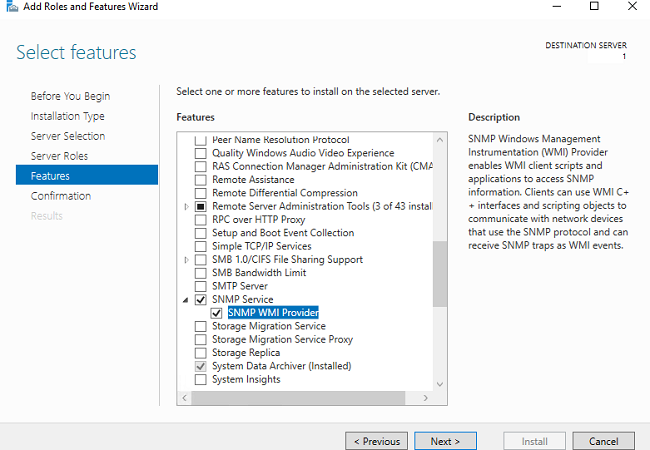
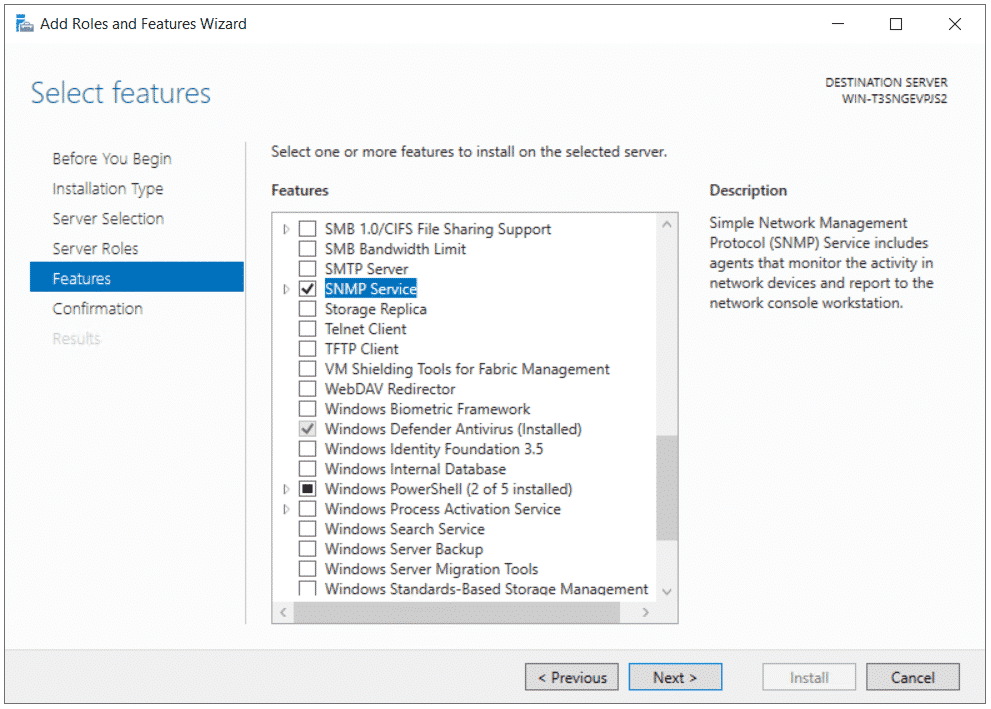
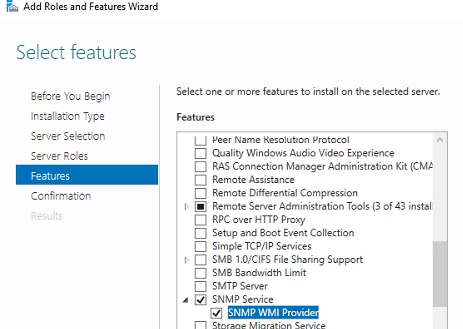
Выберите Add roles and features -> Features. Выберите SNMP Service (если нужно отметьте также SNMP WMI Providers).
Служба SNMP WMI Provider позволяет опрашивать SNMP устройство через WMI.
Нажмите Next -> Install и дождитесь окончания установки.
Установка SNMP агента в Windows Server Core
В Windows Server Core можно установить SNMP с помощью веб-интерфеса Windows Admin Center и PowerShell.
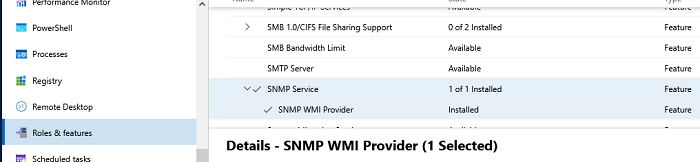
Если вы используете Windows Admin Center, подключитесь к хосту Windows Server, выберите Roles and Features -> SNMP Service.
Т.к. в Windows Server Core отсутствует графический интерфейс, а для его управления используется командная строка, вы можете установить службу SNMP из командной строки PowerShell.
Для установки ролей в Windows Server из PowerShell используется командлет Install-WindowsFeature.
Проверьте, что служба SNMP не установлена:
Get-WindowsFeature SNMP*

Установите роль SNMP и WMI провайдер:
Install-WindowsFeature SNMP-Service,SNMP-WMI-Provider -IncludeManagementTools
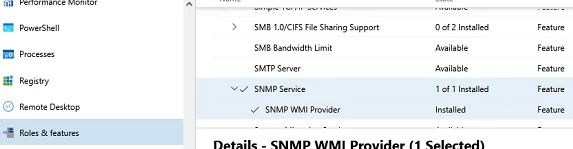
Проверьте, что службы SNMP запущены:
Get-Service SNMP*
В нашем примере SNMP служба запущена, а SNMPTRAP остановлена.
Установка службы SNMP в Windows 10/11
Вы можете использовать службу SNMP не только в Windows Server, но и в десктопных редакциях Windows 10 и 11.
В Windows 10/11 служба SNMP, вынесена в отдельный компонент Feature On Demand (как RSAT и OpenSSH).
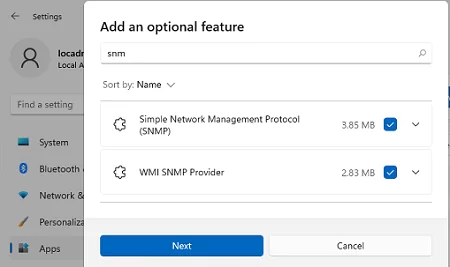
Вы можете установить SNMP через панель Settings. Перейдите в Apps -> Optional features -> Add an optional feature -> View features.
В списке доступных компонентов выберите Simple Network Management Protocol (SNMP) и WMI SNMP Provider. Для начала установки нажмите Next (понадобится интернет подключение к серверам Microsoft).

Для установки службы SNMP через PowerShell, используйте команду:
Add-WindowsCapability -Online -Name SNMP.Client~~~~0.0.1.0
Для установки службы SNMP без подключения к интернету, вам понадобится скачать ISO образ Windows 10/11 Features on Demand из личного кабинета на сайте лицензирования Volume Licensing Service Center (VLSC).
Для офлайн установки службы SNMP с такого ISO образа используется команда:
Add-WindowsCapability -Online -Name SNMP.Client~~~~0.0.1.0 -LimitAccess -Source \\msk-fs01\Distr\Windows-FOD\Win11\
Настройка службы SNMP в Windows Server и Windows 10/11
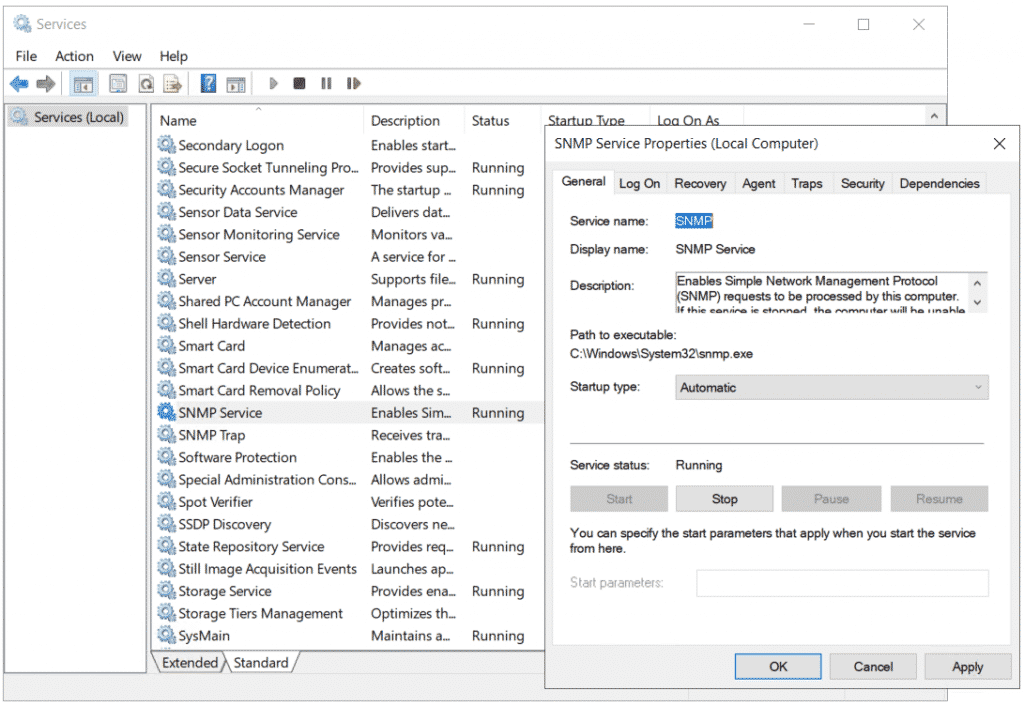
Вы можете настроить параметры службы SNMP в консоли services.msc. Найдите службу SNMP Services в списке и откройте ее свойства.
Обратите внимание, что у службы SNMP есть несколько дополнительных вкладок:
- Agent
- Traps
- Security
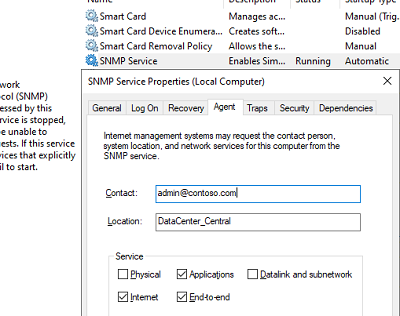
На вкладке Agent указывается базовая информация об устройстве (контакты администратора, местоположение). Здесь же можно указать тип информации, который может отправлять данное устройство при SNMP опросе.
В старых версиях протокола SNMP (SNMP v.1 и SNMP v.2) для авторизации пользователя используется строка сообщества (community string). На вкладке Security можно создать несколько строк подключения.
Можно выбрать один из пяти уровней доступа для сообщества:
- READ ONLY — позволяет получать данные с устройства;
- READ WRITE — позволяет получать данные и изменять конфигурацию устройства;
- NOTIFY — позволяет получать SNMP ловушки;
- READ CREATE – позволяет читать данные, изменять и создавать объекты;
- NONE
Вы можете создать несколько community string. Для этого нужно задать имя и выбрать права/ Для мониторинга состояние сервера достаточно выбрать READ ONLY.
В списке Accept SNMP packets from these hosts можно указать имена/IP адреса серверов, которым разрешено опрашивать данное устройство. Если вы не хотите ограничивать список разрешенных устройств, оставьте здесь Accept SNMP packets from any hosts.
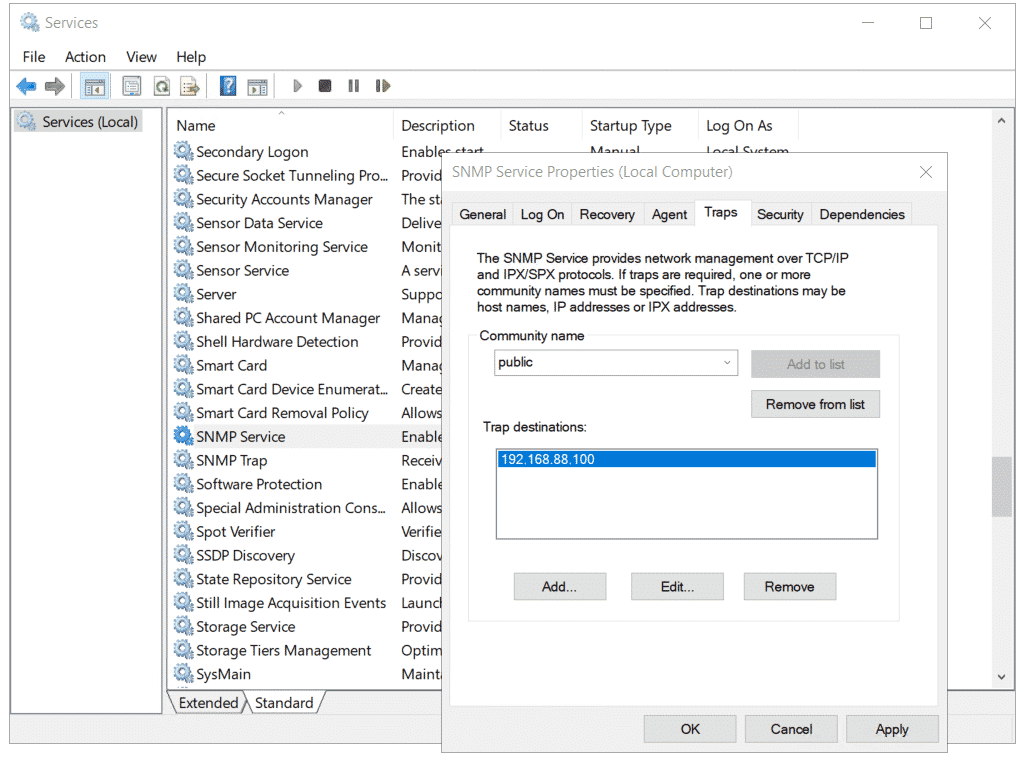
На вкладке Traps указываются адрес серверов, на который SNMP агент должен отправлять SNMP-ловушка (SNMP trap). SNMP Trap это широковещательный USP пакет, используемый для асинхронного уведомления менеджера (например, сообщение о критическом событии).
Не забудьте открыть в Windows Defender Firewall правила, разрешающие входящий и исходящий трафик для SNMP запросов и ловушек (TRAP). Нужные правила фаейрвола можно включить с помощью PowerShell.
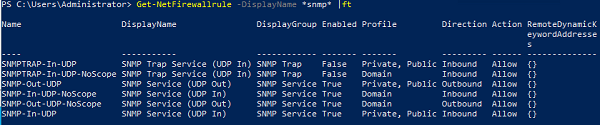
В Windows Firewall есть несколько готовых правил для SNMP трафика:
Get-NetFirewallrule -DisplayName *snmp* |ft
- SNMPTRAP-In-UDP
- SNMPTRAP-In-UDP-NoScope
- SNMP-Out-UDP
- SNMP-In-UDP-NoScope
- SNMP-Out-UDP-NoScope
- SNMP-In-UDP
Можно включить все правила, или только определенное:
Get-NetFirewallrule -DisplayName *snmp* | Enable-NetFirewallRule
Get-NetFirewallrule SNMP-Out-UDP | Disable-NetFirewallRule
В списке служб Windows есть еще одна служба SNMP Trap. Она используется для получения сообщений от других SNMP агентов и пересылки на SNMP сервера (обычно это система мониторинга, опрашивающая устройства по SNMP, например PRTG или Zabbix).
Если вы настраиваете SNMP на Windows Server Core, вы не сможете использовать графический интерфейс службы SNMP для настройки ее параметров. Вместо этого придется вносить изменения в реестр с помощью PowerShell. Настройки службы SNMP хранятся в ветке реестра HKEY_LOCAL_MACHINE\SYSTEM\CurrentControlSet\Services\SNMP\Parameters.
Следующие команды зададут описание агента:
New-ItemProperty -Path "HKLM:\SYSTEM\CurrentControlSet\services\SNMP\Parameters\RFC1156Agent" -Name "sysContact" -Value "[email protected]" -PropertyType REG_SZ
New-ItemProperty -Path "HKLM:\SYSTEM\CurrentControlSet\services\SNMP\Parameters\RFC1156Agent" -Name "sysLocation" -Value "MSK_Datacenter1" -PropertyType REG_SZ
Для каждой ловушки SNMP придется создать отдельный ключ в HKLM\SYSTEM\CurrentControlSet\services\SNMP\Parameters\TrapConfiguration с именем community.
New-Item -Path "HKLM:\SYSTEM\CurrentControlSet\services\SNMP\Parameters\TrapConfiguration\public1"
Укажите разрешения для community:
New-ItemProperty -Path "HKLM:\SYSTEM\CurrentControlSet\Services\SNMP\Parameters\ValidCommunities" -Name "public1" -Value 4 -PropertyType DWord
Возможные значения:
- 1 — NONE
- 2 — NOTIFY
- 4 — READ ONLY
- 8 — READ WRITE
- 16 — READ CREATE
Для каждого community можно указать список серверов, с которых разрешено принимать запросы:
New-ItemProperty -Path "HKLM:\SYSTEM\CurrentControlSet\Services\SNMP\Parameters\PermittedManagers" -Name "1" -Value "server1.winitpro.ru" -PropertyType REG_SZ
Перезапустите службу SNMP для применения новых настроек из реестра:
Get-Service SNMP|Restart Service
Если нужно распространить эти SNMP настройки на множество компьютеров/серверов Windows в домене, используйте возможности внесения изменений в реестр через GPO.
Проверить работу службы SNMP можно с помощью утилиты snmpwalk (доступна в любом Linux дистрибутиве):
# snmpwalk -v 2c -c public1 -O e 192.168.13.122
В этом примере мы опросили наш Windows хост через версию протокола SNMPv2.
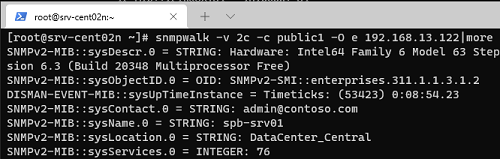
Утилита вернула базовыую информацию о хосте (syscontact, sysname, syslocation) и довольно большое количество информации о состоянии сервера Windows.
In the monitoring world, SNMP is one of the most used protocols to get insights into metrics on target devices. By default, it is not installed in Windows and Windows Server and we will need to enable it manually. In this article, I´ll show you how to install and configure SNMP and SNMP Traps in Windows Server 2019, but the same procedure applies to Windows Servers.
If you are interested in enabling SNMP in Windows 10 1083 and onwards, please check this article How to install deprecated SNMP in Windows 10 1803 and onwards.
INSTALL SNMP SERVICE
- Open Server Manager
- Click Add roles and features
- Under Before you begin click Next
- Under Select installation type click Next
- Under Select destination server click Next
- Under Select server roles click Next
- Under Select features select SNMP Service and click Add Features and then click Next
- Under Confirm installation selection click Install
- Wait until the installation is finished
CONFIGURE SNMP SERVICE
- Open Services applet (click on Start menu and search for services)
- Navigate to the SNMP Service, right click and then click Properties
- Optional: Click on Agent and add Contact and Location and select all services
- Click on Traps and add Community name. In my case it is public.
- Under Trap destinations click Add and add your destination server that is collecting traps.
- Click on Security and then click on Add. Add community name, the default one is public.
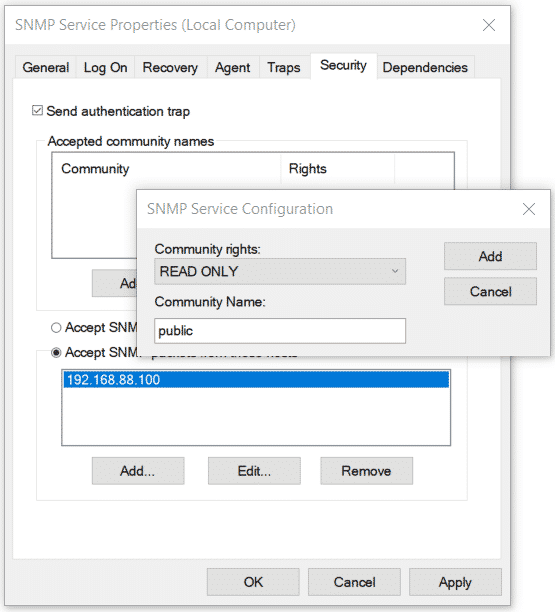
- Click on Accept SNMP Packets from these hosts
- Click on Add and then add your NMS (Network Monitoring Solution) that will collect SNMP Traps. You can delete localhost.
- Click Apply and then OK
Thank you for reading this article. In case of any questions, feel free to comment or contact me.
Introduction
The Simple Network Management Protocol (SNMP) is a popular protocol for network management. It is used for collecting information from network devices, such as servers, printers, hubs, switches, and routers on an Internet Protocol (IP) network. SNMP protocol is the most common protocol used in monitoring system, usually have ability to connect to any servers and receive performance counters data (such as CPU or RAM usage values).
Let’s Get Started. 🙂
1 – Open the Server Manager, click Add roles and features and proceed installation until you reach the Features page. Check the SNMP Service in the list of features.


2 – Select the SNMP Service then Install the installation process will start.


3 – Once the installation complete, click Close.

4 – Open the Server Manager then click Tools select Services.

5 – Open the Services window, find the SNMP Service, and open Properties.


6 – On the General tab, be sure to select Automatic in the Startup Type section so that it is always available even after a restart of the Server.

7 – On the SNMP Service properties, Click on the Security tab.

8 – To configure SNMP Services, first thing is to give a community name. Enter a Community Name and click on the Add button. For example, i’m used NewHelpTech. Community String and Community Name mean the same thing. (Please take note that don’t assign Read Write rights, just assign Read Only rights)


9 – Then Select Accept SNMP packets from these hosts option and then click Add to add Hostname, IP Address of the Monitoring Server.


10 – Just click OK and then restart SNMP Service.


Now you have to configure SNMP Service in order to be useful for polling process that will be started from monitoring tool. Next article will be about configuring SNMP service.
Good luck! Just give it try – I’m sure you’ll love it as well. If you have any comments or questions on feel free to contact me.
That’s all for now. 🙂
SNMP (Simple Network Management Protocol) is a classic protocol for monitoring and collecting information about network devices (servers, network hardware, workstations, printers, etc.). SNMP is quite a lightweight and fast protocol, it uses UDP ports 161 and 162 to transfer data. In this article, we’ll show how to install and configure SNMP service on Windows Server 2022/2019 and Windows 10/11.
Contents:
- How to Install SNMP Service on Windows Server 2022/2019
- Installing SNMP Agent on Windows Server Core
- Enabling SNMP Service in Windows 10/11
- How to Configure SNMP Service on Windows?
How to Install SNMP Service on Windows Server 2022/2019
In Windows Server, you can install the SNMP service using Server Manager. Select Add roles and features -> Features. Click SNMP Service (if needed, also check SNMP WMI Providers).
The SNMP WMI Provider allows you to query an SNMP device via WMI.
Click Next -> Install and wait till the installation is over.
Installing SNMP Agent on Windows Server Core
In Windows Server Core, you can install SNMP using the Windows Admin Center web interface or PowerShell.
If you are using the Windows Admin Center, connect to your Windows Server host, and select Roles and Features -> SNMP Service.
Since there is no graphical interface on Windows Server Core and the Server Core host can be managed from the command prompt, you can install the SNMP service using PowerShell.
You can use the Install-WindowsFeature PowerShell cmdlet to install roles and features on Windows Server.
Check that the SNMP service is not installed:
Get-WindowsFeature SNMP*
Install the SNMP role and WMI provider:
Install-WindowsFeature SNMP-Service,SNMP-WMI-Provider -IncludeManagementTools
Make sure that SNMP services are running:
Get-Service SNMP*
In our example, the SNMP service is running, and SNMPTRAP is stopped.
Enabling SNMP Service in Windows 10/11
You can use the SNMP service not only on Windows Server but also on Windows 10 and 11 desktops. In Windows 10/11, the SNMP service is a part of the Features on Demand (like RSAT or OpenSSH).
You can install SNMP via the Settings panel. Go to Apps -> Optional features -> Add an optional feature -> View features.
Select Simple Network Management Protocol (SNMP) and WMI SNMP Provider in the list of available components. To start the installation, click Next (you will need an Internet connection to Microsoft servers).
To install the SNMP service using PowerShell, run the command below:
Add-WindowsCapability -Online -Name SNMP.Client~~~~0.0.1.0
To install the SNMP service offline (without an internet connection), download the Windows 10/11 Features on Demand ISO image from your account on the Volume Licensing Service Center (VLSC) website.
To install SNMP from the ISO image offline, use this command:
Add-WindowsCapability -Online -Name SNMP.Client~~~~0.0.1.0 -LimitAccess -Source \\munfs01\Distr\Win11\FoD
How to Configure SNMP Service on Windows?
You can configure the SNMP service options with the services.msc console. Find the SNMP Service in the list and open its properties.
Note that the SNMP service has some additional tabs:
- Agent
- Traps
- Security
The Agent tab contains basic information about the device (administrator contact information, location). Here you can also select the type of information that the device can send when polling via SNMP.
In earlier SNMP protocol versions (SNMP 1 and SNMP 2), a community string is used for authentication. In the Security tab, you can create multiple connection strings.
You can select one of five available access levels for the community:
- READ ONLY — allows getting information from a device
- READ WRITE —get information and edit a device configuration
- NOTIFY — allows receiving SNMP traps
- READ CREATE – to read data, change, and create objects
- NONE
You can create multiple community strings. To do it, enter a name and select the permissions. To monitor the server state, the READ ONLY privilege is enough.
In the Accept SNMP packets from these hosts list, you can enter the names or IP addresses of the hosts allowed to query the device. If you don’t want to use the allowed device list, leave Accept SNMP packets from any hosts here.
The Traps tab allows setting the list of the hosts to which the SNMP agent should send SNMP traps. An SNMP Trap is a broadcast UDP packet used for asynchronous notification of the manager (for example, a notification about a critical event).
Remember to create rules allowing inbound and outbound traffic for SNMP queries and traps in your Windows Defender Firewall. You can enable firewall rules with PowerShell.
There are several predefined rules for SNMP traffic in Microsoft Defender Firewall:
Get-NetFirewallrule -DisplayName *snmp* |ft
- SNMPTRAP-In-UDP
- SNMPTRAP-In-UDP-NoScope
- SNMP-Out-UDP
- SNMP-In-UDP-NoScope
- SNMP-Out-UDP-NoScope
- SNMP-In-UDP
You can enable all rules or just a specific one:
Get-NetFirewallrule -DisplayName *snmp* | Enable-NetFirewallRule
 Get-NetFirewallrule SNMP-Out-UDP | Disable-NetFirewallRule

There is the SNMP Trap in the list of Windows services. It is used to receive messages from other SNMP agents and forward them to SNMP servers (usually it is a monitoring system querying devices using via, for example, PRTG or Zabbix).
If you configure SNMP on Windows Server Core, you won’t be able to use the SNMP service GUI to set its settings. You will have to make changes to the registry using PowerShell instead. SNMP service settings are located under the registry key HKEY_LOCAL_MACHINE\SYSTEM\CurrentControlSet\Services\SNMP\Parameters.
The following commands will set the agent description:
New-ItemProperty -Path "HKLM:\SYSTEM\CurrentControlSet\services\SNMP\Parameters\RFC1156Agent" -Name "sysContact" -Value "[email protected]" -PropertyType REG_SZ
 New-ItemProperty -Path "HKLM:\SYSTEM\CurrentControlSet\services\SNMP\Parameters\RFC1156Agent" -Name "sysLocation" -Value "MUN_DCn2" -PropertyType REG_SZ
You will have to create a separate key with the community name under HKLM\SYSTEM\CurrentControlSet\services\SNMP\Parameters\TrapConfiguration for each SNMP trap.
New-Item -Path "HKLM:\SYSTEM\CurrentControlSet\services\SNMP\Parameters\TrapConfiguration\public1"
Set the community permissions:
New-ItemProperty -Path "HKLM:\SYSTEM\CurrentControlSet\Services\SNMP\Parameters\ValidCommunities" -Name "public1" -Value 4 -PropertyType DWord
Possible values:
- 1 — NONE
- 2 — NOTIFY
- 4 — READ ONLY
- 8 — READ WRITE
- 16 — READ CREATE
For each community, you can set a list of hosts they are allowed to accept queries from:
New-ItemProperty -Path "HKLM:\SYSTEM\CurrentControlSet\Services\SNMP\Parameters\PermittedManagers" -Name "1" -Value "mun-mon1.woshub.com" -PropertyType REG_SZ
Restart your SNMP service to apply new settings from the registry:
Get-Service SNMP|Restart Service
If you want to deploy the SNMP service settings to multiple Windows computers/servers in your domain, use Group Policy Preferences to modify the registry.
To make sure if SNMP is working, use the snmpwalk tool (available in any Linux distro):
# snmpwalk -v 2c -c public1 -O e 192.168.12.200
In this example, we have polled our Windows host using SNMPv2.
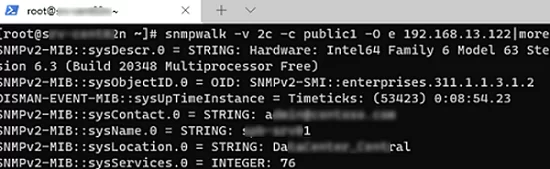
The tool has returned basic host information (syscontact, sysname, syslocation) and a lot of data on the Windows server state.
SNMP is a popular protocol that is used for the exchange of data between devices on a network. SNMP (Simple Network Management Protocol) is most commonly used in modern networks for monitoring, event notification, and device management.
To remotely query a network device via SNMP, it must have an SNMP agent installed.
Let’s see how to install and configure the SNMP service in Windows 10/11 and Windows Server 2022/2019.
Installing SNMP Service on Windows 10 and 11
The SNMP service is available as a separate Feature on Demand (FoD) on Windows 10 and 11, and is not installed by default.
On modern Windows 10 and 11 builds, you can install the SNMP service from the Settings app:
- Click Start > Settings > Apps > Optional Features > Add an optional feature > View features (or run the URI command: Win+R > ms-settings:optionalfeatures);

- Select Simple Network Management Protocol (SNMP) and WMI SNMP Provider (optional) to install;

- Click Next > Install;
- Windows will download the SNMP binaries from the Windows Update servers and install the service.


You can also install the SNMP service on Windows 11 and 10 using PowerShell:
- Open Windows Terminal or PowerShell console as an administrator;
- Check if the SNMP service is not installed (State=NotPresent):
Get-WindowsCapability -Online -Name "*SNMP*"|select name,DisplayName,State

- Install the SNMP service and the WMI SNMP Provider using the commands:
Add-WindowsCapability -Online -Name "SNMP.Client~~~~0.0.1.0"

Add-WindowsCapability -Online -Name "WMI-SNMP-Provider.Client~~~~0.0.1.0"
- Wait for the installation to complete;
- Use the Get-Service cmdlet to verify that SNMP service is installed:
Get-Service -Name snmp*

Note. In previous Windows 10 builds (1803-), including Windows 8.1 and 7 you can install the SNMP service using the Turn Windows features on or off applet.
- Run the command: optionalfeatures.exe
- Install the Simple Network Management Protocol (SNMP) and the WMI SNMP Provider

Can’t Install the SNMP Feature on Windows: Error 0x800f0954
SNMP feature is part of the Feature on Demand (FoD) concept, which requires a direct connection to Microsoft’s online update servers for component downloads. You may receive error 0x800f0954 when installing SNMP on a computer that is on an isolated segment or corporate network.
Add-WindowsCapability failed error. Error code = 0x800f0954
This error occurs if your computer is on a corporate network configured to receive Windows updates from an internal WSUS server. The computer is trying to download SNMP binaries from the WSUS server instead of from Microsoft Update servers.
You can allow computers to download optional feature files directly from Windows Update instead of from WSUS:
- Open the Local Group Policy Editor (gpedit.msc);
- Go to Computer Configuration > Administrative Templates > System;
- Enable the GPO option Specify settings for optional component installation and component repair and check the box Download repair content and optional features directly from Windows Updates instead of Windows Server Updates Services (WSUS);

- Update the Group Policy settings on a computer:
gpupdate /force
- Restart the Windows Update service:
Get-Service wuauserv| Restart-Service -Force

Now you can install any Windows optional feature.
In an environment that is not connected to the Internet, you can install SNMP from the offline FoD ISO image:
- Download the FOD media from your Volume License Servicing Center (VLSC)
- Mount the ISO image to a virtual DVD drive (for example, E:)
- Install SNMP using the PowerShell command:
Enable-WindowsOptionalFeature -Online -FeatureName SNMP -Source "E:\Sources\sxs"
Adding SNMP Service on Windows Server 2022/2019
Now let’s see how to the install SNMP service and WMI providers on Windows Server 2022/2019/2016.
SNMP is not installed by default on Windows Server. You can install the SNMP service:
- Via the Server Manager: Add roles and Features > Features > SNMP Service (you can also check SNMP WMI Providers).

- Using PowerShell (this is the only way to install SNMP on Windows Server Core):
Install-WindowsFeature SNMP-Service,SNMP-WMI-Provider –IncludeManagementTools

Note. SNMP is considered as deprecated and may be removed in future Windows builds. Instead of SNMP, it is recommended to use the Common Information Model (CIM).
Enable and Configure SNMP Service on Windows Computer
The SNMP feature adds two new services snap-in:
- SNMP Service — this is the primary SNMP agent service, that tracks activity and sends information;
- SNMP Trap — receives trap messages from local or remote SNMP agents, and forwards messages to the SNMP management app.
Start both SNMP services manually if they are stopped and change the startup type to Automatic.

Open the SNMP Service properties and go to the Agent tab. Fill in the Contact and Location fields (you can specify the user’s contact name and computer location). Then select the list of services from which you want to collect data and send it to the monitoring device. There are five options:
- Physical;
- Applications;
- Internet;
- End-to-end;
- Datalink and subnetwork.
Click the Security tab. Here you can configure various security settings for your SNMP servers.
The list of Accepted community names contains the names of the communities whose SNMP hosts are authenticated to send SNMP requests to this computer. The community’s name has the same functions like login and password.
Click the Add button and specify the Community Name and one of the five access levels:
- None
- Notify
- READ ONLY
- READ WRITE,
- READ CREATE
READ WRITE is the maximum privilege level that allows the SNMP management application to make changes to the computer. For monitoring systems, it is usually enough to select READ ONLY (the monitoring server can only query the device, but cannot make any changes). In this example, we added a community name public with READ ONLY permissions.
Add a list of monitoring servers (IP addresses) to the Accept SNMP packets from these hosts from which you want to accept SNMP packets. This could be your monitoring system, for example, Zabbix, Nagios, Icinga, OpenNMS, PRTG, and Microsoft System Center Operations Manager (SCOM).

Tip. If you select the Accept SNMP packets from any host option, your SNMP agent will accept packets from any host without restrictions. This option is not recommended for use on public computers for security reasons.
Save the changes and restart the SNMP service.
Hint. To enable your Windows host to receive and send SNMP queries and traps, you need to open SNMP ports in Windows Defender Firewall. Two ports are used: UDP 161 (SNMP) and UDP 162 (SNMPTRAP). You can open inbound and outbound SNMP ports in Windows using the following commands:
netsh advfirewall firewall add rule name="SNMP UDP Port 161 In" dir=in action=allow protocol=UDP localport=161

netsh advfirewall firewall add rule name="SNMP UDP Port 161 Out" dir=out action=allow protocol=UDP localport=161

netsh advfirewall firewall add rule name="SNMPTRAP UDP Port 162 In" dir=in action=allow protocol=UDP localport=162

netsh advfirewall firewall add rule name=" SNMPTRAP UDP Port 162 Out" dir=out action=allow protocol=UDP localport=162
Configuring SNMP Settings in Windows via Group Policy
There are several GPO options that allow you to configure SNMP parameters for multiple Windows hosts from a central location. These parameters are located in the GPO editor (gpedit.msc) under Computer Configuration > Policies > Administrative Templates definitions > Network > SNMP.
- Specify communities — specify a list of communities for the SNMP service;
- Specify permitted managers — Specify a list of allowed hosts that can send SNMP queries to the Agen;
- Specify traps for public community — configure Simple Network Management Protocol trap settings.

Another way to configure SNMP parameters is through the registry. These parameters are set in the following Registry Editor key: HKEY_LOCAL_MACHINE\SYSTEM\CurrentControlSet\services\SNMP\Parameters.
You can configure SNMP parameters as needed on a reference computer, export them to a REG file, and deploy the REG file to computers via GPO (Computer Configuration > Preferences > Windows Settings > Registry).
Windows only supports SNMP v1 and SNMP v2c versions. These versions of the protocol are not encrypted. This means that an attacker can intercept all your SNMP data and view it in clear text. Windows doesn’t support SNMP v3, which is an encrypted and more secure protocol.
Cyril Kardashevsky
I enjoy technology and developing websites. Since 2012 I’m running a few of my own websites, and share useful content on gadgets, PC administration and website promotion.