
Readers help support Windows Report. We may get a commission if you buy through our links.
Read our disclosure page to find out how can you help Windows Report sustain the editorial team. Read more
The Windows 10 error reporting service is designed to help ensure your PC works optimally. The central idea behind Windows Error Report (WER) is to keep Microsoft informed about user issues working with Windows.
However, every Windows OS version has the service enabled on default settings. But an individual user can choose to disable it if the need arises.
This article explores how to enable or disable the error reporting service on Windows 10.
How the Windows 10 error reporting service works
Windows 10 Error Report focuses on discovering hardware and software issues from the user’s PC and reports to Microsoft.
With a database of likely complaints experienced with using the Windows 10, Microsoft can then send solutions for troubleshooting.
While working with the PC, some users experience pop-ups or alerts requesting the submission of the problem report.
Windows error report usually occurs after a system failure, program crashes, refused to load properly or operating system errors. W
Windows usually prompts the user to submit an error report online to help proffer solutions in the future. The problem report may include the program name, date, time of error, and version.
Should I disable the Windows problem reporting service?
Windows users often disable error reporting due to disk space or privacy issues but might need to exercise restraint. Error reporting service for Windows 10 offers dual benefits to Microsoft and PC users.
Each error report helps Microsoft develop more advanced service packs for dealing with glitches. That means a better user experience with Windows 10 based on the information gathered.
How can I disable the Window error reporting Service?
Just like other versions, Windows 10 does have a slightly different graphical user interface for disabling error reports.
Lower versions of Windows OS have error reporting under Action Center Setting. On Windows 10 it is the Security & Maintenance function that requires working with registries.
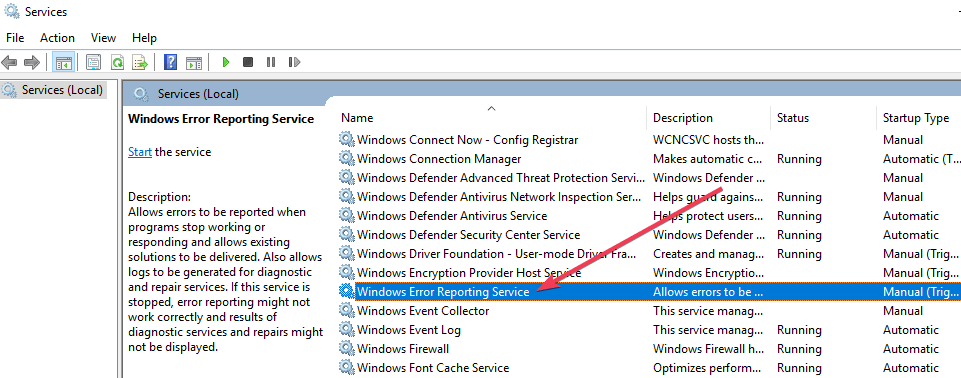
1. Use the Run dialog
-
1. Press down the Windows +R keys on your keyboard.
-
2. The Run dialog box will open.
-
3. Type service.msc in the box and click on OK or press Enter to run the command.

-
4. Locate the Windows Error Reporting Service in the list that opens.
-
5. Right click on it.

-
6. Go to the Startup type section and press the button next to it to open a drop-down menu.

-
7. Click on the Disabled button, which is at the bottom of the list.
-
8. Click on Apply and OK to save the changes.
-
9. Close the service window to exit. Now the process has been completed.

The easiest way to manage the Windows error reporting service is via the built-in Settings app. From there, you can enable or disable the problem reporting service in a few clicks.
- RELATED: 5 best software to fix runtime errors in Windows 10
In some cases, the Startup type which is close to disabled might appear gray. That means the user needs admin rights to continue the process. Therefore, log out and log in as an administrator. Or locate the administrative command prompt by pressing Windows key+ X to select command prompt admin.
2. Use the Registry Editor
Using the Registry Editor is another way to safely disable the Windows 10 Error Reporting Service. This second method for disabling the Windows error reporting service includes tweaking the registry. But first, you need to check for error report issues:
- Locate Control Panel from Windows startup.
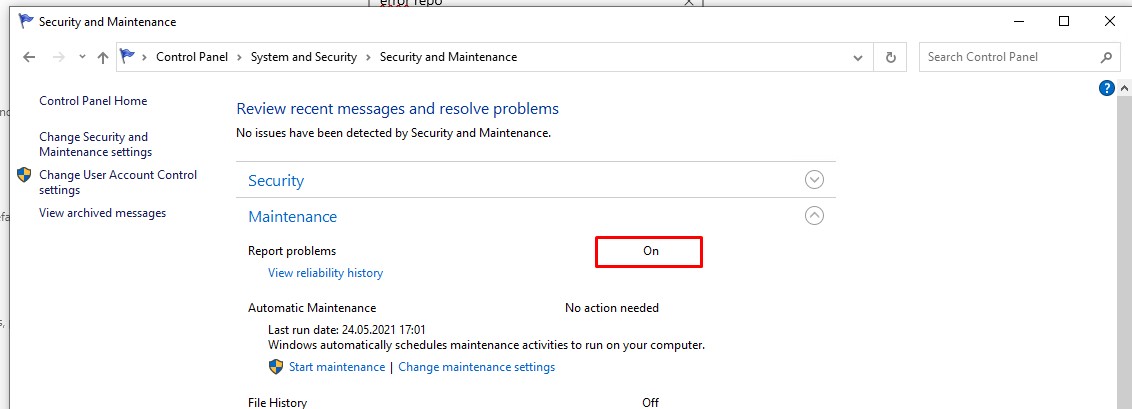
- Click Control Panel> System and Security> Security and Maintenance.

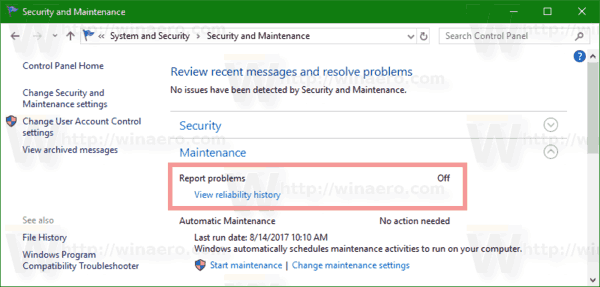
- Look out for Report problems. Report problems should by default display ‘On’.


- RELATED: Fix Blue Screen of Death errors with these 4 software solutions
2.1 Steps to disable Windows Error Reporting Service using the Registry Editor
- Locate the registry editor app below:
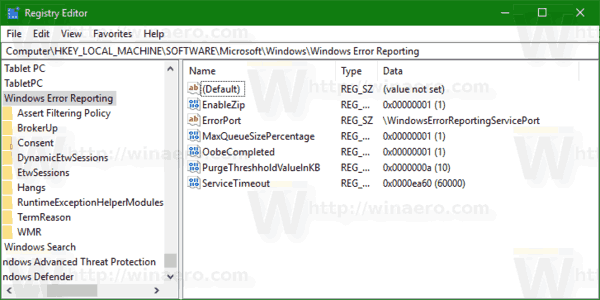
- HKEY_LOCAL_MACHINE\SOFTWARE\Microsoft\Windows\Windows Error Reporting

- HKEY_LOCAL_MACHINE\SOFTWARE\Microsoft\Windows\Windows Error Reporting
- To the right of your window, locate the registry key in the dialog box.
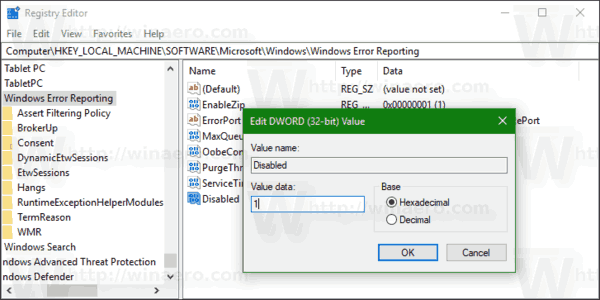
- Click on the option ‘disabled’ so the dialog box can appear. Replace the value ‘0’ with ‘1’.
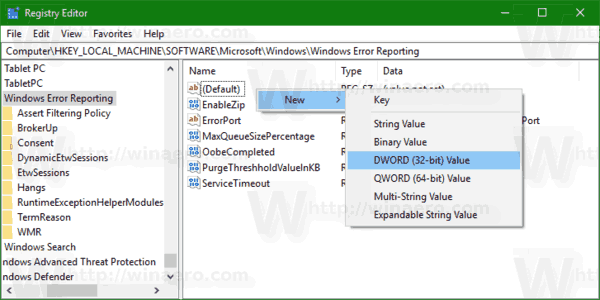
- If there is no value then create a new one with the same name, ‘Disabled’.
- To create a new DWORD from the registry editor, one needs to locate Edit > New on the menu.
- Then set the new 32-Bit DWORD value to ‘1’.
- Tap ‘OK’ to effect changes.
- Microsoft Office Lens: A Powerful Tool for Capturing and Organizing Information
- Swap Left/Right Speaker in Realtek Audio Console [How to]
- How to Get DirectX 12 End-User Runtime and Fix Installation Issues
- Overclocking in OMEN Gaming Hub: How to Use it
To confirm that the Windows error reporting service has been disabled, go to Security and Maintenance. Check the comment on the report problem to see if it reads on or off.
Can I enable the problem reporting service after I disable it?
To re-enable the error reporting service on Windows 10, simply set the disabled value back to zero.
Another option would be to delete the disabled value in the Registry Editor.
It’s quite simple to disable and enable Windows 10 error reporting service anytime. And understanding how to use the Registry Editor or finder makes everything much simpler.
Before you go, don’t miss our guide on Werfault.exe application error for more useful information.
We hope that our guide helped you disable this service. Let us know your thoughts in the comments section below.
Madalina Dinita
Networking & Security Specialist
Madalina has been a Windows fan ever since she got her hands on her first Windows XP computer.
She is interested in all things technology, especially emerging technologies — AI and DNA computing in particular.
Prior to joining the WindowsReport team, she worked in the corporate world for a number of years.
Служба Windows Error Reporting (WER) служит для сбора и отправки отладочной информации о падении системных и сторонних приложений в Windows на сервера Microsoft. По задумке Microsoft, эта информация должна анализироваться и при наличии решения, вариант исправления проблемы должен отправляется пользователю через Windows Error Reporting Response. Но по факту мало кто пользуется этим функционалом, хотя Microsoft настойчиво оставляет службу сбора ошибок WER включенной по умолчанию во всех последних версиях Windows. В большинстве случае о службе WER вспоминают, когда каталог C:\ProgramData\Microsoft\Windows\WER\ReportQueue\ начинает занимать много места на системном диске (вплоть до нескольких десятков Гб), даже не смотря на то что на этом каталоге по умолчанию включена NTFS компрессия.
Содержание:
- Служба Windows Error Reporting
- Очистка папки WER\ReportQueue в Windows
- Отключение Window Error Reporting в Windows Server
- Отключаем сбор и отправки отчетов об ошибках в Windows 10
- Отключение Windows Error Reporting через GPO
Служба Windows Error Reporting
Служба Windows Error Reporting при появлении ошибки показывает диалоговое окно, предлагающее отправить отчет об ошибке в корпорацию Microsoft. Когда в Windows вы видите сообщение об ошибке
YourApp has stop working
, в это время в служба Windows Error Reporting запускает утилиту WerFault.exe для сбора отладочных данных (могут включать в себя дамп памяти).
Данные пользователя сохраняются в профиль пользователя:
%USERPROFILE%\AppData\Local\Microsoft\Windows\wer
Системные данные – в системный каталог:
%ALLUSERSPROFILE%\Microsoft\Windows\WER\
Служба Windows Error Reporting представляет собой отдельный сервис Windows. Вы можете проверить состояние службы командой PowerShell:
Get-Service WerSvc
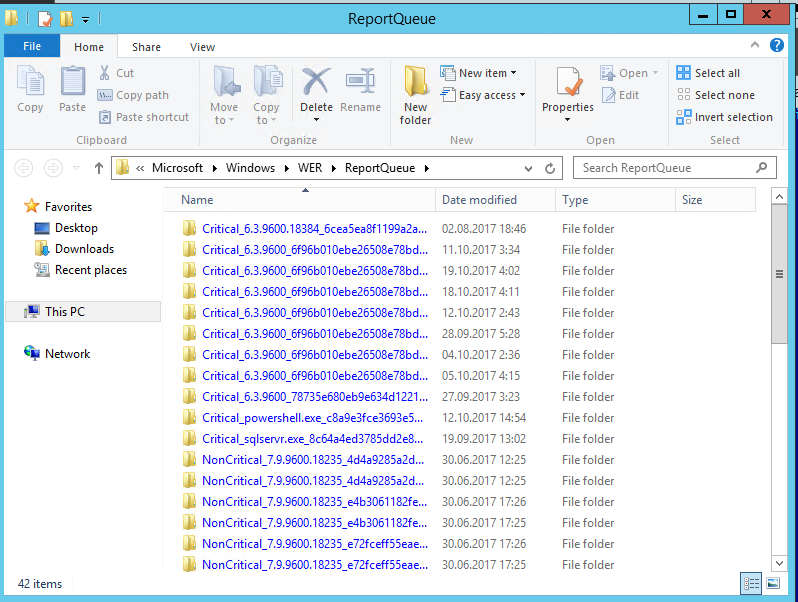
Внутри каталога WER\ReportQueue\ содержится множество каталогов, с именами в формате:
- Critical_6.3.9600.18384_{ID}_00000000_cab_3222bf78
- Critical_powershell.exe_{ID}_cab_271e13c0
- Critical_sqlservr.exe__{ID}_cab_b3a19651
- NonCritical_7.9.9600.18235__{ID}_0bfcb07a
- AppCrash_cmd.exe_{ID}_bda769bf_37d3b403
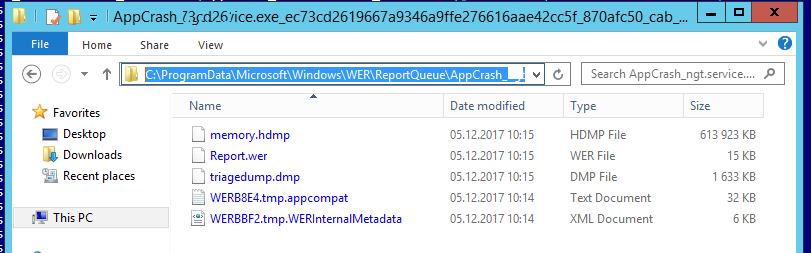
Как вы видите, имя каталога содержит степень критичности события и имя конкретного exe файла, который завершился аварийно. Во всех каталогах обязательно имеется файл Report.wer, который содержит описание ошибок и несколько файлов с дополнительной информацией.
Очистка папки WER\ReportQueue в Windows
Как правило, размер каждой папки в WER незначителен, но в некоторых случаях для проблемного процесса генерируется дамп памяти, который занимает довольно много места. На скриншоте ниже видно, что размер файла дампа memory.hdmp составляет около 610 Мб. Парочка таким дампов – и на диске исчезло несколько свободных гигибайт.
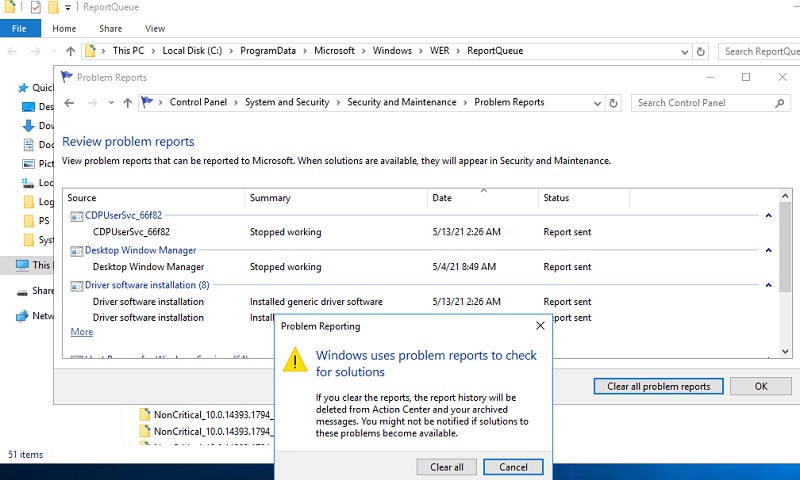
Чтобы очистить все эти ошибки и журналы штатными средствами, откройте панель управления и перейдите в раздел ControlPanel -> System and Security -> Security and Maintenance -> Maintenance -> View reliability history -> View all problem reports (Control Panel\System and Security\Security and Maintenance\Problem Reports) и нажмите на кнопку Clear all problem reports.
Для быстрого освобождения места на диске от файлов отладки, сгенерированных службой WER, содержимое следующих каталогов можно безболезненно очистить вручную.
- C:\ProgramData\Microsoft\Windows\WER\ReportArchive\
- C:\ProgramData\Microsoft\Windows\WER\ReportQueue\
Следующие команды PowerShell удалят из каталога каталогов WER все файлы, старше 15 дней:
Get-ChildItem -Path  'C:\ProgramData\Microsoft\Windows\WER\ReportArchive' -Recurse | Where-Object CreationTime -lt (Get-Date).AddDays(-15) | Remove-Item -force -Recurse
Get-ChildItem -Path  'C:\ProgramData\Microsoft\Windows\WER\ReportQueue' -Recurse | Where-Object CreationTime -lt (Get-Date).AddDays(-15) | Remove-Item -force –Recurse
Для очистки каталогов WER в пользовательских профилях используйте такой скрипт:
$users = Get-ChildItem c:\users|where{$_.name -notmatch 'Public|default'}
foreach ($user in $users){
Get-ChildItem "C:\Users\$User\AppData\Local\Microsoft\Windows\WER\ " –Recurse -ErrorAction SilentlyContinue | Remove-Item –force –Recurse
}
Отключение Window Error Reporting в Windows Server
В Windows Server 2019/2016/2012R2 вы можете управлять состоянием WER с помощью PowerShell. Вы можете отключить службу Windows Error Reporting:
Get-Service WerSvc| stop-service –passthru -force
Set-Service WerSvc –startuptype manual –passthru
Но есть более корректные способы отключения WER в Windows. В версии PowerShell 4.0 добавлен отдельный модуль WindowsErrorReporting из трех командлетов:
Get-Command -Module WindowsErrorReporting

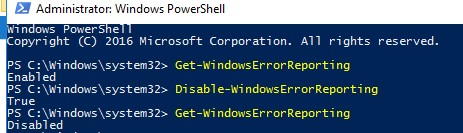
Проверить состояние службы Windows Error Reporting можно командой:
Get-WindowsErrorReporting
Для отключения WER, выполните:
Disable-WindowsErrorReporting
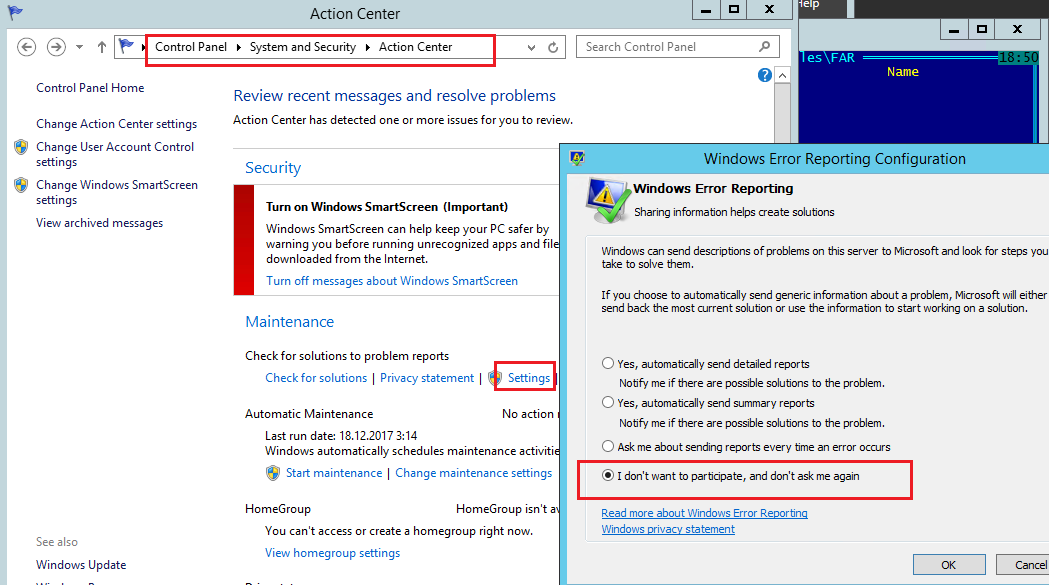
В Windows Server 2012 R2 можно отключить запись информации об ошибках Windows Error Reporting через панель управления (Control Panel -> System and Security -> Action Center -> раздел Maintenance -> Settings -> выберите опцию I don’t want to participate, and don’t ask me again
Отключаем сбор и отправки отчетов об ошибках в Windows 10
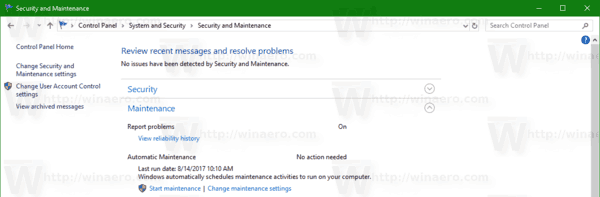
В Windows 10 нельзя отключить Error Reporting через панель управления. В графическогм интерфейсе можно только проверить ее статус (Система и безопасность ->Центр безопасности и обслуживания -> секция Обслуживание). Как вы видите, по умолчанию параметр Поиск решения для указанных в отчетах проблем включен (Control Panel -> System and Security -> Security and Maintenance -> Maintenance -> Report problems = On).
HKLM\SOFTWARE\Microsoft\Windows\Windows Error Reporting нужно создать новый параметр типа DWORD (32 бита) с именем Disabled и значением 1.
Можно отключить сбор ошибок WER для конкретных пользователей:
reg add "HKCU\Software\Microsoft\Windows\Windows Error Reporting" /v "Disabled" /t REG_DWORD /d "1" /f
Или отключить WER для всех:
reg add "HKLM\Software\Microsoft\Windows\Windows Error Reporting" /v "Disabled" /t REG_DWORD /d "1" /f

Измените параметр реестра и проверьте статус параметра Поиск решения для указанных в отчетах проблем в панели управления. Его статус должен изменится на Отключено.

Отключение Windows Error Reporting через GPO
Также вы можете управлять настройками службы Windows Error Reporting через групповые политики.
Запустите редактор локальной (
gpedit.msc
) или доменной GPO (
gpmc.msc
) и перейдите в ветку реестра Computer Configuration -> Administrative Templates -> Windows Components -> Windows Error Reporting (Компоненты Windows -> Отчеты об ошибках Windows). Для отключения сбора и отправки ошибок через WER включите политику Disable Windows Error Reporting (Отключить отчеты об ошибках Windows).
Аналогичная политика есть в пользовательском разделе политик (User Configuration).

Обновите GPO (перезагрузка не потребуется).
В результате в Windows перестанут формироваться сообщения об ошибках Windows и отправляться в Microsoft.
-
Home
-
News
- Try These Methods to Disable Windows 10 Error Reporting Service
By Echo |
Last Updated
If you want to know how to disable Windows 10 Error Reporting Service, you really need to read this post written by MiniTool. It will show you two workable methods. You can try to do this job in Services or in Registry Editor. Hope this post will be helpful to you.
Overview of Windows 10 Error Reporting Service
The purpose of the Windows 10 Error Reporting Service is to help ensure that your PC works optimally by keeping Microsoft informed about problems with users using Windows.
Windows 10 Error Reporting Service aims to discover hardware and software issues from the user’s PC and then reports them to Microsoft. With a database of possible complaints using Windows 10, Microsoft can then send solutions for troubleshooting.
Windows error report always appears after program crashes, refused to load properly, a system failure or operating system errors. In order to help proffer solutions in the future, you need to submit an error report online that includes program name, date, time of error and version.
This service is enabled by default with each version of the Windows operating system. However, you can choose to disable it if needed. This post will show you how to disable Windows 10 Error Reporting Service.
Should You Disable Windows Error Reporting Service?
You may disable error reporting because of disk space or privacy issues, but you need to exercise restraint. Windows 10 Error Reporting Service offers dual benefits to both Microsoft and PC users.
Every error report can help Microsoft develop more advanced service packs to handle glitches. That means Windows 10 will provide a better user experience based on the information gathered. However, it is safe to disable Windows Error Reporting Service. Now, you can try the following methods.
Disable Windows 10 Error Reporting Service
Method 1: Disable Windows 10 Error Reporting Service in Services
First, you can try to disable Windows 10 Error Reporting Service in Services. Here are the steps to do this job.
Step 1: Press the Windows key + R key together to open the Run window.
Step 2: Type services.msc in the dialog box and press Enter to open the Services window.
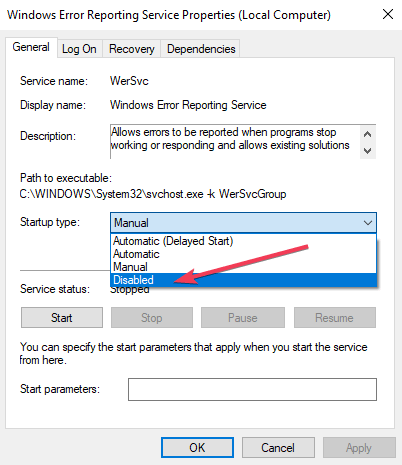
Step 3: In the Services window, navigate to Windows Error Reporting Service, right-click it and then choose Properties.
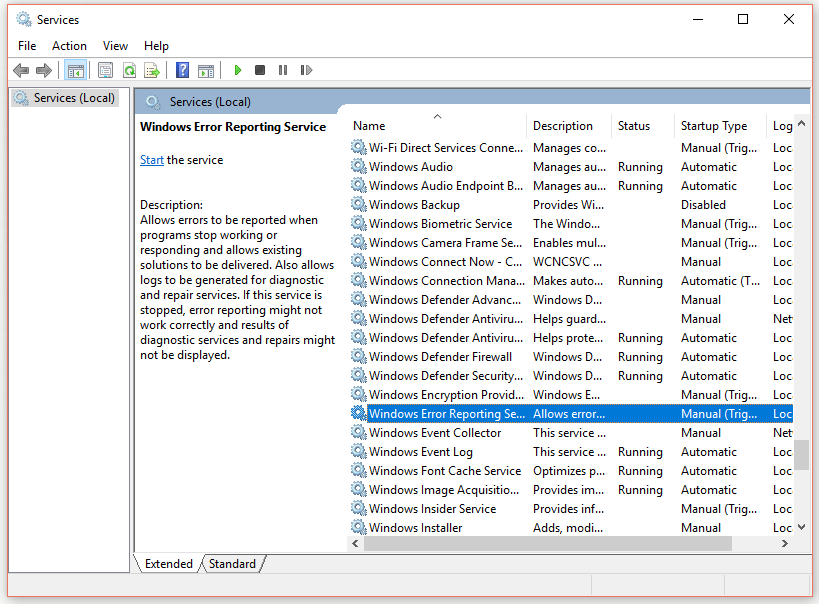
Step 4: In the General tab, change Startup type to Disabled.
Step 5: Click OK or Apply to complete the action. Close the Services window to exit.
After you finish all the steps above, you should successfully disable Windows 10 Error Reporting Service now.
Method 2: Disable Windows 10 Error Reporting Service in Registry Editor
The second method you can try is to disable Windows 10 Error Reporting Service in Registry Editor. But first, you need to check for Report problems.
Check for Report Problems in Control Panel
Step 1: Type control panel in the search bar and click Control Panel to open it.
Step 2: Choose View by: Small icons and select Security and Maintenance.
Step 3: Locate Report problems. It should display On by default.
Start to Disable Windows Error Reporting Service in Registry Editor
Step 1: Type regedit in the search bar and click it to open the Registry Editor window.
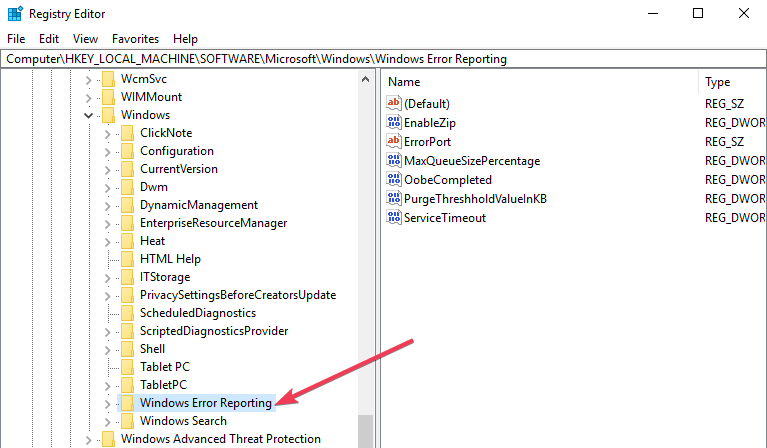
Step 2: Navigate to this path: HKEY_LOCAL_MACHINE\SOFTWARE\Microsoft\Windows
Step 3: Then locate the Windows Error Reporting key.

Step 4: Find the Disabled value. If it doesn’t exist, right-click the blank area to create a new 32-Bit DWORD value with that exact name.
Step 5: Double-click the Disabled value to change Value data to 1, and then click OK to save the change.
Step 6: Open the Security and Maintenance applet again. The Report problems line will change from On to Off.
After you finish all the steps above, now you should disable Windows 10 Error Reporting Service successfully.
Bottom Line
In conclusion, that’s all the information about the methods to disable Windows problem reporting. If you also want to do this job, try these two methods.
About The Author
Position: Columnist
Echo is a technology enthusiast, has published many professional technical articles. She previously specialized in backup and recovery of data, files, disk partition, and system. Now she writes mostly about YouTube expertise.
As an enthusiastic technical writer, Echo believes that technology makes our life better and she has been trying to make her technical articles easier to understand and help more people. You must benefit a lot from reading her article.
On her spare time, she likes listening to songs and hiking.
If a program stops working or responding, Windows 10 can automatically report the problem to Microsoft and check for a solution. By default, Windows 10 collects information that describes the problem. This is called a problem report. It can include the name of the program that has stopped working, the date and time when the problem occurred, and the version of the program that has encountered the problem. Sending a problem report allows Windows 10 to notify you if a solution is available. This is called «Error Reporting». If you are not happy with the OS behavior, for example, because of privacy or disk space issues, you might want to disable it.
In Windows 10, the GUI option to disable Error Reporting was eliminated. In previous Windows versions, it could be found in Action Center settings (the old feature called Action Center was renamed in Windows 10 to Security & Maintenance because the new Action Center is used for showing notifications). In Windows 10, the Error Reporting Settings are missing there. However, there is a Registry tweak you can apply to disable it.
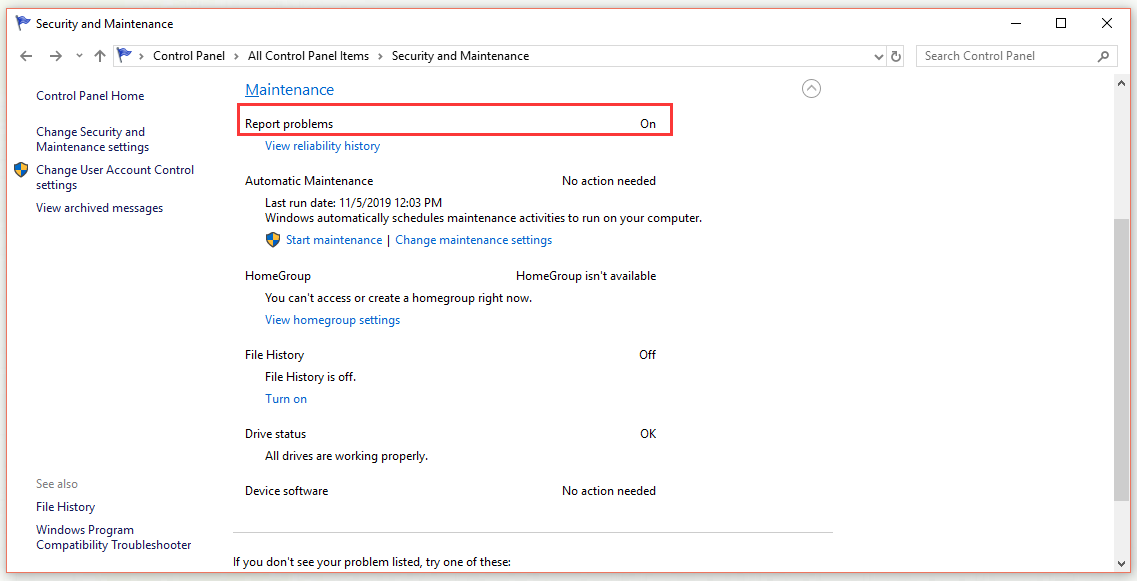
First of all, let’s check the state of the feature. Open the classic Control Panel app and go to Control Panel\System and Security\Security and Maintenance. Under Maintenance, see the Report problems line. By default, it says «On».
To disable Error Reporting in Windows 10, do the following.
- Open the Registry Editor app.
- Go to the following Registry key.
HKEY_LOCAL_MACHINE\SOFTWARE\Microsoft\Windows\Windows Error Reporting
See how to go to a Registry key with one click.

- On the right, modify or create a new 32-Bit DWORD value «Disabled». Set it to 1.
Note: Even if you are running 64-bit Windows you must still create a 32-bit DWORD value.
Now, re-open the Security and Maintenance applet. The Report problems line will change from On to Off as shown below.
Tip: You can quickly check for available solutions to problem reports in Windows 10.
To re-enable the Error Reporting feature, you need to delete the Disabled value you have created or set it to 0.
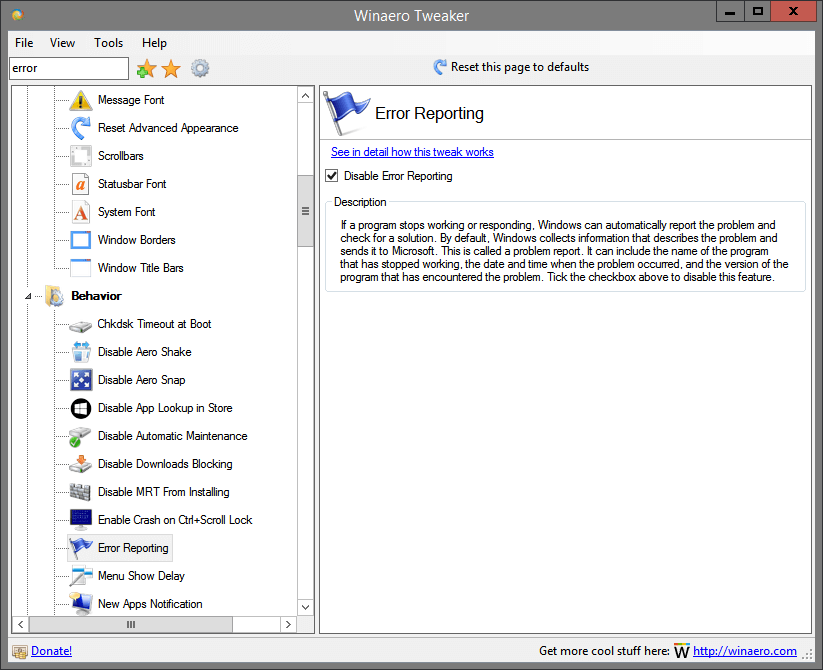
To save your time, you can use Winaero Tweaker. Go to Behavior\Error Reporting and enable the option as shown in the following screenshot.
You can get the app here: Download Winaero Tweaker.
Support us
Winaero greatly relies on your support. You can help the site keep bringing you interesting and useful content and software by using these options:
If you like this article, please share it using the buttons below. It won’t take a lot from you, but it will help us grow. Thanks for your support!