
Microsoft tests the new feature via the insider programs before officially releasing them to the general public. For this very reason, there lies a program titled “Windows Insider” on our computer. The intention is pretty simple – the registered users (insiders) get early access to these beta versions so that they can test new features on their computers. When everything seems to be working fine on the preview builds, the company includes the new features on its next major or cumulative update.
Each and every program on Windows 10 has its own service running in the background and so is the case with the Insider program. Whether you are enrolled in this or not, the service keeps running until you manually stop this. If you are getting performance issues on your device, you may safely disable the related services.
Note: The insiders who want to retain back their PC’s original speed may also disable the Windows Insider service.
To disable the Windows Insider service (wisvc) on Windows 10, you can use the following methods –
- Stop receiving the Next Production Build via Settings (Insiders only)
- Through the Services Console
- Using the cmd command
- Via the Windows PowerShell
1] Stop Receiving the Next Production Build via Settings
If you want to stop receiving the Next production build instead of disabling the whole Insider Services, you may use these steps. Otherwise, follow the next set of solutions –
- First of all, reach out to the following location –
Settings (Win + I) > Update & Security > Windows Insider Program. - Jump to the right side and slide the “Stop getting preview builds” toggle switch to the right.
For Insiders Only
If you are already an insider and want to opt out of these services, make sure that you are using a production build. You may do the following to know what is the current build number on your device.
- Press Win + R, type Winver, and press Enter. There appears a pop-up window displaying your current Windows 10 version along with a build number.

2] Through the Services Console
One may disable the insider services simply by opening the Services window and making the necessary changes. Here’s how to perform this task –
- Press Win + S to launch the Search window.
- Type “services” in the text field and press Enter.
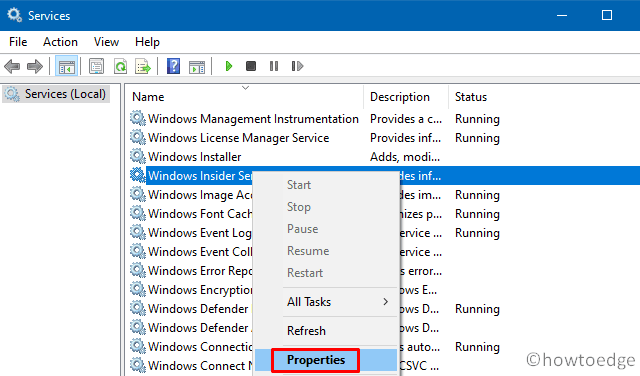
- Scroll and locate “Windows insider service” under the Name column.
- Right-click on this service and hit Properties on the context menu.
- Use the drop-down menu next to Startup type and select “Disabled“.
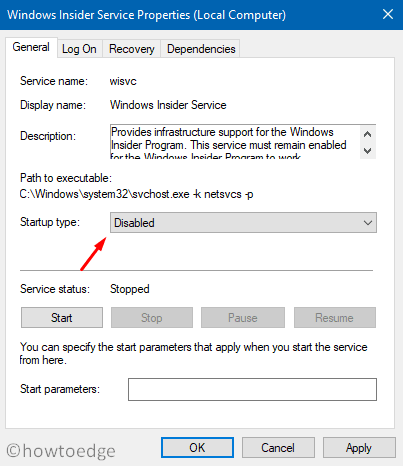
- Subsequently, hit Apply then OK to confirm the above changes.
3] Disable Windows Insider Service using the “cmd” command
Alternatively, you may also use a single command to disable the Insider services on Windows 10. Here are the essential steps to work upon –
- Right-click on the Windows icon and select Run.
- Press and hold Ctrl + Shift + Enter to open Command Prompt as an Administrator.
- Click Yes to agree with the User account control prompt.
- On the elevated console, type the following and hit Enter.
sc config “wisvc” start= disabled
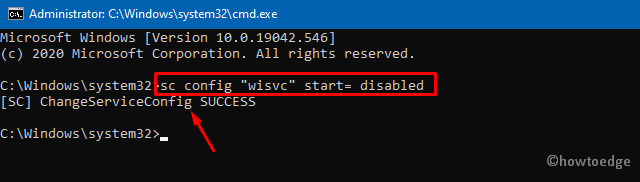
- When you receive the confirmation message i.e. “[SC] ChangeServiceConfig SUCCESS“, close Command Prompt, and Restart Windows.
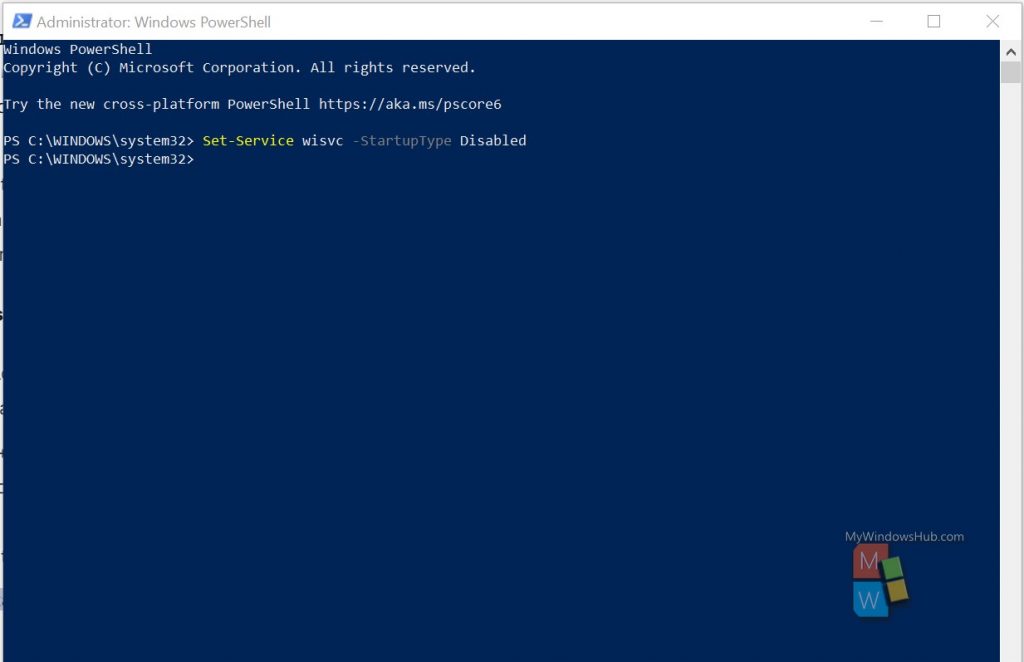
4] With Windows PowerShell
Windows PowerShell also provides an option to disable the insider services on the computer. To do so, use these simple steps –
- Press Windows Key and X altogether to launch the Power Menu.
- Select the option – Windows PowerShell (Admin).
- When the UAC dialog comes into view, hit Yes.
- Now, copy/paste the below code and hit Enter –
Set-Service wisvc –Startup Type Disabled

- Once over, Reboot your computer so that changes made become effective from the next logon.
By choosing any of the above methods, you may safely disable Windows Insider Service. For users who don’t wish to be part of the Windows Insider Program, removing this service can boost their PC’s performance.
Frequently Asked Questions
Windows Insider Program: Is it safe to enable?
There is no stability in the Windows Insider builds. You may find bugs in them. Microsoft releases these previews so that they can receive feedback from users and make the software more stable. The insider preview is not something I will recommend you install on your main system. However, you can try it out on a secondary system if you have one.
Read Next: How to Change Windows 11 insider Channel to Beta from Dev
Download Windows Speedup Tool to fix errors and make PC run faster
Microsoft always comes up with innovation, just like the Windows Insider Program. Today when the world is moving towards information technology and entrepreneurship, Microsoft is working harder to help make dreams come true. Therefore, the Windows Insider Program has been designed to provide a nova and a better approach to IT developers and entrepreneurs.
This optional service has not yet been released publically but is available for testing as per the user’s choice. Microsoft has opened its arms for feedback of the program, some dissatisfied users might want to disable it after use. So here we are to guide you on how to disable Windows Insider Program Settings in Windows 10.
Windows Insider Program is more about telemetries, so it may not suits every user. Furthermore, the program releases build in a very short interval and this may run your PC a little slow and make it unstable. This article shows two different methods to disable Windows Insider Program Settings in Windows 11/10.
- Using Local Group Policy Editor
- Through the Registry Editor
Let’s learn both methods in detail:
1] Disable Windows Insider Program Settings using Group Policy Editor
In case you do not have Group Policy Editor, download it before starting the below steps.
- Click the Start button.
- In the search tab, type run and hit Enter.
- Type gpedit.msc in the Run dialog box and hit Enter.
- In the Local Group Policy Editor window, navigate to the following path:
Computer Configuration > Administrative Templates > Windows Component > Windows Update > Windows Update for Business
- Move to the right pane and double-click on the Manage Preview Builds option.

- Inside the Manage Preview Builds window, check the Enabled radio button.

- Then go to the Options section, and using the drop-down menu, set the preferred release channel.
- Select Apply and then OK.
Once done, verify the changes made.
Read: Your diagnostics settings are preventing this device from getting Insider builds.
2] Disable Windows Insider Program Settings via Registry Editor
If you’re using the Home version then you might not be able to disable Windows Insider Program Settings using Group Policy Editor. In such a case, you can use the help of the Registry Editor using the below instructions.
But before you go to the steps, one thing you must know that editing a registry can be risky. It can damage your system permanently which might be irreversible. So, if you have limited knowledge of what you’re doing then you can skip it and ask a skilled person to complete the tinkering.
Right-click on the Start button and select Run to open the Run dialog box.
Type regedit in the search field press Enter to open the Registry Editor.
Click Yes if UAC prompts on your Windows screen.
Under the Registry Editor folder navigate to the path given below:
HKEY_LOCAL_MACHINE\SOFTWARE\Policies\Microsoft\Windows\WindowsUpdate
You can also simply copy the above path line and paste it into the registry address bar to navigate the path line directly.
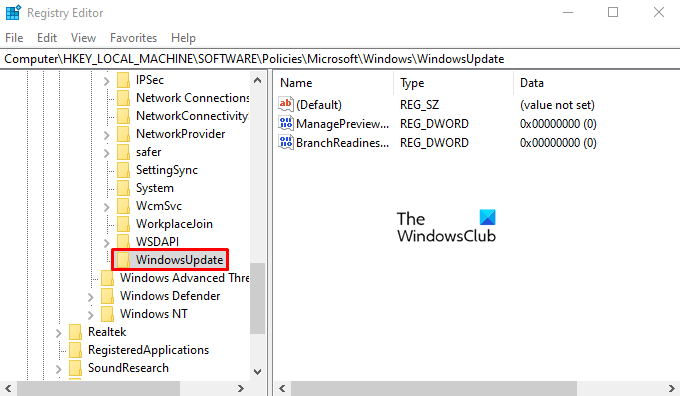
If you don’t find the WindowsUpdate subkey, right-click on Windows and select Key. Then name the new key as WindowsUpdate and then press Enter to save it.
Now move to the right pane, do a right-click on the empty space, and then select New > DWORD (32-bit) Value.
Name the new key as ManagePreviewBuildsPolicyValue and then double-click on it to set the value.
In order to enable the Insider Program page options, set the Value data 1 and hit OK to save it. And set the Value data 2, if you want to disable the Insider Program.
Then again create a new DWORD value and name it BranchReadinessLevel. Right-click on the created Dword Value and select Modify.
In the dialog box, you can set the Value data as following:
- 2 = Receive Dev channel builds.
- 4 = Receive Beta channel builds.
- 8 = Receive Release Preview builds.
Once you set the Value data, click on the OK button to save the changes.
That’s all.
Anand Khanse is the Admin of TheWindowsClub.com, a 10-year Microsoft MVP (2006-16) & a Windows Insider MVP (2016-2022). Please read the entire post & the comments first, create a System Restore Point before making any changes to your system & be careful about any 3rd-party offers while installing freeware.
Все устройства с Windows 10 поставляются с Windows Insider Service (wisvc), независимо от участия пользователей; он будет продолжать работать в фоновом режиме для программы предварительной оценки Windows. Программа Windows Insider — это платформа для тестирования с открытым исходным кодом, которая позволяет лицензированному пользователю получить предварительную сборку операционных систем. В большинстве случаев эта услуга считается бесполезной для пользователей, которые не хотят участвовать в программе Insider. Короче говоря, ненужные службы, работающие в фоновом режиме, снизят общую производительность вашего устройства. В этой статье будут показаны различные шаги по отключению службы предварительной оценки Windows на вашем устройстве с Windows 10.
Как отключить Windows Insider Service?
Этого можно добиться тремя способами, как указано ниже:
- Через консоль служб
- Через командную строку
- Через PowerShell
Отключите Windows Insider Service через консоль служб:
В этом методе мы проведем вас через шаги по отключению службы предварительной оценки Windows с помощью консоли служб . Пожалуйста, выполните следующие шаги,
Теперь вы можете закрыть консоль служб.
Отключите Windows Insider Service через командную строку:
Вот и все. Вы только что отключили Windows Insider Service с помощью командной строки с повышенными привилегиями.
Отключите Windows Insider Service через PowerShell:
Последний метод проведет вас через шаги по отключению службы с помощью PowerShell. Пожалуйста, выполните следующие шаги,
- Нажмите клавишу « Win + X », чтобы открыть меню опытного пользователя.
- Затем нажмите «A» на клавиатуре, чтобы открыть PowerShell в повышенном режиме.
- В консоли введите следующую команду и нажмите клавишу ввода.
Set-Service wisvc -StartupType Disabled

Вывод:
В этой статье показано три разных способа отключить службу предварительной оценки Windows на вашем устройстве с Windows 10. Если вы столкнетесь с трудностями при выполнении любого из шагов, упомянутых выше, оставьте комментарий ниже.
https://www.youtube.com/watch?v=9OGS0h86BLk
Просмотров: 2 512
Microsoft created the Windows Insider Program to allow enthusiasts and developers to test early preview builds of Windows 10 in exchange for feedback to help the company improve the operating system.
Anyone wanting to test upcoming features and willing to submit suggestions can quickly enroll a computer to the program by using the «Windows Insider Program» settings page. However, if you’re not interested or you’re sharing your computer, and you want to prevent other people from enrolling the device, it’s possible to remove the option from the Settings app.
In this Windows 10 guide, we’ll walk you through the steps to edit the Registry to remove the «Windows Insider Program» option from the Settings app.
How to remove ‘Windows Insider Program’ from Settings
Important: As always, this is a friendly reminder warning you know that editing the registry is risky, and it can cause irreversible damage to your installation if you don’t do it correctly. It’s recommended to make a full backup of your computer before proceeding.
- Use the Windows key + R keyboard shortcut to open the Run command.
- Type regedit, and click OK to open the registry.
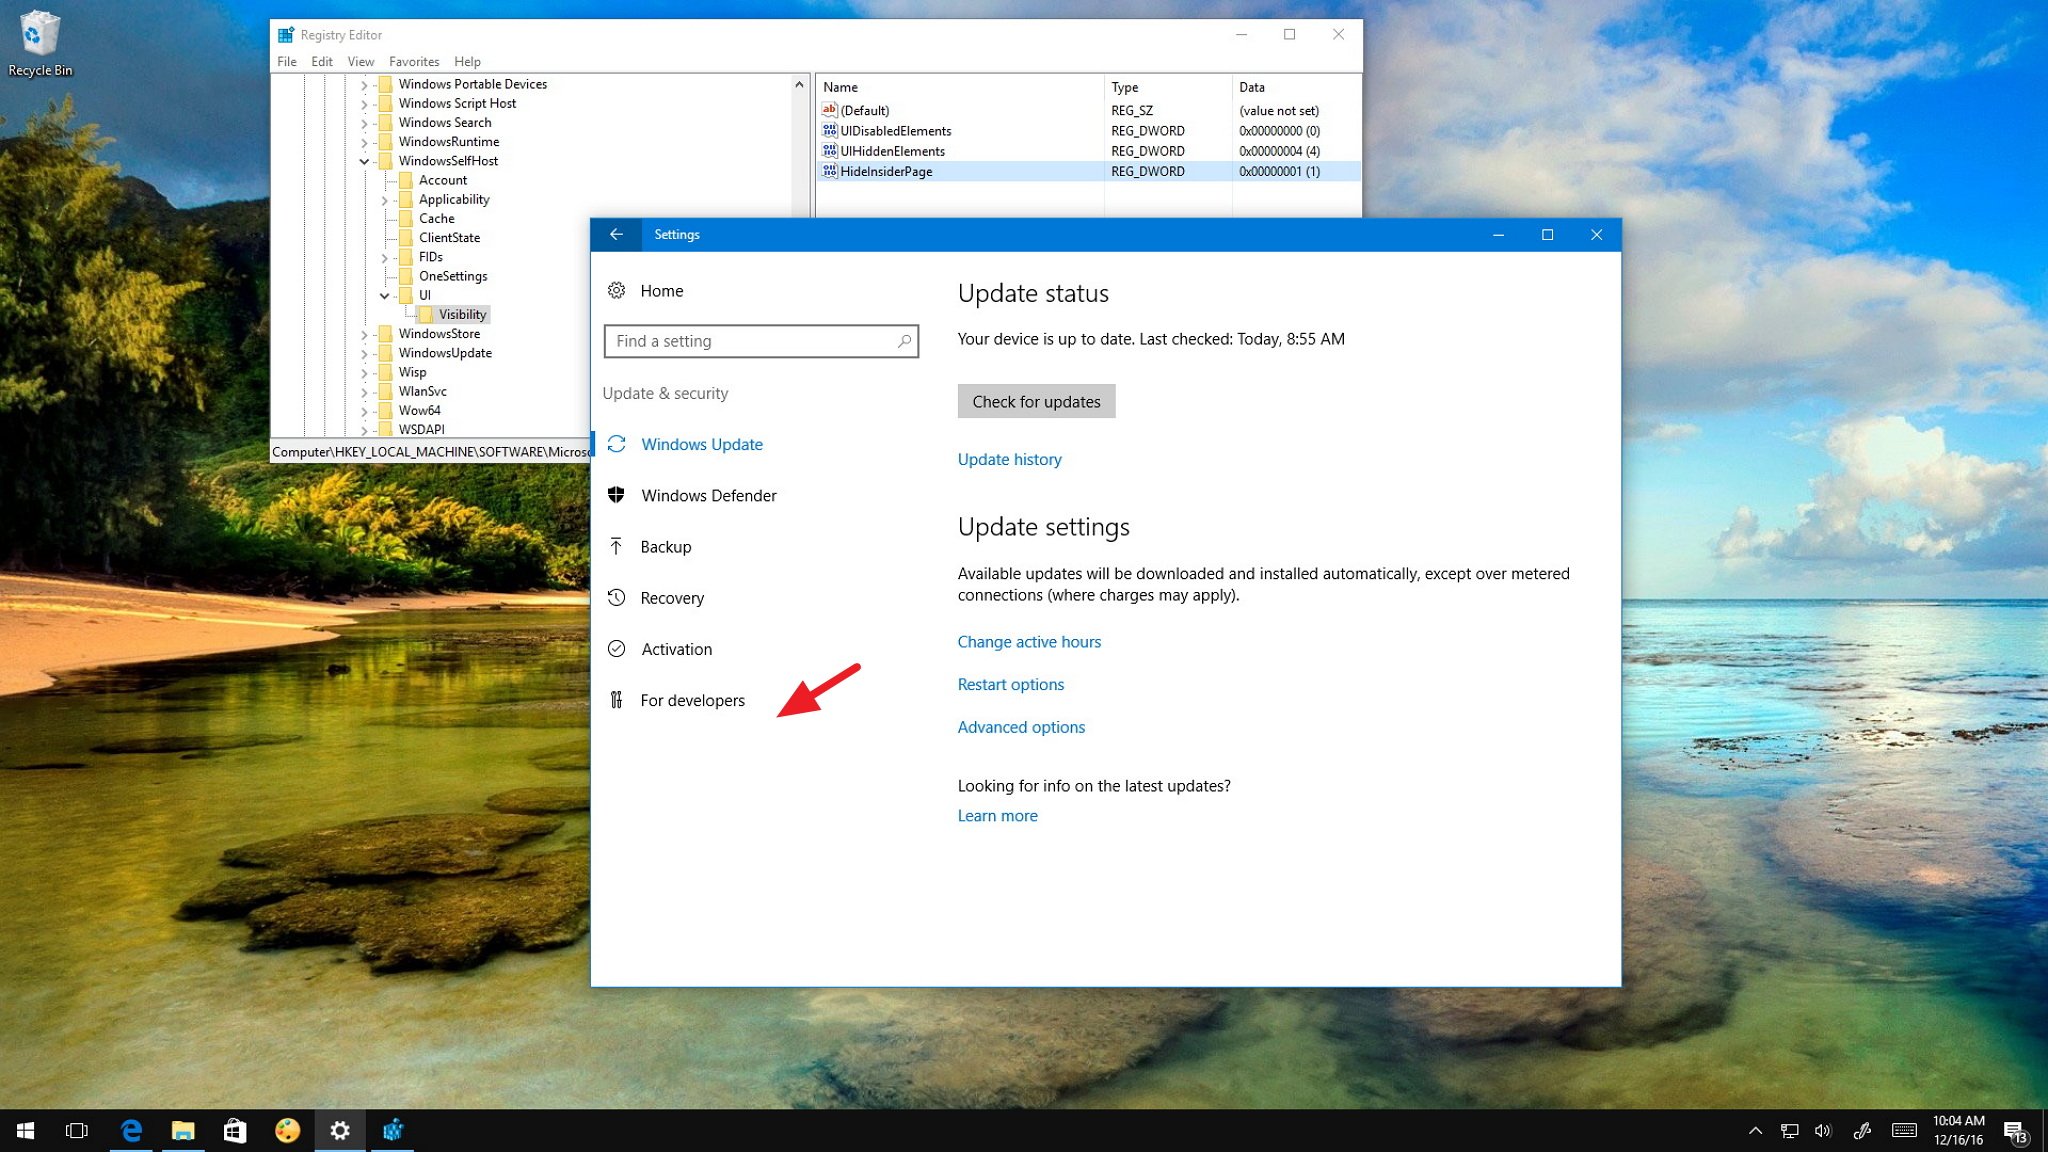
- Browse the following path:
HKEY_LOCAL_MACHINE\SOFTWARE\Microsoft\WindowsSelfHost\UI\Visibility - On the right side, right-click, select New, and click on DWORD (32-bit) Value.
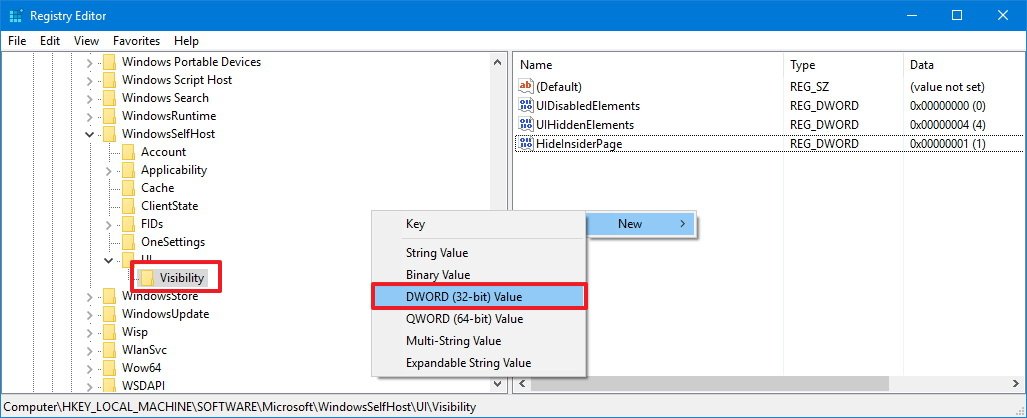
- Name the DWORD HideInsiderPage and press Enter.
- Double-click the newly created DWORD and change the value from 0 to 1.
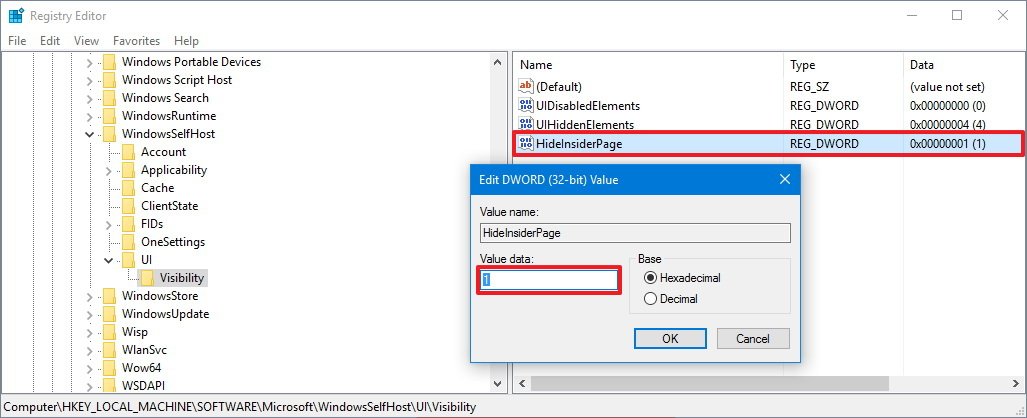
- Click OK.
- Close the Registry to complete the task.
Once you completed the steps, open Settings (Windows key + I), click on Update & security, and you should no longer see the Windows Insider Program at the bottom of the list.
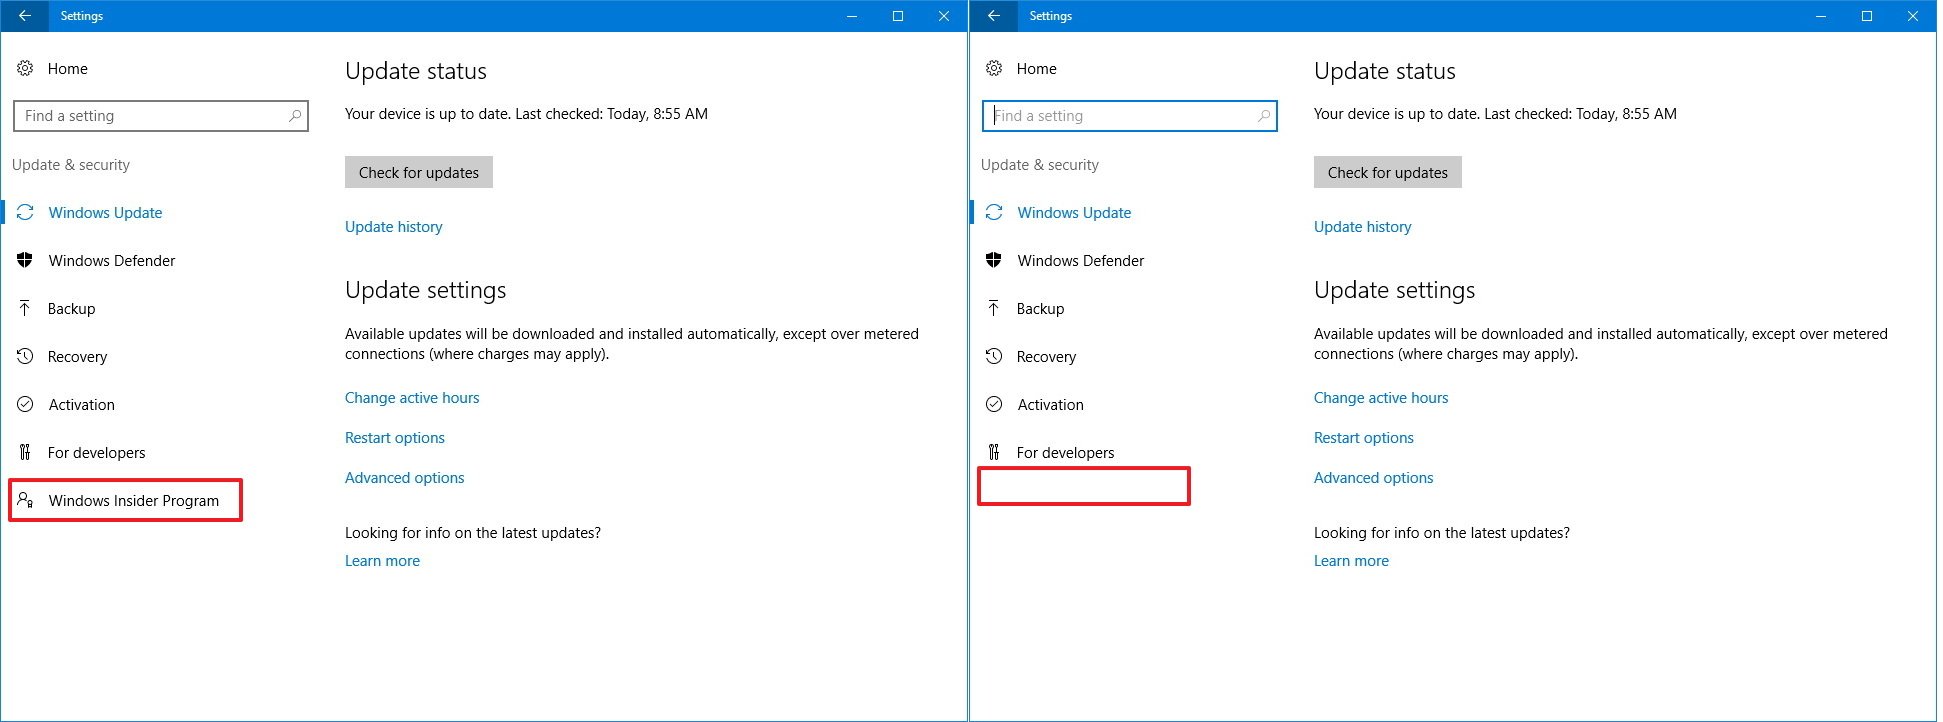
At any time, if you want to participate in the Insider program, you can always revert the changes by following the steps mentioned above, but on steps 6 change the DWORD HideInsiderPage value from 1 to 0.
More Windows 10 resources
For more help articles, coverage, and answers on Windows 10, you can visit the following resources:
All the latest news, reviews, and guides for Windows and Xbox diehards.
- Windows 10 on Windows Central – All you need to know
- Windows 10 help, tips, and tricks
- Windows 10 forums on Windows Central
Mauro Huculak has been a Windows How-To Expert contributor for WindowsCentral.com for nearly a decade and has over 15 years of experience writing comprehensive guides. He also has an IT background and has achieved different professional certifications from Microsoft, Cisco, VMware, and CompTIA. He has been recognized as a Microsoft MVP for many years.