
Here, you will get to know how to Enable or Disable Diagnostic Policy Service in Windows 10 and 11. When your system conflict with bugs and problems, DPS service let you know what they are. At the same time, it allows troubleshooting and a workaround for the problematic component of your Windows. By default, the service runs automatically with the OS to keep finding the issues. If you disable the same, the service will no longer function and you will never come to know what is causing trouble in your system.
DPS is Win32 service whose path is “%SystemRoot%\System32\svchost.exe -k LocalServiceNoNetwork -p”. It runs as NT Authority\LocalService in a shared process of “svchost.exe”. Consequently, other services function in the same process too. If the service fails to start, the details are being recorded into Event Log. Next time, when the device starts up, it will notify you that Diagnostic Policy Service failed to start due to the error.
Ways to Enable or Disable Diagnostic Policy Service in Windows 11 and 10
Here is How to Enable or Disable Diagnostic Policy Service in Windows 11 or 10 –
1] Exploit Services app to manage Diagnostic Policy Service
Step-1: First of all, open Run dialog box by pressing Windows key and R.
Step-2: Type in the command “services.msc” in the empty text field and hit Enter.
Step-3: On the Services console, find out Diagnostic Policy Service located under Name column.
Step-4: Once found, right-click on the same and select Properties.
Step-5: When a new wizard appears, go to its Startup type area and select either Automatic or Manual using the drop-down menu.
Step-6: Thereafter, hover the cursor to Service status and click the Start button to enable Diagnostic Policy Service. To disable the same, hit the Stop button.
Step-7: Finally, click Apply followed by OK in order to save the changes.
2] Make use of System Configuration
- Press Win+Q keyboard shortcut to invoke taskbar search box.
- Write down msconfig in the void space and hit Enter.
- When System Configuration wizard comes into the sight, move to its Services tab.
- Here you will see all the services, locate “Diagnostic Policy Service” from the list.
- Once you get it, click the checkbox located beside the service to put a tick mark.
- After that, click on Apply and then OK button to enable DPS Service.
- If you want to disable Diagnostic Policy Service, just withdraw the tick mark you put there.
- To make the changes effective, you need to restart Windows 10 PC.
3] Do minor change in the registry key
Note – While modifying the registry key, be careful as a wrongly allocated value can cause serious damage to your system.
- Right-click on the Start button and select Run from the Power-user menu.
- Once appears, type regedit in the empty area located and click the OK button.
- A UAC will prompt up, click Yes to give consent.
- In the Registry Editor window, navigate the following path –
HKEY_LOCAL_MACHINE\SYSTEM\CurrentControlSet\Services\DPS
- After getting there, shift to the right pane of the current window and locate the DWORD namely Start.
- Double click on the same to modify its value.
- A popup will show up entitled Value data box. Place your preferred value followed by clicking OK button.
| Startup Type | Value Data |
| Automatic | 2 |
| Disabled | 4 |
| Manual | 3 |
| Automatic (Delayed Start) | 2 |
4] Execute command through elevated Command Prompt
Step#1: Click on the Start button and type cmd.exe. When you see Command Prompt in the search result, click “Run as administrator”.
Step#2: If a UAC prompts up, click Yes proceed forward.
Step#3: To enable Diagnostic Policy Service, you must set the startup type to either Automatic or Manual. For that, execute the preferred command in the black window –
Automatic –
REG add “HKLM\SYSTEM\CurrentControlSet\services\DPS” /v Start /t REG_DWORD /d 2 /f
Manual –
REG add “HKLM\SYSTEM\CurrentControlSet\services\DPS” /v Start /t REG_DWORD /d 3 /f
Step#4: As you modify the startup type, now write down below command in the same Command prompt and hit Enter to execute it –
net start DPS
This will enable the DPS service immediately.
Step#5: In order to disable Diagnostic Policy Service, execute the below command in the same way –
REG add “HKLM\SYSTEM\CurrentControlSet\services\DPS” /v Start /t REG_DWORD /d 4 /f
Note – The called service uses dps.dll file which is located in the %WinDir%\system32 folder. If the file gets corrupted or deleted somehow, you need to restore its original version from Windows 10 installation media.
That’s all!!!!!
Запретите ПК тратить ресурсы на лишние действия.
Windows управляет множеством служб — программ, которые действуют в фоновом режиме, обеспечивая нормальную работу компьютера. Но некоторые из них нужны только для специфических задач и бесполезны для большинства пользователей. Отключив эти службы, вы можете улучшить производительность слабого ПК.
Как настроить службы Windows
Включать и отключать службы можно в специальном менеджере Windows. Чтобы открыть его, воспользуйтесь комбинацией клавиш Windows + R, в появившейся строке введите команду services.msc и нажмите Enter. Вы увидите такое же или похожее (если у вас одна из старых версий ОС) окно:

Менеджер отображает службы в виде таблицы. Здесь можно просмотреть их список и прочитать краткое описание каждой программы. Особую важность представляет столбец «Тип запуска». Именно он показывает, используется ли та или иная служба.
Чтобы отключить службу, нужно кликнуть по ней дважды, нажать «Тип запуска», выбрать «Отключена» и кликнуть «Ок». Но среди прочих вариантов запуска есть значение «Вручную». В целях безопасности выбирайте именно его для всех служб, которые вы захотите отключить. Это позволит системе запускать программы, когда они действительно необходимы, и не тратить на них ресурсы в остальное время.

Перечисленные ниже службы не являются критически важными для работы системы, и многие пользователи могут без них обойтись. Поэтому вы можете перевести эти службы в ручной режим. Перед тем как вносить изменения, обязательно читайте краткие описания, чтобы не остановить работу важных для вас программ.
Некоторые службы из нашего списка могут быть уже полностью отключёнными на вашем ПК или изначально работать в ручном режиме. В таком случае просто пропускайте их.
Ошибочные действия в процессе настройки служб могут привести к некорректной работе системы. Внося изменения, вы берёте ответственность на себя.
Чтобы изменения вступили в силу, после настройки не забудьте перезагрузить ПК.
Какие службы Windows можно перевести в ручной режим работы
Русскоязычные названия некоторых служб из этого списка могут отличаться от тех, которые вы увидите на своём компьютере. Но это касается только формулировок. Если не сможете найти нужную службу по точному названию, ищите варианты, похожие по смыслу.
Windows 10
- Функциональные возможности для подключённых пользователей и телеметрия (Connected User Experiences and Telemetry).
- Служба политики диагностики (Diagnostic Policy Service).
- Служба диагностического отслеживания (Diagnostic Tracking Service).
- Клиент отслеживания изменившихся связей (Distributed Link Tracking Client) — если компьютер не подключён ни к одной сети.
- dmwappushsvc (Служба маршрутизации push-сообщений WAP).
- Диспетчер скачанных карт (Downloaded Maps Manager) — если вы не используете приложение «Карты».
- Вспомогательная служба IP (IP Helper) — если вы не используете IPv6-подключение.
- Служба помощника по совместимости программ (Program Compatibility Assistant Service).
- Диспетчер печати (Print Spooler) — если у вас нет принтера.
- Удалённый реестр (Remote Registry) — эту службу можно полностью отключить.
- Вторичный вход в систему (Secondary Logon).
- Центр обеспечения безопасности (Security Center).
- Модуль поддержки NetBIOS через TCP/IP (TCP/IP NetBIOS Helper).
- Служба сенсорной клавиатуры и панели рукописного ввода (Touch Keyboard and Handwriting Panel Service).
- Служба защитника Windows (Windows Defender Service) — если используете сторонний антивирус или хотите полностью отказаться от защиты.
- Служба регистрации ошибок Windows (Windows Error Reporting Service).
- Служба загрузки изображений Windows (Windows Image Acquisition, WIA) — если у вас нет сканера.
- Windows Search — если вы не пользуетесь функцией поиска Windows.
- Superfetch или SysMain — если Windows установлена на SSD.
- Сетевой вход в систему (NetLogon) — если компьютер не подключён к корпоративной сети.
- Родительский контроль (Parental Controls).
- Служба шифрования дисков BitLocker (BitLocker Drive Encryption Service).
- Факс (Fax).
- Сетевая служба Xbox Live (Xbox Live Network Service) и другие сервисы со словом Xbox в названии — если не играете в игры.
Windows 8/8.1
- Обозреватель компьютеров (Computer Browser) — если компьютер не подключён ни к одной сети.
- Служба политики диагностики (Diagnostic Policy Service).
- Клиент отслеживания изменившихся связей (Distributed Link Tracking Client) — если компьютер не подключён ни к одной сети.
- Вспомогательная служба IP (IP Helper) — если вы не используете IPv6-подключение.
- Автономные файлы (Offline Files).
- Служба помощника по совместимости программ (Program Compatibility Assistant Service).
- Служба перечислителя переносных устройств (Portable Device Enumerator Service).
- Диспетчер печати (Print Spooler) — если у вас нет принтера.
- Удалённый реестр (Remote Registry) — эту службу можно полностью отключить.
- Вторичный вход в систему (Secondary Logon).
- Центр обеспечения безопасности (Security Center).
- Сервер (Server) — если компьютер не используется как сервер.
- Модуль поддержки NetBIOS через TCP/IP (TCP/IP NetBIOS Helper).
- Служба регистрации ошибок Windows (Windows Error Reporting Service).
- Служба загрузки изображений Windows (Windows Image Acquisition, WIA) — если у вас нет сканера.
- Windows Search — если вы не пользуетесь функцией поиска Windows.
Windows 7
- Обозреватель компьютеров (Computer Browser) — если компьютер не подключён ни к одной сети.
- Диспетчер сеансов диспетчера окон рабочего стола (Desktop Window Manager Session Manager) — если не используете тему оформления Aero.
- Служба политики диагностики (Diagnostic Policy Service).
- Клиент отслеживания изменившихся связей (Distributed Link Tracking Client) — если компьютер не подключён ни к одной сети.
- Вспомогательная служба IP (IP Helper) — если вы не используете IPv6-подключение.
- Автономные файлы (Offline Files).
- Служба перечислителя переносных устройств (Portable Device Enumerator Service).
- Диспетчер печати (Print Spooler) — если у вас нет принтера.
- Защищённое хранилище (Protected Storage).
- Удалённый реестр (Remote Registry) — эту службу можно полностью отключить.
- Вторичный вход в систему (Secondary Logon).
- Центр обеспечения безопасности (Security Center).
- Сервер (Server) — если компьютер не используется как сервер.
- Служба ввода планшетного ПК (Tablet PC Input Service).
- Модуль поддержки NetBIOS через TCP/IP (TCP/IP NetBIOS Helper).
- Темы (Themes) — если вы используете классическую тему Windows.
- Служба регистрации ошибок Windows (Windows Error Reporting Service).
- Модуль запуска службы Windows Media Center (Windows Media Center Service Launcher).
- Windows Search — если вы не пользуетесь функцией поиска Windows.
Windows Vista
- Обозреватель компьютеров (Computer Browser) — если компьютер не подключён ни к одной сети.
- Диспетчер сеансов диспетчера окон рабочего стола (Desktop Window Manager Session Manager) — если не используете тему оформления Aero.
- Служба политики диагностики (Diagnostic Policy Service).
- Клиент отслеживания изменившихся связей (Distributed Link Tracking Client) — если компьютер не подключён ни к одной сети.
- Служба индексирования (Indexing Service) — если вы не пользуетесь поиском Windows.
- Автономные файлы (Offline Files).
- Служба перечислителя переносных устройств (Portable Device Enumerator Service).
- Диспетчер печати (Print Spooler) — если у вас нет принтера.
- ReadyBoost.
- Удалённый реестр (Remote Registry) — эту службу можно полностью отключить.
- Вторичный вход в систему (Secondary Logon).
- Центр обеспечения безопасности (Security Center).
- Сервер (Server) — если компьютер не используется как сервер.
- Служба восстановления системы (System Restore).
- Служба ввода планшетного ПК (Tablet PC Input Service).
- Модуль поддержки NetBIOS через TCP/IP (TCP/IP NetBIOS Helper).
- Темы (Themes) — если вы используете классическую тему Windows.
- Служба регистрации ошибок Windows (Windows Error Reporting Service).
- Модуль запуска службы Windows Media Center (Windows Media Center Service Launcher).
- Windows Search — если вы не пользуетесь функцией поиска Windows.
Windows XP
- Оповещатель (Alerter).
- Обозреватель компьютеров (Computer Browser) — если компьютер не подключён ни к одной сети.
- Клиент отслеживания изменившихся связей (Distributed Link Tracking Client) — если компьютер не подключён ни к одной сети.
- Служба индексирования (Indexing Service) — если вы не пользуетесь поиском Windows.
- Брандмауэр интернета (ICF) / Общий доступ к интернету (ICS) (Internet Connection Firewall / Internet Connection Sharing).
- Служба сообщений (Messenger).
- Удалённый реестр (Remote Registry) — эту службу можно полностью отключить.
- Вторичный вход в систему (Secondary Logon).
- Сервер (Server) — если компьютер не используется как сервер.
- Служба восстановления системы (System Restore).
- Модуль поддержки NetBIOS через TCP/IP (TCP/IP NetBIOS Helper).
- Источник бесперебойного питания (Uninterruptible Power Supply).
- Диспетчер отгрузки (Upload Manager).
- Беспроводная настройка (Wireless Zero Configuration).
Этот материал впервые был опубликован в январе 2017 года. В июне 2020-го мы обновили текст.
As you might be aware, there are a number of active background processes and services that contribute to the smooth functioning of Windows. Most of these background processes/services utilize a minimal amount of CPU power and RAM. Although, sometimes a process may malfunction or be rendered corrupt and end up utilizing way more resources than usual, leaving little for other foreground applications. The Diagnostic Policy Service is one such process notorious for hogging up the system resources on rare occasions.
The Diagnostic Policy Service is one of the shared processes of Svchost.exe (Service Host) and is responsible for detecting problems with various Windows components and also troubleshooting them. The service tries to automatically fix any detected issues if possible and if not, log the diagnostic information for analysis. Since diagnosis and automatic troubleshooting of problems is an important feature for a seamless experience, the Diagnostic Policy Service has been set to automatically start when the computer boots on and stay active in the background. The exact reason behind it consuming more CPU power than intended isn’t known but based on the potential solutions, the culprits may be a corrupt instance of the service, corrupt system files, a virus or malware attack, large event log files, etc.
In this article, we have explained five different methods that will help you bring down the CPU consumption of the Diagnostic Policy Service back to normal.

Table of Contents
Potential fixes for Diagnostic Policy Service High CPU Usage
Most users will be able to solve the unusually high disk usage of the Diagnostic Policy Service by simply restarting it. Others might need to perform a few scans (SFC and DISM) to look for corrupt system files or run the built-in performance troubleshooter. Updating to the latest version of Windows and clearing event viewer logs can also resolve the issue. Finally, if nothing seems to work, users have the option to disable the service. However, disabling the Diagnostic Policy Service implies that Windows will no longer carry out auto-diagnosis and resolve errors.
Method 1: End the Process from Task Manager
A process may hog up additional system resources if something prompted a corrupt instance of it. In that case, you can try manually terminating the process (Diagnostic Policy Service here) and then allowing it to automatically restart. All of this can be achieved from the Windows Task Manager (Kill Resource Intensive Processes with Windows Task Manager).
1. Right-click on the Start menu button and select Task Manager.
2. Click on More Details to expand Task Manager and have a look at all the currently active processes & services.

3. Locate the Service Host: Diagnostic Policy Service under Windows processes. Right-click on it and select End task. (You can also select the service by left-click and then click on the End Task button at the bottom right.)

The Diagnostic Policy Service will restart automatically, although if it doesn’t, simply restart your computer and check if the issue persists.
Method 2: Run SFC and DISM scan
A recent Windows system update or even an antivirus attack may have corrupted certain system files resulting in high CPU usage of the Diagnostic Policy Service. Fortunately, Windows has built-in utilities to scan for and repair corrupted/missing system files. The first one is the System File Checker utility and as the name suggests, it checks the integrity of all system files and replaces the broken ones with a cached copy. If an SFC scan fails to fix corrupted system files, users can employ the Deployment Image Servicing and Management (DISM) command-line tool.
1. Type Command Prompt in the Windows search bar and click on Run as Administrator in the right panel when search results arrive.

2. Type sfc /scannow in the Command Prompt window and press enter to execute. The scan may take a while so sit back and do not close the window until the verification process reaches 100%.

3. After completing the SFC scan, execute the following DISM command. Again, wait patiently for the scan and restoring process to finish before exiting the application. Restart the computer when done.
DISM /Online /Cleanup-Image /RestoreHealth

Also Read: How to Fix High CPU Usage by System Idle Process
Method 3: Update Windows and Run the Performance Troubleshooter
As mentioned earlier, a recent Windows update can also be the culprit behind the abnormal behaviour of the Diagnostic Policy Service. You can try rolling back to the previous update or look for any new updates pushed by Microsoft rectifying the mistake. If you are facing any issues while updating Windows, run the built-in update troubleshooter.
Apart from updating Windows, also run the System Performance troubleshooter to scan for any performance issues and have them fixed automatically.
1. Press the Windows key + I simultaneously to launch the System Settings then click on Update & Security settings.
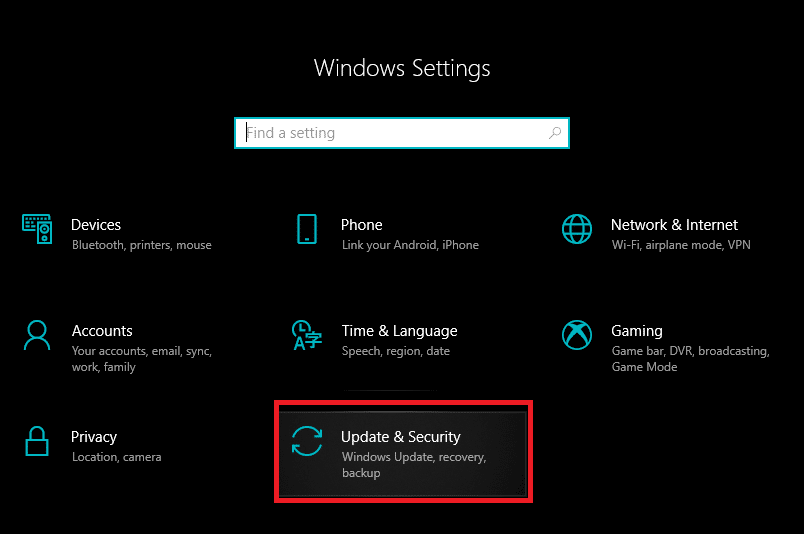
2. On the Windows Update tab, click on Check For Updates. The application will start looking for any available updates and automatically start downloading them. Restart your computer once the new update has been installed.

3. Check if the Diagnostic Policy Service is still hogging up your system resources and if it is, then run the Update troubleshooter. Open Update & Security settings again and move to the Troubleshoot tab then Click on Additional Troubleshooters.

4. Under the Get up and running section, click on Windows Update to view the available options and then click on the ensuing Run the troubleshooter button. Follow the on-screen instructions and go through the troubleshooting process.
To run the System Performance troubleshooter:
1. Type Control Panel in the Start Search bar and press Enter to open the same.

2. Click on Troubleshooting.

3. Under System and Security, click on the Run maintenance tasks hyperlink.

4. On the following window, click on Advanced and check the box next to Apply repairs automatically. Click on Next to run the troubleshooter.

Also Read: Fix Desktop Window Manager High CPU (DWM.exe)
Method 4: Clear the Event Viewer log
The Event Viewer program maintains a record of all the application and system error messages, warnings, etc. These event logs can build up to a considerable size and prompt issues for the Service Host process. Simply clearing the logs can help resolve issues with the Diagnostic Policy Service. We recommend you clear the event viewer logs regularly to avoid any future issues.
1. Launch the Run command box by pressing Windows key + R, type eventvwr.msc and click on Ok to open the Event Viewer application.

2. On the left pane, expand the Windows Logs folder by clicking on the tiny arrow and select Application from the ensuing list.
3. First, save the current event log by clicking on Save All Events As… on the right pane (by default the file will be saved in .evtx format, save another copy in either .text or .csv format.) and once saved, click on the Clear log… option. In the ensuing pop-up, click on Clear again.

4. Repeat the above steps for Security, Setup, and System. Restart the computer after clearing all the event logs.
Also Read: Does Quest Diagnostics Take Walk Ins?
Method 5: Disable the Diagnostic Policy Service and delete SRUDB.dat file
Ultimately, if none of the above methods were able to fix Service Host: Diagnostic Policy Service High CPU usage issue, then you can choose to disable it altogether. There are four different ways via which you can disable the service, the simplest one being from the Services application. Along with disabling, we will also be deleting the SRUDB.dat file which stores all kinds of information regarding the computer (application battery usage, bytes written and read from the hard drive by applications, diagnosis, etc.). The file is created and modified by the diagnostic policy service every few seconds which leads to high disk usage.
1. Type services.msc in the Run command box and click on OK to open the Services application. (There are 8 Ways to Open Windows Services Manager so feel free to make your own choice.)

2. Make sure all the services are sorted alphabetically (click on the Name column header to do so) and look for the Diagnostic Policy Service then right-click and select Properties.

3. Under the General Tab, click on the Stop button to terminate the service.
4. Now, expand the Startup type drop-down menu and select Disabled.

5. Click on the Apply button to save the changes and then on OK to close the Properties window.

6. Next, double-click on the File Explorer shortcut icon on your desktop to open the same and head down the following address:
C:\WINDOWS\System32\sru
7. Find the SRUDB.dat file, right-click on it, and select Delete. Confirm any pop-ups that may appear.

If you weren’t successful in disabling the Diagnostic Policy Service from the Services Manager application, try one of the other three methods.
1. From System Configuration: Open System Configuration > Services tab > Uncheck/untick the Diagnostic Policy Service.

2. From Registry Editor: Open Registry Editor and Head down to:
Computer\HKEY_LOCAL_MACHINE\SYSTEM\CurrentControlSet\Services\DPS
3. Double-click on Start in the right pane then Change Value Data to 4.

4. Restart the computer and Windows will automatically recreate the SRDUB.dat file. The Diagnostic Policy Service should no longer be active and therefore, causing any performance issues.
Recommended:
- Fix Service Host: Local System (svchost.exe) High CPU and Disk Usage
- Fix High CPU Usage by Service Host: Local System
- How to Repair or Fix Corrupted Hard Drive Using CMD?
- Fix Windows Audio Device Graph Isolation high CPU usage
We hope this guide was helpful and you were able to fix Service Host: Diagnostic Policy Service High CPU usage on Windows 10 computer. A few things you can try to prevent the issue from occurring again in the future are updating all computer drivers and performing regular antivirus scans. You should also uninstall third-party applications that have served their purpose and aren’t required anymore. For any assistance regarding the Diagnostic Policy Service, connect with us in the comments section below.
-
Home
-
News
- [Full Fix] Diagnostic Policy Service High CPU/Disk/RAM Usage
By Aurelie | Follow |
Last Updated
Do you know what Service Host Diagnostic Policy Service is? Are you bothered by Diagnostic Policy Service high CPU, RAM or disk usage? If so, try to find possible fixes in this post on MiniTool Website and this issue will be fixed easily and quickly.
Diagnostic Policy Service High CPU/RAM/Disk Usage
Service Host Diagnostic Policy Service is a very important service policy that can detect and troubleshoot the issues in Windows 10/11 system components. This service will automatically start when the system boots up and keep running with your system. If it consumes RAM/CPU/disk usage abnormally, your system performance will be negatively impacted. As a result, it is necessary to fix Diagnostic Policy Service high CPU usage immediately when you suffer from that.
How to Fix Diagnostic Policy Service High CPU Usage?
Fix 1: Delete the Task
Sometimes, Diagnostic Policy Service constantly runs & creates logs in a system file called SRUBD.dat. When the size of the file grows extremely large, Diagnostic Policy Service high CPU usage will appear. In this condition, you can delete the file in Task Manager:
Step 1. Right-click on the taskbar to select Task Manager in the context menu.
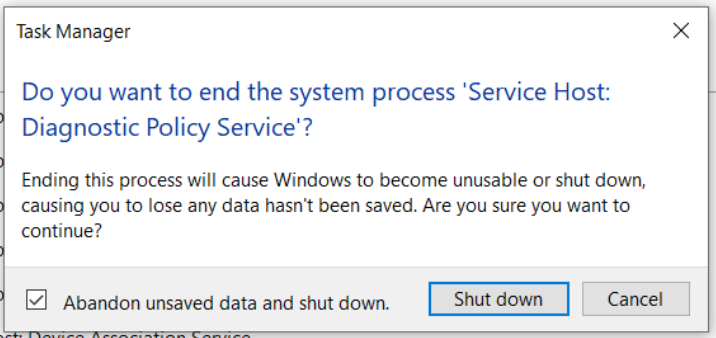
Step 2. In Processes, scroll down to find Service Host: Diagnostic Policy Service and right-click on it to choose End Task.
Step 3. In the confirmation message, tick Abandon unsaved data and shut down and press Shut down.
Step 4. Press Win + R to open the Run box.
Step 5. Type services.msc and hit Enter to open Services.
Step 6. Find Diagnostic Policy Service and right-click on it to choose Properties.
Step 7. In General, hit Stop and OK to stop DPS.
Step 8. Open the Run box again, type %WinDir%\System\sru and hit Enter.
Step 9. Right-click on SRUDB.dat and choose Delete.
Fix 2: Change Power Plan
If you are a laptop user, you can choose to change the default power plan of the system to address Service Host Diagnostic Policy high CPU usage. It is reported that the spikes in the CPU/RAM/Disk usage can also be triggered by Microsoft drivers malfunctioning and changing the battery settings of the system.
Step 1. Type edit power plan in the search bar and hit Enter.
Step 2. Press Change advanced power settings.
Step 3. In the new window, expand Wireless Adapter Settings and Power Saving Mode.
Step 4. Set both On battery and Plugged in to Maximum Performance.
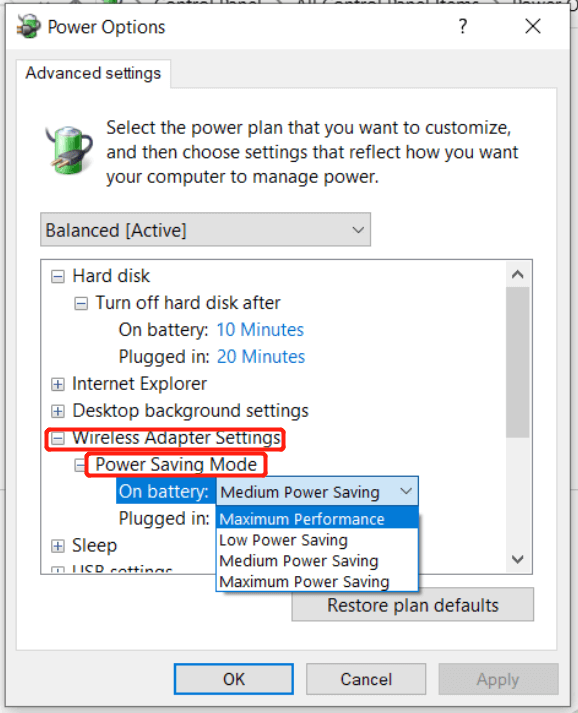
Step 5. Press OK to save the changes.
Fix 3: Clear Event Viewer Log
The event logs in Event Viewer can accelerate up to a considerable size and prompt problems for the Service Host process. Clearing the logs can help to handle Diagnostic Policy Service high CPU usage.
Step 1. Type Run in the search bar and hit Enter to open the Run box.
Step 2. Type eventvwr.msc and hit Enter to open Event Viewer.
Step 3. Expand Windows Logs and Application.
Step 4. In the left pane, press Save All Events As to save the current event log. As soon as they are saved, hit Clear Log > Clear to delete them.
Step 5. Repeat all the steps above for Security, Setup and System under Windows Logs. At last, don’t forget to reboot your computer.
About The Author
Position: Columnist
Aurelie is a passionate soul who always enjoys researching & writing articles and solutions to help others. Her posts mainly cover topics related to games, data backup & recovery, file sync and so on. Apart from writing, her primary interests include reading novels and poems, travelling and listening to country music.
Если на вашем компьютере или ноутбуке не работает Интернет — в браузере или программах, требующих доступа к сети, а устранение неполадок сообщает «Служба политики диагностики не запущена», исправить ситуацию обычно сравнительно легко.
В этой инструкции подробно о том, что делать, если Windows 10, 8.1 или Windows 7 сообщает, что служба политики диагностики не запущена в списке обнаруженных проблем и исправить доступ в Интернет. Также может быть полезным: Что делать, если не работает Интернет по Wi-Fi или кабелю.
- Проверка службы политики диагностики
- Предоставления прав администратора сетевым службам
- Дополнительные способы исправить проблему
- Видео инструкция
Проверка состояния и типа запуска службы политики диагностики

По умолчанию, Служба политики диагностики запускается автоматически и постоянно выполняется в Windows 10 и предыдущих версиях системы. Однако, если вы «оптимизировали» работу служб или произошел какой-либо сбой, это может быть не так, поэтому в первую очередь стоит проверить правильность параметров проблемной службы:
- Нажмите клавиши Win+R на клавиатуре (Win — клавиша с эмблемой Windows), введите services.msc и нажмите Enter.
- В открывшемся списке служб найдите «Служба политика диагностики» и дважды нажмите по ней.

- Если поле «Тип запуска» отличается от «Автоматически», выберите именно этот пункт, после чего нажмите кнопку «Применить». Нажмите кнопку «Запустить» (если после запуска вам сообщат, что служба была остановлена, читаем дальше).


Если причиной проблемы послужил неправильный тип запуска службы, этого будет достаточно, чтобы исправить проблему.
Тут же отмечу ещё один важный момент: если на вашем компьютере или ноутбуке есть автоматические точки восстановления на дату, когда проблемы с подключением не было, используйте их (подробнее — Точки восстановления Windows 10, подойдет и для предыдущих ОС) — это восстановит все параметры служб на те, которые были в то время, когда Интернет был полностью работоспособен.
Предоставление прав администратора сетевым службам
Если предыдущий метод не помог, выполните следующие шаги:
- Запустите командную строку от имени администратора (как это сделать).
- В командной строке по порядку введите следующие две команды
net localgroup Администраторы /add networkservice
net localgroup Администраторы /add localservice
- В случае, если у вас система на английском языке (или была переведена самостоятельно с английского путем установки языкового пакета), используйте Administrators вместо Администраторы.
- После выполнения команды закройте командную строку.
По завершении этих шагов выполните перезагрузку компьютера, после чего проверьте, была ли исправлена проблема.
Другие способы исправить проблему «Служба политики диагностики не запущена»
Как правило, помогает один из двух описанных выше вариантов решения проблемы или точки восстановления системы. Однако, если в вашем случае это не сработало, попробуйте следующее:
- В Windows 10 — выполнить сброс сетевых настроек встроенными средствами системы.
- В Windows 8.1 и Windows 7 по порядку выполнить следующие команды в командной строке от имени администратора, после чего перезагрузить компьютер:
netsh int ip reset
netsh int tcp reset
netsh winsock reset
- Попробуйте переустановить драйвер сетевой карты (для проводного подключения) или Wi-Fi адаптера (для беспроводного): скачайте оригинальные драйверы сетевой карты или Wi-FI с сайта производителя ноутбука или материнской платы ПК, откройте диспетчер устройств и удалите соответствующий адаптер из раздела «Сетевые адаптеры» (правый клик — удалить), установите загруженный драйвер.
Также, при наличии на компьютере сторонних антивирусов или файрволлов проверьте, а меняется ли ситуация, если их временно отключить.
Видео
В случае, если проблема с соединением состоит не только в службе политики диагностики и запуск службы не решает её, опишите в комментариях ситуацию максимально подробно, я постараюсь помочь.