
Сетевая файловая система NFS является родным для мира Linux способом организации общего доступа к файлам по сети и ее взаимоотношения с Windows долгое время оставались напряженными. Однако последнее время ситуация начала меняться и Windows перешел от конфронтации к сотрудничеству с открытым ПО. Начиная с Windows 10 1607 (14393) в системе появился штатный NFS-клиент, который позволяет прозрачно подключать и использовать NFS-ресурсы. В данной статье мы расскажем, как его установить и использовать, а также разберем некоторые особенности эксплуатации.
Онлайн-курс по устройству компьютерных сетей
На углубленном курсе «Архитектура современных компьютерных сетей» вы с нуля научитесь работать с Wireshark и «под микроскопом» изучите работу сетевых протоколов. На протяжении курса надо будет выполнить более пятидесяти лабораторных работ в Wireshark.
Для установки NFS-клиента откройте оснастку Программы и компоненты и перейдите по ссылке Включение или отключение компонентов Windows, найдите там раздел Службы для NFS и включите его содержимое.

Также можно быстро выполнить установку при помощи PowerShell, для выполнения команды нужно запустить терминал с повышенными правами:
Enable-WindowsOptionalFeature -FeatureName ServicesForNFS-ClientOnly, ClientForNFS-Infrastructure -Online -NoRestartГрафических инструментов для подключения NFS-ресурсов нет, поэтому снова воспользуемся терминалом, только теперь запустим его без повышения прав:
mount -o anon \\192.168.233.184\mnt\nfs\doc Z:Команда mount поддерживает ряд опций, которые указываются после ключа -o, в данном случае опция одна — anon, что означает подключение анонимным пользователем. Затем указываем сетевой путь к экспортируемому ресурсу, обратите внимание, что NFS-клиент для Windows поддерживает только NFS v3 и поэтому путь нужно указывать не от корня NFS, а от корня файловой системы. И наконец буква диска куда будет примонтирован ресурс. Адрес NFS-сервера в нашем случае 192.168.233.184.
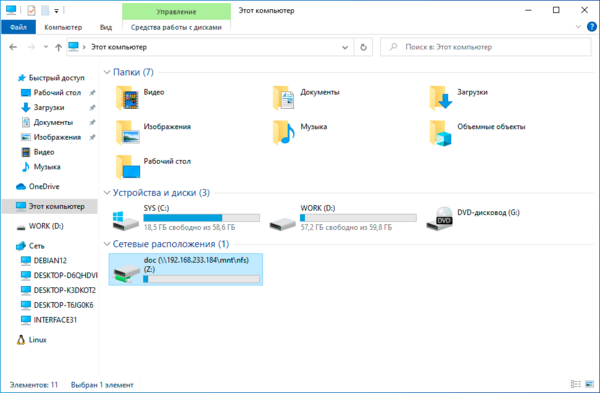
Если нигде не было допущено ошибок, то в проводнике появится новый сетевой диск с указанной буквой.
Для отключение используйте команду:
umount Z:У команды mount есть один существенный недостаток, сетевые диски, подключенные таким образом, не восстанавливаются при загрузке системы. Можно, конечно, пойти наиболее простым путем и добавить в автозагрузку пакетный файл с нужными командами, но лучше снова позвать на помощь PowerShell. Данную команду также нужно выполнять без повышения прав:
New-PSdrive -PSProvider FileSystem -Name Z -Root \\192.168.233.184\mnt\nfs\doc -PersistОбратите внимание, что букву диска для монтирования указываем без двоеточия, а опция -Persist предписывает подключить ресурс на постоянной основе.
Для отключения ресурса воспользуйтесь командой:
Remove-PSdrive -Name ZДля просмотра всех смонтированных NFS-ресурсов, неважно как они были подключены, используйте команду:
mount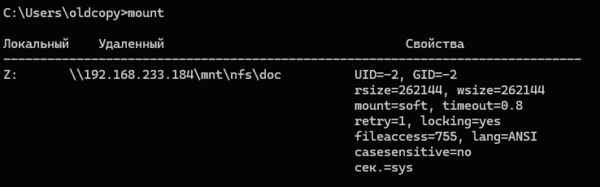
Как можем увидеть, при анонимном подключении Windows использует UID/GID = -2, если мы используем all_squash со стороны NFS-сервера, то это не имеет особого значения, в иных случаях нам может потребоваться указать иные идентификаторы. Это можно сделать через системный реестр, откройте ветвь:
HKEY_LOCAL_MACHINE\SOFTWARE\Microsoft\ClientForNFS\CurrentVersion\DefaultИ добавьте туда два параметра DWORD (32бит) с именами AnonymousUid и AnonymousGid и укажите в них нужные идентификаторы в десятичном виде. После чего перезагрузите компьютер.
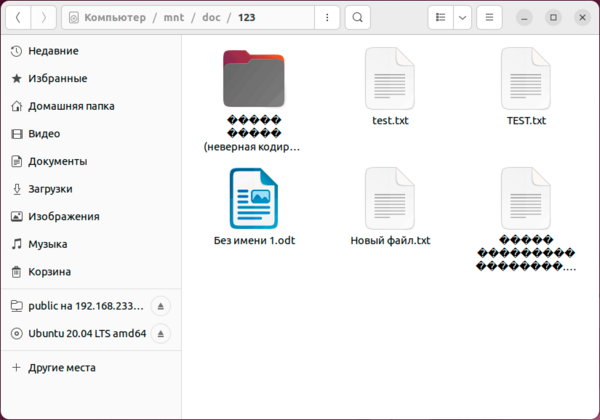
А теперь о проблемах. Для их понимания достаточно посмотреть на следующий скриншот:

Начнем с самого безобидного, регистра в именах файлов. Как мы помним — Linux система чувствительная к регистру, поэтому там TEST.txt и test.txt разные файлы. И если вы будете работать с ними в пределах NFS-ресурса, то проблем не возникнет, вы можете даже открыть оба файла одновременно, внести изменения и сохранить. Все это возможно потому, что NFS — это не протокол удаленного доступа, а именно сетевая файловая система.
Проблемы начнутся, если вы захотите скопировать их в свою систему. Неопытный пользователь вполне может допустить ошибку и перезаписать важный локальный файл.
А вот следующая проблема куда серьезней и не имеет приемлемого решения на сегодняшний день. Современные Linux системы давно работают с UTF-8, в то время как Windows продолжает использовать региональные кодовые страницы, например, CP-1251 для русского языка. Это приводит к тому, что имена файлов, набранные кириллицей (или любыми иными национальными символами) отображаются «крякозябликами». Сами файлы при этом доступны и могут быть отредактированы.
Если же мы со стороны Windows поместим на NFS-ресурс файл с кириллицей в имени, то со стороны Linux мы увидим веселые ромбики.
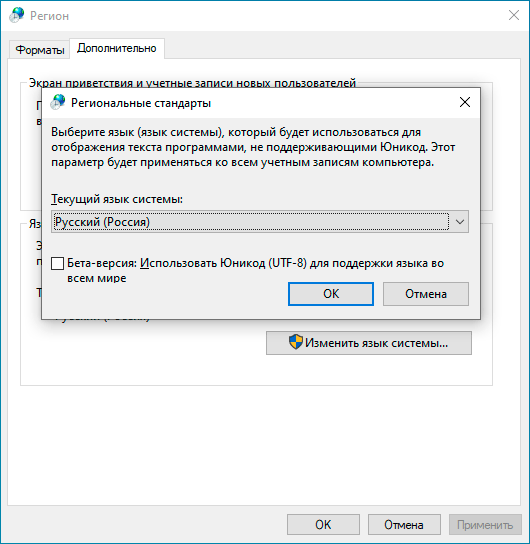
В качестве решения можно найти совет включить поддержку UTF-8 в Windows, которая пока находится в состоянии бета. Эта возможность доступа в языковых настройках панели управления.
Но это решение из разряда «одно лечим — другое калечим» и покалечено будет гораздо больше, чем вылечено. Дело в том, что достаточно большое количество вполне современных программ ничего не знают об UTF-8 и не умеют с ним работать, в итоге веселые ромбики начнут попадаться вам в самых неожиданных местах вашей системы.
Поэтому, используя NFS-клиент для Windows следует четко понимать все плюсы, минусы и имеющиеся недостатки. Но в целом появление поддержки NFS в Windows — хорошо, так как делает поддержку гетерогенных сред проще.
Онлайн-курс по устройству компьютерных сетей
На углубленном курсе «Архитектура современных компьютерных сетей» вы с нуля научитесь работать с Wireshark и «под микроскопом» изучите работу сетевых протоколов. На протяжении курса надо будет выполнить более пятидесяти лабораторных работ в Wireshark.
Модератор: Модераторы разделов
-
Lunatik
- Сообщения: 10
- ОС: FreeBSD 8.1
NFS клиент для Windows 7 Профессианальная
В Win 7 Максимальная есть встроенный NFS клиент, добавляется путем Включения компонентов Win. Но в Win7 профессиональная такова пункта нет в добавлении компонентов. Может необходимо какой нибудь пакет поставить? Кто нибудь сталкивался?
-
zenwolf
- Бывший модератор
- Сообщения: 3139
- Статус: Страшный и злой
- ОС: Slackware..Salix..x86_64
Re: NFS клиент для Windows 7 Профессианальная
Сообщение
zenwolf »
Lunatik писал(а): ↑
16.12.2010 15:20
В Win 7 Максимальная есть встроенный NFS клиент, добавляется путем Включения компонентов Win. Но в Win7 профессиональная такова пункта нет в добавлении компонентов. Может необходимо какой нибудь пакет поставить? Кто нибудь сталкивался?
почему-бы просто не спросить у MS ? Если нормальная лицензионная винда, то в тех.поддержки наверняка смогут рассказать.
Quae videmus quo dependet vultus. (лат) — То, что мы видим, зависит от того, куда мы смотрим.
-
eddy
- Сообщения: 3321
- Статус: Красный глаз тролля
- ОС: ArchLinux
- Контактная информация:
Re: NFS клиент для Windows 7 Профессианальная
Сообщение
eddy »
Lunatik писал(а): ↑
17.12.2010 06:59
NFS это Юниксовая технология, поэтому и спрашиваю у Юниксойдов, администраторы MS вообще не знают что это такое и с чем его едят.
А линуксоиды понятия не имеют, что такое «windows 7» и с чем ее едят
RTFM
——-
KOI8-R — патриотичная кодировка
-
Goodvin
- Ведущий рубрики
- Сообщения: 4333
- Статус: ⚝⚠⚒⚑⚖☭☞☣☤&
Re: NFS клиент для Windows 7 Профессианальная
Сообщение
Goodvin »
eddy писал(а): ↑
17.12.2010 08:33
Lunatik писал(а): ↑
17.12.2010 06:59
NFS это Юниксовая технология, поэтому и спрашиваю у Юниксойдов, администраторы MS вообще не знают что это такое и с чем его едят.
А линуксоиды понятия не имеют, что такое «windows 7» и с чем ее едят
Это тоже неправда.
Нормальный системный администратор владеет всем спектром инструментов, необходимых ему в работе, а чаще даже больше.
А винда пока еще весьма распространена на просторах жестких дисков и ОЗУ многих компьютеров, и гетерогенных сетей вокруг навалом.
Пока еще знание винды и линукса не являются взаимоисключающими, слава Кришне.
-
eddy
- Сообщения: 3321
- Статус: Красный глаз тролля
- ОС: ArchLinux
- Контактная информация:
Re: NFS клиент для Windows 7 Профессианальная
Сообщение
eddy »
Goodvin писал(а): ↑
17.12.2010 08:58
Это тоже неправда.
Нормальный системный администратор владеет всем спектром инструментов, необходимых ему в работе, а чаще даже больше.
А винда пока еще весьма распространена на просторах жестких дисков и ОЗУ многих компьютеров, и гетерогенных сетей вокруг навалом.
Пока еще знание винды и линукса не являются взаимоисключающими, слава Кришне.
Если сис. админ помимо линукса знает еще и венду, ему платить надо будет раз в 5 больше, чем вендузячему и линуксовому админу в лице двух разных человек.
Все-таки, венда — очень сложная ОС.
И да, по-моему, знание венды и знание линукса — вещи довольно-таки взаимоисключающие. Склад ума нужен разный. Это примерно как сочетание гуманитария и технаря в одном лице.
Поэтому такому «гибридному» уникальному админу и должны платить больше.
RTFM
——-
KOI8-R — патриотичная кодировка
-
zenwolf
- Бывший модератор
- Сообщения: 3139
- Статус: Страшный и злой
- ОС: Slackware..Salix..x86_64
Re: NFS клиент для Windows 7 Профессианальная
Сообщение
zenwolf »
eddy писал(а): ↑
17.12.2010 09:21
Поэтому такому «гибридному» уникальному админу и должны платить больше.
Ещё бы найти кто-бы платил.
Я знаю тех которые умеют админить- винду, линукс, netware, freebsd, openbsd, unixware. Думаете им платят?
Quae videmus quo dependet vultus. (лат) — То, что мы видим, зависит от того, куда мы смотрим.
-
IMB
- Сообщения: 2566
- ОС: Debian
Re: NFS клиент для Windows 7 Профессианальная
Сообщение
IMB »
zenwolf писал(а): ↑
17.12.2010 10:44
Я знаю тех которые умеют админить- винду, линукс, netware, freebsd, openbsd, unixware. Думаете им платят?
Эх, ещё бы определить что понимается под словом админить. У меня на попечении кроме linux есть парочка Windows-серверов. Но так как у нас рабочая группа, то на Windows мне приходится делать не дюже много — завести нового пользователя, раздать права, автоматизировать, через bat-файлы, бекап баз 1С, настроить терминал, прописать новую машину в DHCP, который кажется крайне неудобным после linux-го, ну и ещё по мелочам. Назвать себя Windows, также как и linux, администратором я не могу.
Но, уважаемые, мы немного отошли от первоначального вопроса, вам не кажется?
-
sash-kan
- Администратор
- Сообщения: 13939
- Статус: oel ngati kameie
- ОС: GNU
- Контактная информация:
Re: NFS клиент для Windows 7 Профессианальная
Сообщение
sash-kan »
eddy писал(а): ↑
17.12.2010 09:21
Это примерно как сочетание гуманитария и технаря в одном лице.
хорошая аналогия. ещё вариант: шамана и учёного.
zenwolf писал(а): ↑
17.12.2010 10:44
Думаете им платят?
а что, нет? они уже вымерли с голоду? или все поголовно получили наследство от богатых тётушек/бабушек?
Писать безграмотно — значит посягать на время людей, к которым мы адресуемся, а потому совершенно недопустимо в правильно организованном обществе. © Щерба Л. В., 1957
при сбоях форума см.блог
-
zenwolf
- Бывший модератор
- Сообщения: 3139
- Статус: Страшный и злой
- ОС: Slackware..Salix..x86_64
Re: NFS клиент для Windows 7 Профессианальная
Сообщение
zenwolf »
sash-kan писал(а): ↑
17.12.2010 12:17
поголовно получили наследство от богатых тётушек/бабушек?
Платят стандартную зарплату, я о другом- тут выше говорили о том, что за знания дополнительных оп.систем нужно доплачивать причём вдвойне, а если знает 5 оп.систем и админит? пятикратно?
Вот реально на глазах — стоят сервера под Linux, Windows и Netware. Один человек админит.
Quae videmus quo dependet vultus. (лат) — То, что мы видим, зависит от того, куда мы смотрим.
-
Bizdelnick
- Модератор
- Сообщения: 21188
- Статус: nulla salus bello
- ОС: Debian GNU/Linux
Re: NFS клиент для Windows 7 Профессианальная
Сообщение
Bizdelnick »
Lunatik писал(а): ↑
17.12.2010 06:59
NFS это Юниксовая технология
…которая ЕМНИП поддерживается в венде искаропка. Может не во всех версиях, но это вопрос таки к мелкософту.
Пишите правильно:
| в консоли вку́пе (с чем-либо) в общем вообще |
в течение (часа) новичок нюанс по умолчанию |
приемлемо проблема пробовать трафик |
-
Bluetooth
- Сообщения: 4395
- Статус: Блюзовый
- ОС: Debian Squeeze amd64
Re: NFS клиент для Windows 7 Профессианальная
Сообщение
Bluetooth »
eddy писал(а): ↑
17.12.2010 09:21
И да, по-моему, знание венды и знание линукса — вещи довольно-таки взаимоисключающие. Склад ума нужен разный. Это примерно как сочетание гуманитария и технаря в одном лице.
Аргументируйте. Что такого гуманитарного в администрировании винды?
В семерке nfs по умолчанию поддерживается. Подключается как все остальные сетевые диски, только формат монтирования как в nfs. Т.е. server:/share
В любой редакции?
-
eddy
- Сообщения: 3321
- Статус: Красный глаз тролля
- ОС: ArchLinux
- Контактная информация:
Re: NFS клиент для Windows 7 Профессианальная
Сообщение
eddy »
Bluetooth писал(а): ↑
18.12.2010 17:34
Аргументируйте. Что такого гуманитарного в администрировании винды?
Нет, я имел в виду, что администрирование мастдая и администрирование UNIX-based ОС так сильно различаются, как гуманитарный и технический склады ума.
RTFM
——-
KOI8-R — патриотичная кодировка
-
Bluetooth
- Сообщения: 4395
- Статус: Блюзовый
- ОС: Debian Squeeze amd64
Re: NFS клиент для Windows 7 Профессианальная
Сообщение
Bluetooth »
eddy писал(а): ↑
18.12.2010 17:47
Bluetooth писал(а): ↑
18.12.2010 17:34
Аргументируйте. Что такого гуманитарного в администрировании винды?
Нет, я имел в виду, что администрирование мастдая и администрирование UNIX-based ОС так сильно различаются, как гуманитарный и технический склады ума.
хорошо, расскажите, в чем же разница. Я, конечно, понимаю, что привычки и прихваты все другие, интерфейсы другие. Но совершенно не понимаю, что же там в принципе разного. Прихваты, привычки, интерфейсы — это все поверхностная мелочь, которая ничего не решает.
-
Bluetooth
- Сообщения: 4395
- Статус: Блюзовый
- ОС: Debian Squeeze amd64
Re: NFS клиент для Windows 7 Профессианальная
Сообщение
Bluetooth »
Davinel писал(а): ↑
18.12.2010 18:29
Bluetooth писал(а): ↑
18.12.2010 17:34
В любой редакции?
Вот уж понятия не имею, у всех пиратская ультимейт стоит, я других вообще не видел даже.
)
А я — наоборот, не видел почти пиратских ультимейтов. Любители пиратского ПО все еще на хрюше сидят. А вот всяких хоумов насмотрелся много(на ноутбуках,разумеется).
-
zenwolf
- Бывший модератор
- Сообщения: 3139
- Статус: Страшный и злой
- ОС: Slackware..Salix..x86_64
Re: NFS клиент для Windows 7 Профессианальная
Сообщение
zenwolf »
i Уведомление от модератора zenwolf Напоминаю про правила п.3.9. «Обсуждение незаконного ПО в любой форме, как прямые, так и косвенные указания на возможность нахождения такового.»
в том смысле что не разрешается это на форуме.
Quae videmus quo dependet vultus. (лат) — То, что мы видим, зависит от того, куда мы смотрим.
Setting up an NFS (Network File System) server on Windows 7 can be a useful way to share files and resources across a network. NFS allows multiple computers to access the same files simultaneously, making it convenient for collaboration and file sharing. In this tutorial, we will guide you through the steps to set up an NFS server on Windows 7.
Step 1: Install the NFS Server Feature:
Windows 7 does not natively support NFS, so you will need to install the «Services for NFS» feature. Here’s how to do it:
1. Click on the Start menu and open the Control Panel.
2. Navigate to «Programs» > «Programs and Features.«
3. In the left sidebar, click on «Turn Windows features on or off.«
4. Scroll down and locate «Services for NFS» in the list. Check the box next to it.
5. Click «OK» and wait for the feature to be installed.
Step 2: Configure the NFS Server:
Once the NFS Server feature is installed, you need to configure it to share the desired folders. Follow these steps:
1. Open the Control Panel again and go to «Administrative Tools.«
2. Double-click on «Services for Network File System» to open the NFS server configuration panel.
3. In the «Server» tab, click on the «Add» button to select the folder you want to share.
4. Browse and choose the folder you want to share, then click «OK.«
5. By default, the NFS server allows read-only access. If you want to enable write access, click on the «Permissions» button and adjust the settings as needed.
6. Click «OK» to apply the changes.
Step 3: Adjust the NFS Server Settings (Optional):
If you want to fine-tune the NFS server settings, you can modify certain parameters such as port numbers and cache settings. Here’s how:
1. In the NFS server configuration panel, click on the «Mappings» tab.
2. From here, you can change the server’s port numbers, cache size, and other settings according to your requirements.
3. Make the desired changes and click «OK» to save the settings.
Step 4: Start the NFS Server Service:
Once you have configured the NFS server, you need to start the NFS server service for it to become active. Here’s how:
1. Open the «Services for Network File System» window again.
2. In the «Server» tab, click on the «Start» button next to «Server Status.«
3. Wait for the service to start, and you will see the status change to «Running.«
4. Close the NFS server configuration panel.
Step 5: Access the NFS Share from Client Computers:
After setting up the NFS server, you can now access the shared folder from other computers on the network. Here’s how to do it:
1. On the client computer, open File Explorer.
2. In the address bar, type the IP address or hostname of the NFS server followed by the shared folder name (e.g., \\192.168.1.100\SharedFolder).
3. Press Enter, and the shared folder should appear in File Explorer.
4. You can now browse, open, and modify files within the NFS share.
| Pros | Cons |
|---|---|
| 1. Enables easy file sharing and collaboration across a network. | 1. Requires the installation of additional software on Windows 7. |
| 2. Allows multiple computers to access the same files simultaneously. | 2. NFS is not as widely supported on Windows compared to other operating systems. |
| 3. Provides flexibility and scalability for storing and accessing shared files. | 3. Requires proper network configuration and security measures to prevent unauthorized access. |
Setting up an NFS server on Windows 7 can be a great way to streamline file sharing and collaboration among multiple computers on a network. By following the steps outlined in this tutorial, you can easily configure an NFS server and start sharing files seamlessly. Keep in mind the pros and cons associated with NFS to ensure it aligns with your specific requirements and network setup.
Video Tutorial: What ports are needed for NFS?
Setting up an NFS (Network File System) file server can be a useful solution for sharing and accessing files across a network. Here are the steps to set up an NFS file server:
1. Choose a suitable server: Select a server machine with enough storage capacity, processing power, and memory to meet your requirements. Ensure that the server is running a suitable operating system, such as Linux or Unix, which typically have native support for NFS.
2. Install NFS packages: Depending on your server’s operating system, you may need to install the necessary NFS packages. For example, on a Linux distribution like Ubuntu, you can install the NFS server and related utilities using the package manager, such as Apt or Yum.
3. Configure exports: The next step is to configure the NFS exports file. This file specifies the directories you want to share with NFS clients. Edit the exports file (typically found at /etc/exports or /etc/exportfs) and add an entry for each directory you want to share. Define the access permissions (read-only or read-write) and specify the IP addresses or network ranges that are allowed to access the shares.
4. Start NFS services: After configuring the exports file, start the NFS services on the server. Depending on your operating system, the command may vary. For instance, on Ubuntu, you can start the NFS server using the command «sudo service nfs-kernel-server start«.
5. Configure NFS clients: On the machines that want to access the NFS shares, you need to configure the client-side settings. Install the NFS client packages (if not already present) and ensure that they are up-to-date.
6. Mount the NFS shares: Once the client-side configuration is complete, you can mount the NFS shares. Use the mount command along with the server’s IP or hostname, followed by the shared directory’s path on the server. For example, «sudo mount server_ip:/shared_directory /local_mount_point«.
7. Test and verify: After mounting the NFS shares, verify that the clients can access the shared files and directories as intended. Create, modify, or delete files to check if the changes are reflected across the network.
Remember that these steps are general guidelines, and the exact commands and processes may vary depending on your specific operating system and its version. It’s always recommended to refer to the documentation of your operating system and NFS implementation for detailed instructions.
What specs do I need for NFS server?
When setting up an NFS (Network File System) server, there are several important specifications to consider. Here are the key factors to take into account:
1. Hardware requirements:
– CPU: A modern multi-core CPU with sufficient processing power to handle the expected workload is important. More cores can help handle concurrent requests efficiently.
– Memory (RAM): Sufficient RAM is essential to accommodate the operating system, NFS service, and the concurrent client connections. The exact amount primarily depends on the anticipated workload and the number of clients.
– Storage: NFS servers need reliable storage with adequate capacity to store the shared files. Depending on the desired level of redundancy and performance, one can choose between options like hard disk drives (HDDs) or solid-state drives (SSDs), using a RAID (Redundant Array of Independent Disks) configuration if necessary.
2. Network considerations:
– Network Interface Cards (NICs): High-performance NICs, preferably with support for gigabit or higher speeds, are recommended to ensure efficient data transfer between the NFS server and clients.
– Network Bandwidth: Sufficient network bandwidth is critical to handle the expected demand from the clients. It depends on the number of clients, the size of files being transferred, and the intensity of concurrent operations.
– Network Security: Implementing appropriate network security measures, such as firewalls and encryption protocols, is crucial to protect the NFS server and its data from unauthorized access.
3. Operating System and Software:
– Choose a stable and robust operating system with good support for NFS. Popular choices include Linux distributions like CentOS or Ubuntu Server, which offer NFS functionality out-of-the-box.
– Install the latest stable release of the NFS server software to benefit from bug fixes, performance improvements, and new features. Ensure compatibility with the chosen operating system and validate its support for NFSv4, which is more secure and feature-rich than previous versions.
4. Configuration and Optimization:
– Fine-tune NFS server configuration settings to meet your specific requirements, such as adjusting the number of allowed concurrent connections, specifying the shared directories, and setting up access controls.
– Consider implementing caching mechanisms on the server-side, like NFS caching, to improve overall performance and reduce network bandwidth consumption.
– Regularly monitor and assess the NFS server’s performance to identify any bottlenecks or areas that may need optimization, adjusting settings and hardware as necessary.
Remember, the actual hardware and software requirements of an NFS server can vary depending on the specific use case, anticipated workload, and the number of clients. It is therefore important to analyze your requirements thoroughly and plan accordingly to ensure optimal performance and reliability.
How to setup NFS server on Windows?
Setting up an NFS server on Windows involves several steps:
1. Verify your Windows version: NFS is not natively supported on all versions of Windows. Ensure that you have a compatible version, such as Windows Server editions or some specialized Windows 10 variants like Enterprise or Education.
2. Enable the NFS server feature: Open the Control Panel and navigate to the «Programs» section. Then click on «Turn Windows features on or off.» Find «Services for NFS» and check the box next to it. Click «OK» and let Windows install the necessary components.
3. Configure the NFS server: After enabling the NFS server feature, open the «Services for NFS» administration tool. You can access it by searching for «NFS» or locating it in the Administrative Tools folder. In the tool, click on «Server Manager» and then select «Manage NFS Sharing.» Here, you can set the default NFS server settings, such as choosing the NFS version, enabling user mapping, configuring access permissions, and defining exported directories.
4. Export directories: To share directories via NFS, you need to export them on the NFS server. In the «Manage NFS Sharing» window, click the «Add» button and browse to select the directories you want to share. Define the NFS share name, set the permissions, and configure any additional options required.
5. Configure firewall rules: By default, Windows Firewall may block NFS traffic. Ensure that the necessary port and protocol exceptions are in place to allow NFS communication. The standard NFS port is UDP/TCP 2049.
6. Test and verify: Once the NFS server is set up, test the NFS shares from a client device running an NFS client. Verify that you can mount and access the exported directories correctly.
Remember, NFS (Network File System) is commonly used in Unix-like environments, and Windows compatibility can sometimes present challenges. Additionally, consider security aspects, such as authentication methods and network configurations, to ensure the NFS server setup meets your specific requirements.
How to install NFS Client on Windows 7?
To install an NFS (Network File System) client on Windows 7, you can follow the steps below:
1. Open the Control Panel: Click on the «Start» button in the bottom-left corner of the desktop, then select «Control Panel» from the menu.
2. Go to «Programs«: In the Control Panel window, locate and click on the «Programs» or «Programs and Features» option.
3. Enable Windows Features: Within the Programs section, you will find an option called «Turn Windows features on or off.» Click on it to open the Windows Features window.
4. Find NFS Client: In the Windows Features window, scroll down and look for «Services for NFS.» Check the checkbox beside it.
5. Install the NFS Client: After selecting the «Services for NFS» option, click on the «OK» button to begin the installation process. Windows will then install the necessary components and enable the NFS client on your system.
6. Reboot the computer: Once the installation is complete, it is recommended to restart your computer to ensure the changes are applied.
After following these steps, the NFS client will be installed on your Windows 7 machine, allowing you to connect and access NFS shares on remote servers.
It’s worth noting that NFS is typically used in Unix-like environments, and Windows 7’s built-in NFS client may not support advanced features and performance optimizations compared to dedicated NFS clients available for Windows. If you require advanced NFS functionality, you may want to consider using third-party NFS clients like «NFS Manager» or «DiskAccess.«
Remember to always verify the authenticity and security of any third-party software you choose to install on your Windows 7 system.
How do I know if NFS server is installed?
To verify if the NFS (Network File System) server is installed on your system, you can follow these steps:
1. Open a terminal or command prompt on your device.
2. Type the following command and press Enter:
«`bash
systemctl status nfs-server
«`
This command checks the status of the NFS server service and whether it is running or not.
– If the service is installed, active, and running, it will show you a status message indicating that it is active and running.
– If the service is not installed or not running, it will display a message indicating that the service is inactive or not found.
Alternatively, you can also use the following command to check if the NFS server package is installed on your system:
«`bash
dpkg -l | grep nfs-server
«`
This command lists all installed packages and filters out the ones related to the NFS server. If the package is installed, it will display the relevant details. If the package is not found, it won’t display any output, indicating that it is not installed.
Please note that these commands assume you are using a Linux-based operating system. If you are using a different operating system, the steps to check for NFS server installation may vary.
This is a short tutorial on how to setup NFS file sharing on Ubuntu (Server) and connect to it from Windows and Mac OS X. I am assuming you have a Linux server running a NFS server running on ip 192.168.2.1 and that the share is located at /home/username/NFS-Shared.
Linux (Ubuntu) – Server
- Install NFS support:
sudo apt-get install nfs-kernel-server nfs-common portmap - When you configuring portmap, do not bind the loopback!
- Edit the the exports file:
sudo nano /etc/exports - Change it to something like this (please note that I’m configuring it for Read Only access):
/home/username/NFS-Shared 192.168.2.1/24(ro,async,insecure,no_subtree_check) - Restart the NFS server:
sudo /etc/init.d/nfs-kernel-server restart - After changing the /etc/exports file you need to run:
sudo exportfs -a
If you want Read Write access, replace ro with rw.
Windows – Client
- Download and install the Dokan library the current version is DokanInstall_0.6.0.exe
- Download and install the Microsoft .NET Framework 4
- Download and install Neko Drive the current version is NekoDrive_0_9_0.7z
- After NekoDrive is installed, launch the application.
- Change the Target Connection ip address to your server IP (e.g. 192.168.2.1).
- (optional) Set version to V3
- Click on connect and it should connect to your server
- To mount the drive in windows, set the Device location and select a Disk name. Make sure Devices is set to the correct item (e.g. /home/username/NFS-Shared)
- Click on mount and the drive should show up in Windows Explorer
Mac OS X – Client
- Open up the Disk Utility
- Choose File > NFS Mounts…
- Click the small plus (+) icon at the botton
- Enter your NFS URL (IP + PATH), for example:
nfs://192.168.2.1/home/username/NFS-Shared - Enter a Mount location (local mount), for example:
/Volumes/myNFS - (optional) Enable Mount as read-only if you’re only planning to stream music/video from it
- Click Verify, OK
- If everything went fine, you can open up Finder and browse to
/Volumes/myNFS
Windows NFS 4.2 Client Instructions
- Building from Source
- Installing Binaries
- Disable the DFS Client
- Ldap Configuration
- Starting the Client
- Mounting
- Connectation
- Known Issues
1. Building from Source
Requirements
- Windows Vista, Windows Server 2008 R2, or Windows 7 (Windows XP and previous versions are not supported)
- Microsoft Visual Studio 2010
- Windows Driver Development Kit (WinDDK 6000 or later)
- ms-nfs41-client source code:
> https://github.com/kofemann/ms-nfs41-client.git
Building the rpc library and nfs client daemon
- WinDDK does not include the ldap library, so we build the rpc library and nfs client daemon with Visual Studio 2010.
- Open Windows Explorer and navigate to ms-nfs41-client\build.vc10.
- Make a copy of env.props.example, and rename it to env.props.
- Open env.props in a text editor, and verify that the value in
<WDKPATH>C:\WinDDK\7600.16385.0</WDKPATH>points to your WinDDK installation. - Open the solution file ms-nfs41-client.sln in Visual Studio 2010.
- Select the desired configuration and platform (accessible via Build->Configuration Manager).
- Right-click on the daemon project and select Build. The project and its dependencies should build without errors. The resulting binaries, nfsd.exe and libtirpc.dll, can be found under **ms-nfs41-client\build.vc10\x64\Debug**.
Building the driver and utilities
- From the Start menu, open the WinDDK ‘Checked Build Environment’ for the target platform.
- Change directory to ms-nfs41-client and type
build. All projects should build without errors.
Signing the driver
- Open a WinDDK ‘Checked Build Environment’ as Administrator in this directory (right click and ‘Run as administrator’).
- Create a certificate for test-signing the driver (Creating Test Certificates):
> makecert /pe /ss PrivateCertStore /n CN=nfs41_driver nfs41_driver.cer - Use the certificate to sign nfs41_driver.sys (Test-Signing a Driver File):
> signtool sign /v /s PrivateCertStore /n nfs41_driver /t http://timestamp.verisign.com/scripts/timestamp.dll path\to\nfs41_driver.sys
2. Installing Binaries
Requirements
- ms-nfs41-client binaries: nfs41_driver.sys, nfs41_np.dll, libtirpc.dll, nfs_install.exe, nfsd.exe, nfs_mount.exe
- ms-nfs41-client configuration files: nfs41_driver.cer, nfs41rdr.inf, install.bat, uninstall.bat, etc_netconfig, ms-nfs41-idmap.conf
- Microsoft Visual Studio 2010, or Microsoft Visual C++ 2010 Redistributable Libraries (x86 or x64). An installer for the redistributable libraries are included with binary releases.
Instructions
- Copy or extract all ms-nfs41-client binaries and configuration files into a directory that’s convenient for testing.
- Run vcredist_x.exe* to install the Visual C++ Redistributable Libraries.
- Double-click on nfs41_driver.cer and select ‘Install Certificate’, then place it in the ‘Trusted Root Certificate Authorities’ store.
- Open a command prompt as Administrator in this directory.
- Install the driver and update the registry:
> install.bat - Copy configuration files:
> mkdir C:\etc
> copy etc_netconfig C:\etc\netconfig
> copy ms-nfs41-idmap.conf C:\etc\ - Allow windows to load test-signed drivers:
> bcdedit /set testsigning on - Reboot.
3. Disable the DFS Client
- The Windows DFS client interferes with some requests, indicated by long delays during operation. See http://support.microsoft.com/kb/171386 for more information.
Instructions
- Open regedit.exe and navigate to
HKEY_LOCAL_MACHINE\System\CurrentControlSet\Services\Mup. - Add a DWORD value named
DisableDfswith a value of 1.
4. Ldap Configuration
Requirements:
- C:\etc\ms-nfs41-idmap.conf from Installation step 7.
Instructions
- Open C:\etc\ms-nfs41-idmap.conf in a text editor.
- Uncomment the
ldap_hostnameandldap_baselines, and configure as appropriate to match your ldap server configuration (we’ll add suggestions later).
5. Starting the Client
- If you’ve installed the binary distribution, you’ll find two versions of the nfs client daemon: nfsd.exe and nfsd_debug.exe. nfsd.exe is built to run as a service, and does not provide easy access to debug output. We strongly recommend trying nfsd_debug.exe first (using the Instructions below) to verify that you can start the daemon and mount/unmount an nfs share. You can then close nfsd_debug.exe and start running nfsd.exe as a service with:
> nfsd.exe -install.
Instructions
- From a Windows command prompt, run nfsd.exe to start the nfs client daemon. Leave this running in the background until all mapped drives are unmounted.
Usage:
> nfsd.exe -d <debug level> [--noldap]<debug level>determines the log verbosity (1, 2, 3 or 0 to disable)--noldapdisables id mapping and uses a default uid=666 and gid=777--uid, --gidchanges the default uid/gid when no mapping is available (must be nonzero)
6. Mounting
Instructions
- From a Windows command prompt run nfs_mount.exe to mount a share:
> nfs_mount.exe Z: <server_name>:\ - To specify the security flavor, add the ‘sec=’ mount option with sys, krb5, krb5i, or krb5p:
> nfs_mount.exe -o sec=<flavor> Z: <server_name>:\ - You can later unmount with:
> nfs_mount.exe -d Z
7. Connectathon
Requirements
- Cygwin, including packages gcc-core, make, time, tirpc, git
- Connectathon Test Suite
- ms-nfs41-client source code (patches for connectathon are located in ms-nfs41-client\tests)
Instructions
- Extract nfstests.zip into a directory that’s convenient for testing (i.e. cthon04).
- Open a Cygwin shell, and change directory to cthon04.
- Create a git repository to track changes:
> git init
> git add *
> git commit -m "files from nfstests.zip" - Apply all cthon patches:
> git am /path/to/ms-nfs41-client/tests/*.patch - Build the tests:
> make - Run the test suite on a mounted directory:
> ./runtests -a -t z:/testdir
8. Known Issues
- krb5p security with AES keys do not work against the linux server, as it does not support gss krb5 v2 tokens with rotated data.
- When recovering opens and locks outside of the server’s grace period, client does not check whether the file has been modified by another client.
- If nfsd.exe is restarted while a drive is mapped, that drive needs to be remounted before further use.
- Symbolic links are not supported in Cygwin. Connectathon’s basic test8 and special test nfsidem have been commented out.
- Does not allow renaming a file on top of an existing open file. Connectathon’s special test op_ren has been commented out.
- Extended attributes are supported with some limitations: a) the server must support NFS Named Attributes, b) the order of listings cannot be guaranteed by NFS, and c) the EaSize field cannot be reported for directory queries of FileBothDirInformation, FileFullDirInfo, or FileIdFullDirInfo.
Please direct any questions to ms-nfs41-client-devel@lists.sourceforge.net.