Некоторые пользователи могут заметить процесс waasmedic.exe в диспетчере задач Windows 10 или Windows 11, причем чаще всего обращают внимание на него по причине того, что указанный процесс вызывает высокую нагрузку на диск.
В этой инструкции о том, что такое WaasMedic.exe и что делать, если вы обнаружили высокую нагрузку со стороны этого процесса на диск или, реже, процессор.
Служба Medic центра обновления Windows
WaasMedic.exe — это процесс службы Medic центра обновлений Windows или, в англоязычной версии системы — Windows Update Medic Service. Служба присутствует в Windows 10 и Windows 11. Как можно понять из названия, сам процесс является системным, а не сторонней программой.
Задачи службы Medic центра обновлений:
- Основная задача (согласно официальной информации) — обеспечить простой и не отвлекающий пользователя процесс обновлений.
- Есть и дополнительная, очевидная из названия: включать отключенные системные компоненты, имеющие отношение к установке обновлений.
Почему waasmedic.exe грузит диск
Среди причин, по которым процесс может вызывать нагрузку на диск при работе:
- Штатная работа центра обновлений Windows. Если в настоящий момент происходит загрузка обновлений, их подготовка или установка (можно проверить в Параметры — Обновление и безопасность в Windows 10 или Параметры — Центр обновления Windows в Windows 11), это может вызвать временную повышенную нагрузку со стороны waasmedic.exe, при этом что-либо предпринимать не следует: по завершении установки обновлений всё должно вернуться к норме.
- Отключенные вами вручную или отключенные с помощью сторонних инструментов обновления Windows 10 или Windows 11 и попытки службы Medic исправить ситуацию.
- Конфликты службы с каким-либо сторонним ПО на вашем компьютере, например, антивирусом (здесь можно попробовать отключить недавно установленные программы, которые могут вмешиваться в работу системы).
- Системные сбои, повреждения системных файлов.
В случае, если поведение процесса не похоже на штатную работу службы или вы отключали обновления системы, есть следующие варианты действий:
- Попробовать использовать точки восстановления системы на дату, когда проблема не проявляла себя.
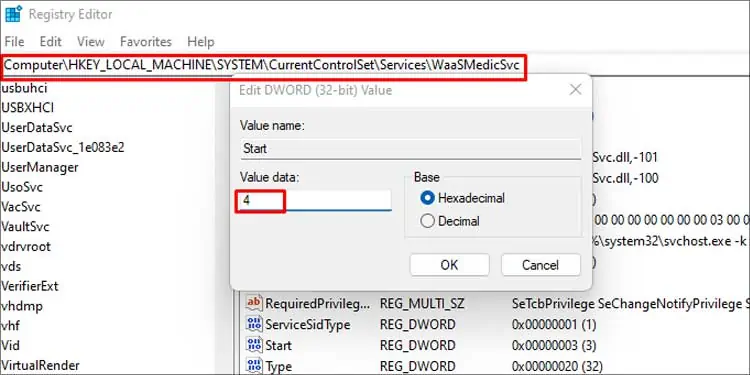
- Отключить службу Medic центра обновления Windows. Нажимаем Win+R, вводим services.msc и нажимаем Enter, затем находим «Служба Medic центра обновления Windows» и дважды нажимаем по службе. В «Тип запуска» устанавливаем «Отключена», нажимаем кнопку «Остановить» (если активна) и применяем настройки. Также можно задать значение параметра Start равным 4 в разделе реестра
HKEY_LOCAL_MACHINE\SYSTEM\CurrentControlSet\Services\WaaSMedicSvc
- Выполнить проверку целостности системных файлов Windows.
- Временно отключить обновления Windows 10.
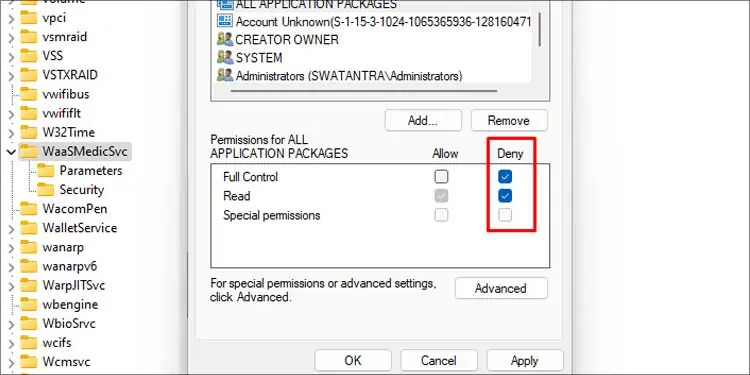
Учитывайте, что при применении 2-го способа не исключено, что в дальнейшем служба будет включена автоматически системой. Одно из решений — запретить доступ «СИСТЕМА» к указанному в способе разделу реестра и значениям в нём, но и это может не сработать.
Every new release of Windows Update focuses on improving the operating system, security improvements, or simple quality-of-life enhancements. And windows update medic service supervises the update components.
The Windows updates are automatic, and there is no dedicated option to just simply shut it off. But since it consumes a lot of resources in the background, it’ll be helpful to disable it if you have limited resources. There are a few ways you can turn off windows update medic service. You can learn about them below.
What is Windows Update Medic Service?
The windows update medic service is a service that checks and repairs windows update components. This service also shows up as WaaSMedicSVC.exe in the service menu. It is usually recognized as a partner software to the windows update.
This service is scheduled to automatically run at a fixed time interval to check the windows update system for errors. It enables windows updates even when you have windows updates disabled.
This is an important Microsoft service that is responsible for protecting the windows update integrity and preventing errors with the update component. Disabling it may cause data corruption along with missing important features and security updates.
How to Enable/disable Windows Update Medic Service?
The WaaSMedicSVC service is listed in the services list and enabled by default. You may not be able to disable it like any other service easily.
However, Windows does not give access to disabling this service even with elevated administrator privileges. While disabling it, you will get ‘access denied’ dialog box.
Even if windows does not provide permission, we have other ways to disable this service.
Using the Registry Editor
We suggest you backup your registry settings before proceeding any further. You can disable the update medic service from the registry editor on windows. The registry editor is an integral program that allows editing low-level settings of your operating system.
You can follow these steps to disable the Windows update medic service:
- Press Windows key + R, type
regeditand press Enter. - Input your administrator password if you have any and press Ok.
- Go to this root in the registry editor:
HKEY_LOCAL_MACHINE>SYSTEM>CurrentControlSet>Services>WaaSMedicSvc - Right-click on Start and select Modify.
- Change the value data from 3 to 4. If you’d like to re-enable it later, you can repeat these steps and change the value back to 3.
The value 4 denotes that the service is disabled at the start. However, since it is an important part of the OS itself, the system automatically turns it back on after a certain period. You can keep these settings up if you want to manually download and install updates at your own leisure.
You can also permanently disable it. But this may put your computer at risk of not getting important updates.
- Open the registry editor and go to the following root:
HKEY_LOCAL_MACHINE>SYSTEM>CurrentControlSet>Services>WaaSMedicSvc - Then right-click on the WaaSMedicSvc and click on Permissions.
- A window will pop up with a box labeled “Group or user names” list. Click on “SYSTEM” from the list.
- Under permissions for SYSTEM, tick on the deny box for “Full Control.”
- Press ok to apply the settings.
How to Disable Windows Update?
There is no direct way to disable Windows updates on your computer. But you can select the ‘Pause updates for 7 days’ option to pause the update for that period of time. However, there’s another simple workaround to disable the windows update. You can temporarily disable the windows update settings through a simple workaround.
- Open settings by pressing Win + I keys and go to Settings and Internet.
- Click on properties under your Wi-Fi.
- Turn on the ‘Set as metered connection.’ This will turn your current network into a metered connection which means that your data usage is metered, and you will have more control over how it’s used.
- Press WIN + I and go to Update and Settings.
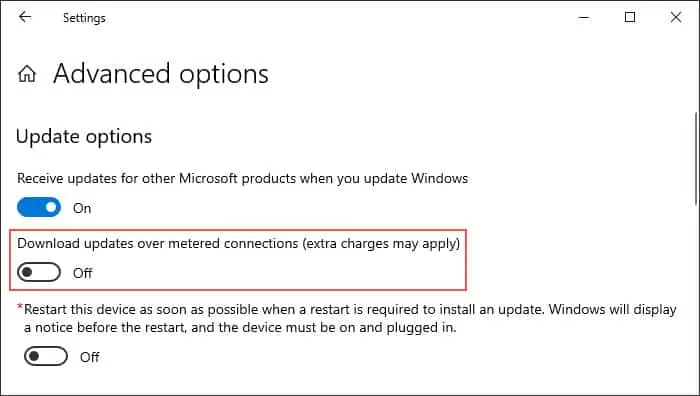
- Click on Advanced options.
- Turn off the slider under ‘Download updates over metered connections (extra charges may apply).’
This will limit the updates your computer downloads in the background and reduces background resource usage. It will only download the absolute necessary updates and ask you to manually download any other low-priority updates.
Should I Disable Windows Update Medic Service?
This entirely depends on how well you can navigate through your computer. Windows update is an important part of the operating system, and Microsoft advises against disabling it in any way. This can also be why there is no option to stop windows update.
Microsoft rolls out important security updates to tackle the latest threats and bug fixes. Since you’ll be missing out on important updates, you should only consider disabling the windows update and the update medic service based on your needs.
-
Home
-
News
- What Is Windows Update Medic Service and How to Disable It?
By Tina |
Last Updated
What is the Windows Update Medic Service? How to disable Windows Update Medic Service? This post will show you the answers. In addition, you can visit MiniTool to find more Windows tips and solutions.
What Is Windows Update Medic Service?
When you are trying to update Windows 10, you need the help of Windows Update Service. However, the Windows Update service may be the target of errors and file inconsistencies. When it happens, several services start running in the background, looking to repair Windows Update. Hence, one of the components is the Windows Update Medic Service.
The Windows Update Medic Service, also known as WaasMedicSVC, is a new background service that was introduced in Windows 10 and the new way this OS handles the updating process. The purpose of Windows Update Medic Service is to repair the Windows Update service so that your computer can continue to receive updates unhindered.
Windows Update Medic Service also handles the remediation and protection of all Windows Update components. As such, even if you disable all Windows Update-related services, WaasMedic will restart them at some point.
However, you can also choose to disable Windows Update Medic Service. But, you may receive the error message Windows Update Medic Service access denied when disabling it from Windows Service Manager. So, we will show you other Windows Update Medic Service disable method.
How to Disable Windows Update Medic Service?
To disable Windows Update Medic Service, you need the help of third-party software. The good recommendation is the Windows Update Blocker.
Now, we will show you how to disable Windows Update Medic Service.
1. Download Windows Update Blocker.
2. Extract the file.
3. Launch Windows Update Blocker.
4. Go to the Menu.
5. Select Windows Service from the context menu.
6. Then the Services window will be called out and look for Windows Update Medic Service.
7. Then copy the service’s name.
8 Go back to the folder where you extracted the Windows Update Blocker.
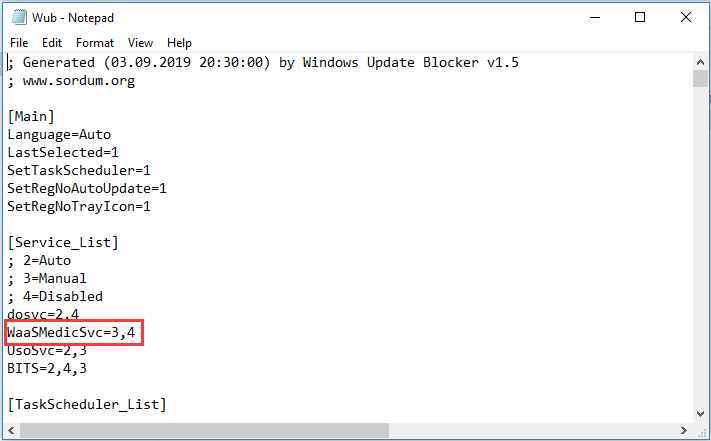
9. Open the ini file with Notepad.
10. And look right under dosvc=2,4.
11. Paste the service name there and add =3,4 in the back of it.
12. Go back to Windows Update Blocker window.
13. Click Apply Now to confirm the changes.
When all steps are finished, you have disabled Windows Update Medic Service. This is pretty much everything there is to know about the Windows Update Medic Service and how you can disable and enable it again.
Besides the method listed above, you can also choose to disable Windows Update Medic Service via the Registry. Open it and then navigate to the HKEY_LOCAL_MACHINE\SYSTEM\CurrentControlSet\Services\WaaSMedicSvc path and then set its value data to 4. After that, the Windows Update Medic Service is disabled.
Final Words
To sum up, this post has introduced what the Windows Update Medic Service is and how to disable Windows Update Medic Service. To disable it, you cannot do that via the Windows Service Manager. You need to disable it via the Windows Update Blocker. If you any better idea to disable Windows Update Medic Service, you can share it in the comment zone.
About The Author
Position: Columnist
Tina is a technology enthusiast and joined MiniTool in 2018. As an editor of MiniTool, she is keeping on sharing computer tips and providing reliable solutions, especially specializing in Windows and files backup and restore. Besides, she is expanding her knowledge and skills in data recovery, disk space optimizations, etc. On her spare time, Tina likes to watch movies, go shopping or chat with friends and enjoy her life.

What is WaasMedic?
WaasMedic or Windows Update Medic Service is a built-in background service in Microsoft Windows 10. Its primary job is to maintain the integrity of the Windows Update service and repair it to let your PC receive updates unhindered.
While it looks like any other utility on the surface, this program introduces several problems in Microsoft Windows 10 systems. Many users have complained that the program causes high CPU and Disk Usage when viewed in the Task Manager.
Windows updates have created performance issues in the past too by messing up both user and system files. However, such updates have been rare. As intended by the company, most of them contain helpful patches which fix critical security flaws and annoying bugs to improve the user experience. Hence, the Windows Update Medic Service Utility is an essential system service to maintain and repair the Windows Update for its smooth functioning.
But are the high disk usage and the enormous amounts of resources consumed worth it? Some users might consider it a healthy trade-off. If you have instead decided to extend your laptop’s battery life and ensure better system stability, you might want to disable this service.
You can also automate the process by setting it up in Windows Task Scheduler. Apart from this, scroll down to see several tips for keeping your PC in sound health.
Disabling WaasMedic.exe
An excellent method to fix performance hits caused by the WaasMedic agent exe is to disable it entirely. This technique might feel intimidating, but disabling it is as simple as making a few tweaks.
If you try to disable it from the Windows Services menu, like other built-in services, your PC will flash an error message: “Access Denied.” We need to download a third party software called Windows Update Blocker to fix this issue.
The Windows Update Blocker is a small executable file that runs as a background service and prevents Windows from automatically updating itself. It does so by disabling the Windows Update service, and it makes sure that it stays disabled.
You have to first download this utility from the official site here:
Once the download has been completed, you will get three files in a folder: an executable file, a configuration file named Wub.ini, and a README text file.
At this point, to disable the WaasMedic Agent.exe:
- Double click on the executable file to launch the program.
- Once the program is running, click on the Menu button in the main window (Figure 1).

Figure 1. Windows Update Blocker.
- You will now see a list of options. Click on the “Windows Services” option.
- The Windows Services Manager window will open. It is a built-in tool that manages the services running in the Operating System (OS) (Figure 2).
- Search for the Windows Update Medic Service entry. You can double click on it to access the options for this service (Figure 3). For our purposes, we only need to know the exact name of this service. We can see the name of this service by clicking on the General tab toward the left hand side of the options window. In our case, the service name is “WaasMedicSvc.”

Figure 2. Windows Services Manager.

Figure 3. The Windows Update Medic Service Properties.
- Once we have the name of the service, we next open the Wub.ini file (in the downloaded folder) with a simple text-editor like Notepad. Include the code as per the instructions below (Figure 4) in this file.

Figure 4. Wub.ini opened in Notepad. You can clearly see the code included after the “dosvc=2,4” line.
- In the Wub.ini file, insert the service name we copied earlier after the line that reads “dosvc=2,4”.
- Next, insert “=3,4” after the service name entered above, as illustrated in Figure 4. This option ensures that the Windows Update Blocker knows the service name we inserted (WaasMedicSvc =3,4) is a Windows Update Service, and we want to disable it manually.
- Switch back to the main utility window and click on the “Apply Now” button. Doing so initializes the program with the configuration we have just set.
- When you want to re-enable the Windows Update Medic service, go back to the Update Blocker main window. Click on the “Enable Service” radio button to resume the service. Next, click on the “Apply Now” button. Your Windows Update Medic service service will resume.
- If you want to automate this process, you can use the system Task Scheduler to do so.
Preventing Issues
Disabling the WaasMedic Agent exe is the solution of last resort to resolve the related issues. However, we can fix Windows Update Medic Service problems by addressing other potential causes without disabling the service altogether.
Often, the following are the two potential causes behind problems with the Windows Update Medic service.
- Junk Files
- Malware
Junk Files and Unused Installed Software
Unneeded files accumulate on your PC when you download files without frequently using them. Files such as pictures, documents, or songs that we no longer use can cause severe performance hits.
These files consume precious space on your hard drive and can impede the regular day-to-day operation of the OS. The same goes for unused installed software. For example, maybe you installed some small software such as a hot-bar or a plugin and forgot about it. Now that software is eating valuable disk space and other critical resources of your PC without you even knowing about it.

Figure 5. Programs Section of the Control Panel.
Fortunately, cleaning unnecessary files and unused software is a simple 2-step process.
- Go to the Programs section of the Control Panel. Scan the list for those programs that you do not use anymore (Figure 5).
- Click on any such program that you find. An option to uninstall it will show. Click on the Uninstall option to launch the program’s uninstallation wizard.
- On the other hand, you need a good disk cleanup utility such as BleachBit or CCleaner to remove junk files. These maintenance programs can remove unused system files, and user files with efficient disk cleanup operations (Figure 6).

Figure 6. The BleachBit landing screen.
- These utilities do not merely clean the Recycle Bin. They also scan the memory and shared storage areas for various installed programs and other files to see which ones can be safely removed to perform a robust disk cleanup operation.
Malware and Data Execution Prevention
Another reason for the problems related to Windows Update Medic Service could be security threats such as viruses and malware. There have been instances where a particular malware attacks or mimics a specific Windows built-in utility. This class of viruses attempts to execute code in Microsoft Windows’ privileged memory areas, where it can cause the greatest damage to your computer.
Browsers carry security features against virus attacks. In spite of this, such programs could have loop holes that provide “entry-points” for harmful malware. Hence, we should pro-actively improve our system security against such threats.
We can make our systems more secure against such threats by using a Windows feature called Data Execution Prevention that does a scan to spot incorrect memory usage in programs.
As we have seen, malware try to execute their malicious code within particular regions of memory with maximum potential risk of harming the system’s security and integrity. By spotting such potentially unusual memory usage patterns, Data Execution Prevention stops these attacks in their tracks.
By default, Microsoft Windows automatically enables this feature for system applications. However, to provide robust security, we need to turn this feature on for all programs on the PC. To do so:
- Search the Start Menu for “This PC.” Once you find it, Right Click on it and select “Properties.”
- The System Properties window opens. You can look at your system configuration and specifications and a general description of the operating system installed (Figure 7).

Figure 7. System Properties Window.
- Click on the “Advanced System Settings” hyperlink on the left-hand side of the system properties window. Next, navigate to the “Settings…” button under the Performance group (Figure 8).
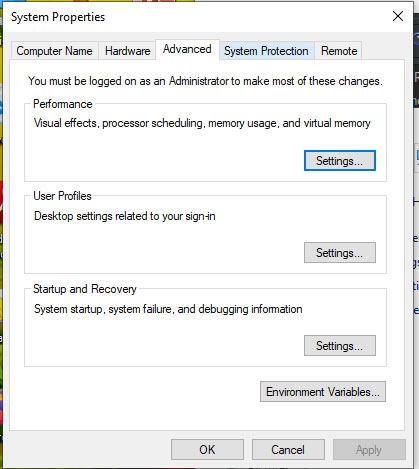
Figure 8. Advanced System Settings.
- Another window opens up. You can find here more settings to further tweak the computer’s performance. Click on the “Data Execution Prevention” tab (Figure 9).
- Next, click on the “Turn on DEP for all Programs and services except those I select” radio button. Finally, click on “OK” to save the setting and enable DEP on your laptop or PC.

Figure 9. DEP Tab.
Disabling Windows Update
Lastly, you can also disable Automatic Windows Updates. While this suggestion might not be suitable for everyone, it is essential to note that Windows Automatic Updates consume significant system resources to cause performance issues.
These updates also consume a lot of network bandwidth to fetch the new update files. Hence, it might be helpful for people looking to extract the maximum performance from their computer if they can control when these updates are downloaded.
Summary And FAQs
In this article, we have talked about the Windows as A Service Medic utility. We have discussed its purpose and some issues that Windows users seem to have with this utility. While it might appear to be a simple, harmless service, some people have reported that this program leads to high CPU and high Disk Usage.
This article also talked about how to disable this utility to repair these performance-related problems. In addition, we have also discussed several alternative solutions that can further fix the stability issues associated with the Windows Update Medic service and the overall health of the computer.
In general, we advise you to perform routine housekeeping tasks on your computer. Among others, these include uninstalling unused programs, deleting unused files, and using disk cleanup utilities such as BleachBit to remove stubborn or hidden junk files or data.
Further, this article also talked about the use and benefits of using Data Execution Prevention as a means of “hardening” the system against malicious software. We also saw a step-by-step procedure to disable Automatic Windows Updates to repair the system issues cause by a malfunctioning Windows Update Medic Service.
We now sign off by answering a few critical questions related to this article:
Q. Can I disable WaasMedic Agent .exe?
A. Yes, you can disable the Waasmedic.exe. However, you cannot disable this service from within Windows natively and the system throws an “Access Denied” error message if you attempt to do so. But you can use a utility such as Windows Update Blocker to disable it, as explained in detail above. You can then use Windows Task Scheduler to automate the enabling/disabling of this service as per your requirements.
Q. Can I delete WaasMedic.exe?
A. No, you cannot delete WaasMedic.exe. This service is an integral part of the Windows operating system. It is essential for maintaining and repairing the Windows Update utility, and the OS does not allow you to remove it.
Q. Should I disable the Windows Update medic service?
A. The decision to disable the Windows Update medic service is a matter of personal preference. Some users prefer to leave it on, especially if it’s not causing them any issues, but others might want to disable it. If you find disabling this service improves system performance, then you should keep it disabled.
Q. Why is disk usage at 100%?
A. 100% disk usage can be due to many reasons. It can occur because of malfunctioning software. Alternatively, the system might be actually under load from a currently running program. If disabling Waasmedic.exe did not fix the 100% disk usage problem for you, you should look at other possible sources of this issue and address them.
Was this article helpful?
YesNo


