
In Windows 10, the CLIPSVC (Client License Service) is a service responsible for managing the licensing for certain Microsoft products on a computer. However, there are times when the CLIPSVC service may not start properly, causing issues with licensing and activation of Microsoft products. This can be a frustrating problem to deal with, especially if you need to use these products for work or personal use.
If you are experiencing issues with the CLIPSVC service not starting in Windows 10, there are several methods you can try to resolve the issue. In this tutorial, we will walk you through the steps to enable the CLIPSVC service and get it up and running again on your Windows 10 computer.
Before we begin, it’s important to note that some of the methods we will discuss require administrative privileges on your computer. If you do not have administrative access, you may need to contact your system administrator or IT support for assistance.
Method 1: Restart the CLIPSVC Service
The first and simplest method to try is to restart the CLIPSVC service. This can often resolve issues with the service not starting properly. Here’s how to do it:
- Press the Windows key + R on your keyboard to open the Run dialog box.
- Type «services.msc» and press Enter to open the Services window.
- In the Services window, scroll down and locate the «Client License Service (CLIPSVC)» entry.
- Right-click on the CLIPSVC service and select «Restart» from the context menu.
- Wait for the service to restart and then check to see if it has started successfully.
If the service still does not start after restarting it, you can try the next method.
Method 2: Check Dependencies
The CLIPSVC service may have dependencies on other services that need to be running in order for it to start properly. If these dependencies are not met, the CLIPSVC service may fail to start. Here’s how to check the dependencies of the CLIPSVC service:
- Open the Services window by pressing the Windows key + R, typing «services.msc,» and pressing Enter.
- Locate the «Client License Service (CLIPSVC)» entry in the Services window.
- Right-click on the CLIPSVC service and select «Properties» from the context menu.
- In the Properties window, click on the «Dependencies» tab to view the services that CLIPSVC depends on.
- Make sure that all the dependencies listed are running and set to start automatically.
If any of the dependencies are not running or set to start automatically, you can right-click on them in the Services window and select «Start» or «Properties» to adjust their startup type.
Method 3: Reset CLIPSVC Service Settings
If restarting the CLIPSVC service and checking its dependencies do not resolve the issue, you can try resetting the service settings to their default values. Here’s how to do it:
- Open the Command Prompt as an administrator by pressing the Windows key, typing «cmd,» right-clicking on «Command Prompt,» and selecting «Run as administrator.»
- In the Command Prompt window, type the following command and press Enter:
sc config clipsvc start= demand - Next, type the following command and press Enter:
sc start clipsvc - Wait for the service to start and then check to see if it has started successfully.
Method 4: Run Windows Update
Sometimes issues with the CLIPSVC service not starting can be caused by missing or corrupt system files. Running Windows Update can help to ensure that your system is up to date and has the latest fixes and patches. Here’s how to run Windows Update:
- Press the Windows key + I to open the Settings app.
- Click on «Update & Security» and then select «Windows Update» from the left-hand menu.
- Click on «Check for updates» to search for and install any available updates for your system.
- Restart your computer after the updates have been installed and check to see if the CLIPSVC service starts successfully.
Method 5: Perform a System Restore
If none of the above methods work, you can try performing a System Restore to restore your system to a previous point in time when the CLIPSVC service was working properly. Here’s how to perform a System Restore:
- Press the Windows key + S and type «System Restore» in the search box.
- Click on «Create a restore point» from the search results.
- In the System Properties window, click on the «System Restore» button.
- Follow the on-screen instructions to choose a restore point and complete the restoration process.
- After the System Restore is complete, check to see if the CLIPSVC service starts successfully.
Conclusion
In conclusion, the CLIPSVC (Client License Service) is an important service in Windows 10 that manages licensing for Microsoft products on your computer. If you are experiencing issues with the CLIPSVC service not starting, it can be a frustrating problem to deal with. However, by following the methods outlined in this tutorial, you should be able to enable the CLIPSVC service and resolve any issues you may be experiencing.
Remember to always ensure that you have administrative privileges on your computer before attempting to make any changes to system services. If you are unsure or uncomfortable performing these steps on your own, it may be best to seek assistance from your system administrator or IT support.
We hope this tutorial has been helpful in guiding you through the process of enabling the CLIPSVC service in Windows 10. If you have any further questions or need assistance, feel free to reach out to us for help. Thank you for reading, and we wish you success in resolving any issues with the CLIPSVC service on your computer.
Provides infrastructure support for the Microsoft Store. This service is started on demand and if disabled applications bought using Windows Store will not behave correctly.
Default Settings
| Startup type: | Manual |
| Display name: | Client License Service (ClipSVC) |
| Service name: | ClipSVC |
| Service type: | share |
| Error control: | normal |
| Object: | LocalSystem |
| Path: | %SystemRoot%\System32\svchost.exe -k wsappx -p |
| File: | %SystemRoot%\System32\ClipSVC.dll |
| Registry key: | HKEY_LOCAL_MACHINE\SYSTEM\CurrentControlSet\Services\ClipSVC |
| Privileges: |
|
Default Behavior
Client License Service (ClipSVC) is a Win32 service. In Windows 10 it is starting only if the user, an application or another service starts it. When the Client License Service (ClipSVC) is started, it is running as LocalSystem in a shared process of svchost.exe along with other services. If Client License Service (ClipSVC) fails to start, the failure details are being recorded into Event Log. Then Windows 10 will start up and notify the user that the ClipSVC service has failed to start due to the error.
Dependencies
Client License Service (ClipSVC) cannot be started under any conditions, if the Remote Procedure Call (RPC) service is disabled.
Restore Default Startup Configuration of Client License Service (ClipSVC)
Before you begin doing this, make sure that all the services on which Client License Service (ClipSVC) depends are configured by default and function properly. See the list of dependencies above.
1. Run the Command Prompt as an administrator.
2. Copy the command below, paste it into the command window and press ENTER:
sc config ClipSVC start= demand
3. Close the command window and restart the computer.
The ClipSVC service is using the ClipSVC.dll file that is located in the C:\Windows\System32 directory. If the file is removed or corrupted, read this article to restore its original version from Windows 10 installation media.
If you are trying to start Clipsvc Service in Windows 10 computer because certain apps/files are unable to open due to disabled Clipsvc service, and experiencing ‘Clipsvc not starting’ error, then you are in right place for the solution. Here, you will be guided with easy steps/methods to resolve the issue. Let’s starts the discussion.
‘Clipsvc – Client License Service’ in Windows 10: Clipsvc service is important Windows service that enables licensing infrastructure support Window Store Apps in Windows computer. You should make sure this service is enabled and running properly in computer if you want to run and use apps/files without any issue. Disabled Clipsvc or Client License Service in Windows 10 can cause issue like some or all dependable applications might fail to function properly or even start correctly.
In sort, Clipsvc should be enabled in your device if you want to certain apps with functionality. However, several users reported that they faced ‘Clipsvc not starting’ error while they tried to start Clipsvc or Client License Service in Windows 10 computer. The text presented in error message states Windows computer is unable to start Clipsvc service and contains some error codes like ‘Error 126’. Let’s take a look at error message.
“Windows could not start Client License Service (ClipSVC) service on Local Computer.
Error 126: The specified module could not be found”
There could be several reasons behind this error including corruption system files or registry, malware or viruses attack in computer, insufficient privileges on system, due to various configuration settings and other reasons. If Clipsvc service is disabled, then no operations related to Microsoft Store licensed apps could be processed. So, it is recommended to enable this service if it is disabled in your Windows computer. Let’s go for the solution.
How to fix Clipsvc not starting error in Windows 10?
Method 1: Fix ‘Clipsvc not starting’ error with ‘PC Repair Tool’
‘PC Repair Tool’ is easy & quick way to find and fix BSOD errors, EXE errors, DLL errors, problems with programs/applications, malware or viruses issues in computer, system files or registry issues and other system issues with just few clicks. You can get this tool through button/link below.
Method 2: Enable Clipsvc or Client License Service manually in Windows 10
Step 1: Press ‘Windows + R’ keys on keyboard, type ‘services.msc’ in the opened ‘Run’ dialog box and hit ‘Ok’ button to open ‘Services’ window
Step 2: Find and right-click on ‘Client License Service’, and select ‘Start’ option if it is disabled
Step 3: Once done, try opening the file/application that was giving ‘Clipsvc not starting’ error, and check if the error is resolved.
Method 3: Enable Clipsvc or Client License Service via Command Prompt
Step 1: Press ‘Windows + X’ keys on keyboard and select ‘Command Prompt as Administrator’
Step 2: Type ‘net start clipsvc’ command and hit ‘Enter’ key to execute. This command will enable Clipsvc service in computer
Method 4: Perform Microsoft Store Reset in Windows 10
Clipsvc service is related to Microsoft Store. You can reset Microsoft Store in computer in order to fix this issue.
Step 1: Press ‘Windows + R’ keys on keyboard, type ‘Control’ in the opened ‘Run’ dialog box and hit ‘Ok’ to open ‘Control Panel’
Step 2: In ‘Control Panel’, go to ‘Apps > Apps & Features’, find and select ‘Microsoft Store’, and select ‘Advanced Options’
Step 3: Click on ‘Terminate’ button and then click on ‘Reset’ button, and click on ‘Reset’ button again if asked for confirmation. This will reset Microsoft Store app in your computer.
Step 4: Once done, retry opening the file/application that was giving the error, and check if the error is resolved.
Method 5: Run SFC Scan and DISM scan in Windows 10
This error can also be occurred due to corruption in Windows System Files and corruption in disk system image. You can run SFC Scan and DISM scan tool in Windows 10 to repair system files and disk system image in order to fix the error.
Step 1: Open ‘Command Prompt as Administrator’ using ‘Method 3’
Step 2: Run SFC Scan. Type ‘sfc /scannow’ command and hit ‘Enter’ key to execute
Step 3: Once executed, run DISM scan. Type the following command and hit ‘Enter’ key to execute
DISM /Online /Cleanup-Image /RestoreHealth
Step 4: Once executed, restart your computer to see the changes and check if the error is resolved.
Method 6: Run a script
If the issue is still persist, then you can try to fix the issue by running a script. Let’s try. But before that you should create a system restore point that could help you to restore your computer in case of damage.
Step 1: Type ‘Create a restore point’ in ‘Windows Search Box’ and open it from results appear
Step 2: Click on ‘Create’ in the opened window, name the restore point and wait till the process is finished
Step 3: Now, open your browser and visit ‘http://www.mediafire.com/file/oup71iopby5kj1e/clipSVC_fix.rar/file’ page to download a REG file in your computer
Step 4: Once downloaded, find and extract it and double-click on it
Step 5: Once the script is executed, repeat ‘Method 3’ again to start Clipsvc service via Command Prompt.
Step 6: Once done, restart your computer and check if the error is resolved.
Conclusion
I am sure this post helped you on How to fix Clipsvc not starting issue in Windows 10 with several easy steps/methods. You can read & follow our instructions to do so. That’s all. For any suggestions or queries, please write on comment box below.
CLIPSVC is an abbreviation of Client License Service and it is used to provide a licensing support structure to Microsoft Store Applications. So, in order for the Windows Store apps to work, CLIPSV should be enabled. However, some Windows users are experiencing an error where CLIPSVC is not starting and they want to know how to enable it.
Windows could not start the Client License Service (ClipSvc) service on the Local Computer
Error 126, The specified module could not be found.
Windows could not start the Client License Service
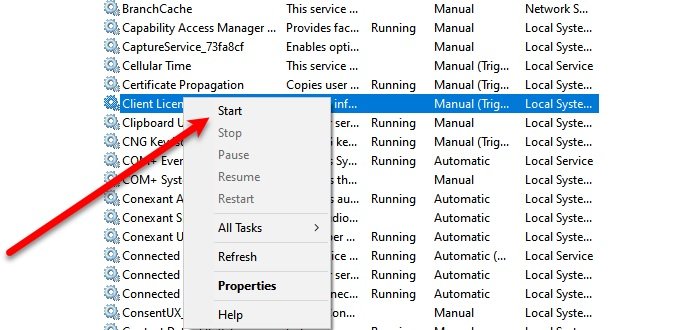
Before seeing the solutions, we must know that you need to manually trigger clipSVC service from the Services app. To do that, launch Services from the Start Menu. Look for Client License Service, right-click on it and select Start. This way you will be able to enable clipSVC on your computer.
If CLIPSVC is not starting in Windows 10, you can use the following solutions to enable it.
- Merge a Registry Script
- Reset Microsft Store apps
Let us talk about them in detail.
1] Merge a Registry Script

You need a create a Registry Script and merge it to start CLIPSVC service.
So, create a system restore point first, and then open Notepad, paste the following code and save it with a .reg extension.
[HKEY_LOCAL_MACHINESYSTEMCurrentControlSetServicesClipSVC]

"DisplayName"="@%SystemRoot%\system32\ClipSVC.dll,-103"

"ErrorControl"=dword:00000001

"ImagePath"=hex(2):25,00,53,00,79,00,73,00,74,00,65,00,6d,00,52,00,6f,00,6f,00,

  74,00,25,00,5c,00,53,00,79,00,73,00,74,00,65,00,6d,00,33,00,32,00,5c,00,73,

  00,76,00,63,00,68,00,6f,00,73,00,74,00,2e,00,65,00,78,00,65,00,20,00,2d,00,

  6b,00,20,00,77,00,73,00,61,00,70,00,70,00,78,00,00,00

"Start"=dword:00000003

"Type"=dword:00000020

"Description"="@%SystemRoot%\system32\ClipSVC.dll,-104"

"DependOnService"=hex(7):72,00,70,00,63,00,73,00,73,00,00,00,00,00

"ObjectName"="LocalSystem"

"ServiceSidType"=dword:00000001

"RequiredPrivileges"=hex(7):53,00,65,00,43,00,72,00,65,00,61,00,74,00,65,00,47,

  00,6c,00,6f,00,62,00,61,00,6c,00,50,00,72,00,69,00,76,00,69,00,6c,00,65,00,

  67,00,65,00,00,00,53,00,65,00,43,00,68,00,61,00,6e,00,67,00,65,00,4e,00,6f,

  00,74,00,69,00,66,00,79,00,50,00,72,00,69,00,76,00,69,00,6c,00,65,00,67,00,

  65,00,00,00,53,00,65,00,53,00,79,00,73,00,74,00,65,00,6d,00,45,00,6e,00,76,

  00,69,00,72,00,6f,00,6e,00,6d,00,65,00,6e,00,74,00,50,00,72,00,69,00,76,00,

  69,00,6c,00,65,00,67,00,65,00,00,00,00,00

"FailureActions"=hex:84,03,00,00,00,00,00,00,00,00,00,00,01,00,00,00,14,00,00,

  00,00,00,00,00,00,00,00,00

"LaunchProtected"=dword:00000002

[HKEY_LOCAL_MACHINESYSTEMCurrentControlSetServicesClipSVCParameters]

"InactivityShutdownDelay"=dword:0000012c

"RefreshRequired"=dword:00000002

"ServiceDll"=hex(2):25,00,53,00,79,00,73,00,74,00,65,00,6d,00,52,00,6f,00,6f,

  00,74,00,25,00,5c,00,53,00,79,00,73,00,74,00,65,00,6d,00,33,00,32,00,5c,00,

  43,00,6c,00,69,00,70,00,53,00,56,00,43,00,2e,00,64,00,6c,00,6c,00,00,00

"ServiceDllUnloadOnStop"=dword:00000001

"ProcessBiosKey"=dword:00000001

[HKEY_LOCAL_MACHINESYSTEMCurrentControlSetServicesClipSVCSecurity]

"Security"=hex:01,00,14,80,b8,00,00,00,c4,00,00,00,14,00,00,00,30,00,00,00,02,

  00,1c,00,01,00,00,00,02,80,14,00,ff,01,0f,00,01,01,00,00,00,00,00,01,00,00,

  00,00,02,00,88,00,06,00,00,00,00,00,14,00,ff,01,02,00,01,01,00,00,00,00,00,

  05,12,00,00,00,00,00,18,00,fd,01,0f,00,01,02,00,00,00,00,00,05,20,00,00,00,

  20,02,00,00,00,00,14,00,9d,01,02,00,01,01,00,00,00,00,00,05,04,00,00,00,00,

  00,18,00,94,00,00,00,01,02,00,00,00,00,00,0f,02,00,00,00,01,00,00,00,00,00,

  14,00,9d,01,02,00,01,01,00,00,00,00,00,05,06,00,00,00,00,00,14,00,14,00,00,

  00,01,01,00,00,00,00,00,05,0b,00,00,00,01,01,00,00,00,00,00,05,12,00,00,00,

  01,01,00,00,00,00,00,05,12,00,00,00

[HKEY_LOCAL_MACHINESYSTEMCurrentControlSetServicesClipSVCTriggerInfo]

[HKEY_LOCAL_MACHINESYSTEMCurrentControlSetServicesClipSVCTriggerInfo ]

"Type"=dword:00000006

"Action"=dword:00000001

"GUID"=hex:67,d1,90,bc,70,94,39,41,a9,ba,be,0b,bb,f5,b7,4d

"Data0"=hex:36,00,34,00,44,00,31,00,44,00,30,00,34,00,35,00,2d,00,46,00,36,00,

  37,00,35,00,2d,00,34,00,36,00,30,00,42,00,2d,00,38,00,41,00,39,00,34,00,2d,

  00,35,00,37,00,30,00,32,00,34,00,36,00,42,00,33,00,36,00,44,00,41,00,42,00,

  00,00

"DataType0"=dword:00000002

[HKEY_LOCAL_MACHINESYSTEMCurrentControlSetServicesClipSVCTriggerInfo1]

"Type"=dword:00000007

"Action"=dword:00000001

"GUID"=hex:16,28,7a,2d,5e,0c,fc,45,9c,e7,57,0e,5e,cd,e9,c9

"Data0"=hex:75,08,bc,a3,21,07,85,41

"DataType0"=dword:00000001

[HKEY_LOCAL_MACHINESYSTEMCurrentControlSetServicesClipSVCTriggerInfo2]

"Type"=dword:00000007

"Action"=dword:00000001

"GUID"=hex:16,28,7a,2d,5e,0c,fc,45,9c,e7,57,0e,5e,cd,e9,c9

"Data0"=hex:75,10,bc,a3,21,07,85,41

"DataType0"=dword:00000001

[HKEY_LOCAL_MACHINESYSTEMCurrentControlSetServicesClipSVCTriggerInfo3]

"Type"=dword:00000007

"Action"=dword:00000001

"GUID"=hex:16,28,7a,2d,5e,0c,fc,45,9c,e7,57,0e,5e,cd,e9,c9

"Data0"=hex:75,18,bc,a3,21,07,85,41

"DataType0"=dword:00000001

[HKEY_LOCAL_MACHINESYSTEMCurrentControlSetServicesClipSVCTriggerInfo4]

"Type"=dword:00000007

"Action"=dword:00000001

"GUID"=hex:16,28,7a,2d,5e,0c,fc,45,9c,e7,57,0e,5e,cd,e9,c9

"Data0"=hex:75,20,bc,a3,21,07,85,41

"DataType0"=dword:00000001

[HKEY_LOCAL_MACHINESYSTEMCurrentControlSetServicesClipSVCTriggerInfo5]

"Type"=dword:00000007

"Action"=dword:00000001

"GUID"=hex:16,28,7a,2d,5e,0c,fc,45,9c,e7,57,0e,5e,cd,e9,c9

"Data0"=hex:75,28,bc,a3,21,07,85,41

"DataType0"=dword:00000001

[HKEY_LOCAL_MACHINESYSTEMCurrentControlSetServicesClipSVCTriggerInfo6]

"Type"=dword:00000007

"Action"=dword:00000001

"GUID"=hex:16,28,7a,2d,5e,0c,fc,45,9c,e7,57,0e,5e,cd,e9,c9

"Data0"=hex:75,30,bc,a3,21,07,85,41

"DataType0"=dword:00000001
Now, right-click the .reg file and select Merge. You will be asked to confirm your action, do that, by clicking Run.
Now, restart your PC or use the following command in Command Prompt (as an administrator) to enable CLIPSVC in Windows 10.
net start clipsvc
2] Reset Microsoft Store apps
Since ClipSVC is related to Microsoft Store apps if the script does not fix your issue try resetting Microsoft Store apps with PowerShell.
If don’t want to use any command, launch Settings (Win + I) and click Apps. Search for Microsoft Store, select it and click Advanced options > Reset. Wait for it to complete and check if the issue persists.
Hopefully, with the help of these solutions, you will be able to fix CLIPSVC not starting error.
Read Next: Microsoft Store not opening or closes immediately after opening.