
The Windows Font Cache Service is an important part of Windows, helping your computer show text faster in apps by keeping a copy of commonly used fonts ready to go. Sometimes, though, it might not work correctly — maybe it won’t start, uses too much of your computer’s brain power (CPU), or causes other issues. We’re going to talk about what this service does, the troubles you might run into, and how to sort them out, whether you’re using Windows 11 or Windows 10.
Also see: How to Limit CPU Usage of a Process in Windows 11
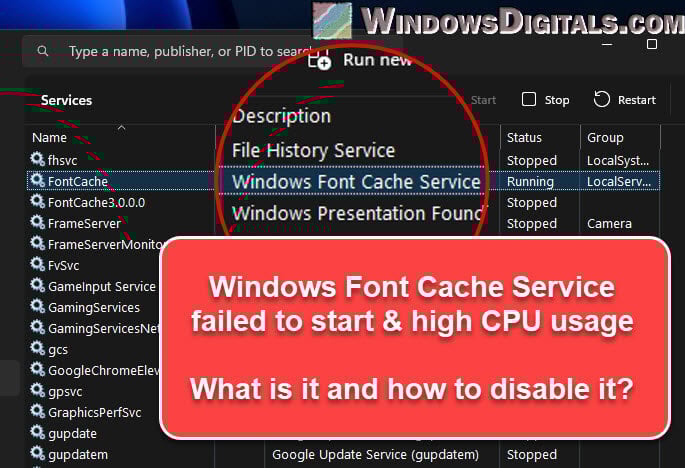
What does Windows Font Cache Service actually do?
The Windows Font Cache Service basically stores font caches so that the OS and apps can show fonts quicker by using the stored caches. It’s especially helpful when an app has a huge amount of text that needs to be shown on the screen.
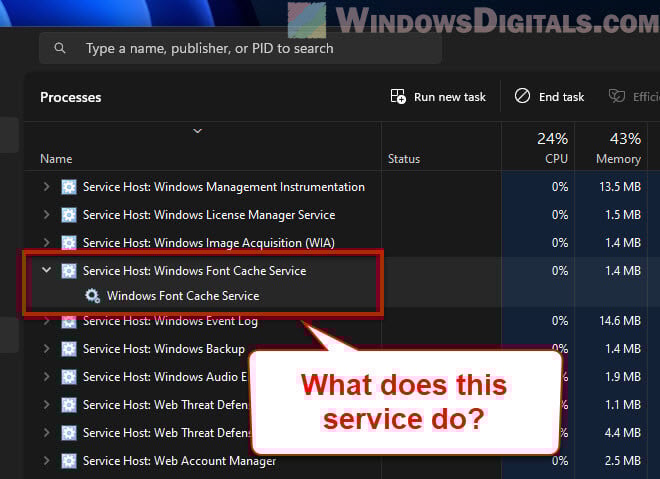
This service usually shows up as svchost.exe in your Task Manager’s Details tab because it shares a space with other system services.
Every time an app needs to show text, it asks Windows for the font data. With the Font Cache service working, this data is pulled from the cache and makes displaying the font more efficient. Even though it’s usually helpful, sometimes it can cause issues.
Linked issue: Service Host Local System High CPU, Disk or Memory Usage
What if Windows Font Cache Service won’t start?
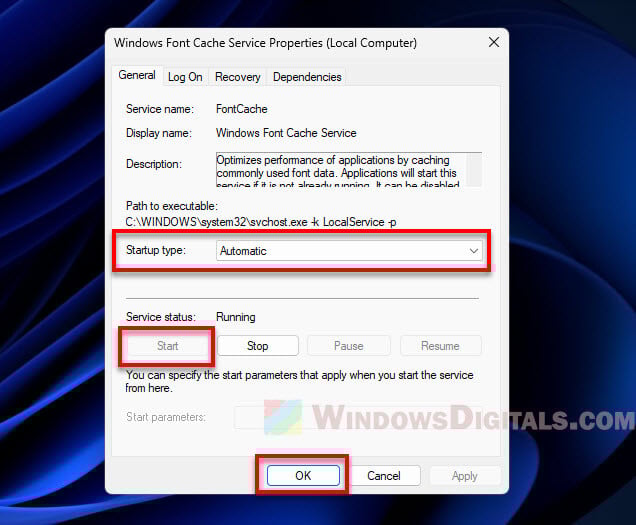
If you get an “Error 1920 or 1921: Windows Font Cache Service failed to start” message, you might need to manually start the service yourself. This usually pops up when you’re installing something and the installer can’t get the service working. Here’s how to manually start the service:
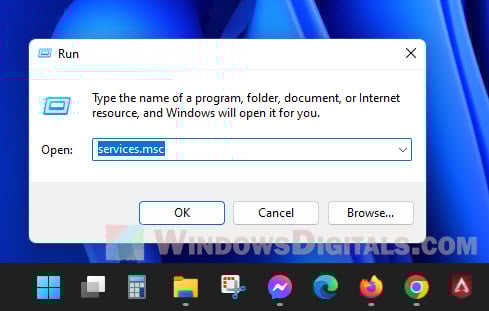
- Hit Windows + R to open the Run box.
- Type “services.msc” and hit Enter to bring up the Services window.

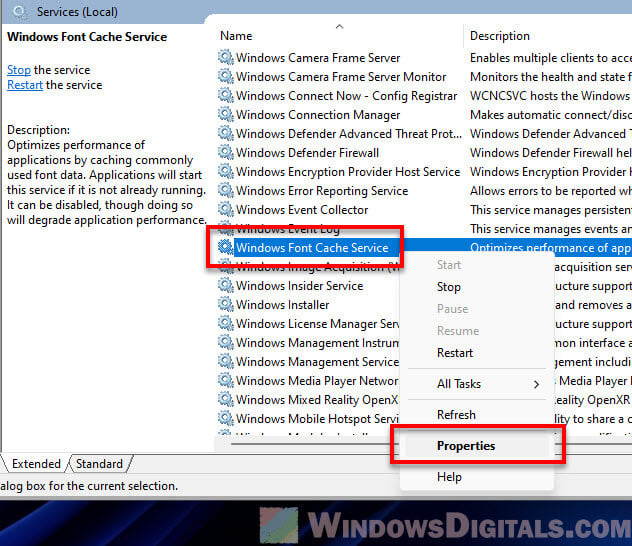
- Look for “Windows Font Cache Service”, right-click it, and choose “Properties”.

- Pick “Automatic” from the “Startup type” menu.
- Hit the “Start” button under the Service status area.

- Click “Apply” then “OK” to save your changes.
If it still won’t start after trying these steps, you might need to repair or reinstall the service.
Related concern: Why is My Memory Usage So High When Nothing is Running?
Fixing high CPU use by Windows Font Cache Service
Sometimes, the Windows Font Cache Service might unexpectedly make your CPU work harder than it should, which can slow your computer down. This could mean there’s something up with the service or the font cache.
If that’s the case, you can try clearing the font cache. Follow the steps below to do so:
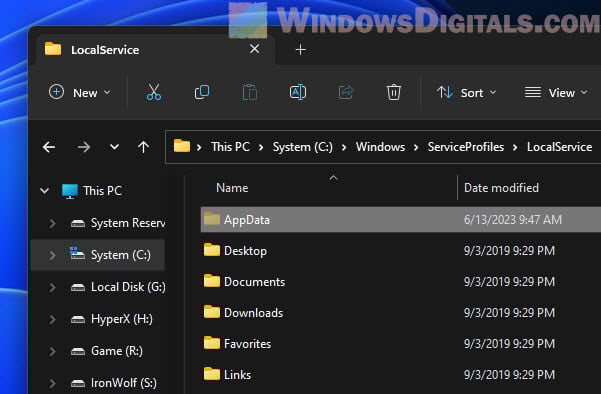
- Open “Windows Explorer”.
- Go to “C:\Windows\ServiceProfiles\LocalService\AppData\Local”. You’ll have to click through the folders since typing the path won’t work due to permissions. If you can’t see the “AppData” folder, you might need to turn on the “Show hidden files, folders, and drives” option.

- Find a folder called “FontCache”. Open it and delete everything inside.

- Restart your computer.
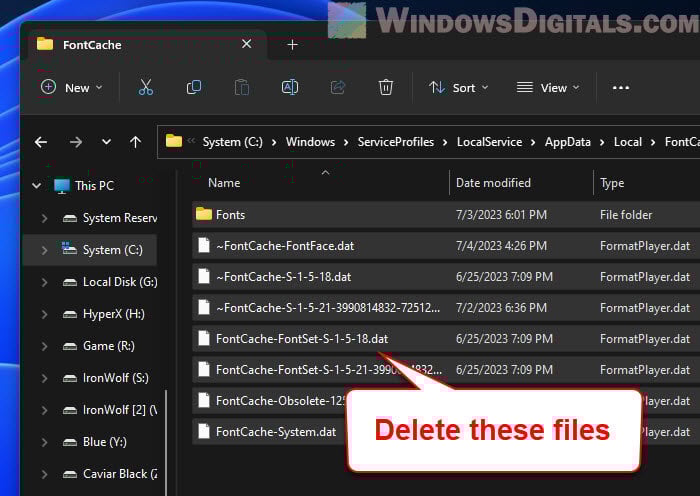
After restarting, Windows will make a new font cache, which should fix the CPU hogging issue for most people.
Useful tip: 30+ Windows 11 Services to Disable for Gaming Performance
Disabling Windows Font Cache Service
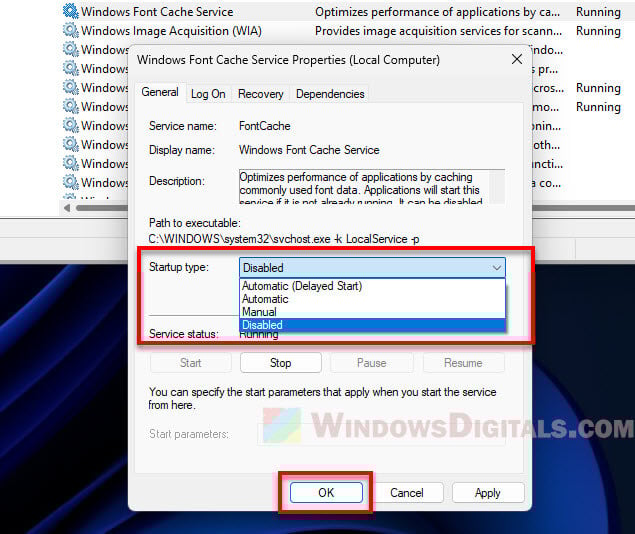
The Windows Font Cache Service doesn’t normally cause too many issues. But if it’s consistently causing high CPU usage or creating other problems, you might consider turning it off. Note that this might make fonts load more slowly in your apps. Follow the steps below to disable the service:
- Press “Windows + R” to bring up the Run box.
- Type “services.msc” and hit enter. This opens the Services window.
- Find the “Windows Font Cache Service” in the list, right-click on it, and choose “Properties”.
- Change the “Startup type” to “Disabled”.

- Click “Stop” to stop the service if it’s running.
- Hit “Apply” and then “OK” for the changes to take effect.
Relevant guide: How to Delete a Service in Windows 11 or 10 Using CMD
Windows Font Cache Service starts then stops
Sometimes, the Windows Font Cache Service might start up but then stop all of a sudden. This can mess with apps that need to show text. It usually means there’s an error with reading the cached font data.
Fixing these issues can often be as simple as clearing the font cache, like we talked about earlier, or reinstalling the program that’s causing problems.
How to reinstall the FontCache service (FntCache.dll)
Reinstalling the Windows Font Cache Service is a bit more complicated and should only be your last resort. You’ll need to re-register the service DLL file and restart the service.
- Hit the Windows Start button, type “cmd”, right-click on “Command Prompt” from the results, and choose “Run as administrator”.

- In the Command Prompt, type these commands one after the other, hitting Enter after each one:
net stop fontcache
cd /d %windir%\system32
regsvr32 FntCache.dll
net start fontcache


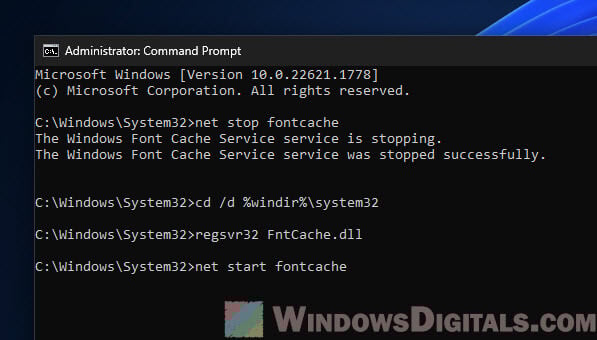
This stops the font cache service, re-registers the DLL file for the service, and then starting it up again.
Please note that these are advanced steps. Only try them if you’re sure about what you’re doing. If you’re not comfortable, it’s a good idea to ask for help from a pro. And, always make a system restore point before you start changing things, just in case something goes wrong.
FontMassive
Pack
Официальная страница FontMassive Pack — набор программ для работы со шрифтами
Техподдержка:
support@fontmassive.ru
В Windows 10 присутствует «Служба кэша шрифтов Windows».
«Благодаря» ей тормозит открытие всех шрифтов, находящихся не в системной папке Fonts.
Не только в FontMassive, но и в других фонт-менеджерах.
Рекомендуется отключить эту службу.
Чтобы отключить «Службу кэша шрифтов Windows», можно воспользоваться cmd-файлом:
(необходим запуск от имени Администратора)
Либо можно отключить вручную, найти её можно здесь:


0. Нажмите Win+R, введите services.msc и нажмите Enter.
1. Сначала выберите тип запуска «Отключена».
2. Затем нажмите кнопку «Остановить».
Перезагрузка компьютера не требуется.
В FontMassive версии до 3.1 и FontDetect версии до 3.8 при запуске их в Windows 10 использовалось собственное кэширование шрифтов в попытке обойти тороза при их открытии.
При этом для каждого шрифта создавались файлы .fm_cache
В более новых версиях такого кэширования нет.
Для быстрого останова системной службы кэша в программы добавлена кнопка отключения.
FontMassive (только для версии 3.1 и выше) — зайдите в настройки (Файл — Настройки F11).

FontDetect (только для версии 3.8 и выше)
Опция отключения внутреннего кэширования находится на вкладке «Шаг 3 — Папки».
Кнопка отключения системной Службы кэша — на в кладке «О программе».

FonTemp — внутреннее кэширование не производится.
В заголовке окна отображается предупреждающий значок (восклицательный знак на жёлтом фоне), если системная Служба кэша в данный момент запущена.
Если её не отключить, то во всех программах, использующих шрифты, подключенные с помощью FT, может притормаживать обращение к этим шрифтам.
Либо эти шрифты могут остаться на какое-то время видимыми даже после их отключения в FT, что может как минимум сбить с толку…

© 2005-2025 Алексей Коноплев aka KLesha28
При использовании материалов с этого сайта указывайте ссылку: http://fontmassive.ru
Не является средством массовой информации.
Optimizes performance of applications by caching commonly used font data. Applications will start this service if it is not already running. It can be disabled, though doing so will degrade application performance.
Default Settings
| Startup type: | Automatic |
| Display name: | Windows Font Cache Service |
| Service name: | FontCache |
| Service type: | share |
| Error control: | normal |
| Group: | AudioGroup |
| Object: | NT AUTHORITY\LocalService |
| Path: | %SystemRoot%\system32\svchost.exe -k LocalService -p |
| File: | %SystemRoot%\system32\FntCache.dll |
| Registry key: | HKEY_LOCAL_MACHINE\SYSTEM\CurrentControlSet\Services\FontCache |
| Privileges: |
|
Default Behavior
Windows Font Cache Service is a Win32 service. In Windows 10 it is starting automatically when the operating system starts. Then the Windows Font Cache Service is running as NT AUTHORITY\LocalService in a shared process of svchost.exe along with other services. If Windows Font Cache Service fails to start, the failure details are being recorded into Event Log. Then Windows 10 will start up and notify the user that the FontCache service has failed to start due to the error.
Restore Default Startup Configuration of Windows Font Cache Service
1. Run the Command Prompt as an administrator.
2. Copy the commands below, paste them into the command window and press ENTER:
sc config FontCache start= auto
sc start FontCache
3. Close the command window and restart the computer.
The FontCache service is using the FntCache.dll file that is located in the C:\Windows\system32 directory. If the file is removed or corrupted, read this article to restore its original version from Windows 10 installation media.
PresentationFontCache.exe — процесс, который может чрезвычайно сильно нагружать компьютеры пользователей на самых разных версиях Windows. В основном нагрузке подвергается ЦП, однако в некоторых случаях на работу процесса может уходить большая часть ресурсов диска или оперативной памяти.
Что такое PresentationFontCache.exe?
PresentationFontCache.exe — этот системная служба Windows, которая по факту является частью платформы .NET Framework. Основная задача Presentation Font Cache — это оптимизация быстродействия программ Windows Presentation Foundation (WPF) путем кэширования используемой информации шрифтов. WPF-приложения самостоятельно запускают данную службу в том случае, если она не работает в системе пользователя изначально.
Проще говоря, Presentation Font Cache — это не какой-то там вторженец из сети, а поэтому можете перестать паниковать. Вы имеете дело с системной службой, которая по ошибке начала поглощать ресурсы компьютера в безумных объемах. Сейчас мы попытаемся с вами это исправить…
Как избавиться от нагрузки процессом PresentationFontCache.exe?
К счастью, существует ряд методов, способных привести службу PFC в нормальное рабочее состояние.
Метод №1 Удаление файла Font*.dat
Данный метод является наиболее эффективным, если верить пользователям в сети. Все, что вам нужно сделать — это найти файл Font*.dat на своем компьютере и удалить его. В файле Font*.dat содержится информация о различных WPF-приложениях. Файл потенциально может вызывать проблемы с PresentationFontCache.exe, если он был поврежден.
Следуйте вот этим шагам:
- нажмите Win+R для вызова окошка «Выполнить»;
пропишите в пустой строке C:\Windows\ServiceProfiles\LocalService\AppData\Local\ и нажмите Enter;
Заметка: если у вас не получается перейти в эту директорию таким способом, воспользуйтесь Проводником Windows. Обязательно включите функцию показа скрытых файлов (находится в том же Проводнике).
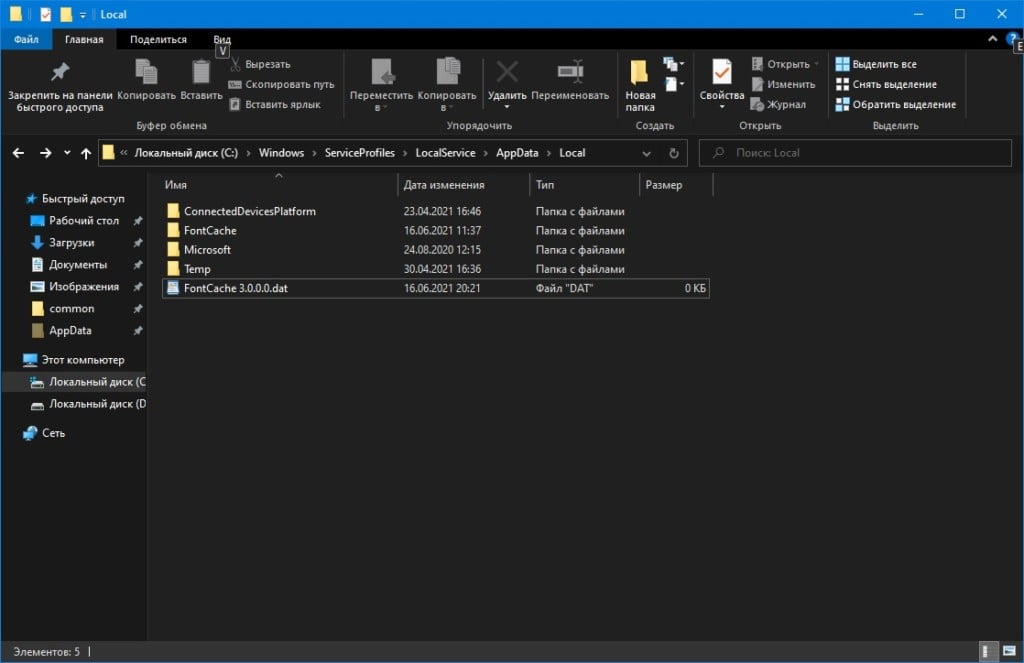
- найдите файл Font*.dat (в нашем случае это был FontCache 3.0.0.0.dat);
- нажмите ПКМ на этот файл и выберите «Удалить»;
- перезагрузите свой ПК.
Заметка: принудительно закройте процесс PresentationFontCache.exe в диспетчере задач, если вам не удается удалить папку Font*.dat.
Метод №2 Остановка службы Presentation Font Cache
Вы, конечно, можете отключить Presentation Font Cache в своей системе, однако это значительно ухудшит производительность всех WPF-приложений. Тем не менее если вы не используете подобных приложений, то можно спокойно выключить эту службу и продолжить пользоваться своей Windows. Деактивация PFC выполняется вот так:
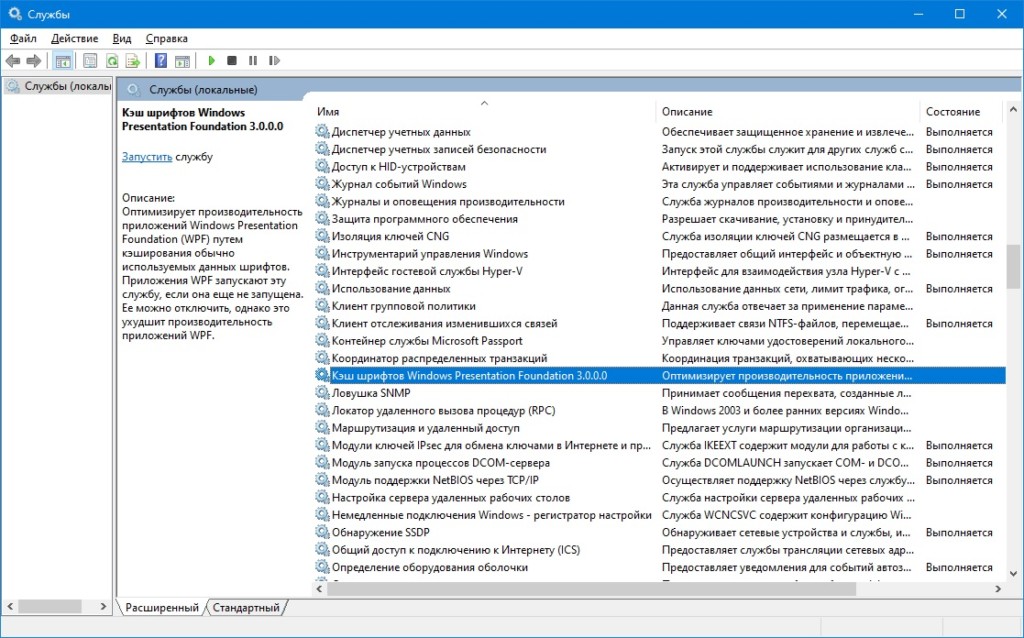
- нажмите Win+S для вызова системного поисковика;
- сделайте запрос «Службы» и кликните на найденный элемент;
- найдите в списке службу «Кэш шрифтов Windows Presentation Foundation *.*.*.*.» и дважды кликните на нее ЛКМ;
- в меню типа запуска выберите пункт «Отключена» и сохраните внесенные изменения;
- перезагрузите ПК.
Метод №3 Восстановление .NET Framework
Два вышеуказанных метода не помогли вам решить проблему с процессом PresentationFontCache.exe? Восстановление платформы .NET Framework — потенциальное решение в сложившейся ситуации. Как мы уже говорили выше, Presentation Font Cache является частью .NET Framework, а поэтому логично, что если что-то произойдет с последней, то служба PFC может начать работать некорректно.
Попробуйте сделать следующее:
- нажмите Win+R;
- выполните значение «appwiz.cpl» и нажмите Enter;
- найдите в списке программ «Microsoft .Net Framework 3.0» (или другую версию), кликните на нее ПКМ и выберите «Изменить»;
- в новом окошке кликните на «Repair» (Восстановить) и следуйте инструкциям на экране;
- закончив с процессом восстановления, перезагрузите компьютер.
Как правило, первый метод работает для большинства пользователей, но в некоторых случаях приходится воспользоваться двумя другими решениями. Мы надеемся, что данная статья была достаточно информативной и вы избавились от проблемы с процессом PresentationFontCache.exe.
Возможные причины:
-
Превышение лимита трафика.
В этом случае необходимо увеличить тарифный план в биллинге, в разделе «сайты» — «подробно» формируете заявку на смену тарифного плана, в разделе «неподтверждённые заявки» в этой заявке будет рассчитана сумма доплаты необходимая для смены тарифа. Если в чём-то ошиблись, то данную заявку можете удалить и сформировать другую. Если в сформированной заявке всё правильно — подтверждайте её, при необходимости пополняйте баланс.
-
Закончился оплаченный период.
Продлите срок действия сайта в биллинге в разделе «сайты» — «подробно» укажите необходимое количество месяцев для продления и нажмите «продлить», сформированную заявку подтвердите в разделе «неподтверждённые заявки», при необходимости пополните баланс любым удобным способом в разделе «баланс».
Рекомендуем включить бесплатное SMS уведомление об изменении статуса услуг.
-
Нарушение правил хостинга.
Если возникли дополнительные вопросы — пишите в службу технической поддержки.