
Любой администратор Windows сталкивался с проблемами в работе службы WMI (Windows Management Instrumentation) и ее компонентах. WMI это одна из ключевых подсистем Windows, и если она неисправна, на компьютере могут наблюдаться проблемы с работой служб, получением системной информации от WMI провайдеров, выполнением скриптов и ошибки в работе сторонних приложений. В этой статье мы рассмотрим, как выполнить диагностику работоспособности WMI и исправить типовые проблемы, если WMI репозиторий поврежден.
Содержание:
- Диагностика проблем с WMI
- Исправление WMI репозитория, перерегистрация библиотек, перекомпиляция MOF файлов
- Сброс и пересоздание WMI репозитория (хранилища)
О наличии проблем с WMI может свидетельствовать широкий спектр ошибок:
- Ошибки обработки WMI запросов в системных журналах и логах приложений:
0x80041002 - WBEM_E_NOT_FOUND
,
WMI: Not Found
,
0x80041010 WBEM_E_INVALID_CLASS
,
Failed to initialize WMI classes
,
Invalid class
или
Invalid namespace - Ошибки обработки GPO, связанные c WMI ( некорректная работа wmi фильтров групповых политик, и пр.);
- Медленное выполнение WMI запросов;
- Ошибки при установке или работе агентов SCCM/SCOM;
- Ошибки скриптов (vbs или PowerShell), обращающихся к пространству имен WMI (скрипты с Get-WmiObject, Get-CimInstance и т.д.).
Диагностика проблем с WMI
В первую очередь проверьте, что запущена служба Windows Management Instrumentation (Winmgmt). Вы можете проверить состояние службы в консоли
services.msc
или с помощью PowerShell:
Get-Service Winmgmt | Select DisplayName,Status,ServiceName
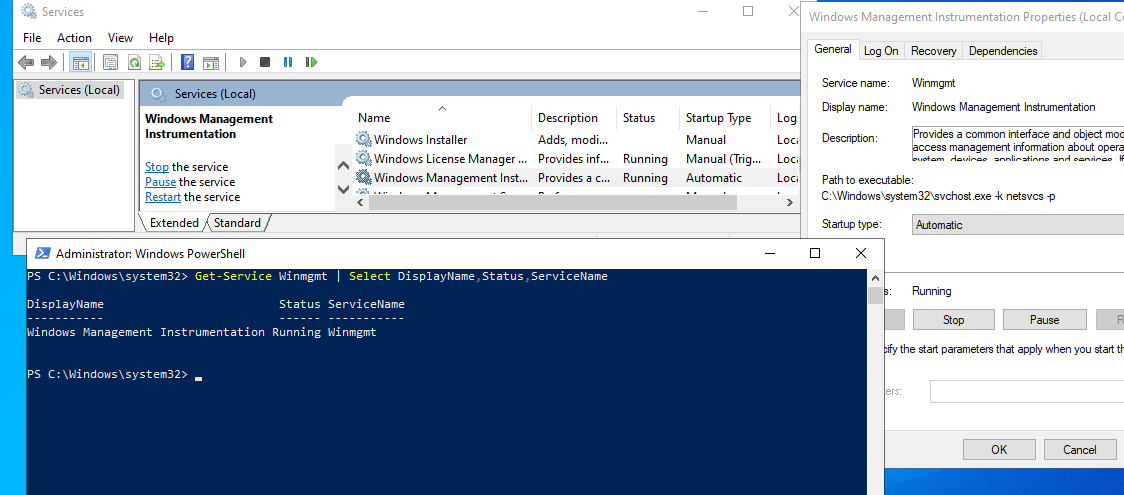
Если служба Winmgmt запущена, протестируйте работоспособность WMI, выполнив простой WMI-запроса. Вы можете выполнить wmi запрос из командной строки или из PowerShell. Например, следующая команда выведет список установленных в Windows программ:
wmic product get name,version
Простая PowerShell команда для получения информации о версии и билда Windows через WMI:
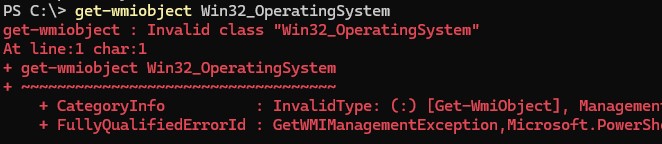
get-wmiobject Win32_OperatingSystem
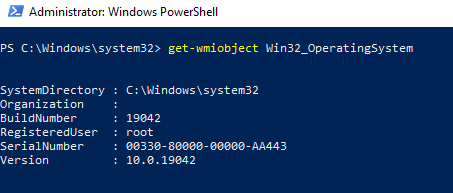
Как вы видите, служба WMI ответила на запрос корректно. Если при выполнении такого WMI-запроса Windows возвращает ошибку, скорее всего сервис WMI работает некорректно, поврежден WMI репозиторий или есть какие-то другие проблемы с WMI классами.
Включите логирование обращений к WMI в Event Viewer, выполнив команду:
wevtutil set-log Microsoft-Windows-WMI-Activity/Operational /enabled:true
Затем откройте консоль Event Viewer (
eventvwr.msc
) и перейдите в Applications and Service Logs -> Microsoft -> Windows -> WMI Activity. В описании событий ошибок в EventID 5858 будет указаны пространство имен WMI и класс, при обращении к которому происходит ошибка. Если это специальный WMI класс некой программы, возможно программа установлена некорректно, или ее файлы повреждены.
В нашем случае ошибка связана с общесистемным WMI классом root\cimv2 : Win32_OperatingSystem, что означает что база данных WMI повреждена.
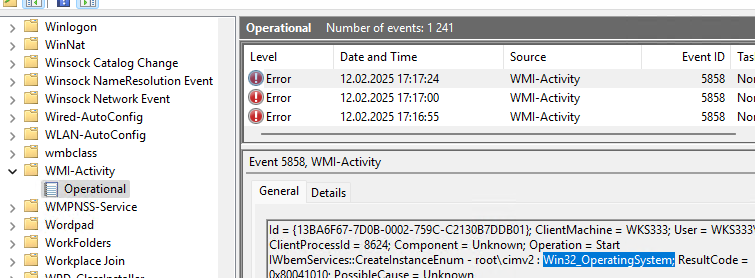
A Windows Management Instrumentation (WMI) query has failed. The WMI repository may be corrupted or it works incorrectly.
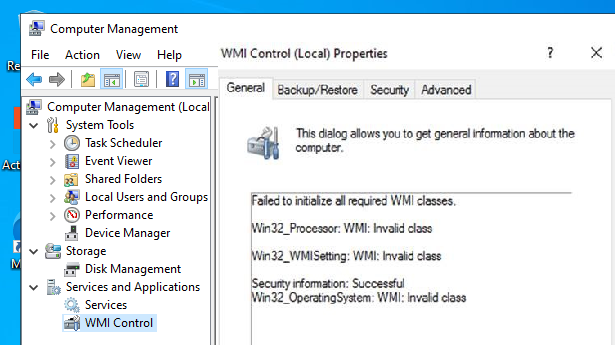
Откройте консоль свойств WMI Control в консоли управления компьютером (compmgmt.msc). В моем случае здесь присутствует ошибка:
Failed to initialize all required WMI classes
Win32_Processor. WMI: Invalid namespace
Win32_WMISetting. WMI: Invalid namespace
Win32_OperationSystem. WMI: Invalid namespace
Ранее для диагностики WMI существовала официальная утилита от Microsoft – WMIDiag.vbs (Microsoft WMI Diagnosis), К сожалению, последняя версия WMIDiag 2.2 корректно работает только с версиями до Windows 8.1/Windows Server 2012 R2.
На данный момент Microsoft даже удалила ссылку на загрузку WMIDiag из центра загрузок. Но при желании, этот скрипт можно найти в сети. WMIDiag дает подробную информацию по исправлению частных ошибок в WMI, но в большинстве случаев процесс это довольно трудоемкий и стоит потраченного времени только при решении инцидентов в критичных системах (на продуктивных серверах).
Для массового сегмента рабочих станций пользователей обычно проще и быстрее сбросить и пересоздать WMI репозиторий в Windows.
Исправление WMI репозитория, перерегистрация библиотек, перекомпиляция MOF файлов
Проверьте целостность WMI репозитория в Windows с помощью команды:
winmgmt /verifyrepository

Если команда возвращает, что база данных WMI находится в неконсистентном состоянии (INCONSISTENT или WMI repository verification failed), стоит попробовать выполнить “мягкое” исправление ошибок репозитория:
Winmgmt /salvagerepository
WMI repository has been salvaged.
Данная команда выполняет проверку согласованности хранилища WMI и перестраивает базу данных WMI при обнаружении несогласованности.
Перезапустите службу WMI:
net stop Winmgmt
net start Winmgmt
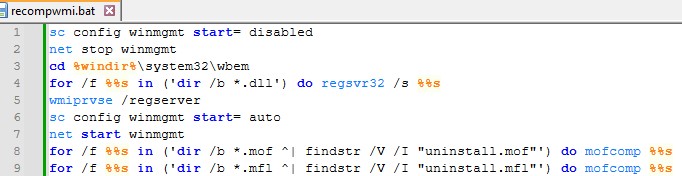
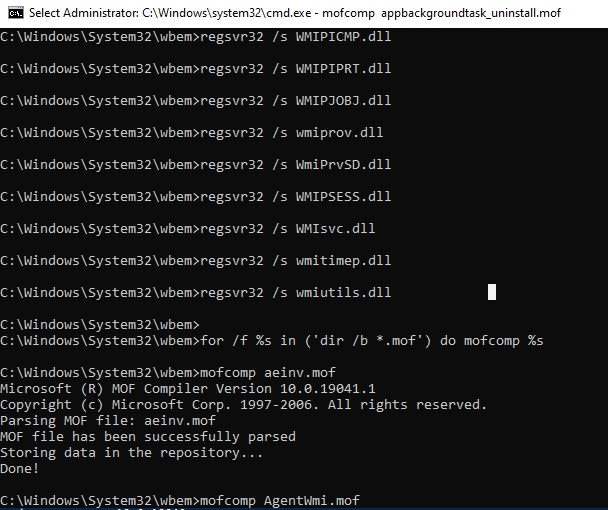
Если стандартный способ исправления ошибок в WMI не помог, попробуйте следующий скрипт. Данный скрипт представляет собой ”мягкий” вариант восстановления службы WMI на компьютере (выполняется перерегистрация dll библиотек и службы WMI, перекомпилируются mof файлы). Данная процедура является безопасной и ее выполнение не должно привести к новым проблемам.
sc config winmgmt start= disabled
net stop winmgmt
cd %windir%\system32\wbem
for /f %s in ('dir /b *.dll') do regsvr32 /s %s
wmiprvse /regserver
sc config winmgmt start= auto
net start winmgmt
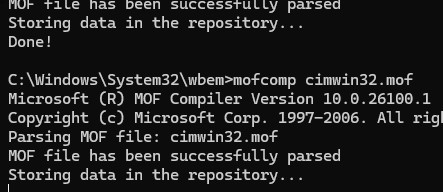
for /f %s in ('dir /b *.mof ^| findstr /V /I "uninstall.mof"') do mofcomp %s
for /f %s in ('dir /b *.mfl ^| findstr /V /I "uninstall.mfl"') do mofcomp %s
При перекомпиляции MOF файлов мы исключили файлы
*uninstall.mof
и
*uninstall.mfl
, т.к. они нужны только для удаления программ/WMI классов.
На 64 битной версии Windows эти действия нужно также выполнить для каталога SysWOW64. Замените третью строку на
cd %windir%\SysWOW64\wbem
Указанные команды можно выполнить путем простой вставки в окно командой строки, либо сохранить код в bat файле wmi_soft_repair.bat и запустить его с правами администратора (замените в BAT файле %s на %%s). После окончания работы скрипта, перезагрузите Windows и проверьте работу WMI.
Сброс и пересоздание WMI репозитория (хранилища)
Если вам не помогли мягкие способ восстановления WMI, рассмотренные выше, придется перейти к более “жесткому” способу восстановления работоспособности службы WMI, заключающегося в пересоздании хранилища WMI.
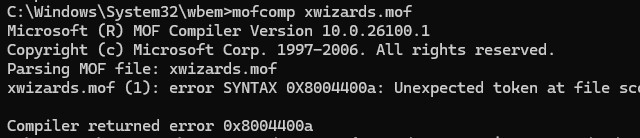
Например, в моем случае команда mofcomp почти для всех MOF файлов вернула ошибку:
Microsoft (R) MOF Compiler Version 10.0.26100.1
Copyright (c) Microsoft Corp. 1997-2006. All rights reserved.
Parsing MOF file: xwizards.mof
xwizards.mof (1): error SYNTAX 0X8004400a: Unexpected token at file scope
Compiler returned error 0x8004400a
WMI репозиторий (хранилище) находится в каталоге
%windir%\System32\Wbem\Repository
и представляет собой базу данных, в которой содержится информация о метаданных и определениях WMI классов. В некоторых случаях WMI репозиторий может содержать статическую информацию классов. При повреждении репозитория WMI, в работе службы Windows Management Instrumentation (Winmgmt) могут наблюдаться ошибки вплоть до полной невозможности ее запустить.
Если вы подозреваете, что репозиторий WMI поврежден, что его пересоздание — это последняя шаг, к которому нужно прибегнуть только тогда, когда другие операции не помогают реанимировать WMI.
Следующая команда выполнит сброс базы данных WMI к исходному состоянию (как после чистой установки Windows). Используйте эту команду для выполнения hard reset репозитория WMI, если параметре salvagerepository не исправил проблему:
Winmgmt /resetrepository
Совет. На практике бывают случаи, когда пересоздание хранилища WMI приводит к проблемам со сторонним софтом. Это связано с тем, что все записи в базе WMI обнуляются (до состояния чистой системы). Такие программы скорее всего, придется переустановить.
Если обе команды (
Winmgmt /salvagerepository
и
Winmgmt /resetrepository
) не восстановили консистентное состояние базы WMI, попробуйте выполнить “жесткое” пересоздание базы WMI вручную таким скриптом:
net stop winmgmt
cd %windir%\system32\wbem
winmgmt /resetrepository
winmgmt /resyncperf
if exist Repos_bakup rd Repos_bakup /s /q
rename Repository Repos_bakup
regsvr32 /s %systemroot%\system32\scecli.dll
regsvr32 /s %systemroot%\system32\userenv.dll
for /f %s in ('dir /b *.dll') do regsvr32 /s %s
for /f %s in ('dir /b *.mof ^| findstr /V /I "uninstall.mof"') do mofcomp %s
for /f %s in ('dir /b *.mfl ^| findstr /V /I "uninstall.mfl"') do mofcomp %s
sc config winmgmt start= auto
net start winmgmt
wmiprvse /regserver
На 64 битной версии Windows нужно также перерегистрировать dll/exe и перекомпилировать mof файлы в каталоге %windir%\sysWOW64\wbem.
Данный скрипт полностью пересоздает хранилище WMI (старый репозиторий сохраняется в каталог Repos_bakup). После окончания работы скрипта нужно перезагрузить Windows. Затем протестируйте работу службы WMI простым запросом.
Проверьте состояние WMI репозитория. Если ошибки исправлены, команда
winmgmt /verifyrepository
должна вернуть:
WMI repository is consistent

В этой статье мы собрали основные способы, позволяющие продиагностировать и устранить неполадки службы и репозитория WMI.
Windows Management Instrumentation (WMI) is a powerful framework that allows administrators to manage and monitor Windows-based systems. It provides a standardized interface for accessing system information, enabling various administrative tasks and automation processes. When WMI is enabled, it unlocks a range of functionalities, such as querying system configurations, monitoring system health, and automating administrative tasks. This makes it an essential tool for effective system management.
Enabling WMI is crucial for maintaining a well-functioning IT environment. It allows for seamless integration with management tools, enhances monitoring capabilities, and supports the automation of routine tasks. By leveraging WMI, administrators can ensure efficient system management, improve productivity, and maintain system integrity across their networks.
- Part 1 :What is Google MDM? What Can You Do with It?
- Part 2 :What’s the feature difference between Google basic and advanced mobile management?
- Part 3 :How to Set up Advanced Google MDM and Manage Your Enterprise Devices?
- Part 4 :What Industries are Suitable for Using Google Mobile Device Management? And what are not?
Part 1: How to Enable WMI on Windows
This section covers the methods of enabling WMI on Windows. We will cover five methods, including service manager, PowerShell, group policy, firewall, and enabling remote WMI requests.
Method 1: Enabling WMI via Services Manager
Services Manager is a tool for Windows devices that allows the management and simplification of all the tasks related to Windows services. To enable WMI using Services Manager, follow the steps below:
- Step 1: Navigate to the search bar beside the Start menu and type `services.msc`.
- Step 2: Once the Services screen opens, look for Windows Management Instrumentation in the list and verify if its status is Running. If not, right-click on the service and select Start from the dropdown.
- Step 3: Additionally, ensure that the Startup Type is set to Automatic.
This enables the WMI services on the Windows device, providing an interface to the operating system’s access management information.
We have created a YouTube video to help you understand this guide better and faster.
How To: Enable the WMI Monitoring Service in Windows
Method 2: Enabling WMI with PowerShell
You can use Windows PowerShell to connect to the WMI on a remote computer. Although the remote connections in WMI depend on their configurations, you can establish the connection with a remote computer via PowerShell script.
If you want to connect to a remote computer using the same credentials you used to log in and intend to request impersonation (by default, its level is set to 3), the following is an example command:
  copy
    Copied!

  Get-WmiObject -Namespace "root\cimv2" -Class Win32_Process -Impersonation 3 -ComputerName Computer_B
However, if you want to connect to a remote computer using different credentials and set the impersonation level to 3, the following are the example commands:
  copy
    Copied!

  $Computer = "atl-dc-01"
  copy
    Copied!

  Get-WmiObject -Namespace "root\cimv2" -Class Win32_Process -Impersonation 3 -Credential `
  copy
    Copied!

  FABRIKAM\administrator -ComputerName $Computer
Similarly, you can connect to a group of remote computers in the same domain and to a remote computer in a different domain. For further details, refer to Microsoft’s official documentation.
Method 3: Enabling WMI via Group Policy (GPO)
To enable Windows Management Instrumentation (WMI) via Group Policy (GPO), you can configure the necessary settings to allow users or groups to access WMI services across multiple computers in a domain. To do so, follow the steps below:
- Step 1: Press `Win + R`, type `gpmc.msc`, and press `Enter` to open the Group Policy Management Console.
- Step 2: Navigate to the appropriate Organizational Unit (OU) where you want to apply the policy. Then right-click on the OU and select `Create a GPO in this domain, and Link it here…` or choose an existing GPO to edit.
- Step 3: Right-click the GPO and select `Edit` to open the Group Policy Management Editor.
- Step 4: Go to `Computer Configuration` > `Policies` > `Windows Settings` > `Security Settings` > `System Services`.
- Step 5: Find `Windows Management Instrumentation` in the list of services. Next, double-click on it to open its properties. Then set the startup type to `Automatic` to ensure the WMI service starts automatically with the system.
- Step 6: Still in the Group Policy Management Editor, go to `Computer Configuration` > `Policies` > `Administrative Templates` > `Network` > `Network Connections` > `Windows Firewall` > `Domain Profile`. Next, enable the policy `Allow inbound remote administration exception` to allow remote WMI queries.
- Step 7 (Optional): If you need to set specific permissions for users or groups to access WMI, you can do so by configuring a script or using additional tools like `wmimgmt.msc` to set permissions on the WMI namespaces.
- Step 8: Close the Group Policy Management Editor and ensure the GPO is linked to the correct OU and that it is enabled.
- Step 9 (Optional): On client machines, you can run `gpupdate /force` in the Command Prompt to apply the new policy settings immediately.
Method 4: Allowing WMI Through the Firewall
Accessing WMI services on the local machine is possible for all the users, but if it is about accessing these services over the remote server, you have to allow the firewall. To do so, follow the steps below:
- Step 1: Navigate to the search bar beside the Start menu and type cmd.
- Step 2: Right-click on the Command Prompt app and select Run as administrator from the dropdown.
- Step 3: Once it opens, enter the following command:
  copy
    Copied!

  netsh advfirewall firewall set rule group="windows management instrumentation (wmi)" new enable=yes
This should enable the WMI traffic through the Windows firewall.
Method 5: Enabling Remote WMI Requests
To allow the WMI users to access the remote server, it is significant to enable the remote WMI requests. To do so, follow the steps below:
This opens your remote server to accept the WMI requests.
Configuring Firewall and DCOM
If your account is a non-administrator on the target server, you need to grant DCOM remote launch permission to that set of users. Additionally, you have to enable the firewall for which the steps have been covered in Method 04.
To grant the permissions for activation and DCOM remote launch, follow the steps below:
- Step 1: Navigate to the search bar beside the Start menu and type Run. Once the dialogue box opens, type dcomcnfg and click on OK.
- Step 2: Expand the Component Services from the sidebar succeeded by the Computer. Right-click on My Computer and select Properties from the dropdown.
- Step 3: From the My Computer Properties screen, click on the COM Security tab.
- Step 4: Click on the Edit Limits button under the Launch and Active Permissions.
- Step 5: If the intended user account/group of users is not present in the list, click on Add to include it.
- Step 6: Once done, enable the Allow checkboxes for Remote Launch and Remote Activation options for these users.
- Step 7: Lastly, click on OK to close the dialogue box.
We have created a YouTube video to help you understand this guide better and faster.
How to enable DCOM setting on Windows
Part 2: How to Check if WMI is Enabled?
Checking if WMI is enabled is an important step to allow access to the remote server. Two of the methods to do so are as follows:
Check Using Services Manager
- Step 1: 1.Navigate to the search bar beside the Start menu and type services.msc.
- Step 2: 2.Once the Services screen opens, look for Windows Management Instrumentation in the list and verify if its status is Running.
Checking Using PowerShell
If you are checking it on a local machine, enter the following command in the PowerShell:
  copy
    Copied!

  Get-WmiObject -query "SELECT * FROM Win32_OperatingSystem"
For remote machines, use the following command:
  copy
    Copied!

  Get-WmiObject -query "SELECT * FROM Win32_OperatingSystem" -ComputerName [Your Computer Name]
Part 3: Advanced WMI Configuration
This section explores the details of two advanced WMI configurations, which can add more value regarding security and troubleshooting.
1 Setting Up Remote WMI Connections
When setting up remote connections, you can keep a few points in consideration for enhanced security. These include:
- Step 1: Open the firewall specifically for the DCOM port, which is 135. To do so, utilize the following command:
  copy
    Copied!

netsh advfirewall firewall add rule dir=in name="DCOM" program=%systemroot%\system32\svchost.exe service=rpcss action=allow protocol=TCP localport=135 - Step 2: Alternatively, you can establish a firewall for all services except for the WMI service. To do so, use the following command:
  copy
    Copied!

netsh advfirewall firewall add rule dir=in name ="WMI" program=%systemroot%\system32\svchost.exe service=winmgmt action = allow protocol=TCP localport=any - Step 3: When enabling and configuring the DCOM permissions, ensure they are enabled only for the required group of users. Additionally, the authorized users should only have the required level of permissions.
- Step 4: Audit and monitor the WMI access (further details on it are covered in the next section).
2 Enabling WMI Logging
Enabling WMI logging is an effective method to troubleshoot the problems in the WMI scripts. However, it is recommended to only enable the logging when performing the troubleshooting process. Having them enabled all the time can be expensive in terms of CPU usage. The steps to enable the logging include:
After enabling the logs, you can visualize them on the Trace screen.
AirDroid Business is an Windows and Android device management solution that can be used to enroll, manage, and monitor large fleet devices. With the centralized platform, organizations are able to deploy smartphones, tablets, rugged devices and others dedicated devices like kiosks and digital signage.
It’s available for Cloud Deployment & On-Premises Deployment.
Key features include: remote access & control, Google Play apps & enterprise’s apps management, policy, single & multi-apps kiosk mode, alerts & automated workflows, geofencing & location tracking, file transfer, notification, user management, reports, etc.
14-days Free Trial
FAQS
How do I enable WMI for a user?
To enable Windows Management Instrumentation (WMI) for a user, follow these steps:
- Step 1: Open the Computer Management console. You can do this by right-clicking on «This PC» or «My Computer» and selecting «Manage.»
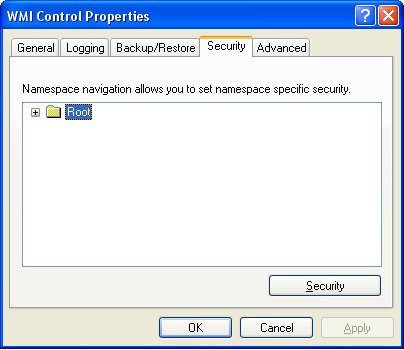
- Step 2: Navigate to Services and Applications > WMI Control.
- Step 3: Right-click on WMI Control and select Properties.
- Step 4: Go to the Security tab, select the namespace you wish to configure (e.g., Root\CIMv2), and click Security.
- Step 5: Add the user or group you want to grant access to by clicking Add…, entering the user or group name, and clicking OK.
- Step 6: Assign the appropriate permissions (e.g., Enable Account, Remote Enable) and click OK.
How do I enable WMI activity?
To enable and monitor WMI activity, follow these steps:
- Step 1: Open the Event Viewer by typing «Event Viewer» in the Windows search box and selecting the application.
- Step 2: In the Event Viewer, navigate to Applications and Services Logs > Microsoft > Windows > WMI-Activity.
- Step 3: Expand WMI-Activity and click on Operational.
- Step 4: To enable logging, right-click on Operational and select Properties.
- Step 5: Check the box for Enable logging and click OK.
Enabling Windows Management Instrumentation (WMI) on Windows 10 is essential for system management and monitoring. This guide will walk you through the steps to enable WMI, ensuring your system is ready for administrative tasks and monitoring tools. In a few simple steps, from opening the Services console to starting the WMI service, you’ll be all set.
WMI is a powerful feature in Windows that allows for system management and monitoring. By following these steps, you will ensure WMI is enabled and running on your Windows 10 system.
Step 1: Open the Services Console
To start, you need to access the Services console.
Press the Windows key + R to open the Run dialog box, type «services.msc,» and hit Enter. This will open the Services console where you can manage various Windows services.
Step 2: Locate Windows Management Instrumentation Service
Once in the Services console, you need to find the specific service.
Scroll through the list of services until you locate «Windows Management Instrumentation.» This service is crucial for WMI functionality, so it’s important to ensure it’s available and ready to be enabled.
Step 3: Start the WMI Service
Now, you need to enable the service.
Right-click «Windows Management Instrumentation» and select «Start» from the context menu. If the service is already running, you might see the option to «Restart» instead, which can also ensure it runs smoothly.
Step 4: Set Service to Automatic
To keep WMI running after every restart, set its startup type to automatic.
Right-click the «Windows Management Instrumentation» service again, select «Properties,» and in the «Startup type» dropdown, choose «Automatic.» Click «Apply» and then «OK.»
Step 5: Confirm WMI is Running
Finally, verify that the service is active.
Check the status column in the Services console; it should now show that the WMI service is running. This confirmation means WMI is enabled and operational on your system.
After completing these steps, your Windows 10 system will have WMI enabled, allowing for effective system management and monitoring tasks through various tools and scripts.
Tips for Enabling WMI Windows 10
- Check Dependencies: Ensure dependent services like «RPC» are also running.
- Restart the Computer: Sometimes a reboot is necessary for changes to take effect.
- Use Elevated Permissions: Make sure you have administrative privileges when enabling WMI.
- Manual Restart: If issues persist, manually restarting the service can help.
- WMI Troubleshooting Tool: Utilize built-in tools like «wbemtest» for advanced troubleshooting.
Frequently Asked Questions
What is WMI used for?
WMI is used for system management and monitoring tasks. It allows administrators to query information and perform actions on the system.
Why would I need to enable WMI?
Enabling WMI is essential for using various administrative and monitoring tools that rely on this service for data.
Can I disable WMI if I don’t need it?
Yes, but it’s not recommended as many system management tools and applications rely on WMI.
What should I do if WMI service fails to start?
Check for dependencies, ensure you have the right permissions, and try restarting your computer.
Is WMI available on all versions of Windows?
WMI is available on most Windows versions, including Windows 10, and is enabled by default on many systems.
Summary
- Open the Services console.
- Locate Windows Management Instrumentation service.
- Start the WMI service.
- Set service to automatic.
- Confirm WMI is running.
Conclusion
Enabling Windows Management Instrumentation (WMI) on Windows 10 is a straightforward process that greatly enhances your ability to manage and monitor your system. By following the steps outlined above, you’ve ensured that your system is ready for various administrative tasks and monitoring tools.
Beyond simply enabling WMI, understanding its importance and functionality can empower you in maintaining your system more effectively. It’s not just a background service; it’s a key player in system administration. If you encounter any issues, refer back to the tips and FAQs provided to troubleshoot and resolve common problems.
For further reading, Microsoft’s official documentation on WMI provides in-depth insights and advanced configurations. Make sure to keep your system updated and revisit the WMI settings periodically to ensure everything runs smoothly. Enabling WMI may seem like a small step, but it opens up a world of possibilities for managing your Windows 10 system.
Kermit Matthews is a freelance writer based in Philadelphia, Pennsylvania with more than a decade of experience writing technology guides. He has a Bachelor’s and Master’s degree in Computer Science and has spent much of his professional career in IT management.
He specializes in writing content about iPhones, Android devices, Microsoft Office, and many other popular applications and devices.
Read his full bio here.
WMI comes installed on all of Microsoft’s modern operating systems. What this page will describe is how to enable remote access to WMI.
The following steps should only take a minute or two of your time.
1. Enable remote WMI requests
This setting is usually all that needs to be changed to get WMI working. (Steps 2 and 3 are typically not needed, but they might be in some circumstances)
1. On the target server, go to Administrative Tools -> Computer Management.
2. Expand ‘Services and Applications’
3. Right click for Properties on ‘WMI Control’.
4. Select the Security tab
5. Press the Security button
6. Add the monitoring user (if needed), and then be sure to check Remote Enable for the user/group that will be requesting WMI data.
At this point go back and see if this fixes the problem. It might take a couple of minutes for the reports to re-generate.
2. Allow WMI through Windows firewall
All users (including non-administrators) are able to query/read WMI data on the local computer.
For reading WMI data on a remote server, a connection needs to be made from your management computer (where our monitoring software is installed) to the
server that you’re monitoring (the target server). If the target server is running Windows Firewall (aka Internet
Connection Firewall) like what is shipped with Windows XP and Windows 2003, then you need to tell it to let remote WMI
requests through1. This can only be done at the command prompt. Run the following on the target computer if it is running a Windows firewall:
netsh firewall set service RemoteAdmin enable
3. Enable DCOM calls on the remote machine
If the account you are using to monitor the target server is NOT an administrator on the target server,
you need to enable the non-administrator to interact with DCOM by following the simple steps listed
here.
Follow the steps for:
- To grant DCOM remote launch and activation permissions for a user or group
- To grant DCOM remote access permissions
Further Investigation
If the above steps didn’t help, we recommend installing the WMI Administrative Tools from Microsoft. This includes a WMI browser that will let you connect to a remote machine and
browse through the WMI information. That will help to isolate any connectivity/rights issues in a more direct and simple environment. Once the WMI browser can access a remote machine,
our products should be able to as well.
WMI Administrative Tools:
http://www.microsoft.com/downloads/details.aspx?FamilyId=6430F853-1120-48DB-8CC5-F2ABDC3ED314&displaylang=en
Finally, UAC
From reports we’re receiving from the field, it appears UAC needs to be disabled for remote WMI queries to work. With UAC running, an administrator account actually
has two security tokens, a normal user token, and an administrator token (which is only activated when you pass the UAC prompt). Unfortunately, remote requests that
come in over the network get the normal user token for the administrator, and since there is no way to handle a UAC prompt remotely, the token can’t be elevated to
the true-administrator security token.
References
1. https://learn.microsoft.com/en-us/windows/win32/wmisdk/connecting-to-wmi-remotely-with-vbscript?redirectedfrom=MSDN
See «To Configure Connection 1». Our software doesn’t use or need Connection 2.
Other helpful pages
Connecting to WMI Remotely Starting with Windows Vista
Connecting to WMI on a Remote Computer