
Windows Server 2019 users find that when searching in RDS, the search indexing on the terminal server do not work while searching in remote desktop and in Outlook.
Symptom
Windows Server 2019 users reported that searching in Remote Desktop on the Terminal Server and searching in Outlook doesn’t showing any search results. The status “Indexing is not running” is displayed in the indexing options.

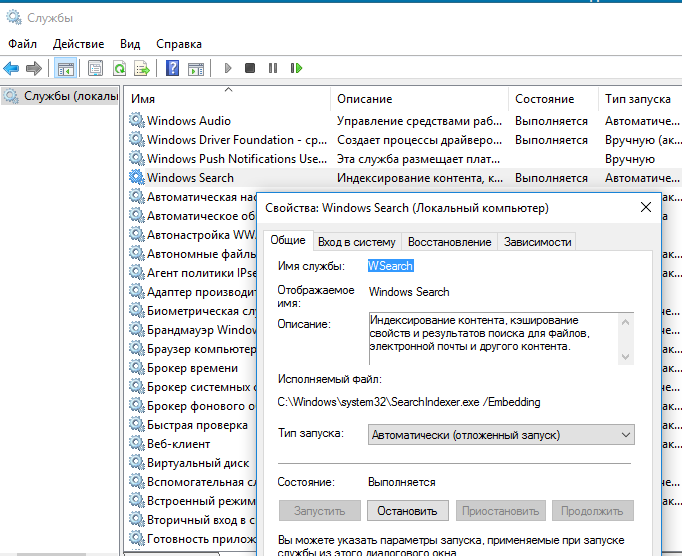
After checking the search indexing service “services.msc”, it is shown that Windows Search is running on the RDS Server 2019. When trying to Rebuild the index under Advanced “Rebuild”, the indexing remains unsuccessful even after this action.
Cause
Starting with Windows Server 2019, Microsoft has made changes to the Windows Search service. The per-user search index is now enabled by default. This search indexing also applies to RDS and Windows Server 2022.
That’s why, as an administrator, you won’t see any locations under Indexing Options > Change > Show all locations.
Administrators can disable the setting and restore the older indexing method for Windows Server and RDS by using the EnablePerUserCatalog registry key:
HKEY_LOCAL_MACHINE\SOFTWARE\Microsoft\Windows Search
DWORD EnablePerUserCatalog 0
Solution: Search Indexing for RDS server
The traditional indexing option “per user search indexing” is restored with the following action.
To do this, open a command prompt on the windows server as an administrator and execute the following command to add the registry DRWOD key EnablePerUserCatalog with the value 0.
REG ADD "HKLM\SOFTWARE\Microsoft\Windows Search" /v "EnablePerUserCatalog" /t REG_DWORD /d "0" /fNow restart the “Windows Search” service or Reboot the Windows Server.
Now all locations are displayed (such as Outlook and/or OneNote). In addition, the number of indexed items should increase significantly.

Note: In Indexing Options > Advanced, the locations of the index can be specified and Rebuild if necessary.
Windows Search Indexing in Server 2019, 2022 using Multi-Session
Now, the default Windows Search service is able to roam all Windows Search index data on a per-user basis. The most significant change of per-user search indexing is that the Windows Search index is now stored per user in the user profile, under the following path:
C:\Users\%Username%\AppData\Roaming\Microsoft\Search\Data\Applications{UserSID}{UserSID}.edbOn each login, the Windows Search process creates a new instance of the search database for the user based on the existing EDB. If no EDB file exists, a new one is created by the Operating System.
Enable Windows Search Service on RDS Server
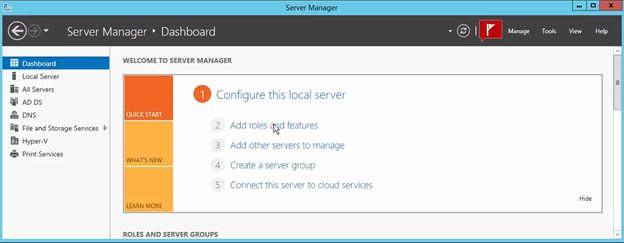
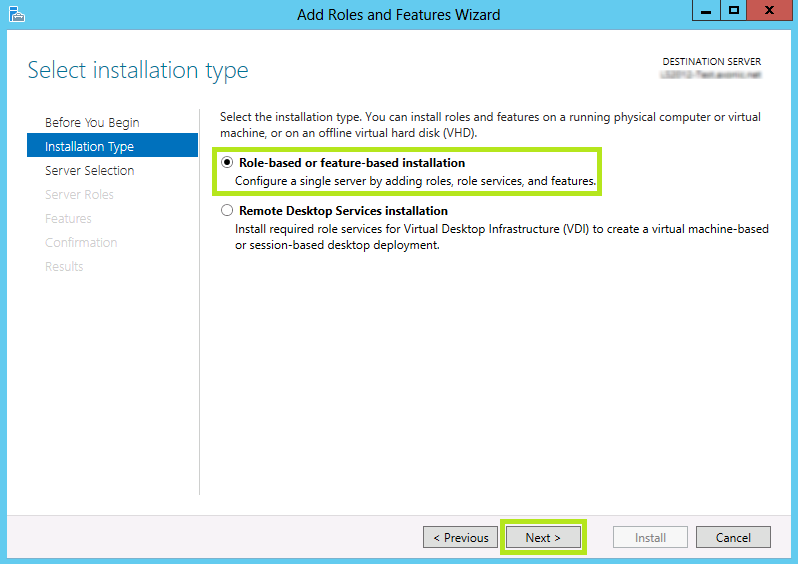
Log in to the Windows Server 2019 or 2022 and launch the Server Manager. Click Manage and select Add Roles and Features. Select Role based or feature-based installation option and click Next, walk through until the Features page, select the Windows Search Service checkbox and click Next. On the Confirmation page, click Install.
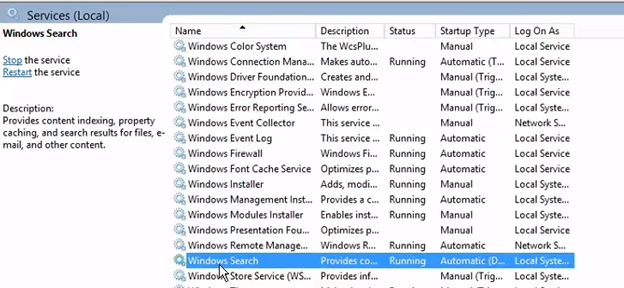
Now the windows search service just needs to be started, this is done from services.msc, open windows search properties, select startup type Automatic (Delayed Start), then click the Start button.

Install Windows Search Service in PowerShell
Using PowerShell is probably the quickest way to install the Windows Search service on a server. Launch the PowerShell as administrator. Run the following PowerShell command to install the Windows Search service on Windows Server.
Install-WindowsFeature Search-ServiceOpen Windows Indexing Options
To access the indexing options, enter “indexing” in the search field.
Alternatively, you can press the key combination Windows-Logo+R.
A new “Run” window will then open. Type the command control srchadmin.dll and select OK.

Windows Search Indexing
Indexing is the process of looking at files, email messages, and other content on your PC and RDS Server and cataloging their information, such as the words and metadata in them. When you search your Computer after indexing, it looks at an index of terms to find results faster.
When you first run indexing, it can take up to a couple hours to complete. After that, indexing will run in the background on your PC or RDS Server as you use it, only re-indexing updated data.
Note. if you are considering using single user search roaming or multi-user search roaming, follow this Microsoft article.
Introduction
This will be a tutorial on how to improve our search for our windows
file servers, using the Windows Search Service. What we will be working
with is Windows Server 2012 R2, however, this will also work for both
2016, 2019, etc.
Getting Into the Server
The first thing we are going to do is go to our server dashboard and add
a role. To do this we are going to select the button that says, “Add
roles and features”. Click “Next”, leave it on the option that says
“Role-based or feature-based installation”, and click “Next” again.
Then, choose your server and select “Next”. While in Server Roles, we
are going to select “Next” at the bottom once again as what we are
searching for is a feature. Under “Features”, we are going to search for
a feature called “Windows Search Service”. Once found, click on the
checkbox next to it and select “Next”. We will then click “Install” to
get this installed.
Filter Pack
Our next item we are going to add is the filter pack. The filter pack
will allow us the ability to search inside of documents. To download
this, we are going to open a web browser, and navigate to this link:
- https://www.microsoft.com/en-us/download/details.aspx?id=17062
Once there, you will notice it says, “Microsoft Office 2010 Filter
Packs”. That is okay as this will provide us with what we need. Make
sure to get the 64-bit version when installing. We will then run the
download. Click “Next”, accept the checkbox and click “Next”, and click
“Ok” and it should be installed.

Turning on the Windows Search Services
Our next step is to turn on the Windows Search Service. To get to that,
go to your Server Manager Dashboard and you should see “Tools” at the
top right. Click on that and select “Services”. We will then need to
find “Windows Search” which may be very far down as it is alphabetical.
If it is not already started, click on it and start it up as well as
make sure “Automatic (Delayed Start)” is selected for startup type.
Control Panel
To Launch the control panel, you can right click on the Windows Icon at
the bottom left of your screen and select “Control Panel”. Whilst in
there, you will search at the top for “Index” and select “Indexing
Options”. Now we are going to add the share drive location. We will
click on “Modify” and navigate to the drive we want and select “Ok”.
Index Location
While in the Indexing options from the previous part, we will select
“Advanced”. We can then change the location that we are storing the
indexing files. This is very important as this file could grow large
depending on how often this is used. Some good options are to create a
separate drive to put this in, or make sure your C: Drive has plenty of
space on it. You can also change the file types that are being indexed
by going to the tab “File Types” if you would like. We can then click
“Ok”.
Indexing Speed
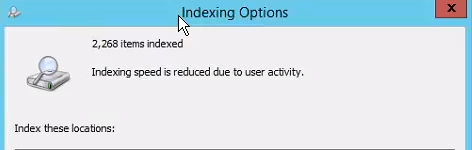
While back in the Indexing Options, you may see that “Indexing speed is
reduced due to user activity”. This is caused by a user being logged in
as it slows down to not use up the PC nearly as much. It is best
practice to leave this running overnight. When it finishes, the file
search will now be much faster and more efficient. All devices connected
will also have much quicker search speeds as well.
Full Video
SUPPORT MY WORK
Hire US
TECH I USE AND RECOMMEND
Tech Kits
Domain Registrar
Digital Ocean CloudServer
- Kevin Stevenson
- Thursday, Oct 14, 2021
Функцией поиска в Windows 10 и 11 приходится пользоваться намного чаще, чем в предыдущих версиях ОС: с помочью поиска можно быстро найти нужное приложение, файл, элемент настройки в новом меню Settings (Параметры), функцию системы или даже выполнить поиск в Интернете через меню Пуск. Однако в некоторых случаях встроенные поиск Windows перестает работать. При попытке найти любое приложение или файл, поиск Windows возвращает пустой список. В этой статье мы собрали основные советы, которые должны помочь, если у вас в Windows 10 или 11 не работает поиск в меню Пуск, панели задач и других элементах интерфейса Windows.
Содержание:
- Перезапустите службы поиска в Windows
- Не работает поиск в стартовом меню Windows
- Проверьте состояние и настройки службы индексирования Windows
- Утилита устранения неполадок службы индексирования и поиска Windows
- Сброс универсальных приложений Microsoft Store
- Не работает поиск Windows при включенной интеграции с Bing
- Не работает поиск в Параметрах Windows
- PowerShell скрипт для сброса Windows Search
Перезапустите службы поиска в Windows
За поиск из панели задач отвечает один из исполняемых файлов Cortana — SearchUI.exe. Если у вас не работает поиск в панели задач Windows 10, попробуйте перезапустить этот процесс:
- Запустите Диспетчер задач (Ctrl+Alt+Del);
- Перейдите на вкладку Подробности;
- Найдите в списке процессов SearchUI.exe, щелкните по нему ПКМ и выберите Снять задачу;

- Аналогично завершите процесс SearchApp.exe и SerchIndexer.exe;
- Когда вы в следующий раз попробуете выполнить поиск в Windows 10, это процесс автоматически перезапуститься.

Не работает поиск в стартовом меню Windows
Если у вас в Windows 10/11 поиск не работает только в стартовом меню Пуск, попробуйте следующее решение:
- Завершите процесс Проводника (Explorer.exe) с помочью щелчка ПКМ по пустому месту в панели задач с зажатыми клавишами
правыми Ctrl+Shift
(выберите Выход из проводника), либо с помощью диспетчера задач (
Ctrl+Shift+Esc
);
- Запустите редактор реестра из Task Manager (Файл -> Запустить новую задачу -> regedit.exe);
- Удалите следующий ключ реестра
HKLM\SOFTWARE\Microsoft\Windows\CurrentVersion\Explorer\FolderTypes\{ef87b4cb-f2ce-4785-8658-4ca6c63e38c6}\TopView\{00000000-0000-0000-0000-000000000000}
. В 64 битной версии Windows 10 нужно удалить ключ реестра
HKLM\SOFTWARE\Wow6432Node\Microsoft\Windows\CurrentVersion\ Explorer\FolderTypes\ {ef87b4cb-f2ce-4785-8658-4ca6c63e38c6}\TopViews\{00000000-0000-0000-0000-000000000000}; - Запустите Explorer.exe через диспетчер задач (Файл -> Запустить новую задачу -> explorer.exe).


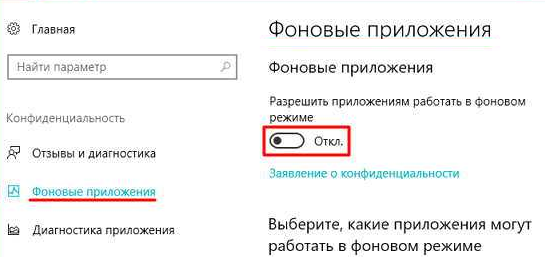
В Windows 10 Creator Update (1703) и более новых версиях есть еще одна частая проблема, из-за которой может не работать поиск. В разделе Параметры -> Конфиденциальность -> Фоновые приложения (Settings -> Privacy -> Background apps), включите опцию «Разрешить приложениям работать в фоновом режиме» (Let apps run in the background). При отключении данной опции может не работает поиск среди только что установленных приложений.
Если вы не нашли эту опцию, можно включить ее через реестр:
- Для этого перейдите в ветку реестра HKEY_CURRENT_USER\Software\Microsoft\ Windows\CurrentVersion\ BackgroundAccessApplications;
- Создайте новый параметр типа DWORD (32-бит) с именем GlobalUserDisabled и значением 0;
- Затем измените значение параметра BackgroundAppGlobalToggle на 1 в ветке реестра HKCU\Software\Microsoft\Windows\CurrentVersion\Search;
Либо вы можете изменить эти параметры из командой строки:
REG ADD HKCU\Software\Microsoft\Windows\CurrentVersion\BackgroundAccessApplications /v GlobalUserDisabled /t REG_DWORD /d 0 /f
REG ADD HKCU\Software\Microsoft\Windows\CurrentVersion\Search /v BackgroundAppGlobalToggle /t REG_DWORD /d 1 /f
- Перезагрузите компьютер.
Проверьте состояние и настройки службы индексирования Windows
Проверьте, запущена ли служба индексирования Windows. Для этого:
- Откройте консоль
services.msc
; - В списке служб найдите Windows Search;
- Проверьте, что служба запущена, а тип ее запуска – автоматический (Automatic — Delayed Start);

- Запустите / перезапустите службу WSearch;
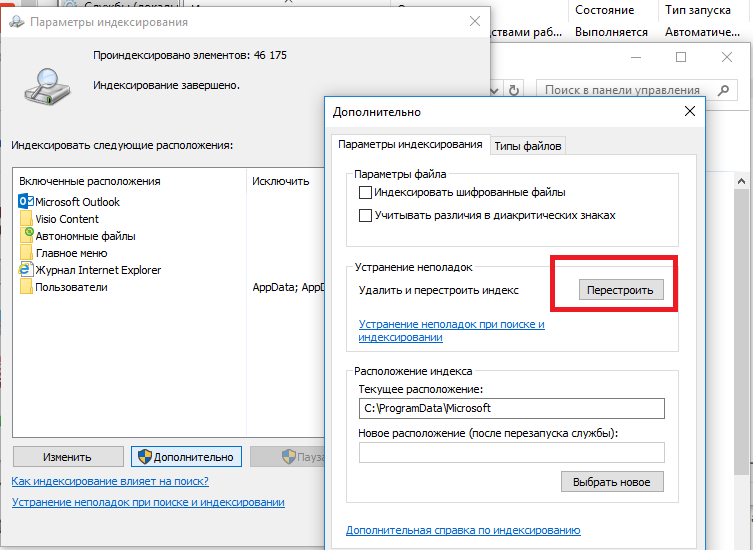
- Теперь откройте классическую панель управления и откройте элемент Параметры индексирования (Control Panel\All Control Panel Items\Indexing Options);
- Убедитесь, что выбрано индексирование всех нужных расположений (как минимум должно быть включено индексирование Start Menu, Users, можете добавить ваши локальные диски и Outlook);

- Нажмите кнопку Дополнительно и в разделе Устранение неполадок нажмите кнопку Перестроить;

- Процесс переиндексации может занять довольно длительное время. Дождитесь его окончания.

Примечание. Проверьте, что на системном диске достаточно свободного места. В некоторых случаях размер индексного файла службы Windows Search (Windows.edb) может быть довольно большим.
Утилита устранения неполадок службы индексирования и поиска Windows
Попробуйте воспользоваться встроенной утилитой исправления неполадок Indexer Diagnostics (Troubleshooter) для исправления типовых проблем с поиском Windows. Для этого:
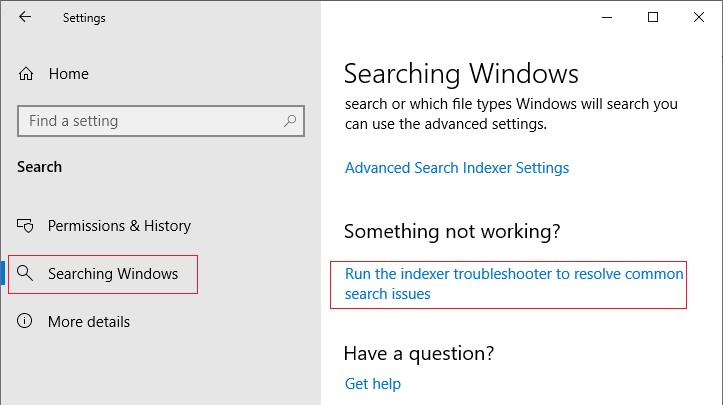
- Перейдите в меню Settings -> Search -> Searching Windows. Промотайте список вниз и нажмите на ссылку “Run the indexer troubleshooter to resolve common search issues”;
Можно запустить мастер исправления ошибок поиска из командой строки:
msdt.exe -ep WindowsHelp id SearchDiagnostic
- Запустится мастер исправления неполадок в службах поиска и индексирования;
- Выберите вашу проблему (скорее всего это будет “Файлы не отображаются в результатах поиска” / “Files don’t appear in search results”) и нажмите Next;
- Дождитесь, пока “Search and Indexing troubleshooter” просканирует ваш компьютер и попробует исправить ошибку, после этого перезагрузите компьютер и проверьте работу поиска.
Сброс универсальных приложений Microsoft Store
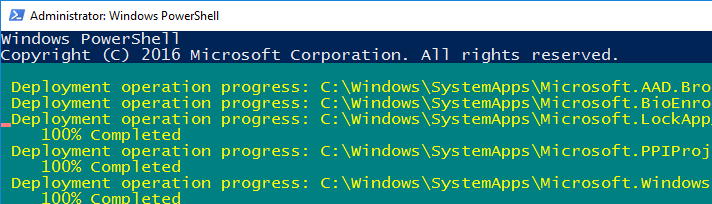
Если у вас на компьютере установлен голосовой помощник Cortana (напомню, что русской версии Cortana все еще нет), исправить проблему неработающего поиска Windows может перерегистрация в системе всех универсальных UWP приложений Windows Store. Для этого в командной строке PowerShell, запущенной с правами администратора, выполните команду:
Get-AppXPackage -AllUsers | Foreach {Add-AppxPackage -DisableDevelopmentMode -Register "$($_.InstallLocation)\AppXManifest.xml"}
После окончания выполнения команды, перезагрузите компьютер.
Если это не исправило проблема с поиском, нужно полностью удалить и переустановить универсальное приложение Microsoft.Windows.Search (
Microsoft.Windows.Search_cw5n1h2txyewy
).
- Запустите консоль PowerShell.exe с правами администратора;
- Остановите службу Windows Search. Сначала нужно изменить тип запуска на Disabled, а потом остановить ее:
Get-Service WSearch| Set-Service –startuptype disabled –passthru| Stop-Service –Force - Перезагрузите Windows;
- Удалите универсальное приложениеSearch:
Get-AppxPackage -Name *Search* | Remove-AppxPackage -Verbose -ErrorAction SilentlyContinue -WarningAction SilentlyContinue
Get-AppxPackage -AllUsers -Name *Search* | Remove-AppxPackage -Verbose -ErrorAction SilentlyContinue -WarningAction SilentlyContinue - Теперь нужно удалить папку приложения
%LOCALAPPDATA%\Packages\Microsoft.Windows.Search_cw5n1h2txyewy
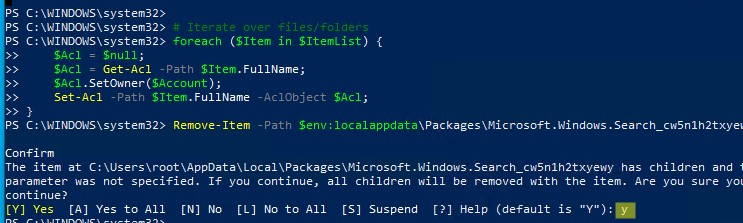
. Но для этого нужно сначала назначить локальную группу Administrators владельцем папки. Это можно сделать вручную в проводнике Windows (вкладка Безопасность в свойствах папки) или с помощью такого PowerShell скрипта:
$searchapp_path ="$env:localappdata\Packages\Microsoft.Windows.Search_cw5n1h2txyewy"
$Account = New-Object -TypeName System.Security.Principal.NTAccount -ArgumentList 'BUILTIN\Administrators';
$ItemList = Get-ChildItem -Path %searchapp_path -Recurse;
foreach ($Item in $ItemList) {
$Acl = $null;
$Acl = Get-Acl -Path $Item.FullName;
$Acl.SetOwner($Account);
Set-Acl -Path $Item.FullName -AclObject $Acl;
} - Теперь можно удалить папку Windows.Search_cw5n1h2txyewy:
Remove-Item -Path $env:localappdata\Packages\Microsoft.Windows.Search_cw5n1h2txyewy –force

- Сейчас поиск в Windows полностью отключен;
- Переустановите приложение Search App:
Get-AppxPackage -AllUsers -Name *Search* | % {Add-AppxPackage -Path ($_.InstallLocation + "\Appxmanifest.xml") -Register -DisableDevelopmentMode -ForceApplicationShutdown -Verbose}

- Включите автозапуск для службы WSearch:
Set-Service WSearch –startuptype automatic - Перезагрузите Windows, войдите под своей учетной записью и проверьте, что поиск теперь работает.

Не работает поиск Windows при включенной интеграции с Bing
5 февраля 2020 года у пользователей Windows 10 массового перестал работать поиск из панели задач. Окно поиска в панели задач открывается, но при вводе любого запроса поиск выдает пустые результаты.

Данная проблема была признана Microsoft и вызывалась недоступностью облачных сервисов поиска Bing. Дело в том, что по-умолчанию Windows 10 отправляет на свои сервера все, что вы вводите в поиске Start Menu, которыt возвращают вам результаты поиска из Bing.
Для исправления этой проблемы проще всего отключить интеграцию поиска Windows 10 с поисковой системой Microsoft Bing.
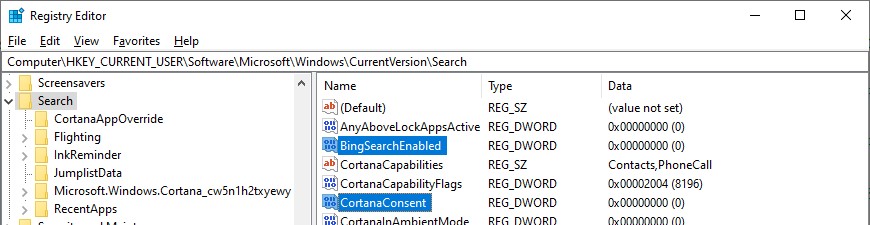
- Запустите редактор реестра (Win+R -> regedit.exe);
- Перейдите в раздел реестра HKEY_CURRENT_USER\SOFTWARE\Microsoft\Windows\CurrentVersion\Search\;
- Измените значение параметров BingSearchEnabled и CortanaConsent на 0;

Если эти параметры реестра отсутствуют, создайте их вручную (тип REG_DWORD 32 bit). Можно создать и изменить эти параметры следующими командами:
REG ADD HKCU\Software\Microsoft\Windows\CurrentVersion\Search /v BingSearchEnabled /t REG_DWORD /d 0 /f
REG ADD HKCU\Software\Microsoft\Windows\CurrentVersion\Search /v CortanaConsent /t REG_DWORD /d 0 /f
- Перезапустите Explorer.exe или перезагружайте компьютер.
Данное решение поможет, если у вас открывается окно поиска, но при вводе текста для поиска не ничего появляется. На момент написания статьи инженеры Microsoft уже исправили проблему с Bing, и службы поиска Windows стали работать нормально. Хотя на мой взгляд интеграцию поиска Windows с Bing нужно отключать сразу после установки операционной системы.
Не работает поиск в Параметрах Windows
В приложении “Параметры” (Settings) Windows 10/11 есть собственной окно поиска для быстрого перехода к элементам настройки системы. Если у вас перестал работать поиск в Параметрах:
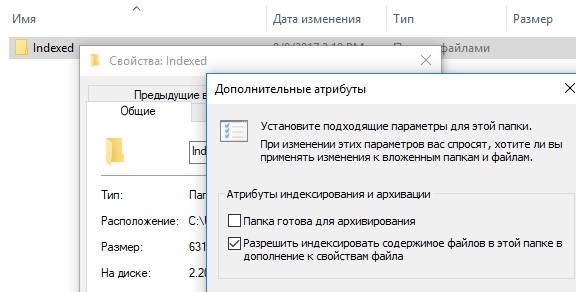
- Запустите File Explorer и перейдите в каталог
%LocalAppData%\Packages\windows.immersivecontrolpanel_cw5n1h2txyewy\LocalState
; - Откройте свойства папки Indexed, нажмите кнопку “Другие”, и проверьте что включена опция включена опция “Разрешить индексировать содержимое файлов в этой папке в дополнении к свойствам файла”;

- Если опция уже включена, отключите ее, нажмите Ок, а затем включите снова.
PowerShell скрипт для сброса Windows Search
Если рассмотренные выше способы не помогли восстановить работу поиска в Windows 10, Microsoft рекомендует воспользоваться скриптом PowerShell для сброса всех настроек службы Windows Search (скрипт предназначен для Windows 10 1903 и выше).
Для запуска этого скрипта нужно
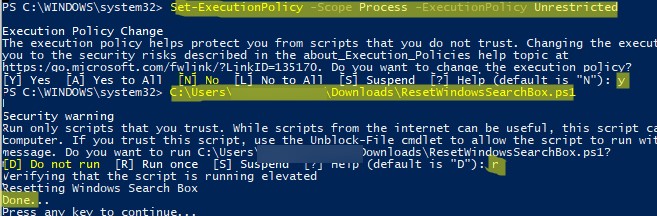
- Скачайте скрипт ResetWindowsSearchBox.ps1 по ссылке;
- Запустите консоль PowerShell с правами администратора;
- Измените настройки политики запуска скриптов PowerShell, выполнив команду (команда разрешает запуск скриптов в текущей сессии powershell.exe):
Set-ExecutionPolicy -Scope Process –ExecutionPolicy Unrestricted - Запустите скрипт;

- Скрипт сбросит настройки поиска Windows на значения по-умолчанию;
- Перезагрузите компьютер и проверьте, исправлена ли проблема поиска в Windows.
Другие варианты исправления проблем поиска в Windows, которые могут помочь, если предыдущие варианты не помогли вам:
Салимжанов Р.Д
Part 3 Basic Configuration of Windows Server 2019(DNS, AD)
Salimzhanov R.D.
Во второй части, мы рассмотрели, как провести настройку удаленного доступа и установку необходимых служб, таких как, DHCP-сервер.
Сейчас мы рассмотрим настройку DNS-сервера и Active Directory (AD).
Мы знаем, что DNS-сервер — это технология интернет-протокола, которая переводит человеко-читаемые доменные имена в IP-адреса компьютеров, чтобы обеспечить связь между ними. DNS (Domain Name System) серверы хранят базы данных доменных имен и их соответствующих IP-адресов, позволяя пользователям получить доступ к веб-сайтам и другим ресурсам в интернете по их доменным именам.
А если простыми словами, то DNS сервер работает по принципу.
После ввода названия какого-либо сайта в браузер:
1) Запрос, который ввел пользователь переадресуется на DNS-сервер.
2) Интернет-провайдер настраивает на своем сетевом оборудовании локальные DNS-серверы. Далее сервер DNS ищет записи о соответствии запрашиваемого домена IP-адресу.
3) По IP-адресу устройство ищется во всемирной паутине.
4) Если оно найдено, запрос обрабатывается и возвращается ответ. В итоге пользователь видит запрошенный сайт.
5) Если не удалось определить IP-адрес устройства, пользователь получает сообщение об ошибке.
Настройка DNS-сервера внутри компании имеет несколько важных целей:
1. Управление именами: Внутренний DNS-сервер позволяет управлять именами хостов и служб внутри сети, что упрощает доступ к ресурсам.
2. Ускорение доступа: Локальный DNS-сервер может значительно ускорить разрешение имен, так как запросы не нужно отправлять на внешние серверы.
3. Безопасность: Внутренний DNS-сервер позволяет контролировать и фильтровать запросы, что может повысить уровень безопасности сети.
Перейдем к настройке, следуем инструкции в скринах:
Создадим зону DNS:
Обратная зона DNS (Reverse DNS Zone) используется для преобразования IP-адресов в доменные имена. Это обратный процесс по сравнению с обычным DNS, где доменное имя преобразуется в IP-адрес. То есть простыми словами мы присвоим имя нашему серверу для пинга с пользовательского ПК.
DNS и Active Directory (AD) являются взаимосвязанными технологиями, поскольку Active Directory зависит от DNS для обеспечения разрешения имен компьютеров и других сетевых ресурсов.
В среде Windows-сервера Active Directory использует DNS для регистрации и поиска устройств, служб и других ресурсов в сети. Когда компьютер присоединяется к домену Active Directory, он автоматически регистрирует свое имя и IP-адрес в службе DNS. Это позволяет другим компьютерам в сети находить и общаться с ним по его имени вместо IP-адреса.
Таким образом, DNS и Active Directory тесно интегрированы для обеспечения эффективной и безопасной работы сети в среде Windows.
Настроим Active Directory (AD):
Создание дополнительных папок (или контейнеров) в Active Directory (AD) позволяет организовать и управлять объектами более эффективно. К примеру, нам это пригодится, когда будем настраивать групповую политику.
Добавляем пользователя в раздел User:
Далее переходим на другой ПК подключений к нашему серверу и подключаемся через нашего созданного пользователя:
Далее входим от пользователя.
Если выдает ошибку проверьте подключение:
После входа автоматически перезагружается ПК.
После перезагрузки входим под созданного пользователя и работаем, если нужно что-то поменять в системе, то заходим от админа (созданного естественно заранее).
Теперь на сервере в подразделении компьютеров отображается подключение:
Если надо мы его можем перенести в другое нужное нам подразделение:
Следующая часть будет об управлении групповыми политиками.
1) Основные сведения об обратной зоне DNS // [электронный ресурс]. URL: https://learn.microsoft.com/ru-ru/azure/dns/dns-reverse-dns-overview / (дата обращения 16.08.2024).
2) Помощник Админа // [канал]. URL: https://t.me/channel_adminwinru (дата обращения 18.08.2024).

Need a more powerful search software for your Windows Server? Learn more here…
Windows Search Server vs. Search Service
The Windows Search Protocol allows communication with a server that hosts a Windows Search Service. The Windows Search Service can issue queries and it also allows an administrator to manage an indexing server. The indexing process runs within the LocalSystem account and constantly runs for all users. This allows Windows Search to:
- Maintain an index that can be shared among all of the users.
- Maintain security restrictions and access to content.
- Process remote queries from computers on the network.
Don’t confuse the Windows Search Service with Microsoft Search Server Express. Microsoft Search Server Express is a free enterprise-class search server, which enables high performance searches of corporate data across multiple systems. Search Server Express has a similar appearance to a Windows SharePoint Services site. The main difference between Windows Search and Search Server Express is that Windows Search can search on a desktop and a server, where Search Server Express can only search on the server.
Windows Search Service on Windows Server 2008
If you are already using a Windows Server based computer, and are currently using Windows Server 2008 then you should know that the Windows Search Service might not be installed by default. You can install and configure the Windows Search Service manually, but it takes some time, patience, and a bit of knowledge to get it done. Here are the steps that you will need to follow:
- Click Start > All Programs > Administrative Tools and then Server Manager
- You will see a console tree in Server Manager, right click on Roles and then choose Add Roles.
- When the Add Roles Wizard opens, click Next.
- Add the Windows Search Service.
- You will need to choose the Volumes with shared folders to be indexed.
- Now you can finish & close the wizard. This should have the search service up and running.
Enable Windows Search Service on Windows Server 2012
While the steps are similar to enabling the search service on previous server versions, there are enough differences to write up the steps you need to follow to enable the Windows search service on Windows Server 2012. Here’s what you need to do:
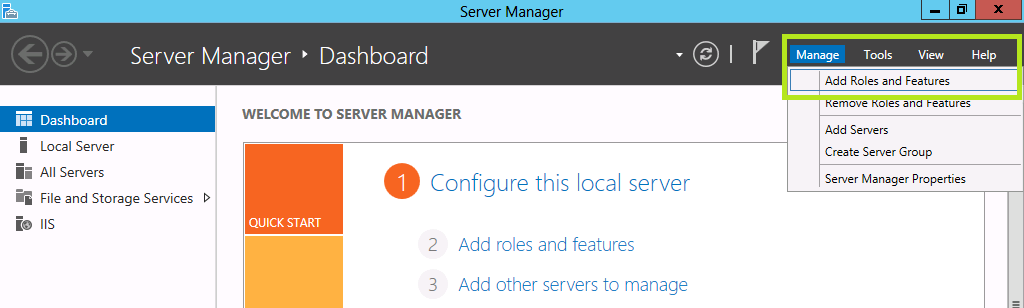
Open the Server Manager tool, then click Manage.
Go to Add Roles and Features to open the Add Roles and Features Wizard window.
Click Next to open the wizard to the Installation type page.
Select Role based or feature based installation option, and click Next.
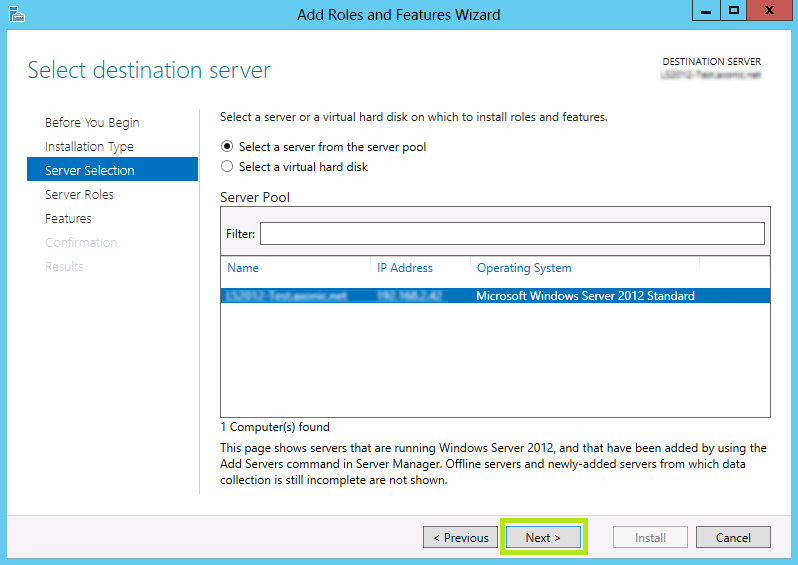
Now you are on the server selection page. Select the server you want the service installed on. If you only have one server, it will automatically select it. Click Next.
Now you are in the Server Roles page. Just click Next, because you are installing a feature, not a role.
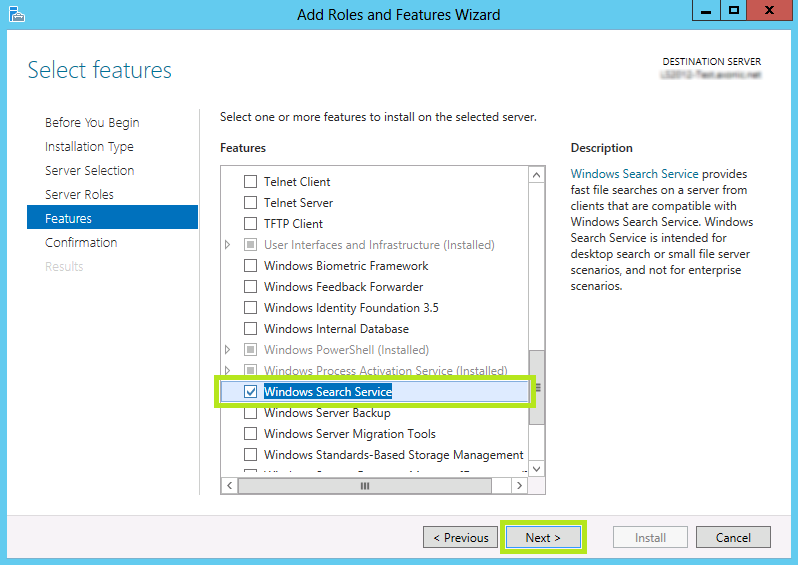
This will open the Features page, here is where you can choose Windows Search Service (make sure the check box is checked) click Next.
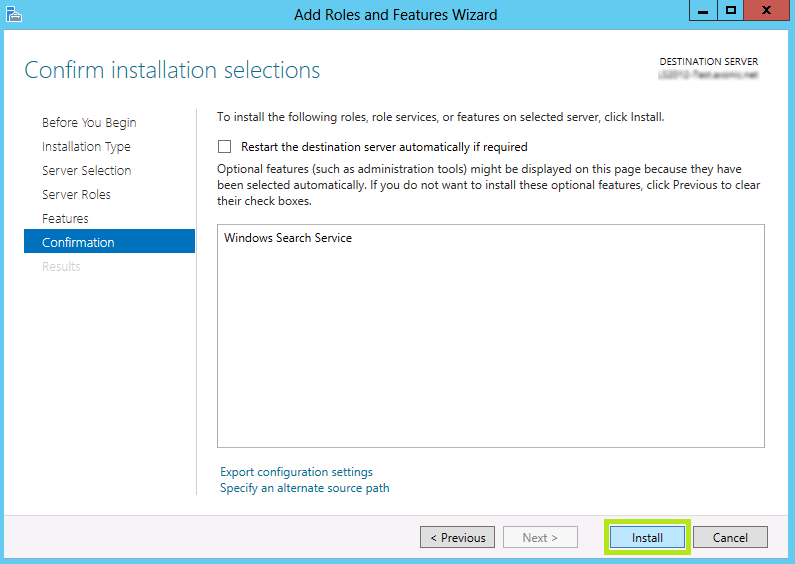
You are now in the confirmation page. To confirm the selection, just click Install. Please note that it will take some time to install the Windows Search Service.
The installation should now be complete.
Adding a New Location to be Indexed
A common problem that users on a network face is that when they try to add a network drive to their Library, an error message suddenly pops up that says “this network location can’t be included because it is not indexed”. There’s no need to worry though, this problem is easy to solve. The following steps require Windows Server 2008 or higher, and will work directly with Windows 7, 8, and 10 Libraries.
When the Windows Search Server is enabled, the server generates an index which is then stored on a Network Share. The clients that have this share mounted can use the search index to find the files they need.
The first step is to create a Shared Folder to host the search index. This can easily be done by going to the Server Manager > File and Storage Services > Shares and setting the appropriate User and File permissions.
Next you should enable Windows Search Service from your server. See the steps outlined above to do so on Windows Server 2008 and 2012.
With Windows Search Service installed and the shared folder created, you will then need to add that shared folder to the index. On the server, go to Control Panel > Indexing Options then click Modify to add the folder or even an entire drive to the index.
Now you will be able to add the network share to the library without the error message appearing.