
Iastordatasvc is a system process that continually runs in the background of Windows and can use up about 30 percent of the CPU’s resources on a regular basis. Occasionally, the CPU usage can go higher than that. This may cause the PC to slow down significantly. This guide will show how to fix this problem.

What Is IAStorDataSvc?
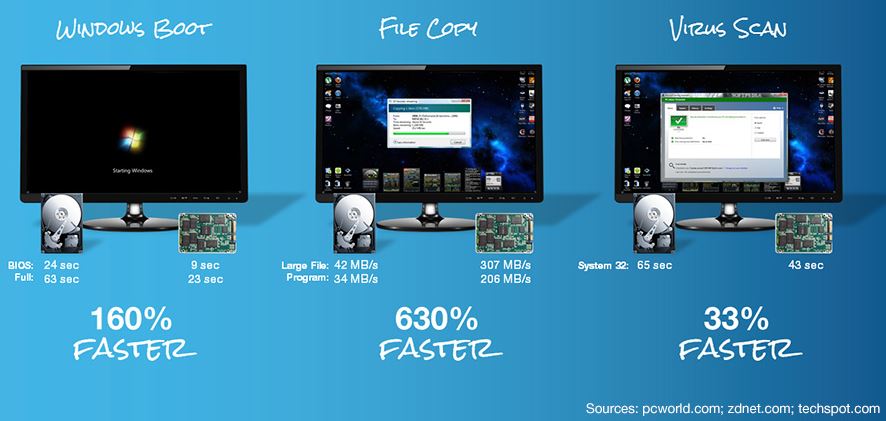
Iastordatasvc (Intel Storage Data Service) is a major component of the Windows operating system used by the pre-installed Intel Rapid Storage Technology (RST). The process helps to save all your frequently used apps and files automatically onto the solid-state drive (SSD) so you can access them much faster.
If you’re a home user and don’t use a SSD on your PC, it’s fine to disable or uninstall the Iastordatasvc process as it’s mostly used in Enterprise, server, and high-end systems.

The Rapid Storage Technology application caches frequently used programs, which involves building its cache index and clearing or upgrading cache to save new information. Sometimes, Iastordatasvc consumes more CPU resources than it should, particularly when the installed version is out-dated.
Quick Fixes
Before addressing IaStorDataSer for high CPU usage issues, review the list below to see if these quick fixes resolve the issue.

- Temporarily disable your antivirus as it could be interfering with the Intel RST process.
- Check that you have the latest driver updates on your PC.
- Run a virus or malware scan to check if a malicious program could be causing the high CPU usage issue. In case you haven’t installed any antivirus software, check out our list of the best virus and malware scanners guaranteed to nuke any virus.
- Close any running background processes or programs that you’re not using.
- Update Windows to ensure that it’s operating effectively and not causing a conflict with the Intel app due to some underlying issues.
If you’ve tried the quick fixes mentioned above and nothing has changed, try the solutions below.
Update Intel Rapid Storage Technology (RST) Driver
If the Intel RST driver is updated, it could significantly impact the performance of the system and result in high CPU usage. You can try to resolve the problem by updating the driver to the latest version.
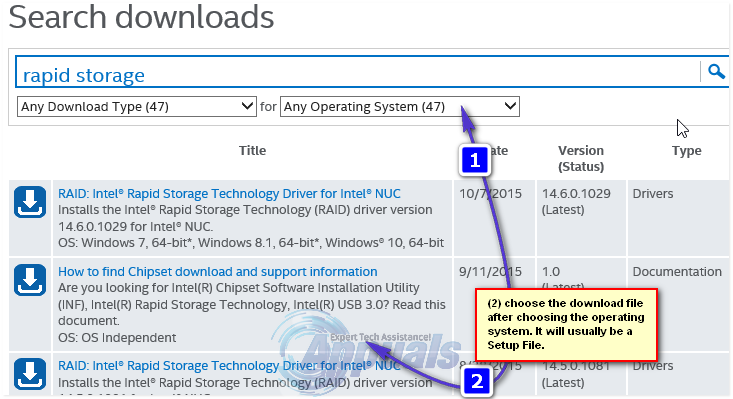
- Search for Intel Rapid Storage Technology chipset driver online or visit Intel RST to open a page with a list of drivers.

- From this list, make sure you look at the version and date. The version should say “Latest” and you preferably would like to pick the one with the highest version number (16, 18, 20, etc).
Note: If you’re not sure which driver to choose, it’s not a big deal. You can either go to your device manufacturer’s website and find the driver from the download section there or you can simply download from the Intel RST page above and try the installation. The Intel installation program automatically checks if the driver is compatible with your system and will give you an error message if it isn’t.
- Before you install the new driver, you should go ahead and uninstall the old one. Scroll down to the bottom of the article for steps on uninstalling Intel RST. Reboot your computer.
- Next, install the latest driver you just downloaded and restart your PC again.
Disable the Intel Rapid Storage Technology Service
If you don’t need the Intel RST application and all of its associated processes and services on Windows 10, you can try disabling the service to see if that resolves your issue. If you find your system performs significantly faster after disabling the service, you can either leave it disabled or you can follow the instructions below to uninstall it altogether.
You can disable the service using the steps below:
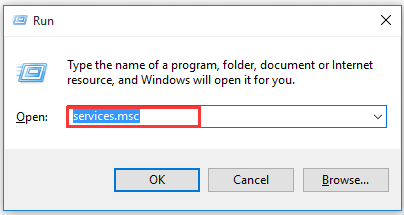
- Right-click Start > Run, type services.msc and press Enter.
- Find Iastordatasvc or Intel Rapid Storage Technology (if it’s still there) in the Services window, right-click and select Stop.

- Next, right-click Intel Rapid Storage Technology again and select Properties.
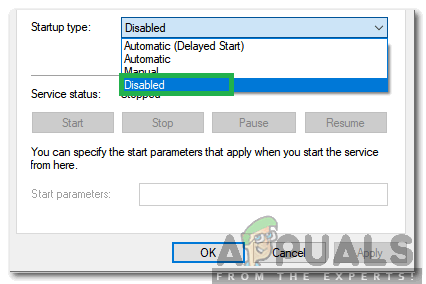
- In the new window, go to Startup Type and select Disable > OK.

Remove the Rapid Storage Technology Application
As mentioned earlier, this application isn’t always needed depending on your system. If you have no Intel Optane memory or don’t have a SSD paired with a traditional hard drive, you won’t see any benefit by using Intel RST. In this case, it’s best to remove the application completely. You can always reinstall it later if required.
Below are 3 different ways to uninstall the Rapid Storage Technology Application.
First, you can just open Control Panel > Programs, click on the application and select Uninstall.
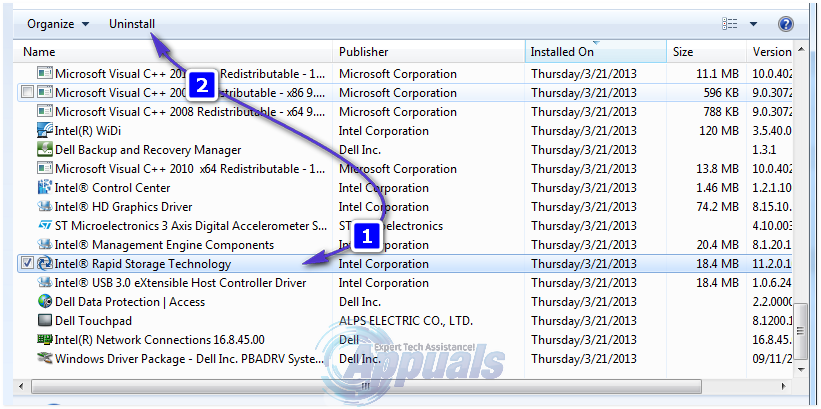
The second method is to right-click Start > Run, type appwiz.cpl and select OK. Double-click on Intel Rapid Storage Technology in the list of installed programs and select Uninstall. Make sure you clear out the junk files to remove any residue from the app.
Another way to uninstall the app uses the following steps:
- Right-click Start > Settings > Apps > Apps and Features.
- Scroll down to Intel Rapid Storage Technology and select Uninstall.
- Follow the uninstall wizard and restart your PC once it completes.
Stop IaStorDataSvc From Hogging CPU Resources
High CPU usage can be difficult to track down. If the problem still plagues you, check out our other guides on how to deal with high CPU usage caused by system interrupts, Svchost.exe or Dwm.exe.
Leave a comment below and let us know which solution helped you fix the Iastordatasvc high CPU usage issue on your PC.
Related Posts
- How to Fix a “This file does not have an app associated with it” Error on Windows
- How to Fix an Update Error 0x800705b4 on Windows
- How to Resolve “A JavaScript error occured in the main process” Error on Windows
- How to Fix the Network Discovery Is Turned Off Error on Windows
- How to Change Folder Icons in Windows
IAStorDataSvc is the name of the service, which translates to Intel Storage Data Service, used by the Intel Rapid Storage Technology that comes installed by default on most modern operating systems. This process is harmless and designed to provide you with faster access to your frequently used programs and applications by automatically saving them to your SSD (if you have one), while maintaining access to your Hard Disk Drive’s capabilities. In essence, it allows you to use both the SSD and the HDD. Intel’s Rapid Response Technology, a feature of Intel’s Rapid Storage Technology, functions similarly to a master-slave database for more rapid access. This is primarily used in enterprise and server scenarios, so its uninstallation or non-use would be acceptable for a home user. SSDs themselves are notably speedy, regardless of whether their capacity is small or large.
Now, since we know what they do, and the choice is ours whether to keep it or lose it, the questions emerge: why is IAStorDataSvc consuming more CPU than it should? This is because the technology is designed to save too. It caches your frequently used programs, and there’s a lot to it: it may be building its cache index, clearing the cache, or upgrading the cache to save any new information. Some users have also reported that the Intel Rapid Storage app might cause a blue screen in some cases. If you decide to keep it, let this process run for a couple of hours. If it still doesn’t fix the problem, then uninstall it and reinstall it. If you decide to uninstall it or stop the process, then that process is easy to do.
I decided to keep it, so how do I fix the High CPU Usage?
Method 1: Uninstall Intel Rapid Storage Technology
Hold the Windows Key and Press R. Type appwiz.cpl and Click OK.

In the list of installed programs, locate Intel Rapid Storage Technology, double click on it and choose Uninstall.
After it has been uninstalled, reboot your computer and return to this page (bookmark it). Next, click ‘Here’ to proceed to the download page for Intel Rapid Storage Technology. Choose your operating system to list the appropriate downloads for your version of Windows, then download, run, and install. This should resolve the issue.
You can also hop over to the manufacturer’s site for your system to get the drivers if you cannot figure out which one to use. The manufacturer’s download section for your product should list them specifically, since they know how the system is configured.
Method 2: Stopping the Intel Rapid Technology Service.
Each process running on your computer, as well as almost every system application installed on it, has its own service operating in the background that facilitates its operation on the system. Therefore, in most cases, disabling the service associated with a program can prevent it from running on the computer. In this step, we will stop this service and then check if doing so resolves the issue. To do this:
- Press “Windows” + “R” to open the Run prompt.
- Type in “Services.msc” and press “Enter” to launch the service management window.

Run dialog: devmgmt.msc - In the service management window, right-click on the “IAStorDataSvc” or “Intel Rapid Storage Service” from the list of installed services and select the “Properties” option.
- In the service properties, click on the “Startup Type” dropdown and select “Disabled” from the list.

Changing Startup Type to Disabled - Click on the “Stop” button to prevent the service from running and then click on the “Apply” button.
- Click on ‘OK’ and close out of the window.
- Now, check to see if the high usage from the application comes back,
Method 3: Perform a System Scan
In certain situations, it is possible that your system has been infected by malware or a virus attack. Some viruses, disguise themselves under the names of system applications so that they are not easily detected by manual checking and so that they can run in the background without interruption from the user. Therefore, in this step, we will be performing a system check using the Default Windows Defender and check if anything is wrong.
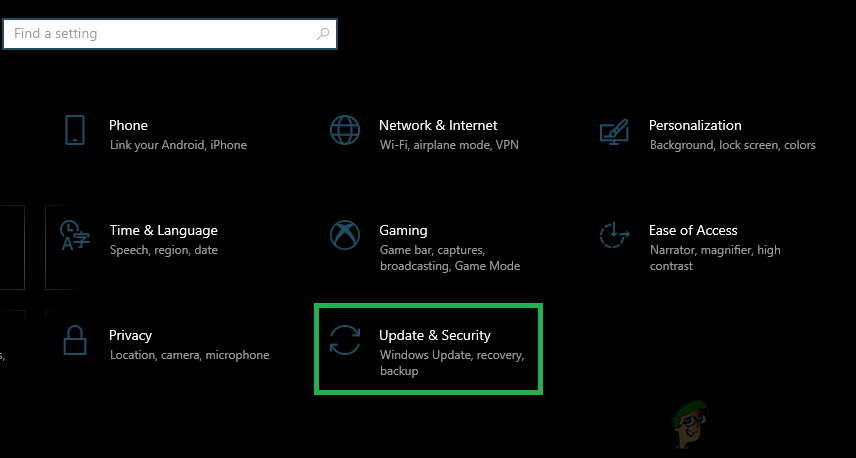
- Press “Windows” + “I” to open the settings.
- Click on the “Update and Security” option to launch the security settings.

Clicking on the “Update and Security” option - In the security settings, click on “Windows Security” from the left side.
- In Windows Security, click on the “Virus and Threat Protection” from the main screen.
- In the next window, click on the “Scan Options” button and then check the “Full Scan” option.

Doing a full scan with Windows Defender - Click on the “Scan Now” button to initiate the scan and let Windows Defender go through the system files to find any failures.
- Wait for the scan to finish and then check to see if it finds any deformities on your computer.

Method 4: Run an Antivirus Scan
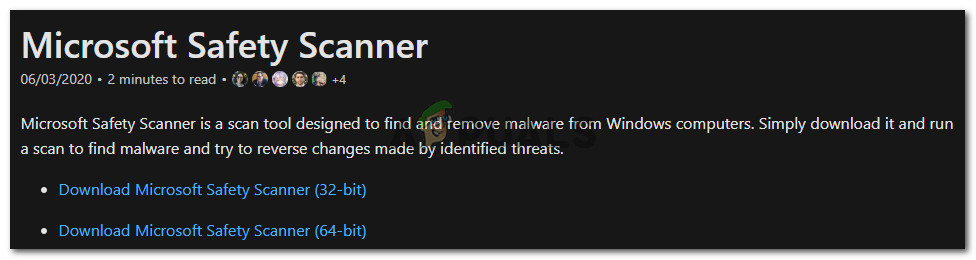
It is possible that the default Windows Defender might not have acquired all the latest virus definitions and updates that are needed to properly isolate viruses and malware on your computer. Therefore, in this step, we will be using the Microsoft Security Scanner to check for any viruses on our computer. For that:
- Launch your browser and navigate to this link.
- Download the version of the application that matches the architecture of your operating system.

Download the proper software - After the download finishes, run the executable and let it run a scan on your computer.
- Follow the on-screen instructions to complete the scan and check to see if the issue still persists.
Method 5: Changing BIOS Settings.
In certain situations, the issue might be resolved by reconfiguring some settings in the computer’s BIOS. The BIOS controls the mode in which your storage devices function, and if a specific mode that is not properly compatible with the hardware installed on your computer has been selected, you might observe high CPU usage while trying to use it. To fix this issue, follow these steps.
- Restart your computer and wait for it to completely turn off.
- When the computer starts booting up, press the “DEL”, “F12”, or “F11” keys to access the computer’s BIOS, depending on your motherboard.
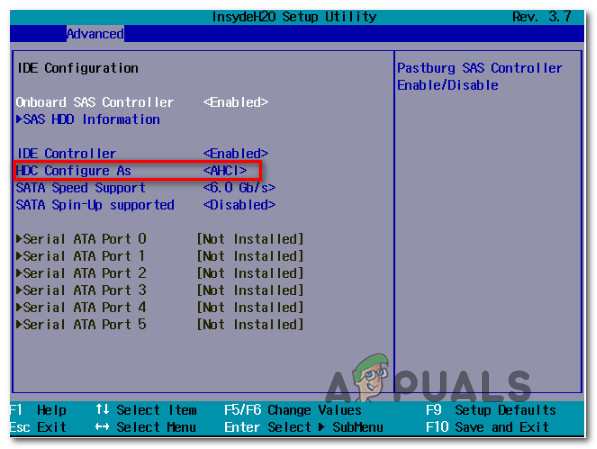
- Once in the Bios, navigate to the Storage section and look for the “Configure SATA As” or “SATA Mode” option.
- Click on this option and select the “AHCI” mode from the list.

Changing the HDC Configuration of IDE to AHCI - Save the changes that you have made inside your Bios and restart your computer.
- Upon booting into Windows, check to see if making this change fixes the situation.
Method 6: Ending Tasks from the Task Manager.
A rather straightforward, albeit temporary, solution to this issue is simply to end the problematic process via the Task Manager, should it begin to consume an excessive amount of resources on your computer. However, it’s essential to remember that this does not permanently prevent the process from restarting, and the remedy may indeed be temporary. Therefore,
- Press “Windows” + “R” to launch the Run prompt.
- Type in “taskmgr” and press “Enter” to launch the Task Manager.
Running the Task Manager - In the Task Manager, click on the “Processes” window and select the “Intel Rapid Storage Technology” process from the list which is using a lot of resources.
- After selecting the process, click on the “End Task” button to prevent the Task from being run.
- Check to see if doing so fixes the issue.
Method 7: Installing an Older Driver.
Most people who encountered this issue on their computers noticed that it only started appearing after they installed an update. Therefore, in this step, we will uninstall the current driver and reinstall an older version of it from the Intel website. To do this:
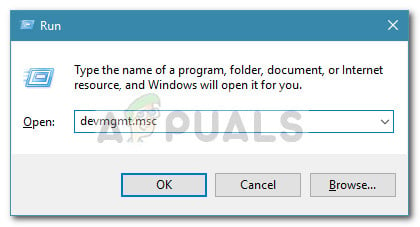
- Press “Windows” + “R” to open the Run prompt.
- Type in “devmgmt.msc” and press “Enter” to launch the device management window.
Run dialog: devmgmt.msc - In the device manager, click on the Storage Controller option to expand it and right-click on the “Intel Rapid Storage Technology” driver.
- Select the ‘Uninstall Device’ button to remove the driver from your computer.
Clicking on the “Uninstall Device” option - Make sure to follow the on-screen prompts to complete the uninstallation process of the driver.
- After uninstalling, open your browser and navigate to this site.
- On this site, click on the “Show More” option to provide some recently published driver updates from intel.
- Download an older version of the driver suitable for the architecture of your Windows.
- After the download finishes, run the executable and follow the on-screen instructions to install it on your computer.
- Check to see if doing so fixes the issue on your computer.
Method 8: Check for any Windows updates.
A Windows Update might just be the solution for you as most updates bring major bug fixes and patches that ultimately should improve the performance on your computer. Therefore, checking for a Windows Update seems like a decent thing to do if you are running into this issue because Microsoft and Intel are aware of this particular problem and might be working to fix it in a recent update. In order to check for updates:
- Press ‘Windows’ + ‘I’ to open the settings.
- In the settings, click on the “Update and Security” option and then select the “Windows Update” button from the left side,
Clicking on the “Update and Security” option - Click on the “Check for Updates” option and let the operating system check for any missing updates on your computer.
- Check to see if the issue is fixed after applying an update,
I have decided to uninstall it. How do I do that?
Press and hold the Windows Key, then press R. Type ‘appwiz.cpl’ and click OK. In the list of installed programs, find ‘Intel Rapid Storage Technology’, double-click on it, and select ‘Uninstall’. This action should uninstall it and stop the process from running. You also have the option to simply disable the service. However, it would be best to uninstall it completely, as it can be reinstalled whenever you want.
Note: After uninstalling, also make sure to clear out the junk files to get rid of any residue from the application,
Issue: I’ve just run a Windows 10 upgrade and everything seems working great. However, I wonder if it’s normal that IAStorDataSvc process is running all the time and consuming almost 30% CPU. I’ve stopped it via Task Manager, but once I restart my laptop, it starts running on the background all the time. Can anyone help with a solution, please?
Solved Answer
IAStorDataSvc service is a part of Intel Rapid Storage software, which is a part of the Windows system. The name of the service is translated as Intel Storage Data Service. Its function is to ensure proper data transfer on your PC, as well as grant quick access to programs/apps you frequently use. For the proper performance, the service requires SSD card as it seeks to maintain access to Hard Disk Drive by automatically saving apps/programs to SSD.[1]
If you noticed a high IAStorDataSvc CPU usage on your home PC, one of the solutions would be its removal. That’s because home users can easily do without Intel Rapid Storage Technology.[2] However, the software should remain in the company PC because it ensures fast access to important data and programs.
The majority of users who experienced IAStorDataSvc high CPU usage problem were using driver version 11.5. In general, no matter what drivers are run on your device, IAStorDataSvc service should not use so much CPU.[3] The reason why it does so frequently is related to cache. To save new data, it identifies/creates most frequently used programs, apps, upgrades, etc. as its cache.

Fix High CPU Usage by IAStorDataSvc manually or automatically
The problem is that IAStorDataSvc high CPU consumption may influence PC’s slowdowns and freezes. In case you’ve decided to keep this process, then wait for a while and let for it to put things into places by itself. However, it may take several hours for IAStorDataSvc process to start using CPU normally. If, however, you think that this process is not needed for you, then follow the instructions give below and uninstall IAStorDataSvc on Windows now.
By the way, things related to CPU consumption, registry errors, slowdowns, and similar can be fixed by a PC optimization tool such as FortectMac Washing Machine X9. Therefore, we recommend installing one and running a scan with it before performing any IAStorDataSvc fixes manually.

High CPU Usage by IAStorDataSvc can be fixed through Task Manager, services.msc, etc.
Method 1: Uninstall Intel Rapid Storage Technology
Fix it now!
To repair damaged system, you will have a 24hr Free Trial and the ability to purchase the licensed version of the Fortect.
- Hold Windows key + press R.
- Type appwiz.cpl in the search box and click OK.

Fix High CPU Usage by IAStorDataSvc by using Task Manager
- Find Intel Rapid Storage Technology in the list, right-click on it and select Uninstall.
- Then, click Ctrl + Alt + Delete to open Task Manager.
- Check if IAStorDataSvc process has successfully been disabled. If it’s still running, right-click on it and select End Task.

Method 2: Reinstall Intel Rapid Storage Technology
- Hold Windows key + press R.
- Type appwiz.cpl in the search box and click OK.
- Find Intel Rapid Storage Technology in the list, right-click on it and select Uninstall.
- Reboot your PC.
- Install Intel Rapid Storage Technology on the official website, run it, and install it.
Method 3. Go to services.msc and deactivate IAStorDataSvc
Fix it now!
To repair damaged system, you will have a 24hr Free Trial and the ability to purchase the licensed version of the Fortect.
- Hold the Windows key and the R button together.
- Wait for the white run box to loads and type “services.msc”.

Fix High CPU Usage by IAStorDataSvc by running Windows Services
- Locate services related to Intel Rapid Storage Technology services.
- Select Disabled in Startup type.
- Hit Apply and OK.

Some of these methods should have helped you to fix the High CPU Usage by IAStorDataSvc problem. However, if you have found the techniques unhelpful, you should go back to the automatical repair method. Use the same software that we have mentioned at the start of the article for scanning your system and searching for the cause of this error.
Repair your Errors automatically
ugetfix.com team is trying to do its best to help users find the best solutions for eliminating their errors. If you don’t want to struggle with manual repair techniques, please use the automatic software. All recommended products have been tested and approved by our professionals. Tools that you can use to fix your error are listed bellow:
do it now!
Download Fix
Happiness
Guarantee
Compatible with Microsoft Windows
Still having problems?
If you failed to fix your error using Fortect, reach our support team for help. Please, let us know all details that you think we should know about your problem.
Fortect will diagnose your damaged PC. It will scan all System Files that have been damaged by security threats. To repair damaged system, you will have a 24hr Free Trial and the ability to purchase the licensed version of the Fortect malware removal tool.
Protect your online privacy with a VPN client
A VPN is crucial when it comes to user privacy. Online trackers such as cookies can not only be used by social media platforms and other websites but also your Internet Service Provider and the government. Even if you apply the most secure settings via your web browser, you can still be tracked via apps that are connected to the internet. Besides, privacy-focused browsers like Tor is are not an optimal choice due to diminished connection speeds. The best solution for your ultimate privacy is Private Internet Access – be anonymous and secure online.
Data recovery tools can prevent permanent file loss
Data recovery software is one of the options that could help you recover your files. Once you delete a file, it does not vanish into thin air – it remains on your system as long as no new data is written on top of it. Data Recovery Pro is recovery software that searchers for working copies of deleted files within your hard drive. By using the tool, you can prevent loss of valuable documents, school work, personal pictures, and other crucial files.
Service Host: Storage Service is an essential component of the Windows Operating System. When Service Host: Storage Service is infected or corrupted, programs won’t execute properly, which could result in a variety of problems such as high CPU usage.

The aforementioned process is not malware, although there are times when a certain infection or system configuration could corrupt or infect Service Host: Storage Service, causing errors and a sluggish computer.
Should Service Host: Storage Service be removed? Because the aforementioned process is a crucial component of the Windows operating system, removing it would cause numerous issues, we strongly urge users against doing so.
If your computer’s Service Host: Storage Service executable behaves considerably differently, it may be feasible to repair it. Following the tutorial below will enable you to repair the problematic executable software and restore your computer’s regular operation.
Methods to Fix Corrupted Service Host: Storage Service
Each method listed below has been tried and tested by our experts because there could be several factors for this problem. If the first one doesn’t work for you, try the next one until the problem is fixed.
Method 1: Utilize System File Checker and DISM Cleanup
DISM Cleanup and the command-line tool Windows System file checker can be used to verify the stability of all significant system files. Additionally, it checks to determine whether any system files are missing or corrupted by comparing them to their original versions.
1 Click the Windows Button from the keyboard and search for CMD or Command Prompt.

2 Right click the Command Prompt application and select Run as administrator.

3 The User Account Control confirmation message will pop-up, click Yes to proceed.

4 Once the Command Prompt opens, type sfc /scannow and hit enter. Please be patient for a few minutes as the scan will start and could take some time.

5 After the scanning process it will report that it have successfully found corrupt files and have repaired them.

6 Next is to use the DISM Cleanup to patch faulty files in the computer system. Type dism /online /cleanup-image /scanhealth onto the command line and hit enter. Wait for a few minutes while it is scanning.

7 After the scan is complete, it will report that the operation is successful and that all corrupted components will be fixed.

8 Lastly, in order to fix serious windows errors, we will use the restore health command. Type dism /online /cleanup-image /restorehealth and hit enter once again to start the scanning process.

9 Once the scan is complete, it will report that the operation was successful and corrupted files and entries are resolved.

Method 2: Scan for Malware
Most of the time, corrupted system files are caused by malware inside the system. When it comes to removing malware-related problems on the computer, it is best to utilize the anti malware software provided by Malwarebytes.
We have determined that it can remove most types of malicious threats when we conducted malware tests.

Malwarebytes also offers a free 14-day trial when you download it for the first time, so you might want to use the remaining time of the trial to test out the premium features.
Download Malwarebytes
1 Click the button above to download the latest version of Malwarebytes Anti-malware.

2 Open the installation file after the download and follow the procedure shown.

3 After following the software setup instructions, wait for the application to finish installing.

4 Once the application is installed, you may now run your first computer scan and wait for it to finish.

5 All discovered malware on the computer will be displayed on the screen, and you can eliminate them by pressing the “quarantine” button.

Any potential malware that may have been hiding on your system has now been eliminated, and the modifications it made to the system have been undone. You can check if Service Host: Storage Service is back to normal after a malware scan.
Method 3: Reset the Computer
If none of the two previous approaches were successful, this should be the last resort. Reinstalling Windows will essentially solve the issue because it will return everything to default settings as if the computer were brand new.
1 Click the Windows Button and select Settings (cog wheel icon) from the left sidebar

2 Once Settings opens up, scroll down and click Update & Security.

3 Select Recovery from the left sidebar and under Reset this PC, click Get started.

4 You will be presented with two options. Select Keep my files if you wish to retain everything in your computer or choose the later if you would like to reset everything. Follow the instructions and wait until the reset is complete.

Final Thoughts
We hope that this guide has assisted you in resolving your computer’s infected Service Host: Storage Service. Please forward this article to anyone who is having a similar issue so that it can be fixed. Feel free to contact us if you have any additional questions; we’ll be pleased to assist.
-
Home
-
Clone Disk
- What Is IAStorDataSvc and How to Fix IAStorDataSvc High CPU Usage
By Ariel | Follow |
Last Updated
Many users find that the IAStorDataSvc process is running all the time and it consumes high CPU usage. What is IAStorDataSvc.exe? How to fix IAStorDataSvc high CPU usage? Now, let’s explore these questions together with MiniTool.
What Is IAStorDataSvc
Are you using the Intel Rapid Storage software on your PC? If it is, you may encounter the IAStorDataSvc high CPU usage issue. IAStorDataSvc is a service provided by the Intel Rapid Storage program.
IAStorDataSvc.exe often comes installed on most modern operating systems by default. It is used to make sure that you can transfer data quickly and access to programs/apps properly that’s used frequently.
This service requires an SSD card to get the proper performance because it keeps access to hard disk drive by saving programs to SSD automatically. IAStorDataSvc service is mostly used in Enterprise and Server editions.
If you find the IAStorDataSvc high CPU usage problem on your home PC, one of the most effective methods is to uninstall or remove it. Without the Rapid Storage Technology, your home computer can easily work.
How to Fix IAStorDataSvc High CPU Usage
To fix the IAStorDataSvc high CPU usage issue, we explore the following 3 solutions.
Solution 1. Disable the Intel Rapid Technology
The first method is to disable the Intel Rapid Technology in Services Manager window. Here’s how to do that:
Step 1. Press the Win + R keys to open the Run dialog box, and then type services.msc in the box and hit Enter.
Step 2. Navigate to the Intel Rapid Storage Technology services and open it by double-clicking.
Step 3. Change the Startup type to Disabled.
Step 4. Click on Apply and OK buttons to execute this change.
Now, you can go to the Task Manager window and check if the IAStorDataSvc high CPU usage problem still persists. If these methods fail to work, please move on to the following methods.
Solution 2. Uninstall the Intel Rapid Technology
As mentioned above, the Intel Rapid Technology service is mainly used for Enterprise and Server users. If you are a home user, you can consider uninstalling it to troubleshoot the IAStorDataSvc high CPU usage issue. To do so, please follow the steps below:
Step 1. Press the Win + R keys to open the Run dialog box, and then type appwiz.cpl in the box and hit Enter.
Step 2. Scroll down the list of installed programs and apps, right-click the Intel Rapid Technology software and select Uninstall. Then click on Yes to confirm this uninstallation.
After the uninstallation is complete, you can press the Ctrl + Alt + Delete keys to open the Task Manager to check if the IAStorDataSvc.exe is running. If it’s still running, select this process and click on End Task at the bottom.
Solution 3. Uninstall or Remove IAStorDataSvc Driver
If you are using an outdated or corrupted driver, it is possible to encounter the IAStorDataSvc high CPU usage problem. So, you can try uninstalling the IAStorDataSvc driver from Device Manager. After a PC restart, your Windows update will automatically find the right driver for you.
Step 1. Right-click the Start button and select Device Manager from the context menu.
Step 2. Navigate to the IAStorDataSvc driver, right-click it, and select the Uninstall device. Then you can follow the on-screen prompts to complete the process.
Step 3. Restart your computer to install the right driver. Now, you can check if the problem is resolved.
About The Author
Position: Columnist
Ariel has been working as a highly professional computer-relevant technology editor at MiniTool for many years. She has a strong passion for researching all knowledge related to the computer’s disk, partition, and Windows OS. Up till now, she has finished thousands of articles covering a broad range of topics and helped lots of users fix various problems. She focuses on the fields of disk management, OS backup, and PDF editing and provides her readers with insightful and informative content.