
1270061
Очень много пользователей, которые обновились, или просто установили Windows 10, столкнулись с проблемами в работе Wi-Fi. У кого-то ноутбук вообще не видит беспроводного адаптера, не отображаются доступные для подключения сети, возникают проблемы при подключении к Wi-Fi. А если все подключается, то может возникнуть проблема «Подключение ограничено», когда интерн просто не работает.
И практически во всех этих случаях, причина только одна: драйвер беспроводного Wi-Fi адаптера. Либо он не установлен вообще, либо установлен, но работает неправильно. Windows 10 как правило уже сама устанавливает драйвер на Wi-Fi адаптер, но этот драйвер не всегда работает так как нужно. А производители ноутбуков и Wireless адаптеров еще не все выпустили новые драйвера для своих моделей. Да и Windows 10 все время обновляется, а проблемы появляются обычно после этих обновлений (судя по комментариям к статьям на этом сайте).
Так вот, практически все проблемы и ошибки и-за драйвера. Драйвер дает команды системе как правильно «общаться» с железом. В нашем случае с беспроводным адаптером. И если сам адаптер и Windows 10 не очень понимают друг друга, то у нас на компьютере появляются проблемы в работе интернета при подключении по Wi-Fi. Поэтому, первым делом нужно проверять и экспериментировать с драйвером беспроводного адаптера.
Мы рассмотрим случаи, когда драйвер все же установлен (возможно, самой Windows 10), но появляются проблемы с Wi-Fi. Либо, не получается подключится к беспроводной сети по стандартной схеме, которая описана в этой статье.
Замена драйвера Wi-Fi адаптера в Windows 10
Как правило, при каких-то проблемах, переустановка (обновление) драйвера не помогает. В любом случае, вы можете попробовать скачать новый драйвер для вашей модели с официального сайта производителя ноутбука (адаптера), и установить его. При возникновении каких-либо проблем, это нужно делать первым делом. Еще, есть возможно выбрать один из нескольких установленных в системе драйверов. Что мы сейчас и попробуем сделать.
Что бы открыть Диспетчер устройств, нажмите на кнопку поиска, и введите «диспетчер устройств». В результатах поиска нажимаем на сам диспетчер. Вот так:
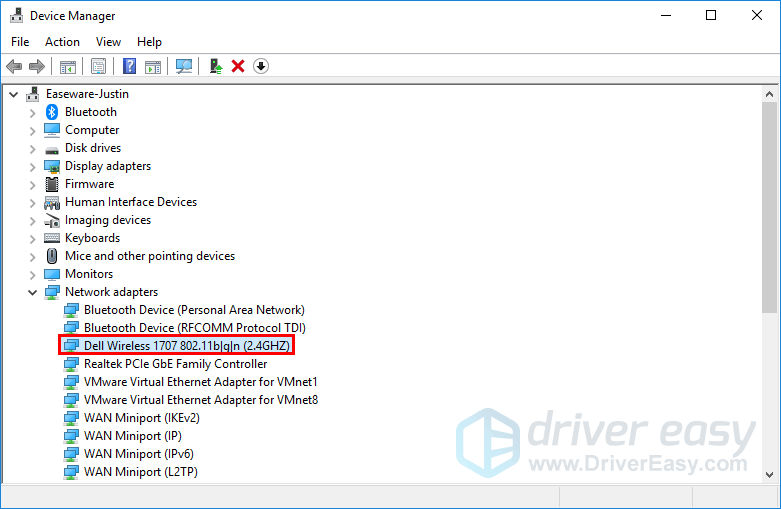
Дальше, в самом диспетчере устройств находим вкладку «Сетевые адаптеры». Там должен быть ваш беспроводной адаптер. В его названии будут слова «Wi-Fi», или «Wireless». Если такого адаптера там нет, то значит он не установлен вообще. Нужно установить. У меня адаптер Qualcomm Atheros, поэтому и драйвер так называется. У вас же может быть другое название (Intel, Broadcom).
Возле адаптера беспроводной сети, может быть желтый восклицательный знак. Нажмите на сам адаптер правой кнопкой мыши, и выберите Обновить драйверы.

Выберите пункт Выполнить поиск драйверов на этом компьютере.
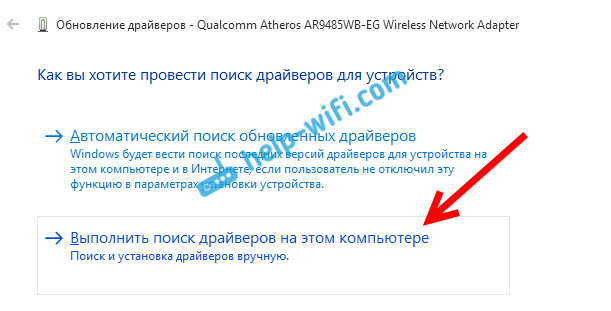
Нажимаем на Выбрать драйвер из списка уже установленных драйверов.

Теперь внимание, в окне у вас должно быть несколько вариантов драйверов (у меня 2). Выделяем тот, который на данный момент не установлен. Который отличается от того, который в диспетчере устройств. Получается, что мы пробуем другой вариант драйвера. Выделяем его, и нажимаем Далее.

Нужный драйвер будет установлен. Теперь, перезагружаем компьютер, и тестируем работу Wi-Fi. Если не помогло, и есть еще другие варианты драйверов, то делаем все еще раз, только в списке выбираем уже другой драйвер. Думаю, смысл этих действий понятен. Помню в Windows 8, этот способ помогла решить проблему с подключением без доступа к интернету (ограничено).
Удаляем драйвер беспроводного адаптера
В этом нет ничего страшного. Если способ описанный выше не помог решить вашу проблему, например с статусом «Подключение ограничено», то можно попробовать удалить драйвер Wireless в диспетчере устройств.
Зайдите в диспетчер устройств, как я показывал выше. Нажмите правой кнопкой мыши на наш беспроводной адаптер и выберите Удалить.

Появится предупреждение. Нажимаем Ok.

После его перезагружаем компьютер. Драйвер снова будет установлен автоматически.
Пробуем откатить драйвер беспроводного адаптера в Windows 10
Откатить драйвер – еще один способ заставить Wi-Fi работать стабильно, или хотя бы просто работать :). Никаких гарантий что поможет, но если уже ничего не помогает, то попробовать стоит. Все в том же диспетчере устройств нажимаем правой кнопкой мыши на все тот же Wi-Fi адаптер. И выбираем в меню Свойства.

Переходим на вкладку Драйвер, и нажимаем кнопку Откатить. Может быть такое, что кнопка откатить не активна. Здесь уже ничего не сделать, значит нет в системе более старого драйвера.

Появится сообщение о том, что откат к более старой версии драйвера может понизить функциональность, и все такое. Нажимаем Да.

Перезагружаем ноутбук, и проверяем как работает Wi-Fi.
Вот такие советы. Если узнаю что-то новое по этой теме, обязательно обновлю статью. Если у вас есть полезная информация по решению проблем с работой Wi-Fi в Windows 10, то можете поделится в комментариях.
If you’re facing the issue where your Windows 10 PC is not able to connect to the saved WiFi network automatically even though you have properly configured the network to connect automatically then don’t worry as today we are going to see how to fix this issue. The problem is when you start your PC, the WiFi doesn’t connect automatically in Windows 10 and you have to manually look for available networks then select your saved network connection and press Connect. But the WiFi should connect automatically as you have checked the box “Automatically connect”.

Well, there is no particular cause for this issue but this can be caused by a simple system upgrade after which the WiFi Adapter is turned off to save power and you need to alter the settings back to normal to fix the issue. So without wasting any time let’s see How to Fix WiFi doesn’t connect automatically in Windows 10 with the help of the below-listed troubleshooting guide.
Table of Contents
Make sure to create a restore point just in case something goes wrong.
Method 1: Forget your WiFi Network
1.Click on the Wireless icon in the system tray and then click Network Settings.
2.Then click on Manage Known networks to get the list of saved networks.

3.Now select the one which Windows 10 won’t remember the password for and click Forget.

4.Again click the wireless icon in the system tray and connect to your network, it will ask for the password, so make sure you have the Wireless password with you.
5.Once you have entered the password you will connect to the network and Windows will save this network for you.
6.Reboot your PC and again try to connect to the same network. This method seems to Fix WiFi doesn’t connect automatically in Windows 10.
Method 2: Adjust WiFi Adapter Power Management Settings
1.Press Windows Key + R then type devmgmt.msc and hit Enter.

2.Expand Network adapters then right-click on your installed network adapter and select Properties.

3.Switch to Power Management Tab and make sure to uncheck “Allow the computer to turn off this device to save power.”

4.Click Ok and close the Device Manager.
5.Now press Windows Key + I to open Settings then Click System > Power & Sleep.

6.On the bottom click Additional power settings.
7.Now click “Change plan settings” next to the power plan which you use.

8.At the bottom click on “Change advanced power settings.”

9.Expand Wireless Adapter Settings, then again expand Power Saving Mode.
10.Next, you will see two modes, ‘On battery’ and ‘Plugged in.’ Change both of them to Maximum Performance.

11.Click Apply followed by Ok. Reboot your PC to save changes.
Method 3: Roll Back Network Adapter Drivers
1.Press Windows Key + R then type devmgmt.msc and hit Enter to open Device Manager.
2.Expand Network Adapter and then right-click on your Wireless Adapter and select Properties.
3.Switch to the Driver tab and click on Roll Back Driver.

4.Choose Yes/OK to continue with driver rollback.
5.After the rollback is complete, reboot your PC.
See if you’re able to Fix WiFi doesn’t connect automatically in Windows 10, if not then continue with the next method.
Method 4: Run Network Troubleshooter
1.Right-click on the network icon and select Troubleshoot problems.
2.Follow the on-screen instructions.
3.Now press Windows key + W and type Troubleshooting hit enter.
4.From there select “Network and Internet.”

5.In the next screen click on Network Adapter.

6.Follow the on-screen instruction to Fix WiFi doesn’t connect automatically in Windows 10.
Method 5: Uninstall Network Adapter Driver
1.Press Windows Key + R then type “devmgmt.msc” and hit Enter to open Device Manager.
2.Expand Network Adapters and find your network adapter name.
3.Make sure you note down the adapter name just in case something goes wrong.
4.Right-click on your network adapter and uninstall it.

5.If ask for confirmation select Yes.
6.Restart your PC and try to reconnect to your network.
7.If you’re not able to connect to your network then it means the driver software isn’t automatically installed.
8.Now you need to visit your manufacturer’s website and download the driver from there.

9.Install the driver and reboot your PC.
By reinstalling the network adapter, you can Fix WiFi doesn’t connect automatically in Windows 10.
Method 6: Update Network Adapter Drivers
1.Press Windows key + R and type “devmgmt.msc” in the Run dialogue box to open device manager.
2.Expand Network adapters, then right-click on your Wi-Fi controller(for example Broadcom or Intel) and select Update Drivers.

3.In the Update Driver Software Windows, select “Browse my computer for driver software.”

4.Now select “Let me pick from a list of device drivers on my computer.”

5.Try to update drivers from the listed versions.
6.If the above didn’t work then go to the manufacturer’s website to update drivers: https://downloadcenter.intel.com/
7.Reboot to apply changes.
Method 7: Delete Wlansvc Files
1.Press Windows Key + R then type services.msc and hit Enter.
2.Scroll down till you find WWAN AutoConfig then right-click on it and select Stop.

3.Again press Windows Key + R then type “C:\ProgramData\Microsoft\Wlansvc\” (without quotes) and hit Enter.
4.Delete everything (most probably the MigrationData folder) in the Wlansvc folder except for profiles.
5.Now open the Profiles folder and delete everything except the Interfaces.
6.Similarly, open the Interfaces folder then delete everything inside it.

7.Close File Explorer, then in services window right-click on WLAN AutoConfig and select Start.
Method 8: Disable Microsoft Wi-Fi Direct Virtual Adapter
1.Press Windows Key + R then type devmgmt.msc and hit Enter to open Device Manager.
2.Expand Network adapters then click on View and select Show hidden devices.
3.Right-click on Microsoft Wi-Fi Direct Virtual Adapter and select Disable.

4.Reboot your PC to save changes.
Method 9: Install Intel PROSet/Wireless Software
Sometimes the problem is caused due to outdated Intel PROSet Software, hence updating it seems to Fix Network Adapter Missing in Windows 10. Therefore, go here and download the latest version of PROSet/Wireless Software and install it. This is a third party software which manages your WiFi connection instead of Windows and if PROset/Wireless Software is outdated is can cause drivers issue in Wireless Network Adapter. Read How to Update Network Adapter Drivers on Windows 10. Read How to Update Network Adapter Drivers on Windows 10.
Method 10: Registry Fix
Note: Make sure to backup Registry just in case something goes wrong.
1.Press Windows Key + R then type regedit and hit Enter to open Registry Editor.
2.Navigate to the following registry key:
HKEY_LOCAL_MACHINE\SOFTWARE\Policies\Microsoft\Windows\WcmSvc
3.Expand WcmSvc in the left pane and see if it has GroupPolicy key, if not then right-click on WcmSvc and select New > Key.

4.Name this new key as GroupPolicy and hit Enter.
5.Now right-click on GroupPolicy and select New > DWORD (32-bit) value.

6.Next, name this new key as fMinimizeConnections and hit Enter.

7.Reboot your PC to save changes.
Method 11: Disable Fast Startup
1.Press Windows Key + R then type control and hit Enter to open Control Panel.
2.Click on Hardware and Sound then click on Power Options.

3.Then from the left window pane select “Choose what the power buttons do.”

4.Now click on “Change settings that are currently unavailable.”

5.Uncheck “Turn on fast startup” and click on Save changes.

6.Reboot your PC to save changes and see if you’re able to Fix WiFi doesn’t connect automatically as WiFi Option Not Showing in Windows 10.
Method 12: Run SFC and DISM
1.Press Windows Key + X then click on Command Prompt(Admin).
2.Now type the following in the cmd and hit enter:
Sfc /scannow
sfc /scannow /offbootdir=c:\ /offwindir=c:\windows (If above fails then try this one)

3.Wait for the above process to finish and once done restart your PC.
4.Again open cmd and type the following command and hit enter after each one:
a) Dism /Online /Cleanup-Image /CheckHealth
b) Dism /Online /Cleanup-Image /ScanHealth
c) Dism /Online /Cleanup-Image /RestoreHealth

5.Let the DISM command run and wait for it to finish.
6. If the above command doesn’t work then try on the below:
Dism /Image:C:\offline /Cleanup-Image /RestoreHealth /Source:c:\test\mount\windows
Dism /Online /Cleanup-Image /RestoreHealth /Source:c:\test\mount\windows /LimitAccess
Note: Replace the C:\RepairSource\Windows with the location of your repair source (Windows Installation or Recovery Disc).
7.Reboot your PC to save changes.
Recommended:
- Fix Unable to Set Default Printer Error 0x00000709
- Fix Microphone Not Working on Windows 10
- Remove Candy Crush Soda Saga from Windows 10
- How to Map Network Drive in Windows 10
That’s it you have successfully Fix WiFi doesn’t connect automatically in Windows 10 but if you still have any questions regarding this article then feel free to ask them in the comment’s section.
Did your Laptop keep losing wifi connection or Wi-Fi keep disconnecting after the Windows 10 update? You are not alone, Several users report Windows 10 internet disconnects randomly It just disconnects and restores in a few seconds. Or sometimes Windows 10 wifi disconnects and won’t reconnect until restart the Laptop. You have a question in mind, Why does my wifi keep disconnecting? The reason may be different, here in this post we will try to find out the solutions to fix the laptop keeps losing wifi connection issues on Windows 10.
Contents
- 1 Why does my laptop keep disconnecting from wifi?
- 2 Windows 10 Laptop keeps disconnecting from wifi
- 2.1 Run Network Troubleshooter
- 2.2 Check for the Latest Driver Update
- 2.3 Reinstall the WiFi Adapter Driver
- 2.4 Tweaking the Power options
- 2.5 Change WIFI AutoConfig Service Startup Type
- 2.6 Use Google DNS
- 2.7 Reset TCP/IP configuration
- 2.8 Try Network Reset
- 2.9 Change network profile
Why does my laptop keep disconnecting from wifi?
Normally, these types of problems “Wifi keeps disconnecting after updating Windows 10” occur more in old laptops, It is because of hardware failure. Sometimes Wi-Fi keeps disconnecting on Windows 10 laptops as a result of bad network or router settings. Erroneous Power Settings related to the network, and incorrect network configuration also cause the laptop keeps losing wifi connection on Windows 10.
- Signal interference from electronic devices, walls, and neighboring networks.
- Outdated or incompatible network drivers.
- Power-saving settings turning off Wi-Fi adapter during inactivity.
- Router firmware glitches and overheating.
- Incorrect network configurations, including IP and DNS settings.
- Conflicts with third-party software like antivirus or VPNs.
Whatever the reason, If your laptop keeps losing wifi connection or Windows 10 internet disconnects randomly, here are a few workarounds you can try to get your WiFi connection stable again.
Windows 10 Laptop keeps disconnecting from wifi
Before applying any solutions, Restart Router, modem and laptop, to automatically clear any temporary glitch that may be causing Wi-Fi to disconnect.
Temporarily disable any third-party security software (antivirus) if installed to check and ensure security software is not blocking the connection.
- Click the Wi-Fi icon (button) from the bottom-right corner of the taskbar.
- This opens the list of WiFi networks available in your area.
- Right-click on the wireless network that you are connected to and click the forget option,
- Restart your PC, including network devices (router, modem) and reconnect to your Wi-Fi network again using the security key.
Run Network Troubleshooter
Let’s first Run the automated network troubleshooter that can find and automatically fix network and internet connection problems on Windows 10.
- Press Windows key + I to open settings,
- Click Network & Internet then Network Troubleshooter,
- A new window opens that diagnoses and fixes network problems.
The troubleshooter checks your network adapter settings to ensure that they are properly configured and working correctly. In addition, check for driver related problems, Reset your network adapter and check related problems then attempt to repair it automatically.
- Once the diagnosis process completes, restart your PC and check wifi dropping issue is solved or not.
Check for the Latest Driver Update
The most common reason behind the problem is the Wifi Adapter driver incompatibility. And Updating your Wi-Fi driver with the latest version probably resolves the issues, causing the laptop to keep disconnecting from the WiFi.
Outdated or incompatible network drivers can lead to communication issues between your laptop and the Wi-Fi network
- Press the Windows key + R, type devmgmt.msc and press Enter.
- This will open the device manager, and display all installed device driver list, locate and Expand Network Adapters.
- Now, Right-click on the WiFi driver and select Update Driver Software.
- Then, Choose Search automatically for updated driver software.
- Follow the on-screen instructions, you also should do it for other network adapters and restart your PC.
Reinstall the WiFi Adapter Driver
Also, try to uninstall the Network Card device from the Device Manager and reinstall the latest driver version. That helps fix outdated Wifi drivers causing Windows 10 internet to disconnect randomly.
- Press Windows key + X and select Device Manager
- Expand network adapters, Right-click on the installed WiFi Adapter driver and select uninstall.
- Click uninstall again, when it prompts for confirmation,
- Restart Windows to completely uninstall the driver.
On the next start windows automatically install a basic driver on your device. If not installed then open the device manager, click action then search for hardware change.
You can also update your network adapter driver manually by going to the manufacturer’s website for it and searching for the most recent correct driver for it.
Tweaking the Power options
Power-saving settings can cause your Wi-Fi adapter to disconnect when idle. Disabling these settings ensures a consistent connection by preventing unnecessary power-saving actions.
- Press Windows + R, type ncpa.cpl and ok to open the Network connection window.
- Right, click on Active WiFi Adapter and Select properties.
- Under WiFi Properties, find out and click on Configure.
- Under Power Management, uncheck the box of choice — Allow the computer to turn off this device to save power and then click OK to save changes.
This is the effective way to fix “WiFi keeps disconnecting,” Where several users marked as working solution And hope this one also resolves your problem.
Change WIFI AutoConfig Service Startup Type
- Press the Windows key + R type services.msc and hit OK.
- This will open the Windows services console.
- Please scroll down to WLAN AutoConfig and right-click it to open its Properties.
- In WLAN AutoConfig Properties, locate the Startup type and choose to set it as Automatic.
- Close the Services window and reboot your computer to take effect.
- Now you can detect your PC will not run into WIF losing connection issues on Windows 10.
Use Google DNS
Also, Several users reported that WiFi is getting disconnected frequently, but after switching to Google’s DNS, the issue was resolved instantly. To switch to Google’s DNS, you need to do the following:
- Press Windows + R, type ncpa.cpl and ok to open network connections.
- Right-click on the active WiFi Adapter and select properties.
- On WiFi, properties select Internet Protocol Version 4 (TCP/IPv4) and click on Properties.
- Select Use the following DNS server addresses. Set the Preferred DNS server to 8.8.8.8 and the Alternate DNS server to 8.8.4.4. Click on OK to save changes.
Reset TCP/IP configuration
If all the above solutions didn’t fix the problem, let’s Reset TCP or IP settings for WIFI into the default settings, which may also help fix the wireless network drops out randomly.
- Open the command prompt as administrator,
- Type commands below one after one and press enter key each,
netsh winsock reset
netsh int ip reset c:\resetlog.txt
Once done, close the command prompt and Restart your computer. Now check if this resolves the problem.
Try Network Reset
Still, experience the same problem, the laptop keeps disconnecting from wifi and won’t reconnect Reset Your Entire Network which brings back all the network configuration settings to their original state.
- Open Settings using Windows key + I,
- Click Network & Internet > Network Reset.
- Then, Click on Reset Now, and click again when ask for confirmation.
- It will reset everything related to Windows network settings.
- Once done the system restarts automatically, on the next start, you need to connect to the WiFi network using the WiFi password manually.
- In many cases, It fixes common internet connectivity issues. So, It also may fix the wifi disconnecting issue.
Change network profile
A few Windows 10 users mention changing the network profile to Private instead of Public help them fix the laptop keeps losing wifi connection problem on Windows 10
- Click on the WiFi icon located lower right system tray,
- Again Click on the Connected Wi-Fi network to bring out the submenu then click Properties,
- Here make sure to Connect automatically when in range option is toggled on,
- Now change the Network profile to private instead of public (If it’s already set to public then try to change it to private)
- Now check now if your laptop has a stable wifi connection.
Third-party software like antivirus or VPNs can interfere with network settings. Temporarily disabling them helps identify if they’re causing the disconnections.
In addition updating router firmware resolves known bugs and issues, while proper placement and ventilation prevent overheating and ensure a steady connection.
FAQ:
Why does my Windows 10 Wi-Fi keep disconnecting?
- There are several reasons, including interference from other wireless devices, outdated or corrupted network drivers, incorrect network settings, or hardware issues cause laptop wifi to disconnect randomly.
How do I fix my Wi-Fi from disconnecting on Windows 10?
- Running the Network adapter troubleshooter, Resetting your Wi-Fi adapter, updating your network drivers or changing your power settings very effectively fix such problems on Windows 10.
Can a router cause a Wi-Fi disconnection on Windows 10?
- Yes, sometimes Router could be the reason why wifi disconnects frequently, if it is not functioning properly or if it is experiencing signal interference.
- Restarting your router or moving your Laptop closer to the router helps fix the issue.
How do I know if my Windows 10 Wi-Fi driver is up to date?
- You can check the same on Device Manager or You can visit the device manufacturer’s website for the latest driver updates.
Also, Read
- Solved: This app is preventing the shutdown of Windows 10
- Google Chrome not working/responding after the Windows 10 update.
- Enable Hidden administrator account on Windows 10
- How To Fix Google Chrome High CPU Usage Windows 10
- How to fix Microsoft Store connection error on Windows 10
Quick Guide
If you’re in a hurry, here’s how to download & install the correct version of drivers with one click!
Want to reinstall your Wi-Fi driver on your Window 10 PC? If so, you’ve come to the right place! After reading this article, you should be able to reinstall your Wi-Fi driver easily and quickly!
If you’re having wireless performance or connectivity issues, it is a good choice to reinstall the driver for your wireless network adapter. By reinstalling your Wi-Fi driver, you can fix many unexpected network issues.
Follow these steps
- Uninstall the driver for your wireless network adapter in Device Manager
- Reinstall the driver for your wireless network adapter
- Bonus tip: How to update your network driver automatically
Note: the screenshots below come from Windows 10, but the fixes also work on Windows 11, Windows 8 and Windows 7.
Step 1: Uninstall the driver for your wireless network adapter in Device Manager
You can uninstall the driver for your wireless network adapter in Device Manager. Here is how to do it:
- On your keyboard, press the Windows logo + R keys simultaneously to open the Run box.
- Type devmgmt.msc and hit Enter.
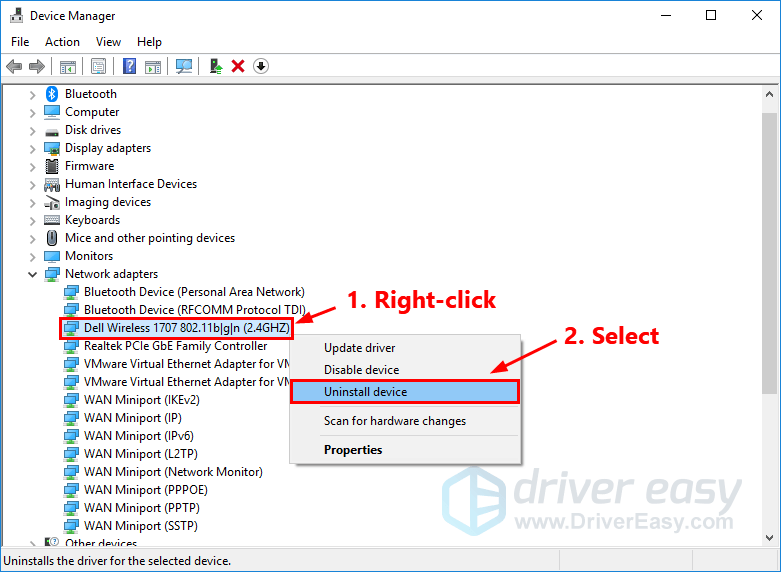
- In Device Manager, right-click on the name of your wireless network adapter and select Uninstall device to uninstall the driver for your wireless network adapter.

- Check the box next to Delete the driver software for this device and click Uninstall.
When it is finished, your wireless network adapter will disappear from the list of Network adapters.
Step 3: Reinstall the driver for your wireless network adapter
It is pretty easy to reinstall the driver for your wireless network adapter. Here is how to do it:
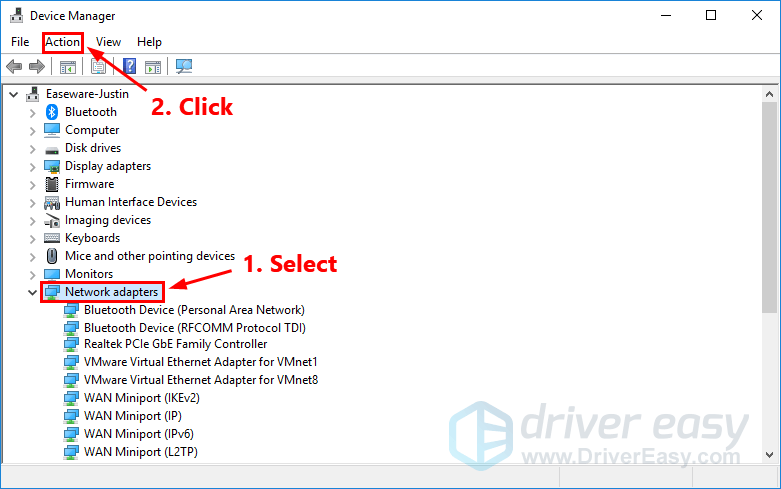
- In Device Manager, select Network adapters. Then click Action.

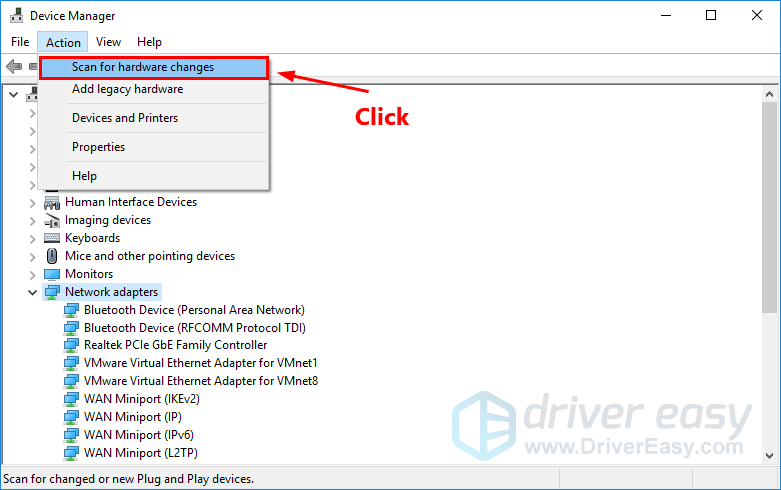
- Click Scan for hardware changes. Then Windows will detect the missing driver for your wireless network adapter and reinstall it automatically.

- Double-click Network adapters. Normally, your wireless network adapter will reappear in the list, which suggests the driver for your wireless network adapter has been reinstalled.

Bonus tip: How to update your network driver automatically
Sometimes, reinstalling the driver for your wireless network adapter may not resolve the Wi-Fi connectivity issues. To fix these issues, you need to update the driver for your wireless network adapter.
If you don’t have the time, patience or computer skills to update your network driver manually, you can, instead, do it automatically with Driver Easy.
You don’t need to know exactly what system your computer is running, you don’t need to risk downloading and installing the wrong driver, and you don’t need to worry about making a mistake when installing. Driver Easy handles it all.
All the drivers in Driver Easy come straight from the manufacturer. They‘re all certified safe and secure.
- Download and install Driver Easy.
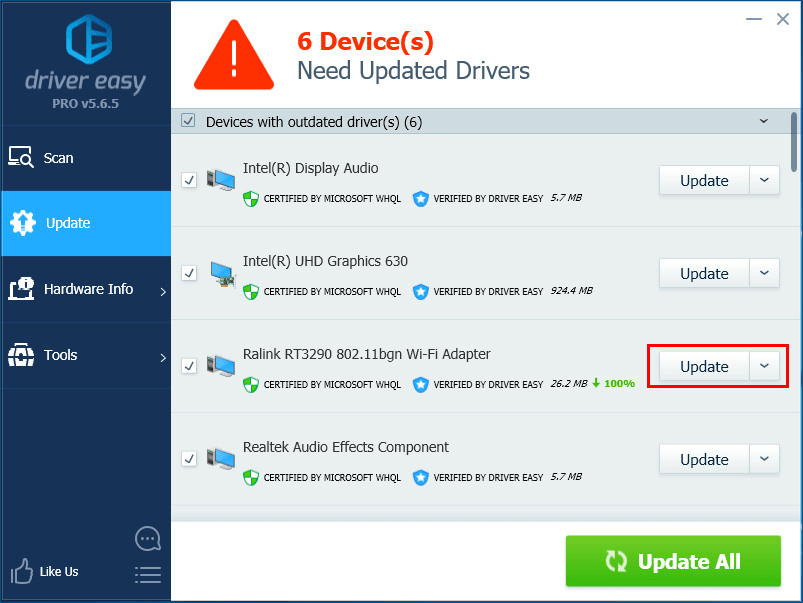
- Run Driver Easy and click the Scan Now button. Driver Easy will then scan your computer and detect any problem drivers.

- Click Update next to your wireless network adapter to automatically download the correct version of its driver, then you can install it manually. Or click Update All to automatically download and install the correct version of all the drivers that are missing or out of date on your system (This requires the Pro version – you’ll be prompted to upgrade when you click Update All. You get full support and a 30-day money back guarantee).


If you need assistance, please contact Driver Easy’s support team at support@drivereasy.com.
If you have any questions or suggestions, please leave us a comment below.
60
60 people found this helpful
При попытке подключиться к одной из доступных Wi-Fi сетей в Windows 10 может появляться ошибка:
Не удается подключиться к этой сети
Can’t connect to this network
Причиной ошибки может быть неправильный пароль, некорректные настройки сетевого профиля WLAN для сохраненной сети (тип шифрования или аутентификации), драйвер Wi-Fi адаптера, измененные настройки точки доступны и т.д. В этой статье мы рассмотрим, как исправить эту ошибку и восстановить Wi-Fi подключение в Windows.
Убедитесь, что вы ввели правильный ключ безопасности (пароль для подключения). Нежелательно использовать в пароле Wi-Fi кириллицу или спец символы.
Самый первый и простой вариант решения проблемы – начните с перезагрузки вашего компьютера и Wi-Fi роутера.
Если предыдущий способ не помог, возможно проблема связана с тем, что изменились настройки Wi-Fi роутера (пароль сети, настройки шифрования) и Windows не может подключиться к вашему роутеру с предыдущими сохраненными настройками в Wi-Fi профиле этой сети. Попробуйте удалить сохраненные настройки беспроводной сети в Windows и переподключиться к точке доступа :
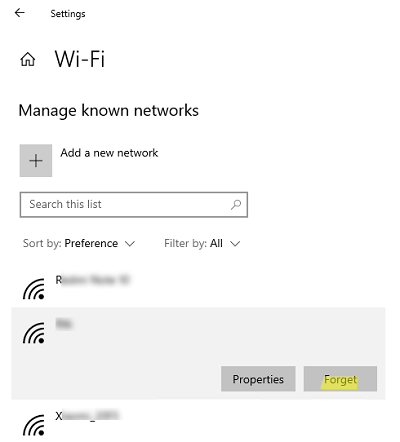
- Перейдите в панель Settings -> Network and Internet -> Wi-Fi -> Manage known networks (или выполните команду быстрого доступа
ms-settings:network-wifi
); - Найдите в списке вашу Wi-Fi сеть и удалите ее (Forget/Забыть);
Можно удалить профиль сети из командной строки:
netsh wlan delete profile name="имя_сети"
- Заново подключитесь к вашей Wi-Fi точке доступа, укажите ключ безопасности сети (пароль для подключения).
Проверьте, что драйвер вашего сетевого адаптера поддерживает типы шифрования и аутентификации, которые разрешены на вашей точке доступа Wi-Fi. Список стандартов и типов шифрования, которые поддерживает ваш Wi-FI драйвер Windows можно вывести с помощью команды:
netsh wlan show all
Например, в моем случае:
Radio types supported : 802.11n 802.11g 802.11b
FIPS 140-2 mode supported : Yes
Authentication and cipher supported in infrastructure mode:
Open None
WPA2-Personal CCMP
Open WEP-40bit
Open WEP-104bit
Open WEP
WPA-Enterprise TKIP
WPA-Personal TKIP
WPA2-Enterprise TKIP
WPA2-Personal TKIP
WPA-Enterprise CCMP
WPA-Personal CCMP
WPA2-Enterprise CCMP
WPA3-Personal CCMP
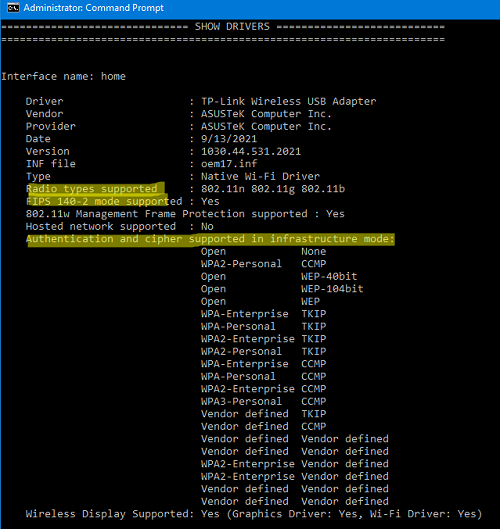
Убедитесь, что эти режимы поддерживаются вашей точкой доступа Wi-Fi (нужно зайти на интерфейс управления вашей точки доступа и проверить настройки безопасности). В некоторых случаях нужно обновить драйвер вашего сетевого адаптера.
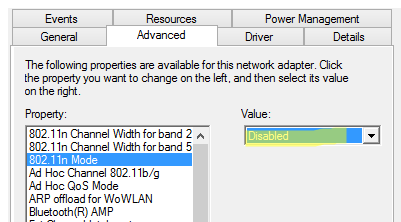
Откройте свойства сетевого драйвера адаптера в Device Manager, перейдите на вкладку Advanced и проверьте, какие режимы разрешены в его настройках. В этом примере режиме 802.11n отключен. Если ваша точка доступа и драйвер адаптера поддерживают его, включите эту опцию.
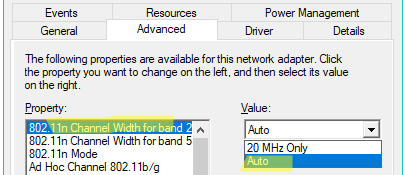
Также попробуйте изменить ширину канала в параметре 802.11n Channel Width for band 2 с
20 MHz
Only на
Auto
.
Удалите/переустановите сетевой драйвер вашего Wi-Fi адаптера (консоль
devmgmt.msc
). Разверните секцию сетевых адаптера, щелкните по вашему Wi-Fi адаптеру и выберите (Удалить устройства/Uninstall device).
При удалении устройства вам будет предложено также удалить драйвер из хранилища драйверов. Включите опцию Delete the driver software for this device и нажмите Uninstall.
После этого выполните обнаружение новых устройств Actions -> Scan for hardware changes и дождитесь, пока Windows обнаружит ваш Wi-Fi адаптер и установит подходящие драйвера.
Это также сбросит текущие настройки вашего Wi-Fi адаптера (полезно, если вы изменяли их вручную).
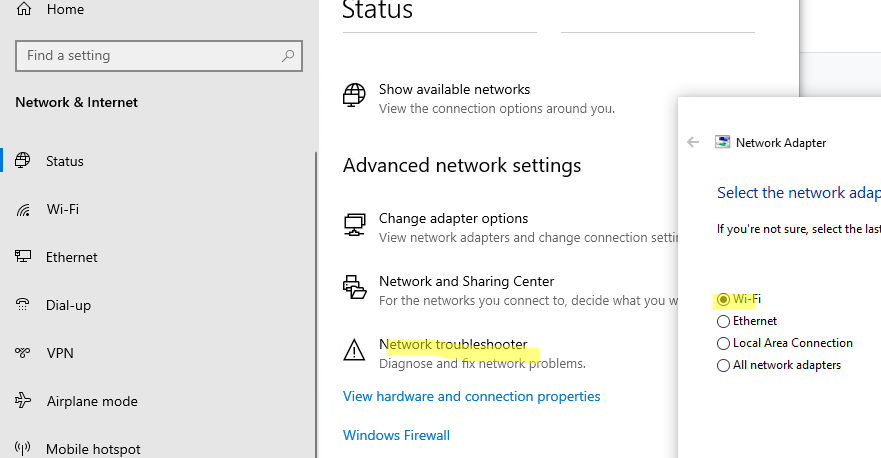
Запустите средство диагностики и устранения неполадок сети Settings -> Network and Internet > Status и нажмите на кнопку Network troubleshooter в секции Advanced network properties (или выполните команду
msdt.exe /id networkdiagnosticsnetworkadapter
). Выберите тип сетевого адаптера Wi-Fi и дождитесь пока мастер найдет и исправит возможные сетевые проблемы.
При появлении ошибки подключения к Wi-Fi сети вы можете найти более подробную информацию о причине ошибки в журнале Event Viewer.
- Откройте консоль Event Viewer (
eventvwr.msc
) и перейдите в раздел Applications and Services Logs -> Microsoft -> Windows -> WLAN-AutoConfig -> Operational; - Проверьте наличие ошибок и предупреждений в этом журнале;
- В моем примере тут нашлось событие EventID 8001 (AcmConnection), со следующим описанием:
Network Adapter: Broadcom 802.11n Network Adapter
Interface GUID: {c8342b50-2894-4d8f-84d7-907fce8e1784}
Connection Mode: Manual connection with a profile
Profile Name: HMNWRK
SSID: HMNWRK
BSS Type: Infrastructure
 Failure Reason:The specific network is not available.
RSSI: 255
Судя по ошибке данная точка доступа Wi-Fi оказалось недоступна (выключена) в момент подключения к ней.
Или еще одна похожая ошибка:
EventID 11006 (MsmSecurity)
WLAN-AutoConfig
Wireless security failed.
Reason: Dynamic key exchange did not succeed within configured time
Здесь похоже, что ваш компьютер не успел обменяться ключами с роутером за определенное время (точка доступа не загрузилась, тормозит, или вне зоны доступа).

Если ничего не помогает, и проблема появляется при подключении к любой Wi-Fi сети (будь то аппаратная точка доступа, или программная Wi-Fi точка доступа на Windows, Linux или Android), очистите таблицу маршрутизации и кэш DNS, выполните полный сброс сетевых настроек в Windows :
route -f
ipconfig /flushdns
netsh int ip reset
netsh int ipv4 reset
netsh int tcp reset
netsh winsock reset
Перезагрузите компьютер и подключитесь к своей сети. Ошибка
“Windows не удалось подключиться к Wi-Fi
” должна исчезнуть.
Несколько дополнительных советов по решению проблемы:
- Слабый и нестабильный сигнал Wi-Fi сети может вызывать эту ошибку. Проверьте уровень сигнала Wi-Fi и наименее загруженные каналы с помощью PowerShell. Попробует переключить вашу точку доступа на один из свободных номеров каналов;
- Измените имя (SSID) Wi-Fi сети на точке доступа;
- Если в настройках роутера жестко задан режима работы беспроводной сети (802.11 b/g/n). попробуйте выбрать тот, режим, который поддерживается драйвером Wi-FI в Windows или переключиться в режим Auto. Например, некоторые старые модели Wi-Fi адаптеров не поддерживают более современный режим 802.11n (работают только в 802.11g);
- Проверьте, не включена ли в настройках Wi-Fi роутера блокировка клиентов по MAC адресу