
Все способы:
- Решение проблем с запуском Скайпа
- Причина 1: Устаревшая версия программы
- Причина 2: Проблемы с интернет-соединением
- Причина 3: Работа антивируса и/или брандмауэра
- Причина 4: Вирусное заражение
- Причина 5: Технические работы
- Дополнительно: Сброс настроек и переустановка программы
- Заключение
- Вопросы и ответы: 3
Несмотря на то что Skype давно потерпел поражение в битве с мессенджерами, он все еще востребован среди пользователей. К сожалению, далеко не всегда эта программа работает стабильно, особенно в последнее время. Связано это не в последнюю очередь с частыми переработками и обновлениями, а на Windows 10 эта проблема усиливается не менее редкими апдейтами операционной системы, но обо всем по порядку.
Решение проблем с запуском Скайпа
Причин, по которым Skype может не запускаться на Windows 10, не так много, и чаще всего они сводятся к ошибкам системы или действиям пользователя – неумелым или заведомо неправильным, в данном случае уже не столь важно. Наша с вами сегодняшняя задача – заставить программу запускаться и нормально работать, а потому приступим.
Причина 1: Устаревшая версия программы
Microsoft активно навязывают пользователям обновление Skype, и если ранее их можно было буквально в несколько кликов отключить, то сейчас все делается значительно сложнее. Кроме того, версии 7+, которые так полюбились многим пользователям этой программы, более не поддерживаются. Проблемы с запуском как на Windows 10, так и на предшествующих ей, а значит, уже не актуальных версиях операционной системы, в первую очередь возникают как раз из-за морального устаревания – Скайп открывается, но все что можно сделать в приветственном окне, это установить обновление или закрыть его. То есть, выбора нет, почти…

Если вы готовы обновиться, обязательно сделайте это. Если же такого желания нет, установите старую, но пока что работающую версию Skype, а затем запретите ей обновляться. О том, как делается первое и второе, мы ранее писали в отдельных статьях.
Подробнее:
Как отключить автоматическое обновление Скайпа
Установка старой версии Skype на компьютер
Дополнительно: Скайп может не запускаться еще и по той причине, что в этот момент он устанавливает обновление. В таком случае остается только подождать, пока данная процедура будет завершена.
Причина 2: Проблемы с интернет-соединением
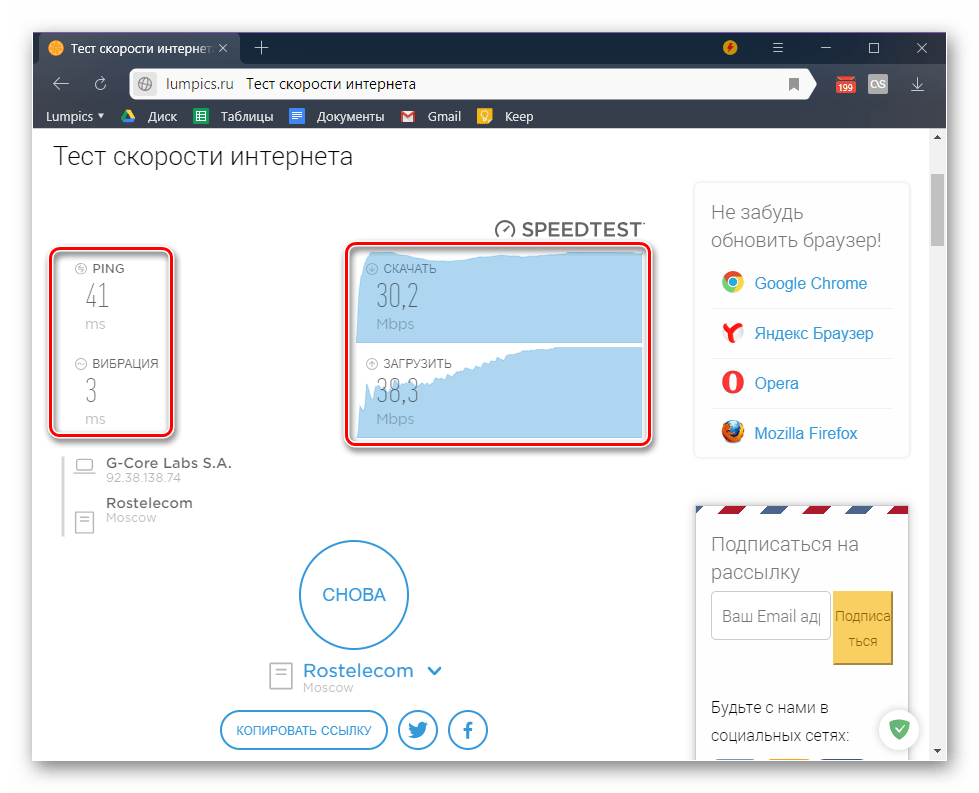
Ни для кого не секрет, что Skype и ему подобные программы работают только при наличии активного подключения к сети. Если на компьютере отсутствует интернет или его скорость слишком низкая, Скайп может не только не выполнять свою основную функцию, но и вовсе отказываться запускаться. Поэтому проверить как настройки подключения, так и непосредственно скорость передачи данных, точно не будет лишним, особенно, если вы не уверены в том, что с ними все в полном порядке.
Подробнее:
Как подключить компьютер к интернету
Просмотр скорости интернета в Виндовс 10
Программы для проверки скорости интернет-соединения
В старых версиях Скайп можно столкнуться и с еще одной проблемой, напрямую связанной с интернет-соединением – он запускается, но не работает, выдавая ошибку «Не удалось установить подключение». Причина в данном случае заключается в том, что зарезервированный программой порт занят другим приложением. Поэтому если вы все еще пользуетесь Skype 7+, но рассмотренная выше причина вас не коснулась, стоит попробовать изменить используемый порт. Делается это следующим образом:

- На верхней панели откройте вкладку «Инструменты» и выберите пункт «Настройки».
- Разверните в боковом меню раздел «Дополнительно» и откройте вкладку «Соединение».
- Напротив пункта «Использовать порт» введите номер заведомо свободного порта, установите галочку в расположенный ниже чекбокс «Для дополнительных входящих соединений…» и нажмите по кнопке «Сохранить».
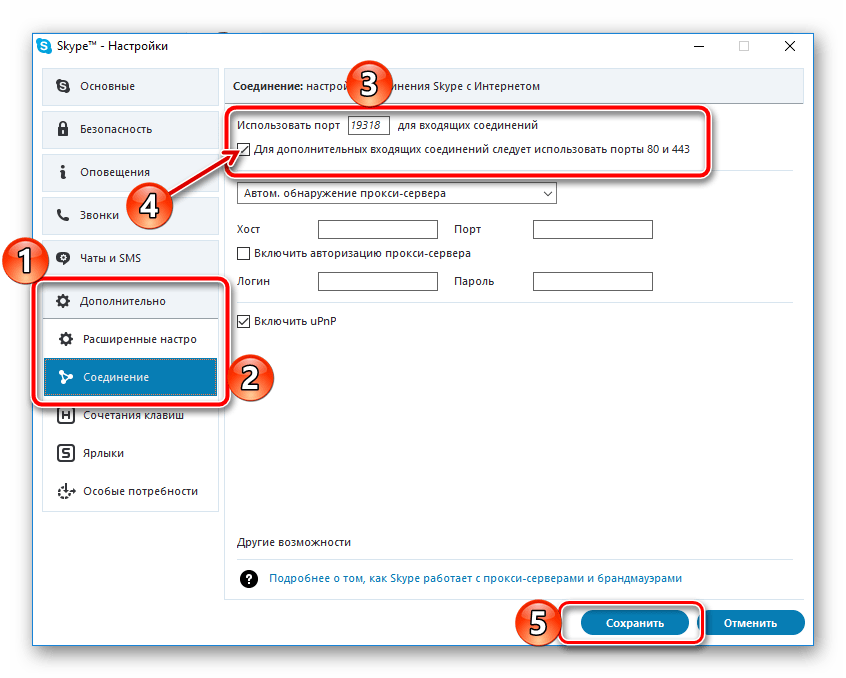
Перезапустите программу и проверьте ее работоспособность. Если проблема по-прежнему не будет устранена, повторно выполните описанные выше действия, но в этот раз укажите в настройках Скайпа изначально заданный порт, после чего переходите далее.
Причина 3: Работа антивируса и/или брандмауэра
Брандмауэр, встроенный в большинство современных антивирусов, время от времени ошибается, принимая за вирусное ПО абсолютно безопасные приложения и обмен данными по сети, которые они инициируют. Это же характерно и для встроенного в Windows 10 Защитника. Поэтому вполне возможно, не запускается Skype как раз из-за того, что стандартный или сторонний антивирус принял его за угрозу, тем самым заблокировав программе доступ к интернету, а это, в свою очередь, мешает ей запуститься.
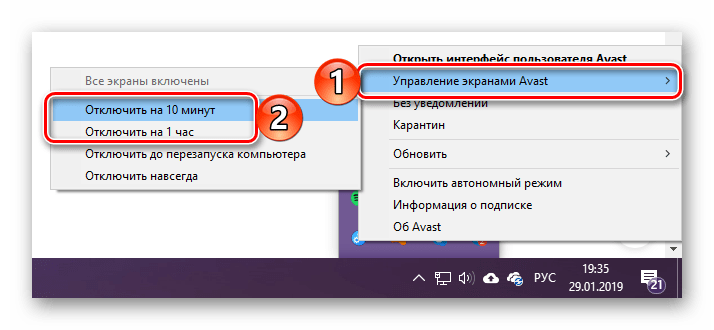
Решение здесь простое – для начала временно отключите защитное ПО и проверьте, запустится ли Скайп и будет ли он нормально работать. Если да – наша теория подтверждена, осталось только добавить программу в исключения. О том, как это делается, рассказывается в отдельных статьях на нашем сайте.
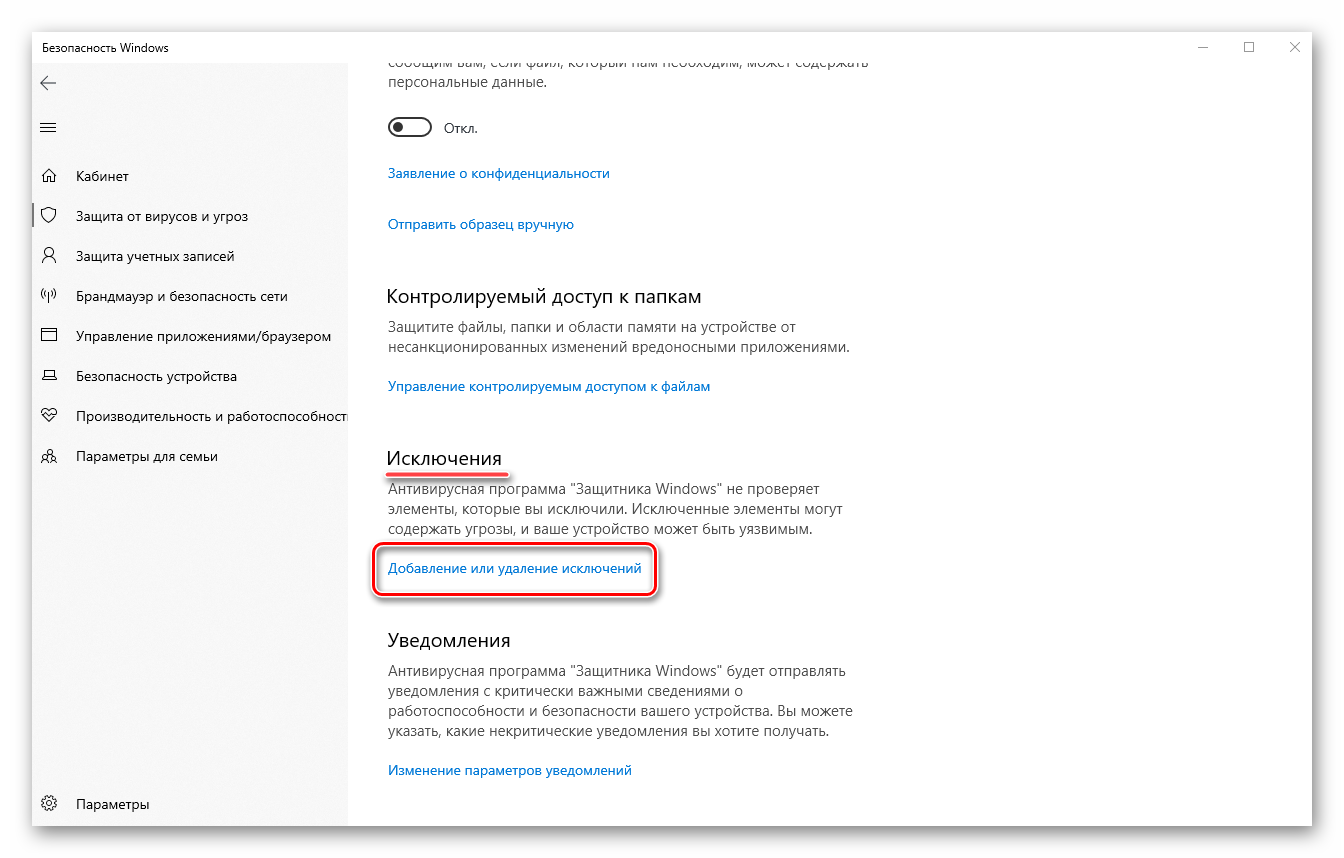
Подробнее:
Временное отключение антивируса
Добавление файлов и приложений в исключения антивирусного ПО
Причина 4: Вирусное заражение
Вполне возможно, что рассматриваемую нами проблему вызвала ситуация, противоположная вышеописанной – антивирус не перестарался, а наоборот, недоработал, упустил вирус. К сожалению, вредоносное ПО иногда проникает даже в самые защищенные системы. Узнать, по этой ли причине не запускается Скайп, можно только после проверки Windows на вирусы и их устранения в случае обнаружения. Сделать это вам помогут наши подробные руководства, ссылки на которые представлены ниже.
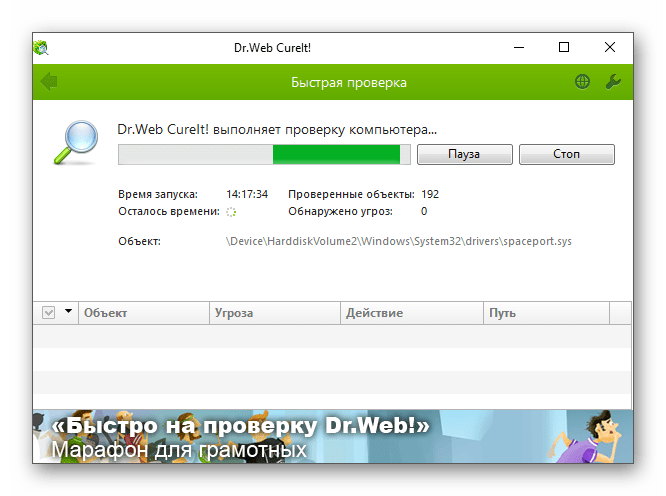
Подробнее:
Проверка операционной системы на вирусы
Борьба с компьютерными вирусами
Причина 5: Технические работы
Если ни один из рассмотренных нами выше вариантов устранения проблемы с запуском Skype не помог, можно смело предположить, что это временный сбой, связанный с проведением технических работ на серверах разработчика. Правда, так это лишь в том случае, если отсутствие работоспособности программы наблюдается не дольше нескольких часов. Все что можно предпринять в таком случае – просто подождать. При желании вы также можете самостоятельно обратиться в службу технической поддержки и попытаться узнать, на чьей стороне проблема, но для этого придется подробно описать ее суть.

Страница техподдержки Скайп
Дополнительно: Сброс настроек и переустановка программы
Крайне редко, но все же бывает так, что Skype не запускается даже после того, как были устранены все причины проблемы и точно известно, что дело не в технических работах. В таком случае остается еще два решения — сброс настроек программы и, если даже это не поможет, ее переустановка начисто. Как о первом, так и о втором, мы ранее рассказывали в отдельных материалах, с которыми и рекомендуем ознакомиться. Но забегая вперед отметим, что Скайп восьмой версии, на которую данная статья ориентирована в большей степени, лучше сразу переустанавливать — сброс вряд ли поможет восстановить его работоспособность.
Подробнее:
Как сбросить параметры Skype
Процедура деинсталляции Скайпа с компьютера
Заключение
Причин, по которым Skype может не запускаться на Windows 10, довольно много, но все они имеют временный характер и устраняются довольно просто. Если же вы продолжаете пользоваться старой версией этой программы – обязательно обновитесь.
Наша группа в TelegramПолезные советы и помощь

Не так давно вышла новая версия Skype 8.2.5 , которая перестала работать на windows 10. Удаление/установка, чистка папок результата не дали. Судя по программе, она пыталась подключиться к серверу и зависала на этом месте. Не открывалось даже меню. Как временное решение, был установлен Skype 8.2.3. Который работал, но каждый день просил обновиться.
Новый скайп пытается подключиться к магазину приложений windows 10.
А по скольку я заблокировал телеметрию windows 10 и подключение к сомнительным серверам, то магазин windows 10 не открывался и скайп не мог найти нужные сервера для подключения.
Как решение: проверяем чтобы в hosts файле по адресу c:\Windows\System32\drivers\etc\ не было указано никаких серверов windows и Microsoft.
Если вы пользовались программами для отключения телеметрии и слежения, то сервера Microsoft в этом списке присутствовать будут.
Если записи есть, удаляем их, сохраняем файл, пробуем запустить скайп. Он должен соединиться и заработать.
После этого в файл hosts можно снова вернуть удалённые записи с серверами.
Просмотров: 27 537
Table of contents
- Most Frequent Skype Problems
- Common Causes of Skype Connection Problems
- Quick Fixes for Skype Connection Issues
- Fix #1: Close and Restart Skype
- Fix #2: Restart Your Computer
- Fix #3: Check Skype Heartbeat
- Fix #4: Check for Skype Updates
- Fix #5: Check for Windows Updates
- Fix #6: Check Your Computer for Malware Issues
- Fix #7: Repair Missing or Corrupted System Files
- Fix #8: Verify Audio and Video Settings in Skype
- What to Do If Skype Keeps Not Responding on Windows 10
- Fix #1: Declutter Your Computer
- Fix #2: Run Skype as Administrator
- Fix #3: Disable Unnecessary Add-ons or Plugins
- Fix #4: Update Device Drivers
- Fix #5: Clear Skype Cache and Cookies
- Fix #6: Repair Skype Installation
- Fix #7: Perform a Clean Reinstall
- How to Avoid Skype Not Working in Windows 10
- In Summary
- FAQ
Are you constantly facing issues with Skype not responding on your Windows 10 device? Say goodbye to frustrating Skype connection problems and regain smooth and uninterrupted communication with friends, family, and colleagues.
In this article, we’ll guide you through what to do when Skype stops working properly, so you can quickly get back to chatting, conferencing, or collaborating without any disruptions.
Let’s dive in and get Skype back on track!
“‘Problems are not stop signs, they are guidelines’”
Most Frequent Skype Problems
Over, 1.3 mln people use Skype, according to Statista. But this doesn’t mean the app is without any faults. From time to time, you may run into a bug on Skype.
The most notorious Skype isn’t working issues in Windows 10 are:
- The app cannot be launched. Or you cannot log in to it: In a nutshell, your Skype won’t open or work.
- Skype crashes on startup , hangs or freezes: Your Skype is acting weird and trying your patience.
- Skype connecting problems: You can’t connect to Skype. Yep, it’s about the creepy ‘Sorry, we couldn’t connect to Skype’ and ‘Skype is currently unavailable’ messages.
- Audio / Video issues: You cannot see each other. Or the sound does not come through. What a mess!
- Problems with screen sharing or video conferencing features. Just when you were finally ready to unveil that PPT.
- Compatibility issues with other software or conflicting programs.
- Slow performance or excessive resource usage by the Skype application. Sometimes Skype can get greedy.
We hope our troubleshooting tips will help you fix all your Skype problems. So let’s start!
Also read: Skype camera not working: What to check first?
Common Causes of Skype Connection Problems
Skype Internet connection problems can happen for a range of reasons.
- Unstable or slow internet connections
- Firewall or antivirus settings
- Outdated Skype version
- Network restrictions: Some networks, such as public or workplace networks, may have restrictions in place that limit or block Skype’s functionality.
- Hardware conflicts: Incompatible or malfunctioning audio devices, webcams, or microphones can interfere with Skype’s connection and lead to issues during calls.
- Server maintenance or downtime: Skype’s servers may occasionally undergo maintenance or experience downtime, resulting in temporary connection problems.
- Third-party software interference: Other applications or services running on your computer may interfere with Skype’s connection, causing disruptions or delays.
- Overloaded system resources: If your computer is running multiple resource-intensive applications alongside Skype, it may struggle to maintain a stable connection.
- Geographic restrictions: In certain regions or countries, Skype may be subject to restrictions or limitations that can affect its connectivity.
Quick fix: Clean Up Windows 10: How to Uninstall Programs and Delete Unnecessary Files
Now that we know what causes Skype connection problems, let’s continue with a step-by-step guide on how to fix them
Quick Fixes for Skype Connection Issues
When you see Skype stuck at “connecting…” , here are a few things you can try.
Fix #1: Close and Restart Skype
If Skype keeps not responding, start with a simple restart. Close the Skype application and relaunch it to see if the issue resolves itself.
Fix #2: Restart Your Computer
A simple restart can help refresh your system and resolve any temporary glitches affecting Skype.
Fix #3: Check Skype Heartbeat
If your Skype won’t connect to the Internet, the best place to start is with a quick and easy built-in solution that comes with your Skype. Here’s how to use a Skype troubleshooter to solve the problem:
Go to Skype > Preferences > Help & Feedback > Skype Status
A new web page will open. There you will find announcements regarding current Skype problems.

Fix #4: Check for Skype Updates
Ensure that you have the latest version of Skype installed:
- Look for the Help option in the top menu bar of the Skype window.
- In the Help menu, click on the Check for Updates or Update Skype option.
- If an update is available, follow the on-screen prompts to download and install the latest version of Skype.
- Allow the update to complete its installation.
- After the update is successfully installed, close and relaunch the Skype application to start using the updated version.
Fix #5: Check for Windows Updates
Your system might be longing for updates, which can lead to uncontrollable or inadequate Skype:
Windows key +I -> Update & security -> Check for updates -> Windows will search for and download available apps automatically
Reboot your computer and check if your Skype is OK now.
Fix #6: Check Your Computer for Malware Issues
If your Skype keeps not responding and is being too confrontational, this might mean that malicious software is at work. Scan your computer and remove all the nefarious invaders as soon as possible. It is your duty to prevent them from leaving a trail of destruction in their wake.
Also read: How to Remove Virus and Other Malware from Windows
Fix #7: Repair Missing or Corrupted System Files
Sometimes, Skype keeps not responding because of corrupted or missing system files. To resolve this issue, try running the System File Checker tool:
- Start -> Enter
Command Prompt-> right-click Command Prompt -> select Run as administrator - Enter
DISM.exe /Online /Cleanup-image /Restorehealth - Enter
sfc /scannow-> Wait for the system scan to finish -> Reboot your Computer
Fix this issue quickly
You can try using a safe and totally free tool developed by the Auslogics team of experts.
A few simple steps to troubleshoot the issue:
Download the tiny Auslogics TroubleShooter tool.
Run the application (no installation is needed).
The app will check for the issue mentioned in the article. When the scan is done, check that this is the issue you were looking to solve and click ‘Apply now’ to apply the recommended fix.
You can use the app to troubleshoot other malfunctions for free by simply typing in a brief description of the issue your PC is experiencing. Or you can scan your PC for performance issues using the My Scanner tab.
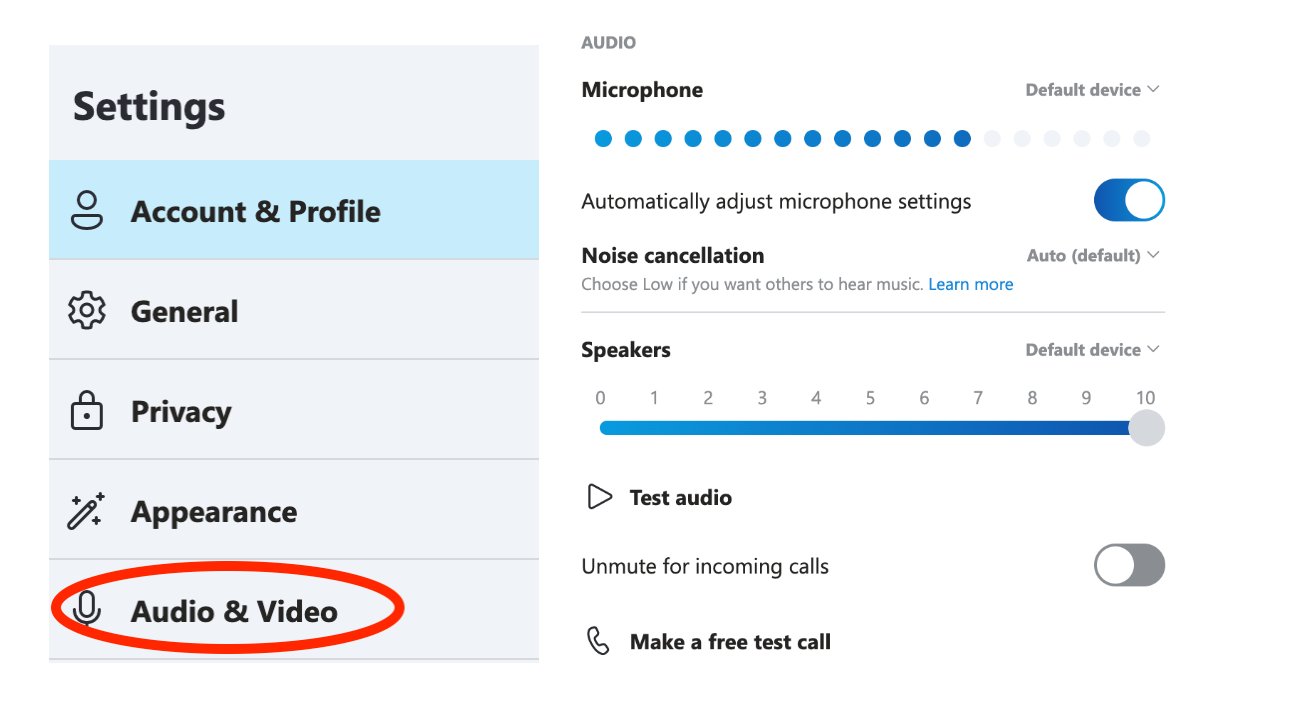
Fix #8: Verify Audio and Video Settings in Skype
Open the Skype application on your computer.
- Click on the Settings or Options or Preferences menu, typically shown by a gear icon in the top-right corner of the Skype window.
- Look for an Audio or Audio & Video option in the settings menu. Click on it to access audio settings.
- Ensure the correct audio device is selected for both microphone and speakers. If necessary, use the drop-down menus to choose the appropriate devices.
- To verify audio settings, use the provided option to test your microphone and speakers. Speak into the microphone, and if the audio bar moves, it indicates that the microphone is working correctly. Adjust the volume levels as needed.
- If you need to adjust video settings, look for a Video or Audio & Video option in the settings menu. Click on it to access video settings.
- Confirm that the correct video device (webcam) is selected. Use the drop-down menu to choose the desired webcam if you have multiple devices connected.
- To verify video settings, Skype usually provides an option to test your video. Click on it to open a preview window and check if the video feed from your webcam is displayed correctly.
- Make any necessary adjustments to the audio and video settings, such as volume levels, video resolution, or aspect ratio, based on your preferences and requirements.
- After verifying and adjusting the settings, click on the Save or Apply button to save the changes.
What to Do If Skype Keeps Not Responding on Windows 10
Why does my Skype keep not responding? If this is what’s on your mind, here are several things you can try.
Fix #1: Declutter Your Computer
Keep in mind that PC junk as well as corrupt keys and invalid entries from the Windows registry can cause the Skype app to crash.
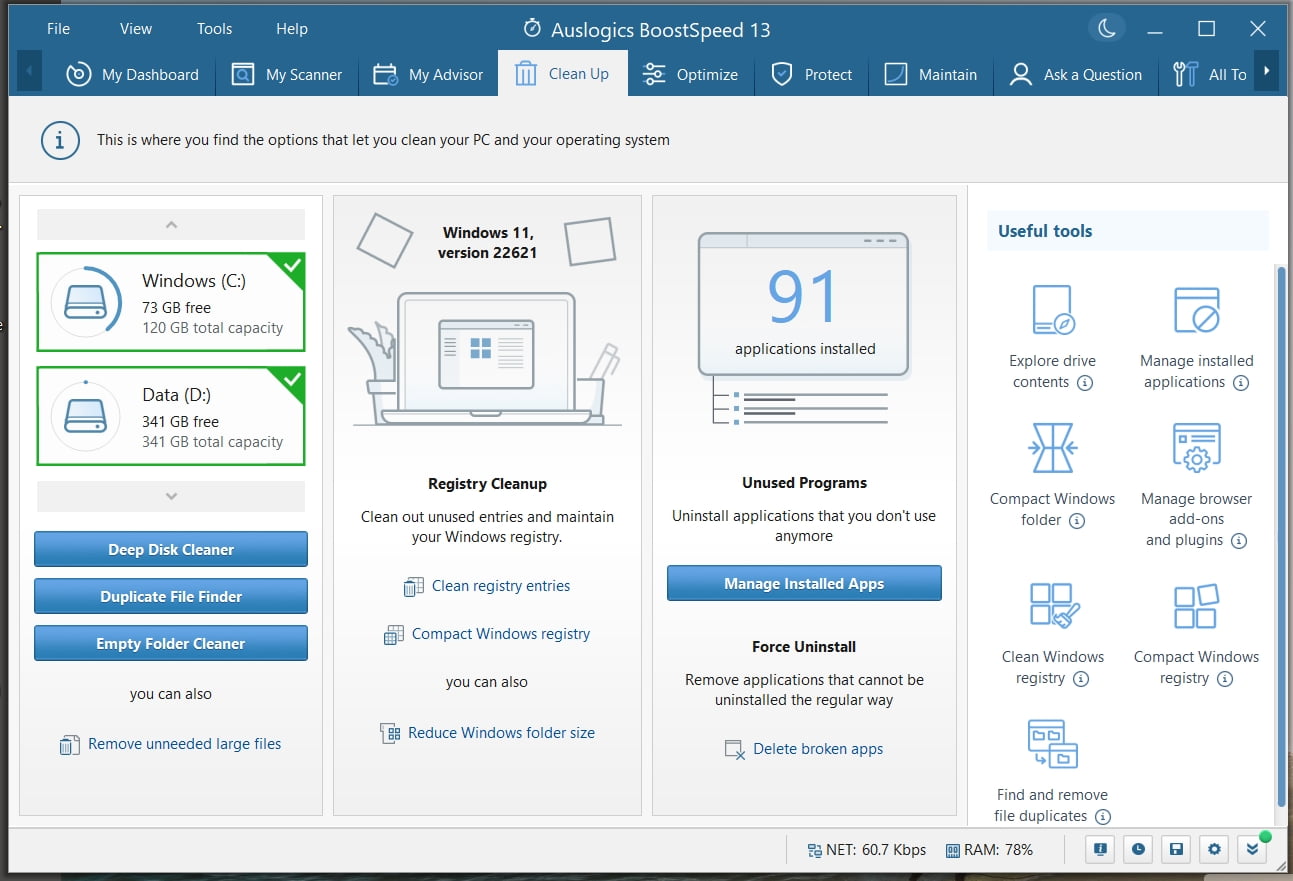
In order to avoid turbulent Skype, you should keep your Windows 10 neat and tidy. To achieve this, we recommend you to declutter your computer on a regular basis. Using a special tool for this purpose, for example, Auslogics BoostSpeed 13, can save you a lot of time and give your computer a major boost.
Fix #2: Run Skype as Administrator
- Right-click on the Skype shortcut or executable file.
- Then, select Run as administrator to give it elevated privileges.
This may help overcome any permission-related issues.
Fix #3: Disable Unnecessary Add-ons or Plugins
In Skype’s settings, disable any unnecessary add-ons or plugins that may be causing conflicts or performance issues:
- Click on the Settings or Options menu.
- Look for an Add-ons or Plugins.
- In the add-ons or plugins settings, you’ll find a list of installed add-ons or plugins.
- Take a moment to review the list.
- Identify any add-ons or plugins that you consider unnecessary or that may be causing conflicts or performance issues.
- Toggle the associated switch or button to disable those add-ons or plugins.
- After disabling the unnecessary add-ons or plugins, click on the Save or Apply button to save the changes.
Fix #4: Update Device Drivers
Ensure that your computer’s audio and video drivers are up to date. Visit the manufacturer’s website or use a reliable driver update tool to check for and install the latest drivers.
Here are the details: [EASY GUIDE] How to Update Device Drivers on a Windows 10 PC?
Fix #5: Clear Skype Cache and Cookies
- Ensure that Skype is completely closed.
- Click on the folder icon in the taskbar or press the
Windows key + Eon your keyboard to open File Explorer. - In the address bar at the top of the File Explorer window, type
%appdata%and pressEnter. This will take you to the AppData folder. - Within the AppData folder, locate and open the folder named Skype.
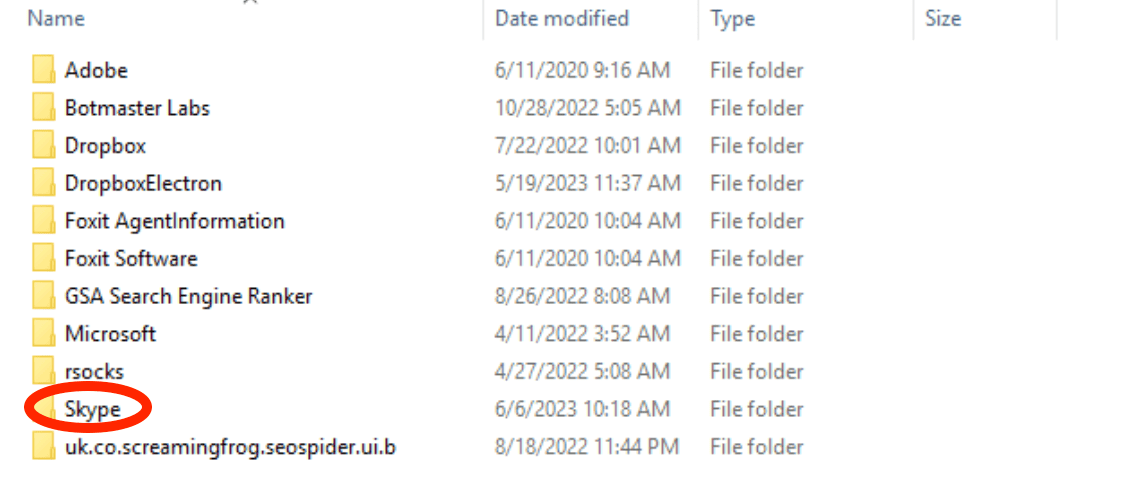
- Within the Skype folder, find and delete the folder named Cache. You can either right-click on the folder and select Delete or simply press the
Deletekey on your keyboard. - After deleting the cache folder, right-click on the Recycle Bin icon on your desktop and choose Empty Recycle Bin to permanently remove the folder from your computer.
- Once the cache has been cleared, relaunch Skype to start a fresh session with cleared cache.
- A prompt may appear asking for confirmation to clear the cache and cookies. Read the prompt carefully and click OK or Confirm to proceed.
- Allow the clearing process to complete. This may take a few moments, depending on the amount of data being cleared.
- After the cache and cookies have been cleared, close the settings menu and exit Skype completely.
- Open Skype again to start a fresh session with cleared cache and cookies.
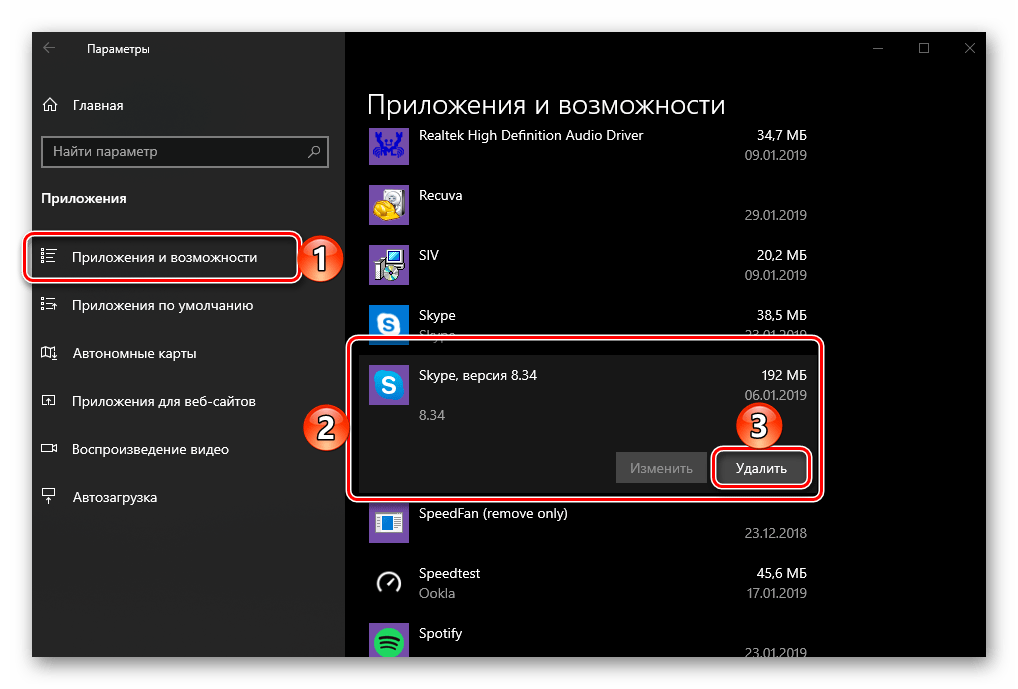
Fix #6: Repair Skype Installation
Windows 10 lets you detect and repair potential Skype issues automatically. Here’s how:
- Open the Apps & Features settings in Windows 10.
- Locate Skype.
- Select Modify or Repair to fix any corrupted files associated with the application.
Fix #7: Perform a Clean Reinstall
If your Skype still refuses to work properly, reinstalling it might resolve the issue.
First, you should completely uninstall the app:
- Start menu -> Control Panel -> Right-click on Skype-> Uninstall
- Follow the instructions provided by the uninstallation wizard
or
Windows key + R-> Typeappwiz.cpl->Enter-> Find Skype -> Right-click on it -> Uninstall- Follow the instructions provided by the uninstallation wizard
Make sure there are no traces of the old Skype version left on your computer: This Computer -> C Drive -> App Data -> Roaming -> Skype ->
Delete the contents of the folder
After uninstalling Skype, reboot your computer.
Now it is time to reinstall Skype:
- Go to the Microsoft Store.
- Search for the latest version of Skype.
- Make sure it is compatible with your Windows 10.
- Download and install the app.
- You can also find the latest version of Skype on its official website.
How to Avoid Skype Not Working in Windows 10
If your Skype keeps not responding systematically, try keeping to these best practices:
- Keep Skype updated: Regularly check for updates and ensure you have the latest version of Skype installed on your Windows 10 computer. Updates often include bug fixes, security enhancements, and improved stability.
- Maintain a stable internet connection: A reliable and stable internet connection is crucial for smooth Skype usage.
Also read: Boost Internet on Your PC: Tips on How to Speed Up Your Internet Connection
- Check system requirements: Verify that your Windows 10 computer meets the minimum system requirements for Skype. Outdated hardware or incompatible operating systems may cause issues with Skype’s functionality.
- Keep Windows 10 updated: To make Skype work better on your computer, it’s a good idea to update Windows 10 regularly. Updates fix problems, make Skype more secure, and improve how it works with your computer. By keeping Windows 10 up to date, Skype will run smoother and you’ll have a better experience using it.
- Disable conflicting programs: Certain programs or applications may conflict with Skype and cause issues. Temporarily disable or exit any unnecessary background programs or applications while using Skype to minimize potential conflicts.
- Configure firewall and antivirus settings: Ensure that your firewall or antivirus software is not blocking Skype’s connection. Configure the settings to allow Skype access to the internet and necessary ports.
- Verify audio and video settings: Check that your audio and video devices are correctly selected and functioning in Skype’s settings. Verify microphone and speaker connections, adjust volume levels, and ensure video devices are properly connected.
- Clear Skype cache and app data: Periodically clear Skype’s cache and app data to remove temporary files that may cause issues.
Also Read: How to Get More Storage on PC – Clean Up Your PC to Run Faster
- Use reputable security software: Install and regularly update reputable antivirus and anti-malware software on your Windows 10 computer. This helps protect against potential security threats that could affect Skype’s performance.
Fix this issue quickly
You can try using a safe and totally free tool developed by the Auslogics team of experts.
A few simple steps to troubleshoot the issue:
Download the tiny Auslogics TroubleShooter tool.
Run the application (no installation is needed).
The app will check for the issue mentioned in the article. When the scan is done, check that this is the issue you were looking to solve and click ‘Apply now’ to apply the recommended fix.
You can use the app to troubleshoot other malfunctions for free by simply typing in a brief description of the issue your PC is experiencing. Or you can scan your PC for performance issues using the My Scanner tab.
In Summary
We have explored various solutions to fix the issue of “Skype keeps not responding” in Windows 10. Remember to keep your system and Skype up to date, verify audio and video settings and maintain a stable internet connection.
With these fixes in place, you can overcome connection problems and effectively use Skype on your Windows 10 device.
FAQ
If you’re experiencing frequent disconnections on Skype, it could be due to a few reasons. These include a weak internet connection, using an outdated version of Skype, conflicting settings with your firewall or antivirus, or issues with other programs or devices. To fix this, make sure you have a stable internet connection, update Skype to the latest version, check your firewall and antivirus settings, and disable any conflicting programs. Additionally, try restarting your computer and modem/router.
- Close Skype.
- Press
Windows key + Rand enter%appdata%\Skype. - Delete the Cache folder.
- Empty the Recycle Bin.
- Close Skype.
- Uninstall Skype from the Control Panel.
- Download and install the desired previous version of Skype.
- Disable automatic updates in Skype settings.
The problem of Skype not opening or responding on a Windows computer is usually reported after an Update. However, this problem can also occur at any other time, while you are trying to make an Audio or Video call using Skype.
If this problem is not related to an update, it could be occurring due to the Skype App being blocked, lacking the permission to access the camera and microphone on your computer and other reasons.
Depending on the reason, you should be able to fix the problem of Skype not opening or responding on your computer using the following troubleshooting steps.
1. Allow Apps to Access Microphone & Camera
First make sure that Apps on your computer are allowed to access Microphone and Camera.
Advertisement
1. Go to Settings > Privacy > Camera > enable Allow Apps to access your Camera option in the right-pane.

2. Next, select Microphone in the left-pane and enable Allow Apps to access Camera hardware option.
2. Allow Skype to Access Webcam & Microphone
Next, make sure that Skype has the permission to access both Camera and Microphone on your computer.
1. Go to Settings > Privacy > select Camera in the left-pane. In the right-pane, scroll down to “Choose which apps can access your camera” section and move the Slider next to Camera to ON position.
2. On the same screen, scroll down further and move the slider next to Skype to ON position.

3. Next, select Microphone in the left-pane. In the right-pane, scroll down to “Allow Apps to Access your Microphone” section and move the toggle next to Skype to ON position.
Restart your computer and see if Skype is now working.
3. Repair Skype App
Sometimes, the Skype App can become corrupted and this can be fixed by using the Repair App option as available in Windows.
1. Go to Settings > Apps > click on Apps & Features in the left pane. In the right-pane, scroll down and click on Skype > Advanced options.

Advertisement
2. On the next screen, scroll down and click on the Repair button.

Restart your computer and see if Skype is now working on your computer.
4. Reset Skype
If the repair option did not work, you can Reset Skype App. This will basically remove and reinstall the Skype on your computer.
1. Go to Settings > Apps > click on Apps & Features in the left pane. In the right-pane, scroll down and click on Skype > Advanced options.
2. On the next screen, click on the Reset button.

3. On the confirmation pop-up, click on Reset to confirm.
Restart your computer and see if Skype is now working on your computer.
5. Check Firewall Blocking
It is possible that Windows Defender Firewall or Firewall of the Antivirus software program installed on your computer might be blocking Skype.
You can unblock Skype in Windows Defender Firewall using steps provided in this guide: How to Allow Apps Through Firewall in Windows 10/11.
If you are using Norton or any other Antivirus program, you will have to go into Firewall Settings of the Antivirus Program to unblock Skype.
Если вы видите это сообщение, значит, произошла проблема с загрузкой файлов в стилей (CSS) нашего сайта. Попробуйте сбросить кэш браузера (Ctrl+F5).
Если это не поможет, а вы находитесь в регионе, где возможны ограничения интернет-трафика с российских серверов — воспользуйтесь VPN.
|
Этот Windows 10 уже достал. Мало того, что установился вопреки моему запрету, он еще удалил часть моих программ (типа они несовместимы с ним), а теперь еще проблемы со Скайпом. Вроде работал нормально, а теперь не запускается с ярлыка совсем. Несколько раз удаляла и переустанавливала. Начинается установка и не завершается, заканчивается на словах «это может занять несколько минут», и все исчезает. По советам из ютуба пробовала вводить в Свойствах ярлыка кодовую программу /legacylogin, с пробелом и без, бесполезно. Системная функция устранения проблем с совместимостью тоже не помогла. В одном ролике что-то про интегрированную видеокарту было, но рекомендации выполнить не получилось, так как при клике правой кнопкой по экрану появляется совсем не то, что в видео. Что еще можно сделать? Может отказаться от обновлений? Если да, то как? Была такая же проблема, мучился неделю, пока не настроил браузер Microsoft Egle, заходите в ПАРАМЕТРЫ-СЕТЬ — СВОЙСТВА БРАУЗЕРА-ПОДКЛЮЧЕНИЕ У меня есть два варианта : Первый — у меня два винта, на одном установил ХР и когда нужен скайп (или другие приложения не совместимые с Win-10) подключаюсь с этого винта и плевать после этого на Бил Гейтса, который хочет продать на один комп — 10 раз свою Винду. Второй — общаюсь с друзьями через службу видеобщения почты gmail.com — отличный и абсолютно бесплатный заменитель Скайпа (кстати, и трафик жрет поменьше ). natat 8 лет назад Переустановите систему на семёрку и не мучайтесь с сырой десятой программой. С этой десяткой много чего не работает. Года через два,если есть желание,вернётесь. Никар 8 лет назад Способ 1. Не работает Скайп, сбрасываем его настройки, удаляя конфигурационный файл.
«Пуск» — «Выполнить» — копируем в открывшееся окно текст %appdata%\skype и жмем «Enter». В открывшейся папке нужно найти и удалить файл shared.xml 
Если данное действие не поможет, Способ 2. Удалив текущий профиль, сбрасываем настройки Скайпа 1.Нажимаем комбинацию клавиши Windows+R, после чего в окно вводим %appdata% 
Переименовываем папку Skype например в Skype1 либо вообще её удаляем. 
Знаете ответ? |