
Video chat on Skype is very interesting and useful. However, experiencing a malfunctioning camera while using Skype on Windows PC or Android or iPhone can disrupt video calls and virtual interactions. This guide will list the reasons that cause Skype video not working issue and the solutions to troubleshoot the same on your Windows 10 PC.

Table of Contents
Here are some common reasons that cause this issue:
- Camera is not properly connected or some other app is using your camera
- Network connection is not stable
- Video call settings on Skype are not appropriate
- Webcam drivers are outdated
- Outdated Skype or DirectX
Method 1: Basic Troubleshooting Methods
1. Clean Camera/Webcam – If you see a black webcam on your Skype, this may be because something is covering your camera either a cloth or dust.
- Check if your inbuilt camera or web camera is filled with something like dust, dirt, and even cover.
- Take a clean microfiber cloth and clean your camera. Make sure you do not damage it. Check if the camera works on Skype.

2. Restart PC – Restarting your computer will resolve many complicated issues and if Skype camera not working Windows 10, reboot your computer as instructed below.
1. Press the Windows + D keys together to go to the Desktop.
2. Then, press the Alt + F4 keys simultaneously.
3. Now, select the Restart option and hit Enter key as shown.

3. Check Skype Server Status – If your Skype server is out of the network, you must face Skype video not working. If you are facing the same, check the Skype server status as instructed below.
1. Visit the official Skype Status page.
2. Now, ensure you get a Normal service message.

3. If you receive something else, you have no other options than to wait.
4. Check Internet Connection – Make sure your internet is stable and there are no interruptions between your router and the device. Run a speed test to check whether you have enough network stability to use Skype without any errors.

Also, check if your device satisfies the below requirements.
- Connect limited devices to the same network.
- Ensure you have bought the router verified by your Internet Service Provider (ISP).
- Avoid using old, broken, or damaged cables.
If you face any trouble with the internet connection, check our guide How to Troubleshoot Network Connectivity Problems on Windows 10 to fix them.
5. Close Background Programs using Camera – If there are too many applications and programs running on your computer, it may slow down your PC and cause Skype video not working Windows 10 issue. If there are any other video calling apps, perhaps they might interfere with Skype, causing you trouble. You must make sure you close all the applications by following our guide How to End Task in Windows 10.

6. Use Skype Web version – While you try to resolve said problem, you can switch to its web version.
1. Visit the Skype web version official site on your browser.

2. Now, type your credentials, sign up for your account and start enjoying video chat on Skype.

Also Read: Fix Camera In Use by Another App in Windows 10
Method 2: Run Hardware & Device Troubleshooter
Run Hardware and Devices Troubleshooter to identify the issues with your device and fix the same.
1. Press the Windows + R keys together to launch the Run dialog box.
2. Type msdt.exe -id DeviceDiagnostic and hit Enter key.

3. In the Hardware and Devices window, click on Next.

4. Now, follow the on-screen instructions and reboot the PC.

Note: Sometimes, your troubleshooter may not identify any problem. In this case, move to the next method.

Also Read: Fix Skype Stereo Mix Not Working in Windows 10
Method 3: Allow Skype to Access Camera
Ensure you have enabled camera permissions for Skype as instructed below:
1. Open Windows Settings by pressing Windows + I keys simultaneously.
2. Then, click on Privacy.

3. Navigate to the Camera menu in the left pane and toggle on Allow apps to access your camera option in the right pane.

4. Then, scroll down the screen and toggle on the Skype app under Choose which Microsoft Store apps can access your camera as depicted.

5. If you cannot find Skype in the list, visit Microsoft support link for further details or try the next troubleshooting method.
Method 4: Update Windows
In case of corrupt or old operating system, you might face Skype video not working Windows 10 issue. Follow our guide How to Download and Install Windows 10 Latest Update to do the same.

Also Read: Fix Snap Camera No Available Camera Input Error
Method 5: Update DirectX
To enjoy a seamless multimedia experience on Skype, you have to make sure DirectX is installed, and it is updated to its latest version such as DirectX12.
1. Press Windows Key + R and type dxdiag, then hit Enter.

2. The following screen will be displayed on the screen when your Windows 10 PC already contains DirectX 12.

3. If you do not have DirectX 12 in your system, download and install it from the official website by following the on-screen instructions.

Method 6: Update Camera Drivers
The newer version of Skype will not be supported by the outdated drivers and now, to resolve Skype camera not working Windows 10 issue, you have to update your camera drivers. Read and implement the steps instructed in our guide to Update Graphics Drivers in Windows 10 to follow the same for your camera drivers too.

Also Read: Fix Laptop Camera Not Detected on Windows 10
Method 7: Reinstall Camera Driver
If you still face Skype video not working Windows 10 issue after updating your camera drivers, then reinstall them to fix any incompatibility issues as instructed in our guide How to Uninstall and Reinstall Drivers on Windows 10.

Also Read: How to Fix Omegle Camera Not Working
Method 8: Switch to Generic Driver
If updating or reinstalling camera drivers does not help you fix Skype camera not working Windows 10 issue, then you can switch to generic built-in drivers that are already present in your Windows 10 operating system.
1. Hit the Windows key and type device manager, then click on Open.

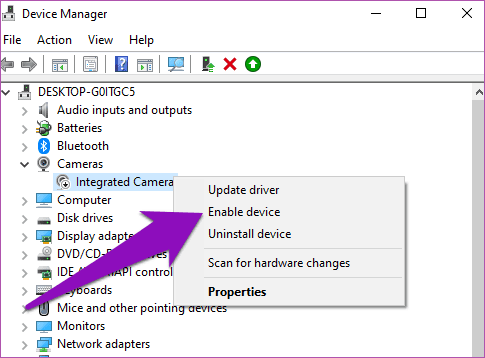
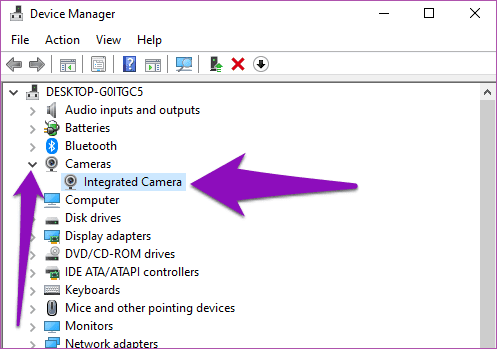
2. Then, expand the Cameras section by double-clicking on it. Right-click on your camera driver and then, select Update driver as shown.

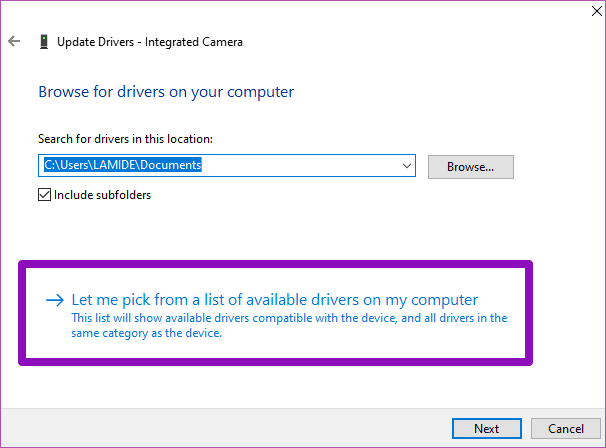
3. Now, click on Browse my computer for driver software followed by Let me pick from a list of available drivers on my computer in the upcoming window.

4. Then, select any generic webcam driver for Windows.
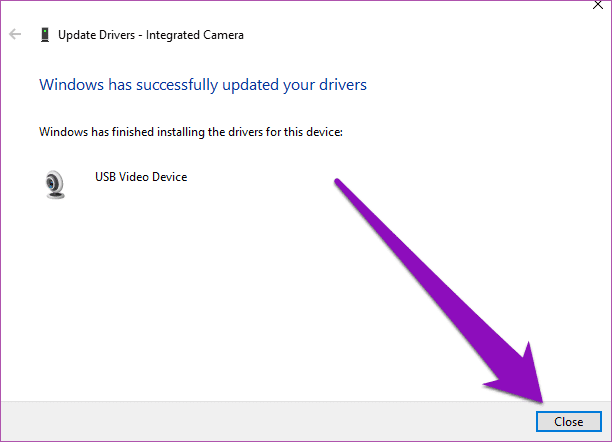
5. Wait until Windows installs the latest compatible driver and if you receive any prompts, click on Yes to proceed.
6. Finally, close the device manager, restart your computer and check if you can video chat on Skype.
Method 9: Modify Antivirus Settings
If your Skype camera not working Windows 10, this might be due to an overprotective antivirus suite.
Option I: Whitelist Skype
If you do not want Skype to be blocked by any antivirus program, then you may it to the allowed apps list.
Note: Here, Avast is taken as an example, follow the steps according to your antivirus program.
1. Press the Windows key and type avast, then click on Open.

2. Now, click on the Menu option in the right corner as depicted.

3. Then, select Settings from the drop-down list.
4. Now, in the General tab, click on the Blocked & Allowed apps tab, and in the right pane, click on ALLOW APP under the List of allowed apps field.

5. Now, click on ADD > option corresponding to Skype to add the application to the whitelist.
Note: Here App Installer is taken as an example, follow the steps according to your antivirus program.

Note: You can browse for the Skype installation path by selecting the SELECT APP PATH option.
6. Finally, click on ADD to confirm the prompt, and now, you have added Skype to Avast Whitelist.

Note: Here, you may check/uncheck the Avast features (like Ransomware Shield) depending upon your convenience.
7. If you want to remove Skype (later if you wish) from the Avast whitelist, then click on the three-dotted icon in the main Settings window. You will see two options over here. Click on Remove.
- Change allowed features: You can modify the features that you have enabled while whitelisting the program.
- Remove: Remove Skype from the Avast whitelist.

Option II: Disable Antivirus Temporarily
If you do not know how to disable the antivirus program on your Windows 10 PC, please check our guide How to Disable Antivirus Temporarily on Windows 10, and follow the instructions.

Also Read: How to Uninstall McAfee LiveSafe in Windows 10
Method 10: Disable Windows Defender Firewall (Not Recommended)
If your Skype camera accessing rights are blocked by Windows Defender Firewall, follow our guide Allow or Block Apps through the Windows Firewall if you want to whitelist Skype on Windows Firewall. Alternately, you can disable then re-enable Windows Firewall once you have fixed such conflicts.

Method 11: Tweak Registry Keys
Some users have suggested that tweaking some registry keys in the Registry editor has helped them fix Skype camera not working Windows 10 issue.
1. Hit the Windows key and type Registry editor, then click on Open.

2. Now, navigate to the following location path in the Registry Editor.
Computer\HKEY_LOCAL_MACHINE\SOFTWARE\WOW6432Node\Microsoft\Windows Media Foundation\Platform

3. Then, right-click on the right pane and click on New > DWORD (32-bit) Value to create a new registry key.

4. Name the key as EnterFrameServerMode and double-click on the key to open it.
5. Type the Value data as 0 and click on OK to save the changes.

6. Finally, restart the PC and check if you can access the camera on Skype.
Also Read: Fix I/O Device Error in Windows 10
Method 12: Re-register Camera
If all the above-mentioned methods do not help you fix Skype camera not working Windows 10 issue, then try re-registering the camera to fix all the hardware issues associated with the camera and thereby you can enjoy the video chat on Skype.
1. Press the Windows key, type powershell, and click on Run as Administrator.

2. Then, type the following command and hit Enter key.
Get-AppxPackage -allusers Microsoft.WindowsCamera | Foreach {Add-AppxPackage -DisableDevelopmentMode -Register "$($_.InstallLocation)\AppXManifest.xml"}

3. Wait for the command to be executed and check if you have fixed the issue. If you’re still having issues with your device, you may need to reset the camera.
Method 13: Reset Camera App
If re-registering does not help you fix Skype video not working Windows 10 issue, reset the camera app as instructed below.
1. Hit the Windows key, type Camera, and click on App settings.

2. Then, scroll down the screen and select the Reset option as highlighted.

3. Next, click on Reset again on the prompt screen as shown.

4. Finally, close the Settings app.
Also Read: How to Send Skype Code with Proper Format
Method 14: Reinstall Skype
If none of the above-stated methods helped you, then reinstall Skype.
1. Press and hold Windows + I keys together to open Windows Settings.
2. Now, click on Apps.

3. Now, search and click on Skype and select Uninstall option.

4. Now, confirm the prompt if any, and reboot your PC once you have uninstalled Skype.
5. Visit the official Skype download site and click on the Get Skype for Windows 10 & 11 buttons as depicted.

6. Then, click on the Get Skype for Windows option and wait until the download gets completed on your device.

7. Now, navigate to My downloads and launch the Skype Installer file.

8. Follow the on-screen instructions to complete the installation of Skype on your PC. Finally, you have reinstalled Skype on your computer. It would have fixed all the issues associated with the app.
Also Read: Fix 0xC00D36D5 No Cameras are Attached in Windows 10
Method 15: Replace Webcam
If you still cannot access camera in Skype web version and if everything seems to be black or blank, you can try replacing your webcam, For an inbuilt version of the camera, seek professional help.

Recommended: Fix Camera Not Working on Teams
We hope that this guide was helpful and you could fix Skype camera not working on Windows 10. Let us know which method worked for you the best. Also, if you have any queries/suggestions regarding this article, then feel free to drop them in the comments section.
Be it for individual, professional, or business use, Skype is one of the best software for visual communication on mobile and PC. And a video call is impossible without a functioning camera. If you are unable to make Skype video calls because your webcam isn’t working or Skype isn’t detecting your Windows PC camera, we have outlined seven (7) ways to get the issue fixed below.

Skype video call might not work if the app doesn’t have access to your device’s camera. Sometimes, it could be as a result of complications with your PC’s webcam driver. Running an outdated or unsupported Windows version can also cause the Skype camera (or some other app feature) not to work as it should. Whatever the case might be, at least one of the fixes below should get your Skype camera back to normal.
1. Check the Plugged Camera
If you are using an external USB camera, fixing the Skype camera issue is as easy as making sure that the camera is plugged in correctly. You could also unplug the camera and plug it back in. Then you need to confirm if the external camera is indeed functional. If you have another computer, you can use it on that device and check if the camera works.
If the external camera works on another computer but still doesn’t work on yours, you should check if the USB ports aren’t faulty or covered with debris. Additionally, if the external camera is powered by a driver/software, make sure the software and firmware/drivers are up to date. Some external webcams need to be turned on/activated manually after plugging into a computer. If you have such a camera, check if it is powered on before proceeding to use it for your Skype call.
2. Check Camera Access
For laptop users (and users of desktop computers with a built-in webcam), you want to make sure that the Skype app has access to use your computer’s camera. Otherwise, you might be unable to make Skype video calls. Here’s how to enable Skype’s access to your Windows 10 computer.
Step 1: Launch the Windows Settings menu.
Step 2: Select Privacy.

Step 3: In the App permissions section, tap Camera.
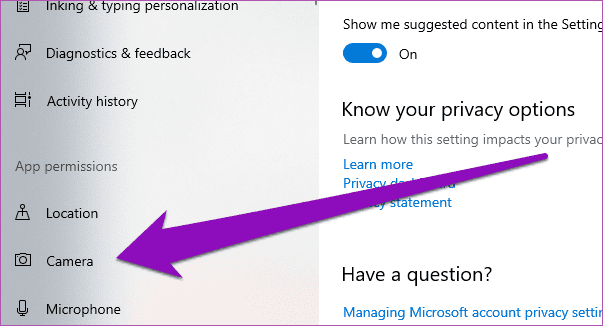
Step 4: Scroll to the ‘Microsoft Store Apps’ section and check if Skype’s access to your PC’s webcam is enabled. Toggle Skype on to allow it access to your camera.

3. Update Skype
When was the last time you updated the Skype app? You might occasionally experience usage glitches and errors if you’re using an outdated version of the app. Update Skype from the Microsoft Store and check it the app now recognizes your camera.
Update Skype (Microsoft Store)
4. Update Windows 10
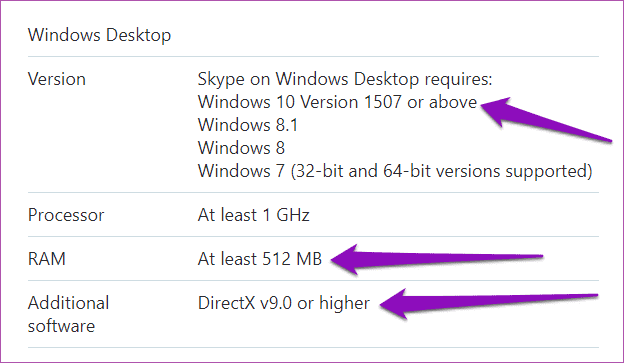
Skype has its system requirements for every Windows version. To enjoy the full features of the apps without glitches, ensure you are running the latest Windows version on your computer. And if you are using Skype on a desktop computer, you want to make sure that it runs at least DirectX v9.0 (or higher) and has a minimum of 512MB of RAM. Keeping your DirectX up-to-date is important for using Skype as well as other video/graphics apps on your computer.
Luckily, updating your desktop’s Windows 10 OS would simultaneously update DirectX and some other software required for Skype to work smoothly. To update your Windows 10 version, follow these steps.
Step 1: Launch the Windows Settings menu.
Pro Tip: Use the ‘Windows key + I’ keyboard shortcut to quickly launch the Windows Settings menu.
Step 2: Tap ‘Update & Security’.
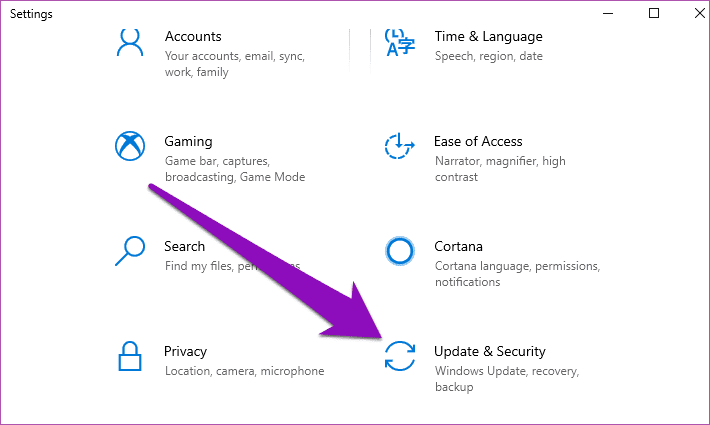
Step 3: Tap the ‘Check for updates’ button to download and install the latest Windows 10 version on your device.
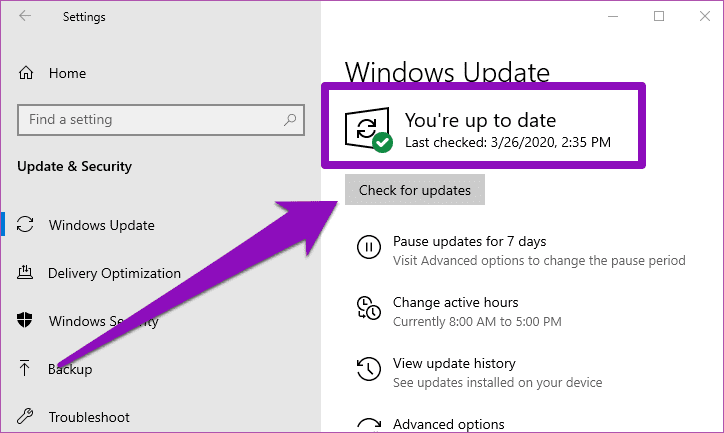
If your Windows 10 PC is up-to-date, but Skype camera still isn’t working, try the next fix below.
5. Re-Enable Webcam Driver
May be Skype camera isn’t working because the app has failed to recognize your webcam. That could be because your webcam is ‘misbehaving’, not literally. You can fix that by disabling and re-enabling your webcam. Here’s how to get it done.
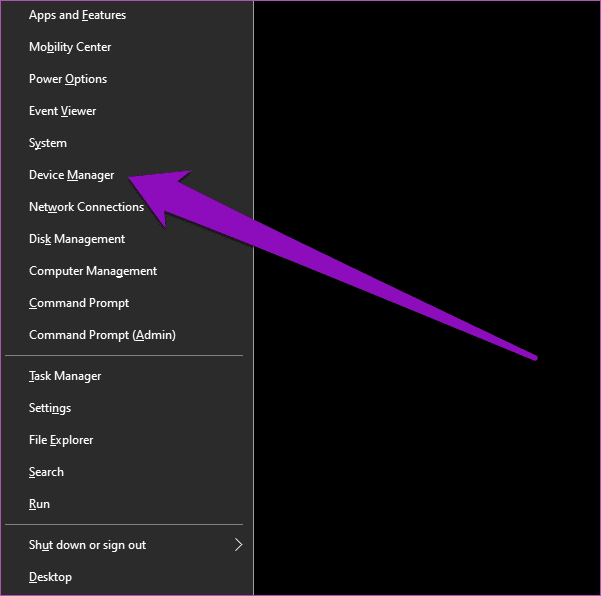
Step 1: Tap the Windows Key + X to launch the Windows Quick Access menu.
Step 2: Click on Device Manager.
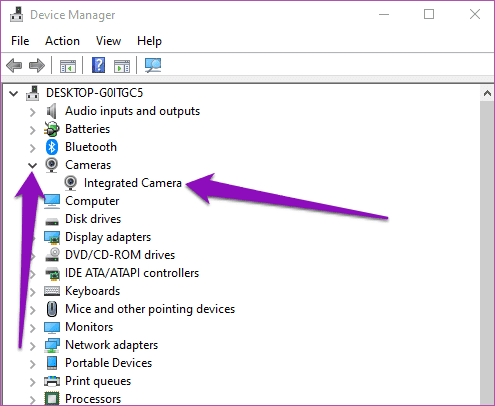
Step 3: Expand the Camera category and right-click on the camera driver.
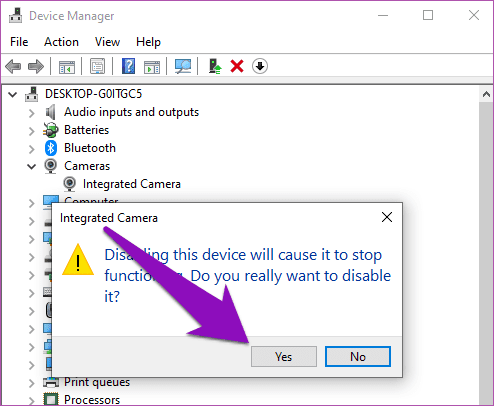
Step 4: Select Disable device.

Step 5: Tap Yes on the pop-up card to proceed.
Step 6: To re-enable the camera driver, right-click the device.

Step 7: Tap the Enable device option, and your webcam should begin working perfectly again.
Now, launch your PC’s Skype app and check if the camera now works. If it doesn’t, try the next troubleshooting option below.
6. Switch to Generic Driver
If re-enabling the default webcam driver doesn’t get your camera to work and you’re still unable to make video calls on Skype, you should switch to a generic driver built into the Windows 10 operating system. May be the webcam’s driver is outdated, corrupt, or damaged.
Step 1: Launch your computer’s Device Manager.
Step 2: Expand the Camera driver section.
Step 3: Right-click on the webcam driver and tap Update Driver.

Step 4: Next, select ‘Browse my computer for driver software’.

Step 5: Select ‘Let me pick from a list of available drivers on my computer’.
Step 6: Pick the generic webcam driver available for your PC and tap Next.

Step 7: When the update process is done, tap Close to return to the Device Manager.
Step 8: Restart your computer, launch Skype, and check if the camera now works with the app.
7. Close Other Apps
If you have too many apps and programs running, that could potential slow down your PC and hold back Skype from recognizing or activating your device’s camera. Again, that’s possible if you are using a fairly old computer with limited memory and an old HDD. With that in mind, if you have any video calling app or perhaps, remote video conferencing and meeting apps opened on your computer, you should close them if Skype is unable to use your webcam.
Now You See Me
Use any of the above methods to fix the issue with the Skype app or computer’s webcam and get back to using the app for video calls, meetings, and web conferences. If nothing works, you could be dealing with a faulty/damaged webcam and you should get it replaced or buy a new one.
Next up: Do you need to communicate visually with your friends, family, colleagues, or team on your computer? Check out some of the best video calling apps for Windows 10 in the post linked below.
Was this helpful?
Thanks for your feedback!
The article above may contain affiliate links which help support Guiding Tech. The content remains unbiased and authentic and will never affect our editorial integrity.
Probably, you have the problem like this:
You may enjoy Skype video call for chatting with your family or friends, having classes, or for conference. Thus if your Skype video stop working, like your video is black or freezing, it would be troublesome. However, there’s no problem can’t be figured out. Don’t worry if you are facing the trouble. Go with this small guide, we will be showing you how to fix Skype video not working on Windows 10.
Read on.:)
Note: Before we go, make sure the video on your chat window is enabled. If there’s a line through your video button, it means the video is switched off. Click the button to turn it on.
If your video is switched on and still don’t work, let’s start to fix it. If you cannot see the other person, the problem is usually on other side not yours. If you cannot be seen, the problem is probably is of your Skype then. If the video is freezing, then maybe there’s problem with network connection. Try the following methods to fix the error:
1. Check your webcam on Skype
2. Update your webcam driver
3. Check your network connection
4. Install the latest version of Skype
Method 1. Check your webcam on Skype
If your webcam is not configured for Skype, your video cannot work then. Whether a built-in webcam or an external USB one you’re using, check it on Skype:
1)
Log in Skype with your account.
Click Tools on menu bar in Skype window.
Then choose Options…

2)
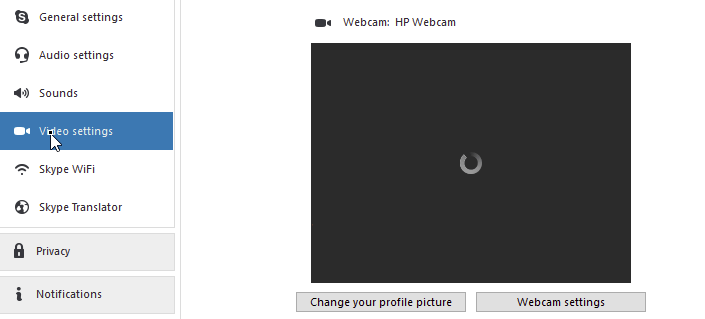
Click Video settings on the open window.
Then choose your webcam from the drop-down menu.
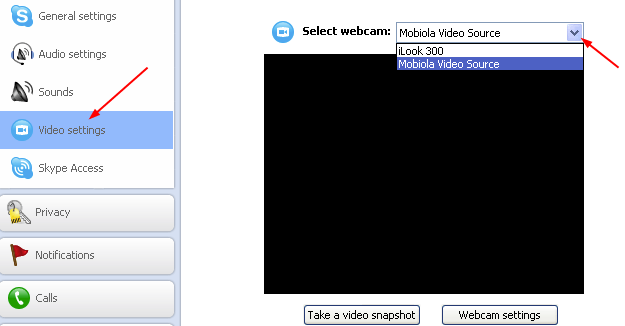
After your webcam is chosen, you should see yourself in the small window.
a) If not and you use the built-in camera, go on next method.
b) If not and you use a USB webcam, try to reconnect it with a different USB port on your computer. If the error persists, go on next method.
Method 2. Update your webcam driver
An outdated or corrupted webcam driver can also make your Skype video stop working. Make it up to the latest version can help you fix the error in most time. The up-to-date driver can make your Skype video stable and smooth.
To update your webcam driver, you can do it with Update driver option in Device Manager.
Or you can download the latest driver from your webcam’s manufacturer’s website. If you’re not confident playing around with drivers manually, or if you want to save much more time, you can use Driver Easy to do it automatically.
1)
Download and install Driver Easy.
2)
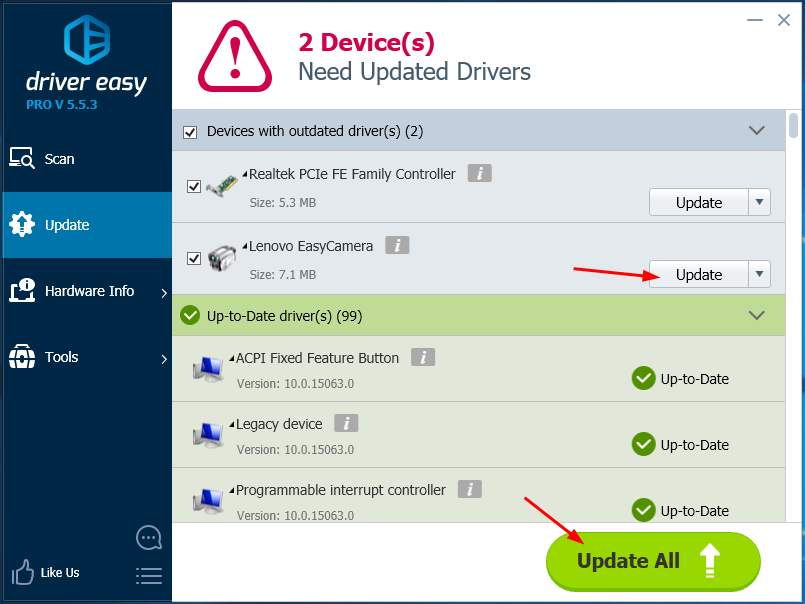
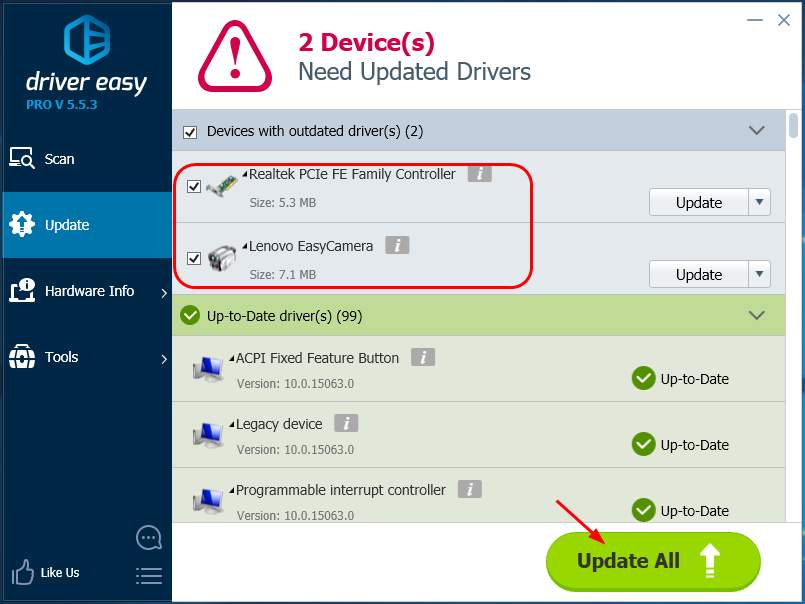
Run Driver Easy and click Scan Now button. Driver Easy will then scan your computer and detect any problem drivers. You webcam driver is no exception.

3)
With Free version: Click the Update button next to a flagged webcam driver to automatically download and install the correct version of this driver.
With Pro version: Click Update All to automatically download and install the correct version of all the drivers that are missing or out of date on your system. (and you get full support and a 30-day money back guarantee)
Method 3. Check your network connection
A bad network connection can make your Skype video stop working or freeze suddenly. In other words, a stable and good network connection is required for Skype video call. Follow the steps here to troubleshoot your network connection issues.
Step 1. Restart your network
1)
Shut down your computer.
2)
Unplug your modem and Wi-Fi router if you have one.
3)
Wait for about 30 seconds and plug in your modem and router back.
4)
Power on your computer and Log in Skype to try video call again.
If the error still exists, go on Step 2, please.
Step 2. Update your network card driver
If your network card driver is outdated or corrupted, it would cause network connection issues on your Windows. Follow the guide here to update your network adapter software.
To get your device software up-to-date, you can directly download the latest correct one from its manufacturer’s website. Or you can use Driver Easy we show you in Method 2. If you try on use its Pro version, you can update your webcam driver and network card driver at the same time. It does really save much of your time and help you solve the problem as soon as possible.
Method 4. Install the latest version of Skype
If after trying all the solutions above, you still cannot use Skype video, please try to install the latest version of Skype from Microsoft website directly.
4
4 people found this helpful
There are several reasons why your Skype camera may not be working. From wrong camera settings to incompatible camera drivers and a physically damaged device; it can be anything. Most users who face Skype camera issues are the ones using an external webcam. The camera issue is not very common with devices such as laptops and tablets which come with integrated cameras. In this guide, we will share some of the solutions that you can apply to fix your camera for Skype video calls.
1. Reinstall Skype
The obvious solution is to uninstall Skype, download the latest version, and reinstall it. Here is how you do it.
- Open the Settings app and go to the Apps group of settings. Select the Apps & features tab.
- From the list, click on Skype and select Uninstall.
- Now Reboot your system.
- Go to the Microsoft Store download the latest version.
- Once you reinstall Skype, make sure you can test your microphone and camera from the settings.
This should fix the majority of the cases with Skype video call camera issues.
2. Cross-Check Camera on other Apps
Check if it’s only Skype that’s having trouble with the camera. Use another app, any app, to check if it can detect the camera. Windows 10 comes with a stock Camera app that you can use to run this check.
- Open the Start menu.
- Go to the Apps list and look for the Camera app.
- Open it, and check if the app is able to get a feed from it.
If the camera works perfectly on other apps and only creates a problem with skype, then it is a Skype-only issue. If the camera doesn’t work on other video call apps as well, then it can be a camera driver issue or physical damage. Here’s how you can troubleshoot the camera.
3. Webcam Configuration for Skype
Skype allows users to select which webcam to use. If you only have the one webcam, it should be selected automatically but in some cases, Skype doesn’t select it.
- Open the Skype app and click on the ellipse (three dots) located right next to your profile picture. Select Settings.
- Go to the Audio & Video tab.
- Open the dropdown for Camera and select the only you want to use.
- If the camera isn’t listed in the dropdown, Skype can’t detect it. Try one of the other solutions in the list.
4. Webcam Privacy Settings
Windows 10 now has a privacy feature that lets you enable or disable the integrated or plugged-in webcam. To check the privacy settings for the camera, follow these steps
- Open the Settings app and go to the Privacy group of settings.
- Select Camera from the left pane.
- Make sure you see the ‘camera access for this device is on‘ message. If it isn’t there, click Change and enable it.
- Next, scroll down to “Choose Which Apps Can Access Your Camera” option and turn the Skype Button on.
- Now open Skype, go to video settings and the webcam will be listed there. Select it.
5. Update Webcam Drivers
Sometimes the webcam doesn’t work for Skype due to outdated webcam software. This usually occurs for Windows 10 systems that come integrated with a webcam. Here are the steps to update your webcam’s device drivers:
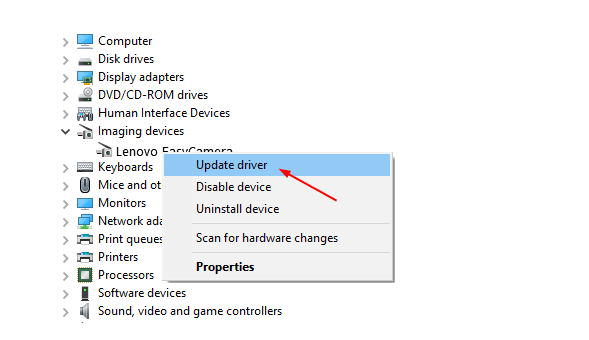
- Open Device Manager.
- Expand either Imaging Devices or Camera. It depends on the camera you have.
- Right-click the camera name – In our case, it is “Integrated Camera” – click on Update driver.
- Wait for Windows to search for the updated driver automatically and install whatever it recommends.
- Restart the system and then open Skype.
6. Uninstall and Reinstall Webcam Drivers
Sometimes a device doesn’t install correctly. Again, it’s more common with external cameras but internal ones can run into the same problem, especially after a Windows update.
- Open Device Manager and expand either Camera or Imaging Devices.
- Right-click your camera and select Uninstall Device.
- Once the device has been uninstalled, click the “Scan for Hardware Changes” button located on the top bar of the Device Manager.
- The hardware scan will detect the camera and automatically install the drivers as standalone or as a Windows update. It is advised to let Windows auto-install the drivers for your camera since manual installation can cause issues if not done right.
- Restart the system and open Skype’s video settings and check if the camera is working.
7. Windows Update
Updating Windows can also help in curbing the issue with a Skype camera. There are many cumulative and stand-alone updates released by Microsoft that fix bugs such as these. To update Windows:
- Open the Settings app and go to the Update and Security group of settings. Select the Windows Update tab.
- Now click on Check for Updates button and let Windows download the latest updates for your PC.
- Once the updates, are complete and you reboot your system, go to Skype > Video Settings and check if your webcam is working.
8. Roll-back Windows Update
Sometimes Windows Update can break the webcam compatibility of your webcam with Skype. If you know a recent update has been causing problems with the webcam, you should uninstall it. To uninstall a recent update, follow these steps.
- Open File Explorer and paste the following in the location bar.
Control Panel\Programs\Programs and Features
- Click View Installed Updates in the column on the left.
- Look for recent updates and select the problematic update.
- Click Uninstall at the top.
- Allow the update to uninstall, and then restart your system.
- Open Skype, go to its settings, and select the Audio and Video tab to check if your camera is back again
9. Update Skype
Open the Microsoft Store app and go to your library. Select the Downloads tab and click ‘Check Updates’. Update Skype if an update is available.
10. Update Drivers for external Webcam
If you are using an external webcam for Skype, then it is suggested to use the disk that comes with the camera and update the drivers. In case there is no disk available, search for the camera model online and you will be able to find the updated drivers. Many users have fixed their Skype webcam issues (for detachable webcams) using this method
Conclusion
Skype’s webcam issue bars any video chats. It is an issue that can be resolved by one of the methods that have been provided here. In case you have a work-around or a fix to this problem, share it with the community in the comments section below.
