
- Создание и шаринг сетевой папки;
- Формирование batch (cmd) скрипта;
- Настройка компоненты Task Scheduler для выполнения задач и раз в минуту;
Приступаем к последовательной настройке.
Создание сетевой папки (шаринг)
Итак, дано: есть сервер А (источник файлов) и сервер Б (получатель файлов). На сервере А мы создали директорию, из которой мы будем забирать файлы. Мы назвали ее source, а на сервере Б, который является сервером назначения, мы создали директорию Destination, в которую мы будем складывать файлы. Разобрались.
Подключаемся к серверу Б. Создаем директорию Destination, нажимаем на нее правой кнопкой мыши, выбираем Properties (свойства). В открывшемся окне, переходим во вкладку Sharing (общий доступ) и нажимаем кнопку Share (общий доступ). Вот как эта опция выглядит в русской и английском интерфейсах:

После нажатия, необходимо выбрать группы пользователей, которым будет видна эта директория. Если нет особых требований к безопасности и это изолированный сетевой сегмент или лаборатория, то можно выбрать Everyone (все). После выбора нажимаем Share. Готово, вот что у нас получилось:

На скриншоте выше красным цветом отмечен Network Path (сетевой путь). Это путь, по которому мы будем обращаться к этой папке. Сохраните его.
Важно! Обратите внимание, что в Network Path, как правило, будет указан путь вида %ИМЯ_ХОСТА%/Destination, где %ИМЯ_ХОСТА% — это имя компьютера, на котором расположена папка Destination. Важно, чтобы это имя резолвилось (разрешалось в IP — адрес) на хосте, где будет размещена папка Source (это сервер А). Можете добавить это имя и IP – адрес в локальный файл C:WindowsSystem32driversetc в Windows.
Батник – batch скрипт
В самом начале статьи мы озвучили небольшой roadmap (дорожную карту) по нашим работам. На сервере А (источник файлов) создайте файл с названием movefiles.bat.
Важно! Расширение файла movefiles должно быть именно bat
В созданный файл добавляем следующий код:
robocopy C:Source \%ИМЯ_ХОСТА%Destination *.* /E /XD \%ИМЯ_ХОСТА%Destination /move
Если у вас не работает команда robocopy в скрипте, попробуйте заменить ее на xcopy
Сохраняем скрипт в корневом каталоге диска С, например.
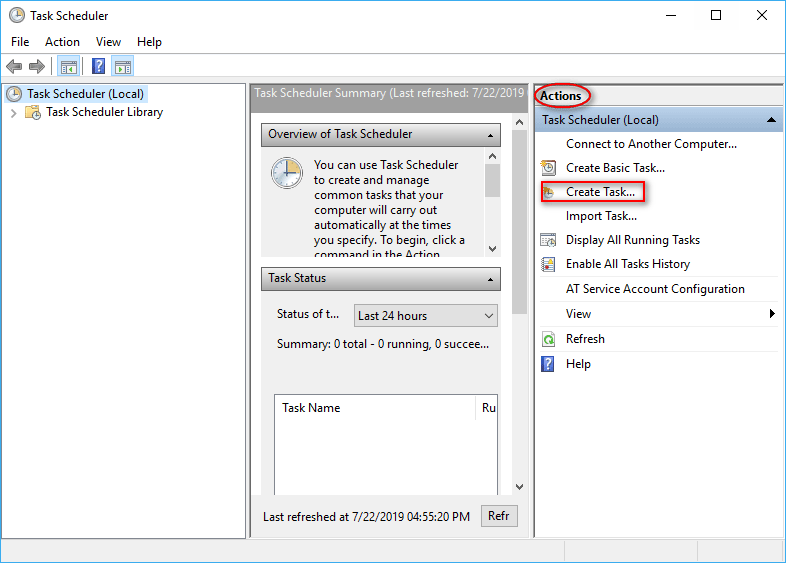
Планировщик задач | Task Scheduler
Открываем Task Scheduler в Windows. После открытия, нажимаем на Create Basic Task в меню справа. Даем имя и описание нашему заданию:

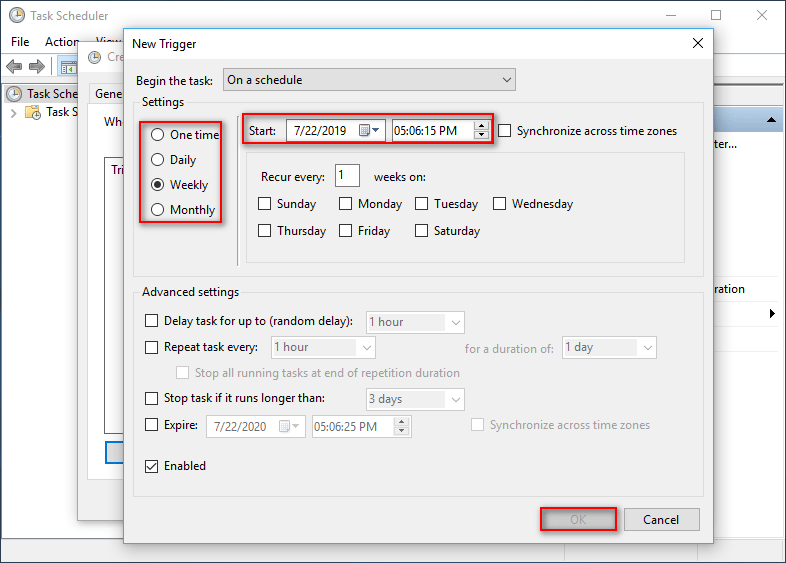
В меню далее выбираем ежедневное выполнение нашего скрипта:

Ставим выполнение задачи на 00:00:00:

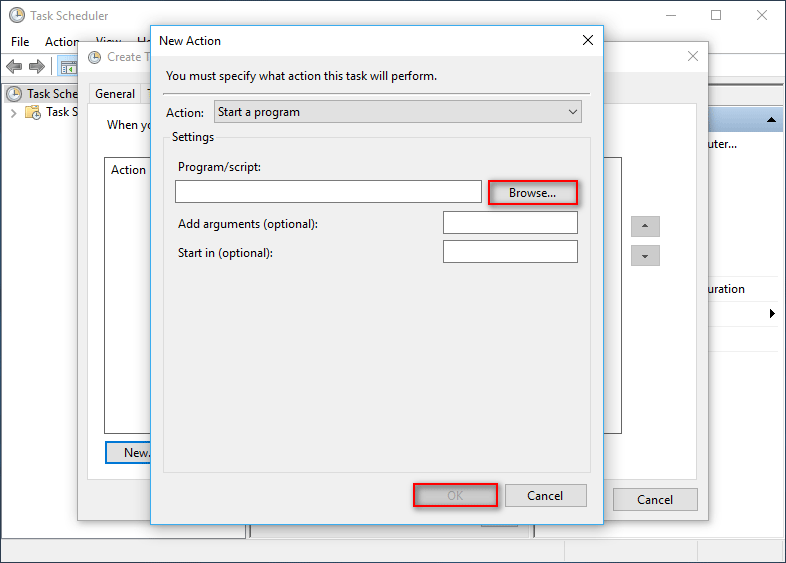
В Action выбираем Start a program:

Далее, указываем путь до нашего скрипта, который создавали ранее — movefiles.bat:

В финальном окне смотрим, что у нас получилось. Если все ОК, как у нас, то нажимаем Finish:

Отлично. Переходим в свойства свежесозданной таски (задачи) и во вкладке General отмечаем Run whether user is logged on or not и чекбокс Run with highest privileges.

Далее, там же, в свойствах, переходим во вкладку Triggers, двойным нажатием открываем свойства уже созданного там триггера (Daily) и делаем вот что:
- Отмечает чекбокс Repeat task every;
- В поле, сразу после Repeat task every вписываем
1 mnute;

Нажимаем ОК.
Тестируем
Итак, давайте протестируем, что у нас получилось. На сервере А в папку Source кладем тестовый текстовый файл:

Проверяем на сервере Б в директории Destination:

-
Understanding Batch Scripts
-
Basic Syntax of the
MOVECommand -
Using Conditional Statements
-
Conclusion
-
FAQ

Moving files efficiently is a crucial task for anyone who works with computers, whether you’re managing a small project or handling large datasets. Batch scripts offer a powerful and straightforward way to automate file management tasks on Windows.
In this tutorial, we will explore how to move files using batch scripts, providing you with the necessary commands and examples to streamline your workflow. By the end of this article, you’ll be equipped with the knowledge to create your own batch files that can move files seamlessly, saving you time and effort.
Understanding Batch Scripts
Batch scripts are simple text files containing a series of commands that the Windows command line interpreter executes in sequence. They are particularly useful for automating repetitive tasks, such as file management. By using batch scripts, you can move files from one location to another without having to manually drag and drop them.
The primary command used for moving files in a batch script is MOVE. This command allows you to specify the source location of the file you want to move and the destination where you want it to go.
Basic Syntax of the MOVE Command
The syntax for the MOVE command is straightforward:
MOVE [source] [destination]
Here, source indicates the file or folder you want to move, and destination is the target location.
Example of Moving a Single File
Let’s start with a simple example. Suppose you have a file named example.txt located in C:\Users\YourName\Documents, and you want to move it to C:\Users\YourName\Desktop. The batch script would look like this:
@echo off
MOVE C:\Users\YourName\Documents\example.txt C:\Users\YourName\Desktop
Output:
In this script, @echo off prevents the commands from being displayed in the command prompt, creating a cleaner output. The MOVE command then takes the specified file from the Documents folder and moves it to the Desktop. This method is efficient for moving single files and can be easily modified to accommodate different file names and locations.
Moving Multiple Files
You can also move multiple files at once using wildcards. For instance, if you want to move all .txt files from the Documents folder to the Desktop, your batch script would look like this:
@echo off
MOVE C:\Users\YourName\Documents\*.txt C:\Users\YourName\Desktop
Output:
This command uses the *.txt wildcard to select all text files in the specified directory. Wildcards are a powerful feature that allows you to batch process multiple files without needing to specify each one individually. This can save considerable time, especially when dealing with large numbers of files.
Using Conditional Statements
Batch scripts can also incorporate conditional statements to enhance functionality. For example, you might want to check if a file exists before attempting to move it. Here’s how you can implement that:
@echo off
IF EXIST C:\Users\YourName\Documents\example.txt (
    MOVE C:\Users\YourName\Documents\example.txt C:\Users\YourName\Desktop
) ELSE (
    echo File not found.
)
Output:
In this script, the IF EXIST statement checks whether example.txt is present in the Documents folder. If the file exists, it proceeds with the MOVE command. If not, it outputs a message indicating that the file was not found. This approach adds a layer of safety to your file management tasks, preventing errors that could arise from attempting to move non-existent files.
Conclusion
In this article, we explored how to move files using batch scripts, from basic commands to more advanced techniques like using wildcards and conditional statements. Batch scripting is a valuable skill that can significantly enhance your productivity, especially when managing files on Windows. By automating these tasks, you can focus on more critical aspects of your work. Start experimenting with batch scripts today, and you’ll find that moving files becomes a breeze.
FAQ
-
What is a batch script?
A batch script is a text file containing a series of commands that are executed by the command line interpreter in Windows. -
Can I move folders using a batch script?
Yes, you can move entire folders using the sameMOVEcommand by specifying the folder path as the source.
-
What is the purpose of using wildcards in batch scripts?
Wildcards allow you to select multiple files at once based on specific patterns, making it easier to manage large groups of files. -
How do I create a batch script?
You can create a batch script by opening a text editor, writing your commands, and saving the file with a.batextension. -
Can I schedule batch scripts to run automatically?
Yes, you can use Windows Task Scheduler to schedule batch scripts to run at specified times or events.
Enjoying our tutorials? Subscribe to DelftStack on YouTube to support us in creating more high-quality video guides. Subscribe
на диске D: две папки 1 и 2
скрипт лежит в корне диска D
нужно перемещать файлы из 1 в 2 чтобы удалялся старый файл из папки 2
перед этим должна быть проверка если есть файл в папке 1 то копировать, если нет то не копировать.
Помогите реализовать я не силен в этом
P.S. По возможности расписать что? где? и зачем?
-
Вопрос задан
-
26601 просмотр
Пригласить эксперта
нужно перемещать файлы из 1 в 2 чтобы удалялся старый файл из папки 2
перед этим должна быть проверка если есть файл в папке 1 то перемещать, если нет тогда скрипт не должен ничего делать.
move /y d:\1\* d:\2
но ты както определись, перемещать нужно или копировать.
Войдите, чтобы написать ответ
-
Показать ещё
Загружается…
Минуточку внимания
-
Home
-
News
- Create Script To Copy Files From One Folder To Another On Win10
By Sarah |
Last Updated
The batch script, also known as batch file, actually refers to a list of several commands; whenever you double-click the file, the commands will be executed. If you want to copy files or folders from one folder to another automatically, creating a batch script is a nice choice. As for how to get the work done, please keep reading.
Windows Script/Batch File
When managing your data on PC, you may need to copy or move files and folders. The permissions set on files and folders may be changed when you move/copy them by using the Windows Explorer. Did you know this?
Windows Explorer Needs To Be Restarted: Problem Solved.
For instance, when you copy a folder/file in an NTFS partition or from one partition to another, the Windows system will regard it as the new folder/file; in this way, you will become the CREATOR OWNER since the system will take on the permissions. That’s why using script to copy files from one folder to another is necessary.
What Is Batch File
A batch file, also known as batch script, is actually a list of commands that will be run in the Command Prompt (CMD) tool. Users can create a batch file to let CMD copy and paste files for them automatically; all they need to do is double clicking on the batch file/script and waiting.
Can You Use Script to Copy Files from One Folder to Another
The Windows clipboard provides an easy way for users to copy and paste files/folder manually. The ordinary copy process seems pretty simple: select the file/folder that needs to be copied and choose copy option; open the destination; select the paste option.
Yet, do you want to automatically move files from one folder to another? The copying and pasting process can be finished quickly by using the Windows command line.
How to create batch file to copy files? How to use Windows script to copy files? Generally, it contains two stages: create batch file and create a task to run the batch file to copy files from one folder to another.
Stage One: Create Batch File to Copy
You can create a batch file to copy data in a file from one place to another place on your computer automatically. The following steps are finished on Windows 10.
- Open Windows search.
- Type notepad.
- Open the Notepad app.
- Copy & paste the script into the new Notepad file.
- Select File -> Save As.
- Give it a name.
- Select All Files.
- Click Save to finish creating the batch file.
Step one: click on the Cortana icon on the taskbar (fix taskbar not working on Window 10).
Step two: type notepad into the search text box.
Step three: select Notepad app from the search result by clicking on it.
Step four: type the following script in or copy & paste it into Notepad.
@echo off
set X=<days>
set “source=C:\<Source Folder Path>”
set “destination=D:\<Destination Folder Path>”
robocopy “source” “destination” “filename with extension” /z
exit /b
- The source folder, destination folder, and number of days can be changed due to your needs.
- The nunber of days refers to the time interval you want to archive your folders.
- “<>” is necessary if the source or desitination folder path includes space.
Please click here to know more about robocopy.
Step five: choose File option from the menu bar and choose Save As… from submenu.
Step six:
- Give it a name and type in the File name text box; the file name format is <filename>.BAT.
- Select All Files for Save as type option to change the default file type.
- Click on the Save button at the bottom to finish this step.
Stage Two: Create Task to Run Batch File
After finish this stage, you can use the batch file to copy folder to another location.
Step one: type task scheduler into the Cortana search box.
Step two: choose Task Scheduler from the search result.
Step three: find Actions section from the right-hand panel.
Step four: select Create Task… from the list.
Step five: give a name for the task and type it into the text box after Name.
Step six: shift to Triggers tab and click on the New… button.
Step seven: define the frequency to trigger the task, choosing from One time, Daily, Weekly, and Monthly.
Step eight: set the Start time to decide when the task will be triggered and click on the OK button to confirm.
Step nine: shift to Actions tab and click on the New… button.
Step ten: click on the Browse button to find & choose the .BAT file you have created in stage one.
Step eleven: click on the OK button to confirm. Then, you can close the Task Scheduler and start to move file from one folder to another by using it.
That’s how to use Windows batch to copy file. Besides, you can also use Xcopy or Robocopy to copy files and folders on your PC.
About The Author
Position: Columnist
Sarah has been working as an editor at MiniTool since she graduated from university. Sarah aims at helping users with their computer problems such as disk errors and data loss. She feels a sense of accomplishment to see that users get their issues fixed relying on her articles. Besides, she likes to make friends and listen to music after work.
PowerShell is a powerful scripting language that can help you automate various tasks on your Windows and Linux system. One of the common tasks that you may need to perform is moving files from one location to another. In this blog post, I will show you how to use PowerShell to move files with different scenarios and options.
Moving a Single File
To move a single file, you can use the Move-Item cmdlet with the following syntax:
Move-Item -Path -DestinationFor example, to move a file named test.txt from C:\Temp to C:\Backup, you can run the following command:
Move-Item -Path C:\Temp\test.txt -Destination C:\Backup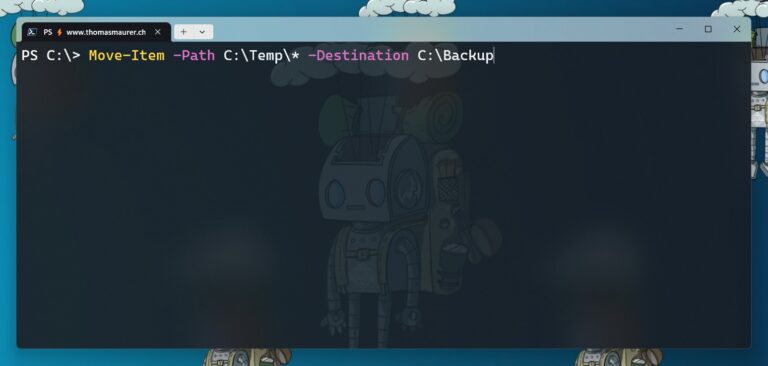
This will move the file test.txt to the Backup folder and delete it from the Temp folder. You can use the -PassThru parameter, which will return the moved file object as output. For example:
Move-Item -Path C:\Temp\test.txt -Destination C:\Backup -PassThruThis will move the file test.txt to the Backup folder and display its properties on the console.
Moving All Files in a Folder
To move all files in a folder, you can use the wildcard character (*) to specify the source files. For example, to move all files in C:\Temp to C:\Backup, you can run the following command:
Get-ChildItem -Recurse -Path C:\temp\* | Move-Item -Destination C:\BackupThis will move all files in the Temp folder to the Backup folder and delete them from the Temp folder.
Moving All Files and Subfolders
To move all files and subfolders in a folder, you can use the -Recurse parameter, which will include all child items in the source path. For example, to move all files and subfolders in C:\Temp to C:\Backup, you can run the following command:
Move-Item -Path C:\Temp\* -Destination C:\Backup -RecurseThis will move all files and subfolders in the Temp folder to the Backup folder and delete them from the Temp folder.
Overwriting an Existing File
By default, PowerShell will not overwrite an existing file in the destination folder if it has the same name as a source file. You will get an error message like this:
Move-Item : Cannot create a file when that file already exists.To overwrite an existing file, you can use the -Force parameter, which will replace any existing file with the same name. For example, to overwrite a file named test.txt in C:\Backup with a file named test.txt in C:\Temp, you can run the following command:
Move-Item -Path C:\Temp\test.txt -Destination C:\Backup -ForceThis will replace the file test.txt in the Backup folder with the file test.txt from the Temp folder.
Conclusion
In this blog post, I have shown you how to use PowerShell to move files with different scenarios and options. You can use the Move-Item cmdlet with various parameters to customize your file moving operations. I hope you found this post useful and learned something new. If you have any questions or feedback, please leave a comment below.
If you want to learn more PowerShell tricks when working with Microsoft Azure, check out my blog post 6 Command Line (PowerShell & CLI) Tips & Tricks for Microsoft Azure you should know about!
Tags: file, Linux, Microsoft, Move, Move Files, PowerShell, Windows, Windows Server Last modified: May 6, 2024
About the Author / Thomas Maurer
Thomas works as a Principal Program Manager & Chief Evangelist Azure Hybrid at Microsoft (Cloud + AI). He engages with the community and customers around the world to share his knowledge and collect feedback to improve the Azure hybrid cloud and edge platform. Prior to joining the Azure engineering team (Cloud + AI), Thomas was a Lead Architect and Microsoft MVP, to help architect, implement and promote Microsoft cloud technology.
If you want to know more about Thomas, check out his blog: www.thomasmaurer.ch and Twitter: www.twitter.com/thomasmaurer