The Internet today is full of surprises and hidden things that users may not be aware of. Having a traffic monitor to monitor your network speed from time to time can be crucial to let you know if there is anything that is using the internet bandwidth without your knowledge. It is also a great way to know how much internet speed an app is using when it is downloading or uploading something.
Back in Windows 10 and older versions of Windows, there was a simple and popular third-party app called “NetSpeedMonitor” that can display the real-time network or internet speed directly on the taskbar. Sadly, this app is not supported in Windows 11.
Also see: How to Know Which App is Using The Internet in Windows 11
How to add a network speed monitor in Windows 11
Fortunately, there are a few other apps that are able to do the same thing as NetSpeedMonitor to display a real-time network speed monitor on the taskbar in Windows 11. This guide will show you how to add a net speed monitor to the Windows 11 taskbar.
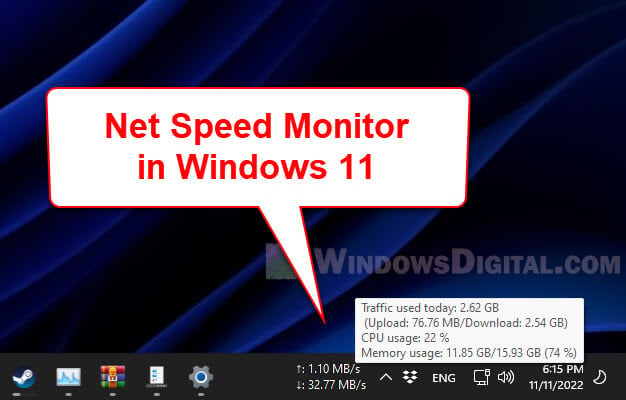
Traffic Monitor for Windows 11
Traffic Monitor is a free and open-source app that lets users display the live network speed on either the taskbar or as a floating gadget on the desktop in Windows. Most importantly, it works perfectly fine on Windows 11.
One huge feature that makes the app stands out among other similar network speed monitor apps is that Traffic Monitor can also display the CPU and Memory usage alongside the Network traffic usage.
Follow the steps below to install Traffic Monitor and add its net speed monitor to the Windows 11 taskbar or desktop.
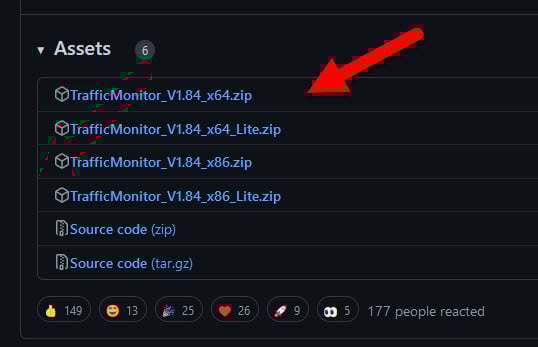
- Go to https://github.com/zhongyang219/TrafficMonitor/releases to download Traffic Monitor. Check the latest release and select the x64.zip under “Assets” to download it. You can download the Lite version but it has much lesser features.
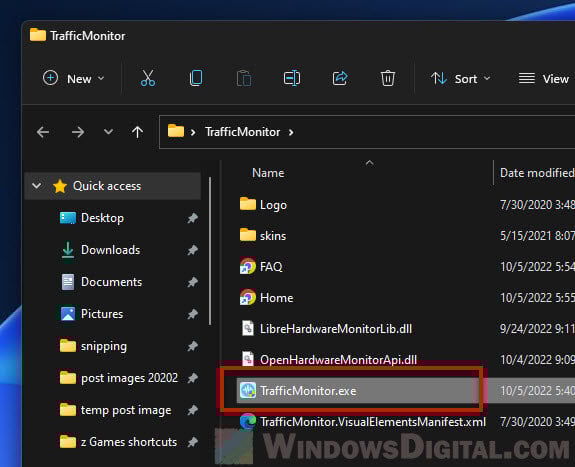
- Once downloaded, unzip the file and open the TrafficMonitor.exe from the extracted folder.
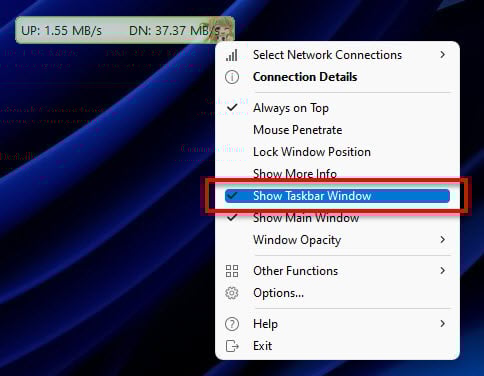
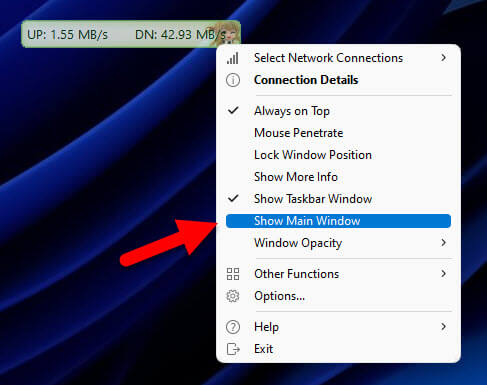
- The app will start off with a floating network speed monitor gadget on the desktop which you can move around easily. To enable it to show on the taskbar instead, right-click the floating network meter and select “Show Taskbar Window“.
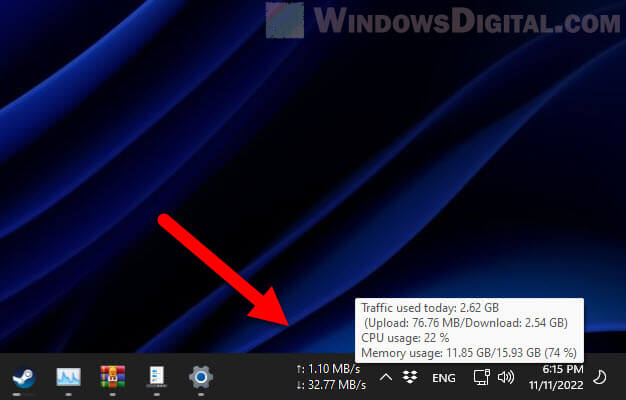
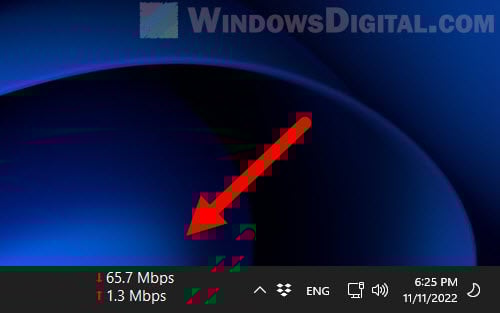
- The net speed monitor will now be displayed on the Windows 11 taskbar.
When you hover your mouse cursor over the speed meter, it will display more details such as the total traffic used today (upload and download), as well as the CPU and Memory usage in percentage.
If you don’t want the floating network meter to display on the desktop, right-click on the gadget and uncheck “Show Main Window”. This option will disable traffic monitor from showing on the desktop.
Read next: How to Change Ethernet Network Speed from 100 Mbps to 1 Gbps
Configure Traffic Monitor to auto start on Windows startup
As Traffic Monitor needs to be running in Windows 11 in order for the net speed monitor to continue displaying on the taskbar, to save you the hassles from having to run the app every time you startup your computer, you can set the app to automatically run when Windows starts.
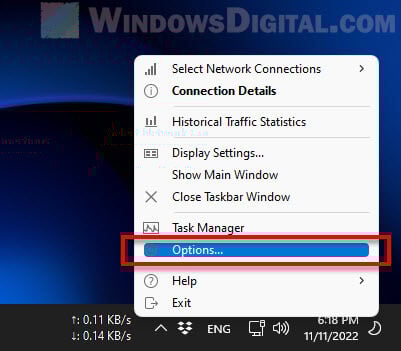
To do so, right-click the net speed monitor on the taskbar and select Options.
Next, go to the “General Settings” tab and enable the checkbox for “Auto run when Windows Starts” under Application Settings.
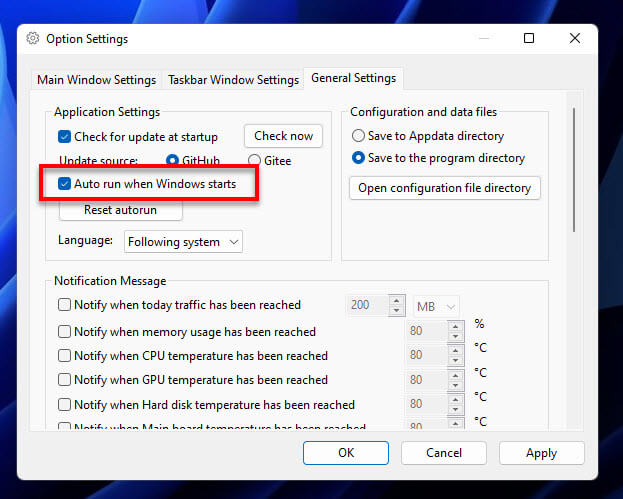
In the mean time, you can also configure other settings from the “Taskbar Window Settings” tab for the net speed monitor on the taskbar or the “Main Window Settings” tab for the floating meter.
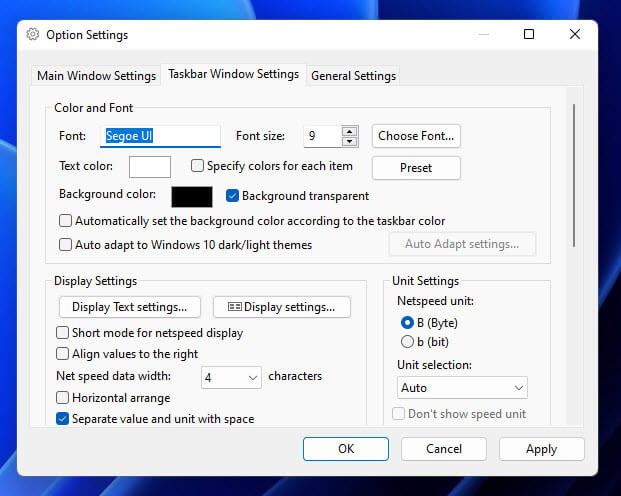
You can change settings such as the color and font of the speed meter, netspeed unit used (Byte or bit), and other display settings.
Related issue: Ethernet Internet Speed Capped at 100 Mbps (Fix)
Internet speed monitor app from Microsoft Store
Alternatively, you can look for a network or internet speed monitor app from the Microsoft Store.
- First, open Microsoft Store via Start menu.
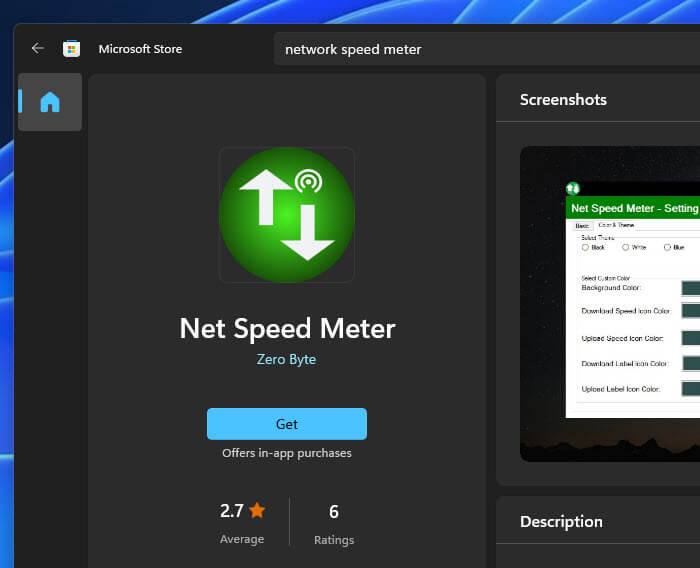
- Search for “Net Speed Meter” using the search bar in the Microsoft Store’s window.
- Select Net Speed Meter and click Get to install the app.
- Once the installation is completed, click Open to launch the app.
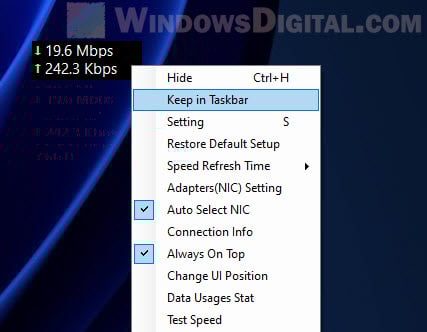
- The app will start out as a floating network meter on the desktop. To move it to the taskbar instead, right-click the floating meter and select “Keep in Taskbar“.
- The net speed monitor will then display on the taskbar in Windows 11.
Task Manager’s Performance tab or Resource Monitor
If you only want to monitor your network or internet speed without installing any third-party app, you can quickly view the network usage via the Task Manager Performance tab or the Resource Monitor in Windows 11. This method does not add any meter to the taskbar or on the desktop.
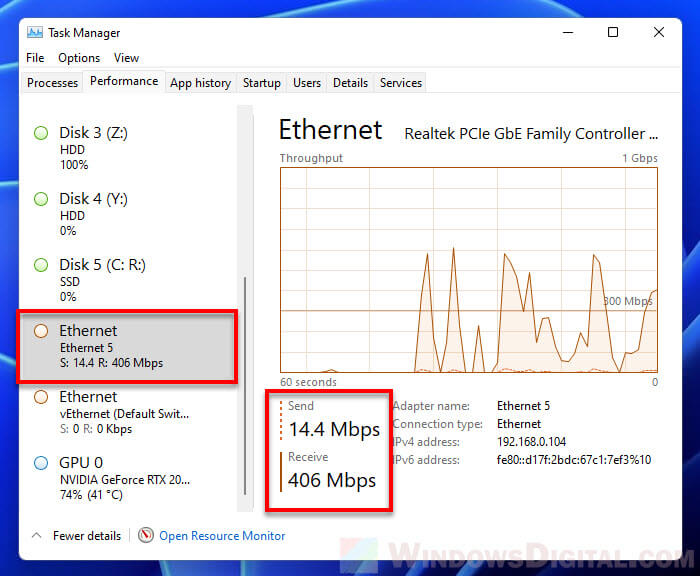
To check the internet speed via Task Manager, first press Ctrl + Shift + Esc to open Task Manager in Windows 11. If it isn’t already in full details mode, click “More details“.
Next, click the “Performance” tab and select your Ethernet or WiFi adapter from the left pane. The network speed usage will shown on the right – the “Send” and “Receive” speed.
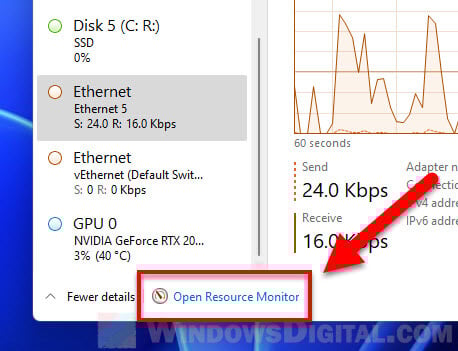
Alternatively, to view more details about which app or process is using the network bandwidth, you can use the Resource Monitor instead. To do so, click Open Resource Monitor at the bottom of the Task Manager window.
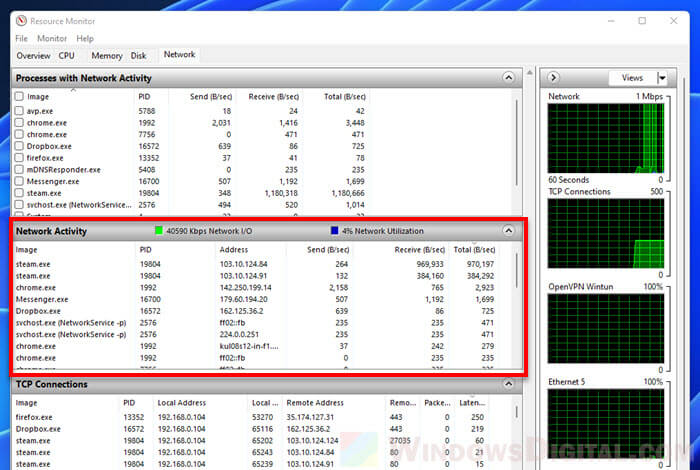
Then, select the Network tab and expand Network Activity. From there, you can view the network transfer speeds (Send, Receive and Total) of all running processes. You can sort the list by transfer speed by clicking the header of the relevant column you want to sort.
In Windows 11, Microsoft has introduced so many new features like widgets, Android Apps support, Snap Layouts, Virtual desktops, and many more. Even, so many taskbar customization options have been introduced. But still, the network speed monitor on Windows 11 missing. In Android, you can enable network speed indicators easily from the settings app. But, in Windows, such an option is missing and much needed. Yes, undoubtedly, the task manager shows the download/upload speed of an active internet connection in send/receive data form. But, you cannot pin it to the taskbar. Like, you can add performance stats to the Windows 11 taskbar.
Well no worries, there are some free third-party apps and tools available. Which shows your Internet connection’s download and upload speed in real time. This means you can constantly track active internet usage on your Windows PC/Laptop. Which will help you to track down connection issues in your network. Also, these net speed monitor apps will work on both Ethernet and WiFI connections. There are so many Internet Speed Monitor Apps available for Windows 11 to use. So, feel free to choose an app that adds a network monitor to the taskbar, and, comes with numerous customization settings.
Add network speed monitor to the Windows 11 Taskbar
Net Speed Meter.
If you don’t want to download an App from a third-party source, then Net Speed Meter is the best app for you. It is available for free on the Microsoft Store. Net Speed Meter app shows the real-time download and upload speed of your internet connection. And, runs in the system tray. The best part is you can drag and drop the network monitor anywhere on the desktop, so no restrictions. App also comes with so many customization options. Like, you can change the speed unit from bits per second to bytes per second. Moreover, you can change the font and text size. Even, you can change the color & theme as well.
By default, the Net speed meter is set as a startup app. So, it gets automatically started when you start Windows 11, no need to run it manually every time. The app does refresh the network speed every 500ms. Which you can change if you want. Test Speed option is also available to perform an Internet Speed Test.
- Click on the start button and after that, click on Microsoft Store App from the pinned apps section.
- Microsoft Store will get open, and search for Net Speed Monitor. Or, you can use the following link to directly open the App page.
- Once you find the Net Speed Monitor app, click on Get to install it in your Windows 11.
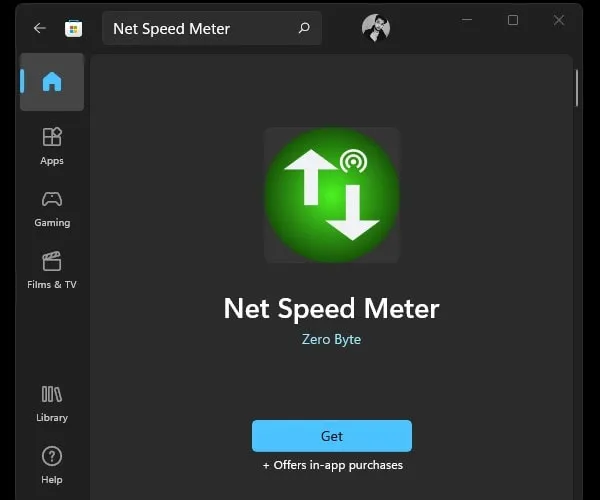
- The app will now get downloaded and installed, click on Open to launch it.
- You will now immediately see a Network Speed Monitor in the upper right corner of your desktop.
- Do right-click on it, and a menu will appear. Click on “Keep in Taskbar”.
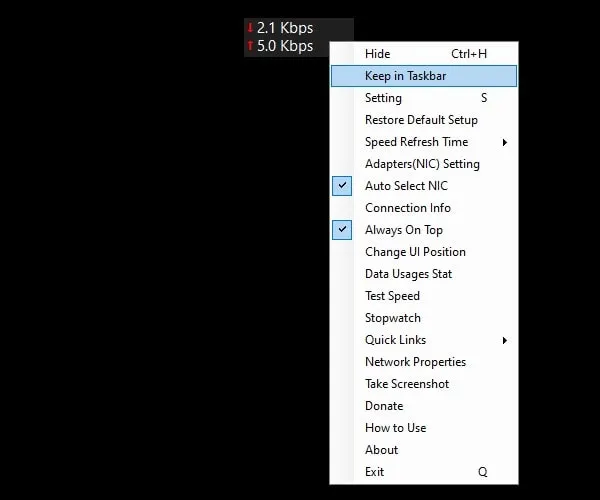
You can also drag and drop the network speed meter wherever you want.
- Once you set it to the desired position, right-click again on it and click on settings.
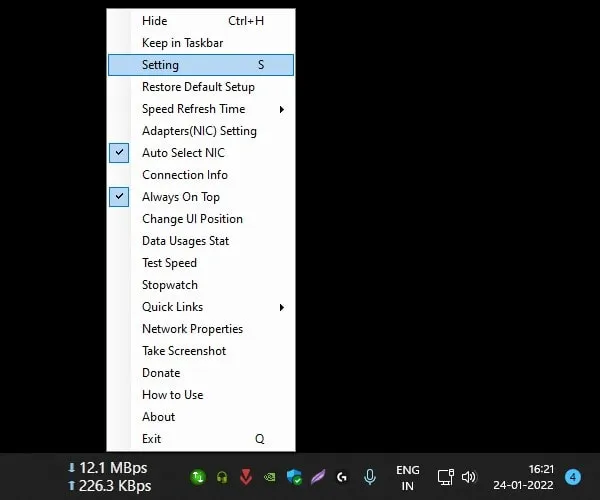
- Select Byte/s in unit speed so that you will get an accurate result. You can also change font and size if you want.

- After that, click on Color & theme and now select the transparent theme. So that it can blend with your Windows 11 theme.
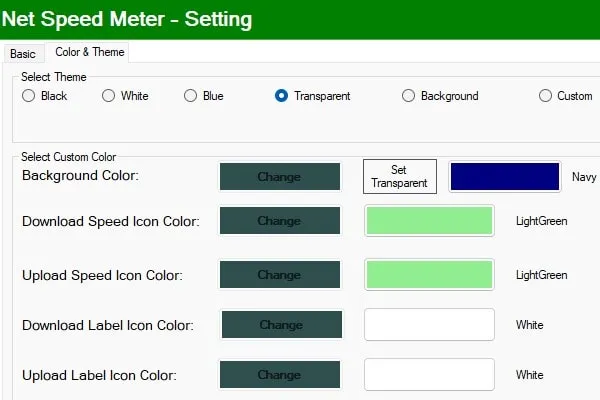
Also, you can change the speed refresh time to fast. By default, it might be set to normal. Okay, so that’s how you can add Network Speed Monitor to the Windows 11 Taskbar.
Windows 11 Traffic Monitor
Traffic Monitor is another free and open-source Windows 11 app to display Windows 11 real-time network speed. Apart from Internet Speed, this app also can display CPU and Memory usage in the taskbar. The traffic Monitor app also can display “historical traffic statistics”, which are locked in the net speed meter app. So definitely, this app is better than that.
The traffic Monitor app comes with two network monitor windows – Main Window and Taskbar Window. The Main Window offers you a graphical interface, which you can drag and drop anywhere on the desktop and lock. But, you cannot drag the main window to the taskbar. So, if you want to add a Network Speed Monitor to the taskbar on Windows 11, then the taskbar window will help you with it. Traffic Monitor also comes with many customization options.
You can customize where you want to show the network monitor in the taskbar. Also, you can choose the background color, text, and theme. Even, you can change the net speed unit as well. Skin replacement function is also available for the main Window. Personally, I find it better than the Microsoft Store.
- First, do download the zip file of TrafficMonitor from GitHub.
It is available for 64-bit and 32-bit Windows OS. Also, there is a lite version also available, but better to download the main version.
Note: I am using Windows 11 64-bit version, so I have downloaded the “TrafficMonitor_V1.82_x64.zip” file.
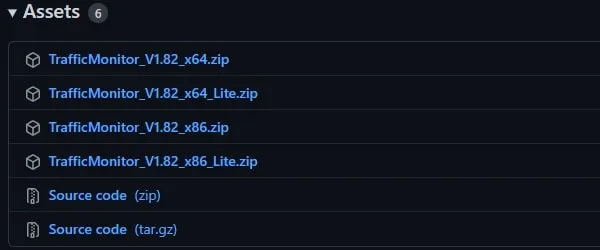
- Once the zip file gets downloaded. Do right-click on it and then click on Extract All > Extract.
- Open the extracted TrafficMonitor folder and then right-click on the “TrafficMonitor” file and click on “Run as administrator”.
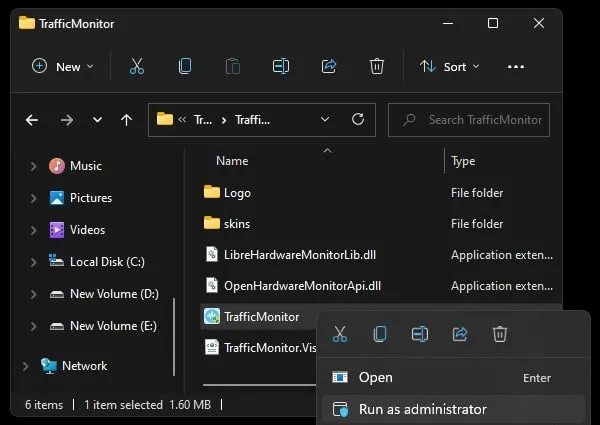
Windows Protection window might appear. Click on More Info > Run anyway. You will now see a shield icon in the Windows taskbar. Click on it and after that click on Yes in the UAC window.
- That’s it, the main window of TrafficMonitor will now appear. Right-click on it, and then click on “Show Taskbar Window”.
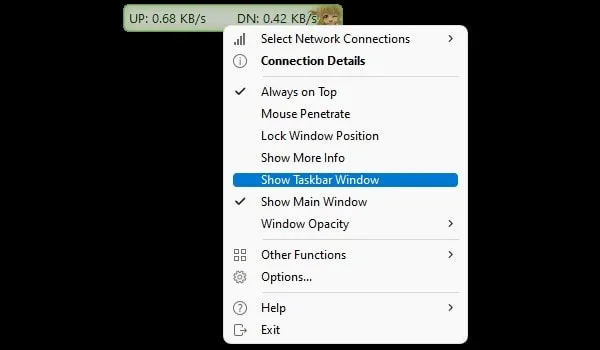
Internet Speed Monitor will now appear in the taskbar.
- Now to disable the main window, right-click again on it. And, after that, click on “Show main Window” to uncheck it.
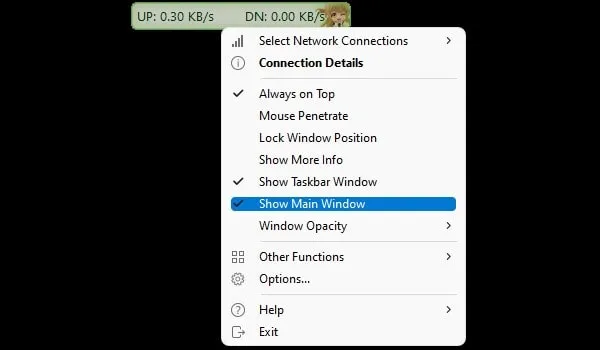
- Okay, now right-click on TrafficMonitor visible in the taskbar. And, click on options to open settings.
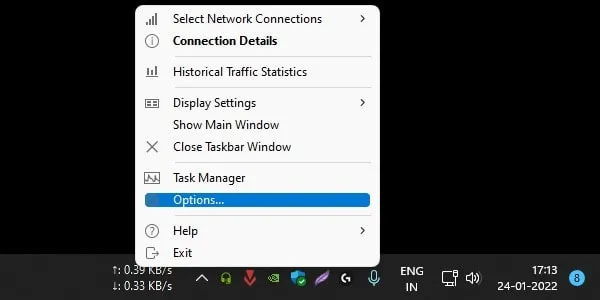
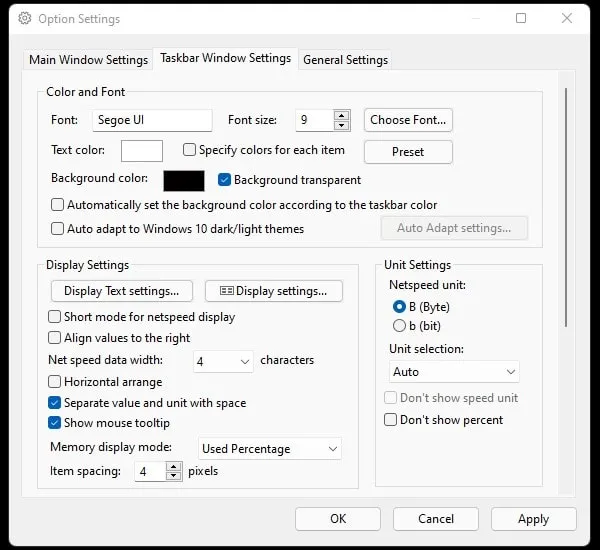
- You can now customize the taskbar window. Also, you can change the net speed unit if you want.
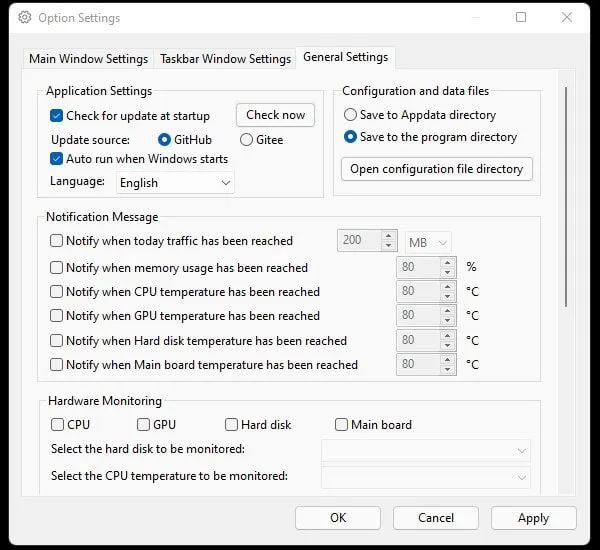
- Click on the General Settings tab. And, do enable the “Autorun when Windows starts” option. Also, select English as the language and click on Apply > OK.
That’s it, so that was the easiest way to add real-time download and upload speed to the Windows 11 taskbar.
Readers help support Windows Report. We may get a commission if you buy through our links.
Read our disclosure page to find out how can you help Windows Report sustain the editorial team. Read more
Are you wondering what your PC’s Internet speed is? To check that, you’ll need to use a Net Speed Monitor for Windows 11.
Since Windows doesn’t have one by default, you need to get it by following these steps.
How can I add a Windows 11 net speed monitor?
1. Get Net Speed Meter
-
1. First, you’ll need to sign in to your Microsoft account to download a UWP app from MS Store. If you don’t have such an account, set one up from the Microsoft account page.
-
2. Click Start on Windows 11’s taskbar.
-
3. Then select the Microsoft Store app on the Start menu to open it.
-
4. Type Net Speed Meter in the MS Store’s search box.
-
5. Then select the Net Speed Meter app in the search results.
-
6. Click the Get button for Net Speed Meter to install it.
-
7. When installed, click the Open button on the Net Speed page.
-
8. Select the Yes option when asked to keep Net Speed Meter on the taskbar. Then you’ll see Net Speed Meter on the desktop.
-
9. You can drag and that meter around the desktop by left-clicking it and holding the left mouse button.
-
10. To add that speed meter to the taskbar, right-click it and select the Keep in Taskbar button.
-
11. You can customize Net Speed Meter by right-clicking it and selecting Setting. Then change the options according to preference.
-
12. For further instructions, you can right-click Net Speed Meter and select the How to use option.
If you’re looking for an internet speed meter for Windows 11, you should know that our first recommendation is Net Speed Meter. It is a Microsoft Store application that can be downloaded for free by all users with an account.
The Net Speed Meter app can be customized to your liking via Settings, and can be added to your Windows 11 taskbar for quick access.
2. Get 8GadgetPack
2.1 Install 8GadgetPack
- Click the Download button on the 8GadgetPack webpage.
- Then press the File Explorer taskbar button.
- Open the folder that includes the 8GadgetPack setup wizard.
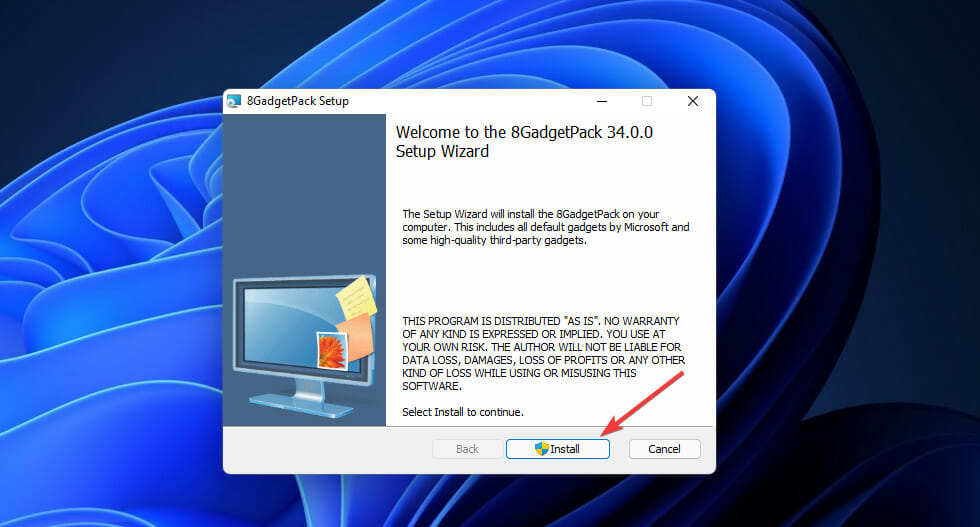
- Double-click 8GadgetPackSetup to open the installer window.
- Click the Install button on the 8GadgetPack Setup window.
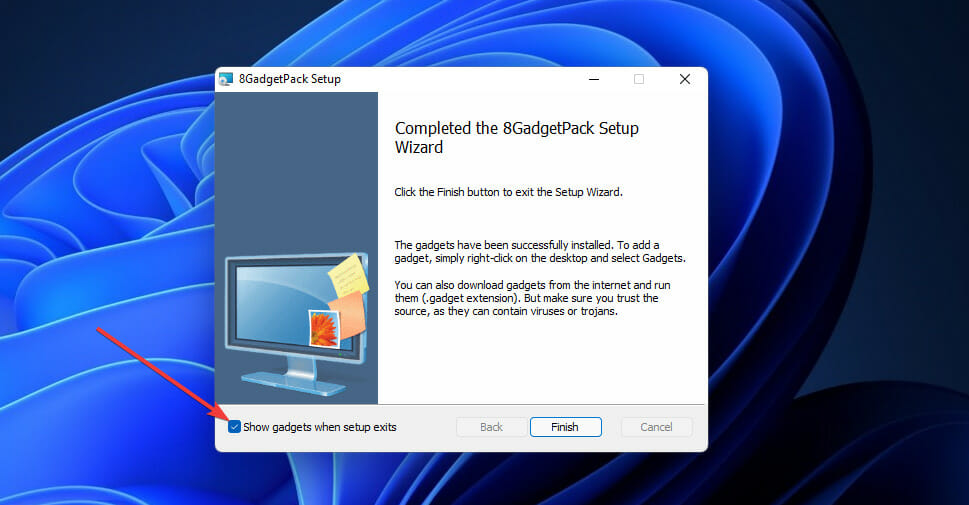
- Select the Show gadgets when setup exits checkbox.
- Press the Finish button. Then the 8GadetPack sidebar will open on the right of the Windows 11 desktop.
2.2 Add Network Meter to the sidebar
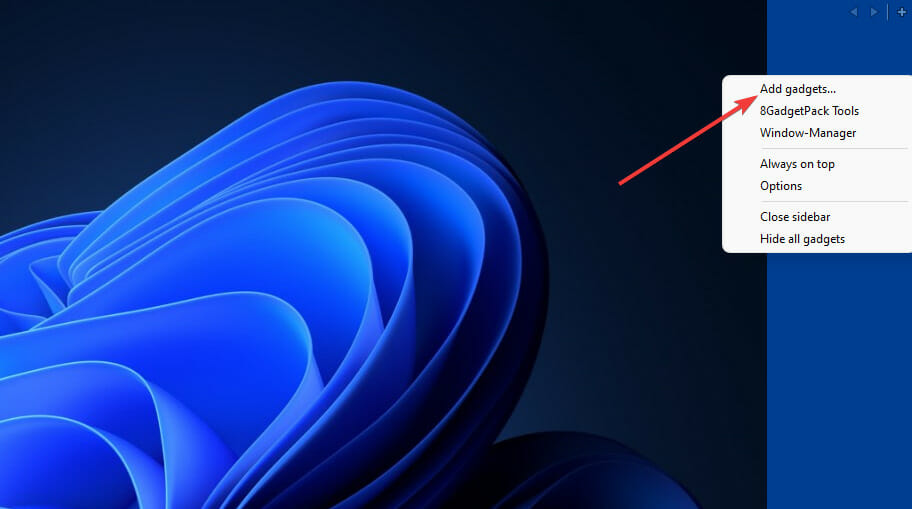
- Right-click the sidebar and select Add gadgets.
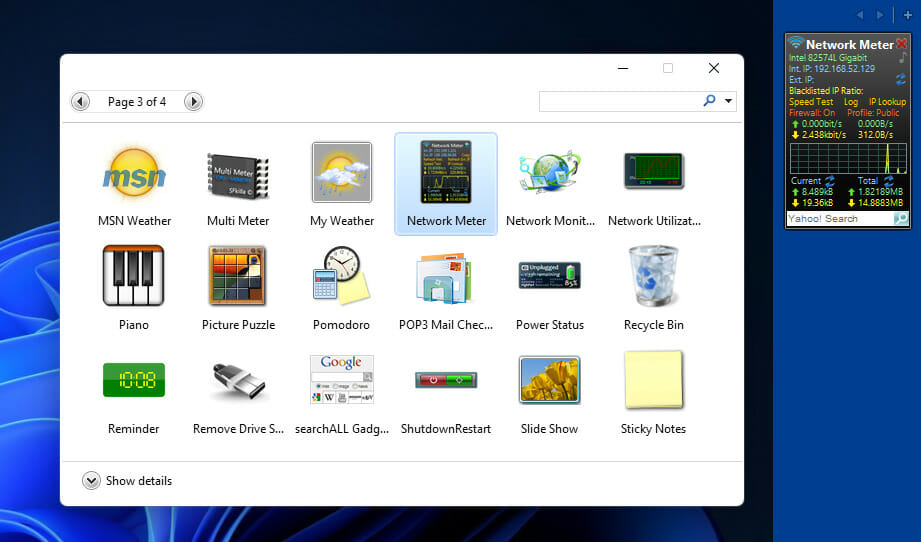
- Double-click Network Meter on the third page of the gadget list to add it to the sidebar.
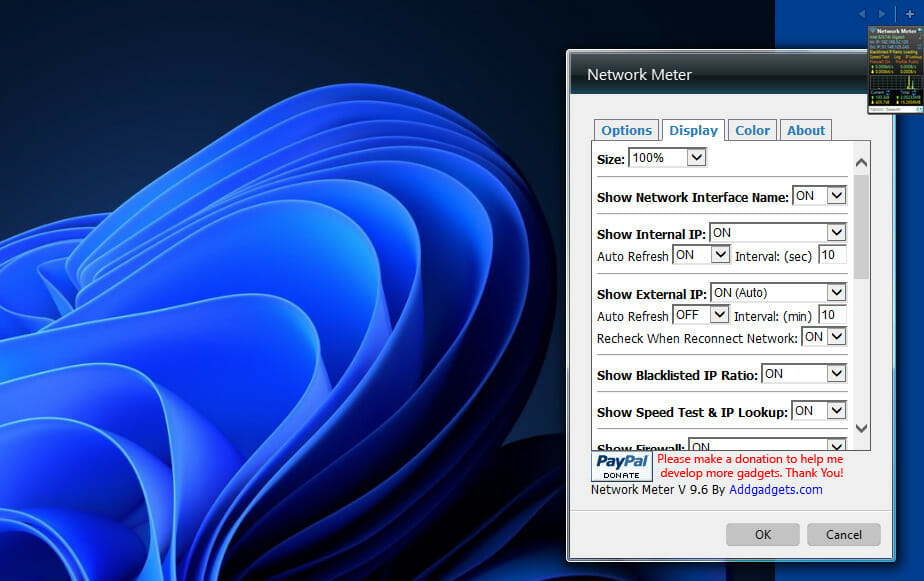
- To configure the Network Meter, right-click its sidebar gadget and select Options.
- Select the Display tab.
- You can add or remove details the gadget displays by selecting ON or OFF drop-down menu options for them.
- To change the gadget’s colors, select the Color tab. Then you can click the codes there to open color palettes.
- Microsoft wants Windows 10 users to upgrade to Windows 11 or Copilot + PCs
- Windows 11 KB5055627 update makes File Explorer more fluid
- A few keyboard settings are moving from Control Panel to Settings app in Windows 11
Does the widgets bar include a network speed monitor in Windows 11?
The widget panel doesn’t include a network speed monitor. There are 11 widget options available there, and none of them add a net speed meter to the panel.
Can I check the connection speed in Windows 11 without third-party apps?
Windows doesn’t have any desktop feature that displays connection speed details, and the only option is to use third-party software.
How can I speed up my PC’s download speed?
If your Internet is slow on Windows 11, close as many background apps as you can on your PC. You can do that by turning off the Let apps run in the background option on the Settings’ Background apps tab.
You can also limit bandwidth for updates via the Windows Update tab’s advanced options in Settings.
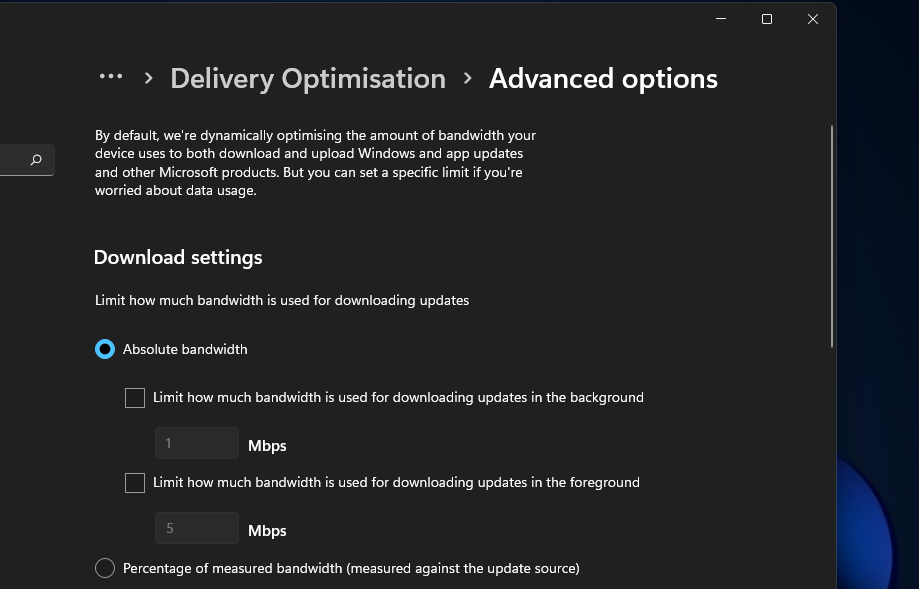
You can also turn off any other devices you have connected to the Internet, such as tablets, smartphones, consoles, etc.
In some cases, you need to check network card speed and make sure that your network adapter isn’t bottlenecking your connection.
You can also try updating your network adapter’s driver if your PC’s download speed seems a lot lower than what it should be.
You can do that by scanning your computer with a third-party driver updater utility, such as Outbyte Driver Updater. Driver updater software enables you to download and install new drivers for PC devices in no time.
Moreover, don’t hesitate to use the best bandwidth limiter tools for those programs that use more bandwidth. Even if they are for Windows 10, you can also use them to see exactly what apps are more demanding in terms of network data.
A Windows 11 net speed monitor is a nice addition to the desktop. Net Speed Meter and 8GadgetPack’s Network Meter are two freely available ones that pack in numerous customization settings.
Either of those network speed monitors on your desktop will make it clearer how long your downloads and uploads might take. With one of those apps installed, you can proactively monitor your PC’s network speed. So, 8GadgetPack and Net Speed Meter are two Windows 11 apps worth noting.
Even more, check out the best resource monitor software for Windows 10. Most of these tools can be enjoyed by Windows 11 users as well. We also have a guide on the best tools to test Internet speed, so don’t miss them.
Which network speed monitor is your choice? Let us know in the comments area below.
Matthew Adams
Windows Hardware Expert
Matthew is a freelancer who has produced a variety of articles on various topics related to technology. His main focus is the Windows OS and all the things surrounding it.
He is passionate about the tech world, always staying up-to-date with the latest and greatest. With an analytical view, he likes problem-solving, focusing on errors and their causes.
In his free time, he likes to read and write about history and tries to always develop new skills.
Время на прочтение2 мин
Количество просмотров16K

Microsoft выпустила версию 3.14 бесплатной утилиты PC Manager для очистки и оптимизации Windows 10/11. Это более продуктивный и простой аналог CCleaner, в который разработчики добавили несколько новых опций.

В текущую версию Microsoft PC Manager входит стандартный комплект инструментов для очистки данных в ОС, включая PC Boost (закрывает ненужные процессы и удаляет файл temp) на ПК, Smart Boost (становится активной, когда использование оперативной памяти резко возрастает или размер файлов temp превышает 1 ГБ), глубокая очистка (обнаруживает старые файлы обновлений Windows, содержимое корзины, веб-кэш и кеш приложений), просмотр всех запущенных процессов, управление приложениями в автозагрузке, поиск больших файлов.

Согласно пояснению разработчиков, утилита Microsoft PC Manager может сочетаться с системной темой и содержит множество полезных инструментов, которые не удаляют системные файлы на ПК, в отличие от других аналогичных решений.

Основные изменения и доработки в PC Manager 3.14:
-
добавлена возможность отслеживать скорость соединения с сетью Интернет в панели задач Windows на рабочем столе (отображаются данные входящего и исходящего потока данных);
-
добавлен новый алгоритм для освобождения места на диске от неиспользуемых файлов, утилита умеет лучше распознавать и быстрее удалять как временные файлы, так и ненужные файлы;
-
появилась возможность интегрировать PC Manager в виджеты Windows 11.


Microsoft позиционирует это решение в качестве одобренного разработчиками Windows 10/11 программного инструмента для безопасной очистки ПК.
Другие сторонние программные инструменты очистки ПК не получили одобрения Microsoft. Многие из них даже помечены в защитных системах Windows 10/11 как вредоносные, поскольку они могут случайно удалить важные файлы реестра ради очистки ненужного мусора. В 2020 году в Microsoft назвали CCleaner потенциально нежелательной программой, но она все ещё доступна в Microsoft Store (но не работает в РФ).
Displaying internet speed on the taskbar in Windows 11 is a useful feature that enables users to monitor their internet connection in real-time. While Windows 11 does not natively provide an option to display internet speed directly on the taskbar, there are various methods and third-party applications that can help achieve this goal. In this extensive article, we will explore several approaches to displaying your internet speed on the taskbar, providing detailed instructions, tips, and additional information to help you find the solution that works best for you.
Understanding Internet Speed
Before diving into the methods for displaying internet speed, it’s helpful to understand what internet speed actually refers to. Internet speed is usually measured in megabits per second (Mbps) and indicates how quickly data is transmitted over your internet connection. It includes two main aspects:
-
Download Speed: This measures how fast data is transferred from the internet to your device. It is vital for activities like streaming videos, downloading files, and browsing websites.
-
Upload Speed: This measures how fast data is sent from your device to the internet. It’s particularly important for activities like video conferencing, sending emails with large attachments, and uploading files to cloud storage.
Built-In Network Monitor
Windows 11 has a built-in network speed monitor which you can see in the Task Manager and the Settings app. Below are the steps to view your internet speed:
-
Open Task Manager: Right-click on the Start button or press
Ctrl + Shift + Escto open Task Manager. -
Go to the Performance Tab: Click on the
Performancetab to view the performance of your computer’s resources. -
Select Network: On the left sidebar, click on
EthernetorWi-Fi, depending on how you are connected to the internet. -
View the Speed: Here you’ll see an overview of your network performance, including the current send and receive speeds.
While this method provides useful information about your internet speed, it’s not real-time monitoring directly on the taskbar.
Methods to Display Internet Speed on Taskbar
To have the internet speed continuously displayed on your taskbar, you may need to consider using third-party applications or system tweaks. Here’s a detailed look at a few popular methods:
1. Third-Party Applications
Many users prefer using third-party applications designed for this purpose. Below are some popular options:
a) NetSpeedMonitor
NetSpeedMonitor is a lightweight application that can easily display your internet speed on the taskbar. Here’s how to set it up:
-
Download NetSpeedMonitor: Visit the official website and download the application.
-
Install the Application: Run the installer and follow the instructions to install NetSpeedMonitor on your Windows 11 system.
-
Add NetSpeedMonitor to the Taskbar: After installation, right-click on the taskbar and select
Toolbars, then chooseNetSpeedMonitor. This will add a new bar that shows your internet speed. -
Customize Settings: You can customize the appearance and the measurements (like showing speeds in Kbps or Mbps) by right-clicking on the NetSpeedMonitor bar and selecting
Settings.
b) GlassWire
GlassWire is another excellent tool that provides detailed information about your network activity, including speed monitoring. Here’s how to use it:
-
Download GlassWire: Go to the GlassWire website and download the free version.
-
Install the Application: Follow the installation prompts to set up GlassWire on your system.
-
Monitor Network Speed: Once installed, open GlassWire, and it will show a real-time visualization of your internet speed on the main interface.
-
Enable Notifications: You can configure notifications in Settings to alert you about any spikes or drops in your internet speed.
c) BitMeter OS
If you’re looking for a tool that provides robust data monitoring and history logging, BitMeter OS is a great alternative:
-
Download BitMeter OS: Visit the official BitMeter OS webpage to download the application.
-
Install the Application: Follow the installation prompts to set it up on Windows 11.
-
Launch the Application: Upon running, BitMeter OS provides a graphical representation of your bandwidth usage along with real-time statistics.
-
Set up the Taskbar Notification: BitMeter OS can run in the background, and you can minimize it to the system tray where it can display your internet speed.
2. System Tweaks and Custom Scripts
For users who enjoy tinkering with system settings and prefer not to use third-party applications, custom scripts can be another way to display internet speed on the taskbar. This method may require some programming knowledge.
a) Using PowerShell Scripts
Here’s a basic approach to displaying internet speed with PowerShell scripts:
-
Create a PowerShell Script: Write a simple script that retrieves your internet speed. You can find various scripts online or create one to ping a reliable server and calculate the speed based on the response time.
-
Schedule the Script: Use the Task Scheduler to run your script at specific intervals to fetch the internet speed.
-
Display in Taskbar: This method is less straightforward than using third-party tools, as you might need additional software to show the fetched speed in a small window on your taskbar.
3. Utilizing Widgets in Windows 11
Windows 11 introduced widgets, which can be a practical way to monitor your internet speed.
-
Access Widgets: Click on the widget icon in the taskbar to open the widgets panel.
-
Add a Widget: Search for internet-related widgets or tools that may allow for speed monitoring.
-
3rd Party Widgets: If none are available, you can look for third-party widgets that integrate with the Windows widget system.
Tips for Monitoring Internet Speed
-
Choose the Right Tool: Depending on your needs, choose a tool that offers the level of detail you want without bogging down system performance.
-
Check Compatibility: Ensure that any third-party application you install is compatible with Windows 11 to avoid stability issues.
-
Regular Updates: Keep any software installed for monitoring your internet speed up to date to benefit from the latest features and security patches.
-
User Reviews: Before downloading a third-party application, it can be beneficial to read user reviews to assess reliability and performance.
Troubleshooting Common Issues
When displaying internet speed on the taskbar, you may encounter several common issues:
-
Software Conflicts: Be aware that some antivirus software may block the installation or proper functioning of monitoring tools. You may need to whitelist your speed monitoring app.
-
Network Issues: If internet speed is not displaying accurately, it may be due to issues with your network connection itself, such as instability or outages.
-
Taskbar Customization: Confirm that your taskbar is configured correctly. Windows allows for significant customization, and desired features may be hidden.
Conclusion
Monitoring your internet speed on the taskbar in Windows 11 can enhance your internet usage experience. Whether through third-party applications like NetSpeedMonitor, GlassWire, or BitMeter OS, or through more technical methods like writing your PowerShell script, the options available are diverse.
Choose the method that suits your preference and technical comfort level, and make informed adjustments to enhance your internet experience. In a world where connectivity is crucial, being aware of your internet speed directly on your taskbar can provide not only peace of mind but also the ability to optimize your online activity for the best performance. As technology continues to evolve, keep an eye out for new tools and methods that may arise to further improve your ability to monitor your internet use effectively.

