
Last Updated :
23 Sep, 2024
The xcopy command in Windows is a powerful tool for copying files and directories. It extends the functionality of the standard copy command by allowing the copy of entire directories along with their subdirectories and files all at once. This makes xcopy highly useful for tasks such as backing up files, migrating data, or automating file management tasks. In this article, we will cover what the xcopy command is how to use it, and provide some common use cases with examples.
Table of Content
- What is the Xcopy Command?
- How to Use the xcopy Command?
- 1. Copy Files
- 2. Copy Entire Directory
- 3. Copy Directory Including Empty Folders
- 4. Copy and Overwrite Files
- 5. Copy Files Based on Date
- 6. Copy Files in Quiet Mode
- 7. Copy Files with Attributes
- 8. Copy Files and Verify
- 9. Copy Files Without Prompting for Destination Confirmation
- Common xcopy Options
- How to Use the Xcopy Command in Windows — FAQs
What is the Xcopy Command?
The xcopy (extended copy) command is used to copy files and directories including the subdirectories and files within them. Unlike the basic copy command, xcopy can handle large-scale directory copying making it perfect for backups, migrations, and file replication.
Basic Syntax:
xcopy [source] [destination] [options]
- [source]: The path to the file or directory we want to copy.
- [destination]: The path to where we want to copy the files.
- [options]: The Various flags that control how the xcopy command behaves.
How to Use the xcopy Command?
1. Copy Files
To copy a file from one location to another using xcopy the basic syntax is:
xcopy C:\source\file.txt D:\destination\
This command copies file.txt from the C:\source directory to the D:\destination directory.
Example:

2. Copy Entire Directory
To copy an entire directory including all its subdirectories and files we can use the /s switch:
xcopy C:\source\ D:\destination\ /s
The /s option copies all directories and subdirectories except empty ones.
Example:
3. Copy Directory Including Empty Folders
If we also want to include the empty directories in the copy use the /e switch:
xcopy C:\source\ D:\destination\ /e
The /e switch copies all subdirectories including the empty ones.
Example:
4. Copy and Overwrite Files
If files in the destination already exist and we want to overwrite them we can use the /y option:
xcopy C:\source\ D:\destination\ /y
The /y option suppresses the prompt that asks if we want to overwrite the file.
Example:
5. Copy Files Based on Date
We can use the /d option to only copy files that have changed after a specific date or if they are newer than the destination files.
xcopy C:\source\ D:\destination\ /d
This ensures that only new or modified files are copied saving time and disk space.
Example:
6. Copy Files in Quiet Mode
To suppress output and avoid unnecessary prompts use the /q option:
xcopy C:\source\ D:\destination\ /q
This copies files quietly without listing each file.
Example:
7. Copy Files with Attributes
To copy system or hidden files we can use the /h option:
xcopy C:\source\ D:\destination\ /h
Normally, hidden and system files are not copied. The /h switch forces the xcopy command to the include them.
Example:
8. Copy Files and Verify
To ensure that files are copied correctly we can use the /v option which verifies each file after copying:
xcopy C:\source\ D:\destination\ /v
Example:
9. Copy Files Without Prompting for Destination Confirmation
Sometimes, xcopy will prompt to confirm whether the destination is a directory or a file. To avoid this we can add the /i option:
xcopy C:\source\ D:\destination\ /i
The /i option assumes the destination is a directory and automatically continues.
Example:
Common xcopy Options
Here are some commonly used xcopy options:
|
Option |
Description |
|---|---|
|
/s |
The Copies directories and subdirectories except empty ones. |
|
/e |
The Copies of all subdirectories including the empty ones. |
|
/y |
Overwrites files without prompting for confirmation. |
|
/d |
Copies files that have changed since the last copy. |
|
/v |
The Verifies each file after copying to ensure accuracy. |
|
/h |
The Copies hid and system files. |
|
/q |
The Copies files in quiet mode suppressing output. |
|
/i |
Assumes the destination is a directory if it’s unclear. |
|
/f |
It displays the full source and destination of each file copied. |
Conclusion
The xcopy command is a versatile and powerful tool in Windows allowing you to perform advanced file-copying tasks with ease. Whether we’re backing up directories copying only newer files or handling large sets of files across different drives, xcopy offers a range of options to suit your needs. By mastering this command we can save time streamline your file management tasks and ensure that data is efficiently copied with accuracy and precision.
Загрузить PDF
Загрузить PDF
Из этой статьи вы узнаете, как в Windows копировать отдельные файлы и файлы из папки с помощью командной строки.
-

Необходимо выяснить, в каком каталоге хранится файл, чтобы указать его в командной строке.
- Чтобы найти каталог, в Проводнике перейдите в папку с файлом, а затем щелкните по адресной строке в верхней части окна Проводника.
- Большинство файлов находится в следующем каталоге: [буква диска]:\Пользователи\[имя пользователя] (например, «C:\Пользователи\Иван»). В этом каталоге хранятся практически все файлы, созданные пользователем.
- Например, файл на рабочем столе находится в следующем каталоге: «C:\Пользователи\Иван\Рабочий стол», а файл в папке «Документы» в каталоге «C:\Пользователи\Иван\Документы».
-
Это необходимо, чтобы скопировать файл. Имейте в виду, что командная строка учитывает регистр букв, поэтому правильно запишите имя файла.
-
Нажмите на логотип Windows в нижнем левом углу экрана.
-
Начнется поиск утилиты «Командная строка».
-
Вы найдете этот значок в верхней части меню «Пуск». Откроется окно командной строки.
- Имейте в виду, что на общедоступном компьютере (например, в школе) вы не сможете открыть командную строку.
Реклама


-
Введите cd, а затем нажмите Пробел; клавишу ↵ Enter не нажимайте.
-
-
В командной строке вы перейдете в указанный каталог.
-
Введите copy, а затем нажмите Пробел; клавишу ↵ Enter не нажимайте.
-
Введите имя файла, а затем нажмите Пробел. Имя файла введите с расширением файла (например, .txt в случае текстового файла). Клавишу ↵ Enter не нажимайте.
- Если в имени файла есть пробелы, заключите их в кавычки. Например, имя файла «Pickles are Good.txt» в командной строке нужно ввести так: Pickles" "are" "Good.txt.
-
Введите каталог (например, C:\Пользователи\[ваше имя пользователя]\Рабочий стол, в который будет скопирован файл.
- Если не ввести конечный каталог, файл будет скопирован в ваш персональный каталог (например, «C:\Пользователи\[ваше имя пользователя]»).
-
Файл будет скопирован в указанный каталог. Чтобы открыть скопированный файл, перейдите в соответствующий каталог в окне Проводника.
Реклама


-
Введите cd, нажмите Пробел, введите каталог с папкой и нажмите ↵ Enter.
- Например, чтобы скопировать файлы из папки «Example», которая находится на рабочем столе, введите каталог C:\Пользователи\Иван\Рабочий стол.
-
Введите robocopy, а затем нажмите Пробел; клавишу ↵ Enter не нажимайте.
-
Введите имя папки, файлы из которой вы хотите скопировать, а затем нажмите Пробел. Клавишу ↵ Enter не нажимайте.
- Если в имени папки есть пробелы, заключите их в кавычки.
-
Введите каталог, в который вы хотите скопировать файлы из папки.
- Если в исходной и конечной папках много файлов, они перемешаются, потому что сама исходная папка скопирована не будет.
-
Файл из исходной папки будут скопированы в конечную папку.
Реклама


Советы
- Чтобы скопировать все файлы, которые находятся в каталоге, введите команду copy *[тип файла] (например, copy *.txt).
- Чтобы создать конечную папку и скопировать в нее сразу несколько файлов, введите каталог конечной папки (включая саму конечную папку) в сочетании с командой «robocopy».[1]
- Если скопировать файлы, которые находятся на рабочем столе, в новую папку, она будет переименована в «Рабочий стол».
Реклама
Предупреждения
- Копировать файлы и папки через командную строку довольно рискованно, если вы не знаете, что делаете. Не трогайте папки и файлы, назначение которых вам неизвестно.
Реклама
Об этой статье
Эту страницу просматривали 224 742 раза.
Была ли эта статья полезной?
При работе в командной строке (cmd) часто возникает необходимость скопировать файл или целую папку. Также консольные команды для копирования могут использоваться в BAT-файлах для резервного копирования и других задачах.
В этой статье мы расскажем о том, как скопировать файл или папку в командной строке Windows. Статья будет актуальной для всех версий Windows, включая самые новые Windows 11 и Windows 10.
Содержание
Как скопировать файл через командную строку Windows
Для копирования файлов в командной строке Windows нужно использовать команду «copy». Данная команда позволяет скопировать один или несколько файлов из одной папку в другую. Обратите внимание, команда «copy» копирует только файлы. Для копирования вложенных папок нужно использовать команду «xcopy», которую мы рассмотрим ниже.
В самом простом случае команда для копирования файлов выглядит так:
copy [исходный файл] [новый файл или папка назначения]
Например, чтобы скопировать файл «file1.txt» из текущего каталога в папку «e:\tmp» нужно выполнить:
copy file1.txt e:\tmp

При необходимости для копируемого файла можно указать новое название в папке назначения. Например, чтобы скопировать «file1.txt» из текущего каталога в папку «e:\tmp» и при этом назвать его «newfile.txt» нужно выполнить:
copy file1.txt e:\tmp\newfile.txt

С указанием полных путей команда копирования будет выглядеть так:
copy d:\tmp\file1.txt e:\tmp\file.txt

Для копирования большого количества файлов в названиях можно использовать маски. Символ звездочка (*) обозначает любое количество любых символов, а знак вопроса (?) – один любой символ. Например, чтобы скопировать все документы с расширением TXT из текущего каталога в папку «e:\tmp\» нужно выполнить следующее:
copy *.txt e:\tmp\

Также с помощью команды «copy» можно скопировать все содержимое одной папки в другую. Например, в случае копирования всех файлов из папки «d:\tmp\» в папку «e:\tmp» команда будет выглядеть так:
copy d:\tmp\ e:\tmp

В данном случае из папки «d:\tmp\» будут скопированы только файлы. Для копирования вложенных папок нужно использовать «xcopy».
Полный синтаксис команды «copy» выглядит так:
copy [/d] [/v] [/n] [/y | /-y] [/z] [/a | /b] <source> [/a | /b] [+<source> [/a | /b] [+ ...]] [<destination> [/a | /b]]
Полный список параметров для команды «copy»:
| Параметр | Описание |
| /d | Сохранение копируемых зашифрованные файлов в расшифрованном виде в месте назначения. |
| /v | Проверка правильности записи скопированных файлов. |
| /n | Использование короткого имени файла (если доступно) при копировании файла с именем длиннее восьми символов или с расширением длиннее трех символов. |
| /y | Подавление запроса на подтверждение перезаписи. |
| /-y | Вывод запроса на подтверждение перезаписи. |
| /z | Копирует сетевые файлы в перезапускаемом режиме. |
| /a | Копирование текстового файла ASCII. |
| /b | Копирование двоичного файла. |
| <source> | Указывает расположение, из которого необходимо скопировать один или несколько файлов. Обязательный параметр. |
| <destination> | Указывает расположение, в которое необходимо скопировать файл или несколько файлов. Обязательный параметр. |
| /? | Отображение справки в командной строке. |
Большинство параметров указываются в начале, сразу после команды «copy». Например, для того чтобы подавить вывод запросов на перезапись существующих файлов можно добавить параметр «/y».
copy /y file1.txt file2.txt
Как скопировать папку через командную строку Windows
Для копирования папок с вложенными папками и файлами в командной строке Windows нужно использовать команду «xcopy». Данная команда позволяет скопировать папку из одного расположение в другое с сохранением структуры каталогов. Фактически «xcopy» — это более продвинутая версия команды «copy».
В упрощенном виде синтаксис команды «xcopy» будет выглядеть так:
xcopy [исходная папка или файл] [папка назначения или файл] [параметры]
Для копирования папок с вложенными папками и файлами нужно использовать параметр «/s» или «/e». Без этих параметров команда будет работать только с одним каталогом.
| Параметр | Описание |
| /s | Копирование каталогов с подкаталогами (исключая пустые) |
| /e | Копирование каталогов с подкаталогами (включая пустые). |
Например, для того чтобы скопировать все файлы и вложенные папки (включая пустые) из папки «d:\tmp» в папку «e:\tmp» нужно выполнить:
xcopy d:\tmp e:\tmp /e

Полный синтаксис команды «xcopy» выглядит так:
xcopy <Source> [<Destination>] [/w] [/p] [/c] [/v] [/q] [/f] [/l] [/g] [/d [:MM-DD-YYYY]] [/u] [/i] [/s [/e]] [/t] [/k] [/r] [/h] [{/a | /m}] [/n] [/o] [/x] [/exclude:FileName1[+[FileName2]][+[FileName3]]] [{/y | /-y}] [/z] [/b] [/j]
Полный список параметров для команды «xcopy» можно посмотреть на сайте Майкрософт. Здесь же приведены только некоторые самые базовые:
| Параметр | Описание |
| /s | Копирование каталогов с подкаталогами (исключая пустые) |
| /e | Копирование каталогов с подкаталогами (включая пустые). |
| /w | Вывод запроса на подтверждения начала копирования. |
| /p | Запрос подтверждение при создании каждого нового файла. |
| /c | Пропуск ошибок. |
| /v | Проверка всех скопированных файлов на соответствие его исходнику. |
| /q | Скрывает вывод информации от команды xcopy. |
| /f | Вывод имен в процессе копирования. |
| /l | Вывод списка копируемых файлов. |
| /g | Сохранение новых файлов в незашифрованном виде. |
| /d[:мм-дд-гггг] | Копирование файлов, которые были измененные не ранее указанной даты. Если не указать дату (мм-дд-гггг), то команда xcopy будет копировать все файлы, которые новее существующих. |
| /u | Обновление только существующих файлов в папке назначения. |
| /y | Подавление запроса на подтверждение перезаписи. |
| /-y | Вывод запроса на подтверждение перезаписи. |
| /z | Копирует сетевые файлы в перезапускаемом режиме. |
| /h | Копирование скрытых и системных файлов. |
| /r | Перезапись файлов с атрибутом «только для чтения». |
| /t | Создание структуры каталогов без копирования файлов. Пустые каталоги не включаются в структуру. Для включения пустых каталогов нужно добавить параметр /E. |
| <source> | Указывает расположение, из которого необходимо скопировать один или несколько файлов. Обязательный параметр. |
| <destination> | Указывает расположение, в которое необходимо скопировать файл или несколько файлов. Обязательный параметр. |
| /? | Отображение справки в командной строке. |
Параметры указываются в конце команды. Например, для того чтобы скопировать все файлы (включая скрытые, системные и только для чтения) и вложенные папки (включая пустые) из папки «d:\tmp» в папку «e:\tmp» нужно выполнить:
xcopy d:\tmp e:\tmp /e /h /r
Посмотрите также:
- Выключение компьютера через командную строку
- Как перезагрузить компьютер через командную строку
- Как вызвать командную строку в Windows 7
- Как поменять дату в Windows 7
- Как выключить компьютер через определенное время
Автор
Александр Степушин
Создатель сайта comp-security.net, автор более 2000 статей о ремонте компьютеров, работе с программами, настройке операционных систем.
Остались вопросы?
Задайте вопрос в комментариях под статьей или на странице
«Задать вопрос»
и вы обязательно получите ответ.
If you want to copy folders from one drive to another, you can use the Xcopy command line without copying each file manually. Follow this post from EaseUS to learn how to copy folders and subfolders using Xcopy command and a much easier alternative.
📃Also read: Robocopy Copy Folders and Subfolders on Windows
Can You Copy Folders and Subfolders Using Xcopy Command
Xcopy, abbreviated as extended copy, is a command line to copy multiple files or complete directory trees from one location to another. Xcopy is the advanced version of the copy command, as this command comes with additional switches to specify the source and destination in detail. Xcopy removes the read-only attribute while sharing, which makes it ideal for copying files from a CDROM to a hard drive.
Many operating systems, like Windows, IBM PC, DOS, MS-DOS, etc., provide this command line utility. Even with the arrival of more advanced commands like Robocopy, many Windows users prefer using the Xcopy command. But can I use Xcopy Command to copy files and subfolders?
Yes, the Xcopy command lets you copy folders and subfolders. Since recreating the directory trees using the conventional copy-paste method is tedious, the Xcopy command helps you do it with just a command line using the source and destination.
Powershell Move Files from One Folder to Another
This article discusses how to use PowerShell commands to perform various operations to move files from one folder to another. Read more >>
How to Use Xcopy Command to Copy Folders and Subfolders
Key Takeaways:
- xcopy [source] [destination] [options]
- Xcopy C:\example D:\example /E /H /C /I
- Xcopy Source Destination /T /E
- Xcopy Source Destination /O /X /E /H /K
The common syntax to copy folders and subfolders with CMD is xcopy [source] [destination] [options]. We can use various options of the above command depending on our demands. Below are some of the cases we often perform using the Xcopy command.
- Case 1. Copy All Folders and Subfolders with Files
- Case 2. Copy Folders and Subfolders Without Files
- Case 3. Copy Folders and Subfolders with NTFS and Share Permission
Case 1. Copy All Folders and Subfolders with Files
First, you should open the Command Prompt in administrator mode. Click on «Start», type CMD, and select «Run as administrator».
After the Command Prompt is open, type the Xcopy command as shown to copy all folders and subfolders with files.
Consider an example folder, and you want to copy the «example» folder and its subfolders from the C drive to the D drive.
Xcopy C:\example D:\example /E /H /C /I

The respective commands mean:
/E — Copies all subdirectories, including the empty ones.
/H — Copies files with hidden and system file attributes.
/C — Continues to copy files even in case of errors.
/I — If in doubt, the command always assumes the destination is a folder. e.g. if the destination is not specified.
Point to remember:
- The Xcopy command won’t copy open files.
- The command does not display any progress bar or completed notification when executed. You have to manually check if the files are copied correctly.
- If your folder name has spaces or is larger than eight characters, make sure you add quotation marks around the path while executing the command.
Case 2. Copy Folders and Subfolders Without Files
Follow the command below to copy folders and subfolders without files.
Xcopy Source Destination /T /E
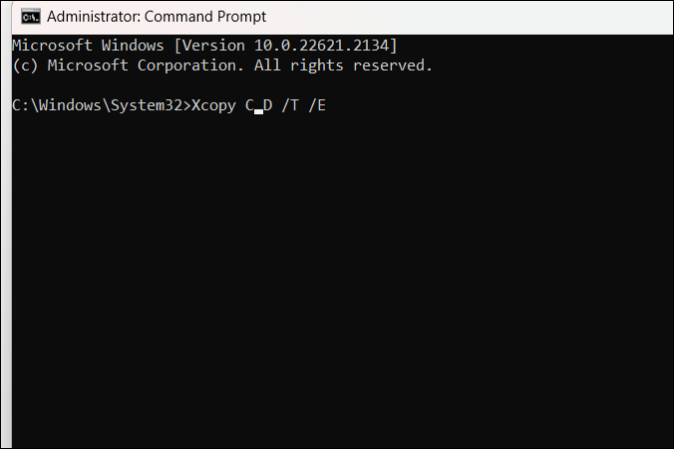
/T — Copies the subdirectory structure but not the files.
/E — Copies all subdirectories, including the empty ones.
Case 3. Copy Folders and Subfolders with NTFS and Share Permission
If you want to transfer the folders and subfolders with NTFS and share permission, type the below command and execute.
Xcopy Source Destination /O /X /E /H /K
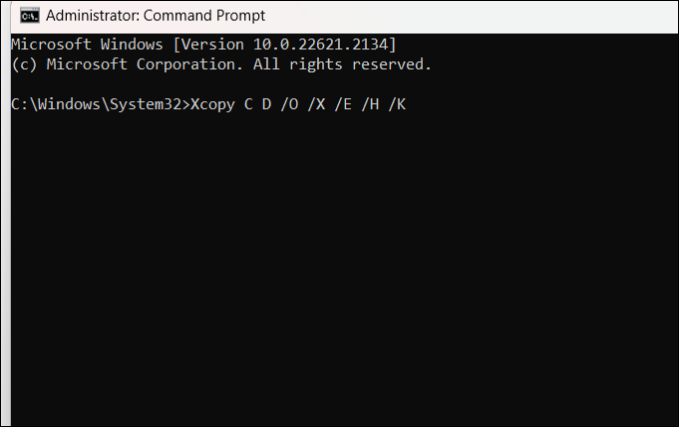
/E — Copies all the folders and subfolders, including empty ones.
/H — Only copies the hidden and system files.
/K — Copies attributes. When used with Xcopy, it restes the read-only attributes.
/O — Copies the file ownership and ACL info.
/X — Copies file audio settings (implies /O).
Along with all these commands, there are many parameters you can use with Xcopy for various kinds of needs. However, a simple error will result in execution failure and may sometimes even lead to data loss. So, be cautious while using the command and parameters.
Easier Way: Automatically Backup Files or Folders on Windows
In many cases, you want to copy folders and subfolders for backup, but Xcopy can only make a folder duplication. If you want to copy files, folders, or hard drives for backup, you need reliable backup software. With a powerful and professional tool, you can even create a system backup to prevent system crash risks.
EaseUS Todo Backup is your complete backup and restore solution to replicate folders, disks, and systems for backup. It can help you automatically back up files on your Windows computers. With the help of advanced programs, you can clone, upgrade, and transfer files for backup. You can make clones for partitions, files, and systems to back up at any time.
In addition, the tool lets you mount the images for fast recovery. The ability to create a bootable backup helps you install your OS anywhere and anytime.
Here are the steps to help you back up files easily.
Step 1. Click the «Select backup contents» button to start backup.

Step 2. There are four data backup categories, File, Disk, OS, and Mail, click File.

Step 3. Both local and network files will be listed on the left. You can expand the directory to select the files to be backed up.

Step 4. Follow the on-screen guide, select the destination where you want to save the backup.

Click «Options» to encrypt the backup with password in «Backup Options«, set the backup schedule and choose to start back up at certain event in «Backup Scheme«. There are also many other options you can explore, customize the backup task according to your need.

Step 5. You can store the backup to local drive, EaseUS’s cloud service, and NAS.

Step 6. EaseUS Todo Backup enables users to back up data to both third-party cloud drive and its own cloud drive.
If you want to back up data to third-party cloud drive, choose Local Drive, scroll down to add Cloud Device, add and login your account.

You can also choose EaseUS’s own cloud drive. Click EaseUS Cloud, sign up with your EaseUS Account and log in.

Step 7. Click «Backup Now» to start backup. After the backup task is completed, it will be displayed in the form of a card on the left side of the panel. Right-click the backup task to further manage it.

You may also be interested in:
To Wrap Things Up
Xcopy is a useful option to simply move/copy files between two locations on your computer. The above post helps you learn how to copy folders and subfolders using Xcopy command in various situations. However, many users complain of the Xcopy command failing or not working frequently.
A reliable option like EaseUS Todo Backup helps you automatically copy files from one folder to another. It has the ability to copy folders, subfolders, hard drives, and systems. With advanced backup and cloning options, it acts as a complete solution for backup and recovery needs.
FAQs on Copy Folders and Subfolders Using Xcopy Command
Here are some of the most frequent FAQs asked on how to copy folders and subfolders using the Xcopy command. I hope you find these queries helpful.
1. How to copy shared folders without losing share permissions?
- Open File Explorer, go to the shared folder and right-click on it.
- Navigate to Properties > Security Tab > Advanced > Change Permissions. Here, uncheck the «Include inheritable permissions from this object’s parent» and click «Add». Now, click OK thrice to save it.
- Change the parent directory of the shared folder.
- Run the Xcopy command with /E/H/K/O/X to copy shared folders without losing share permissions.
2. What command can copy all files directories and subdirectories to another disk all at once?
The Xcopy command can copy all file directories and subdirectories to another disk all at once. The command comes with a set of attributes for specific functions to complete the required task.
3. Should I use Xcopy or Robocopy?
That’s a debatable question. One can consider Robocopy as a more advanced version of Xcopy. The major difference between Xcopy and Robocopy is that Robocopy has a retry option, whereas Xcopy does not.
In this tutorial, we will learn how to copy files and folders in the Windows Command prompt.
We are going to look at two cmd commands: Copy and Xcopy.
Note that the copy command has some limitations compared to the xcopy. For example, to copy directories or hidden files, you have to use the xcopy command.
Copy Command
On Windows, we can use the copy command to copy one or more files from one location to another:
copy C:\data\sales.doc C:\backupThe preceding command will copy sales.doc from C:\data\ to C:\backup.
Use the /y switch to overwrite duplicate files without confirmation:
copy /y C:\data\sales.doc C:\backupWe can also save a file to a different name. For example, the following command saves file1.txt as file2.txt in the same directory:
copy file1.txt file2.txtYou can also use wildcards to copy multiple files:
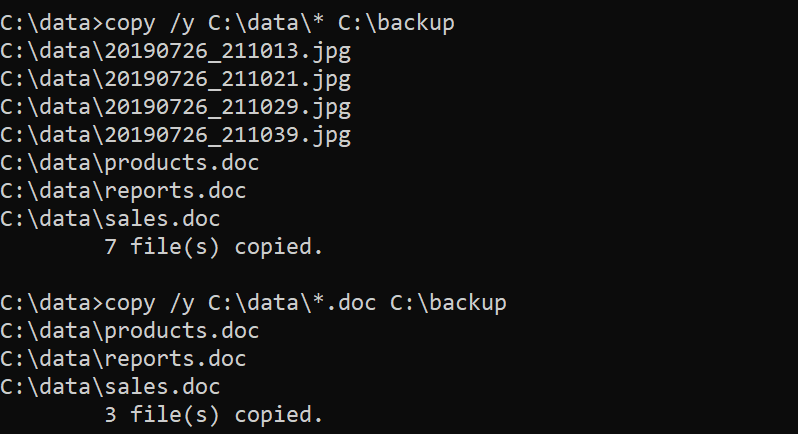
copy /y C:\data\* C:\backup
copy /y C:\data\*.doc C:\backup
The first command copies all files in the C:\data\ directory to C:\backup. The second command copies all files with a .doc extension to the C:\backup.
We can also combine several files into one:
copy file1+file2 file3
copy error* C:\backup\report.txt
In the first line, file1 and file2 are combined to make one file named file3. In the second line, all files whose names start with «error» are copied to the C:\backup, as a single file called report.txt.
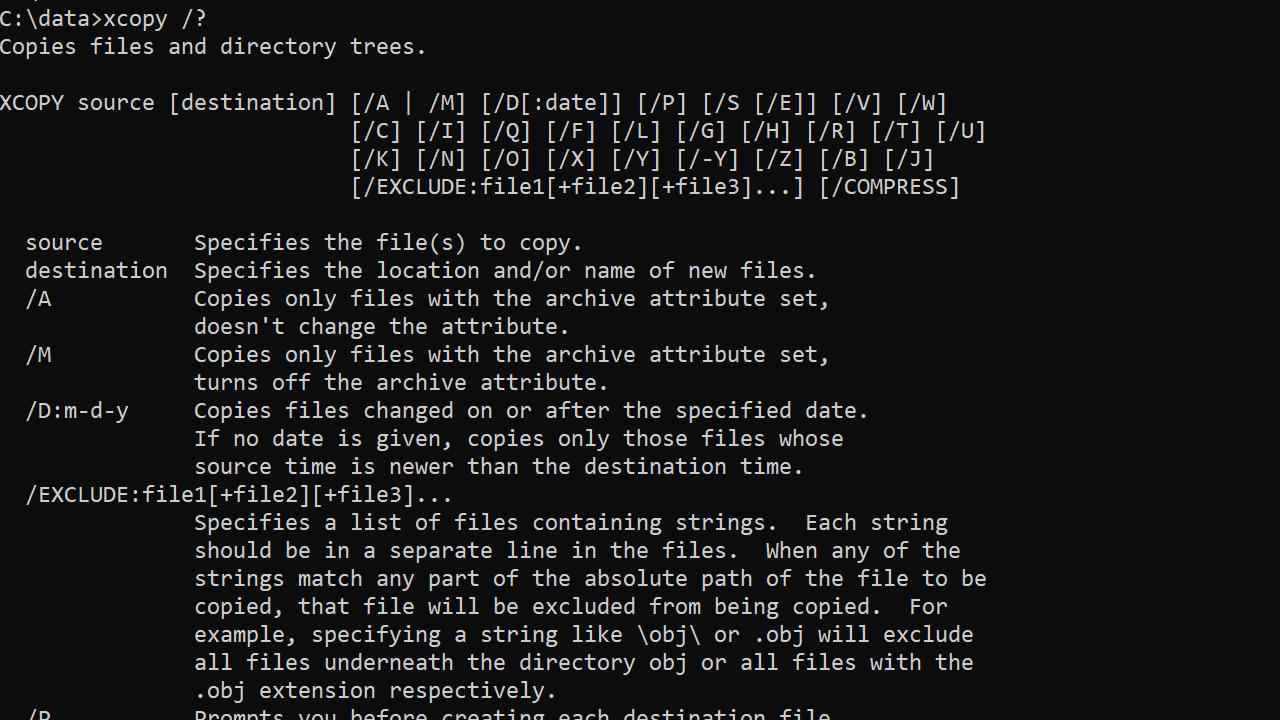
You can get a list of all available options with the copy /? command.
Xcopy Command
The xcopy command offers more features. For example, with xcopy, we can copy directories and subdirectories, as well as hidden files.
Command Options
| /Y | Prompt before overwriting an existing file. |
| /H | Copy hidden files/system files. |
| /S | Copy directories and subdirectories. Empty directories are not included by default (use /e for that). |
| /E | Include empty directories. |
| /I | Create the destination folder if it does not exist. Use this option when you want to copy the parent folder itself. |
| /T | Copy directory tree without files. Empty directories are not included by default. Use /e option to include empty folders. |
| /P | Prompt for confirmation before creating each file. |
| /Q | Quiet mode. |
| /exclude | Specify a text file that contains a list of files to exclude. See the examples. |
| /Z | Resume mode. Use this option when copying files over a network. |
| /D:m-d-y | Copies files changed on or after the specified date. |
Examples of Using the Xcopy Command
Copy sales.doc from the current directory to C:\backup:
xcopy sales.doc C:\backupCopy C:\data\accounts (all files including subdirectories) to C:\backup:
xcopy /s /e /h /i /y C:\data\accounts C:\backup\accounts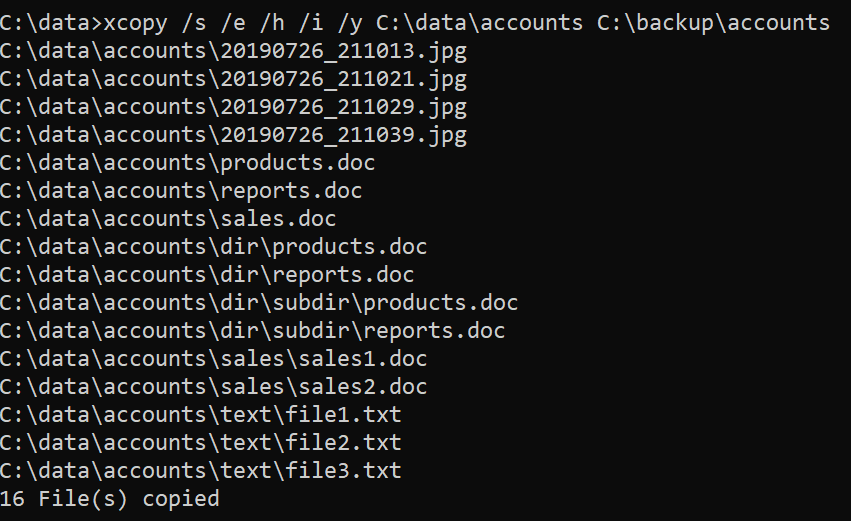
In the following example (without /I switch), the contents of the folder are copied but not the folder itself:
xcopy /s /e /h /y C:\data\accounts C:\backup\Copy the directory structure of C:\OneDrive to the backup directory:
xcopy /s /e /t /y C:\OneDrive C:\backup\You can use wildcard characters to match patterns. The following command copies all files with a .jpg extension:
xcopy /s /h /y C:\data\*.jpg C:\backupUsing for loop to copy multiple files:
for %i in (sales.doc, products.doc) do xcopy /y %i C:\backupExcluding files with xcopy
With the /exclude, we can provide a text file that contains items we want to exclude.
xcopy /s /e /h /y /exclude:C:\Users\user1\files-to-exclude.txt C:\data\ C:\backup\The files-to-exclude.txt may look like the following:
.doc
sales*
In this example, we exclude items with the .doc extension and files whose name starts with sales.
You can get a list of all available options with the xcopy /? command.