Whenever you install Windows 11, or for that matter, any operating system on your computer, some of your disk drive’s space is stored by the EFI System Partition. This partition consists of all the important files that are required to boot up your operating system. Its size varies from 100 MBs to 1.0 GB.
One never needs to let go of this system partition unless s/he is using a dual-boot configuration on his/her computer. If you are using two or more operating system(s) on your PC and want to remove any one OS, you definitely require deleting this system partition as well. This post will discuss the right way to find and delete the EFI system partition in Windows.
When does one require deleting the system partition?
Users must delete the system partition when they are performing a clean installation of Windows or any other operating system on their computers. You may also want to get rid of this system partition when you are selling your laptop or desktop to other users.
While deleting primary and unallocated volumes is quite an easy task, the same can’t be said for the EFI system partition. This post covers what you must do in order to get rid of the system partition on Windows 11/10 PC.
Create a System Restore Point using Command Prompt or PowerShell
How to find the EFI System Partition in Windows?
There are two easy ways by which you can open the Disk Management window on your Windows 11/10 PC. The first one is by using Windows Search while the other one is by using the Run dialog.
- Press Windows + S, and search for disk management in the text field.
- Click on the top result i.e. Create and format hard disk partitions.
- When this opens up, you may see all the disks available inside your PC with different partitions.

Note: One may also open the Disk Management window by simply running “diskmgmt.msc” in the Run dialog box.

To delete the EFI system partition in Windows, use these steps –
- Press Windows + R to launch the Run dialog.
- Type CMD on it and press Ctrl + Shift + Enter keys altogether.
- The UAC window will prompt next, hit Yes to authorize accessing Command Prompt as administrator.
- Type the following near the blinking cursor, and press Enter.
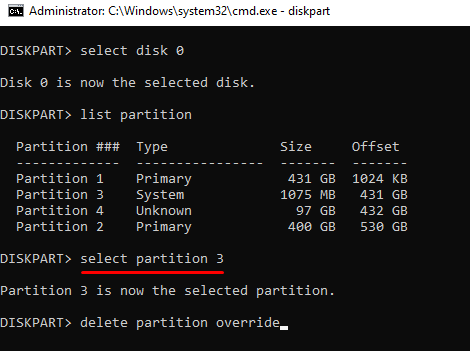
diskpart
- The Command Prompt syntax will now change to Diskpart.
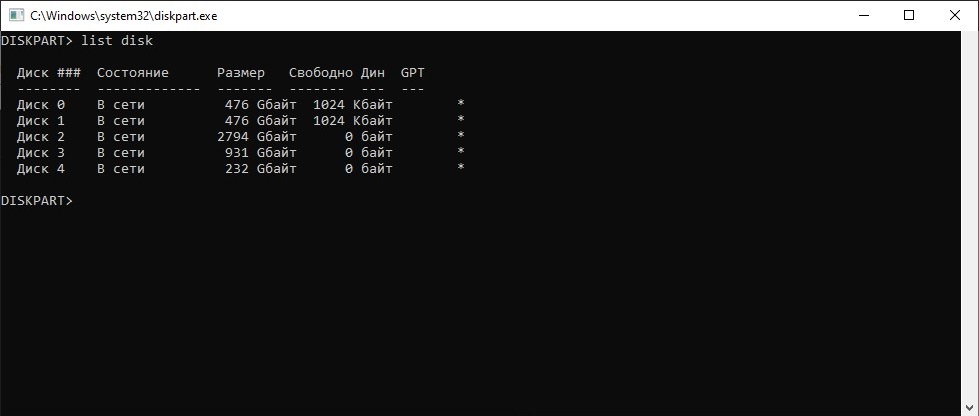
- Execute the following code and press Enter to view a list of all the connected drives to your computer.
list disk
- Select the disk number on which you want to delete the EFI System Partition. For this, you need to copy/paste the below command and press Enter.
select disk 0
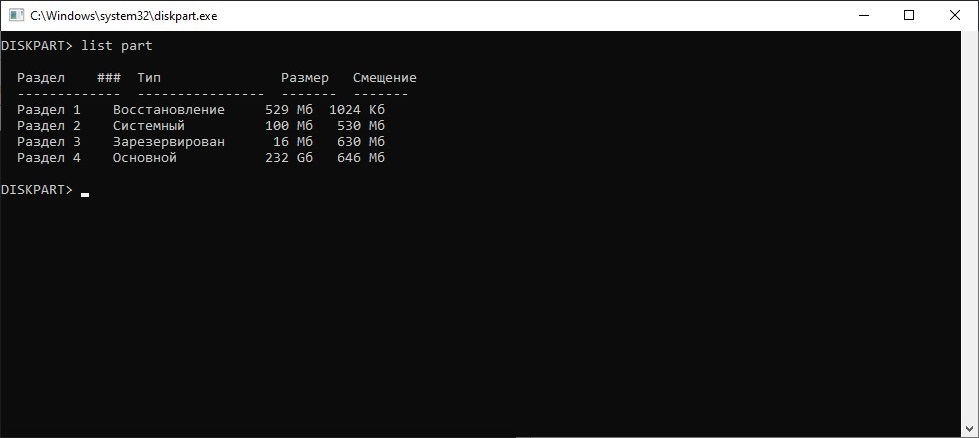
- Now that you have selected the designated disk, run the following code to list out all the partitions available on it.
list partition
- Look out for the partition that is of System type and select that particular partition by running this code.
select partition 3
- Now that you have selected the EFI system partition, execute this command to delete it from the disk.
delete partition override
That’s it, you have successfully deleted the EFI system partition from your disk drive. One may even confirm it by opening the Disk Management app on his/her Windows PC. Though the EFI partition must have gone by now, restart your PC in case it still appears.
How do I delete any other partition in Windows?
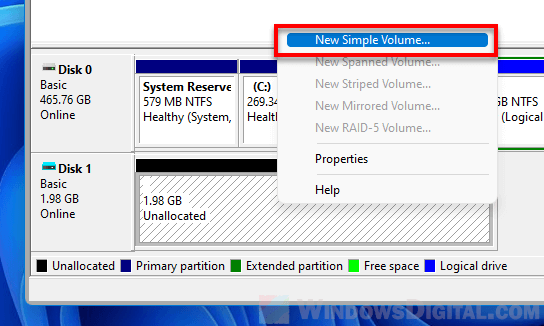
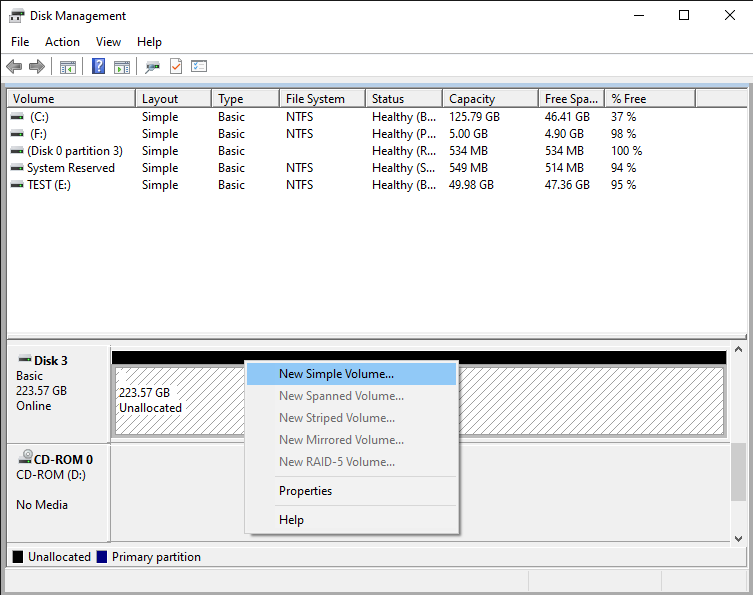
Deleting any other partition in Windows is quite an easy task. For this, you require to launch the Disk Management app, right-click on any partition (primary or unallocated) and choose the “Delete Volume” option.
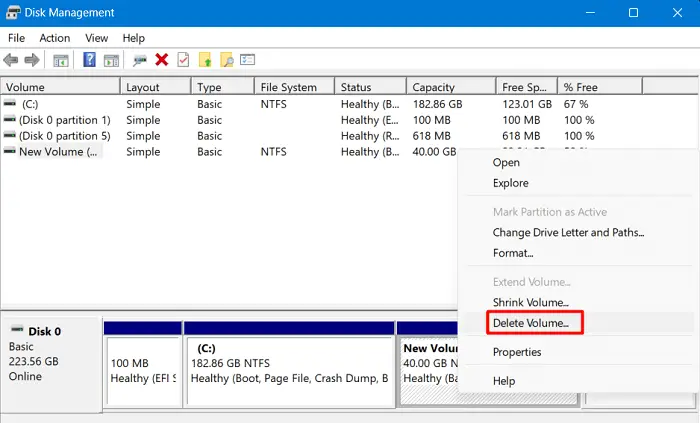
That’s it, your chosen partition will now delete from your system automatically. In case you would like to create a new partition of this, right-click over it and choose the option – New Simple Volume.
This guide explains why Disk Management can’t delete some of the protected partitions such as the EFI System Partition on some disks, and how to delete these protected partitions in Windows 11 using an alternative method (without any third-party software).
Also see: How to Merge Two Drives in Windows 11
Disk Management can’t delete protected partition
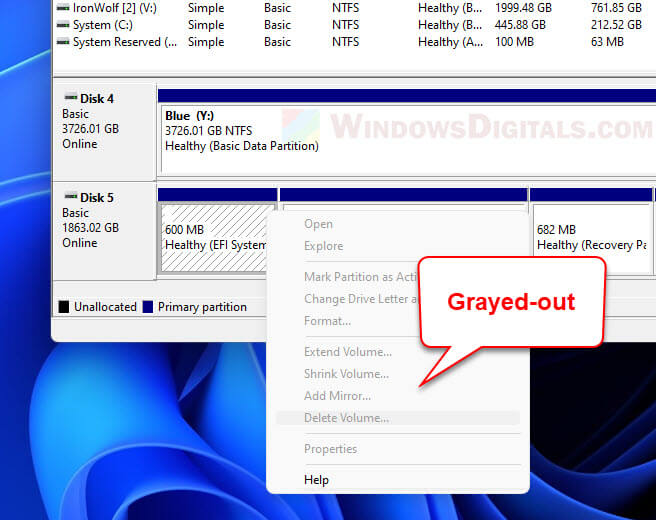
When we need to initialize a disk and create volumes on it, we would normally use the Disk Management tool in Windows to achieve that. It’s common that some disks consist of a small partition called EFI System Partition usually with a size not more than a gigabyte.
When you right-click this partition in Disk Management, the Delete Volume will be grayed-out and cannot be selected. This is because the partition was created in such a way that it restricts any tool from being able to make changes to it, including deleting it. Not even the Disk Management tool is able to delete the partition or apply any changes to it.
Suggested Read: How to Extend C: Drive in Windows 11
Delete Protected EFI System Partition in Windows 11 using DISKPART
Although some third-party disk management software may be able to delete the protected EFI system partition, you can use the Windows built-in DISKPART tool instead to delete the protected partition in Windows 11 without relying on any third-party tool.
However, the DISKPART tool is a command-line tool that can only be executed by typing the relevant commands in a command prompt. It does not have a graphical user interface. It may seem complicated and confusing at first, but believe me, it’s not as difficult as you may think.
Important: Please note that the procedure of deleting the protected EFI system partition will involve cleaning and wiping the entire disk. All data and files from any other partition on the same disk will be erased. This is because the DISKPART “clean” command that we will be using will clean the entire disk, including all partitions on it. There is no way to delete only the protected partition without wiping the disk first. Please back up your important files to some other location before proceeding. If you do not know what you’re doing, please do not proceed as you may risk destroying your existing partitions and lose your files if done incorrectly.
To delete a protected partition in Windows 11 using DISKPART command-line tool, follow the steps below.
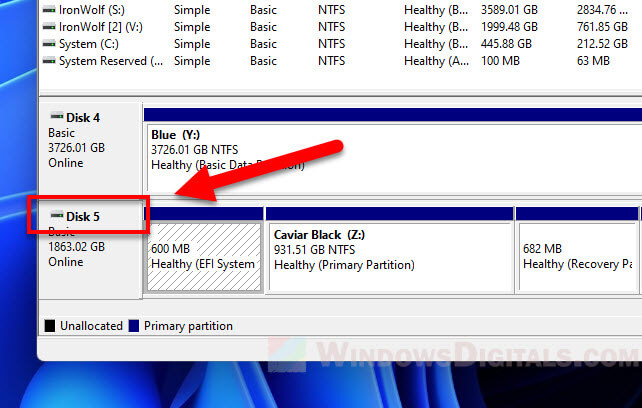
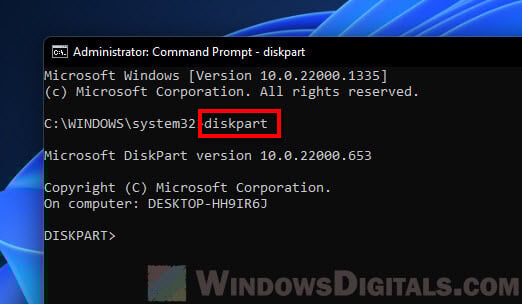
- First, write down the Disk number of the disk that you want to manage. You can view the disk number in the Disk Management tool. In my case, the disk that has the EFI System Partition that I want to delete is called Disk 5.

- Search for and run “Command Prompt” (or CMD) as administrator. Administrative right is required to run the following commands.

- In the Command Prompt window, first type
diskpartand press Enter to begin using the tool. The new line should now begin with “DISKPART>“.
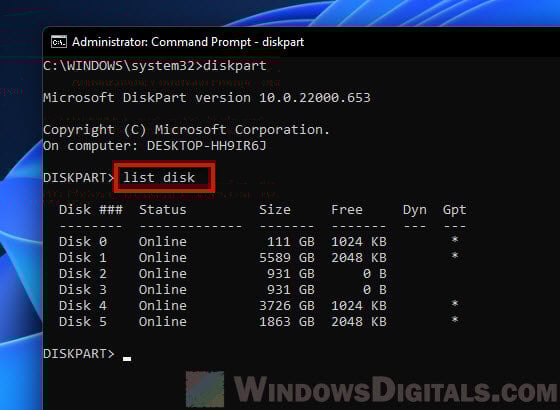
- Next, type
list diskto display all the detected disk drives.
- Double check the size of the disk number you wrote down earlier matches the one displayed in the command prompt. This is to make sure it is the same drive that you want to manage, so you don’t accidentally wipe the wrong drive. For example, in my case, the Disk 5 shown in Disk Management tool has the same size as the “Disk 5” displayed in DISKPART. Thus, I’m sure it is Disk 5 that I want to manage.
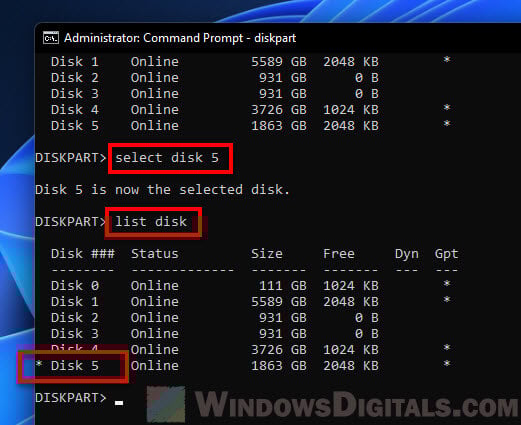
- Then, type
select disk #to select the disk. In my case, I had to typeselect disk 5. - To make sure the disk is selected, type
list diskagain and make sure there is an asterisk (*) symbol next to the disk you select.
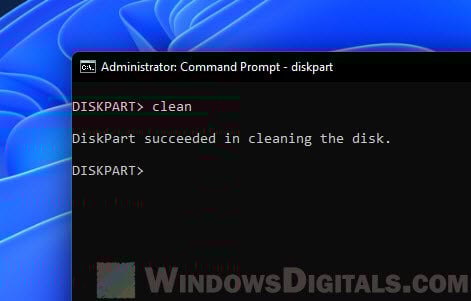
- Now, type
cleanto wipe the disk and delete all partitions on it, including any protected partition such as the EFI system partition.
- The process may take a while to complete depending on the size of the disk that it needs to clean.

Read next: How to Split Drive in Windows 11 without Formatting
Re-initialize the disk and create volume on it
After cleaning the disk, since all partitions on it are deleted, it will be as if it is brand new. To re-initialize it, open Disk Management tool. It should automatically prompt you to initialize the disk as it detects the presence of the disk. You will need to initialize the disk before you can create partition (volume) on it. Select the disk and select a partition style (MBR or GPT) and click OK to initialize it.
After initializing the disk, you should see that all the available disk space is now marked as “Unallocated“. Since all partitions, including the protected EFI partitions are deleted when you run the DISKPART clean command, all disk space will now be unallocated.
To create a new partition on the disk, right-click the unallocated space and select “New Simple Volume”. Follow the on-screen instructions to complete the process. You can create as many partition as you want on the disk.
Related: How to Format and Partition SSD Drive in Windows 11
Can’t delete EFI System Partition on C: drive
You can’t delete the EFI System Partition if it is on your C: drive (system drive) where your Windows resides. Since the process involves wiping the drive, you can’t just erase your system drive from which your Windows is running. Every tool will prohibit you from doing so. And there is no way to delete only the protected partition without wiping the drive.
To delete protected partitions on such a system drive, assuming you no longer need the operating system on it, you can unplug the drive, plug it into another computer, and run the DISKPART clean command to erase the drive from that computer.
Здравствуйте админ! На моём ноутбуке не загружается Windows 10. Статью на вашем сайте о восстановлении загрузчика читал, но она к сожалению мне не помогла, хотя испробовал все приведённые в ней способы. В комментариях к статье один пользователь посоветовал мне создать загрузчик Windows 10 заново, но подробностей не привёл. Скажите, как это можно сделать?
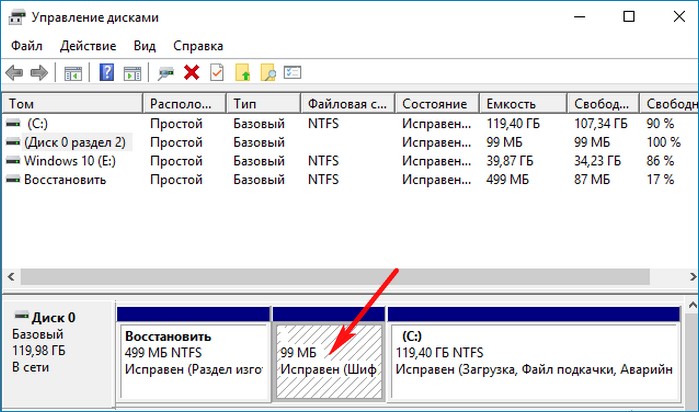
Привет друзья! Если ваша Windows 10 не загружается из-за проблем с файлами, ответственными за загрузку операционной системы, располагающимися на скрытом шифрованном (EFI) системном разделе FAT32 (размер 99 Мб), то можно удалить этот раздел и затем создать заново. В результате файлы загрузчика обновятся и вполне возможно такое решение приведёт к успешной загрузке Windows. Здесь не лишним будет заметить, что за загрузку Windows отвечают файлы конфигурации хранилища загрузки (BCD) в папке Boot и менеджер загрузки системы (файл bootmgr).
Шифрованный (EFI) системный раздел FAT32, размер 99 Мб, можно увидеть в «Управлении дисками» вашего компьютера. Нам также придётся удалить первый раздел со средой восстановления (499 Мб), так как после пересоздания загрузчика она перестанет функционировать (среду восстановления можно будет позже создать заново).
Ещё мы создадим заново не отображаемый в Управлении дисками служебный раздел MSR, обязателен для разметки GPT в системах UEFI (размер 16 Мб).
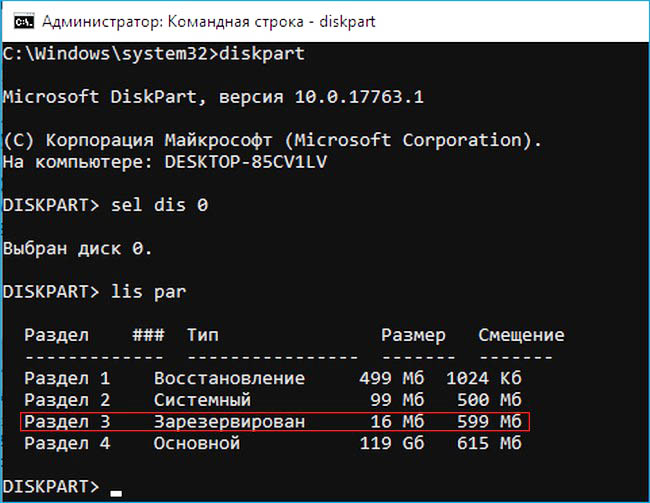
Итак, перед работой ещё раз уточним, какие именно разделы мы будем удалять и затем создавать заново:
1. Раздел (499 Мб) содержащий среду восстановления Windows 10 (от данного раздела можно избавиться и пользоваться при необходимости средой восстановления, находящейся на загрузочном носителе с Win 10).
2. Раздел (99 Мб), шифрованный (EFI) системный раздел, содержащий все файлы загрузчика Windows 10.
3. Служебный раздел MSR (Microsoft System Reserved) 16 Мб, обязательный для разметки дисков GPT.
Загружаем ноутбук с загрузочной флешки с Windows 10 и в начальном окне установки системы жмём клавиатурное сочетание Shift + F10,
открывается окно командной строки, вводим команды:
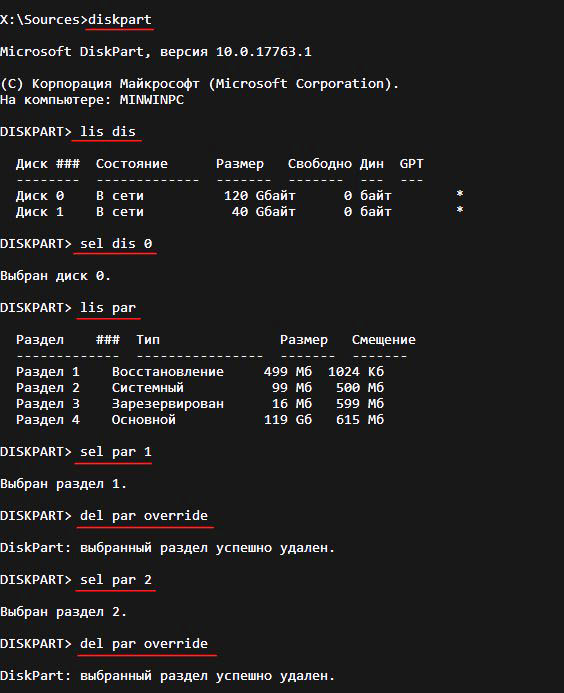
diskpart
lis dis (выводит список физических дисков).
sel dis 0 (выбираем жёсткий диск ноутбука 120 Гб).
lis par (показ всех разделов выбранного диска, первые три раздела будем удалять).
sel par 1 (выбираем первый раздел
del par override (удаляем раздел, для удаления раздела ESP и MSR или раздела OEM-изготовителя ноутбука, необходимо указать параметр override)
sel par 2
del par override
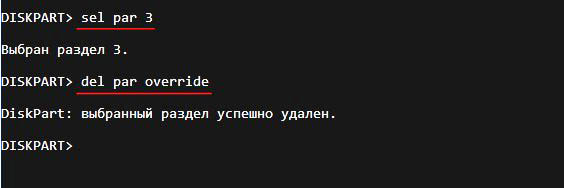
sel par 3
del par override
Всё, все три скрытых раздела мы удалили.
Вводим команды:
diskpart
lis dis (выводим список дисков).
sel dis 0 (выбираем жёсткий диск ноутбука).
create par efi size=99 (создаём шифрованный (EFI) системный раздел 99 Мб).
format fs=fat32 (форматируем его в файловую систему FAT32).
creat par msr size=16 (создаём раздел MSR 16 Мб)
lis vol (выводятся все разделы жёсткого диска).
exit (выходим из diskpart)
Создаём загрузчик командой
bcdboot C:\Windows, так как буква диска операционной системы в среде восстановления (C:).
Файлы загрузки успешно созданы.
Перезагружаемся и Windows 10 должна загрузиться.

As you probably know, in order to be able to store files on a hard drive, it needs to be prepared first: it needs to be initialized, partitioned, and formatted just the right way. If you’ve bought an external drive in a store, the preparation has probably been already done by the drive manufacturer. However, what if you want the drive to be prepared differently? For example, you may want to re-format the drive, or change the partitions that it has. The way to do such tasks in Windows is to use the Disk Management tool that comes preinstalled with Windows.
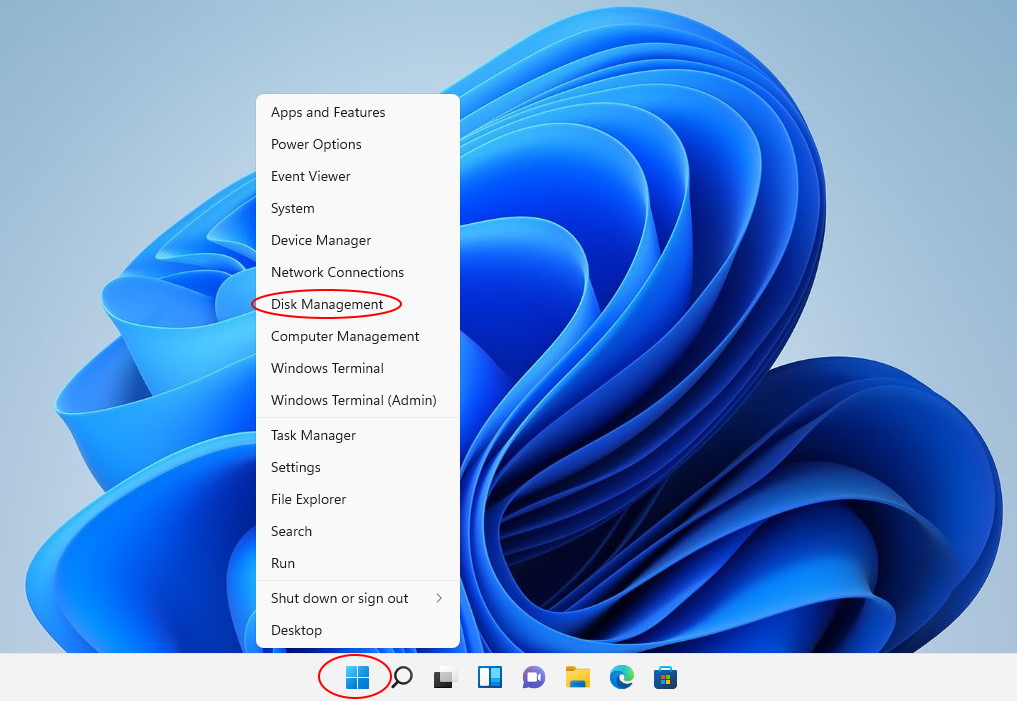
It’s easy to open Disk Management, but the procedure is slightly different in different versions of Windows. If you have a newer version of Windows, such as Windows 11 or 10 right-click on the Start Menu, and choose Disk Management from the menu displayed. (If you have Windows 7, run Windows Explorer, right-click on Computer, choose Manage from the menu, then select Disk Management under Storage.)
Before you continue, first things first: Disk Management is a very powerful tool, and with great power comes great responsibility! If you are not very experienced with computers, you can look, but better not touch and let someone more knowledgeable to do the job. Because with Disk Management it’s very easy to destroy your partitions and lose your files, if you don’t know what you are doing.
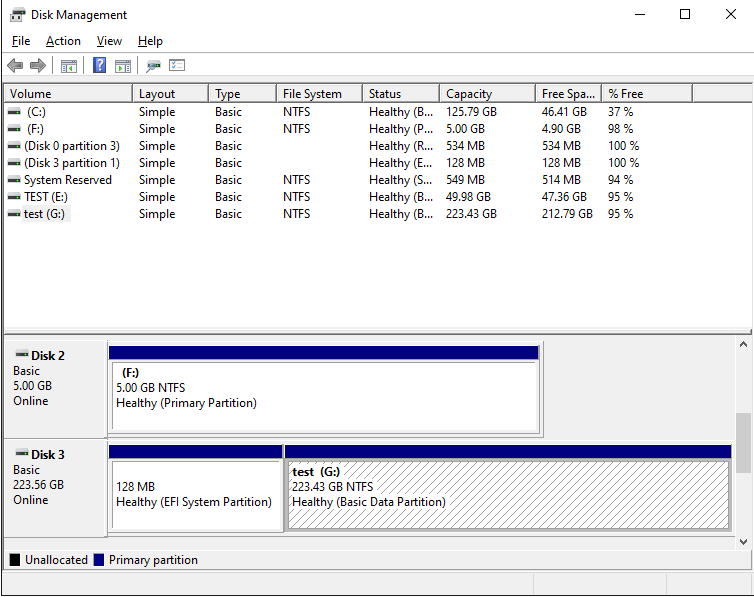
The most important thing when using the Disk Management tool is to make sure you can identify the disk you want to manage in the list. Usually you can do it by the total size of the disk displayed, although it may be confusing. For example, in this example, a hard drive that’s described as a 240 GB drive by the manufacturer, is shown to have only 223.56 GB by Windows. (Apparently, the disk manufacturers and Windows have a different understanding of what a «gigabyte» is.) Also, if you have several disks of the same size attached, it may get even more confusing. If in doubt, better unplug all external drives except for the one you actually want to work with, to make sure you are not accidentally erasing data on a wrong disk!
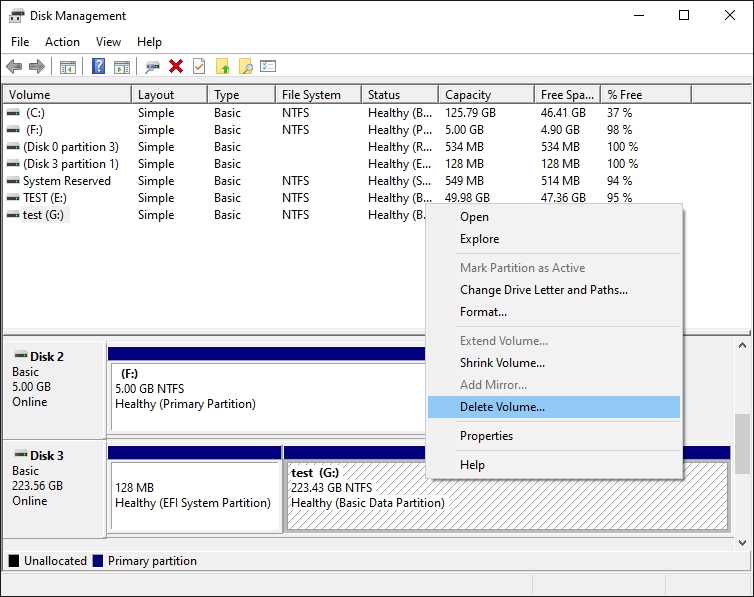
In our case, the 240 GB disk (shown as 223.56 GB disk in the list) is Disk 3 (let’s remember this number, we will need it a bit later.) It has two partitions, one is a 128MB EFI partition that has no drive letter assigned, and another NTFS partition of the size 223.43 GB, that has the label test and the drive letter G:. Although these two partitions looks similar, they are treated very differently by Windows. If you right-click on the normal NTFS partition, you should see the normal menu that lets you perform various tasks on that partition, including the Delete Volume command:
However, if we right-click on the first EFI partition, the menu we get is completely disabled:
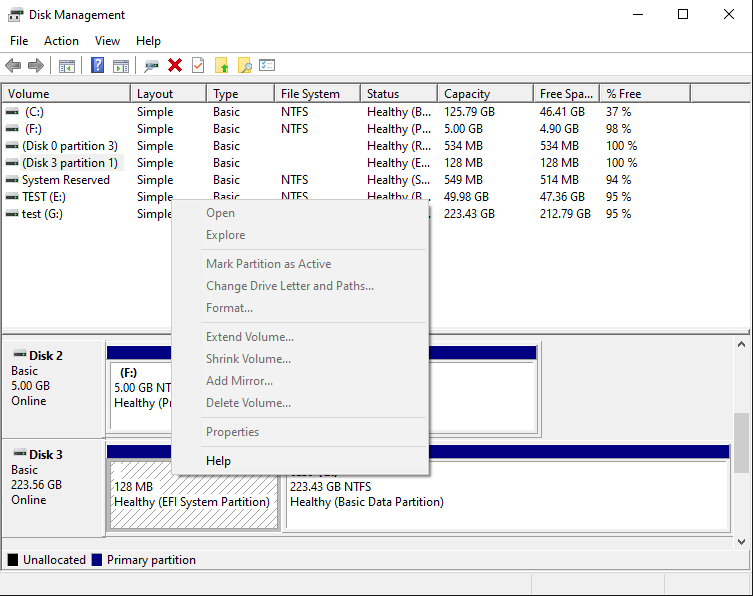
As you can see, the system partition is protected in such a way that even the powerful Disk Management tool cannot do anything to it. Note that it’s not because the partition is EFI, it’s because the tool that created that partition had marked it in a way that prohibits other tools to tamper with it. However, what if we want to delete the EFI system partition and re-initialize the disk from scratch?
While the Disk Management tool is helpless in this situation, fortunately Windows offers another tool, DISKPART, that can do things to the disks that Disk Management can’t. The tricky part is, that DISKPART is a command-line tool, that requires us to type commands into its command prompt to make it do what we want.
The procedure of getting to the DISKPART tool is slightly different in different versions of Windows. First, you need to open Windows command prompt in the «administrator» mode. In the recent versions of Windows you can simply right-click on the Start button and choose one of the command offered:
- Windows Terminal (Admin)
- Power Shell (Admin)
- Command Prompt (Admin)

If you have an older version of Windows such as Windows 7, you can open the command prompt in the administrator mode as follows: click the Start button and enter cmd in the search box; make sure that cmd is highlighted on the menu displayed, but do not press the Enter key yet; instead, press the Ctrl and Shift keys together, and while keeping them depressed, press Enter. The Ctrl+Shift combination should force the command prompt to open in the «administrator» mode.
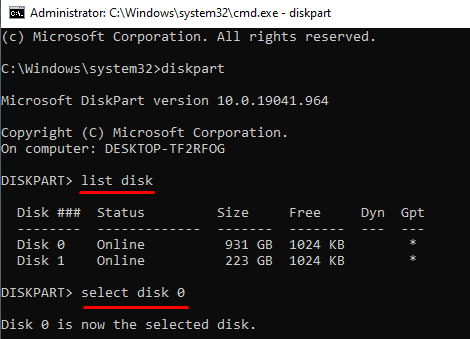
When the command prompt window opens, start the DISKPART tool by entering the diskpart command into the command prompt window:
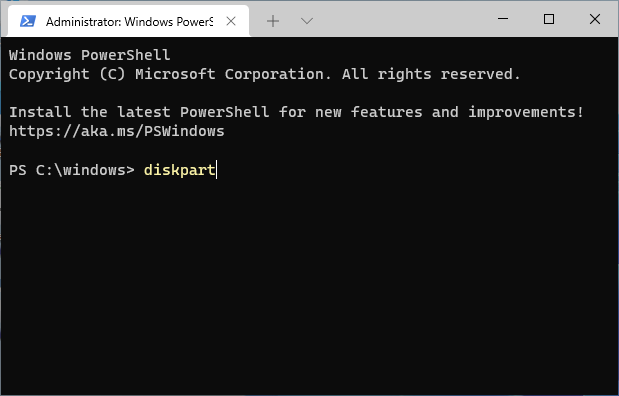
This should display the DISKPART command prompt. The first command we should use is list disk that should display the list of the disks currently connected to the computer:
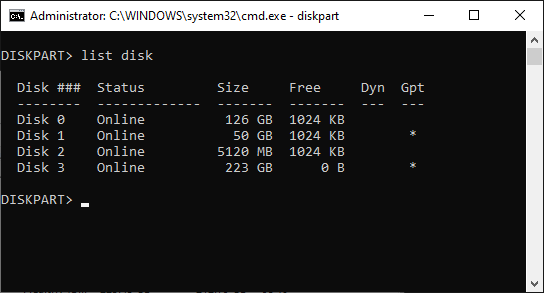
Again, it’s very important to properly identify the disk we want to work with in the list. Our 240 GB disk is still listed as Disk 3 with the capacity 223 GB. (Notice that it is listed as having 0B free. This is because all available disk space is currently allocated for the two partitions we’ve discussed above.) Once we are sure that this is the disk we want to re-initialize, we need to select it, by entering the command select disk 3 (yes, that’s how selection is usually done when using the command line tools!). Then, let’s use the list disk command again, to confirm that the disk in question is indeed now selected:
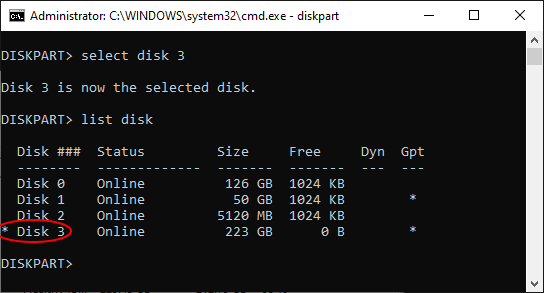
After double-checking that Disk 3 is now selected (it should have the star character * in front of its label), it’s time to finally issue the command that will erase everything on the disk 3, including the protected partition. The command that does that is clean. Note that this command erases everything on the selected disk, all partitions, protected or not. If you still have files on other partitions of disk 3 that you want to keep, you should exit now and backup those files, because after using the clean command all such files will be erased without a trace!
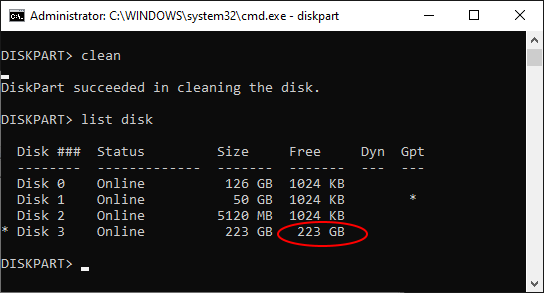
After the clean command is done (it should take no more than a few seconds), we get a fresh disk with all partitions erased. We can exit the DISKPART command prompt (by typing exit into its command line), and go back to the Disk Management tool (see above how to open it.) When it starts, it automatically detects the presence of the clean disk and prompts us to initialize it:
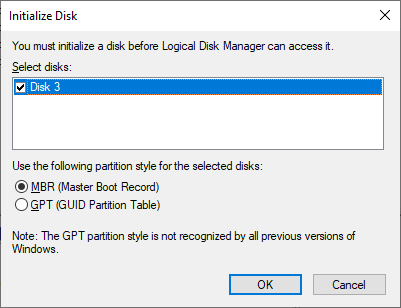
Press OK and the newly cleaned disk will appear in the list. The difference is, the protected EFI partition is gone! (The normal NTFS partition that used to be on the disk 3, is gone, too.) The disk is now ready for you to start creating partitions, formatting them, and do other things as needed:
Note that if you are trying to erase the system disk that hosts the C: drive where Windows itself is installed and running, then even the powerful DISKPART command can’t work: Windows simply refuses to erase the drive from which it is running. To erase such a disk, you need to physically remove it from the computer, attach it to another computer as an external drive, and then use DISKPART on that computer to erase the disk.
Happy disk managing!
If you want to link to this article, you can use this HTML code: <a href=»https://www.winability.com/delete-protected-efi-disk-partition/»>How to delete a protected EFI system partition with Windows 11, 10, 8, or 7</a>
Read more
Windows, Windows 10, Windows 7, Windows 8, Windows Server, Windows Vista, Windows XP
- 27.04.2020
- 30 854
- 17
- 09.06.2020
- 148
- 142
- 6
- Содержание статьи
- Удаление EFI раздела
- Комментарии к статье ( 17 шт )
- Добавить комментарий
При подключении жесткого диска (твердотельного накопителя, флешки или другого накопителя информации), который использовался для работы операционной системы, можно столкнуться с тем, что там есть раздел EFI. Просто удалить его через управление дисками не получится, но это не значит, что это невозможно. Сделать это можно через утилиту командной строки diskpart, которая идет в комплекте с операционными системами Windows.
Удаление EFI раздела
Попытки удалить данный раздел с Вашего системного диска приведут к выходу из строя операционной системы!
- Сперва нужно запустить программу управления дисками, выполнив следующую команду в Командной строке, меню Пуск или Выполнить:
diskpart - Запустится отдельное окно командной строки с программой diskpart.

- В нем вводим команду для показа всех известных системе жестких дисков:
list disk
- Выбираем нужный диск:
select disk [НОМЕР ДИСКА]где [НОМЕР ДИСКА] — номер жесткого диска, на котором находится EFI раздел, который вы хотите удалить (тот, который показала команда
list disk). - Теперь необходимо отобразить все разделы на данном диске. Делается это следующей командой:
list part
- Ориентируясь по полученному списку разделов, выбираем нужный раздел EFI:
select part [НОМЕР РАЗДЕЛА]где [НОМЕР РАЗДЕЛА] — EFI раздел, который сейчас будет удален.
- Теперь осталось дело за малым — удалить раздел EFI. Делается это одной простой командой:
del part override - После выполнения данной команды, раздел EFI будет удален, теперь можно спокойно закрыть окно программы.