
Все версии Windows Server (начиная с 2000 и заканчивая 2025) разрешают одновременное подключение максимум двух удаленных RDP сессий (+ одна консольная сессия, которую можно использовать, подключившись через режим mstsc /admin). Такие сессии можно использовать в административных целях и не требуют установки сервера лицензирования RDS и покупки лицензий RDS CAL.
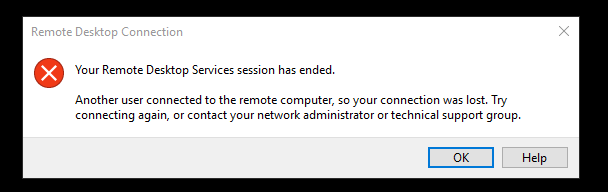
Пользователь может удаленно подключится к рабочему столу Windows Server, если его учетная запись входит в локальную группу Administrators или Remote Desktop Users. Разрешено подключаться только под разными учетными записями. Если для управления сервером используется общий административный аккаунт, то при подключении второго пользователя по RDP под тем же аккаунтом, первая сессия будет отключена с сообщением:
Remote Desktop Connection
Your Remote Desktop Services session has ended
Another user connected to the remote computer, so you connection was lost. Try connecting again, or contact your network administrator or technical support group.
Ваш сеанс работы со службами удаленных рабочих столов завершен.
Подключение было потеряно, потому что к удаленному компьютеру подключился другой пользователь. Попробуйте подключиться еще раз либо обратитесь за помощью к администратору сети или в службу технической поддержки.
Чтобы понять, какой пользовать отключил вашу сессию, откройте консоль Event Viewer и перейдите в секцию Windows Logs -> Security. Отфильтруйте события по Event ID 4624. В описании последнего события будет информация о том, откуда выполнен последний RDP вход на этот компьютер.
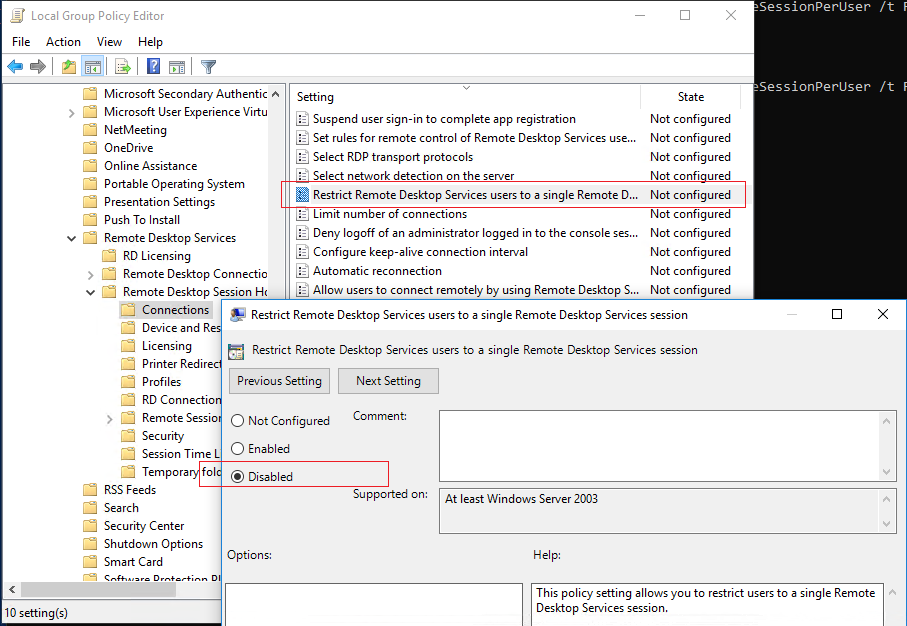
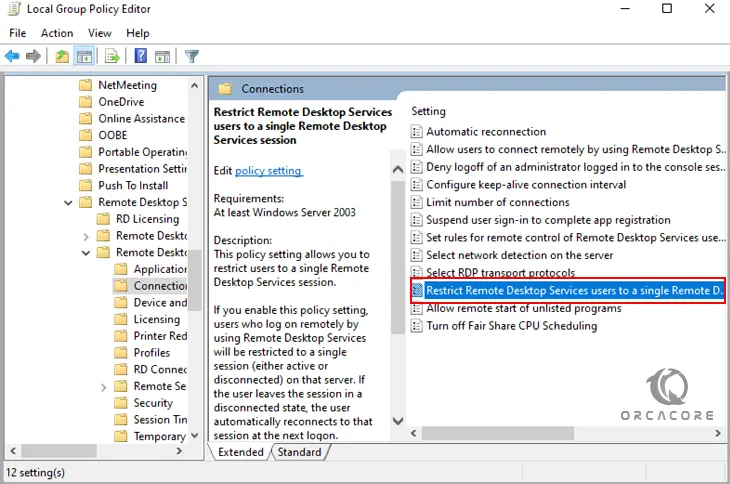
В Windows можно разрешить множественные одновременные RDP подключения под одним пользователем. Для этого нужно включить политику Restrict Remote Desktop Services users.
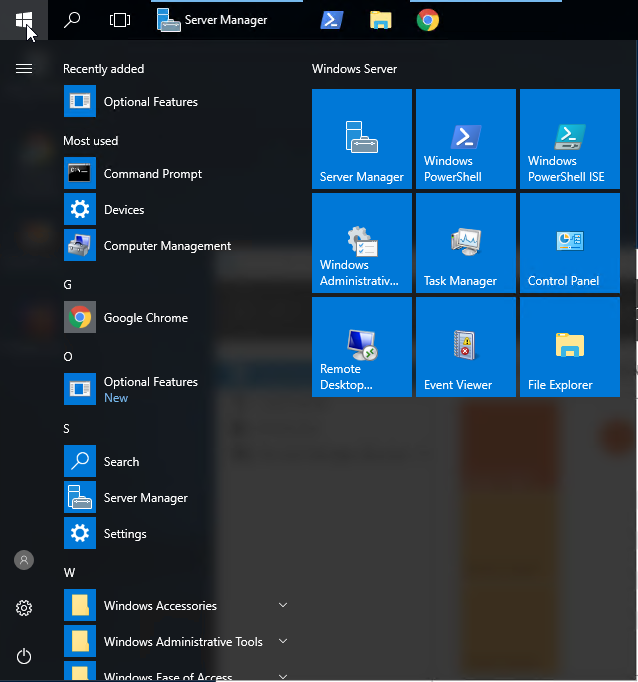
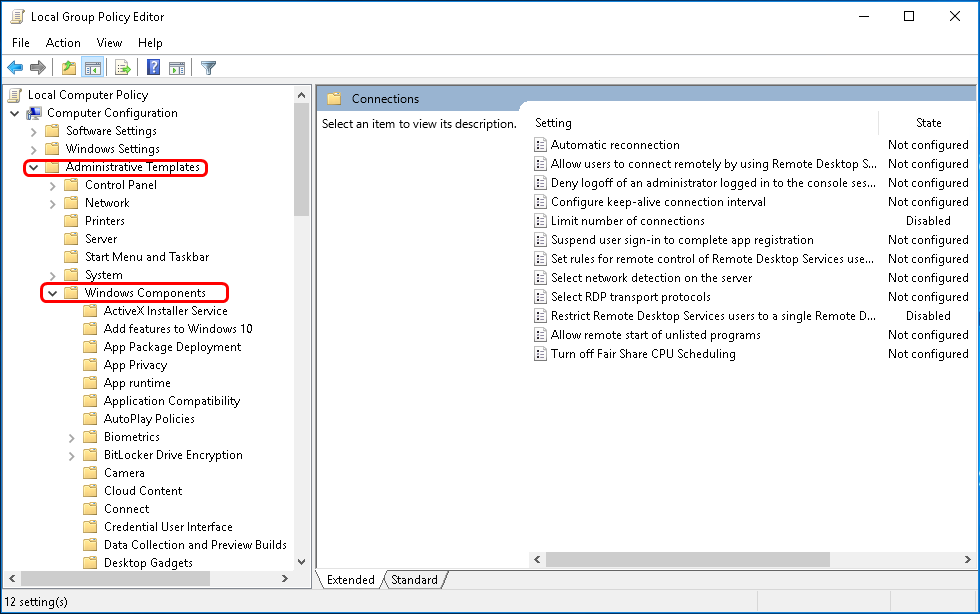
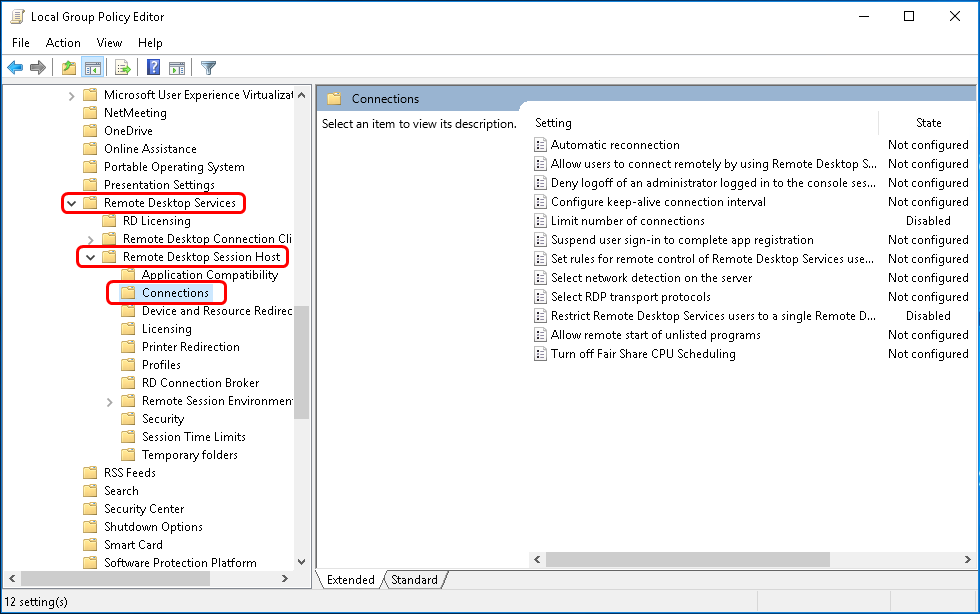
- Запустите консоль редактора локальной групповой политики Win+R ->
gpedit.msc - Перейдите в раздел GPO Computer Configuration -> Policies -> Administrative Templates -> Windows Components -> Remote Desktop Services -> Remote Desktop Session Host -> Connections
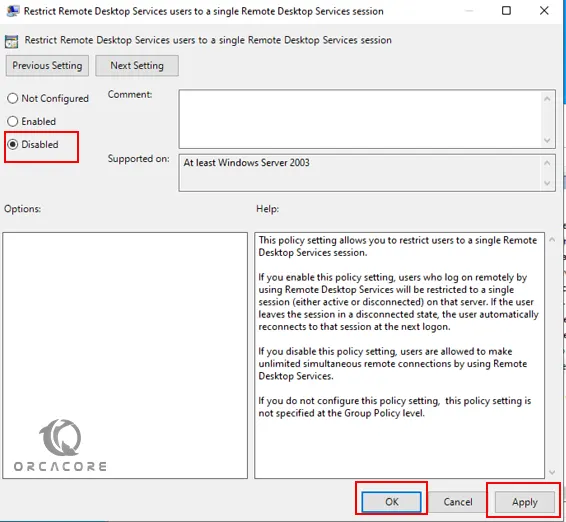
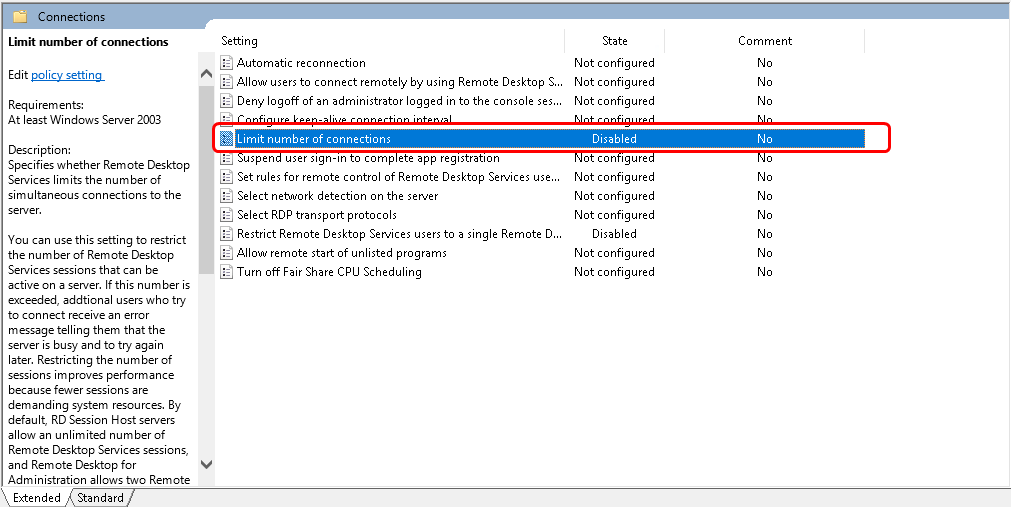
- Измените значение политики Restrict Remote Desktop Services users to a single Remote Desktop Services (Ограничить пользователей служб удаленных рабочих столов одним сеансом служб удаленных рабочих столов) на Disabled

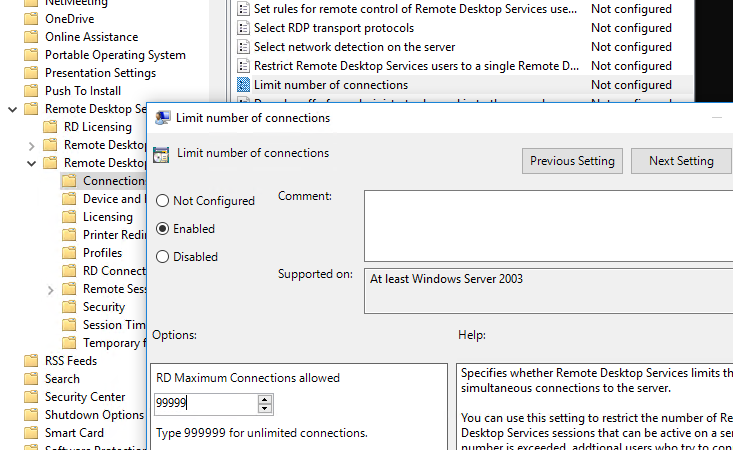
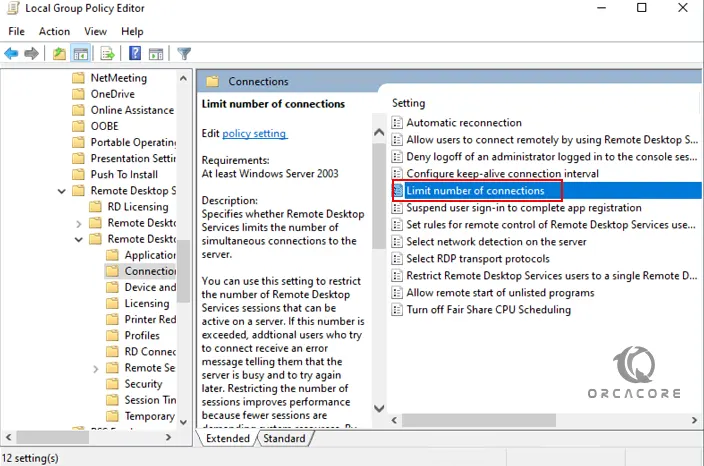
- В этом же разделе GPO имеется еще одна политика Limit number of connections, позволяющая указать максимальное количество RDP подключений к данному серверу. Однако, даже если вы увеличите здесь лимит на количество сессией, количество одновременных RDP подключений все также будет ограничено двумя до тех пор, пока вы не установите роль RDSH.

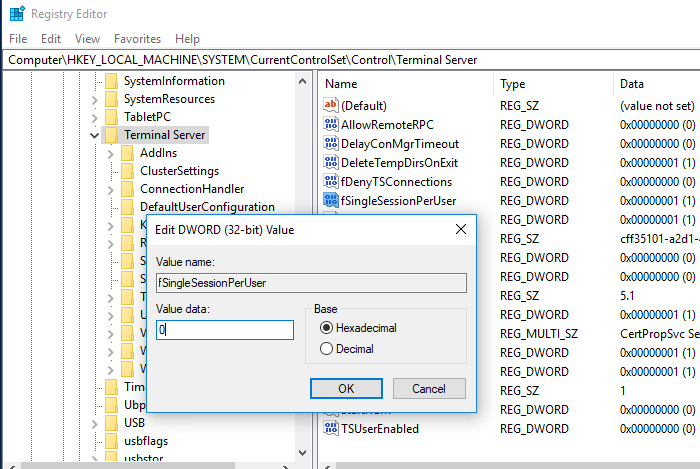
Также политику Restrict Remote Desktop Services users to a single Remote Desktop Services можно включить напрямую через реестр.
- Откройте редактор реестра
regedit.exe - Перейдите к ключу
HKEY_LOCAL_MACHINE\SYSTEM\CurrentControlSet\Control\Terminal Server - Найдите параметр тип REG_DWORD с именем fSingleSessionPerUser и измените его значение с 1 на 0 (если этот параметр отсутствует, создайте его вручную).

Либо можете изменить значение параметра fSingleSessionPerUser из командной строки с правами администратора:
REG ADD "HKLM\SYSTEM\CurrentControlSet\Control\Terminal Server" /v fSingleSessionPerUser /t REG_DWORD /d 0 /f

После этого каждый пользователь, подключаясь под одним общим аккаунтом, будет попадать в собственную RDP сессию. Если вы хотите использовать более 2 одновременных RDP подключений, вам придется устанавливать на сервер роль Remote Desktop Session, приобрести RDS лицензии на подключение пользователей или устройств и активировать их на RDS Licensing роле.
Windows Server 2019, a robust and reliable operating system, is widely used for managing enterprise environments, hosting applications, and enabling remote access. Remote Desktop Protocol (RDP) is one of its core features, allowing users to easily connect remotely and manage servers. However, a common question among administrators is: How many RDP connections are allowed in Windows Server 2019? This blog’ll explore this in detail, covering default configurations, licensing models, and how to configure RDP connections for optimal use.
Default RDP Connection Limit in Windows Server 2019
By default, Windows Server 2019 permits two simultaneous Remote Desktop connections for administrative purposes. This limitation exists to prevent the misuse of resources and ensure the stability of the server when it’s used as a primary domain controller or for other critical roles. These two connections are not licensed for general user access—they are strictly for administrators to perform maintenance or configuration tasks.
If you attempt to initiate a third connection without proper licensing or configuration, you will likely encounter an error message stating that the limit has been reached.
Expanding the Number of RDP Connections
To exceed the default limit of two simultaneous connections, you need to configure the server to act as a Remote Desktop Session Host (RDSH). This setup involves enabling Remote Desktop Services (RDS) and acquiring the appropriate Client Access Licenses (CALs). Below, we’ll discuss the steps and considerations involved in expanding the RDP connection capacity.
Understanding RDS Licensing in Windows Server 2019
Remote Desktop Services (RDS) is a feature in Windows Server that allows multiple users to connect to the server simultaneously using RDP. To enable this feature for more than two connections, you need to:
- Install the RDS Role
- Open the Server Manager and navigate to the Add Roles & Features Wizard.
- Select the Remote Desktop Services role and follow the prompts to install it.
- Activate the RDS Licensing Role
- Once the RDS role is installed, activate the Remote Desktop Licensing Manager.
- This involves setting up a licensing server to issue and manage CALs.
- Purchase and Install CALs
- You need to purchase Remote Desktop Services Client Access Licenses (RDS CALs) based on the number of users or devices that will access the server concurrently.
- Install these licenses on your RDS licensing server to authorize more connections.
Types of RDS CALs
When purchasing RDS CALs, you can choose between two types:
- User CALs
- These licenses are assigned to individual users, permitting them to connect to the server from any device.
- Ideal for environments where users frequently switch devices.
- Device CALs
- These licenses tied to specific devices, regardless of who uses them.
- Best suited for fixed workstations or shared computers.
Configuring RDP for Multiple Connections
After setting up RDS and installing CALs, follow these steps to configure your server for multiple RDP connections:
- Increase the Limit in Group Policy
- Open the Group Policy Editor (gpedit.msc).
- Navigate to:
Computer Configurations -> Administrative Templates -> Windows Components -> Remote Desktop Services -> Remote Desktop Session Host -> Merger. - Enable the Limit number of connections setting & specify the desired number of concurrent connections.
- Adjust Settings in Remote Desktop Session Host Configuration
- Access the Remote Desktop Session Host Configuration tool.
- Under the Connections section, modify the properties of the RDP-TCP connection to allow more simultaneous sessions.
- Ensure Network and Hardware Capacity
- Ensure your server hardware, including CPU, RAM, and network bandwidth, can handle the increased load.
Performance Considerations for Multiple RDP Connections
As you increase the number of RDP connections, it’s vital to monitor server performance to prevent resource contention and maintain a smooth user experience. Key factors to consider include:
- CPU and Memory Usage
- Each active RDP session consumes server resources. Adding too many users without sufficient hardware upgrades can lead to slow performance.
- Network Bandwidth
- Ensure your network infrastructure can handle the increased data flow from multiple RDP sessions.
- Security Measures
- Implement robust security measures, such as Network Level Authentication (NLA) and secure RDP gateways, to protect your server from unauthorized access.
Alternatives to Increasing RDP Connections
If expanding the number of RDP connections on a single server becomes challenging, consider the following alternatives:
- Deploy Additional Servers
- Set up additional Windows Server 2019 instances to distribute the RDP load.
- Use Virtual Desktop Infrastructure (VDI)
- Leverage VDI solutions to provide users with virtual desktops while offloading resource-intensive tasks to a dedicated infrastructure.
- Implement a Cloud Solution
- Consider cloud-based services like Microsoft Azure Virtual Desktop (formerly Windows Virtual Desktop) for scalable and cost-effective RDP access.
Troubleshooting Common Issues
When configuring multiple RDP connections, you might encounter some common issues. Here’s how to address them:
- Connection Denied Errors
- Verify that the required CALs installed & correctly assigned.
- Slow Performance
- Upgrade server hardware or optimize resource usage by limiting background processes.
- Security Warnings
- Ensure that all RDP sessions encrypted, and implement firewalls to block unauthorized access.
Use Cases for Increased RDP Connections
Expanding the number of RDP connections in Windows Server 2019 is particularly beneficial in scenarios such as:
- Team Collaboration
- Allow multiple team members to access shared resources or applications on a centralized server.
- Application Hosting
- Enable remote access to applications without requiring users to install them locally.
- Training and Demonstrations
- Use RDP to provide access to a server-based training environment for large groups.
Conclusion
By default, Windows Server 2019 supports two concurrent RDP merger for administrative tasks. To expand this limit and enable multiple user connections, you need to configure Remote Desktop Services and purchase the necessary CALs. With the right setup, Windows Server 2019 can support hundreds of simultaneous RDP sessions, making it a versatile solution for businesses of all sizes.
However, always consider your hardware capacity, licensing costs, and security requirements when scaling RDP connections. Proper planning & configuration ensure a seamless & efficient remote desktop experience for all users.
This guide intends to teach you How To Set up Multiple RDP sessions on Windows Server 2022.
We can’t start by unpacking the acronym to get a simple RDP definition. It stands for remote desktop protocol, but you likely already knew that part. So what is the real meaning of RDP? A remote desktop protocol is a method that allows a client computer to access and use a host’s computer or server from another endpoint.
In other words, RDP is a system that connects computers via an internet connection, allowing one computer (the RDP client) to see what’s going on with the other computer (the RDP server host) and take over and control its mouse and keyboard functionality.
Table of Contents
To Set up Multiple RDP sessions on Windows Server 2022, you must log in to your Windows Server and follow the steps below.
Enable Multiple Remote Desktop Connections on Windows Server 2022
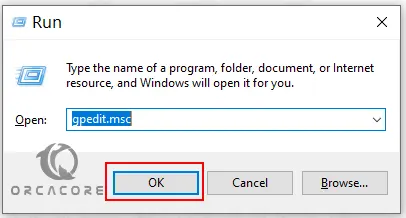
First, you need to open the Run window by pressing Winkey + R.
In your Run window type “gpedit.msc” and press ok to open the Group Policy editor.
Next, in the Group Policy editor, click on the Administrative Templates from the computer configuration section.
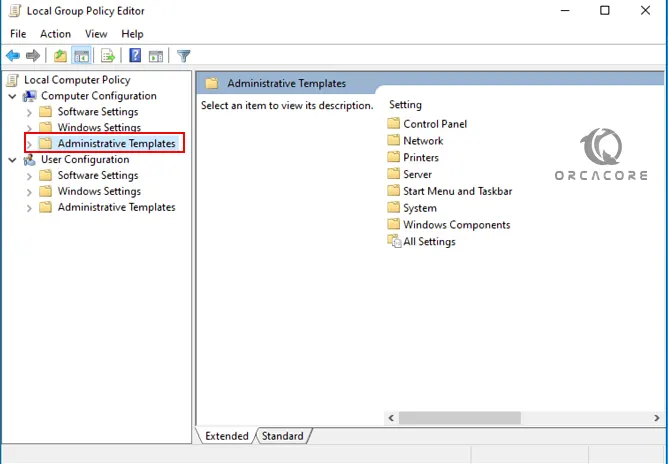
At this point, you need to navigate to the following address:
Windows Components > Remote Desktop Services > Remote Desktop Session Host > ConnectionsIn this window, you need to make two configuration changes to set up multiple RDP sessions.
First, double-click on the Limit number of connections to open it.
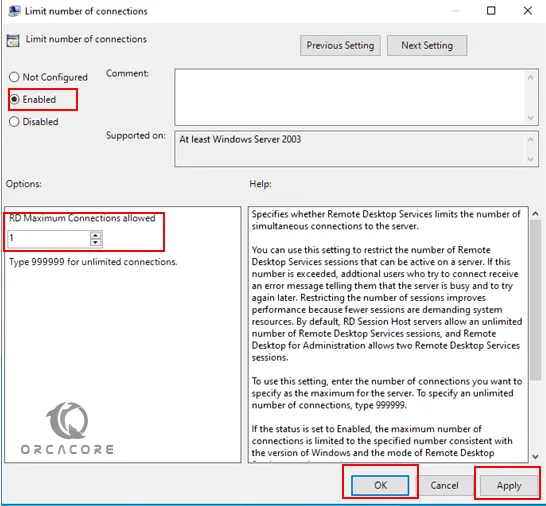
After that, select the Enabled option, enter the allowed number of connections in the specified field, click on Apply, and press ok.
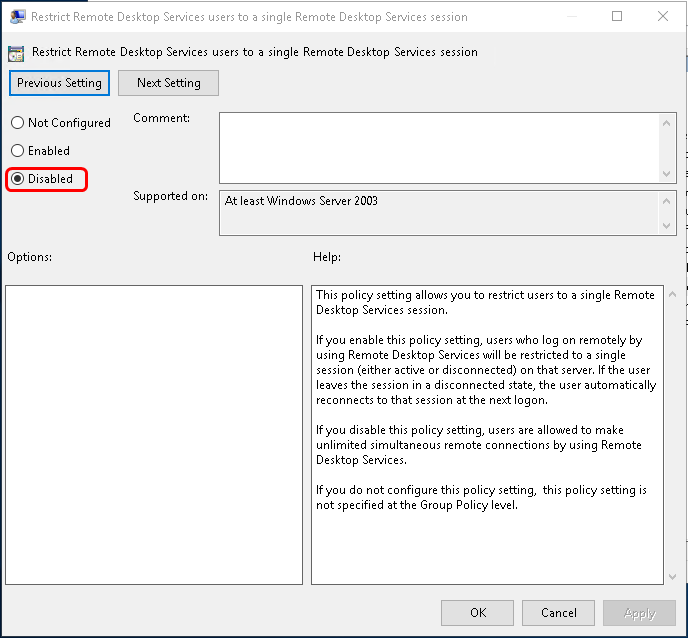
Next, double-click on the Restrict Remote Desktop Services users for a single Remote Desktop Services session to open.
Set the setting to Disable, click Apply, and press ok.
At this point, open the Command Prompt window and run the following command to update Group Policy on your system:
gpupdateOutput
Updating policy...
Computer Policy update has completed successfully.
User Policy update has completed successfully.Now you Set up Multiple RDP sessions on Windows Server 2022.
Best Practices to Secure RDP Sessions
While multiple RDP sessions offer great flexibility, they also introduce potential security vulnerabilities. Hackers often target RDP to gain unauthorized access. To secure your sessions, you can consider the following practices:
- Enable Network Level Authentication (NLA).
- Use strong passwords and multi-factor authentication.
- Regularly update your server and monitor login attempts.
Disable Multiple RDP sessions on Windows Server 2022
If you want to disable multiple RDP sessions, from your Group policy window navigate to the address below:
Computer Configuration >> Administrative Templates >> Windows Components >> Remote Desktop Services >> Remote Desktop Session Host >> Connections
Double click on Set Restrict Remote Desktop Services user to a single Remote Desktop Services session and set this to Enabled.
Conclusion
At this point, you have learned to Set up Multiple RDP sessions on Windows Server 2022. Setting up multiple RDP sessions on Windows Server 2022 allows businesses to increase productivity, support remote work, and maximize the use of their server resources. However, it’s essential to secure these sessions and ensure proper licensing to avoid any issues. Whether you’re managing an IT department, supporting remote users, or running software tests, multiple RDP sessions can significantly streamline your operations.
Hope you enjoy it. You may like these articles:
Activate OpenSSH on Windows Server 2022
Install Nessus Scanner on Windows Server 2022
Install Android Studio on Windows Server 2022
Configure Static IP Address on Windows Server 2025
FAQs
Is it safe to use multiple RDP sessions?
Yes, but it’s important to follow security best practices, such as enabling Network Level Authentication (NLA) and using strong passwords.
How do I improve the performance of multiple RDP sessions?
Ensure your server has adequate hardware resources and improve network bandwidth to reduce latency.
What are the main benefits of setting up multiple RDP sessions?
The main benefits are increased productivity, flexibility, cost savings, and enhanced remote team collaboration.
Can I use RDP to access my server from anywhere?
Yes, as long as you have internet access and proper security measures in place, you can access your server from anywhere.
Удаленные пользователи могут подключаться к своим компьютерам Windows 10 или 11 через службу удаленных рабочих столов (RDP). Достаточно включить удаленный рабочий стол (Remote Desktop), разрешить RDP доступ для пользователя и подключиться к компьютеру с помощью любого клиента удаленного рабочего стола. Однако в десктопных версия Windows есть ограничение на количество одновременных RDP сессии. Разрешается только один активный Remote Desktop сеанс пользователя.
Если вы попробуете открыть вторую RDP сессию, появится предупреждение с запросом отключить сеанс первого пользователя.
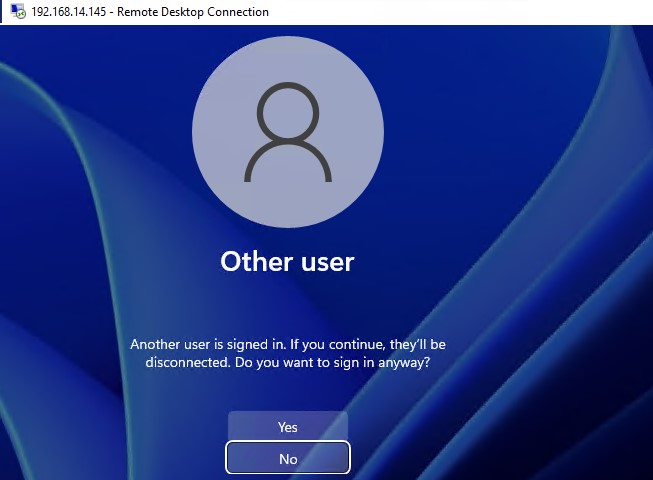
В систему вошел другой пользователь. Если вы продолжите, он будет отключен. Вы все равно хотите войти в систему?
В английской версии предупреждение такое:
Another user is signed in. If you continue, they’ll be disconnected. Do you want to sign in anyway?
Содержание:
- Ограничения на количество RDP сессий в Windows
- RDP Wrapper: разрешить несколько RDP сеансов в Windows
- Не работает RDP Wrapper в Windows
- Модификация файла termsrv.dll для снятия ограничений RDP в Windows 10 и 11
- Встроенная поддержка нескольких RDP сессий в редакции Windows 10 Enterprise Multi-session
Ограничения на количество RDP сессий в Windows
Во всех десктопных версиях Windows 10 и 11 есть ряд ограничений на использование служб удаленного рабочего стола
- Разрешено удаленно подключаться по RDP только к редакциям Windows Professional и Enterprise. В домашних редакциях (Home/Single Language) RDP доступ запрещен;
- Поддерживается только одно одновременное RDP подключение. При попытке запустить вторую RDP-сессию, пользователю будет предложено завершить активный сеанс;
- Если пользователь работает за консолью компьютера (локально), то при удаленном подключении по RDP, его локальный сеанс будет отключен (заблокирован). Также завершается и удаленный RDP сеанс, если пользователь входит в Windows через консоль компьютера.
Ограничение на количество одновременных RDP подключений в Windows является не техническим, но программным и лицензионным. Таким образом Microsoft запрещает создавать терминальный RDP сервер на базе рабочей станции для одновременной работы нескольких пользователей.
Если ваши задачи требуют развертывание терминального сервера, Microsoft предлагает пробрести Windows Server (по умолчанию разрешает 2 активных RDP подключения). Если вам нужно большее количество одновременных сессий пользователей, нужно приобрести лицензии RDS CAL, установить и настроить роль Remote Desktop Session Host (RDSH) или полноценную RDS ферму.
Технически любая редакция Windows при наличии достаточного ресурсов оперативной памяти и CPU может обслуживать одновременную работу нескольких десятков удаленных пользователей. В среднем на одну RDP сессию пользователя требуется 150-200 Мб памяти (без учета запускаемых приложений). Т.е. максимальное количество одновременных RDP сессий в теории ограничивается только ресурсами компьютера.
В этой статье мы покажем три способа убрать ограничение на количество одновременных RDP подключений в Windows 10 и 11:
- Использование RDP Wrapper
- Модификации системного файла termsrv.dll
- Апгрейд до редакции Windows 10/11 Enterprise for virtual desktops (multi-session)
Примечание. Все модификации операционной системы, описанные в этой статье, считаются нарушением лицензионного соглашения Windows, и вы можете использовать их на свой страх и риск.
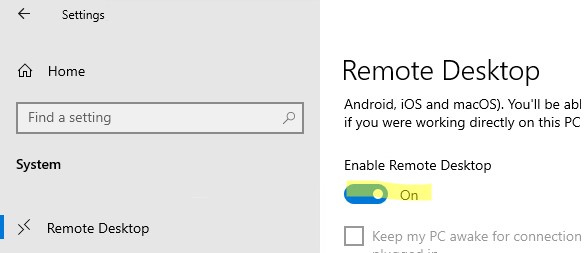
Прежде, чем продолжить, проверьте что в настройках Windows включен протокол Remote Desktop.
- Откройте панель Settings -> System —> Remote Desktop -> включите опцию Enable Remote Desktop;

- Либо воспользуйтесь классической панель управления: выполните команду SystemPropertiesRemote -> Перейдите на вкладку Remote Settings (Удаленный доступ), включите опцию Allow remote connection to this computer (Разрешить удалённые подключения к этому компьютеру).
RDP Wrapper: разрешить несколько RDP сеансов в Windows
Open-source утилита RDP Wrapper Library позволяет разрешить конкурентные RDP сессии в Windows 10/11 без замены системного файла termsrv.dll.
RDP Wrapper работает в качестве прослойки между менеджером управления службами Service Control Manager, SCM) и службой терминалов (Remote Desktop Services). RDP Wrapper не вносит никаких изменений в файл termsrv.dll, просто загружая termsrv с изменёнными параметрами.
Важно. Перед установкой RDP Wrapper важно убедится, чтобы у вас использовалась оригинальная (непропатченная) версия файл termsrv.dll. Иначе RDP Wrapper может работать не стабильно, или вообще не запускаться.
Вы можете скачать RDP Wrapper из репозитория GitHub: https://github.com/binarymaster/rdpwrap/releases (последняя доступная версия RDP Wrapper Library v1.6.2). Утилита не обновляется с 2017 года, но ее можно использовать на всех билдах Windows 10 и 11. Для работы утилиты в современных версиях Windows достаточно обновить конфигурационный файл rdpwrap.ini.
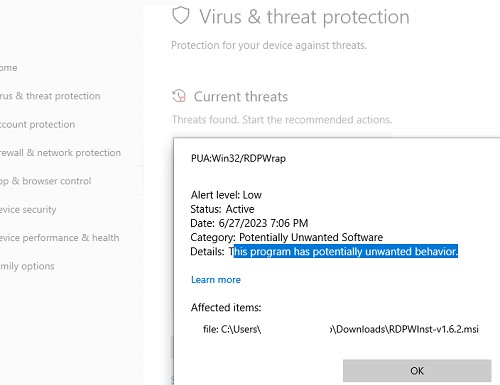
Большинство антивирусов определяют RDP Wrapper как потенциально опасную программу. Например, встроенный Microsoft Defender антивирус классифицирует программу как PUA:Win32/RDPWrap (Potentially Unwanted Software) с низким уровнем угрозы. Если настройки вашего антивируса блокируют запуск RDP Wrapper, нужно добавить его в исключения.
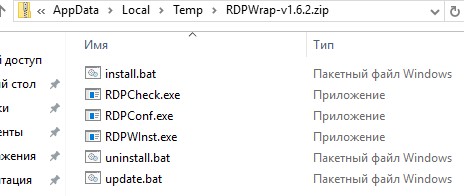
Архив RDPWrap-v1.6.2.zip содержит несколько файлов:
- RDPWinst.exe —программа установки/удаления RDP Wrapper Library;
- RDPConf.exe — утилита настройки RDP Wrapper;
- RDPCheck.exe — Local RDP Checker — утилита для проверки RDP доступа;
- install.bat, uninstall.bat, update.bat — пакетные файлы для установки, удаления и обновления RDP Wrapper.
Чтобы установить RDPWrap, запустите файл
install.bat
с правами администратора.
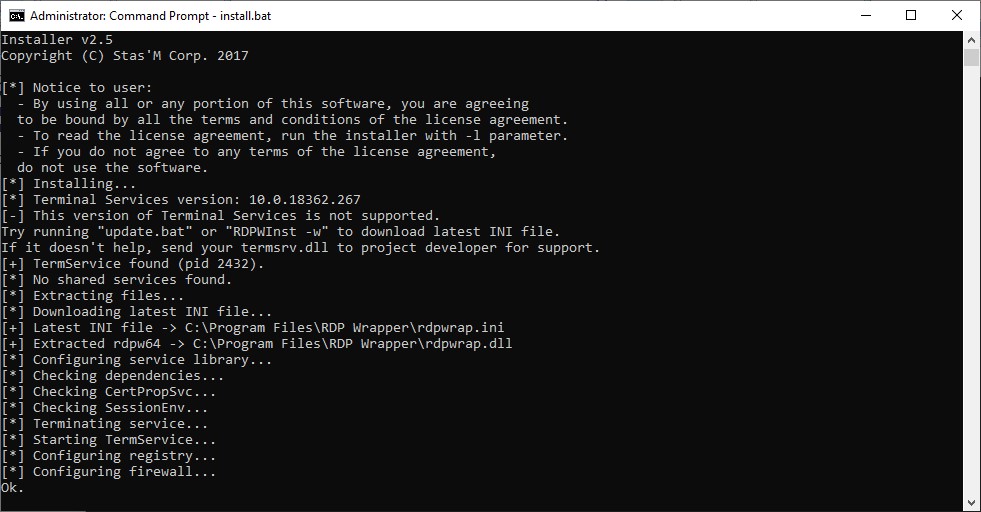
После окончания установки запустите RDPConfig.exe.
![rdp-wrapper: красная надпись не поддерживается [not supported]](https://winitpro.ru/wp-content/uploads/2015/09/rdp-wrapper-ne-podderzhivaetsya.jpg)
Скорее всего сразу после установки утилита покажет, что RDP wrapper запущен (Installed, Running, Listening), но не работает. Обратите внимание на красную надпись. Она сообщает, что данная версий Windows 10 (ver. 10.0.19041.1949) не поддерживается ([not supported]).
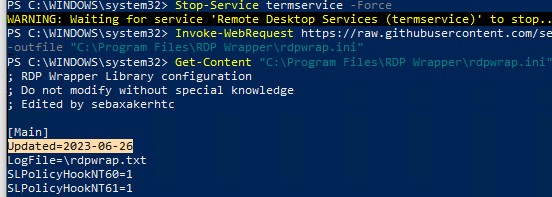
Причина в том, что в конфигурационном файле rdpwrap.ini отсутствует секция с настройками для вашего версии (билда) Windows. Актуальную версию файла rdpwrap.ini можно скачать здесь https://raw.githubusercontent.com/sebaxakerhtc/rdpwrap.ini/master/rdpwrap.ini
Вручную скопируйте содержимое данной страницы в файл «C:\Program Files\RDP Wrapper\rdpwrap.ini». Или скачайте файл с помощью PowerShell командлета Invoke-WebRequest (предварительно нужно остановить службу Remote Desktop):
Stop-Service termservice -Force
Invoke-WebRequest https://raw.githubusercontent.com/sebaxakerhtc/rdpwrap.ini/master/rdpwrap.ini -outfile "C:\Program Files\RDP Wrapper\rdpwrap.ini"
alert] Можно создать задание планировщика для проверки изменений в файле rdpwrap.ini и его автоматического обновления [/alert]
На данном скриншоте видно, что на компьютере установлена свежая версия файла rdpwrap.ini (Updated=2023-06-26).
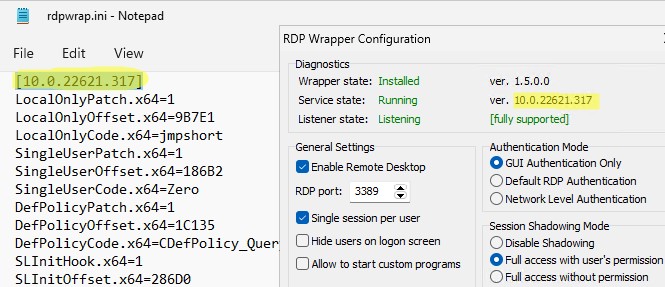
Перезагрузите компьютер, запустите утилиту RDPConfig.exe. Проверьте, что в секции Diagnostics все элементы окрашены в зеленый цвет, и появилось сообщение [Fully supported]. На скриншоте ниже показано, что RDP Wrapper с данным конфигом успешно запущен в Windows 11 22H2.
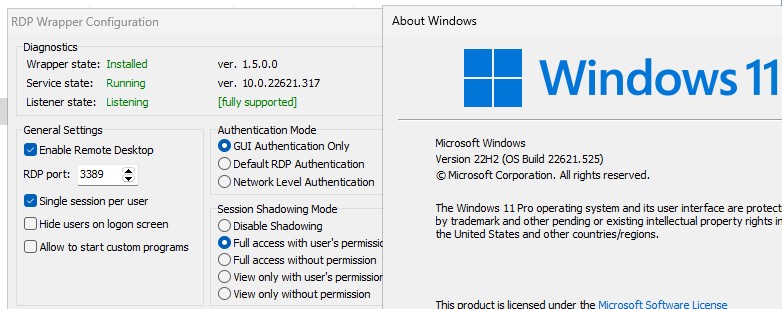
Теперь попробуйте установить несколько одновременных RDP сессий с этим компьютером под разными пользователями (воспользуйтесь любым RDP клиентом: mstsc.exe, RDCMan, mRemoteNG и т.д.).
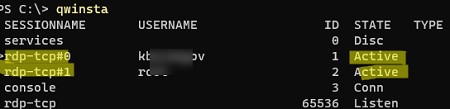
Можете проверить что на компьютере активны одновременно две RDP сессии (или более) с помощью команды:
qwinsta
rdp-tcp#0         user1                 1  Active
rdp-tcp#1         user2                 2  Active

Утилита RDPWrap поддерживается во версиях Windows (включая домашние редакции Windows Home), таким образом из любой клиентской версии Windows можно сделать полноценный сервер терминалов.
В интерфейсе RDP Wrapper доступны следующие опции:
- Enable Remote Desktop — включить/отключить Remote Desktop в Windows доступ
- RDP Port — можно изменить стандартный номера порта удаленного рабочего стола TCP 3389
- Опция Hide users on logon screen позволяет скрыть список пользователей на экране приветствия;
- Single session per user —разрешить несколько одновременных RDP сессий под одной учетной записью пользователя. Эта опция устанавливает параметр реестра fSingleSessionPerUser = 0 в ветке HKLM\SYSTEM\CurrentControlSet\Control\Terminal Server). Также этот параметр настраивается через опцию GPO Restrict Remote Desktop Services to a single Remote Desktop Services session в разделе Computer Configuration > Administrative Templates > Windows Components > Remote Desktop Services > Remote Desktop Session Host > Connections.
- В секции Session Shadowing Mode вы можете настроить режим теневого подключения к рабочему столу пользователей Windows .
Не работает RDP Wrapper в Windows
В некоторых случая утилита RDP Wrapper не работает как ожидается, и вы не можете использовать несколько RDP подключений.
Во время установки обновлений Windows может обновиться версия файла termsrv.dll. Если в файле rdpwrap.ini отсутствует описание для вашей версии Windows, значит RDP Wrapper не может применить необходимые настройки. В этом случае в окне RDP Wrapper Configuration будет указан статус [not supported].
В этом случае нужно обновить файл rdpwrap.ini как описано выше.
Если RDP Wrapper не работает после обновления файла rdpwrap.ini, попробуйте открыть файл rdpwrap.ini и найти в нем описание для вашей версии Windows.
Как понять, есть ли поддержка вашей версии Windows в конфиг файле rdpwrapper?
На скриншоте ниже показано, что для моей версии Windows 11 (10.0.22621.317) есть две секции с описаниями:
[10.0.22621.317]
...
[10.0.22621.317-SLInit]
...
Если в конфигурационном файле rdpwrap соответствующая секция отсутствует для вашей версии Windows, попробуйте поискать в сети строки rdpwrap.ini для вашего билда. Добавьте найденные строки в самый конец файла.
Если после установки обновлений безопасности или после апгрейда билда Windows 10, RDP Wrapper не работает, проверьте, возможно в секции Diagnostics присутствует надпись Listener state: Not listening.
Попробуйте обновить ini файл, и затем переустановить службу:
rdpwinst.exe -u
rdpwinst.exe -i
Бывает, что при попытке второго RDP подключения под другим пользователем у вас появляется надпись:
Число разрешенных подключений к этому компьютеру ограничено и все подключений уже используются. Попробуйте подключиться позже или обратитесь к системному администратору.
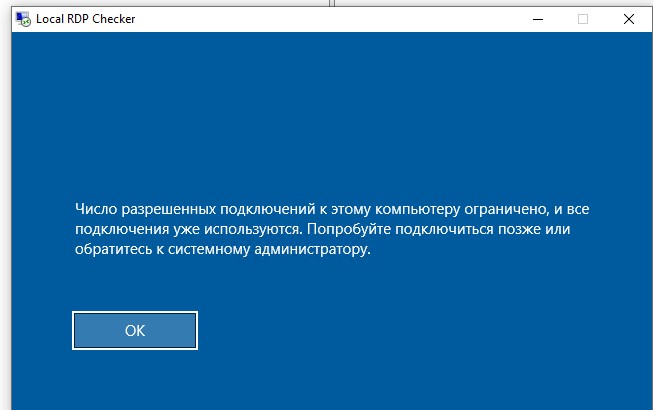
The number of connections to this computer is limited and all connections are in use right now. Try connecting later or contact your system administrator.
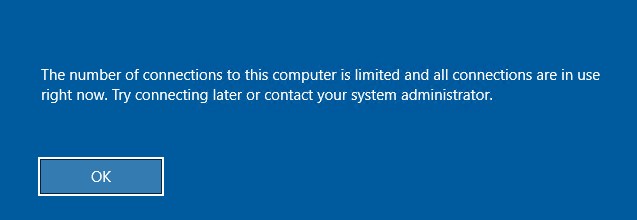
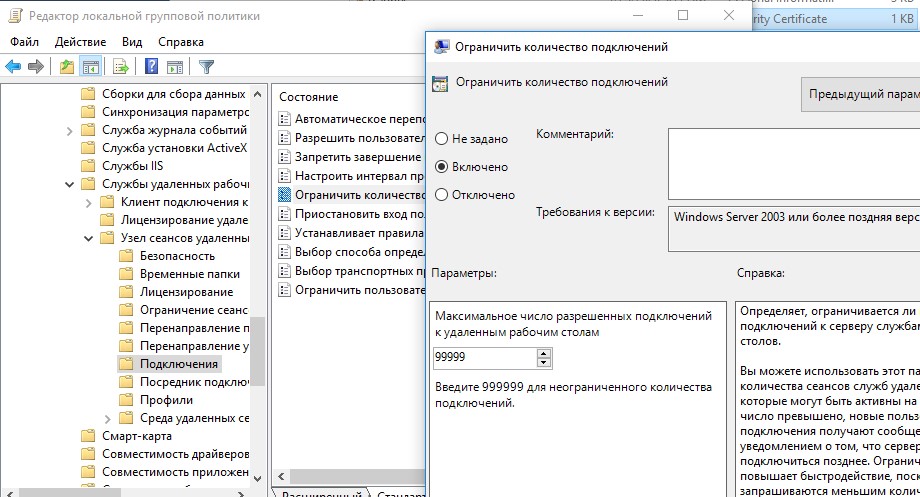
В этом случае нужно с помощью редактора групповых политики gpedit.msc в секции Конфигурация компьютера –> Административные шаблоны -> Компоненты Windows -> Службы удаленных рабочих столов -> Узел сеансов удаленных рабочих столов -> Подключения включить политику “Ограничить количество подключений” и изменить ее значение на 999999 (Computer Configuration -> Administrative Templates -> Windows Components ->Remote Desktop Services ->Remote Desktop Session Host -> Connections-> Limit number of connections).
Перезагрузите компьютер для обновления настроек GPO и применения новых параметров.
Модификация файла termsrv.dll для снятия ограничений RDP в Windows 10 и 11
Чтобы убрать ограничение на количество RDP подключений пользователей в Windows без использования rdpwrapper нужно заменить файл termsrv.dll. Это файл библиотеки, которая используется службой Remote Desktop Services. Файл находится в каталоге C:\Windows\System32.
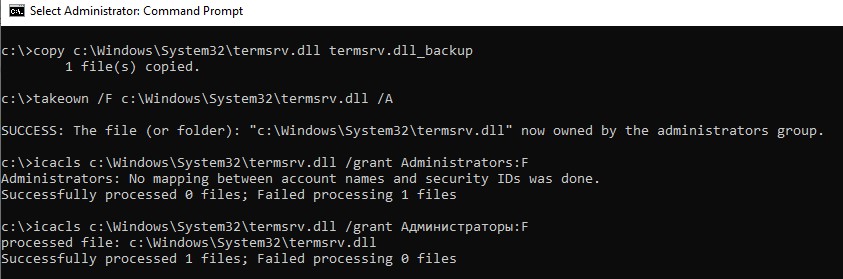
Прежде, чем править или заменять файл termsrv.dll желательно создать его резервную копию. Это поможет вам в случае необходимости можно будет вернуться к исходной версии файла. Запустите командную строку с правами администратора и выполните команду:
copy c:\Windows\System32\termsrv.dll termsrv.dll_backup
Затем нужно стать владельцем файла. Проще всего это сделать из командной строки. Чтобы сменить владельца файла с TrustedInstaller на группу локальных администраторов с помощью команды:
takeown /F c:\Windows\System32\termsrv.dll /A
Должно появится сообщение: «SUCCESS: The file (or folder): «c:\Windows\System32\termsrv.dll» now owned by the administrators group».
Теперь с помощью icacls.exe предоставьте группе локальных администраторов полные права на файл termsrv.dll (Full Control):
icacls c:\Windows\System32\termsrv.dll /grant Administrators:F
(или
Администраторы
в русской версии Windows).
Должно появится сообщение: «processed file: c:\Windows\System32\termsrv.dll Successfully processed 1 files; Failed processing 0 files«.
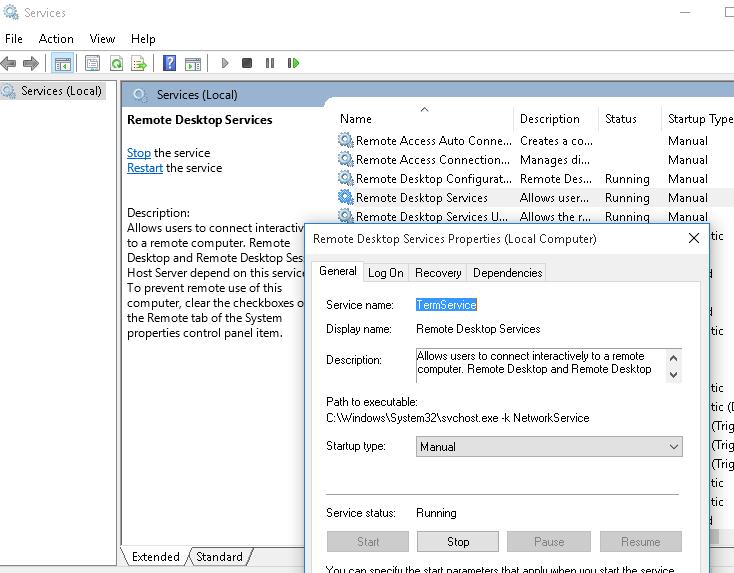
Теперь нужно остановить службу Remote Desktop Service (TermService) из консоли services.msc или из командной строки:
Net stop TermService
Вместе с ней останавливается служба Remote Desktop Services UserMode Port Redirector.
Чтобы узнать номер билда вашей Windows, выполните команду winver или следующую команды PowerShell:
Get-ComputerInfo | select WindowsProductName, WindowsVersion
В моем случае установлена Windows 10 билд 22H2.
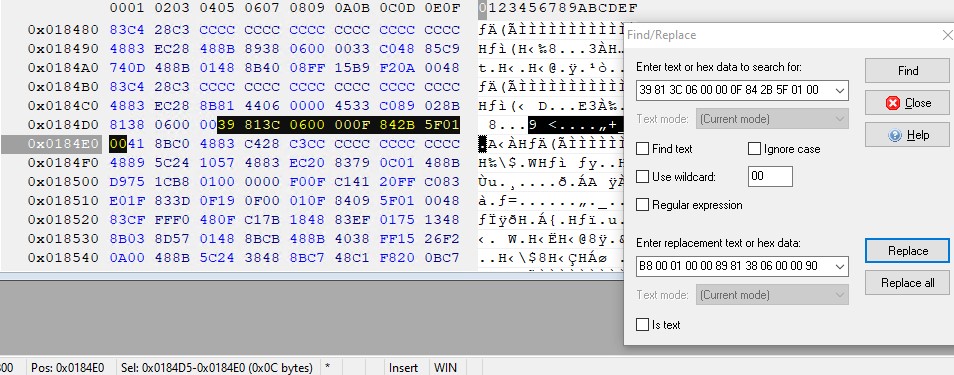
Затем откройте файл termsrv.dll с помощью любого HEX редактора (к примеру, Tiny Hexer). В зависимости от билда нужно найти и заменить строку:
| Версия Windows | Найти строку | Заменить на |
| Windows 11 22H2 | 39 81 3C 06 00 00 0F 84 75 7A 01 00 |
B8 00 01 00 00 89 81 38 06 00 00 90 |
| Windows 10 22H2 | 39 81 3C 06 00 00 0F 84 85 45 01 00 | |
| Windows 11 RTM ( 21H2 22000.258) | 39 81 3C 06 00 00 0F 84 4F 68 01 00 | |
| Windows 10 x64 21H2 | 39 81 3C 06 00 00 0F 84 DB 61 01 00 | |
| Windows 10 x64 21H1 | 39 81 3C 06 00 00 0F 84 2B 5F 01 00 | |
| Windows 10 x64 20H2 | 39 81 3C 06 00 00 0F 84 21 68 01 00 | |
| Windows 10 x64 2004 | 39 81 3C 06 00 00 0F 84 D9 51 01 00 | |
| Windows 10 x64 1909 | 39 81 3C 06 00 00 0F 84 5D 61 01 00 | |
| Windows 10 x64 1903 | 39 81 3C 06 00 00 0F 84 5D 61 01 00 | |
| Windows 10 x64 1809 | 39 81 3C 06 00 00 0F 84 3B 2B 01 00 | |
| Windows 10 x64 1803 | 8B 99 3C 06 00 00 8B B9 38 06 00 00 | |
| Windows 10 x64 1709 | 39 81 3C 06 00 00 0F 84 B1 7D 02 00 |
Редактор Tiny Hexer не позволяет редактировать файл termsvr.dll напрямую из папки system32. Скопируйте его на рабочий стол, а после модификации замените исходный файл.
Например, для самой редакции Windows 10 x64 22H2 19045.2006 (версия файла termsrv.dll — 10.0.19041.1949) нужно открыть файл termsrv.dll в Tiny Hexer. Затем найдите строку:
39 81 3C 06 00 00 0F 84 85 45 01 00
И замените ее на:
B8 00 01 00 00 89 81 38 06 00 00 90
Сохраните файл и запустите службу TermService.
Если что-то пошло не так, и у вас возникнут проблемы со службой RDP, остановите службу и замените модифицированный файл termsrv.dll исходной версией:
copy termsrv.dll_backup c:\Windows\System32\termsrv.dll
Преимущество способа отключения ограничения на количество RDP сессий в Windows путем замены файла termsrv.dll в том, что на него не реагируют антивирусы. В отличии от утилиты RDPWrap, которую многие антивирусов считают Malware/HackTool/Trojan. Основной недостаток — вам придется вручную править файл после каждого обновления билда Windows (или при обновлении версии файла termsrv.dll в рамках ежемесячных кумулятивных обновлений).
Встроенная поддержка нескольких RDP сессий в редакции Windows 10 Enterprise Multi-session
Недавно Microsoft выпустило специальные Enterprise редакции Windows multi-session (ранее назывались Windows 10 Enterprise for Remote Sessions и Windows 10 Enterprise for Virtual Desktops).
Редакция Enterprise multi-session доступна как для Windows 10, так и для Windows 11.
Главная особенность этой редакции – она поддерживает множественные одновременные RDP сессии пользователей прямо из коробки. Несмотря на то, что редакцию Windows multi-session разрешено запускать только в виртуальных машинах Azure, вы можете вам установить эту редакцию в on-premises сети и использовать данный компьютер терминальный сервер (хотоя это будет нарушением лицензионной политики Microsoft).
Далее мы покажем, как обновить компьютер с Windows 10 Pro до Windows 10 Enterprise for Virtual Desktop и использовать его для одновременного подключения нескольких пользователей.
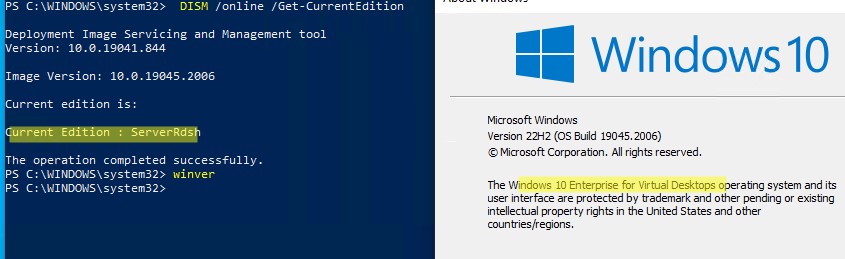
Откройте командную строку и проверьте текущую редакцию Windows (Professional в этом примере):
DISM /online /Get-CurrentEdition
Обновите вашу редакцию Windows с Pro до Enterprise:
Changepk.exe /ProductKey NPPR9-FWDCX-D2C8J-H872K-2YT43
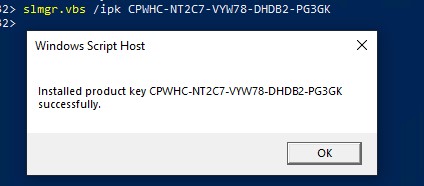
Теперь установить GVLK ключ для Windows 10 Enterprise for Remote Sessions:
slmgr.vbs /ipk CPWHC-NT2C7-VYW78-DHDB2-PG3GK
Проверьте, что теперь ваша редакция Windows 10 изменилась на
ServerRdsh
(Windows 10 Enterprise for Virtual Desktops).
Активируйте вашу копию Windows Enterprise Multi-Session на вашем KMS сервере:
slmgr /skms msk-man02.winitpro.local:1688
slmgr /ato
Откройте редактор локальной GPO
(gpedit.msc
) и включите Per-User режим лицензирования в параметре Set the Remote Desktop licensing mode (Computer Configuration -> Policies -> Administrative Templates -> Windows Components -> Remote Desktop Services -> Remote Desktop Session Host -> Licensing).
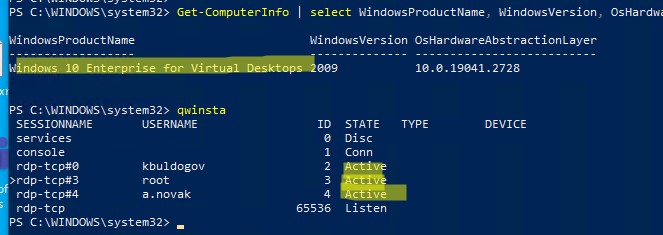
После активации нужно перезагрузить Windows. Теперь попробуйте подключиться к компьютеру по RDP под несколькими пользованиями. Как вы видите, Windows 10 Enterprise multi-session одновременные RDP подключения поддерживаются прямо из коробки.
Get-ComputerInfo | select WindowsProductName, WindowsVersion, OsHardwareAbstractionLayer
Windows 10 Enterprise for Virtual Desktops 2009 10.0.19041.2728
qwinsta
В этой статье мы рассмотрели способы, позволяющие снять ограничение на количество одновременных RDP подключений пользователей, и запустить бесплатный терминальный сервер на клиентской Windows 10 или 11. У каждого из этих способов есть свои преимущества и недостатки. Какой из них использовать — решать вам.
This guide will explain how to allow multiple sessions in a Windows VPS. A common usage case for this would be to allow a developed application or a remotely accessed support desktop. Additionally, there will be some information on where to purchase the RDS CAL license directly from Microsoft to allow for many users.
It may be best to consider a higher specification VPS or a Dedicated Server if you wish to use more than 3 users per machine, as the overall performance of the VPS will degrade per user.
How to Enable Multiple Remote Desktop (RDP) Sessions
Step 1. Connect to the Windows Server session by RDP.
Step 2. Click The Search button next to the start menu (Windows 2016) or typing into the start menu (Windows Server 2012)
Step 3. Enter in gpedit.msc
Step 4. Once Group Policy Editor had loaded, navigate to Computer Configuration, next Administrative Templates, then Windows Components, Remote Desktop Services, and Remote Desktop Session host.
Step 5. From there, you should see a folder marked as Connections. Click on it.
Step 6. Next right click with your mouse on Limit Number of Connections and click Edit.
Step 7. From there, you can set the number to the limit you wish to have or turn it off.

To access more than two sessions at a time, you will want to purchase an RDS Cal license from a certified provider. You can purchase a Remote Desktop Service Client Access License from Microsoft.
Step 8. Next, click Next Setting until you are at the Restrict Remote Desktop Services users to a single Remote Desktop Services session screen so you can edit this setting.
Step 9. In this window, you can click Disabled to turn off the user restrictions.
Step 10. Finally, reboot the server from your Cloud Control Overview page, and the group policy changes should automatically apply.
Reversing These Changes
The process to reverse the changes is easy. You would follow the same steps above and set the desired Group Policies to Not Configured and select Enabled or Disabled.