
Scanning for IP address lets you have better control over your network. With 1-2 commands, you can quickly map out the devices in your network and the IP addresses that they are using. But to understand how to scan a network, first, you need to understand how are IP addresses assigned.
Follow these four simple steps to scan your network for IP addresses in use:
- Open a Command Prompt window.
- On Windows or macOS type ipconfig or on Linux type ifconfig. Press return. Note down the subnet mask, the default gateway, and your own computer’s IPv4 address.
- Enter the command arp -a to get a list of all other IP addresses active on your network.
- Enter the command ping <IP_address> giving any of the addresses returned by ARP in order to test the response times to that node – don’t include the angle brackets that are shown in that example.
DHCP (Assigning IPs Dynamically)
An automated process in networking, called DHCP (Dynamic Host Configuration Protocol), assigns IP dynamic addresses to hosts as soon as they enter the network. In a home or small network, the DHCP server is usually a part of the router. When you come into the network, the router will look for an available IP address in its pool and assign it to you, so that your device can communicate with others without any conflict.
Dynamic allocation of IP addresses is a great advantage for both end-users and network admins. But sometimes you would need to have some control in order to manage and troubleshoot your network more efficiently.
Related post: Find device or IP with MAC
Related Post: PowerShell Kill Process Command
If you are here for free tools and trials, here is our list of the four best tools for discovering IP addresses on a network:
- ManageEngine OpUtils – FREE TRIAL A suite of network address monitoring tools that covers IP addresses, MAC addresses, and port numbers with a cut-down free version also available. Installs on Windows Server and Linux.
- Angry IP Scanner A free network scanner that identifies all connected devices and lists their IP addresses plus connection response speeds. Available for Windows, macOS, Linux.
- SolarWinds Engineer’s Toolset Ping Sweep This utility scans a network and records every IP address that is in use. The Engineer’s Toolset also includes subnetting tools for DHCP management and the Open Port Scanner. Runs on Windows Server.
- MyLAN Viewer A network scanner that identifies all connected devices and lists their IP addresses and MAC addresses. Runs on Windows.
Download Remote Shutdown and Reboot Cheat Sheet
What will you learn in this Tutorial
In this tutorial, you will learn the basic networking skills on how to scan a network for IP addresses. We will scan a network with native OS commands, find which addresses were assigned dynamically, which statically, and test their connectivity.
In the end, we will compare some free IPAM tools aka IP address scanning tools that can give you additional information. To improve your IP addressing insights, even more, we will show you some tools that allow you to track IP addresses and even manage them.
Simple IP Scanning
Operating Systems, like Windows and Linux, come with their own native simple networking set of tools. Commands such as “ipconfig”, “arp -a”, or “ping” allow simple scanning and troubleshooting.
The simplest way to get a quick list of IP addresses and their devices connected to your network is with those OS native commands found in the command line. With a list of the assigned IP address and their devices, you can easily find the devices that are causing the most problems.
- ipconfig This command displays all network settings assigned to one or all adapters in the computer. You can find information such as your own IP, subnet, and Gateway. For Linux and MacOS is “ifconfig”.
- arp -a When you issue the “arp -a”, you’ll get IP-address-to-mac conversion and the allocation type (whether dynamic or static) of all devices in your network.
- PingIt helps determine connectivity between two hosts and find the IP address of a hostname.
Related Post: Best IP & Port Scanners
Reading The Output
Finding your own network adapter configuration
In the following screenshot, you’ll see the output from the ipconfig command. On a Windows, the ipconfig command can be entered through the Command line.
Go to Run > type cmd > type ipconfig
- This Windows computer has 5 network adapters, but the last one (Wireless LAN adapter Wi-Fi) is the only one connected to a network. The rest are disconnected.

- In this network, the router (or Default Gateway) is playing the role of the DHCP server. It is assigning the IP address dynamically and giving access to the Internet.
- You are reading two of the most important IP addresses for your device; Your own device’s IP (IPv4 and IPv6) and your Gateway. The Subnet Mask is also very important, it shows that you are on the same subnet as the gateway.
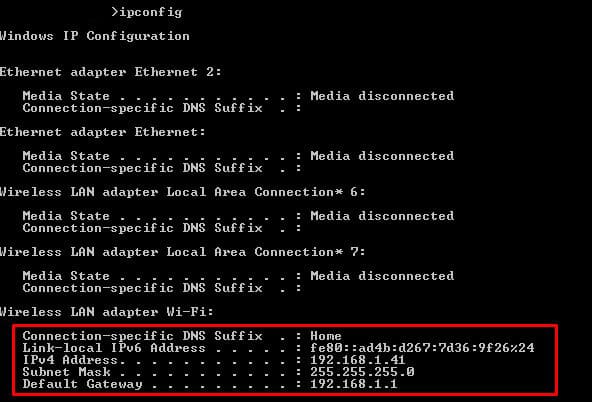
Now you know your subnet, which in this case is 192.168.1.0/24 (using the CIDR range). Now you need to find the rest of the IP address in your network.
Scanning your Network
The job of the ARP protocol is to map IPs to MAC addresses. It provides a method for hosts on a LAN to communicate without knowing any address and create a cache of information. When a new computer enters the LAN, it receives an IP and updates its ARP cache with the Gateway information. This ARP cache can be found using the “arp-a” command.
- Use the command line to enter the “arp -a” command.

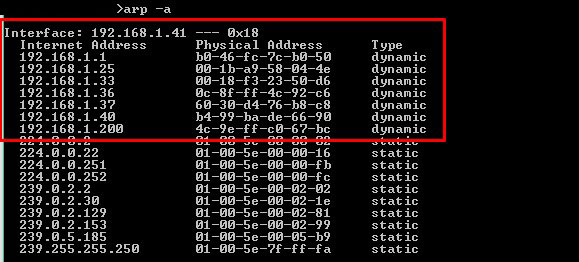
- This computer has been connected for some time into the LAN, so its ARP cache is very precise and complete. The first IP address shown in the display is the Gateway (the same we found through the ipconfig command).
- The output shows the IP, the MAC addresses, and their assignation type. The addresses displayed here were dynamically assigned by the DHCP server in the LAN. All of these IPs are devices connected to the LAN (192.168.1.0/24). The other static addresses are reserved for Multicasting.
- With the MAC information, you can know the vendor. Try searching for vendor prefixes or use an automatic online tool such as MACvendors.
Testing Connectivity
Finally, with some information, you can test connectivity. In the following test, we tried an extended ping with “ping -t” to the gateway. With this, you can learn some simple insights about delay and latency.
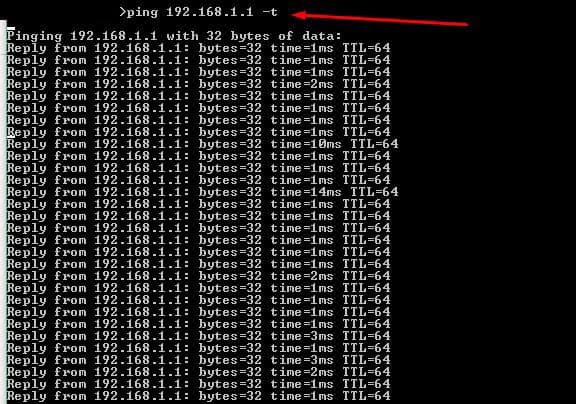
From the list generated by the ARP command, you could ping all the live hosts. Or you can go beyond and ping the entire subnet to find hosts not found by the ARP (but that would be too much manual work…). Later, we’ll discuss how to automatically ping entire subnets at once.
Enhancing IP Scanning
Although having a list of devices and their allocated IP address will give you good insights, the information will not be enough when your network scales. Manual IP scanning in multiple subnets and BYOD (Bring-Your-Own-Device) scenarios is nearly impossible. As the network scales, problems will scale too.
Larger networks demand more results, flexibility, and easy-to-read set of commands.
An IP Address Scanner tool helps you with larger demands. These tools are able to map the entire local network, finds live hosts, and to provide the results of the “arp-a” in a clearer format. Other IP Scanners do not depend on ARP but they operate using repeated ping tests. A Ping Sweep tool lets you ping entire subnets and find live hosts just with one button.
Some other IP Scanners go the extra mile and give more information such as Port number, DNS, DHCP, etc. All of this data is also presented in the most visual and easy-to-read format. They also allow users to save all results and present them in detailed reports.
The best IP Address discovery tools
Our methodology for selecting a third-party tool to scan for IP addresses
We reviewed the market for IP address discovery tools and analyzed options based on the following criteria:
- A service that can be run on demand, on a schedule, or continuously
- Scans of the entire network or the option to limit searches to an address range
- DNS resolution
- Mapping from MAC addresses to IP addresses
- A system that can also provide availability and response time tests
- A free trial that provides a no-cost opportunity to assess the package or a free tool
- Value for money from a system that is offered at a fair price or a free tool that is worth installing
With these selection criteria in mind, we identified a number of network scanners that will discover IP addresses and identify the devices to which they have been allocated by mapping to MAC addresses.
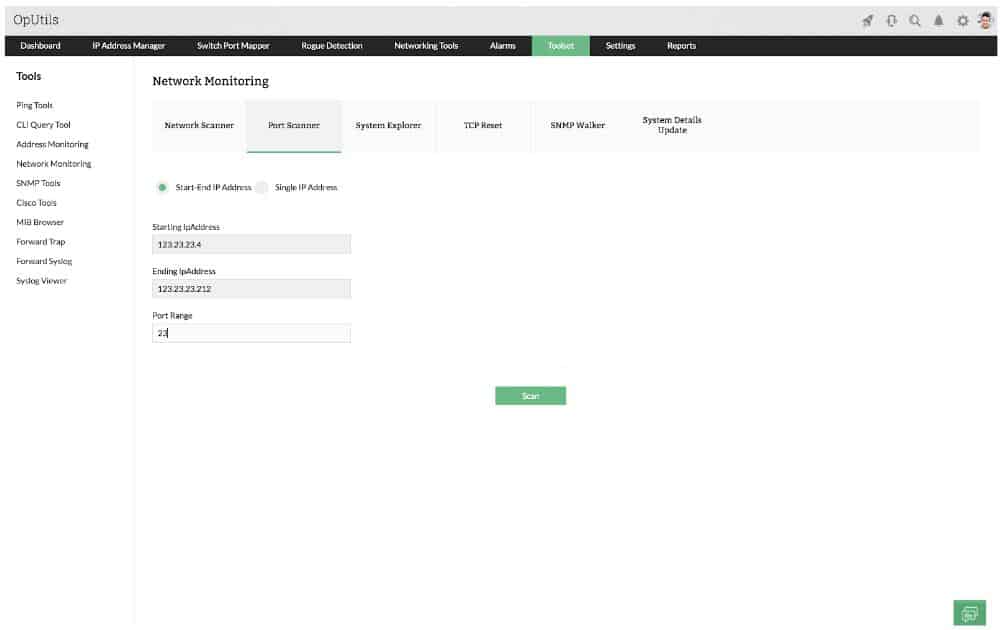
ManageEngine OpUtils combines an IP address manager, a switch port mapper for MAC address discovery, and a port scanner to identify open TCP and UDP ports on all devices. This combination delivers all address-related functions that you will need in order to fully manage your network.
Key Features:
- IP Address Manager: OpUtils IP address manager, provides users with a centralized tool for efficient management and organization of IP addresses within the network.
- Subnet Planner: The subnet planner feature assists in planning and optimizing network subnets. This helps network administrators allocate and manage IP address spaces more effectively.
- Identification of Abandoned Addresses: This functionality aids in reclaiming and optimizing IP resources.
- Robust Utilities Suite: This feature ensures that OpUtils provides a holistic solution for address-related functions in network management.
Feature Distinction
The uniqueness of OpUtils is its robust suite of utilities. It includes an IP address scanner, subnet planner, tools for identifying abandoned addresses, and advanced configuration and diagnosis features.
Why do we recommend it?
We recommend ManageEngine OpUtils for its efficient network management capabilities. OpUtils offers an IP address manager as part of its utility suite, so you can discover all connected devices, and their associated IP addresses, and then manage them from a single console.
The IP address manager is, in itself, a suite of utilities. This group of services includes an IP address scanner. This will discover all of the devices connected to your network and list the IP addresses allocated to them. The IPAM is able to produce IP address reconciliation reports that will enable you to update your native DHCP server in case it fails to notice expired address leases.
The IP address tracker service in the bundle can produce a hierarchical view of your network, enabling you to identify subnets and the allocation of addresses to each. DHCP management tools in the pack let you manage subnet address pools. The switch port mapper identifies each device by MAC address and switch port number. The port scanner in OpUtils lets you see which TCP and UDP ports on each device are open.
OpUtils is available for Windows Server and for Linux.
Who is it recommended for?
ManageEngine OpUtils is recommended for various-sized networks, from SMBs to large enterprises. The solution is designed for any network admin or IT professional within those networks, looking for a complete IP address management solution.
Pros:
- Support for IP Management and Switch Port Monitoring: This dual functionality allows for comprehensive network management, addressing both IP-related tasks and monitoring the status of physical switch ports.
- Built-in Troubleshooting Tools: The inclusion of built-in troubleshooting tools enhances the diagnostic capabilities of OpUtils.
- Compatibility with CISCO and SNMP Tools: OpUtils supports CISCO and SNMP tools, providing compatibility with widely used networking technologies.
- Suitability for Sysadmins: OpUtils is designed to meet the specific needs and preferences of sysadmins, making it potentially more user-friendly for individuals in this role.
Cons:
- Advanced Features Not Suited for SOHO: OpUtils advanced features and options may be considered a drawback for small home networks, where simpler and more basic tools may be more appropriate.
OpUtils is available in a Free version, which includes a port scanner and Ping utilities. Contact the ManageEngine sales team for a quote on the paid version. The paid version of OpUtils can be downloaded as a 30-day free trial.
ManageEngine OUtils
Download a 30-day FREE Trial
2. Angry IP Scanner
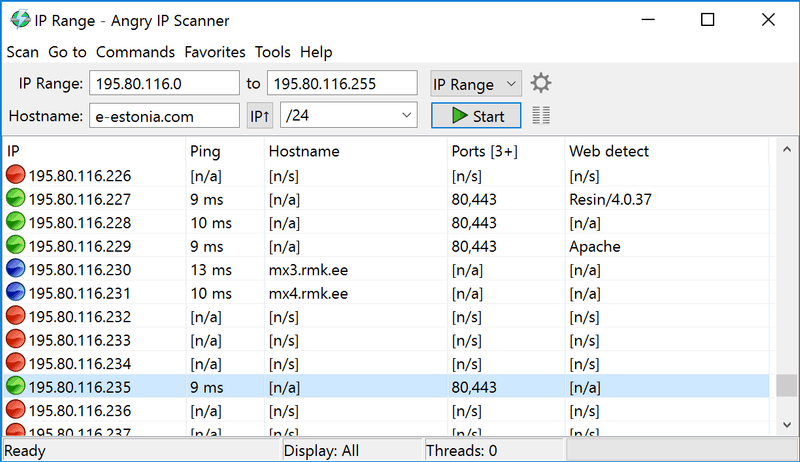
Angry IP Scanner is one of the most popular scanners on the web, with over 29 million downloads. It is open-source, free, and available for Windows, MacOS, and Linux. It can let you scan your local network or the Internet-facing IP addresses.
Key Features:
- On-Demand Ping Sweeps: With this feature, users can initiate scans at their convenience, allowing for flexibility in assessing and discovering devices within the network or specified IP ranges.
- Tabulated Results: This feature enhances the user experience, providing a quick overview of the scanned data.
- Save to File: This feature is valuable for record-keeping, analysis, and documentation purposes. Users can store and reference the scan data at a later time, facilitating further analysis or sharing of findings.
Why do we recommend it?
Angry IP Scanner is recommended for being one of the most used and relied-on open-source tools. If IP address scanning is all you need, Angry IP Scanner is easy to use and quite efficient in scanning both local and Internet-facing IP addresses.
This tool is not only capable of scanning IP addresses but also ports. When you define an IP address range, you can also specify a number of the port, and see if a device in your network is using a specific service (defined by the port). Angry IP Scanner also lets you save all the scan results into multiple formats, such as TXT, XML, CVS, etc.
When you scan, you’ll know what hosts are alive, their response time, hostname, MAC address, etc. If you want even more information, you can extend results by developing Java plugins.
Who is it recommended for?
Angry IP Scanner is recommended for one-off scans of smaller networks. It works very well in uncomplicated situations and small networks where network admins require a fast and simple way to scan networks. Angry IP Scanner does not scale well on larger networks.
Pros:
- User-Friendly: Its user-friendly interface ensures that both beginners and experienced users can quickly initiate and perform scans without extensive training.
- One-Off Scans: Its simplicity and efficiency make it particularly useful for quick network assessments and discovery tasks in smaller environments.
- Open Source and Free: Angry IP Scanner is open source and 100% free. This cost-free nature makes it an attractive option for users with budget constraints.
Cons:
- Lacks Advanced Features: Angry IP Scanner lacks advanced features such as DHCP reconciliation and rogue DHCP identification. This limitation may be a drawback for users requiring more for in-depth network analysis and troubleshooting.
- Limited Scalability: The tool may not scale well in large environments or when tasked with scanning extensive networks, potentially leading to performance issues.
- Lacks Detailed Reporting: For organizations requiring comprehensive and detailed insights into their network infrastructure, the absence of advanced reporting capabilities may be a limitation.
Open Source and 100% free. Get Angry IP from its official site.
3. SolarWinds Engineer’s Toolset Ping Sweep
Tested on: Windows & Windows Server
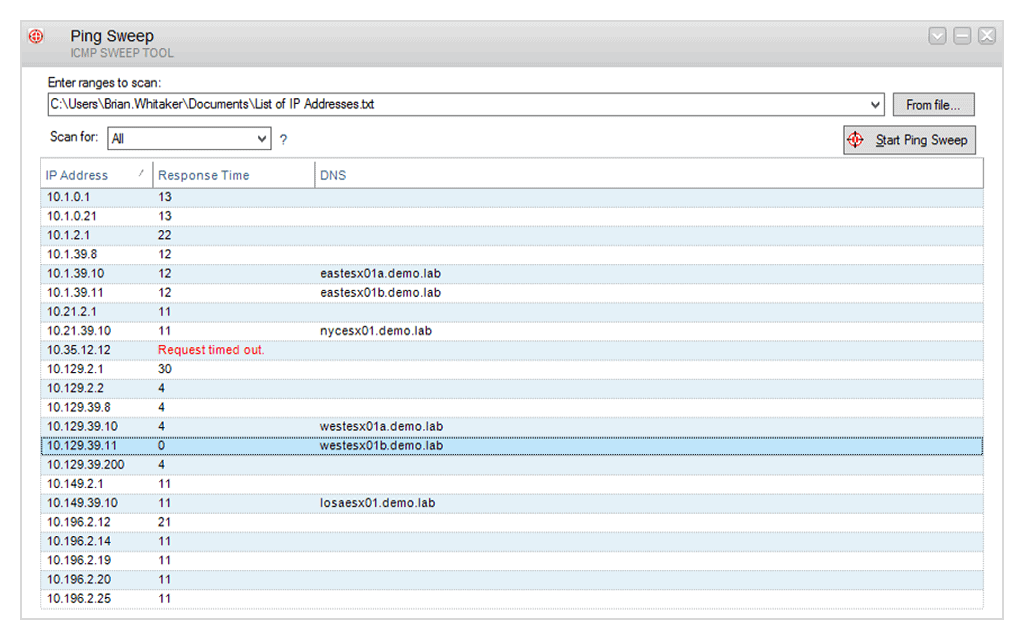
SolarWinds Engineer’s Toolset Ping Sweep is one of more than 60 network management systems in the Engineer’s Toolset. The package provides systems for monitoring networks but it is mainly a bundle of network troubleshooting tools.
Key Features:
- Network Device Discovery: The Ping Sweep tool facilitates the discovery of network devices, allowing users to identify and locate devices connected to the network.
- IP Address Recording: Users can record and keep track of IP addresses currently in use within the network, aiding in the management and organization of IP allocations.
- Address Range Scanning: The tool enables scanning across a specified range of IP addresses, providing a comprehensive overview of devices within that range and helping to identify potential issues.
- Hostname Visualization: Users can easily view hostnames associated with the discovered devices, enhancing the ability to recognize and manage network entities efficiently.
- Response Time Metrics: Ping Sweep provides response time metrics for the discovered devices, offering insights into the network’s responsiveness and performance.
Feature Distinction
This package is part of a bundle of systems for network troubleshooting. It is available for on-demand network scanning to discover which devices are on the network and which IP addresses are available.
Why do we recommend it?
The Ping Sweep tool is part of the SolarWinds Engineer’s Toolset. This package provides a single dashboard for many tools, so you don’t have to go looking around your desktop to find this or any of the other utilities when you need them. The package is for Windows Server but you can also install it on a Windows PC.
The GUI interface includes a field where the user can enter a range of IP addresses to scan. The field can also take a non-sequential list, and if that list is long, you can write it into a text file and put the path and file name in the IP address range field instead of the actual addresses.
The interface makes the output easy to read and it shows a line for each address in the given range or list. You can select a setting that will restrict the output to only show those addresses that responded. The record for a discovered IP address shows the response time of the Ping test to that node and the utility will also check in the local DNS file to show the hostname for the discovered device.
As well as viewing the results in the Engineer’s Toolset dashboard, you can store results to a text file or a CSV for further analysis. The system doesn’t provide the option to run continuously, so you would use this tool for on-demand address testing. The Engineer’s Toolset also includes facilities for managing DNS and DHCP servers and there are a number of subnetting utilities in the package.
After discovering all devices with the Ping Sweep tool, network managers can switch to the Open Port Scanner to examine which ports are open on each device or run through a list of devices to see all results in one list.
Who is it recommended for?
This is a useful package for network troubleshooting on a large or mid-sized network or for network monitoring on a small network. The Engineer’s Toolset also provides utilities to examine DNS and DHCP servers and it provides other OIP address management utilities. You can also use facilities in the package to check on the ports on each endpoint on your network.
Pros:
- On-Demand Network Scanner: Users have the flexibility to initiate network scans on-demand, providing control over when the tool assesses the network.
- DNS Server Testing: Ping Sweep includes the capability to test the local DNS server. This allows users to verify the performance and reliability of the DNS server, ensuring smooth domain name resolution within the network.
- Response Time Metrics: This enables you to assess the efficiency and performance of network-connected devices, aiding in the identification of potential latency issues.
- Identification of IP Address Gaps: Assists network administrators in optimizing IP allocations and preventing potential conflicts or overlaps in addressing.
- Record Storage for Further Analysis: The ability to store scan records to a file allows for in-depth analysis and documentation.
Cons:
- Non-Continuous Operation: The tool doesn’t run continuously, meaning it needs manual initiation for each scan.
The Engineer’s Toolset is a single package for all 60 utilities, including the Ping Sweep tool. The software package runs on Windows Server or Windows. You can examine the package by accessing a 14-day free trial.
IP Address Tracker Tools
Having a map of IP addresses, MAC addresses, used ports, etc, is great for networking inventorying and may help with some troubleshooting cases. But a list can not control and display real-time results.
An IP address Tracker is a good upgrade to our set of tools and commands described so far. It does allow scanning multiple subnets and displaying results, but it also allows you to keep track of one or more IP addresses.
An IP Address Tracker will notice when an IP address is released. This can be either because the device lost connectivity or it changed IP address. It will help you minimize IP addressing conflicts (when two devices are trying to take the same IP) and reduce DNS errors.
MyLAN Viewer
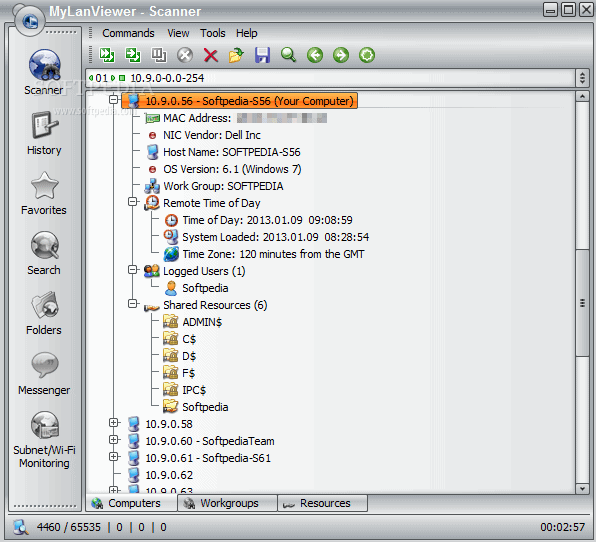
MyLAN Viewer is a NetBIOS and IP address scanner for Windows systems. Just like the IP Scanners shown above, this tool will scan a network and show devices in an easy-to-read format.
Key Features:
- Continuous Scans: Continuous scanning ensures that the information remains up-to-date and reflects any changes in the network.
- Alerts for IP Address Profile Changes: This feature is valuable for immediate awareness of any alterations in the network configuration or device characteristics.
- Device Details: Users can access comprehensive device details, enhancing their ability to understand and manage the devices within the network.
Why do we recommend it?
MyLAN Viewer is recommended for its dedicated IP scanning capabilities. It provides advanced IP scanning, including continuous scans, schedules, and alerts for IP address profile changes. Also, if you are looking for a comprehensive network data collection (aside from IP addresses), MyLAN Viewer is a great option.
But MyLANViewer goes beyond, and not only shows computer name, IP, and MAC, but also NIC, OS version, logged users, shared folders, and much more.
This tool is able to track specific IP addresses and show notifications when their state change. With it, you can also keep track of network security by showing port information and detecting rogue DHCP servers. MyLAN Viewer tracks all devices in the subnet including hidden, and displays alerts when new devices enter the network, and others go.
This tool can also display the following metrics as well:
Display Whois data.
Perform traceroute.
Manage “Remote Shutdown and Wake On LAN (WOL)”.
Monitor wireless networks.
Who is it recommended for?
MyLAN Viewer is recommended for network admins working with Windows-based networks and who need detailed information about connected devices. It does not scale well on large networks, thus it is better to use MyLAN Viewer on smaller networks.
Pros:
- Diverse Network Tools: Additional network tools, such as whois, traceroute, Wake-On-LAN , and remote shutdown options makes it a valuable solution for small networks.
- File Management Features: This enhances collaborative efforts and simplifies file-sharing processes within smaller network environments.
- Effective for SOHO: MyLAN Viewer ability to detect rogue DHCP servers and address IP conflicts, is well-suited for the specific needs of smaller-scale network configurations.
Cons:
- Cluttered Interface: The interface of MyLAN Viewer can feel cluttered in large networks.
- Reporting and Monitoring: For organizations requiring in-depth insights and reporting features for large-scale network analysis, the absence of these capabilities may be a limitation.
- Limited Platform Compatibility: The tool is only available for Windows systems, a drawback for users operating on different operating systems.
Price: Free, but only available for Windows systems.
Download: Get MyLAN Viewer from its official site.
Related Post: Best Wake On LAN Tools
IP Address Management (IPAM)
Basic IP Address Scanning should be enough to manage small networks. But when networks scale they depend on multiple subnets and detailed management requirements.
Sometimes large-scale networks have standalone DHCP and DNS Servers in order to assign addresses to multiple subnets. But IP conflicts occur and it is really challenging to manage them manually. An IP Address Management or “IPAM” is a piece of software able to actively control DHCP and DNS. It also gives you the ability to manage multiple subnets.
IP address scanning FAQs
How do I find a network name from an IP address?
To get the network name of a host from an IP address you need to query the DNS server. Open a Command Prompt window and enter nslookup <IP_address> putting in the IP address you have instead of <IP_address>.
How do I identify an unknown device on my network?
To see all of the devices connected to your network, type arp -a in a Command Prompt window. This will show you the allocated IP addresses and the MAC addresses of all connected devices. To get the hostname of each IP address you see in the list, use nslookup <IP_address> putting in the IP address you have instead of <IP_address>.
How can I tell what device is at an IP address?
To get deeper information on devices connected to your network rather than just an IP address or MAC address, use a network monitor that scans for details with SNMP – the SolarWinds Network Performance Monitor is one example.
You can quickly scan your local network for IP addresses using the `arp` command in the Command Prompt with the following syntax:
arp -a
What You Need to Know About IP Addresses
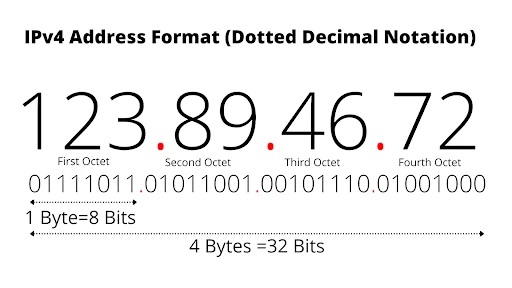
IPv4 vs. IPv6
IP addresses serve as unique identifiers for devices on a network. Understanding the types of IP addresses is crucial when performing an IP scan in CMD.
-
IPv4: This is the most commonly used version, consisting of four octets separated by periods (e.g., `192.168.1.1`). It supports around 4.3 billion unique addresses.
-
IPv6: With the growth of the internet, IPv6 was introduced. It includes eight groups of hexadecimal numbers separated by colons (e.g., `2001:0db8:85a3:0000:0000:8a2e:0370:7334`), allowing for a virtually limitless number of addresses.
Why IP Scanning is Useful
IP scanning is beneficial for various reasons, especially in networking contexts. It aids in:
- Network Troubleshooting: Verifying device connectivity and diagnosing issues.
- Security Assessments: Identifying unauthorized devices connected to your network.
- Network Management: Keeping track of all devices and their health.
Mastering Python in Cmd: A Quick Guide to Efficiency
Getting Started with CMD
Accessing CMD
To utilize the power of CMD for IP scanning, you first need to open it. Here are simple ways to access Command Prompt:
- Press `Windows + R` to open the Run dialog, type `cmd`, and hit Enter.
- Alternatively, search for `cmd` in the Start menu.
Basic CMD Commands
Before diving into IP scanning, it’s essential to familiarize yourself with some basic CMD commands that can aid in your tasks.
- ping: Checks if a specific IP address is reachable by sending packets.
- ipconfig: Displays the current TCP/IP configuration for your network adapters.
- tracert: Traces the path data takes to reach a destination IP.
Escape in Cmd: Mastering Command Line Evasion
Executing IP Scans in CMD
Using the `ping` Command
One of the simplest ways to check the reachability of a device is by using the `ping` command. This sends a series of echo requests to the target IP address:
ping [IP address]
For example, to ping a router with the address `192.168.1.1`, you would type:
ping 192.168.1.1
The output will show whether the requests were successful or timed out, allowing you to ascertain network connectivity.
Using the `arp` Command
ARP stands for Address Resolution Protocol, and it is used to map network addresses to MAC addresses. By using the `arp` command, you can view the IP addresses of devices that your computer has communicated with recently.
arp -a
When you run this command, you will receive a list of IP addresses along with their corresponding physical addresses, helping you identify devices on your network.
Using `net view` for Network Scanning
Another essential command for network scanning is `net view`. This command allows you to view all devices (or shares) available on your network:
net view
Executing this command can give you insights into shared network resources, making it a valuable tool for network management.
Batch Scripting for Continuous Scanning
To increase efficiency, you can create batch scripts that automate the scanning process. Batch files allow you to run a set of commands in sequence.
Here’s a simple example of a batch script that performs a basic IP scan on a local subnet:
@echo off
for /l %%i in (1,1,254) do (
    ping -n 1 192.168.1.%%i | find "Reply"
)
In this script, `for /l %%i in (1,1,254)` creates a loop from 1 to 254. The command inside the loop sends one ping packet to each IP address in the range `192.168.1.1` to `192.168.1.254`. Responses that include “Reply” will be displayed, indicating which IPs are responsive.
Virus Scan Cmd: Quick Guide to Protect Your PC
Advanced IP Scanning Techniques
Using `tracert` for Detailed Analysis
The `tracert` command provides a detailed route taken by packets to reach a specific IP address. This is particularly helpful for diagnosing network problems by showing where delays or failures occur in the route.
tracert [IP address]
For example:
tracert 8.8.8.8
This command will display each hop your data takes to reach Google’s public DNS server, along with the time taken for each hop.
Combining Commands for Better Results
You can also combine multiple commands for a more effective scanning experience. For instance, using `ping` with `tracert` can give you a comprehensive view of a network path and device response times.
For example, first run a `ping` check to see if the network is reachable, and then follow it up with `tracert` to delve deeper into any connectivity issues.
Mastering If Else in Cmd: A Quick Guide
Troubleshooting Common Issues
Firewall and Security Settings
One key factor that might prevent successful IP scanning is local or network firewalls. Firewalls can block ICMP packets, causing the `ping` command to time out or return unreachable status. Ensure that you have the necessary permissions or configurations to allow ICMP requests through firewalls during scans.
Handling Timeouts and Errors
When running commands in CMD, it’s crucial to understand the various responses you might receive. For instance, if you see «Request timed out,» it means the target device is not responding. This could be due to various reasons, including:
- The device is turned off.
- A firewall is blocking the request.
- The device is on a different subnet.
Understanding these messages will help you effectively troubleshoot network issues.
Prank Cmd: Fun Commands to Play on Friends
Conclusion
In summary, performing an IP scan in CMD is a powerful technique for managing and troubleshooting network issues. With the commands discussed, you can efficiently identify devices, check connectivity, and analyze network paths.
Install Cmd: A Quick Guide to Mastering Command Line
FAQs
What is the Difference Between an IP Scanner and CMD Commands?
An IP scanner is a specialized software designed explicitly for discovering devices on a network, providing a user-friendly interface and additional features. In contrast, using CMD commands requires manual input and offers a more hands-on approach, but it allows for powerful customizations.
Can I Scan Remote IP Addresses Using CMD?
You can technically use CMD to scan any reachable device on the internet. However, results can vary, and many external devices may have firewalls in place that block ping requests or other scans.
Are There Any Risks Associated with IP Scanning?
Yes, unauthorized IP scanning can be perceived as malicious activity. It’s important to only scan devices for which you have permission and ensure compliance with legal and ethical guidelines when conducting any network scans.
Для WINDOWS на bat
Определение текущей сети по совпадению например 192.168. или 172.16. (если несколько сетевых адаптеров или есть виртуальные возможно неправильное определение сети!)
Пишем диапазон сканирования сети например от 1 до 255 вся сеть
Проверяем пингом если ок
Запрашиваем МАС (2 варианта), ИМЯ, Расширенные сетевые ресурсы.
Применяемые команды:
arp -a IP
net view IP
nbtstat -a IP
ping -a IP
- scan-seti-otvet-primer
Скачать
В версии cmd 6.0 — нужно закомментировать кодировку UTF-8 так как она не понимает (в базу в место русского быстрей всего придут иероглифы) :: Вывод в кодировке UTF-8 ::chcp 65001 > nul
В версии cmd 5.0 — в команде net view \\%IP%.%1 /all нужно убрать all так как оно там еще не поддерживается сделать net view \\%IP%.%1
V 2.5 08.12.2020 Убран вывод 00 и FF — MAC, сравнение MAC между разными способами получения если разные выводим оба, приводим MAC к единому выводу — меняем на :
@ECHO OFF
mode con:cols=130 lines=1000
color 1A
:: Автор Мамзиков Артём Андреевич
:: V 2.5 08.12.2020
TITLE Skanirovanie Seti Poluchenie Dostupnih IP IMYa MAC SHARE
:: Определение текущей кодировки может отличатся 866 и 1251
for /f «tokens=2 delims=:» %%a in (‘chcp’) do set «kodstr=%%a»
::Удаление старого файла
del /F /Q /A:H «%~dp0OUTSETI.TXT»
::Создать скрытый временный файл для построчного лога
echo LOG %date% %TIME:~,-3%=>»%~dp0OUTSETI.TXT»
::copy /b NUL «%~dp0OUTSETI.TXT»
attrib +h «%~dp0OUTSETI.TXT»
::Получаем просто подсеть из начала совпадения сторки более правильно чем dns
for /f «tokens=2 delims=:(» %%a in (‘ipconfig /all^|FIND /I «IP»^|FINDSTR /c:»192.168.» /c:»172.16.»‘) do (
:: Так как ip разной длинны обрезка :~1.10% нам не подходит разбиваем на октеты
for /f «tokens=1-4 delims=. » %%k in («%%a») do set IP=%%k.%%l.%%m
)
setlocal enabledelayedexpansion
:: Перебор IP
for /L %%b in (1,1,255) do call:scan %%b
::Вывод результатов сканирования сети
::echo %OUTSETI%
curl -X POST -H —silent —data-binary «@%~dp0OUTSETI.TXT» https://сайт.ru/glpi/data_server/data.php
goto:eof
:scan
::Проверка Пингом. Недоступность, строка символов «TTL» в выводимых результатах отсутствует. Если строка символов «TTL» найдена, то FIND сформирует значение переменной ERRORLEVEL равным 0
ping -n 1 -w 1000 %IP%.%1 | find /I «TTL» > nul
if %ERRORLEVEL%==0 (goto :YesPing) else (goto :end)
:: Еще один вызов из-за 2 команды мака, в общем цикле 1 мака если не нашло 2 часть не выполняется, в раздельном виде не передается переменная так как закрыто было циклом пинга!
:YesPing
:: Очистка обнуление перменных в цикле из буфера там где их нет
set «MAC=»
set «MACP=»
set «MACPP=»
set «NAMEP=»
set «NAME=»
set «DISK=»
set «PRINT=»
set «IPC=»
set «NETBIOSP=»
set «NETBIOS=»
set «GROUP=»
:: Запрос Имени
For /f «tokens=4 delims= » %%d in (‘ping -a -n 1 -w 0 %IP%.%1^|FIND /I «[«‘) do set NAMEP=%%d
:: Запрашиваем имя NETBIOS, Рабочую группу и MAC искомые строки 00 20 MAC
for /f «tokens=1,3-5″ %%o in (‘nbtstat -A %IP%.%1^|FINDSTR /c:»<00>» /c:»<20>» /c:»MAC»‘) do (
:: Еще один способ получения MAC
for /f «tokens=2 delims==» %%s in (‘echo %%o%%p%%q%%r^|FIND «MAC»‘) do set MACP=%%s
:: В кодировке cp1251
IF /I «%%p»==»Уникальный» (set NETBIOSP=!NETBIOSP!%%o:) ELSE (IF /I «%%p»==»Группа» set GROUP=%%o)
:: В кодировке cp866 и EN
IF /i «%%p»==»“ЁЄ «мл©» (set NETBIOSP=!NETBIOSP!%%o:) ELSE (IF /i «%%p»==»ѓагЇЇ » (set GROUP=%%o) ELSE IF /i «%%p»==»UNIQUE» (set NETBIOSP=!NETBIOSP!%%o:) ELSE IF /i «%%p»==»GROUP» (set GROUP=%%o)))
:: Разбиваем 2 вывода значения имени 00 и 20
for /f «tokens=1,2 delims=:» %%q in («%NETBIOSP%») do (
:: Сравниваем имя если одинаково выводим 1 , сравниваем с путыми переменными , если разные выводим 2
IF /I «%%q» == «%%r» ( set NETBIOS=%%q) ELSE (IF /i «%%q1″==»1» (set NETBIOS=%%r) ELSE IF /i «%%r1″==»1» (set NETBIOS=%%q) ELSE IF /I «%%q» NEQ «%%r» (set NETBIOS=%%q %%r)))
:: Сравниваем из 2х команд имена если одинаковые выводи 1, если есть пустое выводим одно, если разные выводим оба
IF /i «%NAMEP%»==»%NETBIOS%» (set NAME=%NAMEP%) ELSE (IF /i «%NAMEP%1″==»1» (set NAME=%NETBIOS%) ELSE IF /i «%NETBIOS%1″==»1» (set NAME=%NAMEP%) ELSE IF /I «%NAMEP%» NEQ «%NETBIOS%» (set NAME=%NAMEP% %NETBIOS%))
:: Проверить что 1 MAC не пустой и не 00-00-00-00-00-00 ff-ff-ff-ff-ff-ff 00:00:00:00:00:00 ff:ff:ff:ff:ff:ff , если да берем значение 2рого
IF /i %MACP%1==1 (set MACP=) ELSE (IF /i «%MACP%»==»00-00-00-00-00-00» (set MACP=) ELSE IF /i «%MACP%»==»ff-ff-ff-ff-ff-ff» (set MACP=) ELSE IF /i «%MACP%»==»00:00:00:00:00:00» (set MACP=) ELSE IF /i «%MACP%»==»ff:ff:ff:ff:ff:ff» (set MACP=))
::Если MAC не определился, пробуем 2-ой командой
For /f «tokens=2 delims= » %%l in (‘arp -a %IP%.%1^|FIND /I «%IP%.%1″‘) do set MACPP=%%l
:: Проверить что 2 MAC не пустой и не 00-00-00-00-00-00 ff-ff-ff-ff-ff-ff 00:00:00:00:00:00 ff:ff:ff:ff:ff:ff
IF /i %MACPP%1==1 (set MACPP=) ELSE (IF /i «%MACPP%»==»00-00-00-00-00-00» (set MACPP=) ELSE IF /i «%MACPP%»==»ff-ff-ff-ff-ff-ff» (set MACPP=) ELSE IF /i «%MACPP%»==»00:00:00:00:00:00» (set MACPP=) ELSE IF /i «%MACPP%»==»ff:ff:ff:ff:ff:ff» (set MACPP=))
:: Сравниваем из 2х команд MAC если одинаковые выводи 1, если есть пустое выводим одно, если разные выводим оба
IF /I «%MACP%»==»%MACPP%» (set MAC=%MACP%) ELSE (IF /i «%MACP%1″==»1» (set MAC=%MACPP%) ELSE IF /i «%MACPP%1″==»1» (set MAC=%MACP%) ELSE IF /I «%MACP%» NEQ «%MACPP%» (set MAC=%MACP% %MACPP%))
:: Меняем тире — на :
set MAC=%MAC:-=:%
IF /I «%MAC%»==»-=:» (set MAC=) ELSE (set MAC=%MAC%)
:: Расшаренные сетевые ресурсы (не работает на XP net view \\IP /all работает только без /all так net view \\IP)
FOR /F «skip=2 delims= tokens=1-4″ %%f IN (‘net view \\%IP%.%1 /all^|FIND » «‘) do (
set f=%%f
set f=!f: =:!
::echo !f!
:: Более точно разделим столбцы по 2 пробелам выставим : будет означать новый столбец
FOR /F «delims=: tokens=1,2,3,4» %%g in («!f!») do (
:: В кодировке cp1251
IF /I «%%h»==»Диск» ( set DISK=!DISK!%%h: \\%IP%.%1\%%g comm:%%i ) ELSE (IF /I «%%h»==»Печать» set PRINT=!PRINT!%%h: \\%IP%.%1\%%g comm:%%i )
:: Слово Диск в кодировке dos cp866 „ЁбЄ Слово Печать ЏҐз вм
IF /I «%%h»==»„ЁбЄ» ( set DISK=!DISK!%%h: \\%IP%.%1\%%g comm:%%i ) ELSE (IF /I «%%h»==»ЏҐз вм» set PRINT=!PRINT!%%h: \\%IP%.%1\%%g comm:%%i )
IF /i «%%h»==»Disk» ( set DISK=!DISK!%%h: \\%IP%.%1\%%g comm:%%i ) ELSE (IF /i «%%h»==»Print» (set PRINT=!PRINT!%%h: \\%IP%.%1\%%g comm:%%i ) ELSE IF /i «%%h»==»IPC» (set IPC=!IPC!%%h: \\%IP%.%1\%%g comm:%%i ))))
:: Выводим все в одну переменную плюс накопительную всех циклов
::SET OUTSETI=!OUTSETI!IP:%IP%.%1 MAC:%MAC% NAME:%NAME% SHARE:%DISK%%PRINT% %IPC% ^&echo.& exit /b
:: Выводим строки в файл OUTSETI.TXT
SET OUTSETI=WINSCANSETI=IP:%IP%.%1 MAC:%MAC% NAME:%NAME% SHARE:%DISK%%PRINT%%IPC% NOFILTR:%GROUP%
:: Вывод в кодировке UTF-8
chcp 65001 > nul
echo %OUTSETI% >> «%~dp0OUTSETI.TXT»
:: Возврат кодировки
chcp %kodstr:~1% > nul
setlocal DISABLEDELAYEDEXPANSION
:end
:: Удаление старых логов более 31 день
::forfiles /p «%~dp0logseti» /S /D -31 /C «cmd /c del /f /a /q @file»
Версия 2.4 добавлен вывод имени NETBIOS и Рабочей группы
:: Запрашиваем имя NETBIOS и Рабочую группу искомые строки 00 и 20
for /f «tokens=1,3″ %%o in (‘nbtstat -A %IP%.%1^|FINDSTR /c:»<00>» /c:»<20>»‘) do (
:: В кодировке cp1251
IF «%%p»==»Уникальный» (set NETBIOSP=!NETBIOSP!%%o:) ELSE (IF «%%p»==»Группа» set GROUP=%%o)
:: В кодировке cp866 и EN
IF /i «%%p»==»“ЁЄ «мл©» (set NETBIOSP=!NETBIOSP!%%o:) ELSE (IF /i «%%p»==»ѓагЇЇ » (set GROUP=%%o) ELSE IF /i «%%p»==»UNIQUE» (set NETBIOSP=!NETBIOSP!%%o:) ELSE IF /i «%%p»==»GROUP» (set GROUP=%%o)))
:: Разбиваем 2 вывода значения имени 00 и 20
for /f «tokens=1,2 delims=:» %%q in («%NETBIOSP%») do (
:: Сравниваем имя если одинаково выводим 1 если разные выводим 2
IF «%%q» == «%%r» ( set NETBIOS=%%q ) ELSE (set NETBIOS=%%q:%%r ))
@ECHO OFF
mode con:cols=130 lines=1000
color 1A
:: Автор Мамзиков Артём Андреевич
:: V 2.4 07.12.2020
TITLE Skanirovanie Seti Poluchenie Dostupnih IP IMYa MAC SHARE
:: Определение текущей кодировки может отличатся 866 и 1251
for /f «tokens=2 delims=:» %%a in (‘chcp’) do set «kodstr=%%a»
::Удаление старого файла
del /F /Q /A:H %~dp0OUTSETI.TXT
::Создать скрытый временный файл для построчного лога
echo LOG %date% %TIME:~,-3%=>%~dp0OUTSETI.TXT
::copy /b NUL %~dp0OUTSETI.TXT
attrib +h %~dp0OUTSETI.TXT
::Получаем просто подсеть из начала совпадения сторки более правильно чем dns
for /f «tokens=2 delims=:(» %%a in (‘ipconfig /all^|FIND /I «IP»^|FINDSTR /c:»192.168.» /c:»172.16.»‘) do (
:: Так как ip разной длинны обрезка :~1.10% нам не подходит разбиваем на октеты
for /f «tokens=1-4 delims=. » %%k in («%%a») do set IP=%%k.%%l.%%m
)
setlocal enabledelayedexpansion
:: Перебор IP
for /L %%b in (1,1,255) do call:scan %%b
::Вывод результатов сканирования сети
::echo %OUTSETI%
curl -X POST -H —silent —data-binary «@%~dp0OUTSETI.TXT» https://сайт.ru/glpi/data_server/data.php
goto:eof
:scan
::Проверка Пингом. Недоступность, строка символов «TTL» в выводимых результатах отсутствует. Если строка символов «TTL» найдена, то FIND сформирует значение переменной ERRORLEVEL равным 0
ping -n 1 -w 1000 %IP%.%1 | find /I «TTL» > nul
if %ERRORLEVEL%==0 (goto :YesPing) else (goto :end)
:: Еще один вызов из-за 2 команды мака, в общем цикле 1 мака если не нашло 2 часть не выполняется, в раздельном виде не передается переменная так как закрыто было циклом пинга!
:YesPing
:: Очистка обнуление перменных в цикле из буфера там где их нет
set «MAC=»
set «NAME=»
set «DISK=»
set «PRINT=»
set «IPC=»
set «NETBIOSP=»
set «NETBIOS=»
set «GROUP=»
:: Запрос Имени
For /f «tokens=4 delims= » %%d in (‘ping -a -n 1 -w 0 %IP%.%1^|FIND /I «[«‘) do set NAME=%%d
:: Запрос MAC
For /f «tokens=5 delims= » %%e in (‘nbtstat -a %IP%.%1^|FIND /I «MAC»‘) do set MAC=%%e
::Если MAC не определился, пробуем 2-ой командой
IF %MAC%1==1 For /f «tokens=2 delims= » %%l in (‘arp -a %IP%.%1^|FIND /I «%IP%.%1″‘) do set MAC=%%l
:: Расшаренные сетевые ресурсы (не работает на XP net view \\IP /all работает только без /all так net view \\IP)
FOR /F «skip=2 delims= tokens=1-4″ %%f IN (‘net view \\%IP%.%1 /all^|FIND » «‘) do (
set f=%%f
set f=!f: =:!
::echo !f!
:: Более точно разделим столбцы по 2 пробелам выставим : будет означать новый столбец
FOR /F «delims=: tokens=1,2,3,4» %%g in («!f!») do (
:: Слово Диск в кодировке dos cp866 „ЁбЄ Слово Печать ЏҐз вм
IF «%%h»==»„ЁбЄ» ( set DISK=!DISK!%%h: \\%IP%.%1\%%g comm:%%i ) ELSE (IF «%%h»==»ЏҐз вм» set PRINT=!PRINT!%%h: \\%IP%.%1\%%g comm:%%i )
IF /i «%%h»==»Disk» ( set DISK=!DISK!%%h: \\%IP%.%1\%%g comm:%%i ) ELSE (IF /i «%%h»==»Print» (set PRINT=!PRINT!%%h: \\%IP%.%1\%%g comm:%%i ) ELSE IF /i «%%h»==»IPC» (set IPC=!IPC!%%h: \\%IP%.%1\%%g comm:%%i ))))
:: Запрашиваем имя NETBIOS и Рабочую группу искомые строки 00 и 20
for /f «tokens=1,3″ %%o in (‘nbtstat -A %IP%.%1^|FINDSTR /c:»<00>» /c:»<20>»‘) do (
:: В кодировке cp1251
IF «%%p»==»Уникальный» (set NETBIOSP=!NETBIOSP!%%o:) ELSE (IF «%%p»==»Группа» set GROUP=%%o)
:: В кодировке cp866 и EN
IF /i «%%p»==»“ЁЄ «мл©» (set NETBIOSP=!NETBIOSP!%%o:) ELSE (IF /i «%%p»==»ѓагЇЇ » (set GROUP=%%o) ELSE IF /i «%%p»==»UNIQUE» (set NETBIOSP=!NETBIOSP!%%o:) ELSE IF /i «%%p»==»GROUP» (set GROUP=%%o)))
:: Разбиваем 2 вывода значения имени 00 и 20
for /f «tokens=1,2 delims=:» %%q in («%NETBIOSP%») do (
:: Сравниваем имя если одинаково выводим 1 если разные выводим 2
IF «%%q» == «%%r» ( set NETBIOS=%%q ) ELSE (set NETBIOS=%%q:%%r ))
:: Выводим все в одну переменную плюс накопительную всех циклов
::SET OUTSETI=!OUTSETI!IP:%IP%.%1 MAC:%MAC% NAME:%NAME% SHARE:%DISK%%PRINT% %IPC% ^&echo.& exit /b
:: Выводим строки в файл OUTSETI.TXT
SET OUTSETI=WINSCANSETI=IP:%IP%.%1 MAC:%MAC% NAME:%NAME% %NETBIOS% SHARE:%DISK%%PRINT%%IPC% NOFILTR:%GROUP%
:: Вывод в кодировке UTF-8
chcp 65001 > nul
echo %OUTSETI% >> %~dp0OUTSETI.TXT
:: Возврат кодировки
chcp %kodstr:~1% > nul
setlocal DISABLEDELAYEDEXPANSION
:end
:: Удаление старых логов более 31 день
::forfiles /p «%~dp0logseti» /S /D -31 /C «cmd /c del /f /a /q @file»
Версия 2.3 поправлена обрезка по разным ip сетям
::Получаем просто подсеть из начала совпадения строки более правильно чем dns
for /f «tokens=2 delims=:(» %%a in (‘ipconfig /all^|FIND /I «IP»^|FINDSTR /c:»192.168.» /c:»172.16.»‘) do (
:: Так как ip разной длинны обрезка :~1.10% нам не подходит разбиваем на октеты
for /f «tokens=1-4 delims=. » %%k in («%%a») do set IP=%%k.%%l.%%m
)
@ECHO OFF
mode con:cols=130 lines=1000
color 1A
:: Автор Мамзиков Артём Андреевич
:: V 2.3 14.11.2020
TITLE Skanirovanie Seti Poluchenie Dostupnih IP IMYa MAC SHARE
:: Определение текущей кодировки может отличатся 866 и 1251
for /f «tokens=2 delims=:» %%a in (‘chcp’) do set «kodstr=%%a»
::Удаление старого файла
del /F /Q /A:H %~dp0OUTSETI.TXT
::Создать скрытый временный файл для построчного лога
echo LOG %date% %TIME:~,-3%=>%~dp0OUTSETI.TXT
::copy /b NUL %~dp0OUTSETI.TXT
attrib +h %~dp0OUTSETI.TXT
::Получаем просто подсеть из начала совпадения строки более правильно чем dns
for /f «tokens=2 delims=:(» %%a in (‘ipconfig /all^|FIND /I «IP»^|FINDSTR /c:»192.168.» /c:»172.16.»‘) do (
:: Так как ip разной длинны обрезка :~1.10% нам не подходит разбиваем на октеты
for /f «tokens=1-4 delims=. » %%k in («%%a») do set IP=%%k.%%l.%%m
)
setlocal enabledelayedexpansion
:: Перебор IP
for /L %%b in (1,1,255) do call:scan %%b
::Вывод результатов сканирования сети
::echo %OUTSETI%
curl -X POST -H —silent —data-binary «@%~dp0OUTSETI.TXT» https://сайт.ru/glpi/data_server/data.php
goto:eof
:scan
::Проверка Пингом. Недоступность, строка символов «TTL» в выводимых результатах отсутствует. Если строка символов «TTL» найдена, то FIND сформирует значение переменной ERRORLEVEL равным 0
ping -n 1 -w 1000 %IP%.%1 | find /I «TTL» > nul
if %ERRORLEVEL%==0 (goto :YesPing) else (goto :end)
:: Еще один вызов из-за 2 команды мака, в общем цикле 1 мака если не нашло 2 часть не выполняется, в раздельном виде не передается переменная так как закрыто было циклом пинга!
:YesPing
:: Очистка обнуление перменных в цикле из буфера там где их нет
set «MAC=»
set «NAME=»
set «DISK=»
set «PRINT=»
set «IPC=»
:: Запрос Имени
For /f «tokens=4 delims= » %%d in (‘ping -a -n 1 -w 0 %IP%.%1^|FIND /I «[«‘) do set NAME=%%d
:: Запрос MAC
For /f «tokens=5 delims= » %%e in (‘nbtstat -a %IP%.%1^|FIND /I «MAC»‘) do set MAC=%%e
::Если MAC не определился, пробуем 2-ой командой
IF %MAC%1==1 For /f «tokens=2 delims= » %%l in (‘arp -a %IP%.%1^|FIND /I «%IP%.%1″‘) do set MAC=%%l
:: Расшаренные сетевые ресурсы (не работает на XP net view \\IP /all работает только без /all так net view \\IP)
FOR /F «skip=2 delims= tokens=1-4″ %%f IN (‘net view \\%IP%.%1 /all^|FIND » «‘) do (
set f=%%f
set f=!f: =:!
::echo !f!
:: Более точно разделим столбцы по 2 пробелам выставим : будет означать новый столбец
FOR /F «delims=: tokens=1,2,3,4» %%g in («!f!») do (
:: Слово Диск в кодировке dos cp866 „ЁбЄ Слово Печать ЏҐз вм
IF «%%h»==»„ЁбЄ» ( set DISK=!DISK!%%h: \\%IP%.%1\%%g comm:%%i ) ELSE (IF «%%h»==»ЏҐз вм» set PRINT=!PRINT!%%h: \\%IP%.%1\%%g comm:%%i )
IF /i «%%h»==»Disk» ( set DISK=!DISK!%%h: \\%IP%.%1\%%g comm:%%i ) ELSE (IF /i «%%h»==»Print» (set PRINT=!PRINT!%%h: \\%IP%.%1\%%g comm:%%i ) ELSE IF /i «%%h»==»IPC» (set IPC=!IPC!%%h: \\%IP%.%1\%%g comm:%%i ))))
:: Выводим все в одну переменную плюс накопительную всех циклов
::SET OUTSETI=!OUTSETI!IP:%IP%.%1 MAC:%MAC% NAME:%NAME% SHARE:%DISK%%PRINT% %IPC% ^&echo.& exit /b
:: Выводим строки в файл OUTSETI.TXT
SET OUTSETI=WINSCANSETI=IP:%IP%.%1 MAC:%MAC% NAME:%NAME% SHARE:%DISK%%PRINT%%IPC%
:: Вывод в кодировке UTF-8
chcp 65001 > nul
echo %OUTSETI% >> %~dp0OUTSETI.TXT
:: Возврат кодировки
chcp %kodstr:~1% > nul
setlocal DISABLEDELAYEDEXPANSION
:end
:: Удаление старых логов более 31 день
::forfiles /p «%~dp0logseti» /S /D -31 /C «cmd /c del /f /a /q @file»
V 2.2 Добавлен вывод в файл построчно, так как эхо построчно выводит, а переменная нет, идет как одной строкой пришлось сделать в файл с его очисткой
@ECHO OFF
mode con:cols=130 lines=1000
color 1A
:: Автор Мамзиков Артём Андреевич
:: V 2.2 12.10.2020
TITLE Skanirovanie Seti Poluchenie Dostupnih IP IMYa MAC SHARE
:: Определение текущей кодировки может отличатся 866 и 1251
for /f «tokens=2 delims=:» %%a in (‘chcp’) do set «kodstr=%%a»
::Удаление старого файла
del /F /Q /A:H %~dp0OUTSETI.TXT
::Создать скрытый временный файл для построчного лога
echo LOG %date% %TIME:~,-3%=>%~dp0OUTSETI.TXT
::copy /b NUL %~dp0OUTSETI.TXT
attrib +h %~dp0OUTSETI.TXT
::Получаем просто подсеть из начала совпадения сторки более правильно чем dns
for /f «tokens=2 delims=:(» %%a in (‘ipconfig /all^|FIND /I «IP»^|FINDSTR /c:»192.168.» /c:»172.16.»‘) do set IPDNS=%%a
set IP=%IPDNS:~1,11%
setlocal enabledelayedexpansion
:: Перебор IP
for /L %%b in (1,1,255) do call:scan %%b
::Вывод результатов сканирования сети
::echo %OUTSETI%
curl -X POST -H —silent —data-binary «@%~dp0OUTSETI.TXT» https://сайт.ru/glpi/data_server/data.php
goto:eof
:scan
::Проверка Пингом. Недоступность, строка символов «TTL» в выводимых результатах отсутствует. Если строка символов «TTL» найдена, то FIND сформирует значение переменной ERRORLEVEL равным 0
ping -n 1 -w 1000 %IP%.%1 | find /I «TTL» > nul
if %ERRORLEVEL%==0 (goto :YesPing) else (goto :end)
:: Еще один вызов из-за 2 команды мака, в общем цикле 1 мака если не нашло 2 часть не выполняется, в раздельном виде не передается переменная так как закрыто было циклом пинга!
:YesPing
:: Очистка обнуление переменных в цикле из буфера там где их нет
set «MAC=»
set «NAME=»
set «DISK=»
set «PRINT=»
set «IPC=»
:: Запрос Имени
For /f «tokens=4 delims= » %%d in (‘ping -a -n 1 -w 0 %IP%.%1^|FIND /I «[«‘) do set NAME=%%d
:: Запрос MAC
For /f «tokens=5 delims= » %%e in (‘nbtstat -a %IP%.%1^|FIND /I «MAC»‘) do set MAC=%%e
::Если MAC не определился, пробуем 2-ой командой
IF %MAC%1==1 For /f «tokens=2 delims= » %%l in (‘arp -a %IP%.%1^|FIND /I «%IP%.%1″‘) do set MAC=%%l
:: Расшаренные сетевые ресурсы (не работает на XP net view \\IP /all работает только без /all так net view \\IP)
FOR /F «skip=2 delims= tokens=1-4″ %%f IN (‘net view \\%IP%.%1 /all^|FIND » «‘) do (
set f=%%f
set f=!f: =:!
::echo !f!
:: Более точно разделим столбцы по 2 пробелам выставим : будет означать новый столбец
FOR /F «delims=: tokens=1,2,3,4» %%g in («!f!») do (
:: Слово Диск в кодировке dos cp866 „ЁбЄ Слово Печать ЏҐз вм
IF «%%h»==»„ЁбЄ» ( set DISK=!DISK!%%h: \\%IP%.%1\%%g comm:%%i ) ELSE (IF «%%h»==»ЏҐз вм» set PRINT=!PRINT!%%h: \\%IP%.%1\%%g comm:%%i )
IF /i «%%h»==»Disk» ( set DISK=!DISK!%%h: \\%IP%.%1\%%g comm:%%i ) ELSE (IF /i «%%h»==»Print» (set PRINT=!PRINT!%%h: \\%IP%.%1\%%g comm:%%i ) ELSE IF /i «%%h»==»IPC» (set IPC=!IPC!%%h: \\%IP%.%1\%%g comm:%%i ))))
:: Выводим все в одну переменную плюс накопительную всех циклов
::SET OUTSETI=!OUTSETI!IP:%IP%.%1 MAC:%MAC% NAME:%NAME% SHARE:%DISK%%PRINT% %IPC% ^&echo.& exit /b
:: Выводим строки в файл OUTSETI.TXT
SET OUTSETI=WINSCANSETI=IP:%IP%.%1 MAC:%MAC% NAME:%NAME% SHARE:%DISK%%PRINT%%IPC%
:: Вывод в кодировке UTF-8
chcp 65001 > nul
echo %OUTSETI% >> %~dp0OUTSETI.TXT
:: Возврат кодировки
chcp %kodstr:~1% > nul
setlocal DISABLEDELAYEDEXPANSION
:end
:: Удаление старых логов более 31 день
::forfiles /p «%~dp0logseti» /S /D -31 /C «cmd /c del /f /a /q @file»
V2.1 — для 2х подсетей
минус плохо режет IP адрес %IPDNS:~1,11% если количество цифр разное в ip адресах где то надо 1.11 или 1.10 или 1.9 обрезку делать
@ECHO OFF
mode con:cols=130 lines=1000
color 1A
:: Автор Мамзиков Артём Андреевич
:: V 2.1 31.08.2020
TITLE Skanirovanie Seti Poluchenie Dostupnih IP IMYa MAC SHARE
::Получаем просто подсеть из начала совпадения строки более правильно чем dns
for /f «tokens=2 delims=:(» %%a in (‘ipconfig /all^|FIND /I «IP»^|FINDSTR /c:»192.168.» /c:»172.16.»‘) do set IPDNS=%%a
set IP=%IPDNS:~1,11%
setlocal enabledelayedexpansion
:: Перебор IP
for /L %%b in (1,1,255) do call:scan %%b
::Вывод результатов сканирования сети
curl -X POST -d «%OUTSETI%» https://DNS/glpi/data_server/data.php
::echo %OUTSETI%
pause
goto:eof
:scan
::Проверка Пингом. Недоступность, строка символов «TTL» в выводимых результатах отсутствует. Если строка символов «TTL» найдена, то FIND сформирует значение переменной ERRORLEVEL равным 0
ping -n 1 -w 1000 %IP%.%1 | find /I «TTL» > nul
if %ERRORLEVEL%==0 (goto :YesPing) else (goto :end)
:: Еще один вызов из-за 2 команды мака, в общем цикле 1 мака если не нашло 2 часть не выполняется, в раздельном виде не передается переменная так как закрыто было циклом пинга!
:YesPing
:: Очистка обнуление переменных в цикле из буфера там где их нет
set «MAC=»
set «NAME=»
set «DISK=»
set «PRINT=»
set «IPC=»
:: Запрос Имени
For /f «tokens=4 delims= » %%d in (‘ping -a -n 1 -w 0 %IP%.%1^|FIND /I «[«‘) do set NAME=%%d
:: Запрос MAC
For /f «tokens=5 delims= » %%e in (‘nbtstat -a %IP%.%1^|FIND /I «MAC»‘) do set MAC=%%e
::Если MAC не определился, пробуем 2-ой командой
IF %MAC%1==1 For /f «tokens=2 delims= » %%l in (‘arp -a %IP%.%1^|FIND /I «%IP%.%1″‘) do set MAC=%%l
:: Расшаренные сетевые ресурсы (не работает на XP net view \\IP /all работает только без /all так net view \\IP)
FOR /F «skip=2 delims= tokens=1-4″ %%f IN (‘net view \\%IP%.%1 /all^|FIND » «‘) do (
set f=%%f
set f=!f: =:!
::echo !f!
:: Более точно разделим столбцы по 2 пробелам выставим : будет означать новый столбец
FOR /F «delims=: tokens=1,2,3,4» %%g in («!f!») do (
:: Слово Диск в кодировке dos cp866 „ЁбЄ Слово Печать ЏҐз вм
IF «%%h»==»„ЁбЄ» ( set DISK=!DISK!%%h: \\%IP%.%1\%%g comm:%%i ) ELSE (IF «%%h»==»ЏҐз вм» set PRINT=!PRINT!%%h: \\%IP%.%1\%%g comm:%%i )
IF /i «%%h»==»Disk» ( set DISK=!DISK!%%h: \\%IP%.%1\%%g comm:%%i ) ELSE (IF /i «%%h»==»Print» (set PRINT=!PRINT!%%h: \\%IP%.%1\%%g comm:%%i ) ELSE IF /i «%%h»==»IPC» (set IPC=!IPC!%%h: \\%IP%.%1\%%g comm:%%i ))))
:: Выводим все в одну переменную плюс накопительную всех циклов
::SET OUTSETI=!OUTSETI!IP:%IP%.%1 MAC:%MAC% NAME:%NAME% SHARE:%DISK%%PRINT% %IPC% ^&echo.& exit /b
SET OUTSETI=!OUTSETI!WINSCANSETI=IP:%IP%.%1 MAC:%MAC% NAME:%NAME% SHARE:%DISK%%PRINT%%IPC% ^&echo.& exit /b
setlocal DISABLEDELAYEDEXPANSION
:end
:: Удаление старых логов более 31 день
::forfiles /p «%~dp0logseti» /S /D -31 /C «cmd /c del /f /a /q @file»
V2.0 изменено определение столбцов в net view \\192.168.ххх.ххх /all где 2 пробела и больше заменить на : и определяем по : столбцы
где не поддерживается /all убрать не будут выводится скрытые ресурсы с $ в конце
В кодировке 1251
@ECHO OFF
mode con:cols=130 lines=1000
color 1A
:: Автор Мамзиков Артём Андреевич
:: V 2.1 31.08.2020
TITLE Skanirovanie Seti Poluchenie Dostupnih IP IMYa MAC SHARE
::Получаем просто подсеть из начала совпадения сторки более правильно чем dns
for /f «tokens=2 delims=:(» %%a in (‘ipconfig /all^|FIND /I «192.168.1»‘) do set IPDNS=%%a
set IP=%IPDNS:~1,11%
setlocal enabledelayedexpansion
:: Перебор IP
for /L %%b in (1,1,255) do call:scan %%b
::Вывод результатов сканирования сети
echo %OUTSETI%
pause
goto:eof
:scan
::Проверка Пингом. Недоступность, строка символов «TTL» в выводимых результатах отсутствует. Если строка символов «TTL» найдена, то FIND сформирует значение переменной ERRORLEVEL равным 0
ping -n 1 -w 1000 %IP%.%1 | find /I «TTL» > nul
if %ERRORLEVEL%==0 (goto :YesPing) else (goto :end)
:: Еще один вызов из-за 2 команды мака, в общем цикле 1 мака если не нашло 2 часть не выполняется, в раздельном виде не передается переменная так как закрыто было циклом пинга!
:YesPing
:: Очистка обнуление перменных в цикле из буфера там где их нет
set «MAC=»
set «NAME=»
set «DISK=»
set «PRINT=»
:: Запрос Имени
For /f «tokens=4 delims= » %%d in (‘ping -a -n 1 -w 0 %IP%.%1^|FIND /I «[«‘) do set NAME=%%d
:: Запрос MAC
For /f «tokens=5 delims= » %%e in (‘nbtstat -a %IP%.%1^|FIND /I «MAC»‘) do set MAC=%%e
::Если MAC не определился, пробуем 2-ой командой
IF %MAC%1==1 For /f «tokens=2 delims= » %%l in (‘arp -a %IP%.%1^|FIND /I «%IP%.%1″‘) do set MAC=%%l
:: Расшаренные сетевые ресурсы (не работает на XP net view \\IP /all работает только без /all так net view \\IP)
FOR /F «skip=2 delims= tokens=1-4″ %%f IN (‘net view \\%IP%.%1 /all^|FIND » «‘) do (
set f=%%f
set f=!f: =:!
::echo !f!
:: Более точно разделим столбцы по 2 пробелам выставим : будет означать новый столбец
FOR /F «delims=: tokens=1,2,3,4» %%g in («!f!») do (
:: Слово Диск в кодировке dos cp866 „ЁбЄ Слово Печать ЏҐз вм
IF «%%h»==»„ЁбЄ» ( set DISK=!DISK!%%h: \\%IP%.%1\%%g comm:%%i ) ELSE (IF «%%h»==»ЏҐз вм» set PRINT=!PRINT!%%h: \\%IP%.%1\%%g comm:%%i )
IF /i «%%h»==»Disk» ( set DISK=!DISK!%%h: \\%IP%.%1\%%g comm:%%i ) ELSE (IF /i «%%h»==»Print» (set PRINT=!PRINT!%%h: \\%IP%.%1\%%g comm:%%i ) ELSE IF /i «%%h»==»IPC» (set IPC=!IPC!%%h: \\%IP%.%1\%%g comm:%%i ))))
:: Выводим все в одну переменную плюс накопительную всех циклов
SET OUTSETI=!OUTSETI!IP:%IP%.%1 MAC:%MAC% NAME:%NAME% SHARE:%DISK%%PRINT% %IPC% ^&echo.& exit /b
setlocal DISABLEDELAYEDEXPANSION
:end
:: Удаление старых логов более 31 день
::forfiles /p «%~dp0logseti» /S /D -31 /C «cmd /c del /f /a /q @file»
V 1.0 27.08.2020
Тут есть момент по расшареным устройствам например
Имя общего ресурса Тип Используется как Комментарий
————————————————————————
ADMIN$ Диск Удаленный Admin
C$ Диск Стандартный общий ресурс
D$ Диск Стандартный общий ресурс
IPC$ IPC Удаленный IPC
Kyocera FS-4020DN KX Печать Kyocera FS-4020DN KX
print$ Диск Драйверы принтеров
Команда выполнена успешно.
Определение столбцов по пробелам а в 1 столбце Kyocera FS-4020DN KX есть 2 пробела и в место типа Печать получаем FS-4020DN
@ECHO OFF
mode con:cols=130 lines=1000
color 1A
:: Автор Мамзиков Артём Андреевич
:: V 1.0 27.08.2020
TITLE Skanirovanie Seti Poluchenie Dostupnih IP IMYa MAC SHARE
::Получаем просто подсеть из начала совпадения строки более правильно чем dns
for /f «tokens=2 delims=:(» %%a in (‘ipconfig /all^|FIND /I «192.168.1»‘) do set IPDNS=%%a
set IP=%IPDNS:~1,11%
setlocal enabledelayedexpansion
:: Перебор IP
for /L %%b in (1,1,255) do call:scan %%b
::Вывод результатов сканирования сети
echo %OUTSETI%
pause
goto:eof
:scan
::Проверка Пингом. Недоступность, строка символов «TTL» в выводимых результатах отсутствует. Если строка символов «TTL» найдена, то FIND сформирует значение переменной ERRORLEVEL равным 0
ping -n 1 -w 1000 %IP%.%1 | find /I «TTL» > nul
if %ERRORLEVEL%==0 (goto :YesPing) else (goto :end)
:: Еще один вызов из-за 2 команды мака, в общем цикле 1 мака если не нашло 2 часть не выполняется, в раздельном виде не передается переменная так как закрыто было циклом пинга!
:YesPing
:: Очистка обнуление перменных в цикле из буфера там где их нет
set «MAC=»
set «NAME=»
set «DISK=»
set «PRINT=»
:: Запрос Имени
For /f «tokens=4 delims= » %%d in (‘ping -a -n 1 -w 0 %IP%.%1^|FIND /I «[«‘) do set NAME=%%d
:: Запрос MAC
For /f «tokens=5 delims= » %%e in (‘nbtstat -a %IP%.%1^|FIND /I «MAC»‘) do set MAC=%%e
::Если MAC не определился, пробуем 2-ой командой
IF %MAC%1==1 For /f «tokens=2 delims= » %%l in (‘arp -a %IP%.%1^|FIND /I «%IP%.%1″‘) do set MAC=%%l
:: Расшаренные сетевые ресурсы (работает если между расшаренным и типом 1 пробел, если пробел не один до типа то не отработает)
FOR /F «skip=2 tokens=1,2,3,4 delims= » %%f IN (‘net view \\%IP%.%1^|FIND » «‘) do (
:: Слово Диск в кодировке dos cp866 „ЁбЄ Слово Печать ЏҐз вм
IF «%%g»==»„ЁбЄ» ( set DISK=!DISK!%%g: \\%IP%.%1\%%f ) ELSE ( IF «%%g»==»ЏҐз вм» set PRINT=!PRINT!%%g: \\%IP%.%1\%%f )
IF «%%g»==»Disk» ( set DISK=!DISK!%%g: \\%IP%.%1\%%f ) ELSE ( IF «%%g»==»Print» set PRINT=!PRINT!%%g: \\%IP%.%1\%%f ))
:: Выводим все в одну переменную плюс накопительную всех циклов
SET OUTSETI=!OUTSETI!IP:%IP%.%1 MAC:%MAC% NAME:%NAME% SHARE:%DISK%%PRINT% ^&echo.& exit /b
setlocal DISABLEDELAYEDEXPANSION
:end
:: Удаление старых логов более 31 день
::forfiles /p «%~dp0logseti» /S /D -31 /C «cmd /c del /f /a /q @file»
::@ECHO OFF
mode con:cols=130 lines=130
color 1A
::chcp 1251 >NUL
TITLE Skanirovanie Seti Poluchenie Dostupnih IP IMYa MAC SHARE
::Получаем просто подсеть из начала совпадения сторки более правильно чем dns
for /f «tokens=2 delims=:(» %%a in (‘ipconfig /all^|FIND /I «192.168.2»‘) do set IPDNS=%%a
set IP=%IPDNS:~1,11%
SETLOCAL
:: Перебор IP
for /L %%b in (3,1,255) do call:scan %%b
……..
goto:eof
:scan
::Проверка Пингом. Недоступность, строка символов «TTL» в выводимых результатах отсутствует. Если строка символов «TTL» найдена, то FIND сформирует значение переменной ERRORLEVEL равным 0
ping -n 1 -w 1000 %IP%.%1 | find /I «TTL» > nul
if %ERRORLEVEL%==0 (
:: Запрос Имени
For /f «tokens=4 delims= » %%d in (‘ping -a -n 1 -w 0 %IP%.%1^|FIND /I «[«‘) do (
set NAME=%%d
:: Запрос MAC
For /f «tokens=2 delims= » %%e in (‘arp -a %IP%.%1^|FIND /I «%IP%.%1″‘) do (
set MAC=%%e
:: Расшаренные сетевые ресурсы
FOR /F «skip=2 tokens=1,2,3,4 delims= » %%f IN (‘net view \\%IP%.%1^|FIND » «‘) do (
:: Слово Диск в кодировке dos cp866 „ЁбЄ Слово Печать ЏҐз вм
IF «%%g»==»„ЁбЄ» ( set DISK=%%g: \\%IP%.%1\%%f ) ELSE ( IF «%%g»==»ЏҐз вм» set PRINT=%%g: \\%IP%.%1\%%f )
IF «%%g»==»Disk» ( set DISK=%%g: \\%IP%.%1\%%f ) ELSE ( IF «%%g»==»Print» set PRINT=%%g: \\%IP%.%1\%%f )
)))) else (echo %IP%.%1 noping)
echo IP:%IP%.%1 MAC:%MAC% NAME:%NAME% SHARE:%DISK%%PRINT%
:: Удаление старых логов более 31 день
::forfiles /p «%~dp0logseti» /S /D -31 /C «cmd /c del /f /a /q @file»
pause
Первый цикл
FOR ** in *** do (
FOR ** in *** do set выдает строчную переменную для этой же строки команды
set уже не выдает
)
Другой вариант
Первый цикл
FOR ** in *** do (
FOR ** in *** do (
set выдает переменную в текущие скобки 2рого цикла
но если 2 цикл не отработал не выполнилась команда или не было данных, то если есть 3 подцикл он выполнятся не будет нужно делить на отдельные циклы
FOR ** in *** do ( )
)
)
Но отдельные циклы не передают переменную, в другие строки если они заключенный в общий первый цикл тут помогает только вариант
if %Переменная сравнения%==0 (goto :YesPing) else (goto :end)
:YesPing
тут отдельные циклы не заключенные в общий но зависит от первого через вызов
Перевод на новую строку переменная %n%
set n=^&echo.
Вывод переменной за пределы цикла возврат в основной цикл пример
@echo off
if «2»==»» (
echo Peredayte parametry scenariju!) & (goto EXIT)
setlocal enabledelayedexpansion
call :FACT 8
echo %Result%
pause
goto :EXIT
:FACT
if %1 == 0 (set Result=1 & exit /b)
if %1 == 1 (set Result=9 & exit /b)
set /A PARAM=%1 — 1
call :FACT %PARAM%
set /A Result=%1 * %Result%
setlocal DISABLEDELAYEDEXPANSION
exit /b
:EXIT
:: Расшаренные сетевые ресурсы (работает если между расшаренным и типом 1 пробел, если пробел не один до типа то не отработает)
попытка вывести все строки
FOR /F «skip=2 delims= tokens=1-4″ %%f IN (‘net view \\%IP%.%1 /all^|FIND » «‘) do set share=%%f
:: Более точно разделим столбцы по 2 пробелам выставим : будет означать новый столбец
В переменную поподает 1 последняя строка set share=%%f ,а если так set share=!share!%%f то все в одной строке весь вывод
set share=!share!^%%f не помогает , если только для для вывода в echo то set share=!share!^&echo.%%f работает но надо нам в переменную и тудя тянется весь текст а не перенос.
для того что бы преобразовать нам нужна переменная вида %переменная% будет приобразование 2 пробела на : %переменная: =:%
а переменная такого вида из цикла не идет %%f: =: — работать не будет.
Дальше попытки создать это все в одном цикле с подциклами у нас не работает переменная set
Сделать вывод сразу с :: в место пробелов получаем опять все в одной строке либо только первую переменную на обработке
FOR /F «delims=: tokens=1,2,3,4» %%g in («%share: =:%») do (
:: Слово Диск в кодировке dos cp866 „ЁбЄ Слово Печать ЏҐз вм
IF «%%h»==»„ЁбЄ» ( set DISK=!DISK!%%h: \\%IP%.%1\%%g ) ELSE (IF «%%h»==»ЏҐз вм» set PRINT=!PRINT!%%h: \\%IP%.%1\%%g )
IF /i «%%h»==»Disk» ( set DISK=!DISK!%%h: \\%IP%.%1\%%g ) ELSE (IF /i «%%h»==»Print» (set PRINT=!PRINT!%%h: \\%IP%.%1\%%g ) ELSE IF /i «%%h»==»IPC» (set IPC=!IPC!%%h: \\%IP%.%1\%%g ))))
И по итогуу выходит у нас вот так
:: Расшаренные сетевые ресурсы
FOR /F «skip=2 delims= tokens=1-4″ %%f IN (‘net view \\192.168.101.10 /all^|FIND » «‘) do (
set f=%%f
set f=!f: =:!
echo !f!
:: Более точно разделим столбцы по 2 пробелам выставим : будет означать новый столбец
FOR /F «delims=: tokens=1,2,3,4» %%g in («!f!») do (
:: Слово Диск в кодировке dos cp866 „ЁбЄ Слово Печать ЏҐз вм
IF «%%h»==»„ЁбЄ» ( set DISK=!DISK!%%h: \\%IP%.%1\%%g ) ELSE (IF «%%h»==»ЏҐз вм» set PRINT=!PRINT!%%h: \\%IP%.%1\%%g )
IF /i «%%h»==»Disk» ( set DISK=!DISK!%%h: \\%IP%.%1\%%g ) ELSE (IF /i «%%h»==»Print» (set PRINT=!PRINT!%%h: \\%IP%.%1\%%g ) ELSE IF /i «%%h»==»IPC» (set IPC=!IPC!%%h: \\%IP%.%1\%%g ))))
:: Выводим все в одну переменную плюс накопительную всех циклов
SET OUTSETI=!OUTSETI!IP:%IP%.%1 MAC:%MAC% NAME:%NAME% SHARE:%DISK%%PRINT% %IPC% ^&echo.& exit /b
setlocal DISABLEDELAYEDEXPANSION
From the desktop, navigate through; Start > Run> type “cmd.exe”. A command prompt window will appear. At the prompt, type “ipconfig /all”. All IP information for all network adapters in use by Windows will be displayed.
How do I scan a IP address?
On Windows or macOS type ipconfig or on Linux type ifconfig. Press return. Note down the subnet mask, the default gateway, and your own computer’s IPv4 address. Enter the command arp -a to get a list of all other IP addresses active on your network.
How do I find my IP address near CMD?
Windows 10: Finding the IP Address
- Open the Command Prompt. a. Click the Start icon, type command prompt into the search bar and press click the Command Prompt icon.
- Type ipconfig/all and press Enter.
- The IP Address will display along with other LAN details.
What is netstat command in CMD?
The netstat command generates displays that show network status and protocol statistics. You can display the status of TCP and UDP endpoints in table format, routing table information, and interface information. netstat displays various types of network data depending on the command line option selected.
What is nslookup command in CMD?
The nslookup command queries internet domain name servers in two modes. Interactive mode allows you to query name servers for information about various hosts and domains, or to print a list of the hosts in a domain. In noninteractive mode, the names and requested information are printed for a specified host or domain.
How do I scan a IP address in Windows?
How do I scan subnet for IP addresses?
- Open a terminal window to get to the command line.
- Issue the command ipconfig and press Return.
- Note your own IP address and the subnet mask.
- If the subnet mask is 255.255.255.0 the first three sections in your own IP address applies to the entire subnet.
What is Nmap command?
By scanning your network through Nmap- a network mapper. Nmap (“Network Mapper”) is a free and open-source utility for network discovery and security auditing. It is a globally recognized tool mostly used by networking experts and penetration testers to find services, hosts, and open ports on a computer network.
How do I find someones IP using netstat?
If you’re not already in an active chat or call with the person you want to trace, start by initiating one. Then type the command netstat –an and hit the ‘Enter’ or ‘Return’ key. You will gain the IP address of every established TCP connection. Note that this method only works with direct peer-to-peer communications.
Can hackers use netstat?
To hijack remote connections, hackers use rootkits to exploit the netstat command. Netstat is a command-line network tool that comes in handy for troubleshooting. This command displays the IP addresses of the networks which have been connected with the target computer recently.
How do I get all DNS records for an IP?
For Windows:
- Launch Windows Command Prompt by navigating to Start > Command Prompt or via Run > CMD.
- Type NSLOOKUP and hit Enter.
- Set the DNS Record type you wish to lookup by typing set type=## where ## is the record type, then hit Enter.
- Now enter the domain name you wish to query then hit Enter..
What is netsh command?
Netsh is a command-line scripting utility that allows you to display or modify the network configuration of a computer that is currently running. Netsh commands can be run by typing commands at the netsh prompt and they can be used in batch files or scripts.
What are all ipconfig commands?
The Top 10 Ipconfig Commands You Should Learn
- Ipconfig /all.
- Ipconfig /allcompartments.
- Ipconfig /displaydns.
- Ipconfig /flushdns.
- Ipconfig /registerdns.
- Ipconfig /release.
- Ipconfig /renew.
- Ipconfig /showclassid.
What is arp command?
The arp command displays and modifies the Internet-to-adapter address translation tables used by the Address in Networks and communication management. The arp command displays the current ARP entry for the host specified by the HostName variable.
How do I scan an IP with Nmap?
To use nmap to scan the devices on your network, you need to know the subnet you are connected to.
…
Using the IP scanning-tool NMAP
- On Linux, type hostname -I into a terminal window.
- On macOS, go to System Preferences then Network and select your active network connection to view the IP address.
How do I scan a network with Nmap?
Scan your network with Nmap on Ubuntu
- Step 1: Open the Ubuntu command line.
- Step 2: Install the network scanning tool Nmap.
- Step 3: Determine the IP range/subnet mask of your network.
- Step 4: Scan the network for the connected device(s) with Nmap.
- Step 5: Exit the terminal.
Can you track an IP address?
Tracing an IP address will give you its approximate geographic location, and it’s actually pretty easy to do. There are several online IP trackers that allow you to search for an IP address, including WolframAlpha and the Spiceworks IP Lookup tool.
Can I look up an IP address?
Is it illegal to look up someone’s IP address? IP addresses are available publicly and do not lead to personally identifiable information, so it is legal to check someone’s IP address by using an IP lookup tool.
What should I see when I run netstat?
netstat can be very handy in the following.
- Display incoming and outgoing network connections.
- Display routing tables.
- Display number of network interfaces.
- Display network protocol statistics.
How do I query DNS?
Name Server lookup
Access your command prompt. Use the command nslookup (this stands for Name Server Lookup) followed by the domain name or IP address you want to trace. Press enter. This command will simply query the Name Service for information about the specified IP address or domain name.
What is WMIC?
The Windows Management Instrumentation Command line (WMIC) is a software utility that allows users to performs Windows Management Instrumentation (WMI) operations with a command prompt.
What does dism mean?
Deployment Image Servicing and Management (DISM.exe) is a command-line tool that can be used to service and prepare Windows images, including those used for Windows PE, Windows Recovery Environment (Windows RE) and Windows Setup. DISM can be used to service a Windows image (.
What are the 3 main commands in IP config?
IPCONFIG /release [adapter] Release the IP address for the specified adapter. IPCONFIG /renew [adapter] Renew the IP address for the specified adapter. IPCONFIG /flushdns Purge the DNS Resolver cache.
How do I ping and ipconfig?
ANALYZE AND CONFIGURE WITH IPCONFIG AND PING
- Type the command ipconfig.
- Type the command ipconfig /all.
- Type the command ipconfig /?.
- Type the command ipconfig /allcompartments.
- Work with a dynamically assigned address:
- Display, flush, and register DNS information:
- Type the command ping /?.
How do I use ARP in cmd?
To do this from a Windows PC:
- Click Start -> Run.
- Type cmd and click OK to bring up the command line.
- Type arp -d to flush the ARP cache.
- Type arp -a to view the current ARP cache which should be empty.
- Type arp -s 192.168. 100.23 00-13-C6-00-02-0F (Note for UNIX the syntax is: arp -s 192.168. 100.23 00:13:C6:00:02:0F)
How do I ARP an IP address?
Start Command Prompt installed in Windows as standard, and set the IPv4 address of the machine. Start [Command Prompt]. Open the [Start] menu and select [All Programs] or [Programs] [Accessories] [Command Prompt]. Enter “arp -s <IP address> <MAC address>” and press the [ENTER] key.
Узнать, не подключился ли сосед к вашему wi-fi, посмотреть устройства в локальной сети и выявить сторонние несанкционированные хосты — все это можно с помощью IP-сканера. Разбираемся, как они работают, и какие программы можно бесплатно скачать в сети.
Что такое IP
IP — это протокол, который используют для передачи данных в сети. Когда вы отправляете отчет на работу или картинку другу, IP помогает ничего не перепутать и доставить файл нужному адресату. Это можно сравнить с адресом дома, который используют для отправки обычных бумажных писем.
IP бывает двух видов:
- IPv4: состоит из четырех чисел от 0 до 255 (например, 192.168.1.1).
- IPv6: содержит 8 комбинаций из букв и цифр (например, 2001:0db8:85a3:0000:0000:8a2e:0370:7334).
Чтобы узнать IP-адрес компьютера на Windows:
- Откройте параметры (Win + I).
- Перейдите в «Сеть и Интернет».
- Выберите «Состояние» или «Ethernet/Wi-Fi».
- Нажмите «Свойства».
Зачем нужен IP-сканер
Сетевые IP-сканеры — это сервисы для исследования и анализа сетей. С их помощью можно:
- Узнать, какие устройства подключены к сети;
- Мониторить состояние сети, выявлять конфликты адресов и устройства, которые требуют обновления;
- Искать несанкционированные устройства, которые используют вашу сеть;
- Собирать данные о типах устройств, операционных системах и открытых портах (что важно для диагностики и планирования сети).
Как работает сканер сети:
- Сканирование диапазона IP: сетевой сканер отправляет запросы на разные IP-адреса в заданном диапазоне, например от 192.168.1.1 до 192.168.1.255.
- Ответы от устройств: компьютеры, принтеры или маршрутизаторы в сети отвечают на запросы сканера. Он получает всю информацию об устройстве: его имя, открытые порты и другие характеристики.
- Составление отчета: после завершения сканирования сканер собирает и отображает информацию о найденных устройствах. Обычно отчет включает: IP-адреса, MAC-адреса (уникальные идентификаторы сетевых интерфейсов), операционные системы и статус открытых портов.
Таким образом, с помощью IP-сканера можно видеть, что происходит в сети, и обеспечивать ее безопасность.
Программы для поиска IP-адресов в локальной сети
Рассмотрим самые популярные сетевые IP-сканеры, которые используют системные администраторы.
Nmap
Это один из самых мощных инструментов для аудита сетей. Он работает на Windows, Linux и macOS. Nmap может показаться сложным для начинающих пользователей, но опытным специалистам он предоставляет множество возможностей:
- Сканирование сети, выявление активных хостов и открытых портов;
- Поиск компьютеров в локальной сети;
- Определение операционных систем и версий программного обеспечения;
- Управление сетями и безопасностью.
Nmap может выполнять сканирование с использованием различных методов: TCP, UDP, ICMP и др. А также поддерживает скрипты для автоматизации задач (Nmap Scripting Engine).
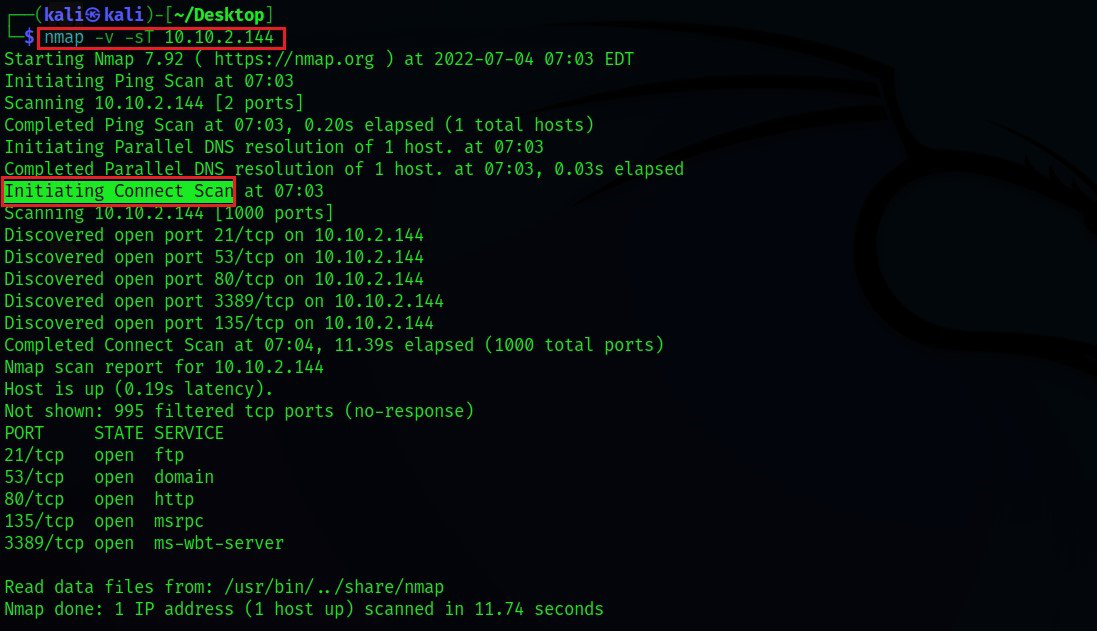
Advanced IP Scanner
Сканер IP-адресов для локальной сети. В отличие от Nmap, работает только на Windows. С его помощью можно:
- Находить все подключенные устройства;
- Получить удаленный доступ к компьютерам через RDP или HTTP;
- Экспортировать результаты в формате CSV для дальнейшего использования.
У Advanced IP Scanner простой интуитивно понятный интерфейс. Он хорошо подходит для домашних компьютеров и небольших офисов. Это автономный исполняемый файл, который можно запускать без установки в любое удобное время.
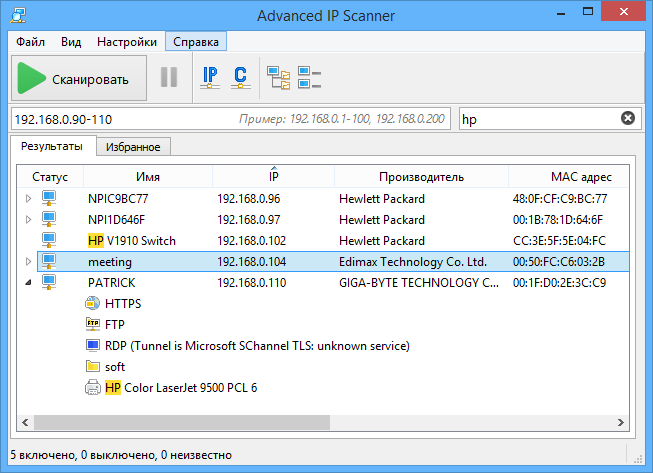
Angry IP Scanner
Программа для просмотра устройств в сети. Имеет простой графический интерфейс, работает на Windows, macOS и Linux.
С помощью Angry IP Scanner можно:
- Быстро сканировать сетевые порты и IP-адреса в заданном диапазоне;
- Собирать информацию о хостах (имя хоста, MAC-адрес и статус);
- Экспортировать результаты в разных форматах для дальнейшего использования (CSV, TXT, XML и др.).

Angry IP Scanner подходит для быстрого анализа локальных сетей. Это простой инструмент без сложных настроек. Для расширения его функциональности можно использовать дополнительные плагины, например:
- Ping Plugin: сканирует доступность IP-адресов с помощью команды ping;
- HTTP Plugin: проверяет доступность веб-серверов;
- DNS Plugin: выполняет DNS-запросы и получает информацию о доменных именах, связанных с IP-адресами;
- MAC Address Plugin: извлекает MAC-адреса устройств в локальной сети;
- WMI Plugin: получает информацию о Windows-устройствах через WMI (Windows Management Instrumentation).
Free IP scanner
Бесплатный сканер локальной сети Windows. С его помощью можно:
- Сканировать сеть в заданном диапазоне IP-адресов и отображать активные устройства;
- Получать информацию о MAC-адресах и именах хостов;
- Настраивать уровни приоритетов процесса сканирования и максимальное количество потоков;
- Экспортировать результаты сканирования в текстовые файлы.
Free IP Scanner подходит пользователям, которым нужен простой инструмент для быстрого сканирования сети. Работает после установки на компьютер, скачать и использовать можно без регистрации.
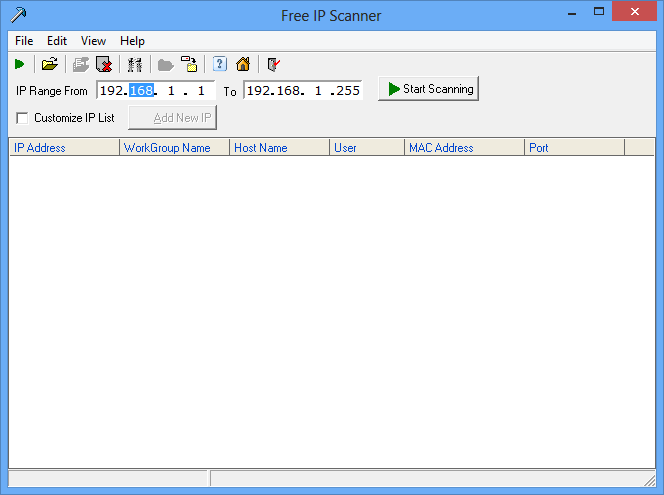
Встроенная командная строка
Для нахождения хостов в сети вместо IP-сканера можно задействовать обычную командную строку (cmd). Для этого используют команды:
- ping: для проверки доступности конкретного IP-адреса или доменного имени;
- arp: для отображения таблицы ARP, которая содержит IP-адреса и соответствующие MAC-адреса (после выполнения команды ping);
- net view: для отображения всех компьютеров в локальной сети, если они работают в рабочей группе или домене;
- tracert: для отслеживания маршрута до определенного IP-адреса или домена и выявления проблем с сетью;
- nslookup: для получения информации о DNS и проверки доступности доменных имен.
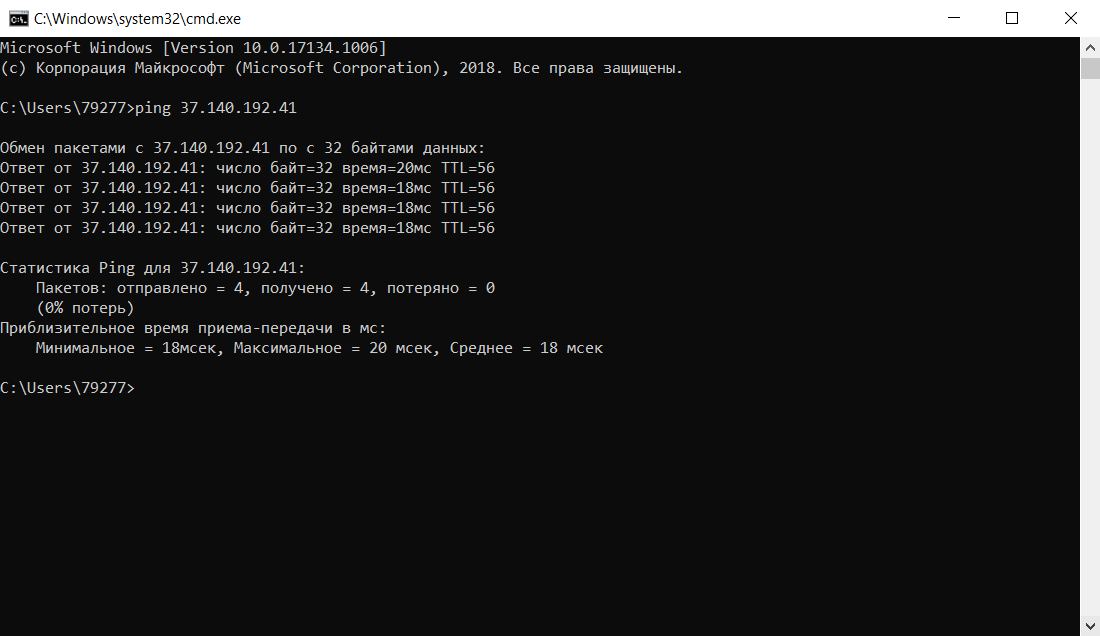
Еще можно использовать PowerShell — это мощная командная оболочка и язык сценариев от Microsoft, который предоставляет инструменты для работы с сетью.
Как выбрать сканер IP-адресов
При выборе сетевого IP-сканера ориентируйтесь на его:
- Функциональность: некоторые инструменты помогают находить устройства в сети, другие — собрать о них информацию и выгружать ее в удобном формате;
- Интерфейс: простые инструменты, типа Advanced IP Scanner подойдут для домашнего использования, более сложные вроде Nmap рассчитаны на профессионалов;
- Документация и поддержка: убедитесь, что у сервиса есть понятная документация и служба поддержка, особенно, если пользуетесь им впервые;
- Совместимость: выбранный сканер должен быть совместим с вашей операционной системой (Windows, Linux, macOS).
Выбор сканера сети зависит от поставленной задачи и ваших навыков. Тестируйте разные инструменты, чтобы найти подходящий вариант.
Главное о сетевых IP-сканерах
- IP-адрес позволяет идентифицировать компьютер в сети;
- С помощью IP-сканера можно обнаружить подключенные устройства и мониторить проблемы сети;
- Есть бесплатные сканеры сети, которые можно установить на компьютер, например, Free IP scanner, и сканеры, которые запускаются с автономного исполняемого файла, например Advanced IP Scanner;
- Помимо специализированных IP-сканеров можно использовать командную строку или PowerShell от Microsoft.