
Все способы:
- Вариант 1: Брандмауэр
- Вариант 2: Консольные утилиты
- Способ 1: «Командная строка»
- Способ 2: «Windows PowerShell»
- Вариант 3: Онлайн-сервисы
- Вариант 4: Сторонние приложения
- Способ 1: TCPView
- Способ 2: PortQry
- Вариант 5: Веб-интерфейс маршрутизатора
- Вопросы и ответы: 0
Важно! Большая часть описанных в этой статье способов просмотра открытых портов являются универсальными для всех операционных систем семейства Windows, оставшиеся подойдут только для определенных версий. Об этом будет указанно непосредственно в тексте. Несмотря на это, все скриншоты, приведенные в статье, сделаны в Windows 10, но отличия в них заключаются исключительно в графическом оформлении интерфейса.
Вариант 1: Брандмауэр
Все открытые в системе порты фиксируются в брандмауэре, соответственно, их можно посмотреть там. Для этого выполните следующее:
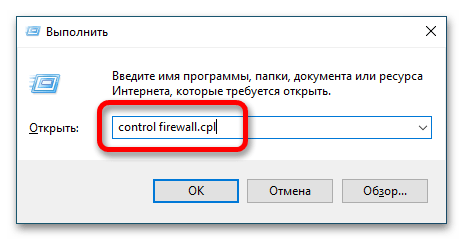
- Откройте главное окно брандмауэра. Сделать это можно разными способами, универсальный подразумевает использование ввода специальной команды в утилите «Выполнить». Для этого сначала вызовите ее сочетанием клавиш Win + R, а затем впишите в поле «Открыть» команду
control firewall.cplи нажмите Enter.
Читайте также: Настройка брандмауэра в Windows 11 / 10 / 7
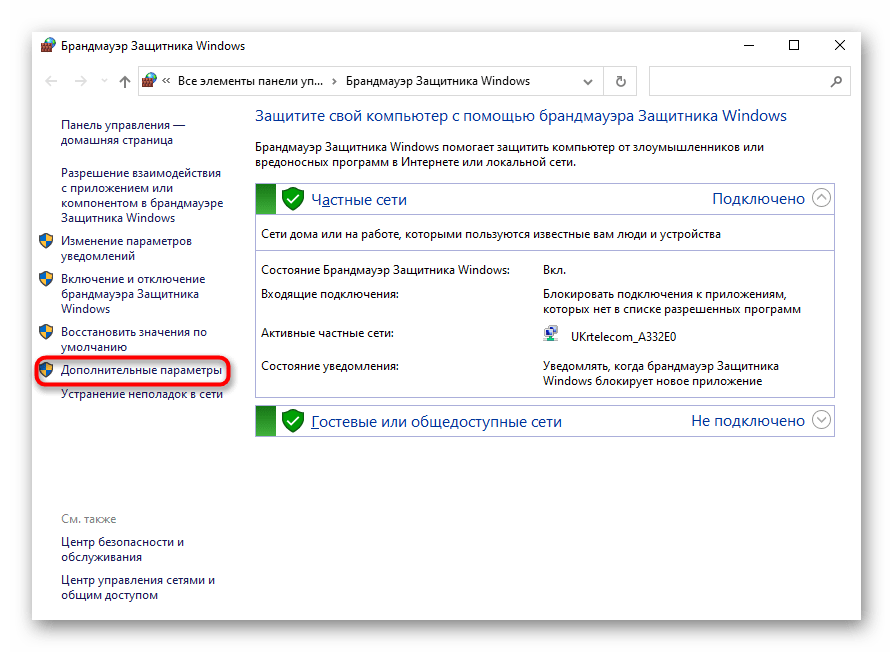
- В открывшемся окне щелкните по пункту «Дополнительные параметры», расположенному на боковой панели слева.
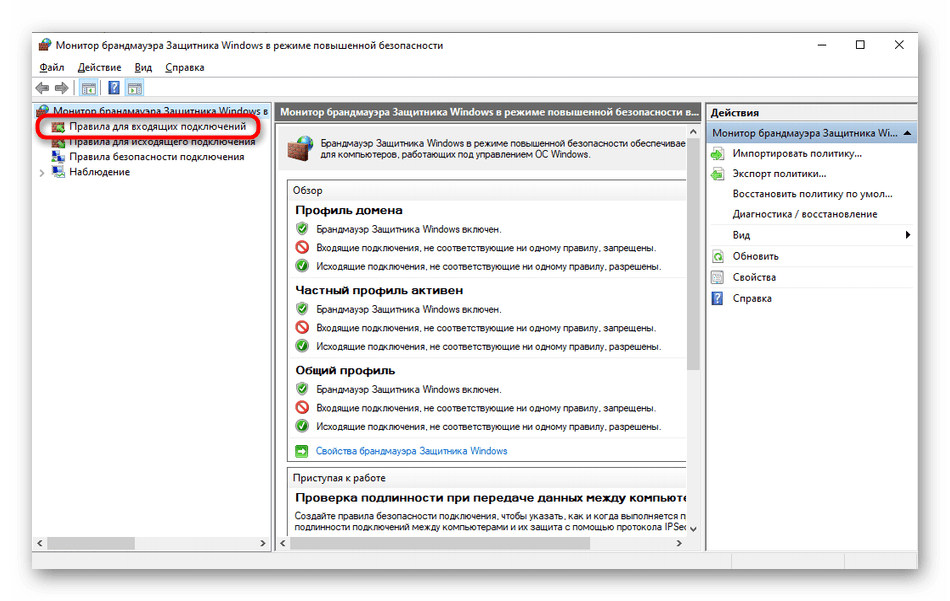
- В новом меню на навигационной панели слева нажмите по пункту «Правила для входящих подключений».
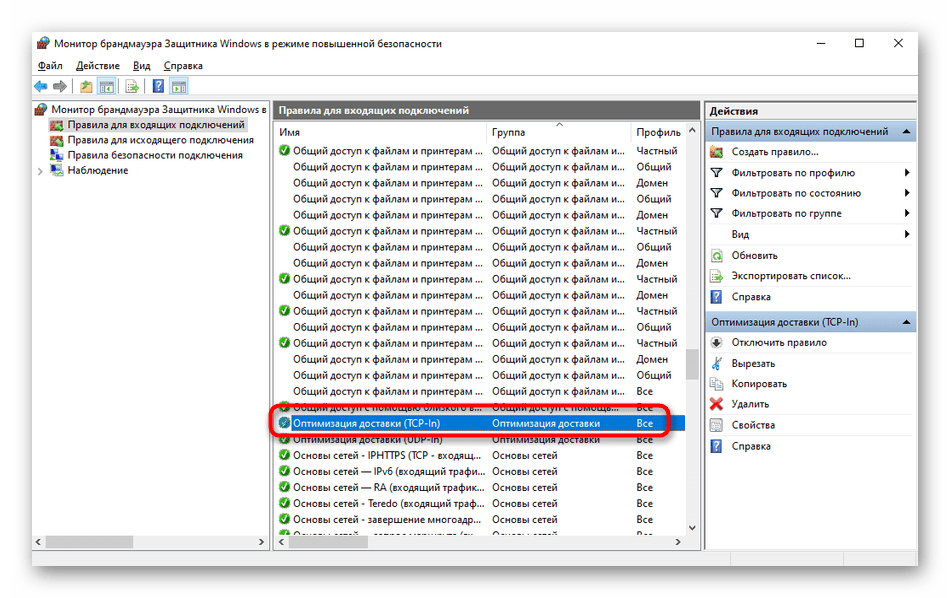
- Найдите в списке интересующее вас разрешающее подключение (пункт, отмеченный зеленной галочкой) и откройте его «Свойства». Для этого щелкните дважды кнопкой мыши по названию.
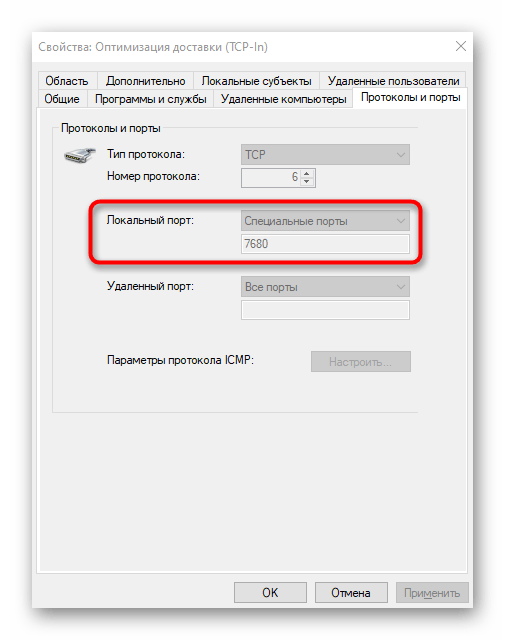
- В появившемся окне проследуйте на вкладку «Протоколы и порты» и найдите поле «Локальный порт» — именно там и указаны искомые данные.
- Таким же образом проверьте оставшиеся подключения, чтобы узнать все открытые порты.
Обратите внимание! Этот способ не предоставляет сразу весь список открытых портов, их потребуется проверять каждый раз отдельно, что не очень удобно. Но таким образом вы сможете узнать дополнительную информацию выбранного подключения в окне его «Свойств».
Вариант 2: Консольные утилиты
Посмотреть сразу все открытые порты в операционной системе можно путем ввода специальной команды в консольных утилитах. Притом они будут различаться в «Командной строке» и «Windows PowerShell».
Способ 1: «Командная строка»
В «Командной строке» можно вывести перечень всех открытых портов с помощью команды netstat. Она также имеет дополнительные параметры, которые позволяют гибко настроить вывод данных. Этой утилите у нас на сайте посвящена отдельная статья, в которой подробно рассмотрено ее использование. Воспользуйтесь ссылкой ниже, чтобы ознакомиться с изложенной там инструкцией.
Подробнее: Использование команды netstat для просмотра открытых портов
Способ 2: «Windows PowerShell»
Аналогичные сведения можно посмотреть в «Windows PowerShell», для этого потребуется воспользоваться командой Get-NetTCPConnection.
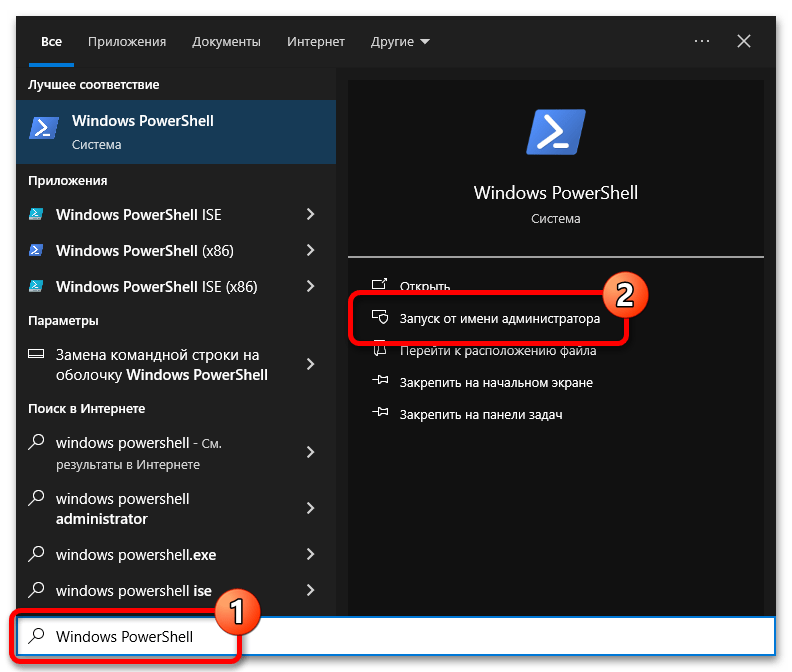
- Сначала нужно запустить саму консоль от имени администратора. Во всех операционных системах это можно сделать через поиск. Вызовите его сочетанием клавиш Win + S и в появившееся поле введите запрос «Windows Powershell», а затем в результатах кликните правой кнопкой мыши по искомому приложению и воспользуйтесь пунктом «Запуск от имени администратора». При необходимости после этого подтвердите запуск, нажав по кнопке «Да» в появившемся диалоговом окне контроля учетных записей.
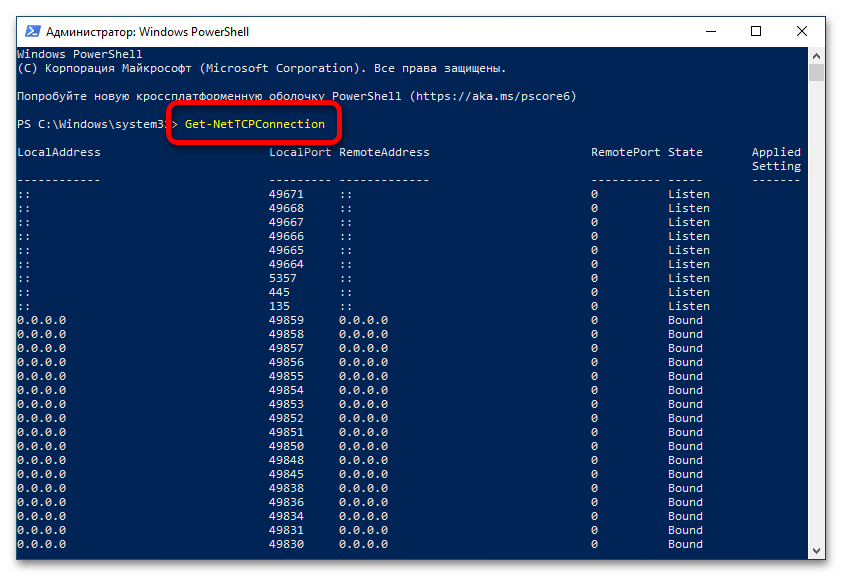
- Теперь можете ввести в окно консоли команду
Get-NetTCPConnectionи нажать Enter. По итогу на экране появится перечень всех портов TCP в системе, включая закрытые. - Чтобы отобразить список только открытых, необходимо воспользоваться параметром
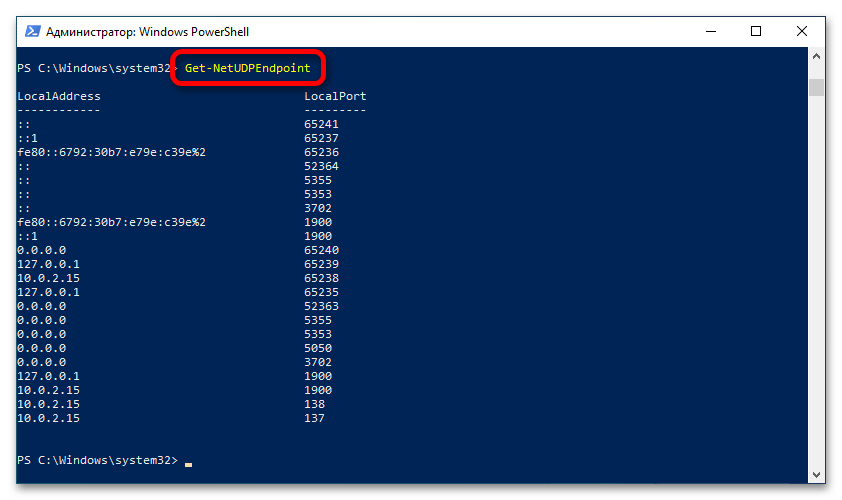
-Stateсо значениемListen. Итоговая команда будет выглядеть следующим образом:Get-NetTcpConnection -State Listen - Если вы хотите просмотреть информацию о конечной точке UDP, тогда команда будет другой:
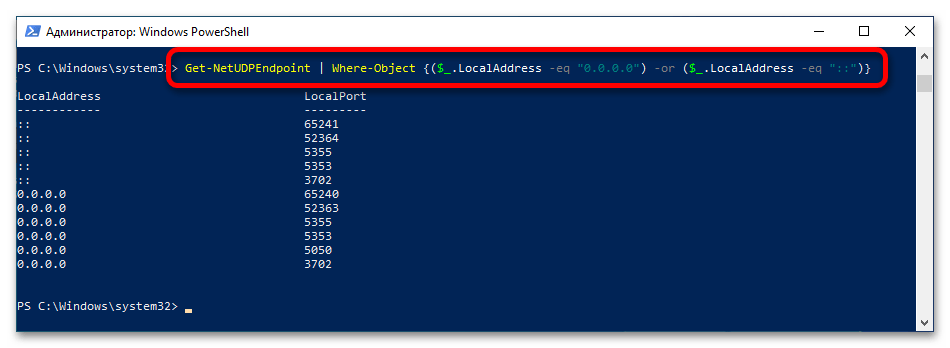
Get-NetUDPEndpoint. Запущенная без опций, она вернет список только локальных портов. - Если необходимо просмотреть сетевые интерфейсы, тогда к команде потребуется добавить дополнительный параметр. В итоге она будет выглядеть следующим образом:
Get-NetUDPEndpoint | Where-Object {($_.LocalAddress -eq "0.0.0.0") -or ($_.LocalAddress -eq "::")}Вы увидите только открытые удаленные порты UDP, локальные в перечне будут отсутствовать.

Вариант 3: Онлайн-сервисы
В интернете есть специальные сервисы, которые позволяют вывести информацию о всех открытых на компьютере портах. Это удобный способ, который не подразумевает использования штатных средств операционной системы и ввода специальных консольных команд. В сети есть множество решений для выполнения поставленной задачи, о трех из них детально рассказывается в отдельной статье на нашем сайте.
Подробнее: Онлайн-сервисы для проверки портов компьютера
Вариант 4: Сторонние приложения
Компания Microsoft для просмотра информации о состоянии портов выпустила два отдельных приложения. Они различаются набором дополнительных функций, но одинаково хорошо подходят для выполнения поставленной задачи.
Способ 1: TCPView
TCPView — это приложение с графическим интерфейсом, которое предоставляет сведения о процессах, запущенных в операционной системе. Также в нем отображается их принадлежность к определенному порту и протоколу передачи данных. Чтобы воспользоваться всеми функциями программы, потребуется изначально скачать ее на компьютер. Для этого перейдите на официальный сайт разработчика, воспользовавшись кнопкой ниже.
Скачать TCPView с официального сайта
Теперь выполните описанные далее действия, чтобы получить данные об открытых портах компьютера:
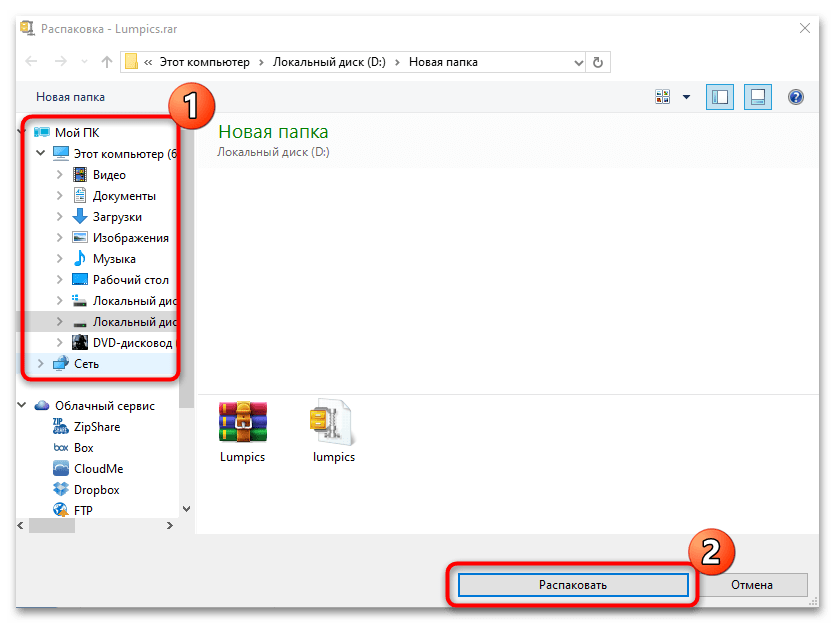
- Находясь на странице загрузки приложения, кликните по строке «Download TCPView». Точное ее расположение показано на изображении ниже.
- После завершения загрузки перейдите в папку, в которую вы сохранили файл, и извлеките их из архива. Сделать это можно как встроенными средствами операционной системы, так и с помощью стороннего программного обеспечения. Об этом подробнее рассказывается в другой статье на нашем сайте.
Подробнее: Методы извлечения из архива папки с файлами
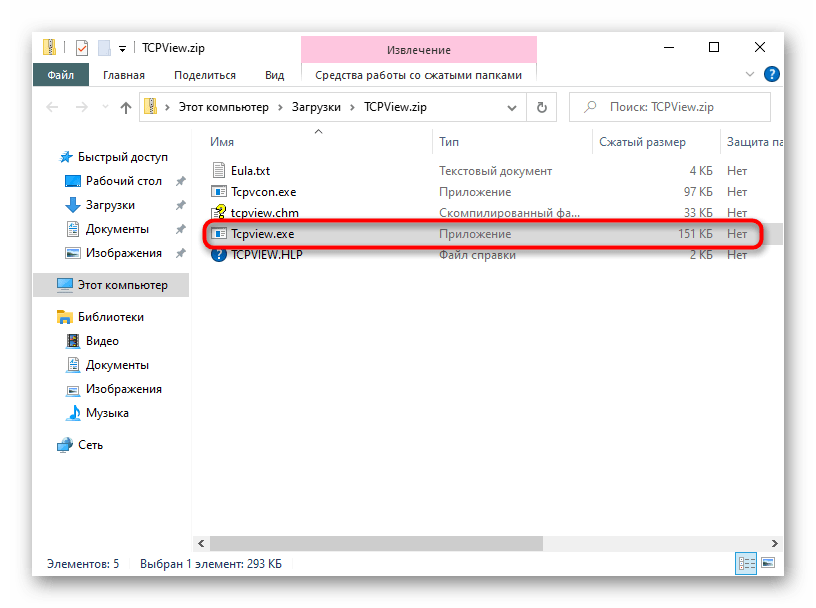
- Затем перейдите в извлеченную директорию и запустите исполняемый файл приложения «Tcpview.exe». Устанавливать его не потребуется, так как программа является портативной.
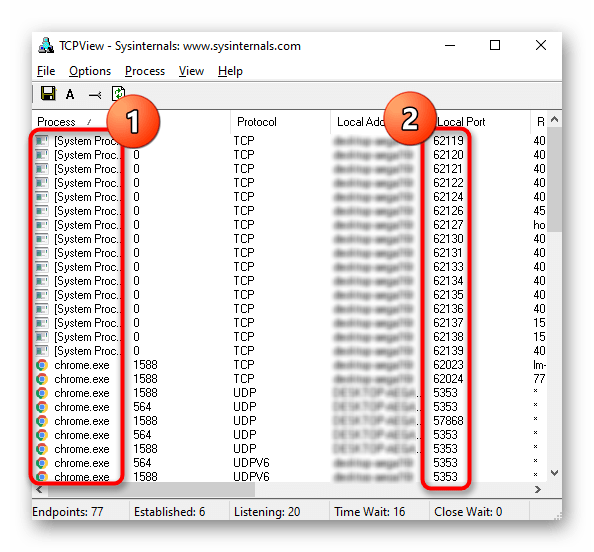
- В открывшемся окне будут отображаться все запущенные процессы, их название находится в столбце «Process», а используемые ими порты указаны в столбце «Local Port». Соответственно, все они являются в настоящее время открытыми.
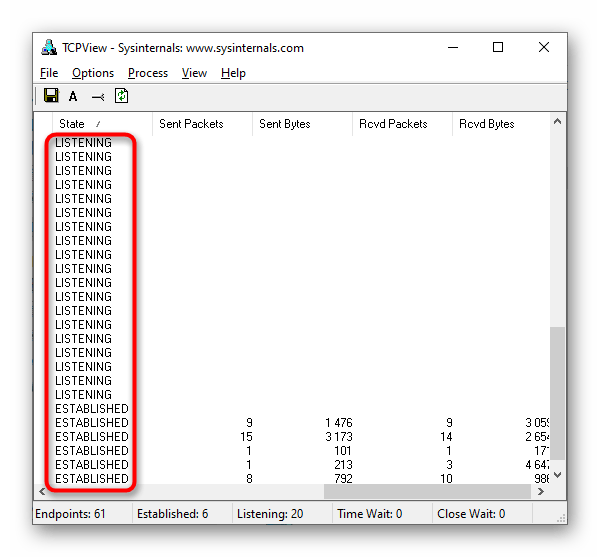
- Дополнительно можете пролистать страницу программы вправо до столбца «State» — именно там отображается состояние каждого порта. Он может прослушиваться, находиться в ожидании или вовсе не использоваться. Но, несмотря на это, каждый находящийся в списке порт является открытым.
Способ 2: PortQry
PortQry — это тоже приложение от компании Microsoft для просмотра открытых портов, только она не имеет графического интерфейса, поэтому пользоваться ей возможно только через «Командную строку».
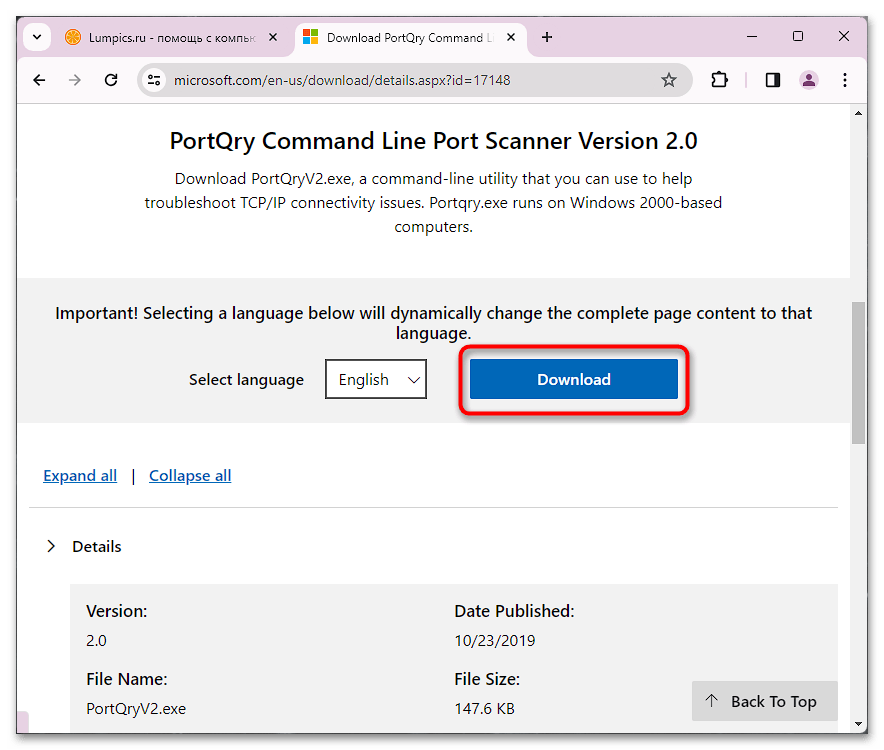
Скачать PortQry с официального сайта
Эта программа не является портативной, в отличие от разобранной ранее в статье, поэтому ее потребуется инсталлировать, предварительно скачав на компьютер. А потом можно будет запустить утилиту в консоли и проверить открытые порты.
- Перейдя на страницу загрузки приложения, нажмите по кнопке «Download», чтобы начать скачивание инсталляционного файла.
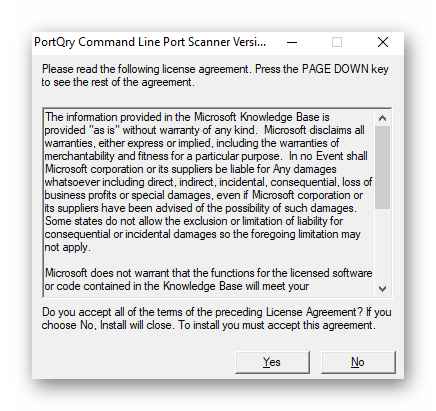
- После того как загрузка завершится, перейдите в директорию со скачанным файлом и запустите его двойным кликом по названию. Затем в появившемся окне примите условия лицензионного соглашения и продолжайте следовать инструкциям инсталлятора.

Важно! Оставьте путь установки программы по умолчанию, чтобы при выполнении последующих действий, описанных в этой инструкции, не появлялось ошибок.
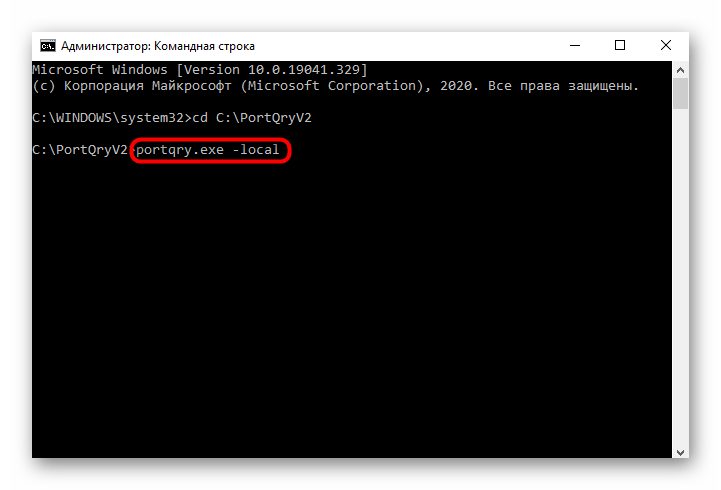
- Закройте окно инсталлятора и запустите «Командую строку» от имени администратора, например через поиск по системе. Вызовите соответствующий интерфейс комбинацией клавиш Win + S, введите запрос и в результатах щелкните по пункту «Запуск от имени администратора».

Читайте также: Как запустить «Командную строку» от имени администратора в Windows 11 / 10
- Проследуйте в директорию, в которую было установлено приложение. По умолчанию это
C:\PortQryV2. Чтобы туда перейти, следует ввести и выполнить следующую команду:cd C:\PortQryV2 - Запустите приложение с параметром
-local, чтобы вывести на экран список всех открытых портов в операционной системе.portqry.exe -local
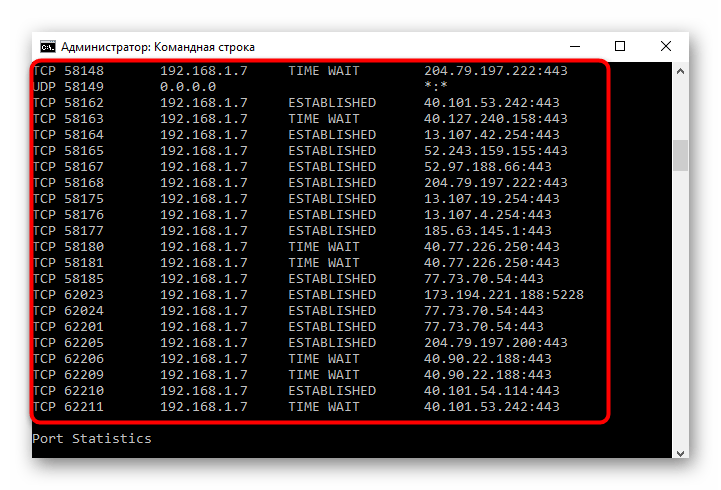
Теперь, спускаясь по консоли вниз, вы будете видеть тип подключения, номер порта, его адрес (внешний и внутренний) и статус.


Вариант 5: Веб-интерфейс маршрутизатора
Оставшийся способ просмотра открытых портов на компьютере подразумевает вход в админ-панель роутера. Для этого необходимо знать логин и пароль, а по умолчанию они соответствуют тем, что указаны на корпусе устройства. Развернуто о том, как войти в меню маршрутизатора, рассказывается в другой статье на нашем сайте. При необходимости воспользуйтесь ссылкой ниже, чтобы ознакомиться с изложенной там информацией.
Подробнее: Как войти в веб-интерфейс роутера
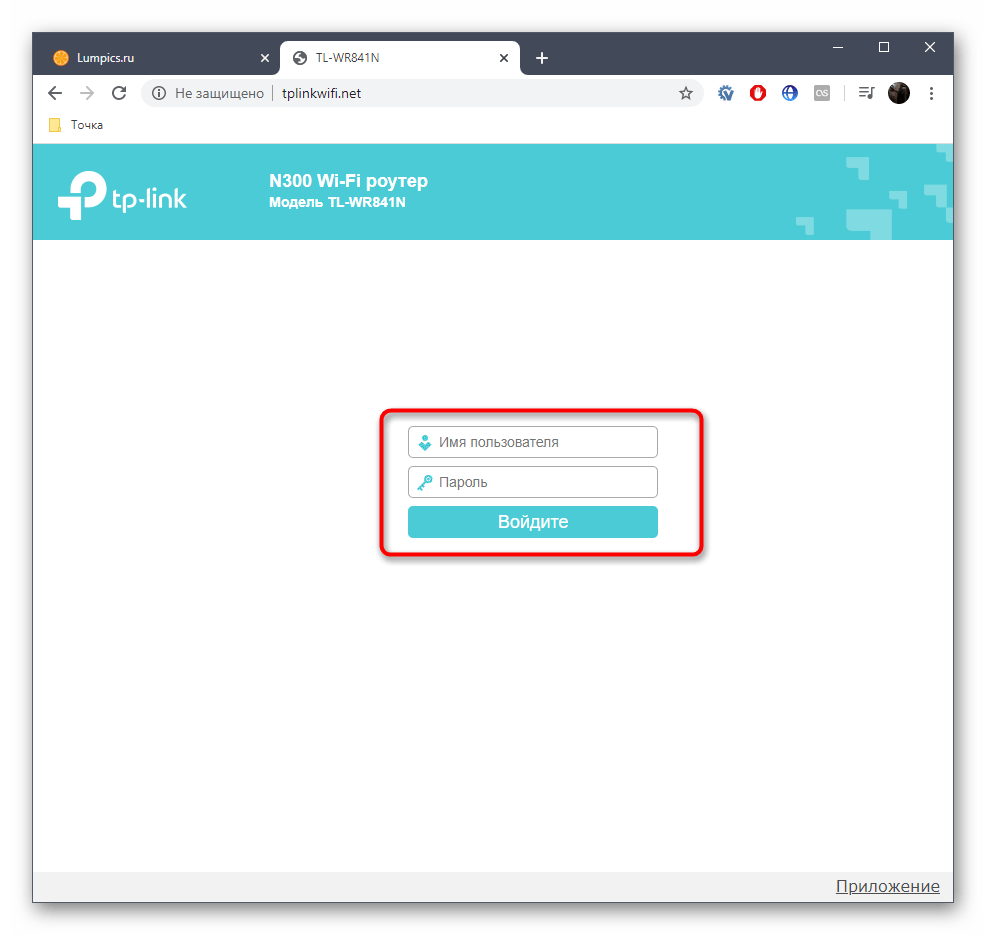
Важно! В админ-панели маршрутизатора можно посмотреть только те порты, которые были заданы по умолчанию или созданы вручную пользователем. Так что посмотреть абсолютно все порты этим способом не получится. Также следует учитывать, что все дальнейшие действия будут выполняться на примере админ-панели роутера TP-Link, но в других моделях устройств все будет похожим.
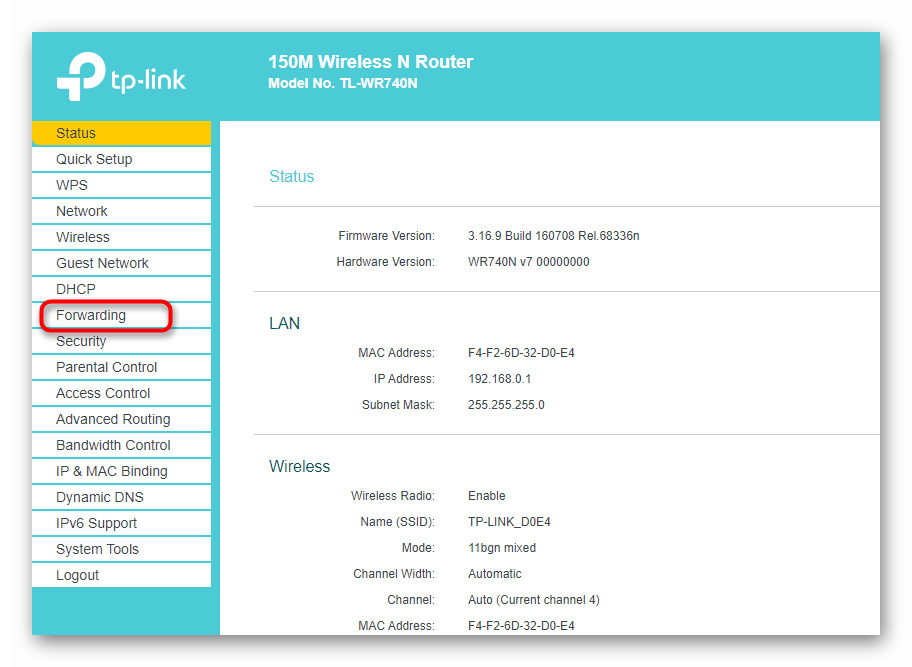
- Перейдите в меню роутера, после чего проследуйте в раздел «Forwarding», воспользовавшись навигационной панелью в левой части интерфейса.
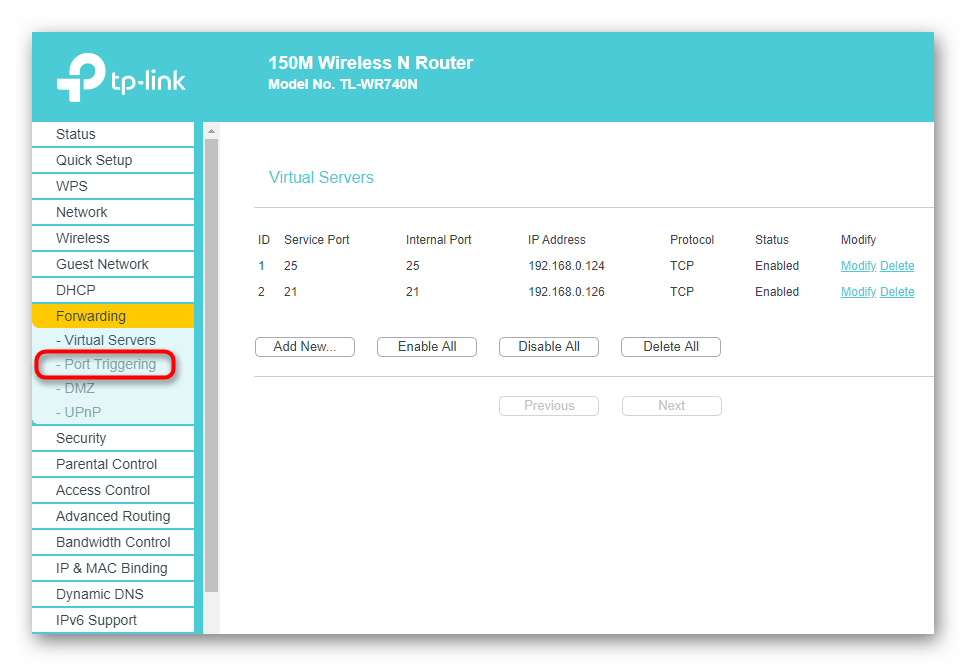
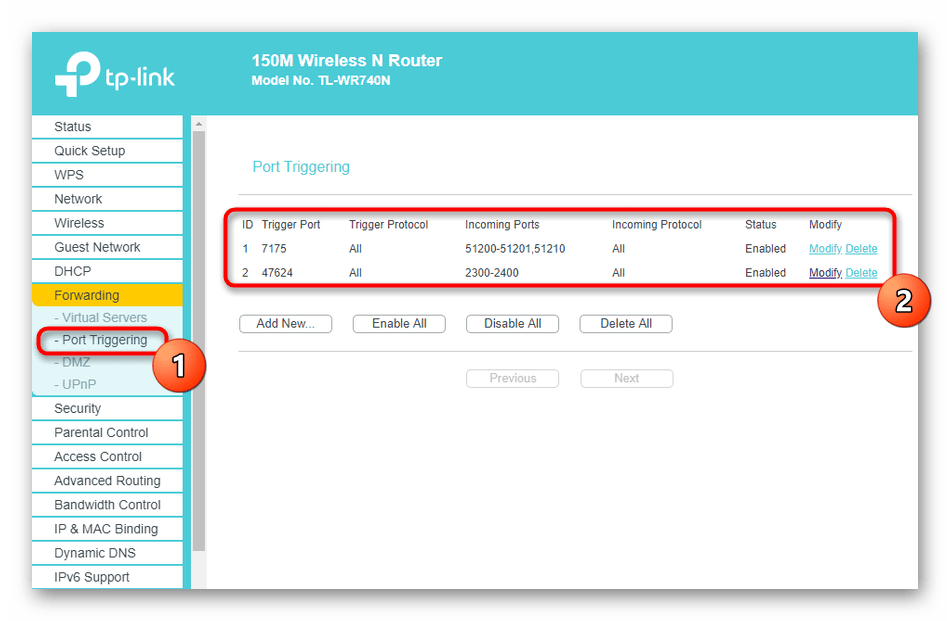
- В развернувшемся списке подразделов кликните по пункту «Port Triggering», чтобы перейти к списку открытых портов.
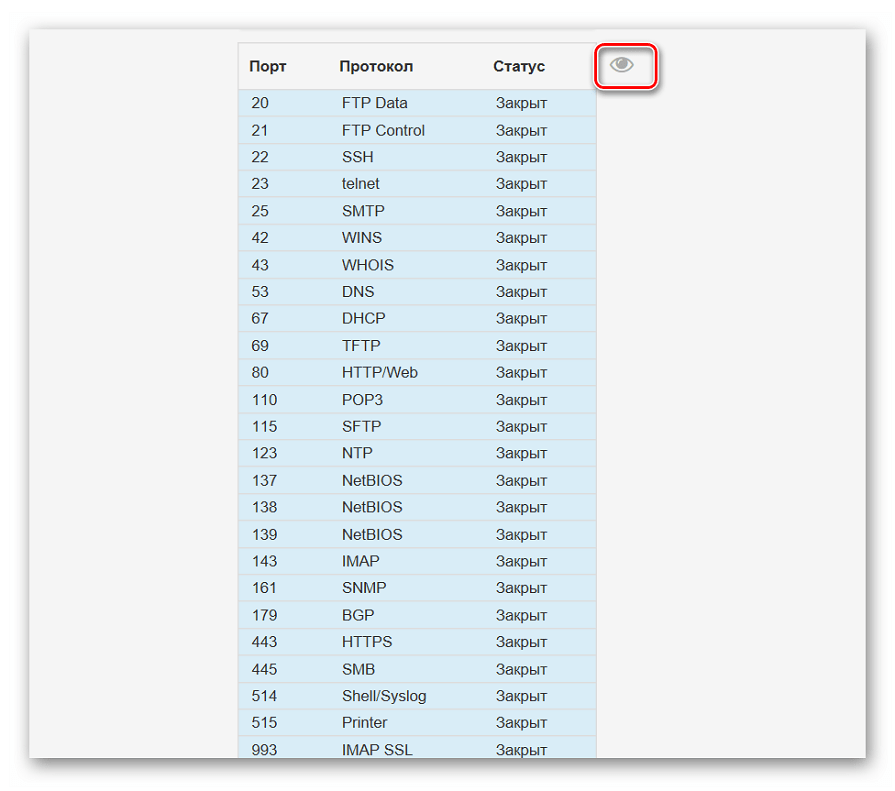
- В целевом меню размещен список всех портов маршрутизатора. В нем номер находится в столбце «Trigger Port», а в «Status» вы можете посмотреть его статус. Значение «Enabled» означает, что порт открыт, а «Disabled» — закрыт. Также вы можете менять этот статус вручную, нажав по соответствующей кнопке.
Наша группа в TelegramПолезные советы и помощь
Checking open TCP/IP ports on your Windows computer is crucial for managing network security and ensuring smooth connectivity. Certain apps and processes in Windows may face issues due to closed or misconfigured ports, often caused by firewalls or private IP addresses. This guide will walk you through step-by-step methods to check whether a TCP port is open or closed using built-in tools and third-party utilities.
Why You Should Check TCP/IP Ports?
Here are some common scenarios where checking ports is necessary:
- Troubleshooting connectivity issues for applications or services.
- Configuring firewalls to ensure necessary connections are allowed.
- Detecting suspicious activity that might indicate a security breach.
Methods to Check Open TCP/IP Ports
There are several ways to check open TCP/IP ports in Windows. Here are a few options:
Method 1. Using Telnet Client
Step 1: Check whether the telnet client feature is ON or not. In order to check, open the Turn Windows feature on or off settings from the search bar. OR press the ‘window’ key and type ‘windows’ features. Then press on “Turn Windows features on or off”.
-660.png)
A new prompt will be opened. Search for “Telnet Client” and check the box in front of ‘telnet Client’.

Step 2: Open the command prompt. Press the ‘windows’ key and type ‘cmd’. Press “Command Prompt”.
-660.png)
Step 3: On the command prompt, type the command “telnet + IP address or hostname + port number” and check the status of the provided TCP port.
-660.png)
Step 4: If only the blinking cursor is visible, then the port is open.
-660.png)
Step 5: If you get the message “connection failed” then the port is closed.
-660.png)
Method 2: Using built-in netstat command-line utility:
Step 1: Open the command prompt.
Step 2: Run the following command:
netstat -an

Method 3. Using TcpView
Another option is to use the TcpView utility from Microsoft’s Sysinternals suite of tools. This utility provides a more user-friendly interface for viewing active TCP/IP connections, along with additional information such as the process ID and process name for each connection. Steps to be followed:
Step 1: Download the TcpView utility from the Microsoft Sysinternals website. You can find the download link on the TcpView page of the Sysinternals website.
-660.png)
Step 2: Extract the downloaded file and run the TcpView.exe file to launch the TcpView utility. This will open the TcpView window, which shows a list of all active TCP/IP connections on your machine.

Step 3: Open the tcpview.exe (application).
By default, TcpView will display the following columns in the list of connections:
Protocol: Shows the protocol being used for the connection (TCP or UDP)
Local Address: Shows the local address and port being used for the connection
Remote Address: Shows the remote address and port being connected to
State: Shows the current state of the connection (e.g. Established, Listen, etc.)
You can use the “Local Address” and “Remote Address” columns to see which ports are being used by which applications. For example, if you see a connection with a local address of “127.0.0.1:80”, this means that the local application is using port 80 for outgoing connections.
Method 4. Using Windows PowerShell
You can also use Windows PowerShell to check open TCP/IP ports. To do this, use the Get-NetTCPConnection cmdlet, which allows you to view a list of active TCP/IP connections and the local and remote addresses and ports being used. For example, you can run the following command to view a list of all active TCP/IP connections:
Get-NetTCPConnection |
Select-Object LocalAddress,
LocalPort, RemoteAddress, RemotePort

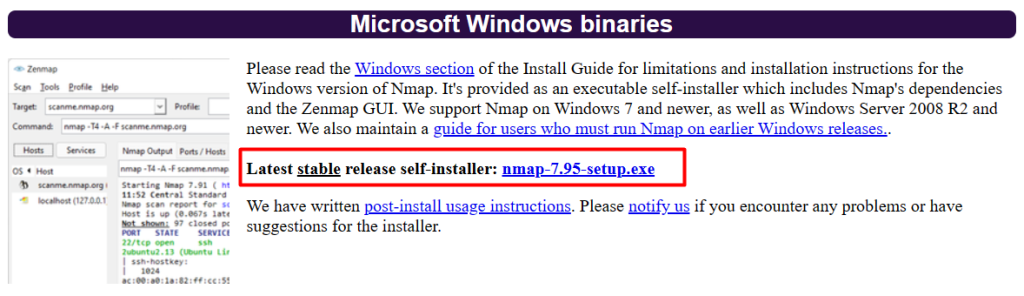
Method 5. Using Nmap
To install Nmap in the Windows command line, follow these steps:
Step 1: Download the latest version of Nmap from the Nmap website. You can find the download link on the Nmap download page:
https://nmap.org/download.html
Step 2: Extract the downloaded file to a location on your computer. This will create a new folder containing the Nmap files.
Step 3: Open a command prompt and navigate to the directory where you extracted the Nmap files. For example, if you extracted the files to the C:\nmap directory, you would run the following command:
cd C:\nmap
Step 4: Once you are in the Nmap directory, you can install Nmap by running the nmap.exe file. To do this, run the following command:
nmap.exe -V
This will display the version number of Nmap, indicating that it has been installed successfully.
Step 5: To use nmap to scan for open TCP/IP ports, run the “nmap -sT” command, followed by the IP address or hostname of the machine you want to scan.
nmap -sT localhost

This will scan the specified host or IP address and display the results. You can also use the -h option to view a list of available options and arguments for the nmap command. Overall, installing Nmap in the Windows command line is a straightforward process. You can download the latest version of Nmap from the Nmap website, extract the files, and then run the nmap.exe file to install it. Once it is installed, you can use the nmap command to scan hosts and IP addresses and view the results.
Common Issues That Close Ports
- Applications not functioning as expected.
- Misconfigured firewall rules blocking connections.
- IP addresses improperly set as private.
Troubleshooting Common Issues
Here are some common issues that may occur during opening TCP/IP Ports in Windows:
- Telnet Not Listed in Features: Ensure your system version supports Telnet or enable it via PowerShell.
- Firewall Blocking Ports: Temporarily disable the firewall to test port connectivity.
- Command Not Recognized: Verify tool installation and environment variables.
Conclusion
Checking open TCP/IP ports on your Windows computer is an important step for maintaining your system’s security and efficiency. By regularly monitoring these ports, you can identify any unwanted or suspicious connections that might put your computer at risk. Windows provides several simple tools, like Command Prompt and PowerShell, which make it easy to see which ports are open and what applications are using them. Taking the time to check your open ports helps ensure that your computer runs smoothly and stays protected from potential threats. Staying proactive about monitoring your network connections is a key part of keeping your digital environment safe and reliable.
Imagine you’re playing your favorite online game, but you’re experiencing lag and connection issues. Or perhaps you’re concerned about the security of your Windows system and want to ensure no unauthorized access points exist. The culprit behind these scenarios could be open ports on your system.
Open ports act as virtual doorways that allow your computer to communicate with other devices or servers across a network. They play a crucial role in facilitating various online activities, from web browsing and email to file sharing and online gaming. However, open ports can also pose security risks if not properly managed, potentially allowing malicious actors to gain access to your system.
Understanding how to check open ports Windows is essential for both troubleshooting network problems and maintaining optimal system security. This process, known as port scanning, allows you to identify which ports are open, the services or applications associated with them, and potential vulnerabilities that may need addressing. The article will guide you on how you can check Windows open ports.
What are Open Ports?
Open ports are TCP (Transmission Control Protocol) or UDP (User Datagram Protocol) ports that are currently in use by a running process or service on your system. These ports are essential for network communication protocols, as they allow different applications and services to exchange data. For example, when you access a website, your web browser uses port 80 (HTTP) or port 443 (HTTPS) to communicate with the web server.
There are 65,535 available TCP and UDP ports, divided into three ranges:
- Well-known ports (0-1023): Assigned to common network services like FTP (21), SSH (22), and HTTP (80).
- Registered ports (1024-49151): Assigned to specific organizations or vendors for their products and services.
- Dynamic ports (49152-65535): Used for temporary or private connections, such as during a file transfer.
Explore the Blazing Fast Speed with Cheap Windows VPS!
With Ultahost, Hosting Windows VPS has never been easier or faster. Enjoy ultra-fast SSD NVME speeds with no dropouts and slowdowns.
Checking open ports is crucial for maintaining system security and preventing unauthorized access. Here are some reasons why:
- Malware and virus infections: Malware can use open ports to communicate with their command and control servers, stealing sensitive data or spreading further infections.
- Unauthorized access: Open ports can allow hackers to access your system remotely, potentially leading to data breaches or system compromise.
- Resource utilization: Unused open ports can consume system resources, slowing down your system’s performance.
Windows provides two built-in tools for port scanning: Netstat and PowerShell. Below we outline the basic guide on how to see open ports Windows.
Netstat
Netstat is a command-line utility that displays active network connections, routing tables, and interface statistics. To use netstat for port scanning, you need to open Command Prompt as an administrator use the following command and press Enter:
netstat -an
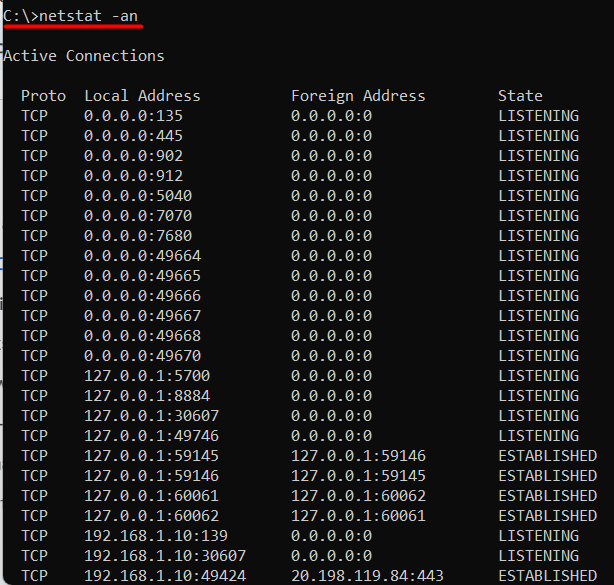
The -an option displays all active connections, including listening ports. Look for the “Local Address” column, which shows the IP address and port number of each connection.
PowerShell
PowerShell is a powerful task automation and configuration management framework from Microsoft. To use PowerShell for port scanning, you need to open it as an administrator and then execute the below command:
Get-NetTCPConnection
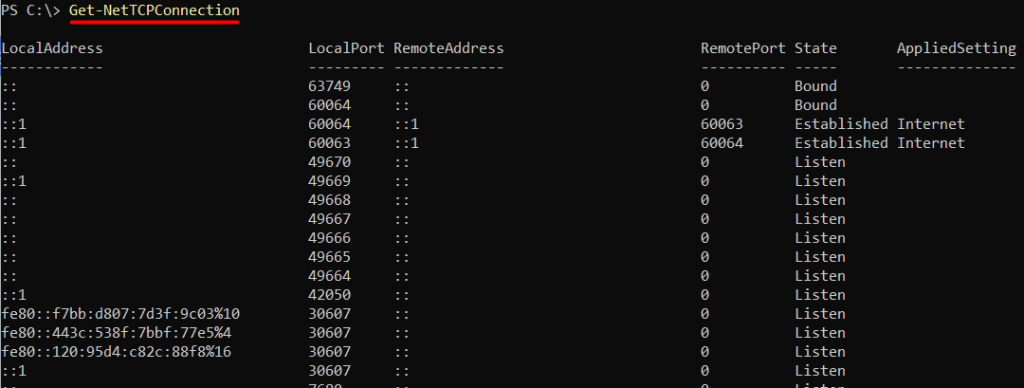
This cmdlet displays all list open ports Windows, including listening ports. Look for the “LocalAddress” property, which shows the IP address and port number of each connection.
Third-party software for Port Scanning
While built-in tools can provide basic port scanning capabilities, third-party software offers more advanced features and flexibility.
Nmap
Nmap is a popular, open-source port scanner that provides detailed information about network hosts and services. To use Nmap:
Download and install Nmap from the official website.
After installing it you need to open the open Command Prompt as an administrator and execute the below command:
Type nmap -p 1-65535 <IP address>
Replace <IP address> with the IP address of your system or a specific host. Nmap will scan all 65,535 ports and display the results, including open ports and services:
nmap -p 1-65535 192.168.10.1
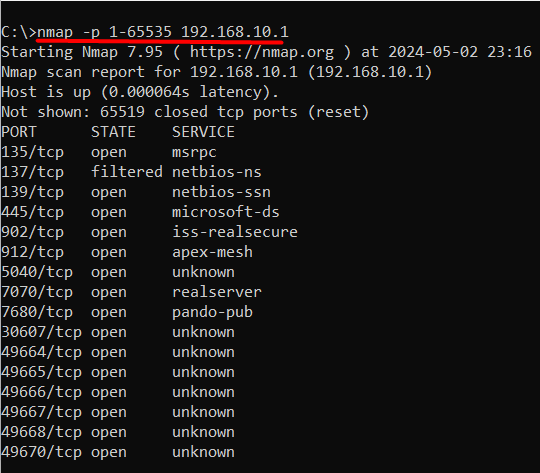
If you are unaware of your IP address then you can execute the ipconfig command on the command prompt to find it.
Conclusion
Open ports play a vital role in facilitating online activities, but they can also pose significant security risks if not properly managed. Understanding how to check open ports in Windows is essential for both troubleshooting network problems and maintaining optimal system security. By identifying open ports, users can determine which services or applications are associated with them and address potential vulnerabilities that may need attention.
By utilizing built-in tools like Netstat and PowerShell, or third-party software like Nmap, users can effectively scan for open ports and take necessary steps to ensure system security. Regular port scanning can help prevent malware infections, unauthorized access, and resource utilization, ultimately protecting sensitive data and system integrity. By grasping the importance of open ports and how to manage them, users can take a proactive approach to maintaining a secure and efficient Windows system.
While enabling open ports on your Windows machine can be useful for specific applications but it also introduces security risks. For a more secure and controlled environment rent a VPS from Ultahost. These VPS plans grant you root access and complete control over your server’s firewall configuration. This allows you to open ports with specific control ensuring only necessary ports are exposed.
FAQ
What are open ports in Windows?
Open ports are communication endpoints that allow data to be transmitted between a device and a network. In Windows, these ports can be in a listening state, waiting for incoming connections, or actively transmitting data.
Why is it important to check open ports in Windows?
Checking open ports can help you identify any potential security vulnerabilities on your Windows system. Unnecessary open ports could be exploited by malicious actors to gain unauthorized access to your system or to launch attacks.
How can I check open ports in Windows?
You can check open ports in Windows using various methods, including using built-in command-line tools like Netstat or PowerShell, third-party software, or online port scanning tools.
How do I use the netstat command to check open ports?
To use the netstat command, open Command Prompt, and type netstat -an. This will display a list of all open ports and their respective states (listening, established, etc.).
Can PowerShell be used to check open ports in Windows?
Yes, PowerShell provides cmdlets such as Get-NetTCPConnection and Get-NetUDPEndpoint that allow you to check open TCP and UDP ports, respectively.
The Windows command prompt utility netstat allows you to scan your computer to learn whether it has any programs or services listening for incoming connections over the Internet. In most cases, legitimate programs such as anti-virus update services cause your computer to listen for incoming connections. However, in some cases the netstat utility can help you spot a vulnerability caused by a virus or malicious software. Run the netstat utility from an elevated Windows command prompt.
Step 1
Open the Start menu, and type «cmd» in the «Search programs and files» field at the bottom.
Step 2
Right-click the «cmd» icon when it appears on the result list. Select «Run as Administrator» on the context menu. Type an Administrator password and press «Enter» if the computer prompts you for administrative credentials.
Step 3
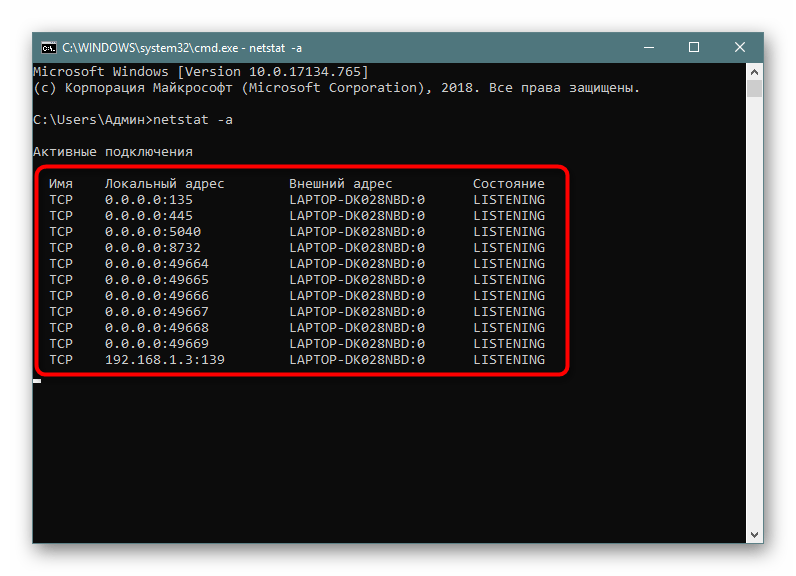
Type «netstat -a» in the Command Prompt window, and press «Enter.» The computer displays a list of all open TCP and UDP ports.
Step 4
Look for any port number that displays the word «LISTENING» under the «State» column. Your computer is listening for incoming connection requests over these port numbers. Look the port numbers up using an online list to determine the programs and services associated with those ports.
Port scanning is essential for penetration testers and red teams to
identify potential vulnerabilities in networks and systems. It is the process of
scanning a range of ports on a target system to determine which ones are open
or closed. Attackers can exploit an open port to gain access
to a system or network, whereas a closed port is inaccessible to external
connections. This article will cover the basics of port scanning on Linux
and Windows operating systems and explore some of the commonly used tools and
techniques.
Linux is one of the most popular operating systems for server and networking
environments, making it a prime target for attackers. Here are some of the
commonly used tools for port scanning on Linux:
Nmap
Nmap is a free and open-source tool for scanning for open ports and discovering network services running on a target system.
It is a powerful and versatile tool that supports various scanning
techniques, including TCP, UDP, and ICMP scans.
To scan a target system using Nmap, you can use the following command:
Using the default TCP scan, this command will scan the target system for open ports. You can also specify the port range to be scanned using the -p option.
For example, to scan for ports 80 and 443 on a target system, you can use the
following command:
nmap -p 80,443 <target IP>
Netcat
Netcat is a versatile networking tool that can be used for various
tasks, including port scanning. It is a command-line tool that allows you to
send and receive data across network connections.
To perform a port scan using Netcat, you can use the following command:
nc -zv <target IP> <start port>-<end port>
This command will scan the target system for open ports between the specified
range. The -z option specifies no data should be sent, and the -v
option provides verbose output.
Masscan
Masscan is a high-speed port scanner that can scan entire networks in minutes.
It is designed to be faster and more efficient than other port scanners, making
it an ideal tool for large-scale scanning operations.
To scan a network using Masscan, you can use the following command:
masscan -p1-65535 <target IP>
This command will scan all 65535 ports on the target system. You can also
specify a port range to be scanned using the -p option.
Tool-less Scanning on Linux
These are some additional techniques for port scanning on Linux that use only
built-in functionality. These techniques include scanning with Telnet, Bash
Sockets, and Python.
Scanning with Telnet
Telnet is a command-line tool that allows you to connect to a remote system
using the Telnet protocol. It can also be used for port scanning by attempting
to connect to each port and checking if it is open or closed.
To perform a port scan using Telnet, you can use the following command:
for i in $(seq <start port> <end port>); do echo "" | telnet <target IP> $i 2>/dev/null | grep Connected; done
This command will attempt to connect to each port between the specified range on
the target system using Telnet. If the connection succeeds, the output will show “Connected”, indicating the port is open.
Scanning with Bash Sockets
Bash Sockets is a built-in feature in Bash that allows you to create network
connections using sockets. It can be used for port scanning by attempting to
connect to each port and checking if it is open or closed. To perform a port
scan using Bash Sockets, you can use the following command:
for i in $(seq <start port> <end port>); do (echo >/dev/tcp/<target IP>/$i) &>/dev/null && echo "Port $i is open"; done
This command will attempt to connect to each port between the specified range on
the target system using Bash Sockets. If the connection is successful, the
output will show “Port <port number> is open”, indicating that the port is
open.
Scanning with Python
Python is a powerful programming language that can be used for various
tasks, including port scanning. Its built-in socket library allows you
to create network connections and check for open ports. This Python example uses the socket library and includes a timeout to prevent hanging on unresponsive ports.
To perform a port scan using Python, you can use the following code:
import socket

target_ip = "<target IP>"
start_port = <start port>
end_port = <end port>

for port in range(start_port, end_port+1):
    sock = socket.socket(socket.AF_INET, socket.SOCK_STREAM)
    sock.settimeout(1)
    result = sock.connect_ex((target_ip, port))
    if result == 0:
        print("Port " + str(port) + " is open")
    sock.close()
This code will attempt to connect to each port between the specified range on
the target system using Python. If the connection is successful, the output will
show “Port <port number> is open”, indicating that the port is open.
Port Scanning on Windows
While many of the port scanning tools used on Windows are the same as those used
on Linux, some techniques and tools are unique to Windows. This section will cover some of these unique techniques and tools.
Windows Management Instrumentation (WMI)
WMI is a powerful framework that allows administrators to manage and monitor
Windows systems. While not a traditional port scanner, WMI can help gather information about running services which may correspond to listening ports. To perform a port scan
using WMI, you can use the following PowerShell command:
Get-WmiObject -Class Win32_Service -ComputerName <target IP> -Impersonation 3 -Credential (Get-Credential)
This command will query the target system for information about the running
services and their associated ports.
Windows Remote Management (WinRM)
WinRM is a service that allows remote management of Windows systems. Though not a full-featured scanner, it can be used to test individual ports on a remote system. To perform a port scan using WinRM, you can use the
following PowerShell command:
Invoke-Command -ComputerName <target IP> -ScriptBlock { Test-NetConnection -Port <port number> }
This command will test the specified port on the target system using the
Test-NetConnection cmdlet.
Microsoft Baseline Security Analyzer (MBSA)
MBSA is a free tool from Microsoft that can scan Windows systems for
security vulnerabilities, including open ports and services. To perform a port
scan using MBSA, you can use the following steps:
- Download and install MBSA from the official website.
- Launch the application and select the “Scan a computer” option.
- Enter the IP address of the target system and select the scan options.
- Click on the “Start Scan” button to begin the scan.
The application will scan the target system for open ports and services and
provide a report of any vulnerabilities found.
Common Port Scanning Techniques
Port scanning can be performed using various techniques, each with strengths and weaknesses. Here are some of the commonly used methods:
- TCP Connect Scan: TCP Connect Scan is the most basic and widely used scanning
technique. It involves establishing a TCP connection with each
port to determine whether it is open or closed. - SYN Scan: SYN Scan is a stealthier scanning technique that sends a SYN packet
to each port and waits for a response. If the port is open, it will respond
with a SYN-ACK packet; if it is closed, it will respond with a RST
packet. - UDP Scan: UDP Scan is used to scan for open UDP ports. It involves sending a
UDP packet to each port and waiting for a response. If the port is open, it
will respond with an ICMP packet; if it is closed, it will not. - Null Scan: Null Scan is a scanning technique that involves sending a packet
with no flags set to each port. If the port is open, it will not respond;
if it is closed, it will respond with a RST packet. - Xmas Scan: Xmas Scan is a scanning technique that involves sending a packet
with the FIN, URG, and PUSH flags set to each port. If the port is open, it
will not respond; if it is closed, it will respond with a RST packet.
Conclusion
Port scanning is essential for penetration testers and red teams to
identify potential vulnerabilities in networks and systems. This article covers the basics of port scanning on Linux and Windows operating systems and explores some commonly used tools and techniques. Port scanning can be used for both legitimate and malicious purposes, so it’s important to use these techniques responsibly and within legal boundaries.