
Fix Cursor Jumps or moves randomly: Many users encounter the issue in the mouse after updating their Windows OS, where the mouse cursor jumps randomly or keeps moving automatically at times. This seems as if the mouse is moving on its own without you controlling the mouse. This horizontal or vertical movement of the mouse automatically annoys the users but there are approaches that can be used to solve this problem. In this article, you will learn about the different approach to solve this issue.

Table of Contents
Make sure to create a restore point just in case something goes wrong.
Method 1: Checking the hardware of your Mouse
Before doing any technical tweaks to your system, let us first check whether the hardware i.e. the mouse is working as expected or not. To do this, plug out your mouse & put it into another system & try to check whether the mouse is working fine or not. Also, make sure whether there is any damage to the USB ports or not; buttons of the mouse as well as the wires are intact & working perfectly or not.
Method 2: Change Touchpad Delay
In case you are using a laptop, the touchpad needs a thorough check. As your laptop touchpad, as well as an external mouse, is acting as the pointing device for your system, it may happen that the touchpad may cause the issue. You can try to alter the touchpad delay prior to the working of a mouse click in order to Fix Cursor Jumps or moves randomly in Windows 10. To do this, the steps are –
1.Use the key combination Windows Key + I to open the Settings window.
2.Now choose “Devices” from the settings window.

3.From the left-hand window pane select Touchpad.
4.Now alter the Delay or Touchpad sensitivity from the options.

Method 3: Disable the Touchpad
In order to check if the problem lies in your mouse or not, you have to disable your laptop’s touchpad & check whether the issue still remains or not? If the issue remains, you can simply turn the touchpad back on. To do this the steps are –
1.Press Windows Key + I to open Settings then click on Devices.

2.Select Mouse from the left-hand menu & then click on Additional mouse options.

3.Now switch to the last tab in the Mouse Properties window and the name of this tab depends on the manufacturer such as Device Settings, Synaptics, or ELAN etc.


4.Next, select your device then click “Disable.“
5.Reboot your PC to save changes.
6.After the reboot, confirm whether your mouse moving on its own issue is fixed or not. If it does, enable back your touchpad again. If not, then there was a problem with your touchpad settings.
OR
1.Press Windows Key + I to open Settings then click on Devices.
2.From the left-hand menu select Touchpad.
3.Under Touchpad uncheck “Leave touchpad on when a mouse is connected“.

4.Reboot your PC to save changes.
Method 4: Update your Mouse Drivers
The problem may because of your outdated or corrupted driver. So, this approach can also help you Fix Cursor Jumps or moves randomly in Windows 10:
1.Press Windows Key + R then type devmgmt.msc and hit Enter to open Device Manager.

2.Expand “Mice and other pointing devices” and right-click on your device and choose “Update Driver”.

3.Then choose the option “Search automatically for updated driver software” which will search on the internet for the updated driver automatically.

4.If this search fails, you can manually go to the website of your device manufacturer and manually download the updated Mouse driver.
OR
1.Press Windows Key + X then select Device Manager.
2.Expand Mice and other pointing devices.
3.Right-click on your device and select Properties.

4.Switch to Driver tab and click on Update Driver.

5.Now select Browse my computer for driver software.

6.Next, select Let me pick from a list of device drivers on my computer.

7.Select the HID-compliant device from the list and click Next.

8.After the driver is installed restart your PC to save changes.
Method 5: Run Hardware and Devices Troubleshooter
1.Go to Start and type “Control Panel” and click to open it.
2.From the top right, select View By as “Large Icons” & then click on “Troubleshooting”.

3.Next, from the left-hand window pane click on “View All”.

4.Now from the list which opens choose “Hardware and Devices”.

5.Follow on-screen instructions to run the Hardware and Devices troubleshooter.

6.If any hardware issues are found, then save all of your work and click “Apply this fix” option.
See if you’re able to fix Cursor Jumps or moves randomly issue or not, if not then continue with the next method.
Method 6: Scan your PC with Anti-Malware
Malware can cause tremendous trouble in various services and programs including the mouse. The possibilities of creating issues by malware are endless. So, it is recommended to download and install applications like Malwarebytes or other anti-malware applications to scan for malware in your system. This may fix the mouse moving on its own, cursor jumps or random mouse movement issue.
1.Download and install CCleaner & Malwarebytes.
2.Run Malwarebytes and let it scan your system for harmful files.

3.If malware is found it will automatically remove them.
4.Now run CCleaner and in the “Cleaner” section, under the Windows tab, we suggest checking the following selections to be cleaned:
5.Once you’ve made certain the proper points are checked, simply click Run Cleaner, and let CCleaner run its course.
6.To clean your system further select the Registry tab and ensure the following are checked:
7.Select Scan for Issue and allow CCleaner to scan, then click Fix Selected Issues.
8.When CCleaner asks “Do you want backup changes to the registry?” select Yes.
9.Once your backup has completed, select Fix All Selected Issues.
10.Restart your PC to save changes.
Method 7: Changing the Mouse Sensitivity
1.Press Windows Key + I to open Settings then click on Devices.
2.Now from the left hand window pane select Mouse.
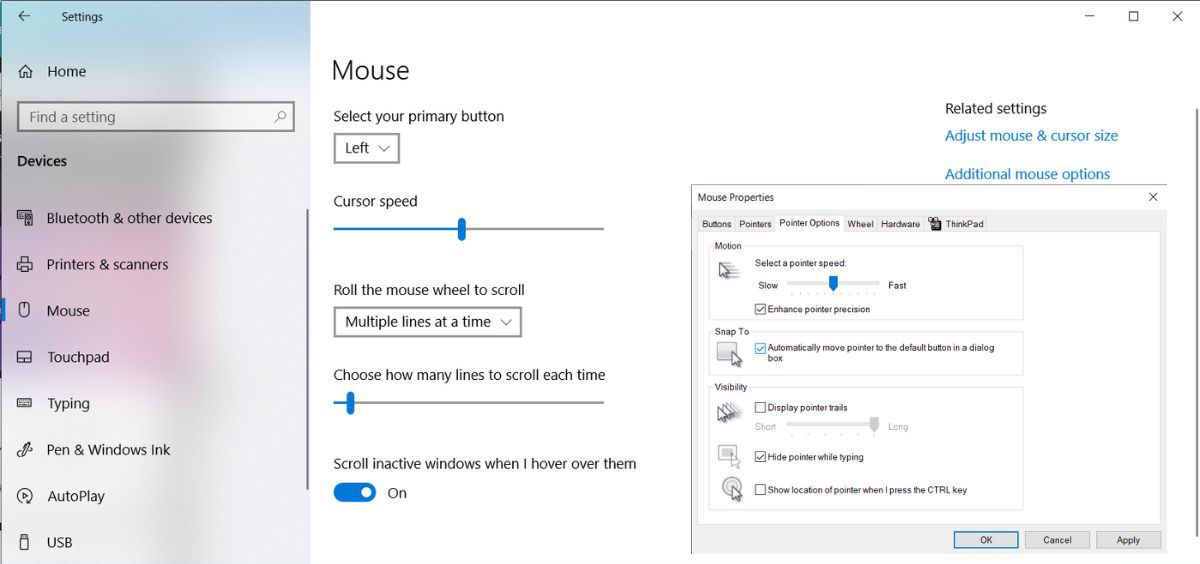
3.Next, click on “Additional Mouse Options” from the rightmost part of the Mouse settings window.
4.This will open Mouse Properties window, here switch to “Pointer Options” tab.
5.Under the motion section, you will see a slider. You have to move the slider from high to moderate to low and check if the issue is getting resolved or not.

6.Click Apply followed by OK to save the changes.
Method 8: Disable Realtek HD Audio Manager
Realtek HD Audio Manager deals with your system audio and is responsible to make the PC sound work. But this utility program is also popular for interfering with other drivers of your system. So, you need to disable it in order to Fix Cursor Jumps or moves randomly in Windows 10 issue.
1.Press Ctrl+Shift+Esc key combination together to open Task Manager.
2.Now switch to Startup tab and select Realtek HD Audio Manager then click on Disable button.

3.This will disable Realtek HD Audio Manager from automatically launching when the system starts.
Method 9: Update Your Windows
1.Press Windows Key + I to open Settings then click on Update & Security icon.
2.Then under Update status click on “Check for updates.“

3.If an update is found for your PC, install the update and reboot your PC.
Recommended:
- Kill Resource Intensive Processes with Windows Task Manager (GUIDE)
- Install Group Policy Editor (gpedit.msc) on Windows 10 Home
- What is the Difference Between CC and BCC in an Email?
- Print Spooler Keeps Stopping? Here is how to fix it!
I hope this article was helpful and now you can easily Fix Cursor Jumps or moves randomly in Windows 10, but if you still have any questions regarding this tutorial then feel free to ask them in the comment’s section.
Sometimes when using your computer, your cursor will seemingly move by itself. Don’t call the exorcists just yet, though; there are several reasons why a cursor can move about without you moving the mouse.
Let’s check out some ways to fix this problem on Windows
1. Double-Check Your Hardware
Before checking or changing any settings on your laptop or PC, check all your hardware components that could cause this problem. Take a look at the mouse cable, USB ports, or remaining battery charge if you use a wireless mouse.
2. Double-Check Your Mouse’s Surface
If the hardware looks okay, check the surface that the mouse is resting on. Your desk might have scratches or uneven surfaces on it. If you use a mouse pad, it might be worn out and giving your mouse incorrect information about its movement.
3. Adjust the Mouse Pointer Speed
If your mouse pointer speed is set too high, you may get the feeling that your cursor is moving by itself. Here’s how you can adjust the pointer speed:
- Press Windows key + I to bring up the Settings menu.
- Go to Devices > Mouse.
- Click on Additional mouse options.
- Select the Pointer Options tab.
- Use the slider below Select a pointer speed.
- Click Apply > OK to save your new settings.
4. Change Touchpad Settings
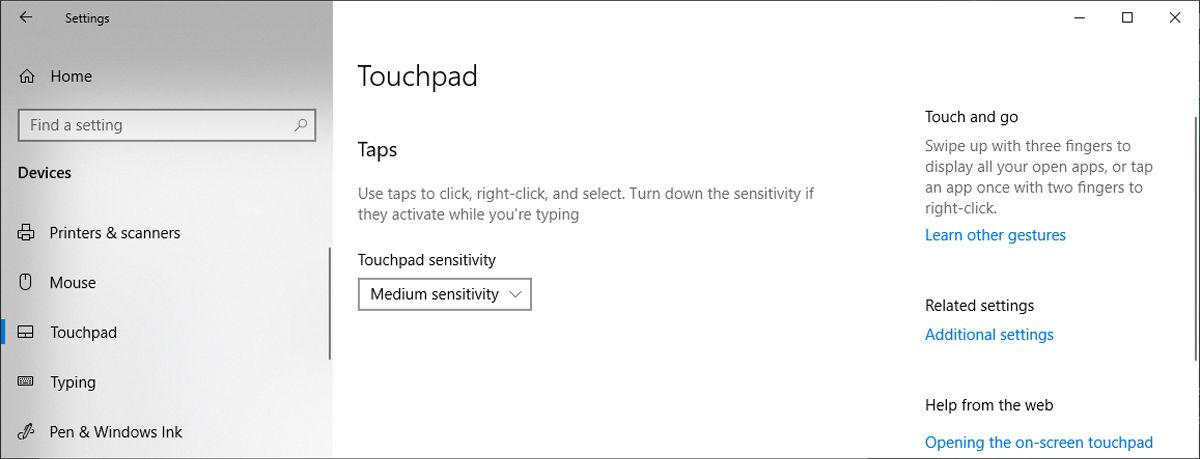
If you set your touchpad sensitivity on your laptop too high, the cursor will move at the slightest touch. As such, you should take a look at its sensitivity setting. Here’s how to change the touchpad sensitivity on your laptop:
- Click Start, then head to Settings > Devices.
- Select Touchpad, from the left-hand menu.
- Below Taps, use the drop-down menu to change the touchpad sensitivity.
The change will take place in real-time, so you can try multiple settings until you find one that you like.
If you have connected a mouse to your Windows 10 laptop, you can disable the touchpad if you find yourself never using it.
It’s worth noting that the cursor might move on its own because the touchpad might have accumulated dust. If your laptop is a little grimy, you should clean your laptop and see if that fixes the problem.
5. Disconnect Any Other Devices
Your problem could be caused by a joystick, graphics tablet, or other input devices connected to your laptop or PC. Because some of these can also control the cursor, it can lead to a conflict between them as they fight for power.
You can disconnect all devices and reconnect them one by one so you can find out which one causes the issue, or you can disable them temporarily when you don’t need them.
6. Run the Windows Hardware Troubleshooter
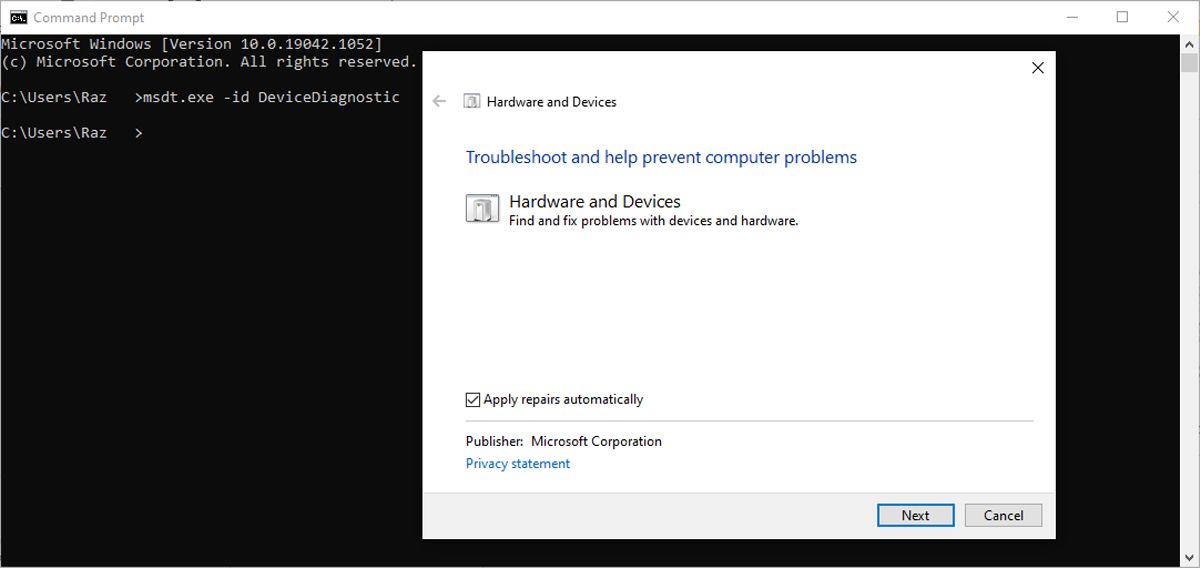
While Windows 10 doesn’t have a dedicated troubleshooter for the mouse, you can use Command Prompt to access the Hardware troubleshooter.
Here is how you can do it:
- In the Start menu search bar, search for command prompt and select Run as administrator.
- Type msdt.exe -id DeviceDiagnostic.
- Press Enter. Windows 10 will now open the Hardware and Devices troubleshooter.
- Click Advanced > Apply repairs automatically.
- Select Next.
7. Disable the «Snap To» Feature
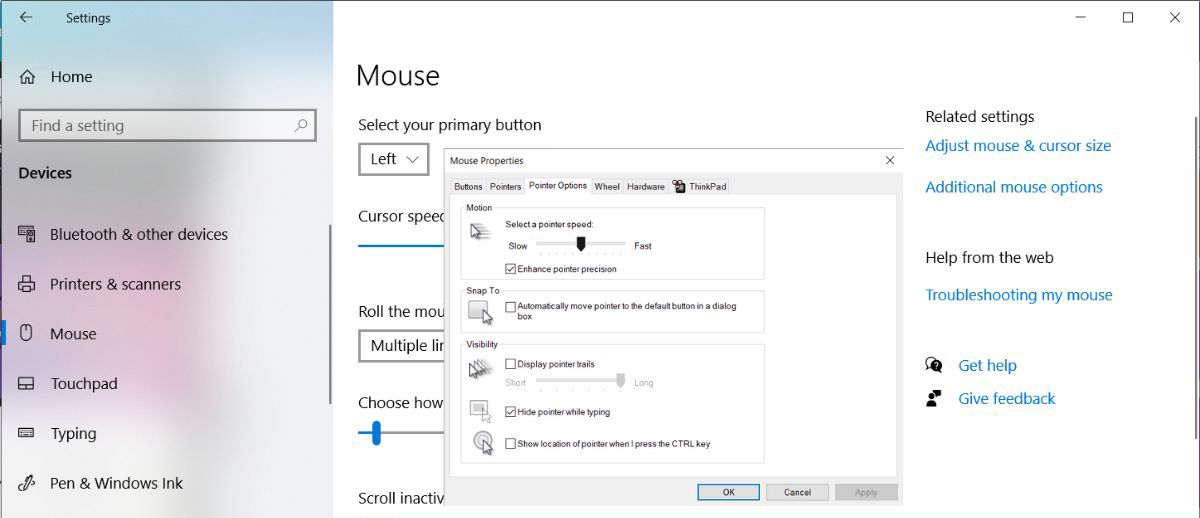
If your cursor moves by itself to the default option when you’re working with installers, alert boxes, or configuration tools, you have the «Snap To» feature turned on. If you find it annoying as you don’t want to go on with the default option every time, you should turn it off.
Here’s how you can do it:
- Right-click the Start button and go to Settings.
- Click Device > Mouse > Pointer options.
- Open the Pointer options tab.
- Uncheck the Automatically move pointer to the default button in a dialog box option.
- Click Apply.
8. Update Your Mouse’s Drivers
Sometimes a mouse’s drivers become outdated or corrupted over time, and you’ll need to download new ones to get them back in working order. Bad or faulty drivers can have a negative effect on your hardware, so it’s worth giving it a shot.
Tame Your Mouse Again on Windows
If your mouse is getting a little rebellious, it may be due to one of many issues. However, once you’ve worked your way down the list, your cursor will have hopefully calmed down and stopped moving by itself.
If you think your mouse needs a good clean, there are certain tricks and tips you can use to get it as good as new. For instance, isopropyl alcohol is a good cleaner and sanitizer for a dirty mouse.
Курсор мыши стал дергаться и неожиданно двигаться по экрану. «Блог системного администратора» расскажет, что в таких случаях делать.
Что-то прилипло
Содержание
- Что-то прилипло
- Поверхность
- Избыточная чувствительность
- В интерфейсе драйвера
- Обновление драйвера
- Маловероятно, но исключить нельзя
К сенсору мышки могло что-то прилипнуть. Достаточно крошки. Поверните мышь нижней частью к себе и внимательно осмотрите. Протрите сенсор сухой чистой, но не ворсистой тканью. Еще лучше — влажной салфеткой для компьютерной техники.
Поверхность
Рекомендую использовать коврик даже в 2023 году. С появлением оптических мышек вместо механических, их способность работать на любых поверхностях без коврика рассматривалась в качестве основного преимущества, даже на коленке. Возможно, но нежелательно. На ряде поверхностей сенсоры работают некорректно. В особенности нежелательно использовать мышку на стеклянном столе. В итоге курсор начинает работать неправильно.
Отдавайте предпочтение коврикам со специальным покрытием или матерчатым. Избегайте глянцевых. Периодически очищайте их. Если курсор стал сбоить — коврик необходимо протереть.
Избыточная чувствительность
Установлена максимальная или повышенная чувствительность? Порой подобный подход становится причиной незначительных колебаний. Происходят даже тогда, когда вы держите мышку.
Опция повышения точности указателя — еще один фактор, который становится причиной произвольных колебаний курсора. В таком случае софт сам определяет, куда перемещать курсор.
Через поиск по элементам системы («лупа» справа от кнопки «Пуск») найдите приложение Параметры. Для этого введите в строку: параметры
Доступ к нужному приложению — слева вверху в результатах поиска. Закрепите значок приложения на панели задач (щелчок по соответствующей опции в правой части окна), чтобы в дальнейшем располагать быстрым доступом к основным настройкам ОС.

Кликните по значку-«шестеренке» на панели задач. В дальнейшем используйте его, если нужно внести изменения в параметры ОС.
Перейдите в раздел настройки параметров устройств.

Слева — перечень настраиваемого оборудования. Вам необходимо щелкнуть по надписи «Мышь». В правой части окна прокрутите до ссылки перехода к ее дополнительным параметрам. Щелкните по ссылке.

С помощью ползунка настройте оптимальную скорость перемещения указателя. Чтобы сделать медленнее — сдвигайте ползунок влево. Отключите повышенную точность указателя (снимите «птичку» в квадратике слева от соответствующей надписи).
Для подтверждения изменений последовательно нажмите кнопки «Применить» и «OK» (в нижней части окна настроек).
В интерфейсе драйвера
Рассмотрю ситуацию, при которой рассмотренные выше настройки на уровне ОС не помогут. У вас мышь с настраиваемой чувствительностью (DPI). Чаще всего речь идет о дорогих моделях. Установите для нее драйвер с собственным графическим интерфейсом (с сайта вендора вашей модели).
После установки значок отобразится на панели задач. Кликните по нему. В настройках найдите опцию изменения чувствительности (DPI). Переведите параметр в значение не более 3000 DPI. Для дисплеев с диагональю 32 дюйма и менее этого достаточно.
Обновление драйвера
Перейдите в диспетчер устройств.

Обновите драйвер оборудования.
Маловероятно, но исключить нельзя
В интернете рассматриваются способы исправления неполадки, которые редко актуальны в 2023. Тем не менее полностью исключить их нельзя. Поэтому перечислю:
- проверка антивирусным ПО и удаление вирусов (если есть);
- удаление сомнительных программ (тех, которые вы не ставили или не помните, зачем и как они появились на компьютере);
- ускорение работы компьютера (программная оптимизация или замена устаревших компонентов оборудования).
Важно. Если компьютер настраивал опытный знакомый, компьютерный специалист или мастер, проконсультируйтесь с ним перед удалением софта. Программы могут оказаться важными и полезными.
Писал, что делать, чтобы данные из буфера обмена случайно не оказались в интернете. Рассматривал методы отключения автоматической загрузки драйверов.
Часто ли возникают сбои мыши и что нужно делать в таких случаях? Поделитесь своим мнением и опытом в комментариях.
3
10
голоса
Рейтинг статьи
Readers help support Windows Report. We may get a commission if you buy through our links.
Read our disclosure page to find out how can you help Windows Report sustain the editorial team. Read more
While working on your PC, it can get a bit frustrating when the cursor starts to flicker. It is very unpleasant to the eyes and can entirely prevent you from using your computer till the error is resolved.
If you’re struggling with mouse cursor flickering on your PC, stick around. This article will provide you with the necessary steps to help you resolve the error.
Why is the mouse cursor flickering in Windows 10?
- Outdated Drivers – If you’re connecting an external mouse to your PC, you need the corresponding driver for the device to function correctly. If the driver is outdated or faulty, it can cause the mouse cursor to flicker in Windows 10.
- Antivirus Software – In some cases, the operations of antivirus software can conflict with the normal functionality of Windows. Also, if your antivirus software detects anomalies with your mouse driver or hardware, it can indirectly restrict it from functioning, which can cause cursor flickering.
- Windows Update – Many Windows users have reported errors after updating their OS because the update might not be compatible with their PC. If you notice the mouse cursor flickering after running a Windows update, you’ll need to uninstall or roll back the update.
- File Explorer Error – File Explorer is often utilized as software to manage files, folders, and network connections. However, it also contains certain audio and video playback features. Further, if the File Explorer is in an error state, it can cause the mouse cursor to flicker.
- Biometrics – Biometric devices facilitate quick and easy login on Windows. However, the device might occasionally clash with the OS, leading to the mouse cursor flickering in Windows 10.
How can I fix a flickering mouse cursor in Windows 10?
Before we proceed with more advanced solutions, here are a couple of quick fixes you can attempt:
- Disconnect and reconnect the external mouse.
- Restart your PC.
If the error persists after attempting the above solutions, the following are a couple of advanced troubleshooting steps to help you fix the error:
1. Restart File Explorer
- Right-click on the Start menu on the Desktop and select Task Manager.
- Now, locate Windows Explorer from the list of Processes, and select End task.

- Now, click on the File Menu at the top left corner of the window and select Run New Task.

- In the task window, type explore.exe, and hit the OK button

- Then, close the Task Manager and check if the error is fixed.


Windows Explorer is Windows’ primary file management tool, but it also has some audio and visual features that most likely have no use in file management. Restarting File Explorer can help you fix the blinking cursor issue.
2. Update Mouse & Keyboard drivers
- Press the Windows key, type Device Manager in the Windows search bar, and hit Enter.
- Then, locate Mice and other pointing devices, right-click the option in the drop-down menu, and select Update driver.

- In the next window, select Search automatically for the updated device, and follow the on-screen instructions to complete the update.

- Restart your PC and check if the error persists.


External devices like mice and keyboards require functional drivers to operate. If such drivers are outdated, it can cause the device to malfunction. If you run into the unable to update drivers error, ensure to read our guide on how to fix the error.
Moreover, it’s possible to manage all your drivers automatically and update old files with their latest official version. The application will scan the system in 5 minutes and update the drivers securely.
⇒ Get Outbyte Driver Updater
3. Temporarily disable antivirus software
- Press Windows + I to open the Settings app
- In the Settings app, click Update and Security, and select the Windows Security tab.

- Then, click on Virus and Threat Protection and click Manage Settings.

- Then, click the toggle button next to Real-Time Protection to turn off the feature. (You can also disable more options in this tab).

- Close the Windows Security window and restart your PC to check if the error is resolved.


Antivirus software protects your PC from harmful files and applications but can also infringe on the normal functionality of Windows. You can temporarily disable your antivirus software to check if it’ll fix the mouse flickering issue.
- Microsoft wants Windows 10 users to upgrade to Windows 11 or Copilot + PCs
- Deleting ‘inetpub’ folder lets hackers permanently stop Windows updates, Microsoft warns
- The latest KB5055612 for Windows 10 22H2 brings huge stability to the OS
- Microsoft April 2025 Patch Tuesday: Fixes for 134 security vulnerabilities, one exploited Zero-Day
- With KB5055518, Windows 10 finally fixes a basic File Explorer issue
4. Disable the Biometrics feature
- Press the Windows key, type Device Manager in the Windows search bar, and hit Enter.
- In the Device Manager window, locate the Biometric devices, right-click Validity Sensor, and select Disable device.

- Then, click Yes to confirm your actions, and close the Device Manager once you’re done.
- Then, restart your PC and check if the error is resolved.

Biometrics is a very useful addition to Windows PCs, but its operation can sometimes conflict with Windows’ functionality which can lead to errors. Disabling the feature can help resolve mouse flickering in Windows 10.
If you attempt to disable Biometrics but can’t find it in the Device Manager, here is a detailed guide showing how to fix Biometric devices not showing in Device Manager.
Further, mouse cursor flickering is an annoying Windows anomaly that can frustrate you if you don’t fix the error. The error can be triggered by several reasons ranging from viruses, Windows updates, and corrupt drivers.
Irrespective of the error, if you apply the steps in this article, you should be able to fix the mouse cursor flickering in Windows 10.
Vlad Turiceanu
Windows Editor
Passionate about technology, Windows, and everything that has a power button, he spent most of his time developing new skills and learning more about the tech world.
Coming from a solid background in PC building and software development, with a complete expertise in touch-based devices, he is constantly keeping an eye out for the latest and greatest!
Многие пользователи ПК и ноутбуков сталкиваются с тем, что указатель мыши «тормозит» — двигается рывками или замирает в определенные моменты, что мешает удобной работе с компьютером. Причины такого поведения могут отличаться, но обычно проблема решаема.
В этой инструкции о том, что делать, если тормозит мышь в Windows 11 или Windows 10, чем это может быть вызвано и дополнительная информация, которая может быть полезной.
Активность USB-контроллера
Первая из возможных причин — работа других устройств на том же USB-контроллере, к которому подключена мышь или её приёмник. Подробнее по пунктам:
- На ПК/ноутбуках обычно присутствует несколько USB-контроллеров, увидеть их можно в соответствующем разделе диспетчера устройств.
- Каждый контроллер обычно обслуживает несколько USB-разъемов.
- Если мышь и другое USB-устройство подключены к одному контроллеру, при этом ведется активный обмен данными с USB-устройством, указатель мыши может начать двигаться рывками.
- То же самое актуально для случая подключения мыши к USB-хабу (в том числе на мониторе) или какому-либо переходнику: если к нему же подключены другие устройства, это может влиять на работу мыши.
Распространенным симптомом для этой причины является усугубление проблем с лагами мыши при работе с другими USB-устройствами: накопителями, внешними звуковыми картами или микрофонами, веб-камерами.
Решение для этой ситуации — подключение мыши (или её приемника) к другому разъему USB:
- В случае ПК — к отдельной, не используемой другими устройствами, группе разъемов. На многих материнских платах производителем предполагается, что мышь и клавиатура будут подключены к верхним разъемам.
- Если у вас ноутбук, можно попробовать подключение на другой стороне корпуса или к порту с другой версией USB.
- Во всех случаях рекомендую использовать прямое подключение, без каких-либо адаптеров.
Проблемы радиосигнала
Для беспроводных мышек, работающих по радиоканалу, приемник которых подключается к USB-разъему, «тормоза», помимо описанной выше причины, могут быть вызваны слабой мощностью сигнала и помехами на его пути.
Например, когда грузный металлический системный блок расположен под столом, примыкающим к железобетонной стене, а приёмник мыши подключен к его задней панели, это может приводить к неуверенному соединению мыши с приёмником.
Если же поставить на системный блок Wi-Fi роутер, проблема может усугубиться: мышь и роутер могут использовать пересекающиеся частоты. Потенциально, на частоте 2.4 ГГц могут одновременно несколько различных устройств, не мешая друг другу, но у некоторых пользователей проблемы с мышью бывают вызваны именно этим.
Решение: попробовать другие варианты подключения и расположение приемника мыши, исключить наличие помех.
Энергосбережение
В случае беспроводной или Bluetooth мыши причиной замирания указателя мыши, особенно после некоторого периода неиспользования могут быть параметры энергосбережения. Возможные действия для решения проблемы:
- Откройте диспетчер устройств, в Windows 11 и Windows 10 для этого можно нажать правой кнопкой мыши по кнопке «Пуск» и выбрать нужный пункт контекстного меню.
- Откройте свойства вашей мыши в разделе «Bluetooth», «Мыши и иные указывающие устройства» или «Устройства HID».
- Проверьте наличие вкладки «Энергосбережение» и отметки «Разрешить отключение этого устройства для экономии энергии». При наличии — снимите отметку и примените настройки.

- Для Bluetooth мыши выполните то же самое для Bluetooth-адаптера.
- Для беспроводной мыши, приемник которой подключается по USB, может помочь отключение экономии энергии для USB-контроллера.


В случае появления проблемы с мышью на ноутбуке, проверьте, меняется ли ситуация, если переключить схему электропитания на «Максимальная производительность».
Некоторые мыши могут иметь собственные, не зависящие от настроек системы, функции энергосбережения и «засыпать» после некоторого периода неиспользования.
Высокая нагрузка на процессор
Ещё одна возможная причина того, что мышь тормозит — загруженный процессор: например, при задачах рендеринга, архивации, установке обновлений. Проблема в большей степени актуальна для старых версий ОС, но изредка может наблюдаться и на Windows 11/10, особенно когда нагрузка вызвана неправильной работой драйверов и пунктом «Системные прерывания», подробнее об этом — в этой статье.

В некоторых случаях высокая нагрузка на процессор может быть вызвана наличием вредоносных программ, майнеров на компьютере: если вы подозреваете что-то подобное, имеет смысл проверить компьютер на наличие соответствующих угроз.
Аппаратные проблемы
В некоторых случаях причиной происходящего могут быть те или иные аппаратные проблемы, среди которых:
- Повреждение кабеля проводной мыши.
- Загрязненный сенсор мыши, работа на стеклянной или другой отражающей поверхности.
- Севшая батарейка/аккумулятор мыши.
- Статика на корпусе ПК, отсутствие заземления.
- Иногда к остановке указателя мыши могут приводить аппаратные проблемы других устройств: например, неисправность какого-либо другого USB-устройства, жесткого диска может приводить к тому, что Windows «зависает» на какое-то время в попытке обратиться к устройству.
В завершение — несколько дополнительных вариантов, которые могут оказаться полезными при решении проблемы:
- Если вы каким-либо образом настраивали чувствительность и другие параметры мыши, и лишь после этого возникли рассматриваемые проблемы, попробуйте вернуть настройки на значения по умолчанию.
- Проверьте частоту обновления монитора в дополнительных параметрах экрана: эффект задержек при движении указателя мыши может быть вызван сниженной частотой обновления.
- Если проблема возникла недавно, и вы предполагаете, что причина — в системе, попробуйте использовать точки восстановления системы на дату, когда проблема не наблюдалась.
Возможно, вам есть что добавить к списку? Буду рад вашему комментарию к статье.